Week 4 - Electronics Production
This week the snow has gone and it is getting warmer fast. 15 degrees in the weekend. Next week the kids have holidays. Corona rages on. People getting tired from being inside. Will we see relaxation of the lockdown? The week ended for me with my first PCR test... Hopefully a negative result before practice starts again on thursday
Local
It is a lousy week. We're not going to design anything. We're just gonna make. We need to make the board, and debug it. Because it is probably not going to work the first time. The design of the board is going to be a run of the mill (HAHA) fablab board.
We are also going to make an FTDI(?) board. This is used for reading out components.
We'll have to program our ESP's with an existing ESP.
Global
Inspirations from around the world
Lecture
http://academy.cba.mit.edu/classes/electronics_production/index.html
We're going to make a circuit board. What you do is:
- make traces
- connect components
There are many different ways to do this. Neil encourages you to go above and beyond the standard stuff. If you have finished your board, look into other ways of making the board.
We are going to look a lot a SDS (Safety data sheet) as many of the materials can be hazardous. Especially when etching this is important. We're not going to be etching. If you, at one point need more then a couple of boards, you can also let a company in China doe this for you. And they will take care of the waste.
Milling is better
- less waste
- easier to operate
- direct result
Most are using Roland milling machines. But we get a Sainsmart miller and with that I can make almost anything!!!!
- Adhesive tape; only leaves the adhesive.
- sometimes you have to replace the underlay as it gets damaged. (the sacrificial layer)
- zeroing is the art of making the drill exactly zero. Neil explains that you can best gently let the drill drop onto the surface. That way you'll
- "or the saint smart you can use a height map to help with the flex of the machine and the flatness by probing"
- climb vs conventional cutting is interesting... how does this work?
Materials.
- FR1 is the material we use for machining.
- It is slightly yellow.
Designing
We design not using breadboards. You can also just use the PCB themselves and make modification to it.
Soldering
You'll make a mess out of it. We have to get used to lead-free solder. They are harder to use. But we have to. It is better for everyone.
This might be a good moment to look back the video from Duaa about soldering (starts at min. 48)
what is flux..?
Use a little solder to keep the component in place.
Order!
Bottom to top. Inside to out!
It is good to think about a fume-extractor for soldering reasons.
Desolder:
The different pieces of solder you don't want to have. - Wix it away with a braid. (some kind of tape) The tape sucks the solder out - Or use a pump - Melt it and hold the component and let the board fall.
CAM
You can use Gerber. But we use PNG (don't do JPG as they make artifacts because of compression) With the PNG you can mess around and view it in any program. Unlike Gerber. But if you want to grow, you might want to use Gerber.
Assignment.
- Described the process of milling, stuffing, de-bugging and programming
- Demonstrate correct workflows and identify areas for improvement if required
Links
- Hands-On: The RISC-V ESP32-C3 Will Be Your New ESP8266
- Cardboard surfboards
- On Etching
- Printing PCB's]
- a guide on how to reduce runout on lower cost mills like the sain smart mill
- CirQoid mills are very good according to Ferdi
- And also these
- more information here of the Height map for the Saint Smart
- super cool source with an amazing works using breadboards - the proper way :) Plus explaining some basics of electronics - very informative
- http://www.geda-project.org/
- Climbing or conventional Milling
Research
Soldering Basics with Duaa Allaaali from Bahrein
Watch back here: https://vimeo.com/502325132#t=2820s
note: Duaa Currently working on educational projects using fab techniques.

Introduction
At fabacademy we are going to make circuit boards. Like normally you are using wires, we are now using etching to create boards.
We then connect our components using solder to the etched parts.
That is the act we are talking about today. And which we will continue on january 27 and then later we'll have multiple electronics learning weeks.
Soldering requires practice. Ailaa is going to give us some resources to practice. Duaa is going to give some tips.
The tools
Solder helps to guide the electricity and keep the component in place.
A good soldering iron that you can adjust the temperature of is really nice.
To clean the tips, just use a sponge with drinking water.
You can also use a brass pad
Solder wire
Then there is solder wire. This might get confusing. There are many different terms on solder wire.
- Alloy Fabacademy inventory normally has different solders; lead based and lead free. Most people tend to say that the solder with lead gives best results. But we are committed to use lead free solder as lead is bad for you.
RMA is the 'flux ratio'. It defines how stuff adheres. RMA is better then RA.
other stuff:
- Flux Pen: something to help the solder flow (?)
- tweezer; to keep stuff in place when you solder.Not for other stuff: don't damage the tweezers!
- Vise: a way to keep your stuff in place
- Third hand (with magnifier!)
- Digital microscope: this is a good way to check your work.
- Solder sucker, GReat for desoldering.
- Solder wix; also absorbs the solder out.
Safety
Ironing can get hot. - Always put the iron back in the holder! - And don't touch the metal part. - Wash your hands after using lead based solder - Smoke up sucker needed; don't inhale the smoke.
Soldering tips.
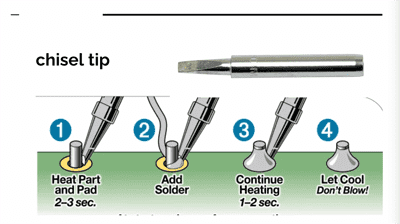
Tips: - start with small components - start in the middle
Flow soldering
Applying solder paste and then melting it. Could be usefull to put under components.
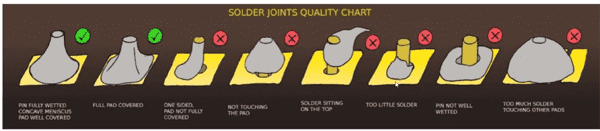
What to solder where?
There are many different components. And it matters in which way you solder them. A good rule of thumb is to see if you can switch the symbol. If you can; probably the real component can also be switched.
How to get better?
practice practice practice... don't let the frustration get you down. It is liking learning an instrument.
So many tips. Have to watch the video again and again and again. Link is: