Project Management
Did you document it?
Description
The week to get started. We basically gear up to create a home for all our documentation and stuff.
Assignments - Learning Outcomes
| # | Assignment | Fin |
|---|---|---|
| 1 | Explore and use website development tools | 1 |
| 2 | Identify and utilise version control protocols | 1 |
Spirals - Have you?
| Spirals | Description | Done |
|---|---|---|
| 1 | Made a website and described how you did it | 1 |
| 2 | Introduced yourself | 1 |
| 3 | Documented steps for uploading files to archive | 1 |
| 4 | Pushed to the class archive | 1 |
| 5 | Signed and uploaded Student Agreement | 1 |
| 6 | First sketch of your final project. Documented on final projects page |
Project management
| Subtask | Documentation | time/min | Outcome | Fin |
|---|---|---|---|---|
| Make this table | describe process | 60 | publish table | 1 |
| Figure out workflow | workflow template | 90 | template for each week | 1 |
| Able to use Git confidently | explainer + record commands | 120 | explainer + record command | 1 |
| Manipulate images with IM | cheat sheet | 30 | cheat sheet | 0 |
| Manipulate video w/ ffmpeg | cheat sheet | 30 | cheat sheet | 0 |
| MKdocs | explainer + cheat sheet | 60 | explainer + cheat sheet | 1 |
| write about me page | 0 | 1 | publish page | 1 |
| Upload student agreement | 0 | 1 | publish | 1 |
| Sketch final assignment | writing + drawing | 180 | publish | 1 |
| Make project priority list | Writing | 60 | publish | 1 |
| Current size of website | 6,5MB | |||
| Total | 765m/12.8h |
nb. this table and the idea to structure it this way was made by Tessel
MKdocs
My website is based on MKdocs. It was pre-setup for us, but I also like it. I like the non-linear feeling of it: you can define what is important yourself and not based on timestamps as it is done with blogs. I need to adjust it to my needs. What does will be, will probably evolve through fabacademy. Any changes to MKDocs made by me will be documented here in the week one documentation file.
Getting started with MKDocs
Install MKDocs
Open a terminal window on your mac use the following command:
$ pip install mkdocs
IMPORTANT: do not install with brew! This advice is wrong and will give you trouble later on. (check notes below for the issues I had because of homebrew)
This step also installs a default project folder named my-project with the structure and files needed to set up a basic website.
How to launch MKdocs
cd my-projectNavigate to the folder containing your docs in the terminal.mkdocs serve- Your website is ready for you at http://127.0.0.1:8000/
- Configuration is done in the yml file.
My spirals for the MKdocs project
| Spiral # | Spiral aspiration | Why | Is it working? |
|---|---|---|---|
| 1 | Get a dark theme... | make the site more personal and easier to read | 1 |
| 2 | Get The material theme | The page TOC in the right column is just great | 1 |
| 3 | Get a dark material theme | best of both world of above spirals | 0 |
| 4 | menus based on subfolder | so menu items get created easy | 1 |
| 5 | Copy good ideas from Tessel | To add more grandeur to my website | 0 |
| 6 | Get anchor links | to link to parts of the same page | 0 |
| 7 | Reorder menu items | because week 1 should be on top | 0 |
| 8 | Get a nice url for my website | 1 |
Issues and how I solved them.
Install a theme
Following Spiral 1. I wanted a dark theme. I like the one made by Nora which she explains on here website
First get the theme
$ pip install mkdocs-windmill-dark
Then activate the theme by adding 'windmill-dark' to the yaml file.
| Problem | Description | Debugging | Solved |
|---|---|---|---|
| Theme is not changed. | MKdocs throws an error. Read below under 'First Error' | Theme did not change. I am not sure what the pip command did and where the theme is installed... | 0 |
| idem. | Could it be that the theme files are at the wrong location? | MKDocs and the theme items are located at: /Library/Frameworks/Python.framework/Versions/3.9/lib/python3.9/site-packages/mkdocs Using pip to install a theme seems to place them outside the mkdocs folder. Following common CMS practices I moved the windmill theme into the themes directory in the mkdocs directory. | 0 |
| idem. | The original theme (readthedocs) that I used was appointed to my site in the yml file without backticks around the name. | The windmill documentation suggest I should use backticks. I try to remove them. | no |
| idem | I found that the windmill directory is not called 'windmill', but 'mkdocs_windmill_dark'. | I tried to change the name to 'windmill' | 0 |
| idem | using this part of the documentation I will now try to create a special theme directory in my site folder. And use that to change the theme of my site. | I changed the YML file to look for local Theme files. Adding the windmill theme there | 0 |
| idem | Possible solution found "Brew uses a weird non-conventional way of installing MkDocs which does not allow any third party themes or plugins to work with it. – Waylan Dec 28 '19 at 20:37" | Reinstall MKDocs with pip | 1! |
To summarize. If your MKDocs can't be modified, the theme not changed and the plugins do not seem to work, you probably need to reinstall MKDocs with pip, not Brew.
After I removed and reinstalled MKDocs the proper way (with pip) I can also install any theme I want. But in the meantime I have grown a liking for the material theme, and will leave the windmill theme for what it is. For now.
Steps to repeat:
$ brew uninstall mkdocs
$ pip install mkdocs
$ pip install mkdocs-windmill-dark
Subfolders to menu items.
this works on the pretext that you do not specify a menu in the .yml file.
| Problem | Description | Debugging | Solved |
|---|---|---|---|
| Menus are not auto-created | I want a new menu item to appear when I create a new subdirectory. This does not happen | Remove the hand-made menu from the YML file | 1 |
Website modifications.
In the end I decided to go with the material theme of MKDocs as it has extended navigation which I like. You can quickly access the main items from the top menu, the main subitems from the left menu and the different page parts from the right side menu bar.
In the yml file I made a few small modifictions to limit dependencies on external sites (disabling google dependent fonts), changed the side color and added a star to the menu.
theme:
  name: material
  palette:
    primary: deep orange
    accent: deep orange
  font: false
  icon:
    logo: fontawesome/solid/star
  favicon: files/favicon.svg
Also I added a gitlab link to the menu so people visiting the site can quickly navigate to the gitlab repo.
On screenshots
MacOS has a build-in way to make PNG screenshots. I use command-shift-4 a lot. With this keycombo you can make a screengrab of a specific window. And it includes the shadow of the window for nice rendering.
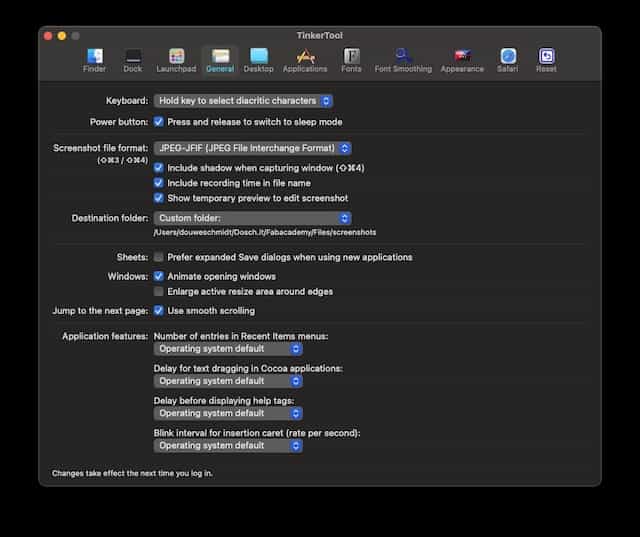
BUT. The PNG format is very big. Files over 1MB are produced. And for my website I prefer smaller website in the JPG format. With the Tinkertool application I changed the default format for JPG.
Also, the default location for screenshots is de desktop. I changed this to a dedicated folder in my Fabacademy working directory.
What went wrong:
Notice that the file format JPG2000 produces even smaller file sizes. But VSC doesn't recognize the .jp2 files this produces. So you better go with the slightly bigger, but more compatible JPG.
the nice window shadow is not part of the screenshot in jpg as it does not have translucency like png has.
On Video
I use the build in Quicktime app to make screenrecordings. These can then be compressed, cropped and converted in the Handbrake app. The resulting file is an .mp4 file.
I made my own video converting preset that will convert any video to the same format with the same dimension. It also will drop audio and cap framerate to 12fps to minimize the size of a file.
I use one of the files to document the steps I made in week 2, but the video did not show up. There was a little error:
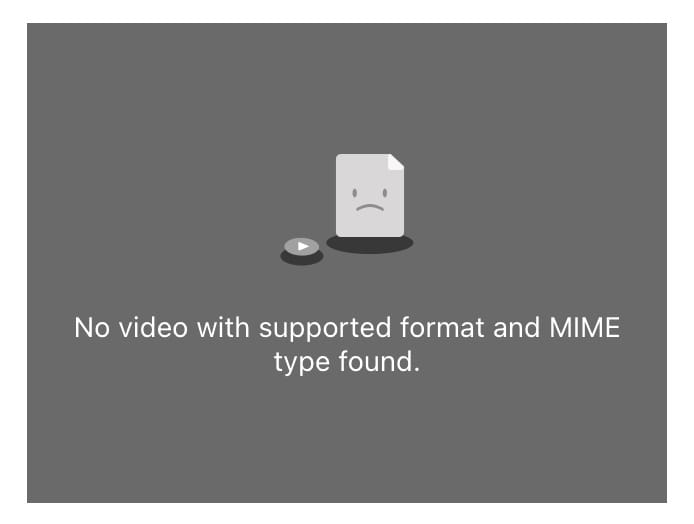
Problem: Video does not show
Description: There is an error No video with supported format and MIMI type found (see above)
| # | Hypotheses | Debugging | Solved |
|---|---|---|---|
| 1 | The browser does not understand the format | Open file locally in the browser works. This means that the browser can play this file | 0 |
| 2 | The html code I use is wrong | Try to embed a random other video. One dl-ed from the net for example. | 0 |
| 3 | MKdocs can't find the file. The console outputs an error: [W 210208 16:42:26 web:2239] 404 GET /assignments/week02/ferryclockvid.mp4 (127.0.0.1) 10.04ms WARNING - 404 GET /assignments/week02/ferryclockvid.mp4 (127.0.0.1) 10.04ms |
Move file to other locations and update path. | 0 |
| 4 | I miss what is going on | Ask Henk for help. He said that the file is correct so it must be the path | 1 |
Here is a test with a different video. For this I used the Big Bunny video made by Blender. As this same video is also used on the W3C website in their tutorial on HTML5 video, I think I can assume it works.
nb. it does not work on this website now as I added the file to .gitignore. It is way to big to upload (over60Mb). But It gave me the exact same issues as the other vids did.
This is the code I used:
<video width="320" height="240" controls>
  <source src="../files/week02/assemble_vid.mp4" type="video/mp4">
Your browser does not support the video tag.
</video>
In the end it was this:
I used. ../ to make it relative. But it seems not to have been relative enough. When I add another ../ it works. So what annoys me then is that for the videos I need to use:
"../../files/week02/filename.mp4"
and for the picture I can use
../files/week02/filename.jpg
videos require an extra ../
The reason is that I am writing HTML. In HTML you need to consider your present working document also to be part of the path. So, one more directory to consider.
Git & Terminal
Accounts were created. Profile pictures uploaded and connections with Mattermost made. SSO setups pose no challenge for me.
To train myself in Git I followed this tutorial
To train myself in terminal I played this game
Merging existing files
What I forgot was that you have to pull a git repo to get started. So the little structure of files and directories I already had, had to be merged with the new directory. I moved the files from the directory I already had to the newly downloaded directory using MacOS finder.
Getting used to good conduct.
Also I forgot that SSH is a much cleaner and better way to pull from GIT then to use HTTPS so I needed to set up my SSH key in gitlab and use the SSH command on my project page to pull the directory in.

My current git workflow
My current git workflow is terminal independent. I use the build in options in Visual Studio Code.
- Add all files using the plus icon.
- Commit all changes and give your commit a name using the check icon
- Upload all files using the arrow up icon.
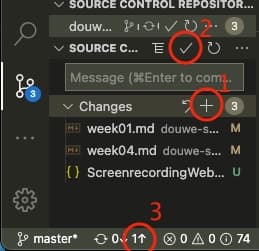
In terminal you can basically do this as well, but you'd have to remember three words: git add, git commit and git upload. So I find the Visual Studio Code methos a tat easier.
Terminal
You use the terminal to access the CLI. You access the CLI with the shell
A few terminal tricks examples
$ identifyget file properties$ convertconvert an image from one format to another$ convert -resize 20%scale an image
What went wrong
website
- The making of the website was overly complicated by using brew instead of pip to install mkdocs.
- I am still struggling to make my website mine: modifications to the YML file lead to loads of errors in the terminal and no changes on the website. Time-supply management forbids me to spend more time on this this week.
- I spend a lot of time to think about the right structure for the website. In the end I copy-pasted a lot of structure from previous fab-lab students. I love the markdown/directory simplicity of making a website and how this allowed me to experiment with different structures.
Git
- The tutorial I used never mentioned the use of a password (or any other mode of identification) in order to push local changes to the remote repo. Still I had to enter a password (in this case of Github_)
On repo sizes
- My local repo is 75,9MB of which 74,8MB recites in a hidden .git folder.
- The files I created in my local repo are 1.1MB combined.
- Gitlab reports my that remote repo is 7,9MB
How am I supposed to make sure that my repos don't get to bloated if all the numbers are inconsistent?
This Stackoverflow answer helped me to shrink my .git folder.
git gc --prune=now --aggressive
git repack
Project management general
I really need to get used the supply-side time management. And, now that the fabacademy has really started i becomes apparent how it conflicts with my day-to-day activities and how procrastinating is really no longer an option.