16. Interface and application programming
This week I write an application that interfaces with an output device that I made, I compared as many tool options as possible I could.
Graphical User Interface (GUI)
The graphical user interface (GUI /ˈɡuːi/) is a form of user interface that allows users to interact with electronic devices through graphical icons and visual indicators such as secondary notation, instead of text-based user interfaces, typed command labels or text navigation.

This is an interesting video related to GUI.
Factors to consider when choosing the toolkit:
-
Operating System (cross-platform or not)
-
Accessibility (accessibility framework is a usual client-server architecture)
-
Looks.
-
Licensing
This is an interesting List of GUI toolkits where you can visit if you don know where to start.
The GTK Project
GTK, or the GIMP Toolkit, is a multi-platform toolkit for creating graphical user interfaces. Offering a complete set of widgets, GTK is suitable for projects ranging from small one-off tools to complete application suites.
![]()
Reason why to choose GTK toolkits
-
What languages are supported?
-
C/C++
-
Perl
-
Python (especially in combination with the Glade GUI builder)
-
-
GTK runs everywhere!
Applications using GTK can run on:
-
Windows
-
GNU/Linux
-
Unix
-
OSX
-
Mobile devices.
-
-
Are there any licensing restrictions?
GTK is free software and part of the GNU Project. However, the licensing terms for GTK, the GNU LGPL, allow it to be used by all developers, including those developing proprietary software, without any license fees or royalties.
-
Well documented
This is GTK project complete documentation
This tutorial gives an introduction to writing GTK+ 3 applications in Python.
Installing GTK + 3 in Xubuntu
sudo apt-get install libgtk-3-dev
Glade
Glade is a RAD tool to enable quick & easy development of user interfaces for the GTK+ toolkit and the GNOME desktop environment.
The user interfaces designed in Glade are saved as XML, and by using the GtkBuilder GTK+ object these can be loaded by applications dynamically as needed.
By using GtkBuilder, Glade XML files can be used in numerous programming languages including C, C++, C#, Vala, Java, Perl, Python,and others.
Glade is Free Software released under the GNU GPL License
Installing Glade on Xubuntu
sudo apt-get install glade
This are useful videos about GTK + 3 with Glade first steps
Creating GUI using glade with the source files for experimenting with it
I made a short video about Glade usage, in order to understand my GUI I did and you will see below.
Here you have the files related to the example that is a Glade file and a python file with the code of how to run it.
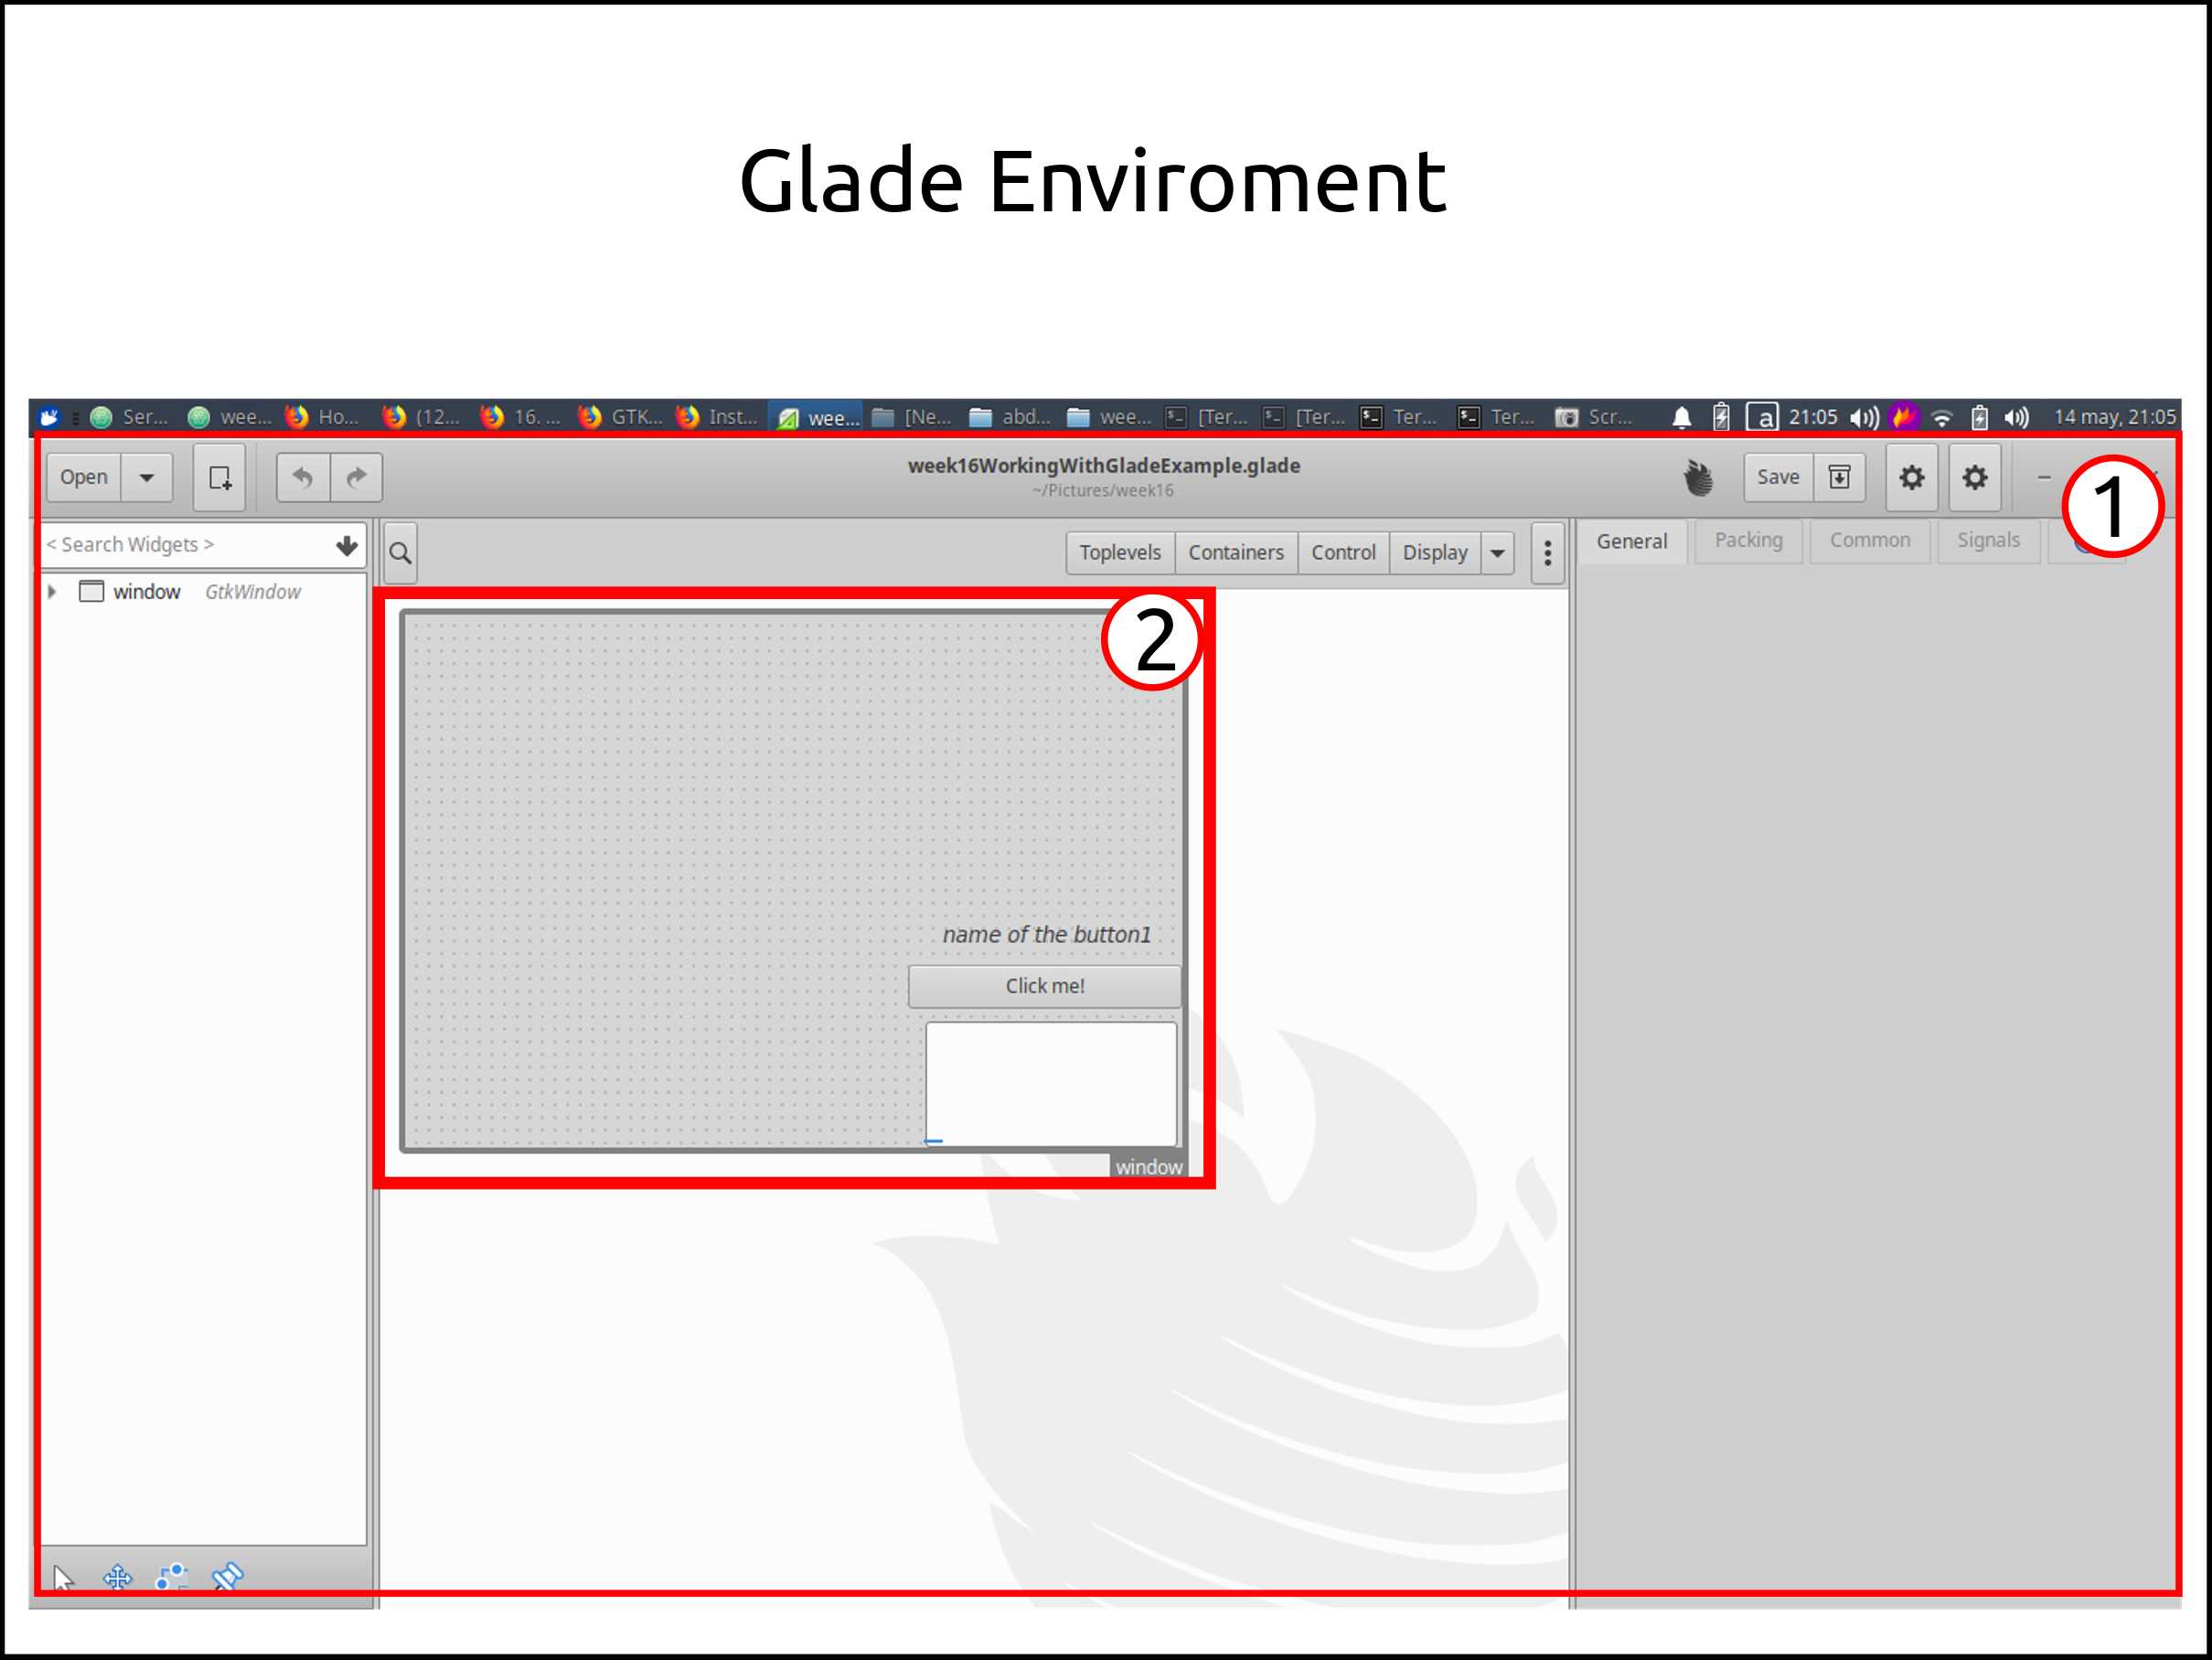
THIS IS WHAT IS INSIDE THE GLADE FILE
-
This is the Glade environment
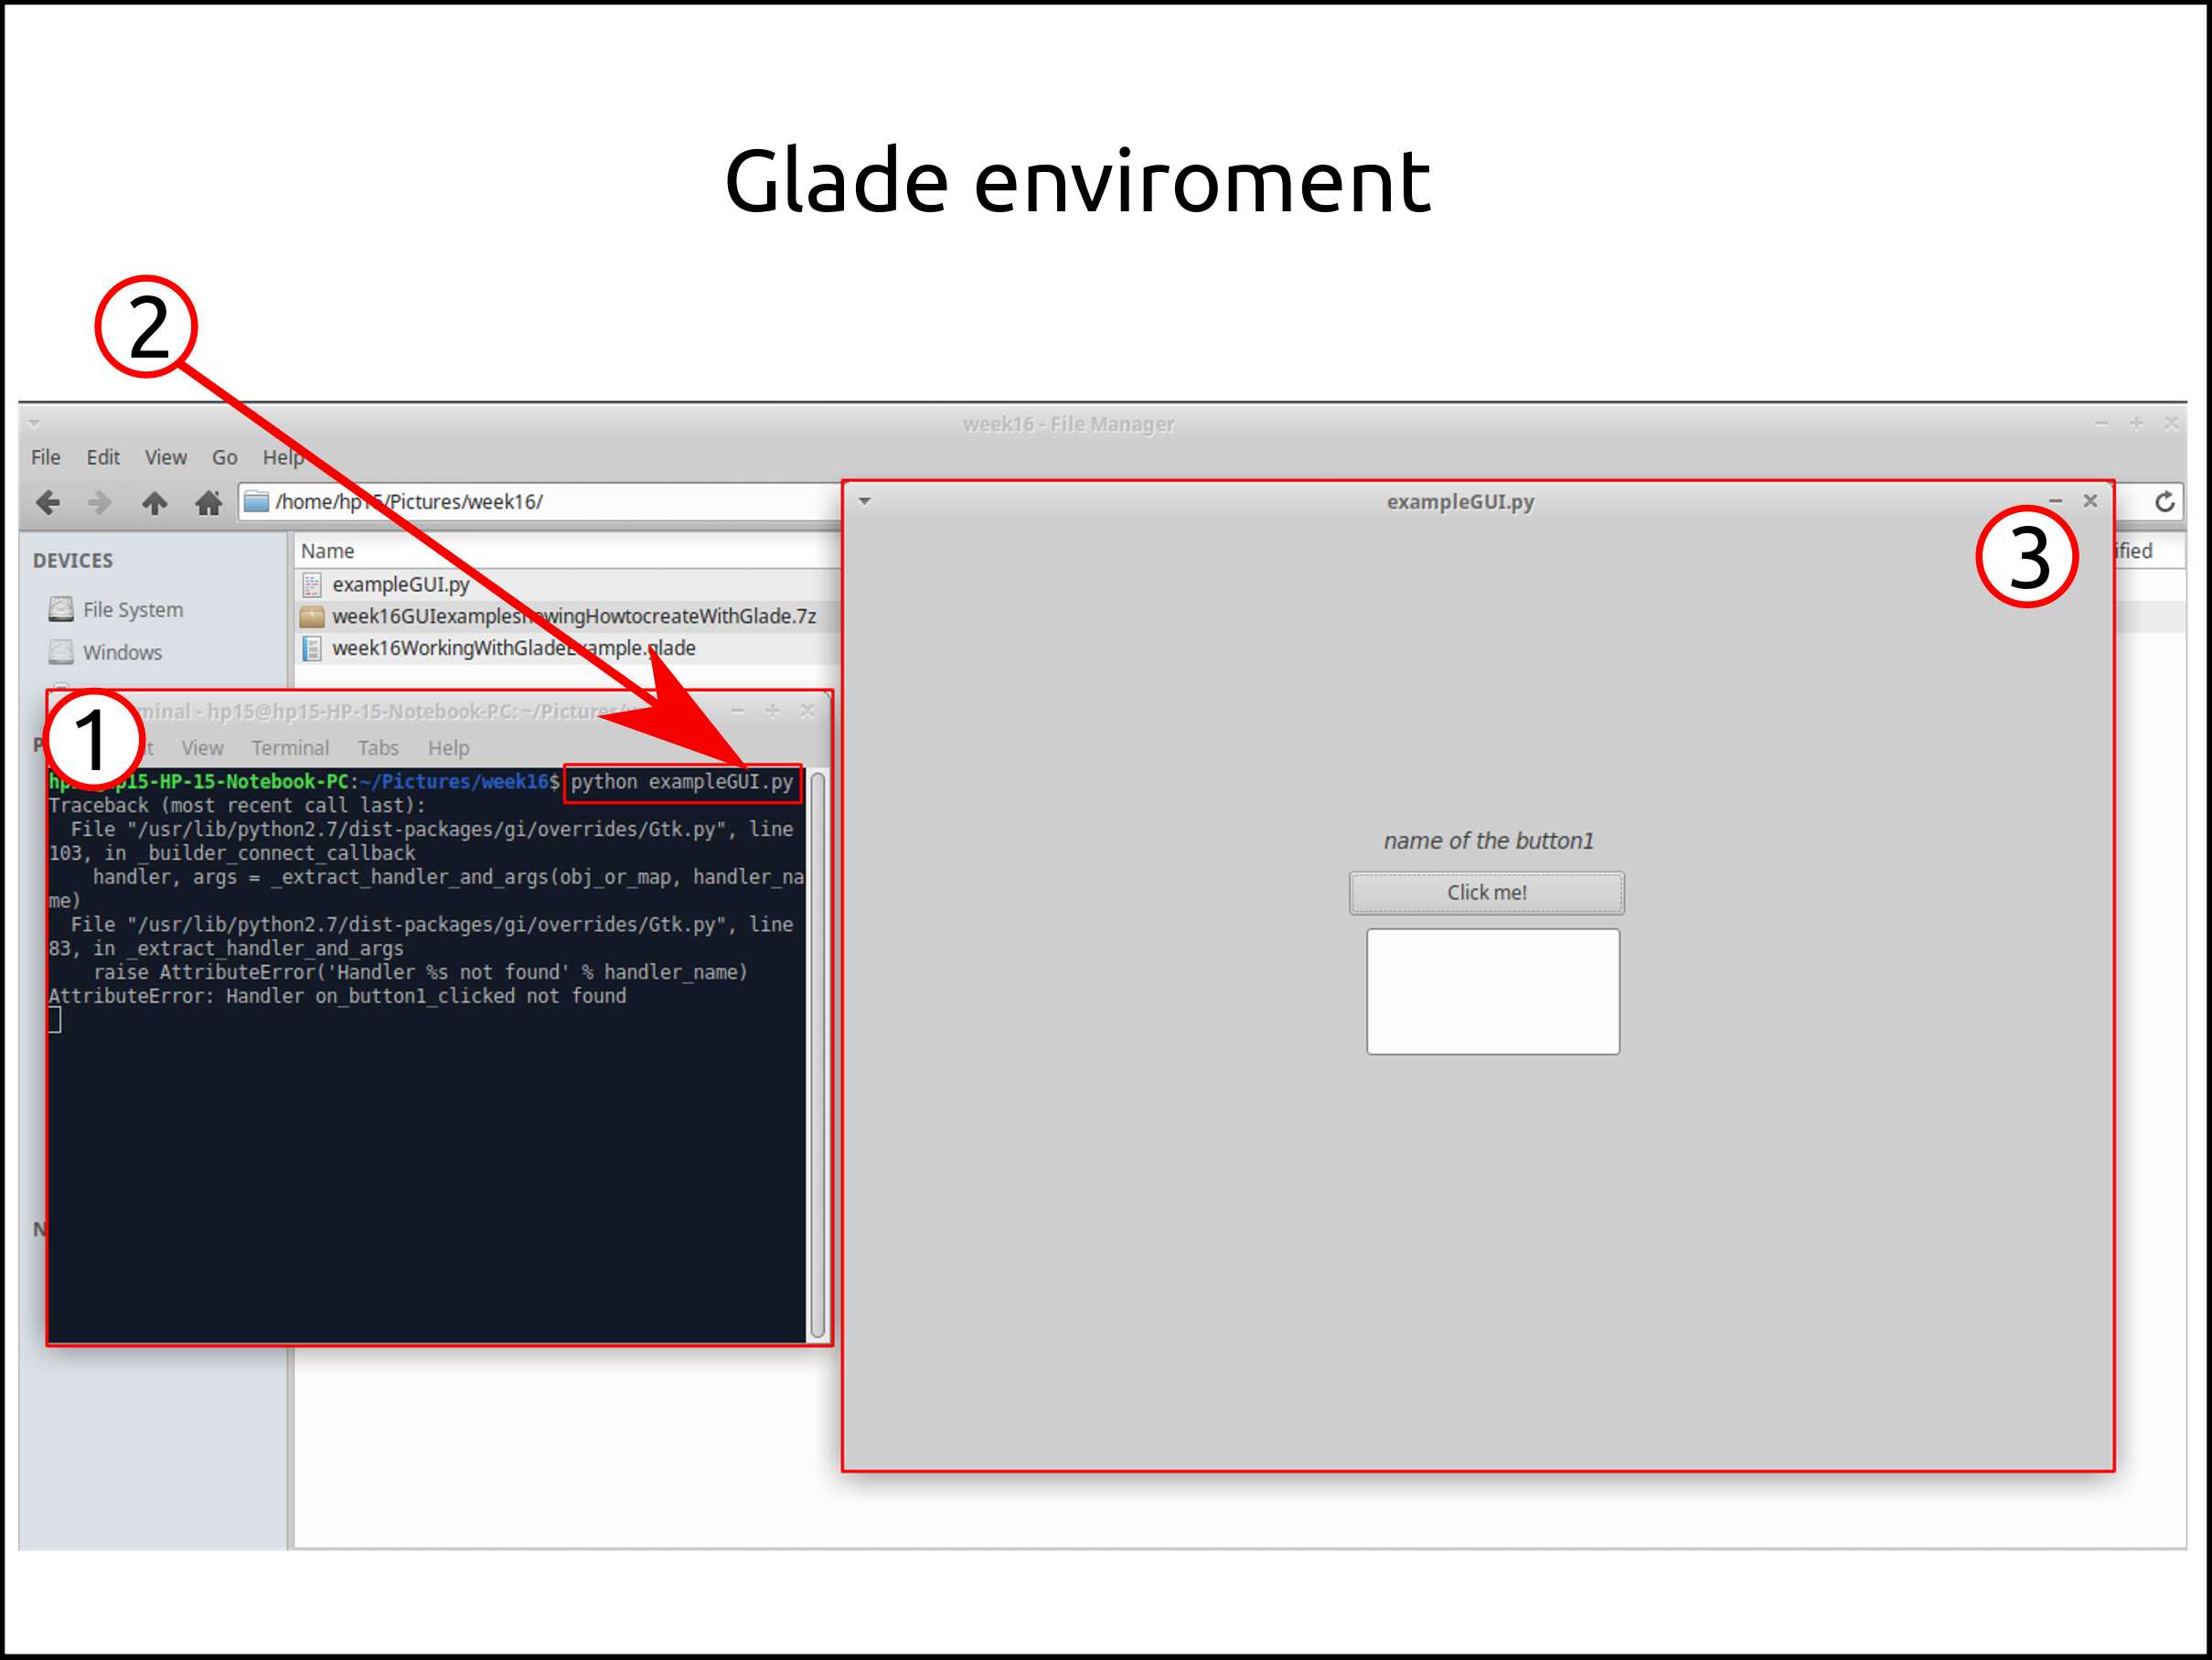
-
This is the way we see our GUI at the beginning before launching it using in this case python.
<?xml version="1.0" encoding="UTF-8"?>
<!-- Generated with glade 3.22.1 -->
<interface>
  <requires lib="gtk+" version="3.20"/>
  <object class="GtkWindow" id="window">
    <property name="visible">True</property>
    <property name="can_focus">False</property>
    <property name="tooltip_text" translatable="yes">This an example GUI that shows how to work with Glade</property>
    <property name="resizable">False</property>
    <property name="window_position">center</property>
    <property name="default_width">800</property>
    <property name="default_height">600</property>
    <property name="gravity">center</property>
    <child>
      <placeholder/>
    </child>
    <child>
      <object class="GtkFixed">
        <property name="visible">True</property>
        <property name="can_focus">False</property>
        <child>
          <object class="GtkButton" id="button1">
            <property name="label" translatable="yes">Click me!</property>
            <property name="width_request">174</property>
            <property name="height_request">27</property>
            <property name="visible">True</property>
            <property name="can_focus">True</property>
            <property name="receives_default">True</property>
            <property name="tooltip_text" translatable="yes">This message shows what does the button1</property>
            <signal name="clicked" handler="on_button1_clicked" swapped="no"/>
          </object>
          <packing>
            <property name="x">319</property>
            <property name="y">222</property>
          </packing>
        </child>
        <child>
          <object class="GtkLabel" id="label1">
            <property name="width_request">147</property>
            <property name="height_request">33</property>
            <property name="visible">True</property>
            <property name="can_focus">False</property>
            <property name="label" translatable="yes">name of the button1</property>
            <attributes>
              <attribute name="font-desc" value="Sans Bold Italic 10"/>
              <attribute name="style" value="italic"/>
              <attribute name="weight" value="medium"/>
              <attribute name="variant" value="normal"/>
              <attribute name="stretch" value="expanded"/>
            </attributes>
          </object>
          <packing>
            <property name="x">334</property>
            <property name="y">187</property>
          </packing>
        </child>
        <child>
          <object class="GtkEntry" id="entry1">
            <property name="width_request">100</property>
            <property name="height_request">80</property>
            <property name="visible">True</property>
            <property name="can_focus">True</property>
            <property name="tooltip_text" translatable="yes">this shows what does this entry</property>
          </object>
          <packing>
            <property name="x">330</property>
            <property name="y">258</property>
          </packing>
        </child>
      </object>
    </child>
  </object>
</interface>
THIS IS HOW IT LOOKS THE CODE ABOVE AFTER YOU RUN IT
-
Is a good practice to print messages in between our code to make some debugging and see how far your code is running.
-
This is how you run this GUI: Open the terminal in the GUI files directory and run this line << python exampleGUI.py >>
-
The example GUI will appear like this, after this step you are free to try.
import gi
gi.require_version('Gtk', '3.0')
from gi.repository import Gtk

class week16WorkingWithGladeExample:
    __gtype_name__ = "week16WorkingWithGladeExample"

    def __init__(self):
        interface = Gtk.Builder()
        interface.add_from_file("week16WorkingWithGladeExample.glade")
        interface.connect_signals(self)
        ourwindow = interface.get_object("window")
        ourwindow.show_all()

if __name__ == '__main__':
    week16WorkingWithGladeExample()
    Gtk.main()
This are the files relate to the Glade example
PySerial
This module encapsulates the access for the serial port. It provides backends for Python running on Windows, OSX, Linux, BSD (possibly any POSIX compliant system) and IronPython. The module named “serial” automatically selects the appropriate backend.
Installing Pyserial on Xubuntu
pip install pyserial
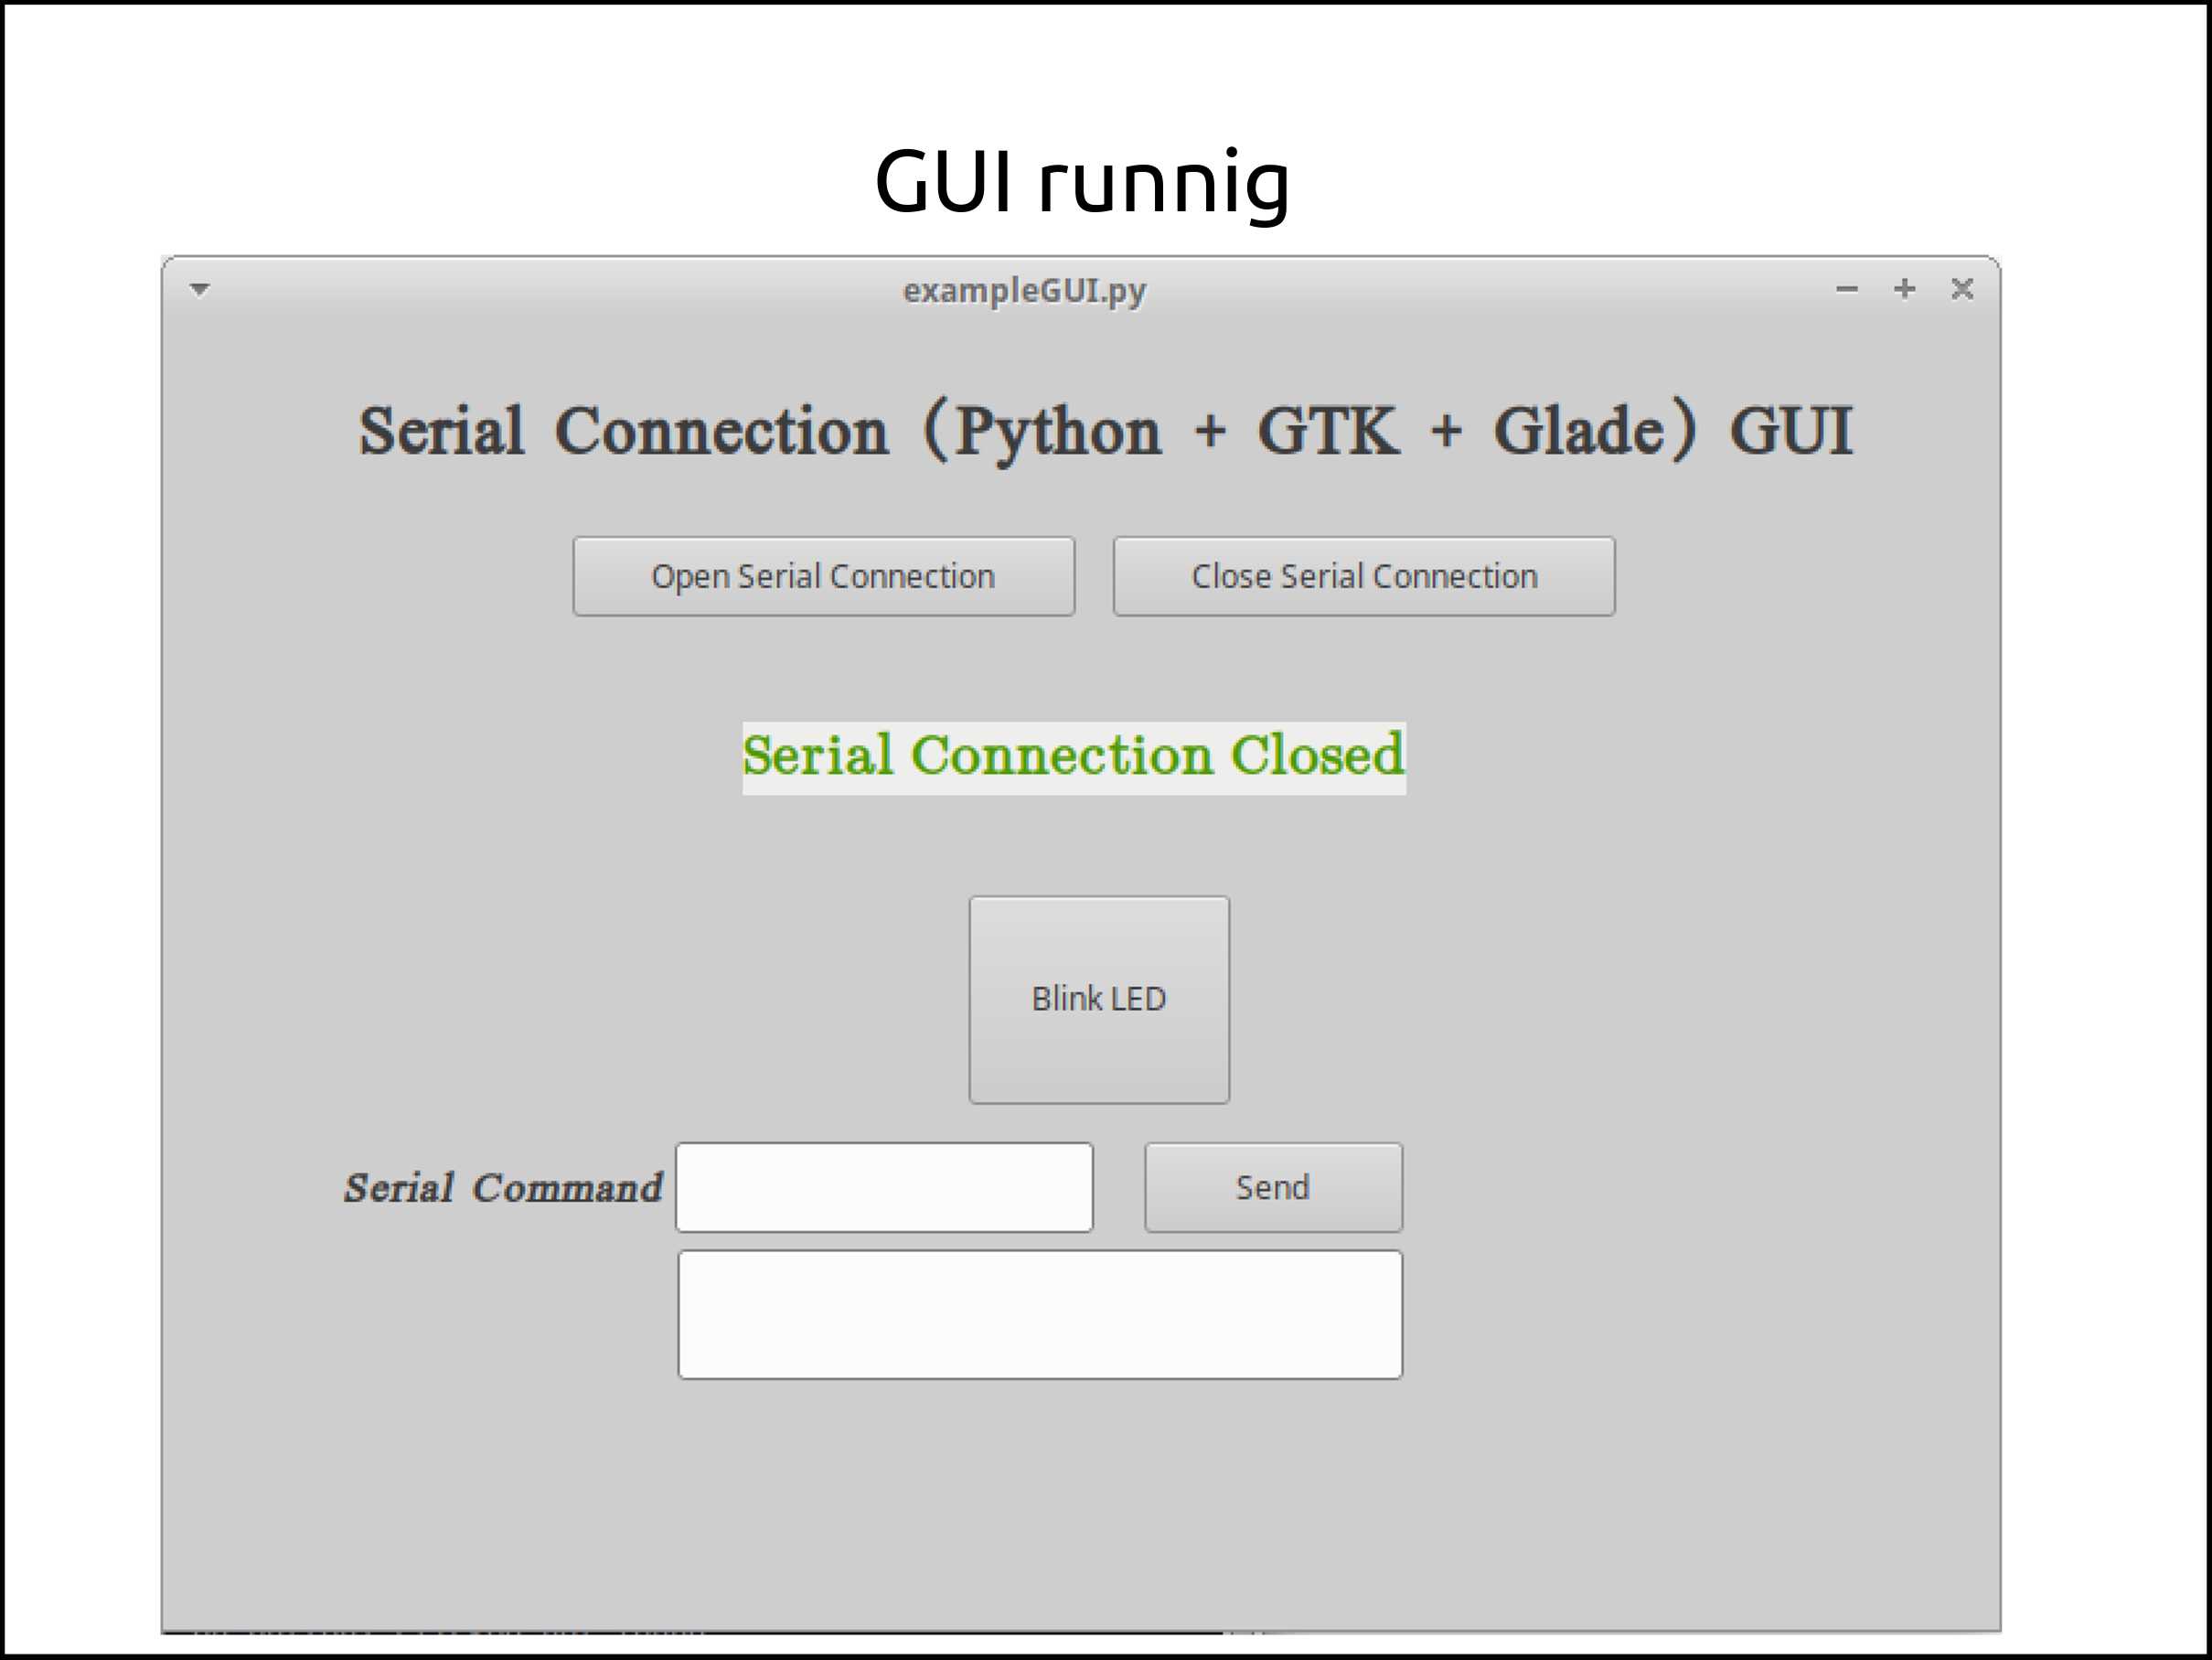
Programming a terminal using Python, GTK + 3, Glade and Pyserial
Used hardware
Files of the hardware
#include <SoftwareSerial.h>

int rx = 1;    //Declares the RX 1 pin 3
int tx = 2;    //Declares the TX 2 pin 4

SoftwareSerial mySerial(rx, tx);  //Setting up the RX/TX pins as a SoftwareSerial

char buttonState = '1';//Declares the character that represents the virtual button current state
char lastButtonState = '0'; //Declares the character that represents the virtual button last state

int ledPin = 3;     //Declares the pin where the indicator LED is already attached

void setup(){
  mySerial.begin(9600);       //Start the serial communication and select the its speed that deppends of the frequency that it will be program the attiny

  pinMode(ledPin, OUTPUT);      //Configures the LED pin as an output

}

void loop() {

  buttonState = mySerial.read();    //Reads the message a "1" or a "0" from the command line

  if (buttonState != lastButtonState) {   //Checks if there exist a change in the virtual button state

    if (buttonState == '1') {         // Condition For Motor ON

      mySerial.println("LED IS ON \r");         //Prints in the screen the actual state
      digitalWrite(ledPin, HIGH);     //Turns ON the indicator LED

    }
    else if (buttonState == '0'){      // Condition For Motor OFF

      mySerial.println("LED IS OFF \r");         //Prints in the screen the actual state
      digitalWrite(ledPin, LOW);       //Turns OFF the indicator LED

    }

    delay(50);
  }

  lastButtonState = buttonState;        //Sets the current state as a last state

}
Files of the Python, GTK + 3, Glade and Pyserial GUI
Video of the GUI working
This video is a screen capturing of the GUI working.
In this video I used a smartphone to record the GUI working.
Faced problems and solutions programming a terminal using Python, GTK + 3, Glade and Pyserial
Problems
-
The first problem was that the example related to using glade was using C instead of Python.
-
The second problem was the connection to with FTDI that it change the name of the port every time you disconnect an connect it again.
Solutions
-
The solution was to watch a video how to use glade (that runs in C) and read the documentation of GTK for Python
-
The solution was to look the term.py example how does it work and use it technique.
What I learned this week?
After I finished the terminal GUI tried to use socket to make a Python script as a server and Android as a client.
The thing what I achieved was to send a string to my computer through wireless connection using Mobile Telnet for android to connect to the server.
The code I used was from this source: codes
Server Code
import socket
import sys

HOST = '192.168.142.160' #this is your localhost
PORT = 8888

s = socket.socket(socket.AF_INET, socket.SOCK_STREAM)
#socket.socket: must use to create a socket.
#socket.AF_INET: Address Format, Internet = IP Addresses.
#socket.SOCK_STREAM: two-way, connection-based byte streams.
print 'socket created'

#Bind socket to Host and Port
try:
    s.bind((HOST, PORT))
except socket.error as err:
    print 'Bind Failed, Error Code: ' + str(err[0]) + ', Message: ' + err[1]
    sys.exit()

print 'Socket Bind Success!'


#listen(): This method sets up and start TCP listener.
s.listen(10)
print 'Socket is now listening'


while 1:
    conn, addr = s.accept()
    print 'Connect with ' + addr[0] + ':' + str(addr[1])
    buf = conn.recv(64)
    print buf
s.close()
How I did it? First of all is to connect both devices to the same networking connection, in this case WiFi. Then check what is your IP address in the Network, I used Xubuntu so I did like this:
ip addr show
And the select the IP address from the line that began with wlo1:
Finally connect with the smartphone using mobiletelnet by adding the IP address and the port correctly and pressing connect. The you will be able to send a message.
The inspiration was this video
This information is great for mixing with OpenCV to make video streamming throw the WiFi to your smartphone.
The inspiration was from here.