This Week's Assignment
The assignment for this week was in two parts:
- Design and 3D print an object that could not be made subtractively
- 3D scan an object, and optionally print it.
Since the word clock model wasn't particularly suited to 3D printing, I decided that I would try scanning, fixing and printing some objects instead.
This is the final outcome:

I'm splitting this weeks documentation into two parts:
Part 1: is using the Modela MDX-20 to scan a small broken oven knob and print it. That's this post.
Part 2: is using the Cubify Sense to scan and print the bust of a person. You can see that post in Week 5 Part 2: 3D Scanning and Printing.
But First, A Test Print
The first thing I did was download the 3D Printer Tolerance Test that Neil mentioned in class. I printed it in PLA on the Replicator 2.

Clearly the printer failed that particular test. It looked like the nozzle got clogged, as the printer was still going when I noticed but no plastic was coming out. Even though it failed, it did teach me something: if you have multiple individual parts of an STL, so that it essentially has internal faces, then the printer will respect that. I had assumed that only the outer shell of any model would get printed.
So a failure, but a useful one. I never bothered trying again. Lots of people in the lab had been having issues with that particular batch of black PLA. Onwards to scanning.
Scanning On The Modela
The object I wanted to scan was a broken oven knob from my Auntie's oven, with the idea being that I could perhaps print her some new ones. The internal structure is reasonably complex, with some very deep sections that I thought light based scanners would probably struggle with.

However, the size and geometry of the knob made it a good candidate for scanning on the Modela. Last year's student James Fletcher has a pretty good overview on scanning with the Modela using the Roland Dr PIXZA software.
I switched the spindle out for the scanning head, and attached the knob to the scanner bed. Since I didn't have any blu tack handy, and the base of the knob wasn't suitable for double sided tape, I once again resorted to hot glue.

After setting the scanning area, these are the main parameters you have to set.

The X SCAN PITCH and Y SCAN PITCH settings are pretty obvious. For my first scan I went with a very fine 0.1mm for both. The setting that tripped me up was Z BOTTOM. I assumed that the Z limit I was setting was the maximum height of the object. It is, in fact, the maximum depth of the scan, as offset from the base of the scanner. Not knowing this, I set my scan going and left it for the estimated 12 hours it was going to take. I came back to this:

At first I thought that the point cloud was so dense that I couldn't make anything out. But no. I had just spent 12 hours scanning the air above the oven knob...
Having learnt from my mistake, I adjusted the Z BOTTOM value so that I would actually scan the oven knob. Confident it would work, and since I would be leaving it over night anyway, I set the scan resolution to a tiny 0.05mm. 12 hours later I came back, and the scan still had an estimated 80 hours to go...
The part it had scanned so far looked pretty good though! Being impatient, I killed the scan, set the resolution to a more manageable 0.3mm and 8 hours alter came back to this:

After wrestling with the hot glue, I managed to flip the knob over and do a scan of the other side using the same settings.

Scans complete, it was time to start playing with the meshes.
Combining The Meshes
To combine the two meshes into a single object I tried both MeshLab and MeshMixer.
MeshLab
I imported the STL files into MeshLab and the results looked pretty good from the get go.
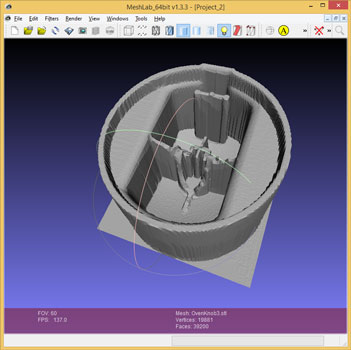
However, I quickly grew to hate MeshLab. It's clearly a very powerful mesh manipulator, but the user interface is awful and the documentation is sketchy at best. With great power comes great responsibility (to properly document). I quickly got frustrated and tried MeshMixer instead.
MeshMixer
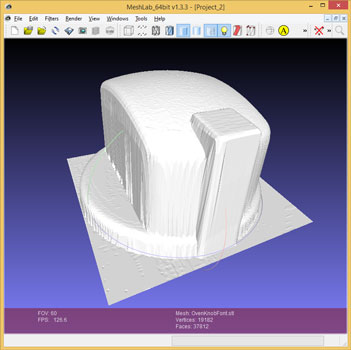
I found MeshMixer much more intuitive to use. Pretty quickly, I had my two mesh sections lined up and one Boolean Intersect later, I had a completed oven knob.


The screen captures from above were from a very quick mess around with the software, hence the small hole. I spent some time playing with the mesh alignment and fixed that before heading to the printer.
Printing The Oven Knob
Even though the scan of the oven knob was still "broken", I thought it would be cool to try and print it out anyway. I fully expected the print to fail due to the walls being so thin but on this occasion I was pleasantly surprised!


There were some obvious issues with the thickness of the print around the bottom, but overall the process went pretty smoothly. I split the print from its raft and started to (very carefully) clean the support structure from the inside of the part.

In hindsight, I should have printed the knob upside down so that the supports were on the outside. That would have made them a lot easier to remove.
So how well does the copy compare?


The clone is a pretty good match in my opinion. A little more work on the mesh and I think this would have been a really faithful imitation.
At some point in the future I might try using the mesh as the basis for a new knob that could actually be used on the oven itself. I would essentially fill in the middle part with "solid" plastic, while keeping the bore in the middle for attaching it to the rod that sticks out of the oven. That would probably mean the whole part could be printed without supports, and it would be thicker and more robust to boot.
But that's for another day. At this point I wanted to get a scan of something more interesting: me. Head over to Week 5 Part 2: 3D Scanning and Printing to read all about it.
Get The Files
The files for this week are pretty large, but Neil said in the lecture we were allowed to host them off site for a change! So, if you for some reason want to print a broken oven knob of your own, you can get the files on my GitHub.
Comments
comments powered by Disqus