1. Project Management
Objectives
- Build a personal website that will serve as a documentation of the assignments and the final project
- Go through a Git Tutorial
This week I worked on project and time management. The latter is pretty much the biggest issue I’ll have during my FabAcademy as I am working full-time and I’ll only have nights and week-ends to work on it. This is big for me, as I always tend to want to do “too much” in my projects.
This especially startled me as Neil said “You will probably never finish your planned project” or something along these lines. To avoid handing out a half completed project, it’s important to plan the main features and tasks ahead of time and document everything on the go. That’s the reason for this website ! Document everything related to assignments or my project !
Moreover, the best management method would be to plan how much time I have to work on the FabAcademy and try to deliver something finished in this period and at least, it will be delivered on time. This is the whole balance between supply-side (i.e. I’ll work on it for how long I can and the best I can in this time) and demand-side (i.e. I’ll work on it until I reached this level of perfection which will basically never happen) time-management.
It’s also important to work in parallel rather in series to avoid getting blocked by one task. Working in spiral also helps with this. Every project should start with the basic tasks and simply grow like an onion, adding layers of complexity as you go.
To help parallelize tasks, it’s important to work in modules and hierarchy (that’s the power of object-oriented programming  ) and that will surely help debugging when things will eventually fail.
Tools for developing my Website
I will be listing here the main tools that I used to build my website and the main steps to get to this result.
MkDocs
A website is usually made out of HTML code. You can either write it yourself, which allows you to basically do anything you want if you take the time, or you can go the easiest route to use a HTML generator from Markdown files.
That’s what Mkdocs (short for Make Docs I assume) does ! MkDocs is a static site generator that build static HTML sites out of .md files. It is highly customizable and configurable by changing the mkdocs.yml file.
Installing MkDocs is pretty much straightforward with a Python package manager such as pip (natively installed with Anaconda, an open-source Python distribution):
It is always a good practice to update everything before starting a new project:
conda update --all
conda update python
pip install --upgrade pip
Once done: let’s install mkdocs: pip install mkdocs
With everything installed, a simple mkdocs new MyFabAcProject and there we go, ready to document my cursus! Basically, Markdown files must be placed in the created docs folder. Each branch of the folder must have an index.md file which will basically be the main page. The actual tree of navigation can be set in the mkdocs.yml file.
To preview the website, the command mkdocs serve will create a local dev-server that updates in real-time as changes are made in the source files. The server can obviously be accessed by the classical address localhost:8000 or 127.0.0.1.
To deploy it, mkdocs build --clean will generate the html files and remove any stale files that may remain. Note that these generated files should not be pushed directly for version control. GitLab Continous Integration (CI) is the best way to publish the website.
Note
Any dependencies required for MkDocs can be set in a .txt file and pip install -r myfile.txt in the continuous integration will do the trick perfectly fine.
Alternatives
Theme
Multiple themes exist. I first hesitated between Bootstrap and Material, finally going for the latter.
The theme is set in the mkdocs.yml file. The font, the color palette, the icon,… can all be set in there as well
Extra CSS
To not be limited only by the theme classical palette and styles, one can add an extra_css: option in the configuration file and then add a extra.css file in the docs folder. In there, I can override the default theme values to customize my website even more.
Here is an example to override some headers:
1 2 3 4 5 6 7 8 9 10 11 12 13 14 | |
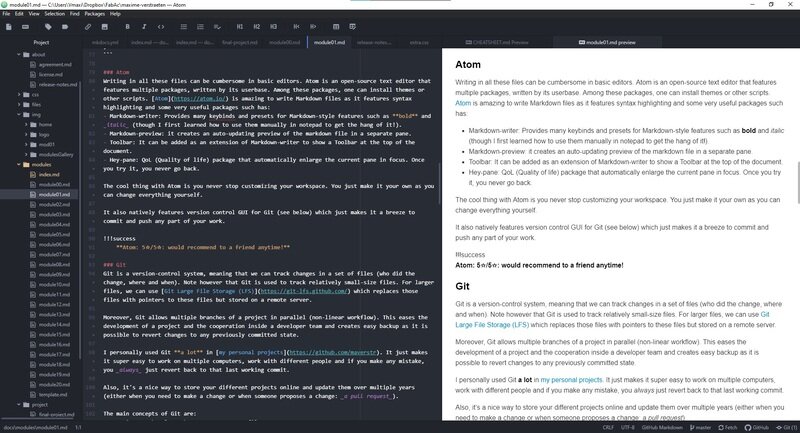
Atom
Writing in all these files can be cumbersome in basic editors. Atom is an open-source text editor that features multiple packages, written by its userbase. Among these packages, one can install themes or other scripts. Atom is amazing to write Markdown files as it features syntax highlighting and some very useful packages such has:
- Markdown-writer: Provides many keybinds and presets for Markdown-style features such as bold and italic (though I first learned how to use them manually in notepad to get the hang of it!).
- Markdown-preview: it creates an auto-updating preview of the markdown file in a separate pane.
- Toolbar: It can be added as an extension of Markdown-writer to show a Toolbar at the top of the document.
- Hey-pane: QoL (Quality of life) package that automatically enlarge the current pane in focus. Once you try it, you never go back.
The cool thing with Atom is you never stop customizing your workspace. You just make it your own as you can change everything yourself.
It also natively features version control GUI for Git (see below) which just makes it a breeze to commit and push any part of your work.
AtomCeption
Success
Atom: 5☆/5☆: would recommend to a friend anytime!
Git
Git is a version-control system, meaning that we can track changes in a set of files (who did the change, where and when). Note however that Git is used to track relatively small-size files. For larger files, we can use Git Large File Storage (LFS) which replaces those files with pointers to these files but stored on a remote server.
Week 04 edit: I did later use LFS to store my design files for my assignments. I simply created my .zip files and used the command git lfs track "*.zip" then git add .gitattributes and that’s it ! Super easy.
Moreover, Git allows multiple branches of a project in parallel (non-linear workflow). This eases the development of a project and the cooperation inside a developer team and creates easy backup as it is possible to revert changes to any previously committed state.
I personally used Git a lot in my personal projects. It just makes it super easy to work on multiple computers, work with different people and if you make any mistake, you always just revert back to that last working commit.
Also, it’s a nice way to store your different projects online and update them over multiple years (either when you need to make a change or when someone proposes a change: a pull request).
The main concepts of Git are:
- Repository: the place where you store your files.
- Branches: the fact that you can work in parallel on the same project before merging them.
- Commit: the act to stage your changes to a specific commit.
- Fetching/Pulling: The fact of fetching and incorporating committed changes to your local version.
- Pushing: Pushing your local commits to the remote repository.
- Pull-request: Allows to include changes of another branch (a development branch for example) to the main branch (that can be set to read-only for security)
- Tags and releases: The ability to tag a specific commit as being an important history point (a release e.g.). Some platforms like GitHub also propose the ability to download such releases in the specific section reserved for it. This gives the ability to have multiple releases for different operating systems or alpha/beta/stable, … all on the same page for the user to choose.
For the FabAcademy, we have a dedicated repository per student on GitLab. GitLab is a web-based DevOps tool that provides Git-repository but also features issue tracking, continuous integration and deployment pipelines which makes it possible to build our website and publish it on Git.
This week’s assignment was also to work through a git Tutorial. As I said before, I have used Git a lot before so I have already a bit of knowledge about it but decided to get through the Git-it app to learn more about it and get more used to branching and merging which are my main difficulties.

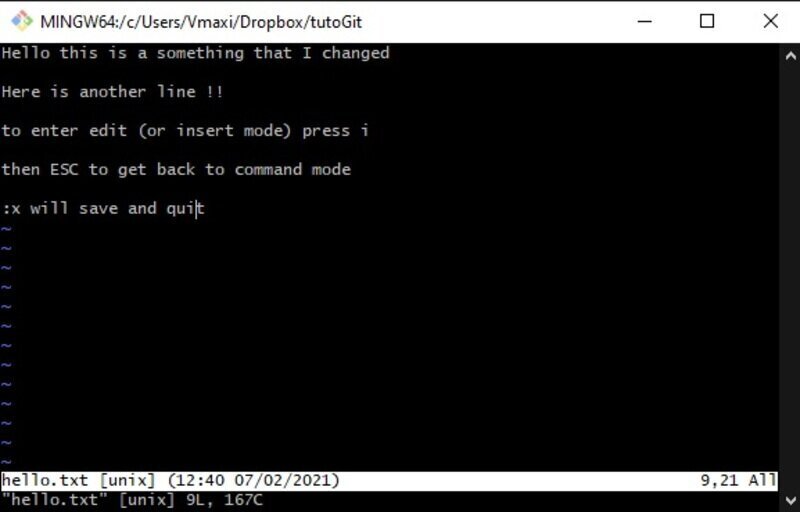
I also took some time to familiarize myself with Vim ! I remember how panicked I was when I unexpectedly entered Vim editor and I couldn’t get out ! This is all in the past now  !
!
Note
Let’s note here the most important commands and some things that I learned or tips and tricks that I always tend to forget !
- To create an empty folder inside a local repository:
create a .gitkeep file inside of it. - To avoid committing useless files (for CVS) and/or large files, use
.gitignore - To setup git, use :
git config -gobal user.name "Maxime Verstraeten" - Git pull is the combination of git fetch and git merge.
- To undo changes:
git checkoutorgit reset HEAD - To revert back to the last commit and amend it:
git commit -amend -m "message" - To go back to a previous commit stage:
git checkout <commit SHA> - Soft resets only move the HEAD pointer but leave everything else as is:
git reset -soft <SHA> - Mixed resets also makes the staging index look the same as the repository, i.e. changes need to be re-staged and re-commited.
- Hard reset just throw everything away and makes the working directory the same as the repository.
git cleanremove untracked files.git checkout -v 'name'creates a new branch and switch to it.git checkout mastergoes back to master branch.- Delete a branch:
git branch -d 'name' - Merging a branch:
git merge 'branchName' git commit -a -m "commit message" - In case of merge conflicts (no fast-forward):
git merge -abortor manual merge. - The stash is a separate place to store changes that we do not want to commit (yet) but work like commits.
git stash save "message" - To retrieve a stash change:
git stash pop 'stash@{i}'with i being the stash index (starting at 0) - To delete stashed changes:
git stash drop 'stash@{i}'orgit stash clear
Git commands can be run either through a GUI (Git Tower, Kraken, Git-Cola, Guitar, …) or through a command-line interpreter (Git Bash). I personally prefer the latter but I got to admit when you have a lot going on, being able to easily commit chunks of your code independently in a GUI of the rest is very useful.
Adding SSH authentication
In order to secure the connection, I used the SSH protocol that GitLab provides. This option allows to authenticate to the GitLab remote server without having to enter my login details every time I’m trying to push my work.
The SSH (or Secure Shell) protocol uses public-key (or asymmetric) cryptography, meaning that with my public key (accessible to anyone I share it with, and I don’t care who I share it with), everyone can encrypt a message that only me will be able to decrypt using my very secret very personal private key.
With my public key, GitLab can encrypt a message for me, that I can decrypt (as I have the corresponding private key) and I can send it back for verification. Since only me would be able to decrypt the message, GitLab can be sure that it is me on the other end of the communication, hence, I am authenticated.
How ?
First thing first, I need to generate my own pair of keys.
The SSH-keygen is a tool that can create those kind of pairs and the OpenSSH client is natively pre-installed on many operating systems, including Win10.
Multiple types of encryptions exist, among these the most known RSA and the ED25519. The latter is suggested more secure (others are also deprecated like the DSA, as they present security issues) so we’ll go on with ED25519 but the process is mostly the same for whatever type of keys.
Generating a new key pair
ssh-keygen -t ed25519 -C "MyKeyName"
created my pair of keys in the folder of my choice.
I then selected my public key and set it up on my GitLab settings.
It is also possible to use a passphrase to further encode the private key in case it gets divulgated.
Listing GitLab as a known host
When connecting to a new host, we first must verify that this host can be trusted.
ssh -T git@gitlab.fabcloud.org
We can also consult the SSH host keys fingerprints to further ensure that we are connecting to the host we want but I did not find those fingerprints for the FabAcademy GitLab instance.
Once done, we can use that command again and GitLab should be able to authenticate our identity.
With this, no need to log in for every push. For increased security, SSH could also be used for 2FA (2-factor authentication).
Image and video compression
To avoid storing huge photos on the repository, we can compress videos and images. Moreover, to access a webpage, a user needs to download the images on that page and that can take quite a while if the files are huge.
No one wants to wait 10 seconds to navigate a webpage !
Compression consists of optimizing the size of the file by changing how it’s encoded or change slightly the file (e.g. slightly altering colors) so that it can be more optimally encoded. In particular, compressing images can take advantage of the visual perception and the statistical properties of the images to obtain results that are often better than with generic data compression algorithm that can be used for other types of files. Moreover, since we are using the images here on the website and they will therefore be viewed online on a navigator, there is no interest in having very high resolution images anyway. So resizing images is usually the first step in compressing them.
Lossy VS lossless compression
Lossless compression is obviously less optimized since it does not alter the image to compress it. It must be used for medical imaging, technical drawings, pattern recognition, archiving, … Lossy compression will introduce artifacts. Hopefully, for natural images such as photographs, losses can be so minor that they are imperceptible to the human eye (visually lossless) but still result in very high compression rate.
I won’t go into the details of the multiple algorithms that can be used to compress files but it is still a very interesting subject
SVG files
As a side note, Scalable Vector Graphics is a vector image format that is now a standard for web browsing. Vector graphics are a way to define images not as a set of pixels (raster graphics), but rather as a series of lines and curves to form polygons or other shapes. The big advantage of vector graphics is that they can be scaled up and down without any limit and without any change in the file size. They are therefore perfect for logos and such and are usually not very heavy.
Tools for image compression
First of all, Mac users have Preview natively installed on their computer and it can be used to resize and convert images very easily. For Windows users, IrFanView is an image viewer that is freeware, very compact and simple but proposes many features including cropping, resizing, converting and optimizing images. GIMP is also an open source, powerful image editor. Finally, for all Linux lovers here: gThumb will basically allow you to do the same.
Personally, I chose to use ImageMagick which is an extremely powerful tool with a very long list of features but note that it lacks a GUI. Here is a simple batch script that converts all .png files in the directory to .jpg files, resize them and reduce their quality.
1 2 3 4 5 6 7 8 | |
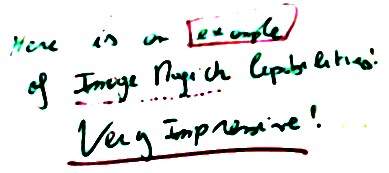
Just in case I need to clean up whiteboard pictures (we never know and I find it so powerful I want to use it one day), here is a nice script to do it:
1 2 3 4 | |
I voluntarily chose a badly-written, badly-lighted, blurry picture and the result is still impressive.
A fork of ImageMagick in 2002 gave birth to a new project that, according to them is more powerful (i.e. faster) than ImageMagick. This is GraphicsMagick.
OptiPNG is another tool but only for PNG files that can lossless compress them to a smaller size. Note that PNG files are made to be faitful, unlike jpeg which are made to be compressed but with imperceptible changes.
It can be run using the command line:
optipng -o <optimization level 1-7> -dir <the output directory> <theFileToCompress>
The main advantage of command line being that it can be used on a web server to automatically convert and compress images or videos using those script on the server side!
Tools for video compression
ffmpeg is a video converter that through command line. It is extremely powerful and can highly compress videos. Handbrake is a free, open-source, cross-platform tool that comes with a GUI for video conversion. It is way more user friendly and comes with a variety of presets.
Here is a command line that I use to compress the videos to put on the website:
ffmpeg -i "NameofVideo.mp4" -vcodec libx264 -crf 30 -vf scale=1024:576 -an out.mp4
Video editing
I always used Premiere Pro when it comes to video editing but kdenLive is an open source alternative that I will probably use in the future. Other free alternatives include Olive, Shotcut, OpenShot.
To go further
This week I didn’t have time to investigate in details HTML and CSS. Sure I did include some but I wish I could use it more. I will probably include more of it in the next few weeks whenever I find time. I also want to use jQuery, a Javascript library to handle events and animations on my website.
Useful links
By exploring other repos I found Asciinema which can record terminal inputs ! That looks extremely nice. PowerSession is an alternative for Windows PowerShell.
Converseen is a Qt application (cross-platform) that can convert, resize and rotate a batch of images and even transform a PDF document in a series of images.