2. Project management
![]()

Introduction
This is the second part of week one, we are required to build a personal site to use for weekly documentation and also for the final project
Fab Academy is a fast-paced, hands-on learning experience where students learn rapid prototyping by planning and executing a new project each week, resulting in a personal portfolio of technical accomplishments.
Because of that, you will have new material to add to your website each week as you improve and expand your knowledge through the academy.
The best way to manage this kind of rapid and continuous change on your files is to use Version control and other tools that support this process.
![]()
***What is Version control ?
Version control, also known as source control, is the practice of tracking and managing changes to software code. Version control systems are software tools that help software teams manage changes to source code over time. As development environments have accelerated, version control systems help software teams work faster and smarter.*
In other words, Version control is a system that records changes to a file or set of files over time so that you can recall specific versions later.***
Benefits of version control systems:
The primary benefits you should expect from version control are as follows.
-
A complete long-term change history of every file: This means every change made by many individuals over the years.
-
Branching and merging: Creating a “branch” in VCS tools keeps multiple streams of work independent from each other while also providing the facility to merge that work back together.
-
Traceability: Being able to trace each change made to the software.
Version Control Systems (VCS) categories:
- Local Version Control Systems
It is to copy files into another directory
![]()
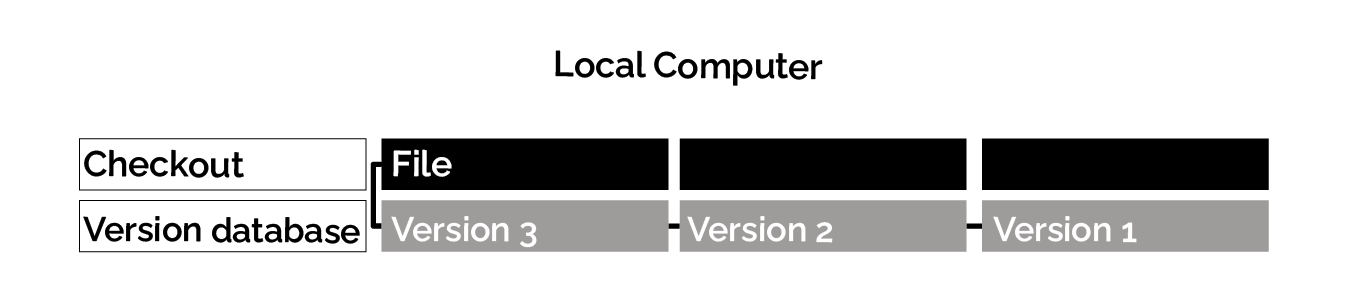
Figure 1. Local version control
![]()
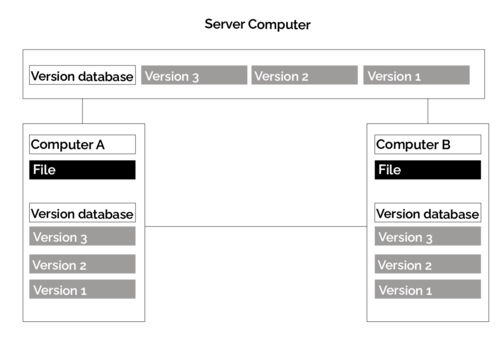
- Centralized Version Control Systems
These systems have a single server that contains all the versioned files, and a number of users that check out files from that central place.
![]()

Figure 2. Centralized version control
![]()
- Distributed Version Control Systems
Users don’t just check out the latest snapshot of the files; rather, they fully mirror the repository, including its full history.
![]()
(Figure 3. Distributed version control
![]()
Version Control Systems (VCS) have seen great improvements over the past few decades and some are better than others. One of the most popular VCS tools in use today is called Git. Git is a Distributed VCS (DVCS), more on that later. Like many of the most popular VCS systems available today, Git is free and open source.
We are going to focus on Git and learn more about it.
![]()
What is Git ?
Git is a free and open source distributed version control system designed to handle everything from small to very large projects with speed and efficiency.*
![]()
Step 1: downloading Git
![]()
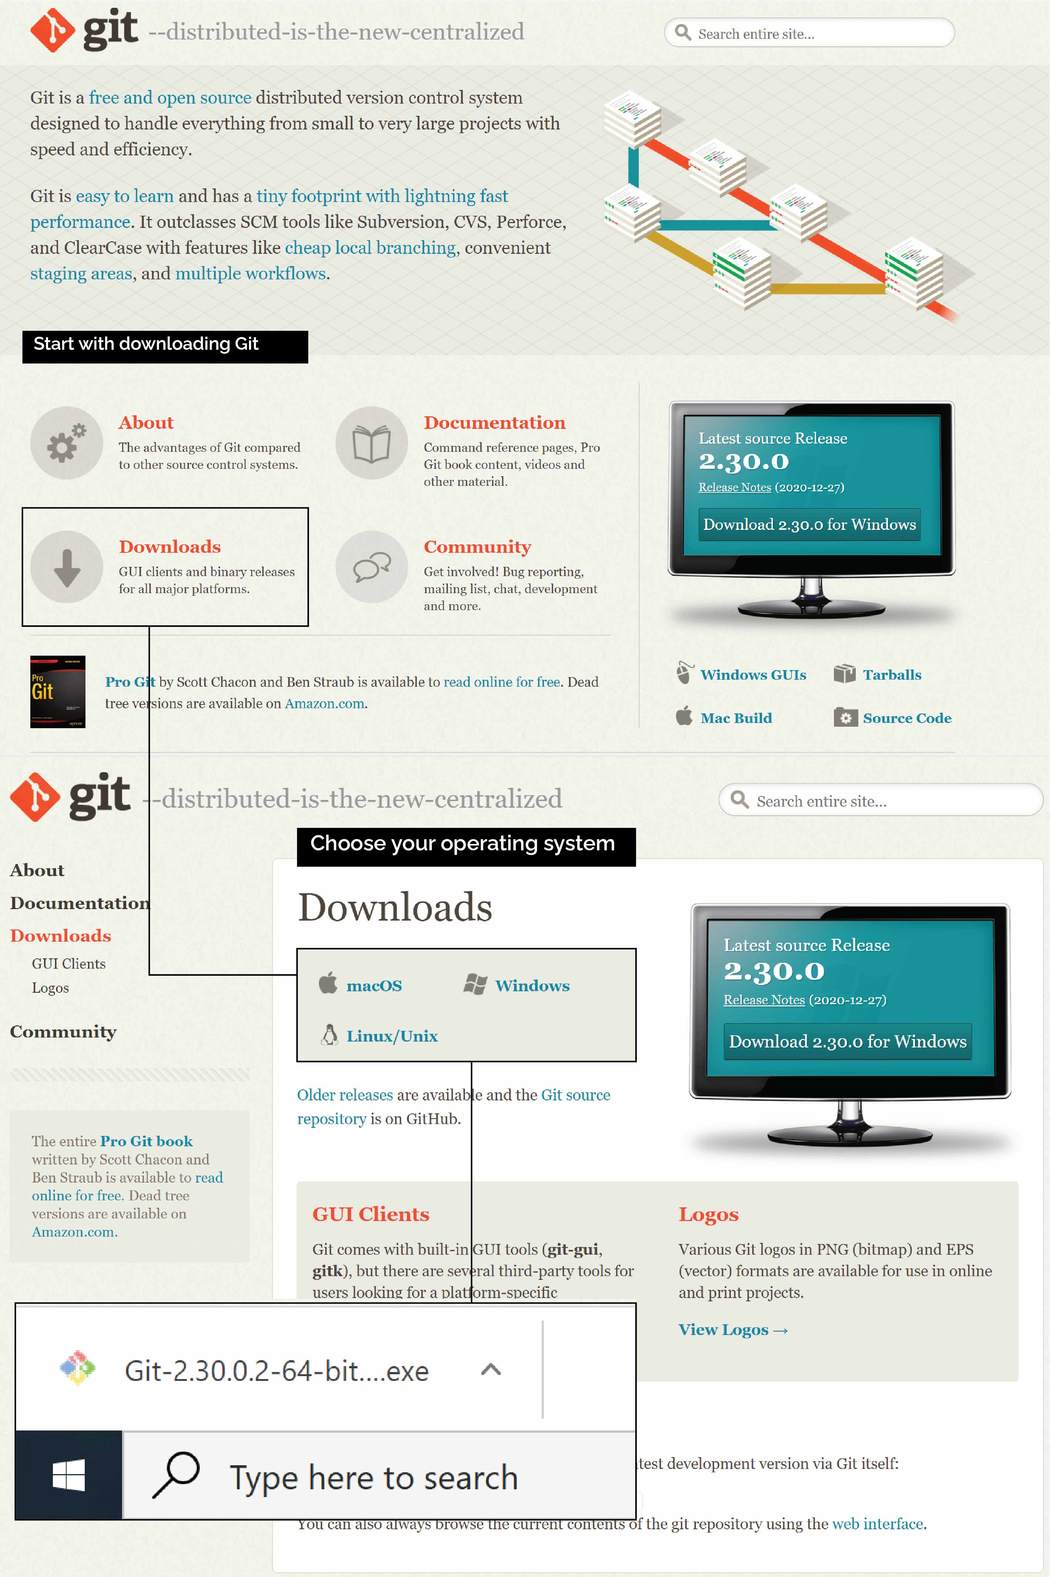
![]()
Step by step
Step 2: Gitlab Account
![]()
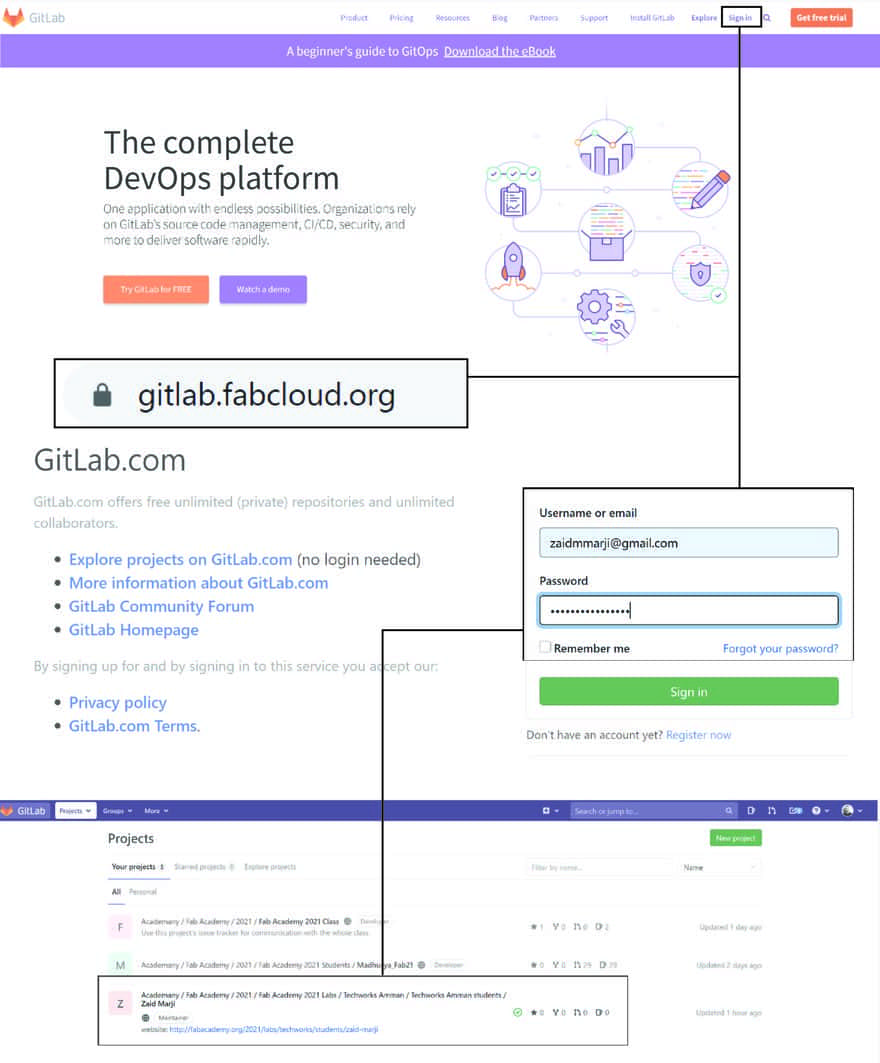
![]()

Step by Step
![]()
![]()
- This to fork your first project
![]()
![]()
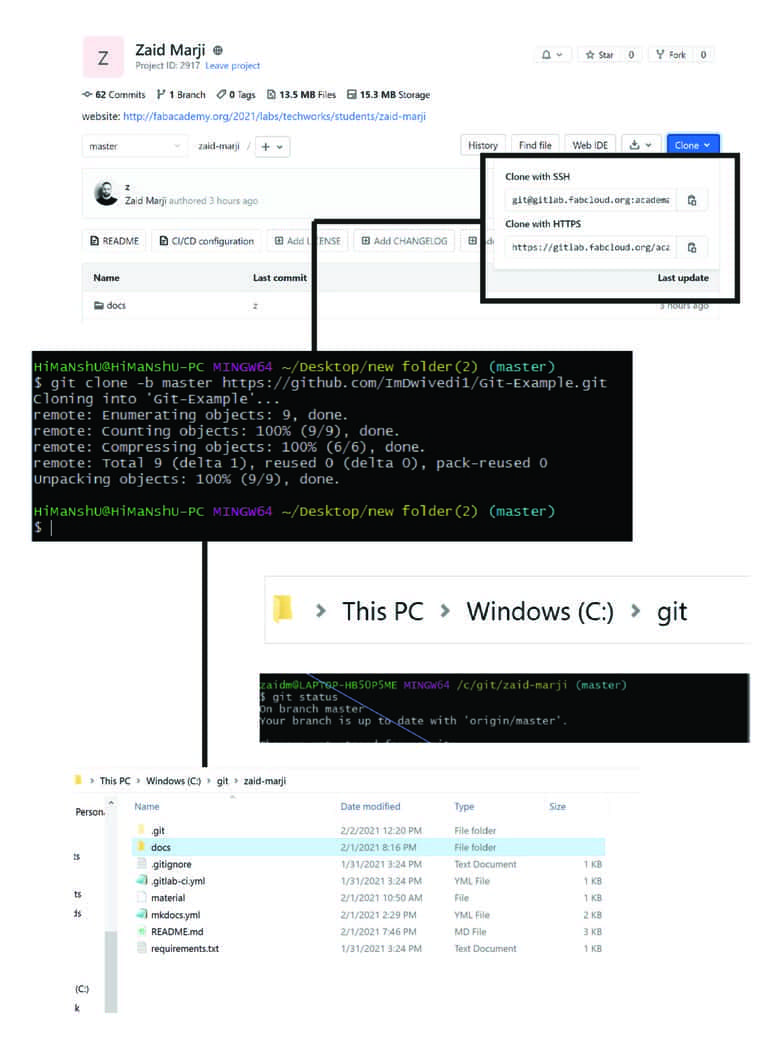
Step 3: clone the repository
- create a directory for Git (C:\git) to save all repository
- As a Fab academy Student you will Have a MKdocs template we will talk more about Mkdocs and Markdown later on
- to clone the repository you need to configure your user through Git bash using your Email and SSH key

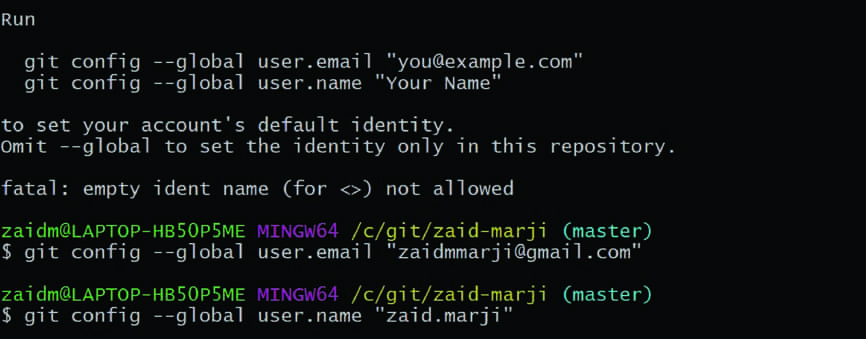
![]()
Cloning my remote repository¶ Step1: I created a directory C:\git to save my repository. Step2: From my account in fabcloud in gitlab, I copied the source URL to clone with HTTPS.
Step3: In git command I used cd git to work inside the directory created. Step4: In git command I used git clone copied URL to clone my repository with the name as used in the cloud, which is “zaid_marji”.
then using Git Bach you clone your files
![]()
![]()
![]()
for full tutorial step by step check this playlist
![]()
MKdocs and markdown
MkDocs is a fast, simple and downright gorgeous static site generator that’s geared towards building project documentation. Documentation source files are written in Markdown, and configured with a single YAML configuration file. Start by reading the introduction below, then check the User Guide for more info.
To edit the files of you website you need to edit using mark down and a text editor
![]()
you can learn how to use markdown using those useful links
![]()
Example
<!-- Headings -->
# Heading 1
## Heading 2
### Heading 3
#### Heading 4
##### Heading 5
###### Heading 6
<!-- Italics -->
*This text* is italic
_This text_ is italic
<!-- Strong -->
**This text** is italic
__This text__ is italic
<!-- Strikethrough -->
~~This text~~ is strikethrough
<!-- Horizontal Rule -->
---
___
<!-- Blockquote -->
> This is a quote
<!-- Links -->
[Traversy Media](http://www.traversymedia.com)
[Traversy Media](http://www.traversymedia.com "Traversy Media")
<!-- UL -->
* Item 1
* Item 2
* Item 3
* Nested Item 1
* Nested Item 2
<!-- OL -->
1. Item 1
1. Item 2
1. Item 3
<!-- Inline Code Block -->
`<p>This is a paragraph</p>`
<!-- Images -->

<!-- Github Markdown -->
<!-- Code Blocks -->
```bash
npm install
npm start
  function add(num1, num2) {
    return num1 + num2;
  }
  def add(num1, num2):
    return num1 + num2
| Name | |
|---|---|
| John Doe | john@gmail.com |
| Jane Doe | jane@gmail.com |
- [x] Task 1
- [x] Task 2
- [ ] Task 3
![]()
preview
Heading 1
Heading 2
Heading 3
Heading 4
Heading 5
Heading 6
This text is italic
This text is italic
This text is italic
This text is italic
~~This text~~ is strikethrough
This is a quote
- Item 1
- Item 2
- Item 3
- Nested Item 1
- Nested Item 2
- Item 1
- Item 2
- Item 3
<p>This is a paragraph</p>

  npm install

  npm start
  function add(num1, num2) {
    return num1 + num2;
  }
  def add(num1, num2):
    return num1 + num2
![]()
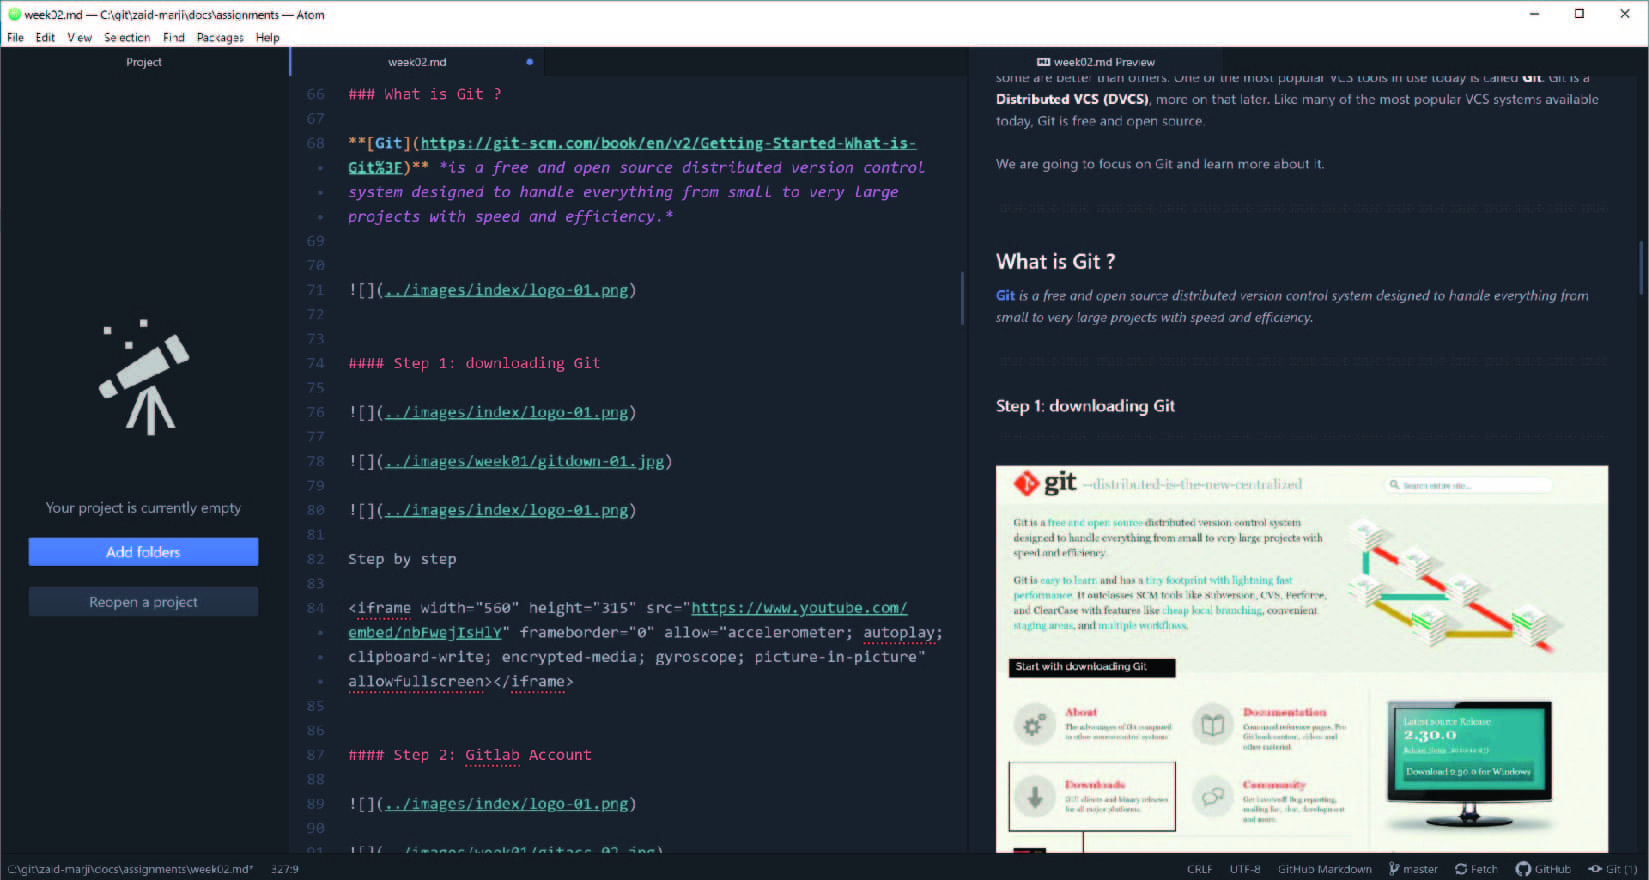
text editor : Atom
I used Atom as a text editor
you open a file and then save it as .md and start editing your files
Using CTRL+SHIFT+m you can preview your changes before uploading them into remote directory.
![]()
Edit your website
you can edit you .yml file to change you website’s theme ” font “color step by step
![]()
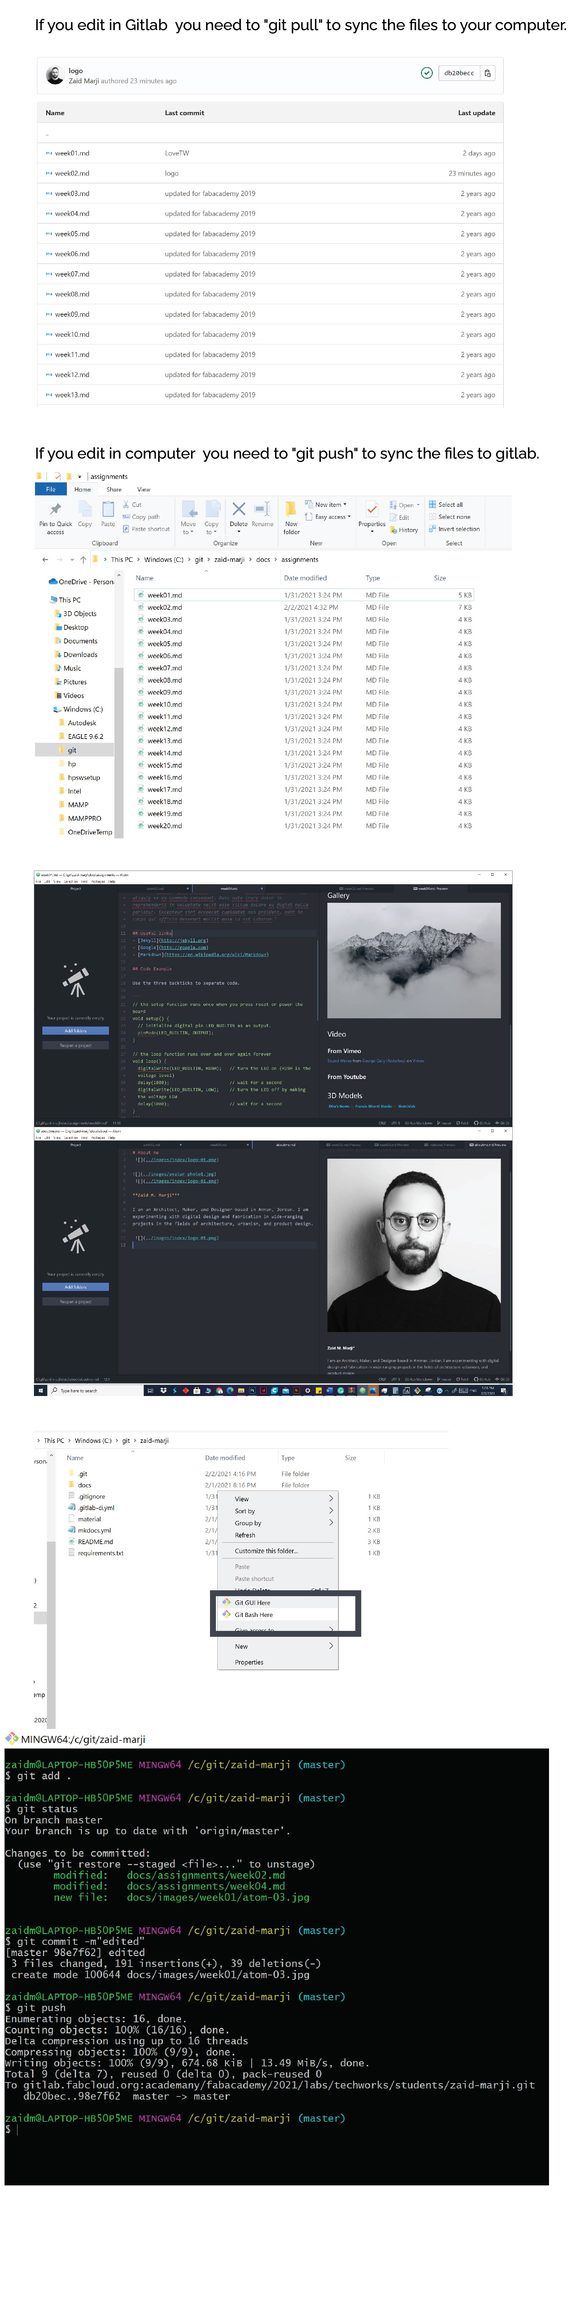
git push git pull
![]()
Uploading local directory into remote repository¶ I am happy with changes I made, and ready to push everything into my cloud repository. Step1: Using git add . to add changes into staging area. Step2: Using add commit -m” any comment” I saved changes into local directory with a comment for future reference. Step3: Using git push I uploaded local directory into cloud or remote repository. Step4: Using git status I checked the status of local directory and staging area. Everything looks good.

Time management
I usually used this schedule to all weeks with little changes to specific weeks

Theming website
I changed logos , colors and links to theming the website by editing my .yml file
# Replace the text below to customize your site
site_name: Zaid M. Marji | Fab Academy 2021
site_description: Fab Academy documentation site Zaid M. Marji
site_author: Zaid M. Marji
copyright: Copyright 2021 Zaid M. Marji- Creative Commons Attribution Non Commercial

site_url: http://fabacademy.org/2021/labs/techworks/students/zaid-marji

extra:
  social:
    # For other social icons at https://squidfunk.github.io/mkdocs-material/setup/adding-social-links/
    - icon: fontawesome/brands/instagram
      link: https://www.instagram.com/zaid_marji/
    - icon: fontawesome/brands/facebook
      link: https://web.facebook.com/zaidmmarji/
    - icon: fontawesome/brands/twitter
      link: https://twitter.com/zaid_marji
    - icon: fontawesome/brands/linkedin
      link: "https://linkedin.com/in/academany"

theme:
  name: material
  palette:
    # try other colors https://squidfunk.github.io/mkdocs-material/getting-started/#primary-colors
    primary: white
    accent: orange
  font:
    # See available fonts at https://fonts.google.com/
    text: Raleway
    code: Ubuntu Mono

  logo: logo1.png
  favicon: images/favicon1.svg
  features:
    - navigation.tabs
    - navigation.instant

plugins:
  - search
  - git-revision-date-localized:
      fallback_to_build_date: true

markdown_extensions:
  - extra
  - smarty
  - admonition
  - codehilite:
      guess_lang: false
  - toc:
      permalink: true
Make sure to take this part as is and save the images in same file the index.md file is in
icon:
    logo: material/school
  favicon: images/favicon.svg
  features:
    - navigation.tabs
    - navigation.instant
the line Icon: needs to be deleted then you can save new logo , other than that the logo from material theme will automatically be selected
font:
  # See available fonts at https://fonts.google.com/
  text: Raleway
  code: Ubuntu Mono

logo: logo1.png
favicon: images/favicon1.svg
features:
  - navigation.tabs
  - navigation.instant

plugins:
- search

after this I made some visual wising illustrator to fit my personal brand.

![]()
