14. Interface and application programming
- Write an application hat interfaces a user with an input and/or output device you made
Previous experience with Processing
Prior to using Processing for this week’s assignment, I had a bit of experience with Processing. At the end of last year, we were unable to be in person for school because of the COVID-19 pandemic. In my engineering class, we learned about the basics of Processing. One example is shown below which simulates a ball bouncing infinitely. Click here to download that file. This means that I was vaguely familiar with the basics, but I had never done anything more complex like exporting the window to an Android device (which I will do this week) or reading from a serial port (also something I will do this week).
float BallPos = 150;
float speed = 1;

void setup() {
  size(1000, 750);
  background(255);
}

void draw() {
  background(255);
  circle(320, BallPos, 20);
  BallPos = BallPos + speed;
  speed = speed + 0.2;
  if(BallPos > 730) {
     speed = speed * -1;
  }
}
How to send Processing programs to Android
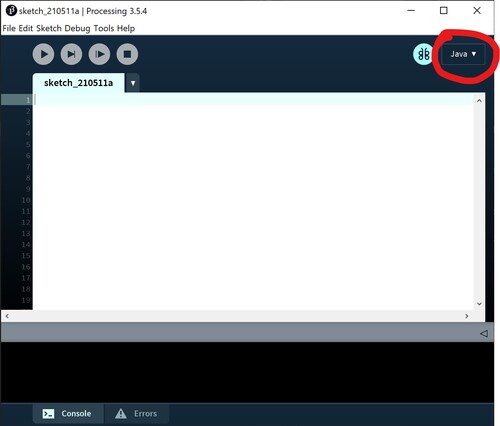
TO upload a Processing program to an Android device, you need to change a few things. The first is the “mode”. If you lok in the top right corner of the default Processing interface, you should see that “Java” is selected.
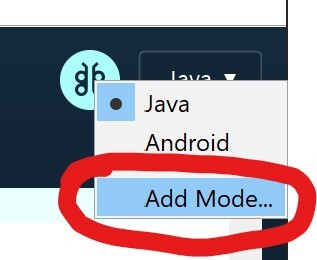
Since I want to the mode to be “Android”, click “Add Mode …”. My version looks a bit different because I already have installed the “Android” mode, but if you haven’t done that, the only 2 options should be “Java” and “Add Mode…”
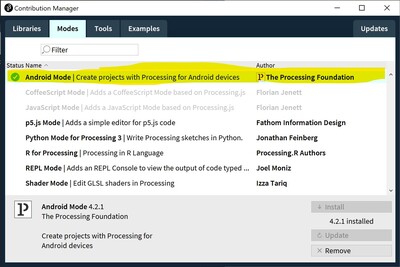
One of the first options should be “Android Mode”. Click “install” in the bottom right corner and then an SDK package will download which will add “Android” to the modes menu.
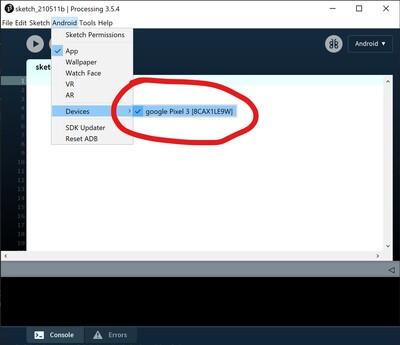
Then, change the mode from “Java” to “Android”. When this is completed, the Processing window you have open should close and then open a new window set as “Android” mode. To connect an Android device, simply use a normal USB connector. For Processing to find the device, go to the “Android” drop down menu, click “Devices”, and your device should appear.
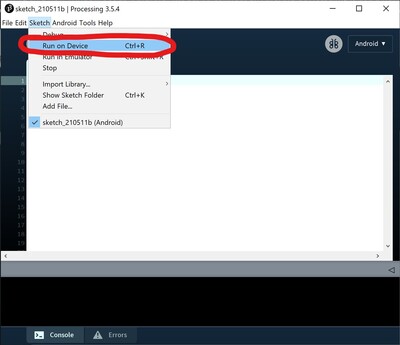
To upload a program on the Android device, go to the “Sketch” drop down menu and click “Run on device”
Processing programs
Basic tapping screen on Processing Android
This link is where I found the program for this simple android app. This is a very simple program that I used to learn about sending Processing programs to an Android device. The program starts off with a blank, gray background. When you tap on either side of the screen, that side will become completely black. Click here to download this code for yourself.
void setup() {
  fullScreen();
  noStroke();
  fill(0);
}

void draw() {
  background(204);
  if (mousePressed) {
    if (mouseX < width/2) {
      rect(0, 0, width/2, height); // Left
    } else {
      rect(width/2, 0, width/2, height); // Right
    }
  }
}
Screen recording of the screen tap program:
External view of the screen tap program:
Printing text on the screen
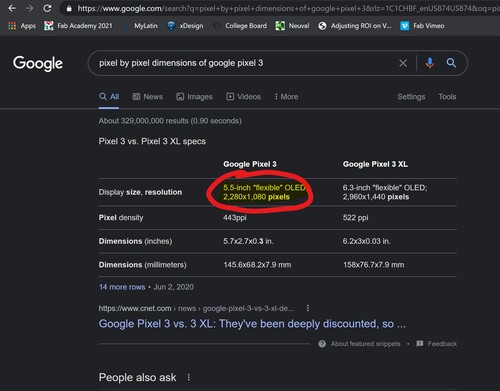
For my next test, I just wanted to print text to the screen of my phone. To do this, I had to set the size of the window as “fullScreen()” and set the size of the text to 225 by using the command “textSize(225)”. Font height is measured by the top of each character to the bottom. By setting my font size to 225, it means that every character will be at most 225 pixels tall. To actually print something, I have to use the command “text()”. The first thing you need in the parenthesis is what you want to print, in my case it is “Welcome to my interface!”. The next 2 values are the coordinates of the top left corner of the text box in (x, y) format. The last 2 values are the coordinates of the bottom right corner of the text box also in the (x, y) format. to download this file for yourself. To find these values, I had to find the dimensions of my screen in terms of pixels and set the values according to those dimensions:
Click here to download this file for yourself
void setup() {
  fullScreen();
  noStroke();
  fill(0);
  textSize(225);
}
void draw() {
  text("Welcome to my interface!", 50, 100, 1000, 2000);
}
Reading sensor values
Since I want to print the values coming in from the COM port, I had to start by reading those values. Since there is no “praseInt()” function in Processing like there is in the Arduino IDE, I had to use the “readBytes()” function. This does pretty much the same thing, except that it does the interpretation byte by byte. I found an explanation and a sample code at the Processing page for the “readBytes()” function.
// Example by Tom Igoe

import processing.serial.*;

Serial myPort;  // The serial port

void setup() {
  // List all the available serial ports
  printArray(Serial.list());
  // Open the port you are using at the rate you want:
  myPort = new Serial(this, Serial.list()[2], 9600);
}

void draw() {
  // Expand array size to the number of bytes you expect
  byte[] inBuffer = new byte[7];
  while (myPort.available() > 0) {
    inBuffer = myPort.readBytes();
    myPort.readBytes(inBuffer);
    if (inBuffer != null) {
      String myString = new String(inBuffer);
      println(myString);
    }
  }
}
Printing sensor values on the interface
This next step is very similar to the previous step, except that we will print the values to the interface. I set the size of the page as 1000 pixels by 1000 pixels. I set the font size to 250 pixels tall and set the background to a light gray. In the same part of the code as the values are printed to the serial monitor, I reset the background to erase any previous values, and then write text where the string with the distance value is being printed.
import processing.serial.*;

Serial myPort;

void setup() {
  size(1000, 1000);
  background(200);
  textSize(250);
  fill(0,0,0);
  printArray(Serial.list());

  myPort = new Serial(this, Serial.list()[2], 9600);
}

void draw() {
  byte[] inBuffer = new byte[7];

  while (myPort.available() > 0) {
    inBuffer = myPort.readBytes();
    myPort.readBytes(inBuffer);
    if (inBuffer != null) {
      String myString = new String(inBuffer);
      print(myString);
      background(200);
      text(myString, 100, 100, width-100, height-300);

    }
  }
}
Final interface
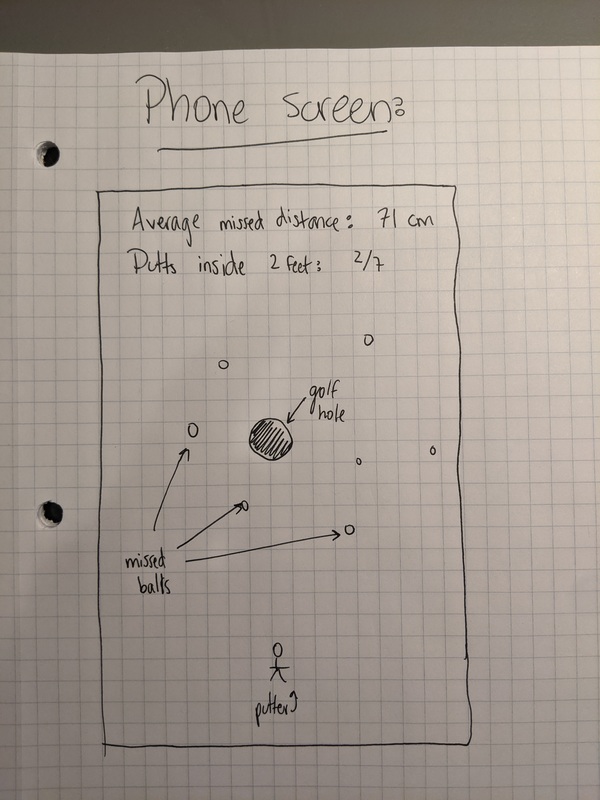
The final interface I would like to have is shown below. The background of the screen will be green to mimic the color of an actual putting green. The hole will be placed exactly in the middle of the screen and will be completely black. All the little white circles around the hole will represent all the missed putts. Since a golf ball is roughly 1.5 inches across, these dots will be noticeably smaller than the 4.5 inch wide hole. Then, to have a reference point of which direction is which, I will make something like a stick figure at the bottom to demonstrate where the ball is being hit from. At the top of the screen, there will be some statistics about that specific putting session. The ones I came up with already are the average distance to the hole and how many putts were inside a certain distance of the hole. These are both helpful to gauge accuracy and consistency.
First attempt
The first thing I wanted to do to replicate the final project interface is just set the background color, make a circle representing the hole, and randomly place 5 golf balls on the screen. To find the specific background color, I visited this link which listed “golf course green” in several color formats such as RGB (47, 120, 31) and Hex (#2f781f). The code and the video of this failure are both shown below. If you look at the video, you can see that it obviously did not display 5 circles, but rather hundreds of circles.
float x = 0;
float y = 0;

void setup() {
  fullScreen();
  background(47,120,31);
  stroke(0,0,0);
  fill(0);
  circle(width/2, height/2, 100);
}

void draw() {
  fill(255);
  for (int i = 0; i < 5; i++) {
    float x = random(width);
    float y = random(height);
    circle(x, y, 25);
  }

}
Second attempt
On this second attempt, I had to find a way to make the software know that after 5 circles, it should stop. At first, I thought it might be in the “for” loop, but then I decided to look in the Processing reference for the “draw()” function and I read that “the draw() function continuously executes the lines of code contained inside its block until the program is stop or noLoop() is called”.
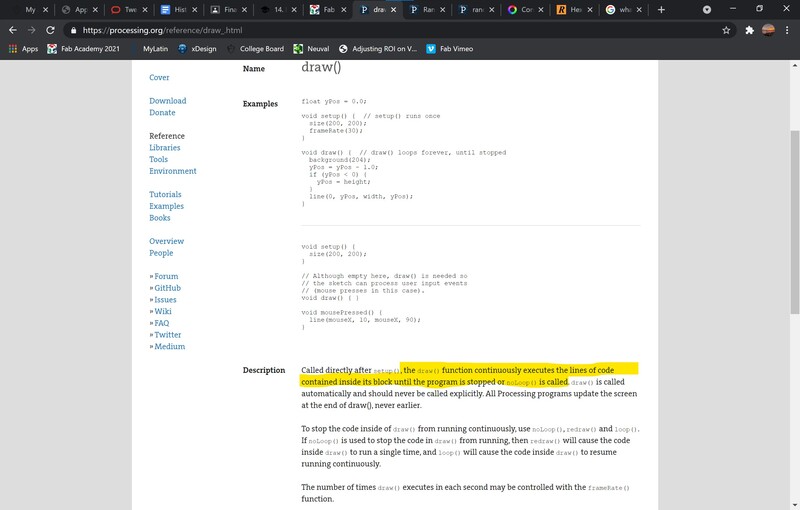
There is a very simple fix for this, I just have to add the “noLoop()” function after the “for” loop that makes the 5 random coordinates of the 5 circles. Click here to download this file for yourself.
noLoop();
Third attempt
Once I had 5 successfully generated dots on the screen, I needed to add more. The first thing I did was add something at the top of the screen to represent scaling. In the “void setup()”, I wrote the lines of code below. This printed text onto the screen saying “Scaling: 240 pixels represents 1 foot” and then I made a bracket that goes underneath the “240 pixels” part of the text to show what that looks like on a screen.
text("Scaling: 240 pixels represents 1 foot", 50, 100, width-50, 250);
line(300, 180, 300, 210);
line(300, 210, 540, 210);
line(540, 210, 540, 180);
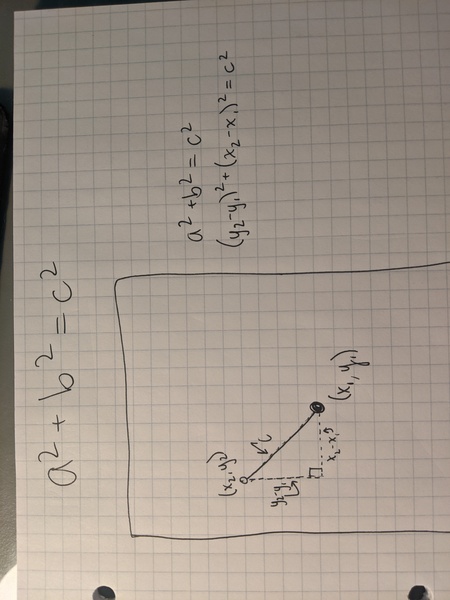
The next thing I had to do was find the distances from each point to the hole. Since I had randomly generated coordinates for the points and I knew where the hole was located, this was pretty easy. I used the Pythagorean Theory to find the distance between the 2 points. I had to find the net x distance and the net y distance. I did this by taking the x coordinate of the hole (width/2) and subtracting it from the x coordinate of the ball (x) and then squaring that to get a2. I did the same thing to find b2 except with the y coordinates. I found the sum of those 2 values to get c2 and then took the square root to find c. This gives me the distance in pixels, which is not very helpful, so I convert it to inches by dividing by 20. I subtract 2.25 from this distance because the hole is 4.5 inches wide and I want to find the distance to the edge of the hole, not the very middle. Another thing I have to do is set any negative number to 0. In the software, a negative number represents a ball that has its center within the bounds of the hole. In real life, this would mean the putt went inside the hole, meaning the distance to the hole would be 0. This is what this looks like in code:
float distance_from_hole = round((sqrt(sq(width/2 - x) + sq(height/2 - y)) / 20) - 2.25);
if (distance_from_hole <= 0) {
  distance_from_hole = 0;
}
Then I added all of these values to an array by using the code below
distances[i] = distance_from_hole;
Since it is not very helpful to just have all of these distance values in an array without being able to access or view the values, I needed to find a way to print them on the screen below the point they represent. Since these values are floats, they have to first be converted to a string to become printable text.
text(str(distances[i]) + " in", x-75, y+75);
This is the final code for this step. Click here to download it for yourself. There is also an image of the result:
import java.io.*;
import java.util.*;


float x = 0;
float y = 0;

float[] distances = new float[5];

String printable_array = "";

void setup() {
  fullScreen();
  background(47,120,31);
  fill(0);
  circle(width/2, height/2, 90);
  textSize(60);
  stroke(255);
  strokeWeight(6);
  text("Scaling: 240 pixels represents 1 foot", 50, 100, width-50, 250);
  line(300, 180, 300, 210);
  line(300, 210, 540, 210);
  line(540, 210, 540, 180);
}

void draw() {
  fill(255);
  for (int i = 0; i < 5; i++) {
    float x = random(width/2-500, width/2+500);
    float y = random(height/2-500, height/2+500);
    circle(x, y, 33);
    float distance_from_hole = round((sqrt(sq(width/2 - x) + sq(height/2 - y)) / 20) - 2.25);

    if (distance_from_hole <= 0) {
      distance_from_hole = 0;
    }

    distances[i] = distance_from_hole;
    text(str(distances[i]) + " in", x-75, y+75);
  }

  noLoop();

}

Files
Tapping to each side of the screen
5 random ball positions with distances printed below
Group work
To access this week’s group assignment, visit this page. Since I was the only person who used Processing for Android this week, my contribution to the group work was to describe the different features of this software and compare it to the traditional Processing.