1. Principles and Practices, Project Management
This week, we planed and sketched a final project. And then we decided which text editors that I use and learnt about MkDocs to write my documentation with Markdown. Lastly, We learnt about Git, GitLab, how to use them to control the version of my documentation files between local and global repositories and build my website for uploading your documentation each week.
Assignments
- Plan and Sketch a potential final project.
- Build a personal site in the class archive describing you and your final project.
Goals
- To master the version control of my files with Git.
- To make my website with Markdown Language.
- To make my website with HTML & CSS.
1. Final Project
Product Name : Geodrop (Geo Drop)
Keywords; Colored Liquid Ink, Dropping, Drawing Machine, GPS sensing, CoreXY
Introduction
Geo Drop is the machine that makes the artworks automatically by dropping the liquid inks at the appropriate position on the paper. The Drop position is controlled by using CoreXY platform which is the slider mechanism applying to 3D printer and Pen Plotter. The most outstanding feature of Geodrop is that GPS data (mainly the data of Longitude, Latitude, Altitude) is used to control the drop position. That means the painting is different depend on where I am.
Why do I want to make this machine? Because I just want to enjoy my trip for all the time of the trip, even the way of getting back my home. I always feel depressed when I got back to my home from my trip. I wish there are something that entertains me after trip and Geo Drop would fulfill my wishes. It can provide a painting artwork every trip. So I can also enjoy getting back to my home because the artwork completed at home is unique to where you go.
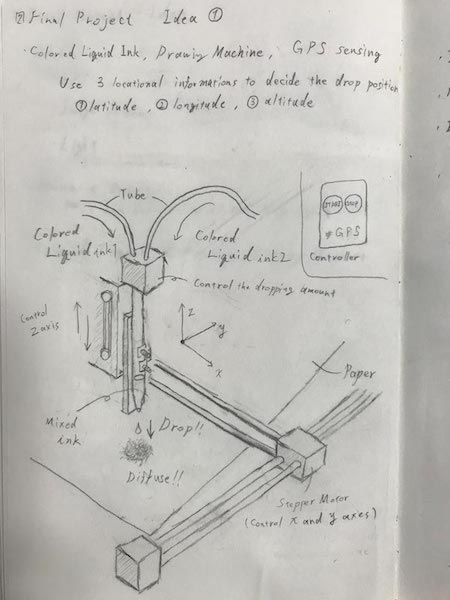
Fig. Sketch of my final project
How does it works
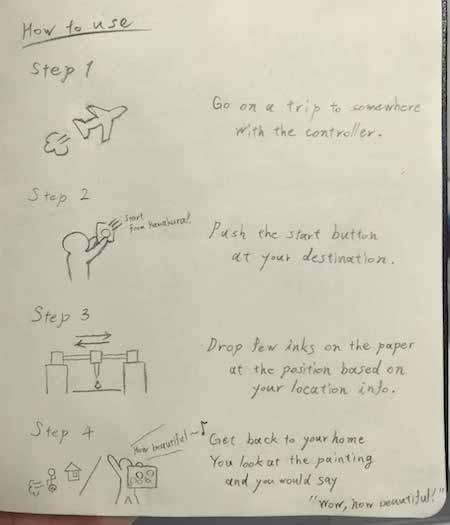
Fig. How to use Geodrop
-
Step 1
Go on a trip to somewhere with your smartphone. -
Step 2
Push the start button at your destination using the application for smartphone.
(Your location data is sent to the main controller of Geo Drop.) -
Step 3
Drop a few inks on the paper at the position based on your location info. -
Step 4
Congratulations! You just get back to your home. Enjoy your artworks!!
Components
Geo Drop is composed of the below components;
-
Nozzle
The syringe is fulfilled by the colored liquid ink and it drops the ink after the machine was given direction by push the start button down on the controller. More syringes might be added to increase a degree of freedom for color expression. -
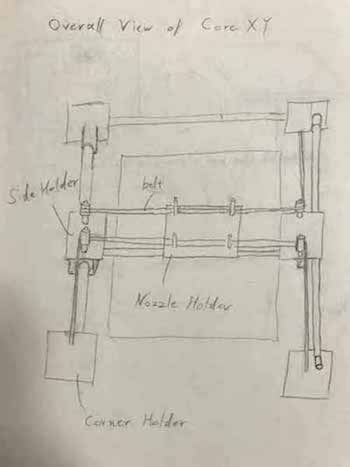
CoreXY system
CoreXY system determines the dropping point for x, y, and z axes. It consists of the Stepper Motor, belt, pole, and holders as shown in the below image. The stepper motor and belt are used to give the force to the syringe parts and to adjust its position. The outside frame is made by assembling the poles and the holders. The holders that support the corner of the frame, slider parts, and syringe part are all made by printing using 3D printer. -
Application on Smartphone
Smartphone can get your location information data with its GPS sensor. So I make the application to send it to the main computer, and to turn on / off the machine. Emergency stop button is also attached just in case. -
Micro Computer
Micro controller in the main machine receives your location information data with GPS from the smartphone and converts them to x-y-z direction data.
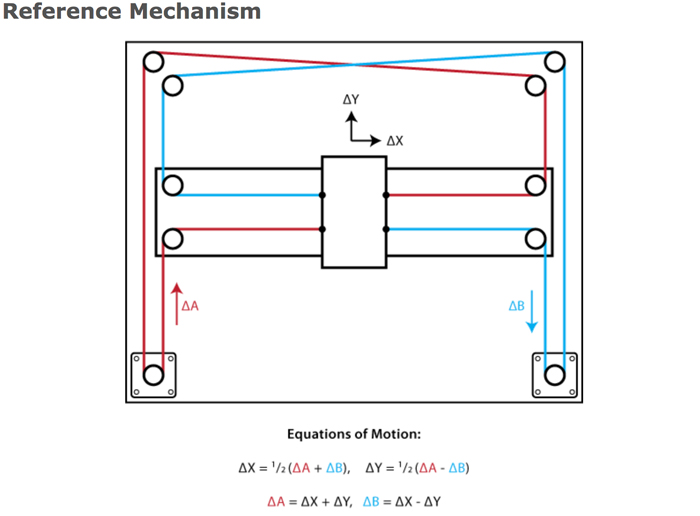
Fig. Mechanism of CoreXY
 ___
___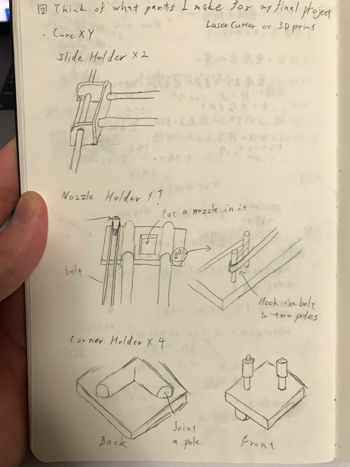
Fig. Holder Parts to form CoreXY system
Factors
I’m thinking that GPS data is converted to the below factors by;
-
Regularity - Random ⇄ Regular
It determines how randomly or regularly the painting is done. When the artwork becomes regular, it gets to like have a pattern, linear, and predictable. -
Density (Spatially) - Dense ⇄ Sparse
It determines how closely each ink drops on the paper. -
Drop Size - Large ⇄ Small
The diffusing area of the dropped ink on the paper is determined by the amount of the ink-drop and the height between the paper and the drop point.
Additional Functions
Things that I’d like to try to challenge if I have enough time.
-
Colorfulness
We can express the various colors by adding more syringes or mixing some inks in one syringe. The former way might be relatively easy to realize. But the latter needs the adjusting mechanism of the quantity of an ink. -
Gradation
If it is possible to add the ink mixing mechanism, it may be able to express the gradation of color. -
Continuity
You might go to some places at your once trip and make the artworks at each place. To realize that, the paper feeding mechanism might be needed.
2. Text Editor
In the global session, Neil introduced us many kinds of text editors. So I looked them up and tried to prepare a template written by markdown language and show it, and write some words on every editor. All the editors I looked up are free to use. Note that I usually use a Mac book so my main OS is macOS.
Atom (1/4)
Atom is the open source text editor that everyone can install at free. One of the great feature in Atom is that Atom is easy and various to customize. You can install the additional packages and use many kinds of plug-ins.
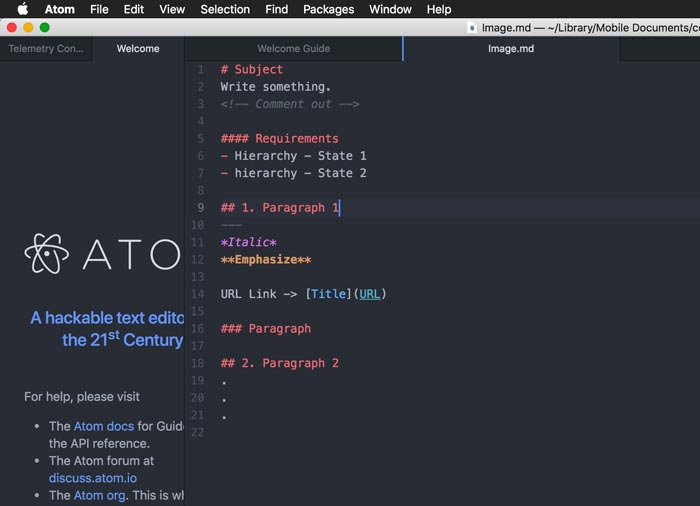
Fig. Coding using Atom
- Smooth operation but slow start-up
- Customizability
but I have no time to try to customize Atom. It might be difficult to use for beginner like me.
Sublime Text (2/4)
Sublime Text is the commercial text editor, but you can also use its evaluation version that is free to use. Sublime also has the many kinds of the package supports.
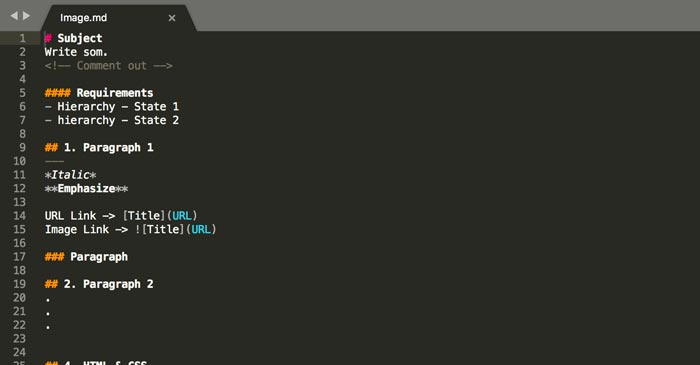
Fig. Coding using Sublime Text
- Simple screen - It has distraction free mode, consisting of placing only the text in your screen.
you can focus on your own work! but It’s better for me that each word was emphasized more by coloring when using syntax.
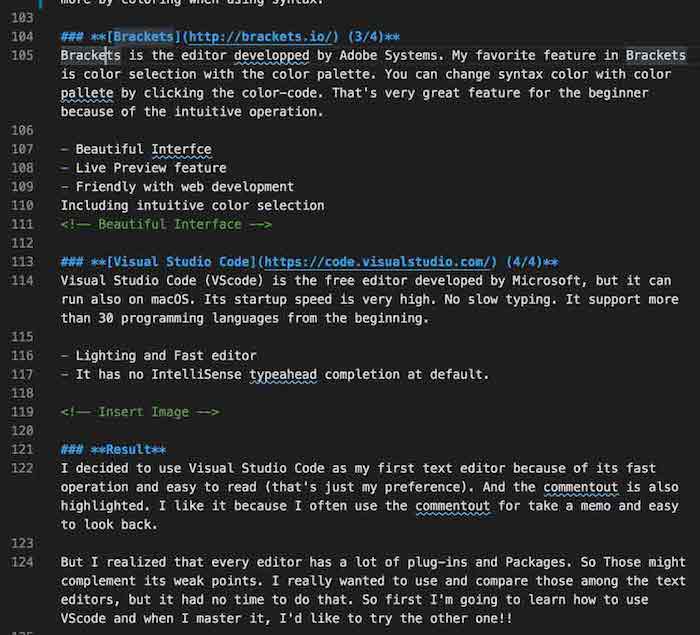
Brackets (3/4)
Brackets is the editor developed by Adobe Systems. My favorite feature in Brackets is color selection with the color palette. You can change syntax color with color pallet by clicking the color-code. That’s very great feature for the beginner because of the intuitive operation.
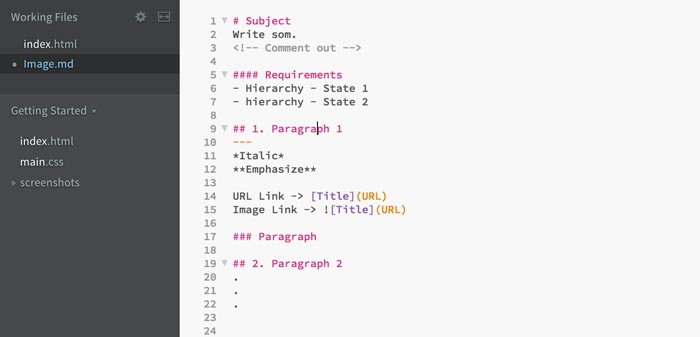
Fig. Coding using Brackets
- Live Preview feature
As I changed some words in HTML file, its changes was reflected very fast to live view. Sounds useful! but it can applied only to HTML file. - Friendly with web development Including intuitive color selection
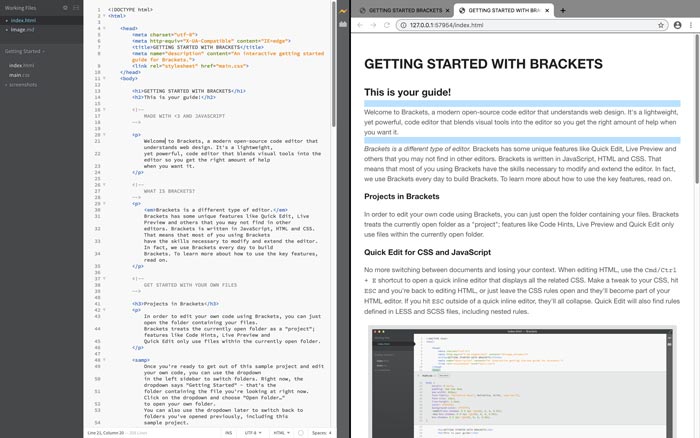
Fig. Live view in Brackets
Visual Studio Code (4/4)
Visual Studio Code (VScode) is the free editor developed by Microsoft, but it can run also on macOS. Its startup speed is very high. No slow typing. It support more than 30 programming languages from the beginning.
- Lighting and Fast editor
- It has no spell checker at default.
Fig. Coding using VScode
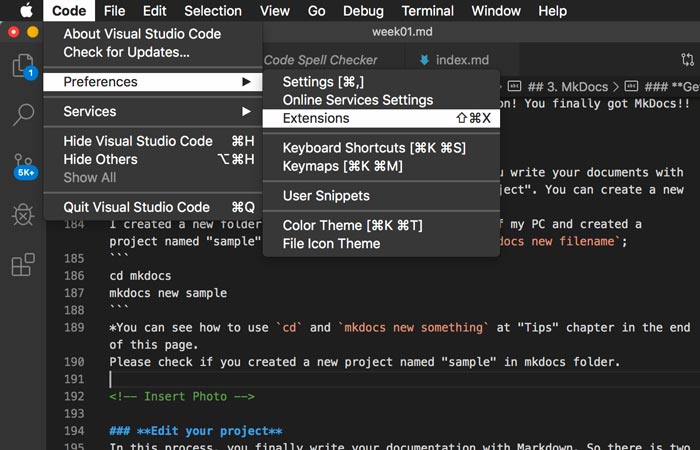
You can add a spell checker function in VS code. I installed the extension “Code Spell Checker” that tell me where I mis-spelled. Very easy to download. Open VS code and go to Preference -> Extensions and type as “Code Spell Checker” at search engine and download it. I really recommend to download it!! I’m really surprised that I was mis-spelling a lot…
Figs. Extension: Code Spell Checker
Result
I decided to use Visual Studio Code as my first text editor because of its fast operation and easy to read (that’s just my preference). And the comment out is also highlighted. I like it because I often use the comment out for take a memo and easy to look back.
But I realized that every editor has a lot of plug-ins and Packages. So Those might complement its weak points. I really wanted to use and compare those among the text editors, but it had no time to do that. So first I’m going to learn how to use VScode and when I master it, I’d like to try the other one!!
Reference site:
3. MkDocs
This chapter explains the below process to build your own website;
Install MkDocs -> Get a new project -> -> Edit your project -> Preview your project
Install MkDocs
MKDocs is one of the static site generator that converts the files written in Markdown to HTML and CSS. You can download MkDocs in accordance with this pages. You have to install three items to do. Here is what I installed;
Python -> pip (Package Manager ) -> MkDocs
Firstly, MkDocs drives under Python. So you’d better to check if the things like software or programming language are already installed on your PC before you start to download them. Firstly, you can check if Python is already installed on your PC by opening terminal and running the below command to terminal.
python --version
If the current version of Python was shown, Python is already installed on your PC.

My PC was already installed Python because Python is installed on Mac by default. If you’ve not installed it, you can install from here.
If you installed Python, please run python --version again to check if Python is installed properly. You would show the current version of Python on terminal.
After that, you need to install the package manager like Homebrew, pip. The package manager is the tool that can install not only Python but also other files needed. Don’t forget to check if pip is already installed with command;
pip --version
If you’ve not installed yet, run the below command to get pip;
python get-pip.py
And then you can update the pip with the latest version;
pip install --upgrade pip
You can finally get MkDocs package by using pip. Ops, before that, please run pip --version to check if pip is installed properly.
To get MkDocs, simply run the below command;
pip install mkdocs
Lastly, you can check if MkDocs is installed properly;
mkdocs --version
If the current version of MkDocs was shown, Congratulation! You finally got MkDocs!!
Get a new project
Next, you will get the set of folders and files where you write your documents with Markdown. Notes that those folder is also called as “project”. You can create a new project at any directory.
I created a new folder “mkdocs” on the first directory of my PC and created a project named “sample” into the folder “mkdocs” with mkdocs new filename;
cd mkdocs
mkdocs new sample
*You can see how to use cd and mkdocs new something at “Tips” chapter in the end of this page.
Please check if you created a new project named “sample” in mkdocs folder.
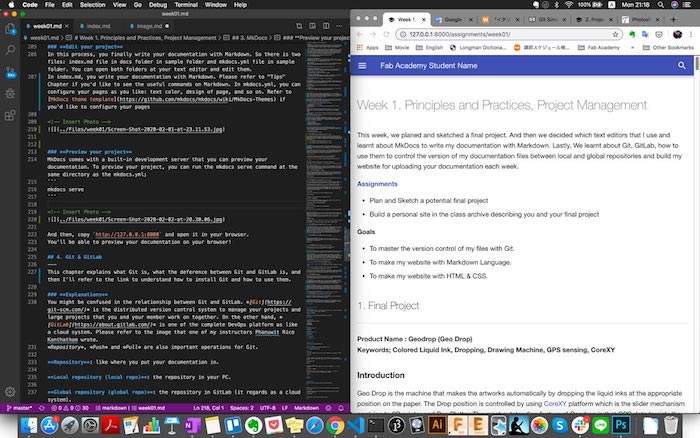
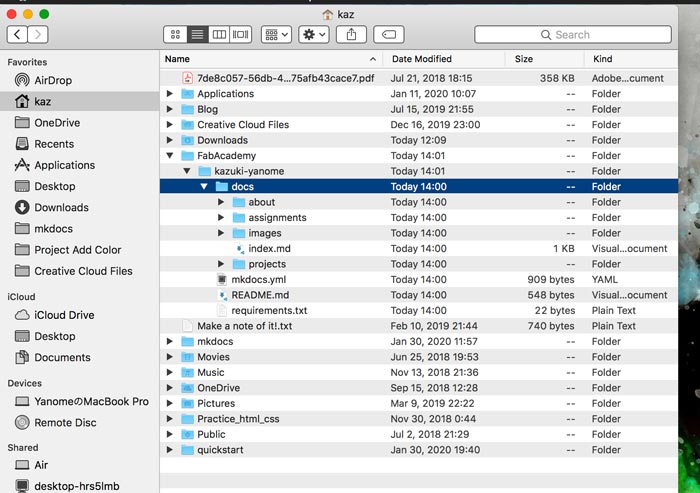
Edit your project
In this process, you finally write your documentation with Markdown. So there is two files: index.md file in docs folder in sample folder and mkdocs.yml file in sample folder. You can open both folders at your text editor and edit them.
In index.md, you write your documentation with Markdown. Please refer to “Tips” Chapter if you’d like to see the useful commands on Markdown. In mkdocs.yml, you can configure your pages as you like: text color, design of page, and so on. Refer to MkDocs theme template if you’d like to configure your pages
Preview your project
MkDocs comes with a built-in development server that you can preview your documentation. To preview your project, you can run the mkdocs serve command at the same directory as the mkdocs.yml;
mkdocs serve

And then, copy http://127.0.0.1:8000 and open it in your browser.
You’ll be able to preview your documentation on your browser!
4. Git & GitLab
This chapter explains what Git is, what the deference between Git and GitLab is, and then I’ll refer to the link to understand how to install Git and how to use them.
Explanations
You might be confused in the relationship between Git and GitLab. Git is the distributed version control system to manage your projects and large projects that you and your member work on together. On the other hand, GitLab is one of the complete DevOps platform as like a cloud system. Please refer to the image that one of my instructors Phanuwit Rico Kanthatham wrote.
Repository, Push and Pull are also important operations for Git.
Repository: like where you put your documentation in.
Local repository (local repo): the repository in your PC.
Global repository (global repo): the repository in GitLab (it regards as a cloud system).
Push: like you upload your project from your local repo to global repo.
Pull: like you download from global repo to local repo.
The point is all the histories of changing or configuring your projects are recorded on the GitLab server through pushing it. You can pull not only the latest version of your projects but also its previous version thanks to this function of Git.
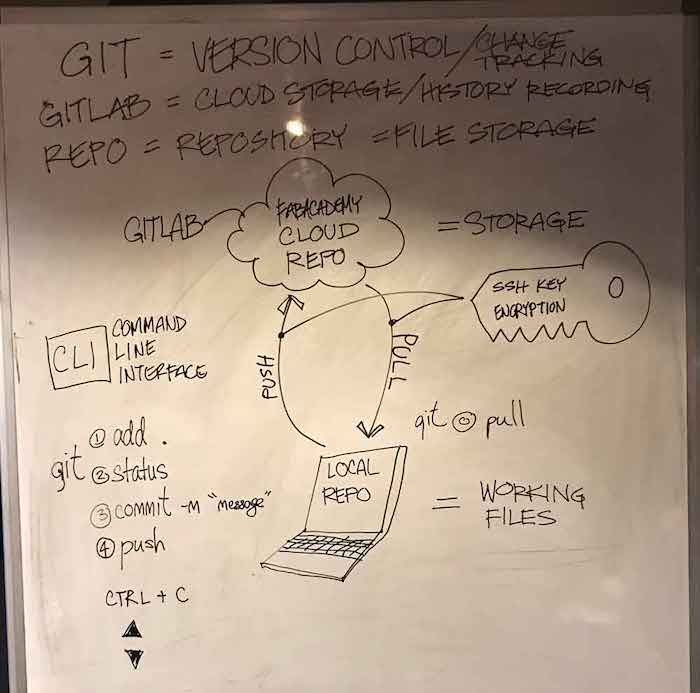
Fig. Concept of Git drawn by Roco-san
*Notes that you must not push too large volumed files to GitLab because those data volume stack up as you push the latest version of your projects. It means the volume of your projects might exceed the limit capacity of the server.
Setup Git
I really easily set up Git thanks to Git Cheat Sheet made by Fab instructors and students in the world. It also include the video tutorial. So I’ll just complement that tutorial in this paragraph.
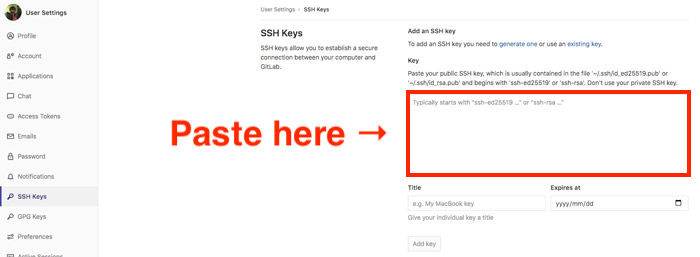
Git SSH key
You need to create SSH key because only you can push and pull your documentation and anyone can’t change the version of your documentation. There are two type of key: Private key and SSH key. Private key is the key that you think and set up as like a password. SSH key is created randomly using Git command. Git system matches two keys so you can push and pull your documentation only when you input the correct private key.
1. Make SSH key pair
Opened Terminal and run ssh-keygen at my gitlab repository;
$ ssh-keygen
Enter file in which to save the key (/Users/me/.ssh/id_rsa):(ENTER)
Enter passphrase (empty for no passphrase): (password)
Enter same passphrase again: (password)
Then SSH key pair will be generated in /Users/me/.ssh as “id_rsa” and “id_rsa_pub”.
2. Set SSH key in Git lab
To check the SSH key, run the below commands;
$ cd /users/me/.ssh
$ cat id_rsa.pub
Then you can see the ssh-rsa texts. So copy the text, go to Gitlab page and paste it to “Key” feed. Set title make you easy to recognize the key.
Clone your student repository
The attached image shows where you can copy the behind of git@ in tutorial.
Write and edit your projects in the cloned files
As well as “3. MkDocs - Edit your project” in this page, you can edit index.md and mkdocs.yml in cloned files and make your own pages.
I’d like to explain the workflow to modify a file locally.
1. Pull the global repository
Open Terminal and move to your repository. And then, run git pull.
The global repository is updated to your local repository.
2. Edit pages**
You can edit the .md pages in your repository in the same way of editing the word file.
Open .md file you’d like to edit on the text editor, and edit as you’d like.
3. Push your local repository to the global repository**
To reflect the page you edited on the global repository, you need to push your local repository to global repository.
First, run git add . to select the parts that you’d like to push and then, git commit -m'Write your comment'.
And then, run git push. The password (private key) is required.
YanomenoMacBook-puro:kazuki-yanome kaz$ git add.
git: 'add.' is not a git command. See 'git --help'.

The most similar command is
    add
YanomenoMacBook-puro:kazuki-yanome kaz$ git commit -m'Add week1 page'
On branch master
Your branch is up to date with 'origin/master'.

Changes not staged for commit:
    modified:   docs/assignments/week01.md

Untracked files:
    docs/Files/week01/week1.jpg

no changes added to commit
YanomenoMacBook-puro:kazuki-yanome kaz$ git push
Enter passphrase for key '/Users/kaz/.ssh/id_rsa':
Everything up-to-date
YanomenoMacBook-puro:kazuki-yanome kaz$
Upload your repo online
You can finally upload your repository online and see your documentation on the browser! Follow the tutorial to upload. For complement, the git commands introduced are also shown in “Tips” Chapter as well as the useful git commands.
Conclusions
In this week, I learnt a lot how to build Git system in my PC and write my website and open it to the network. I’m so glad to be able to build my website, but actually I have a lot of things I couldn’t due to the shortage of time. I think those skills are very important for Fab Academy because every week we use those system and network. It also leads to save my time during each week. So I’m going to keep studying!
Things that I learnt
- Compared the the operation of several text editors.
- Built my website using MkDocs with Markdown.
- Understood Git & GitLab and how to use them.
- Used Terminal to implement some of operations in my PC.
Advanced Skills
- Master HTML & CSS
- Use extensions of the other editors
X. Tips
Tons of tips about Hardware that I learned at each week session were described in this page.
MkDocs
Get a new project
Run mkdocs new something at the directory where you’d like to create a new project.
For this example, the file name is something.
mkdocs new something
Serve
To get the link to preview your documentation on the browser.
mkdocs serve
Extension - Admonition
You can annotate with a very cute design.
Firstly, you can open up mkdocs.yml and write the below sentence in mkdocs.yml;
markdown_extensions:
  - admonition
*If you already has markdown_extensions: in mkdocs.yml, you just write as - admonition in it.
And then, as you just enter the command like !!! ~ in .md file, you can use the annotation like;
!!! note
Note
failure
Failure
!!! abstract
Abstract
!!! tip
Tip
!!! question
Question
!!! warning
Warning
!!! bug
Bug
!!! example
Example
*Note that leave 4 indents (spaces) from the next line.
Markdown
Heading
Need Space between # and words.
# Something
## Something
### Something
Underline When you’d like to draw an underline to the sentence or word.
Something
---
Italic
Enclose the words in *.
*Something*
Emphasis
Enclose the words in **.
**Something**
Comment out
<!-- Something -->
To draw the line
---
To insert URL
[Word](http://www.jamesnolangandy.com/)
To insert a file (images and movie)
No fill in [] and fill the location of the file in ().

Table
|a  |b  |c  |
|---|---|---|
|1  |2  |3  |
|4  |5  |6  |
• Line 1 (a, b, c) is called as header line.
• Line 2 (—, —, —) is called as alignment line.
• Line 3 and below (1, 2, 3, …) is called as data line.
Git
status
git status command tells you which files you changed and is not pushed to GitLab.
git status
add
git add command instructs which files in local repo you upload to global repo. git add index.html to instruct file by file. git add . to instruct all the files at once.
git add index.html
or
git add .
commit -m ‘message’
You need to write what you changed with this push in “message” of git commit -m 'message'
git commit -m 'message'
Push
As you instruct which files you upload by git add and run git commit -m 'something', you run git push to upload them to GitLab.
git push
• If you make a branch and work together with someone, don’t push from master. Push from a branch.
• If the error message are shown when you push from a branch, you input ‘git push –set-upstream origin [branch name].
Pull
git pull
*If you have a local branch and you’d like to pull the remote branch, you need to pull it from the local branch.
Clone
Clone master that you’d like to get.
Make sure that master is created in the hierarchy of the folder that you are in.
git clone git@address
Create a branch
Create a branch.
git branch [branch name]
Check the current branch you are in
‘’‘
git branch
‘’‘
Checkout to branch
Change the branch you works.
git checkout [branch name]
Terminal
ls
Use if you’d like to view the files in the current directory.
ls
cd
Use when you’d like to move from your current directory to the lower directory.
cd directory1
For example, when you’re now at the Directory1 and want to move to its lower directory: Directory2;
cd Directory2
cd ..
Use when you’d like to back to the upper directory.
cd ..
MEMO
What I wanted to learn more
-
What do I do on
mkdocs serve? -
Make my own website using HTML and CSS.
-
VScode, Brackets
-
Terminal
-
Git