Final Project - xook
A story telling scenario that helps kids learn to read while telling them a story with a theatre play brought to the digital fabrication world. The name XOOK means to read or lecture in mayan, it's pronounced sho-/o/k.
Main Objective
Scenario simulating a theatre, with a grid for characters to be able to move within certain parameters, as a background scenrario there will be an app that will control the characters movement and will tell a story.
The device can be used for three different segments, toddlers as a way to keep them entertained, kindergarden kids and tha first few years of elementary to help them start reading and a third segment (if I have time) to help them learn a second language.
Project Plan from week 2
The Project Plan will be updated as changes occur to the project baseline and activities are completed. It includes activities regarding the Final Project as well as the Fab Acacdemy in general
Sketch including fist story board from week 1
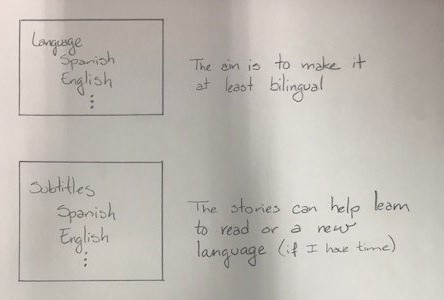
App Configuration
The language for the voice of the story teller and characters can be selected or mute if the kid wants to read or create his/her own story, as well as the language for subtitles (or no subtitles if preferred). If the same language is used it can work to help kids read, and if the subtiles are different it can help with learning a new language.
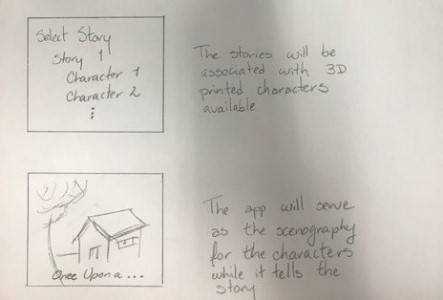
App Story
Once the story is defined the app will tell the kid to set the characters on the specified support within the grid of the scenario.
The story telling will begin and the scenography will be changing similar to pages in a book to create the feeling of being immersed in the adventure.
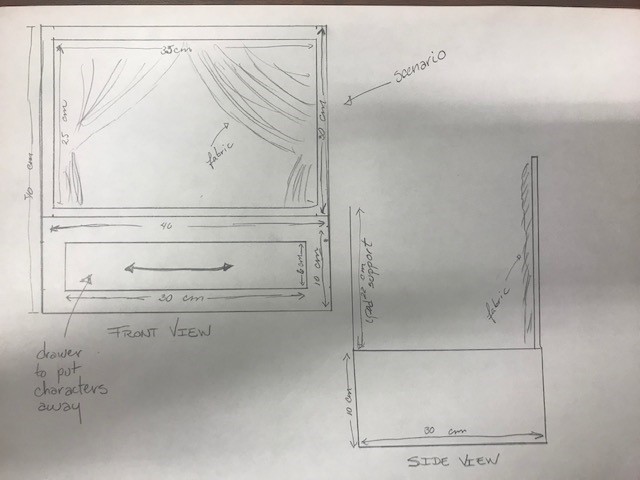
Scenario
The scenario will be big enough to have a grid where the characters will be moved automatically. Teh front will have the look and feel of an old play theatre with a drawer on the base to put away the characters once play time is over.
The back will have a support for the iPad to serve as scenogrpahy once the story starts.
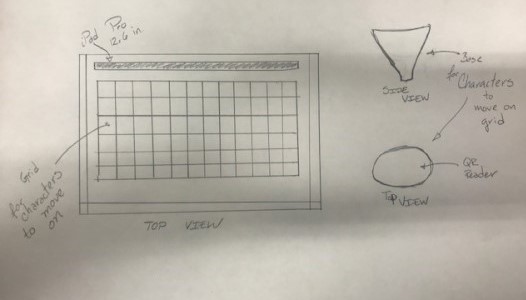
Grid
The grid will allow the characters to mve similar to a chess set, within a base that will be connected to the electronics within.
Story, scenarios and characters
- To start creating the app at the same time as the physical part of theproject I need to define which story to develop for the demo and decided on a tale I used to hear from my grandpa, making it closer to me and my history.
- The hardest part will be translating, because a lot of the fun in the story is a play with words in Spanish so hopefully I'll be able to not just translate but re-interpret it in English so you can enjoy it also.
- Choosing the story means I know which characters are in it, I'll need just to adapt it to the minimum so the interaction with the scenario can be managed.
- The app will work as a narrator and as the scenography and the whole look and feel will be based on watercolors, tying this project to another part of my history.
Final Project Model from week 3
First draft for XOOK. Model for the scenarios and first sketches of the scenography to be included in the app.
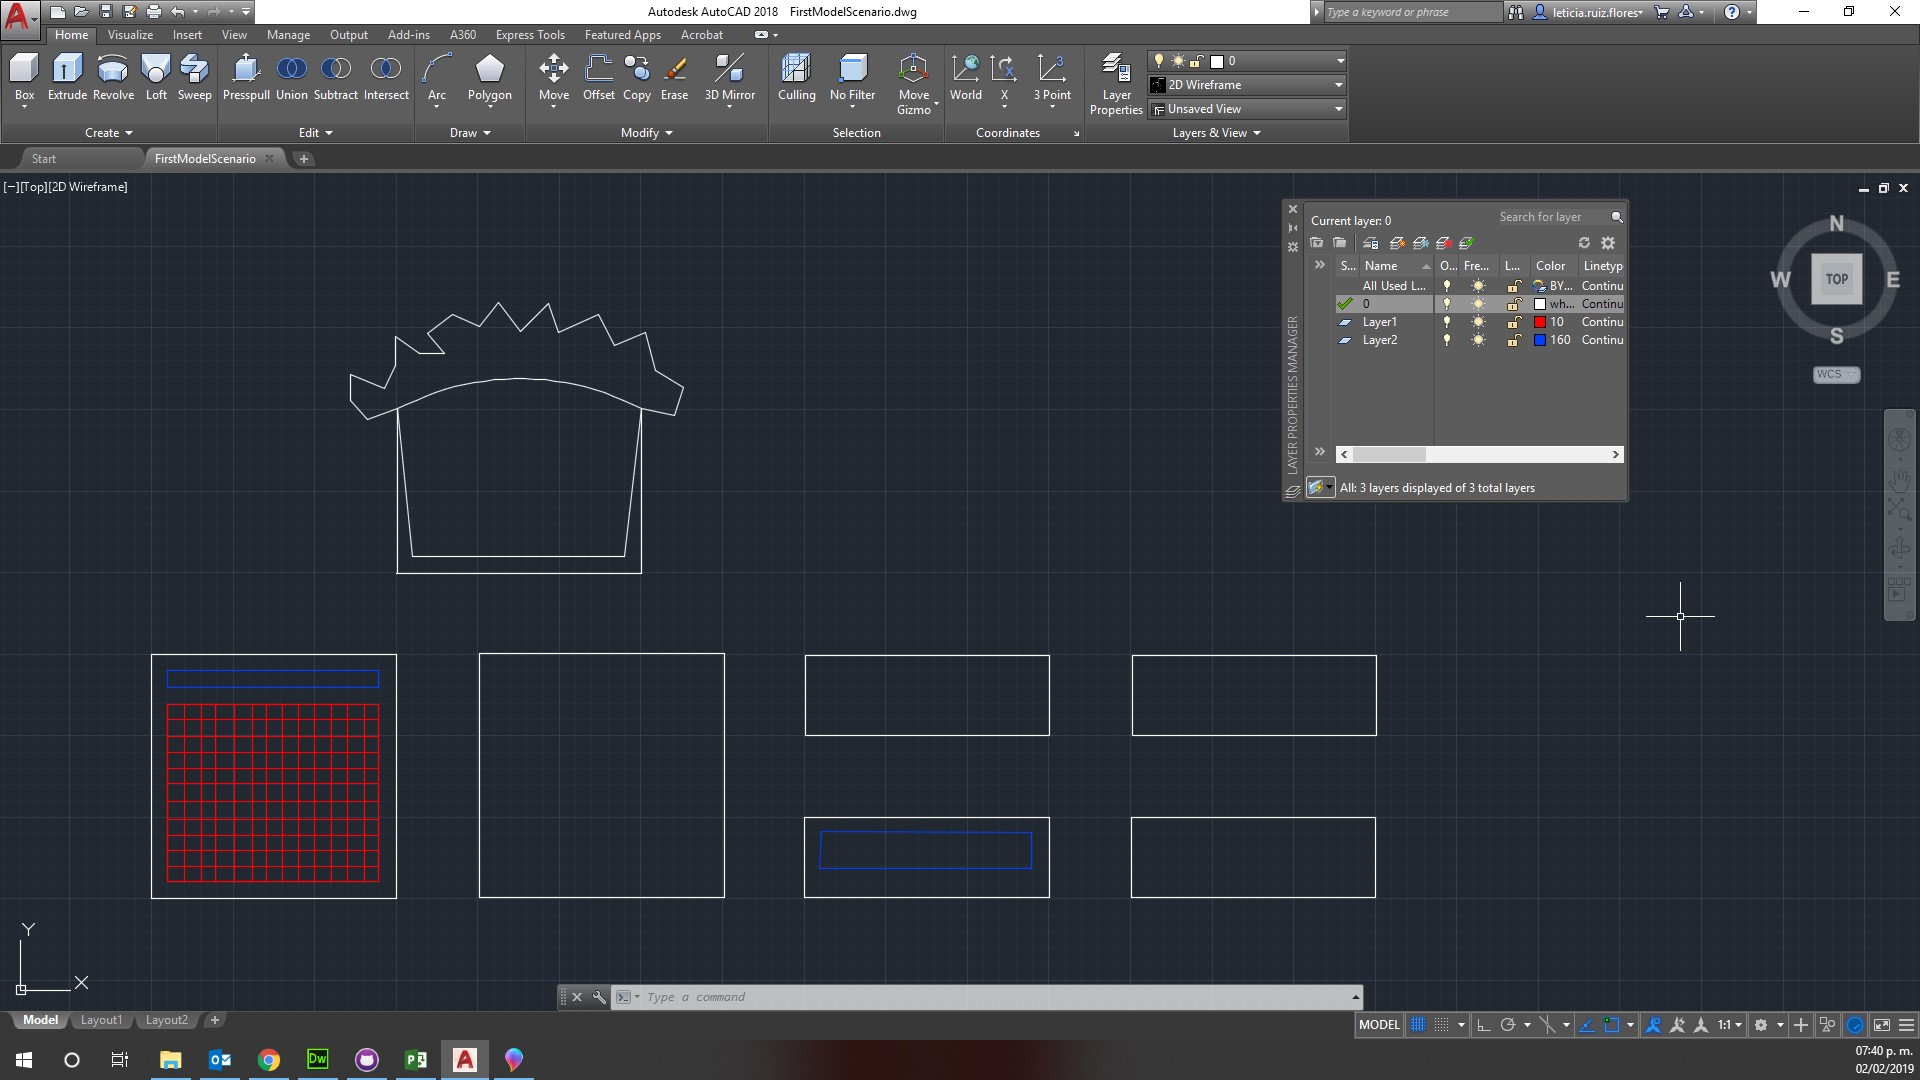
First CAD model
I made the basic parts for the scenario needed for Xook, it still needs ensambling dents and instructiosn, and probably much more organic look and feel to it. I made it in AutoCAD and I'm still not ocmfotable with the results or with the program, hopefully by the end of the month I'll have a abetter control of computer-aided modeling.

Mood Board Scenographies
Before sitting and painting each scenogrpahy I need to defne which ones are relevant for the story and become critical and which ones are going to be secondary, not an easy task at this point. I still need to decide if I'll go old school and draw and paint manually and than digitize or start directly digital, either way I need to start soon.
Mood Board Characters
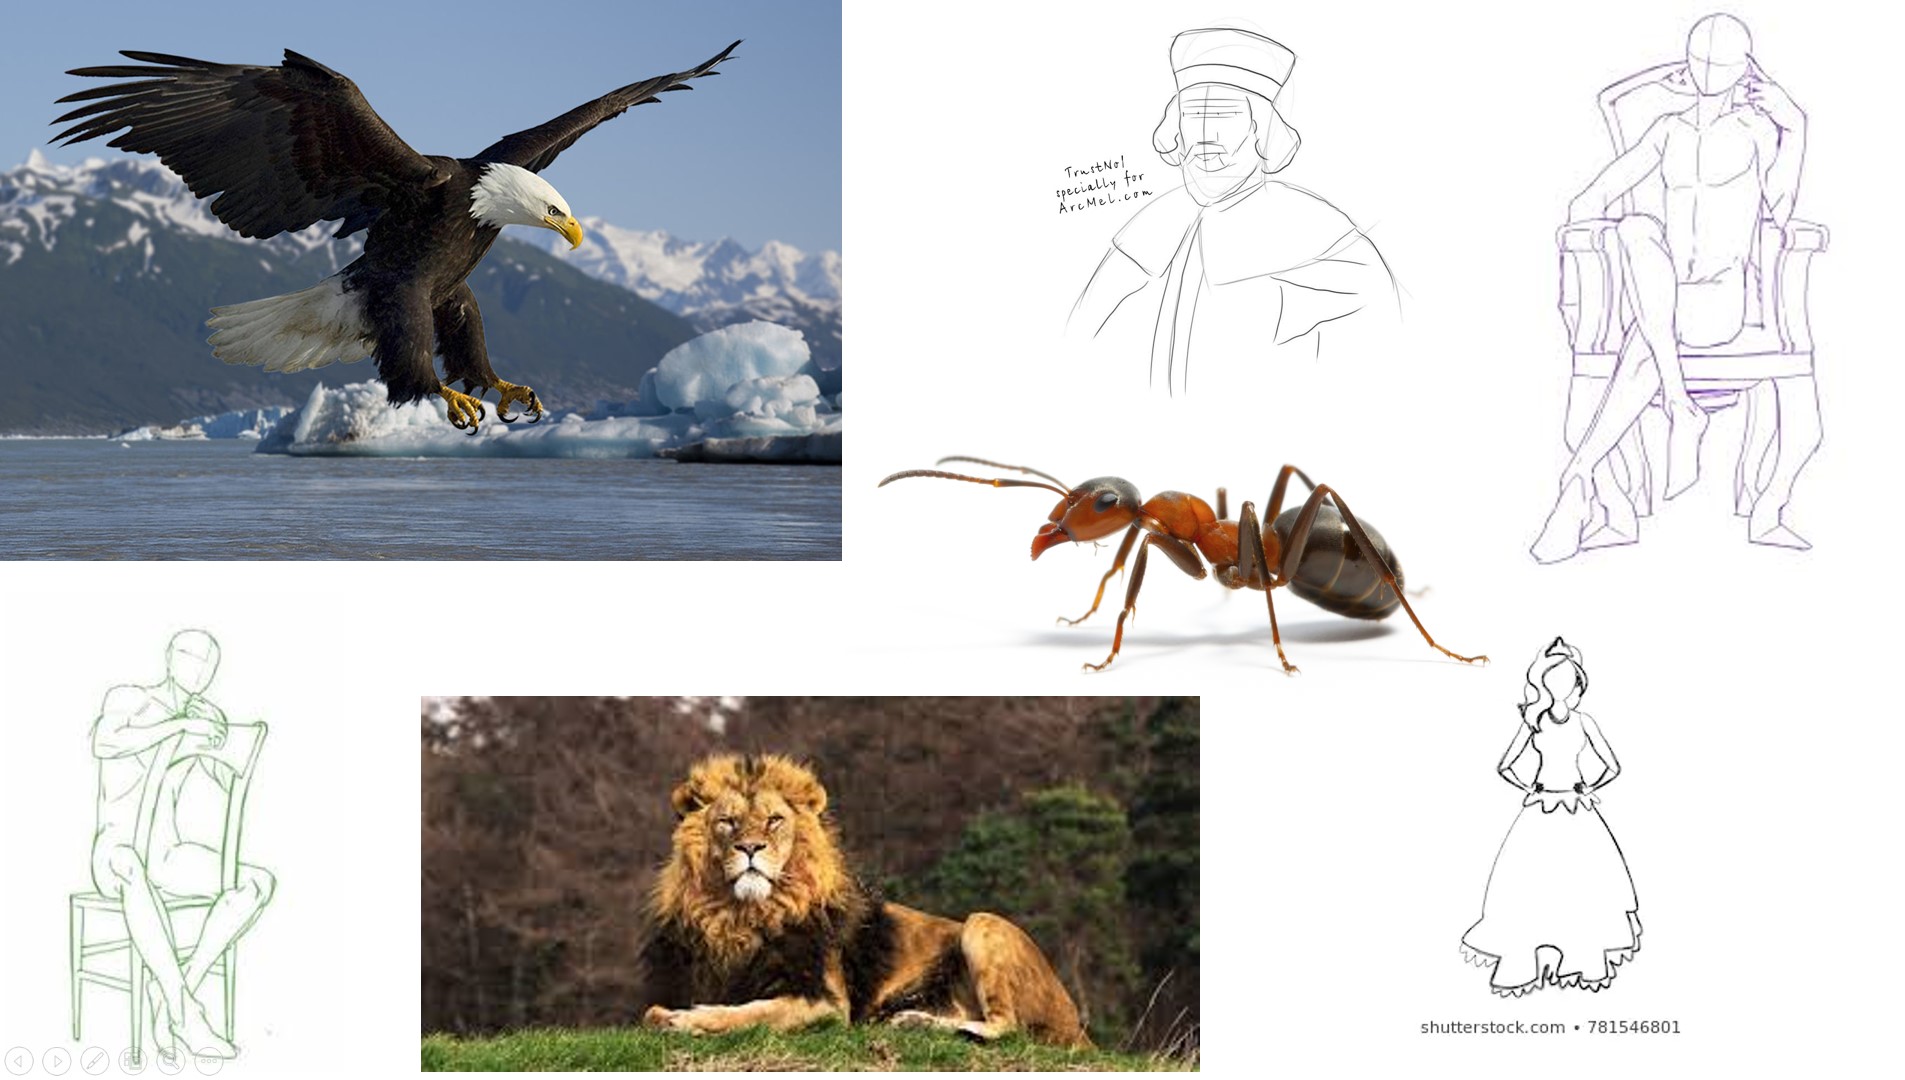
There are seven main characters, plus the children hearing the story (it's one of those break the foruth wall kind of stories), a princess, a peasant, the king, a lion, an ant and an eagle and obviously there is always a villain or it wouldn't be fun. I need to defeine if it's going to be the whole story (a bit long for a demo) or I'll shorten it to make feassible, I'll keep you in the loop either way.
Instructions
Instructions for CAD Model
- Start AutoCAD
- Create a square with constraints for parallel sides to be equal, this will be your top
- Define constraints for two sides's lengths
- Define constraints for union points
- Copy square for bottom
- Copy square for sides and make it smalle on one of the sides, about one third of side, creating a rectangle
- Make three more copies of the side rectangle
- On the top sqaure, define the ipad setting piece on the second layer
- On the top square, define a grid with rectangles on the third layer
- Copy square for scenario
- Define an angle based center
- Define something to make the top different and theatre like, it's still a work in progress
Instructions for MoodBoards
- Define the story you want to tell
- In that story, which scenarios pop to mind? A forest? a castle? the throne room? a cottage?
- Go on-line and find inspiration for the final paintings
- I pasted some of the images in a power point and saved as a jpg file to show, but you can create a pinterest board or print them and have them close when you paint
- In the story there are main characters, so choose which ones they are
- Go on-line and find inspiration for the final models (they will probably end up being 3D printing or casting and molding)
- I pasted some of the images in a power point and saved as a jpg file to show, but you can create a pinterest board or print them and have them close when you paint and/or model
Fab Academy Revised Objective
Phase One, recognize a character and tell its story through a mobile app.
The device can be used for three different segments, toddlers as a way to keep them entertained, kindergarden kids and tha first few years of elementary to help them start reading and a third segment (on a second phase) to help them learn a second language.
Base
I decided to merge all of the last few tasks into the final project to make a better use of time. The base was used for outputs also.
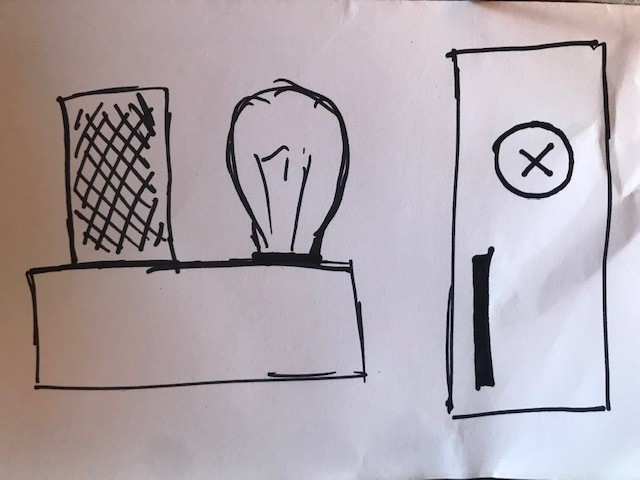
First Sketch
On the left you can see the fornt of the lamp, with a phone standing next to the light bulb, on th eright you can see it from the top.
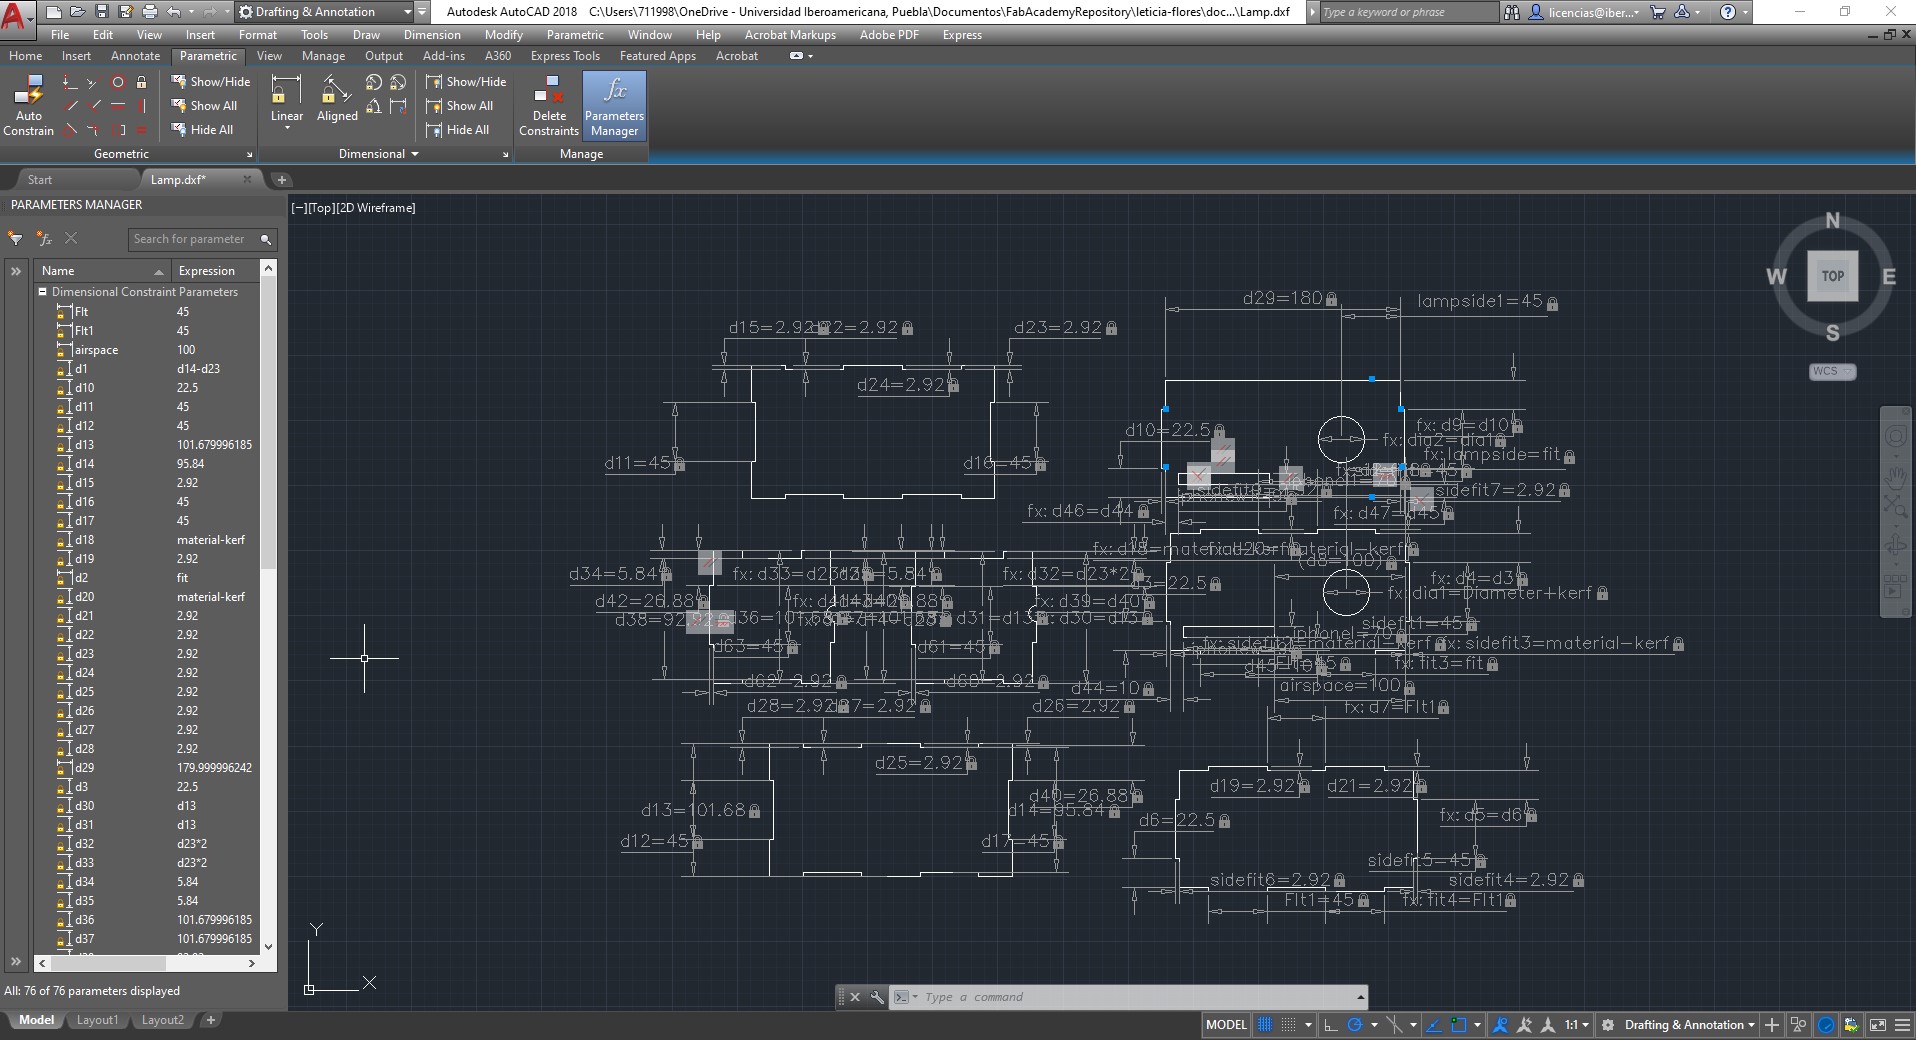
CAD
Computer Aided Design of the lamp and base designed.

Base Pieces
Lasser cutted base pieces before starting to assemble..
Assembling
At first I did not trust the press fit.
Assembling
It turned out to be just right, so assembling took a bit of force.
Base Pieces Assembled
Before closing the piece you need to guarantee that the electronics work.
Instructions
- Skecth your idea, so it willbe easier afterwards on your preferred software.
- For the base I decided to make a basic rectangle shape box, with the cut out for the bulb and spec for the cell phone to be held.
- One of the main issues in creating press fit boxes is to guarantee not only that pieces fit together but that you don't leave any gaps in the joins.
- Choose the material you'll be using. I decided to go for 3mm MDF for my first prototipe to keep costs down and put to use lasser cutting.
- Measure the socket base so you can include that measurement in your design, mine has a three centimeter diameter and so I included that into the circle that will be used as the socket holder.
- I measured my phone so it is basically delivereed for a standing iPhone 7.
- Than I decided to make 90 by 180 mm so it would fit any night table.
- Since it is aimed at kids, the rectangle box makes it more stable, I'm still defining if the bulb should have a lamp shade or not, at this point I rather have a vintage light bulb.
- Define your measurements in the CAD file, making sure it's parametric so if you decide to change materials afterwards it will be possible with minor changes.
- After your CAD file is finished convert it into DXF so it can be read by the lasser cutter software.
- Measure twice (make a mock up in the software), cut once.
- Cut and assemble.
- Before giving the finishing touches guarantee all of the electronics are working correctly, you don't want to have to break in to correct a faulty electronic component.
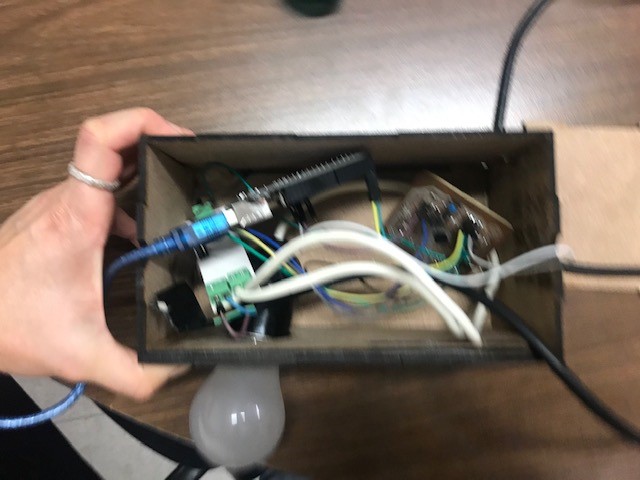
Electronics
All the electronics from inputs and outputs were reused for this project.
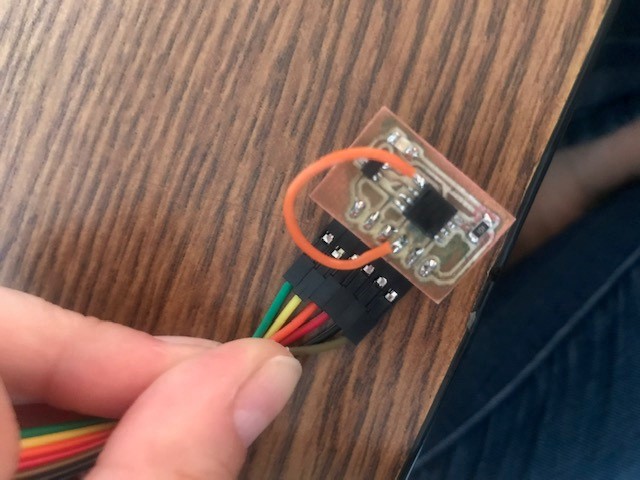
Inputs
Even after finding out I was missing a conection the PCB worked and I was able to use it to turn on the lamp with a magnet.
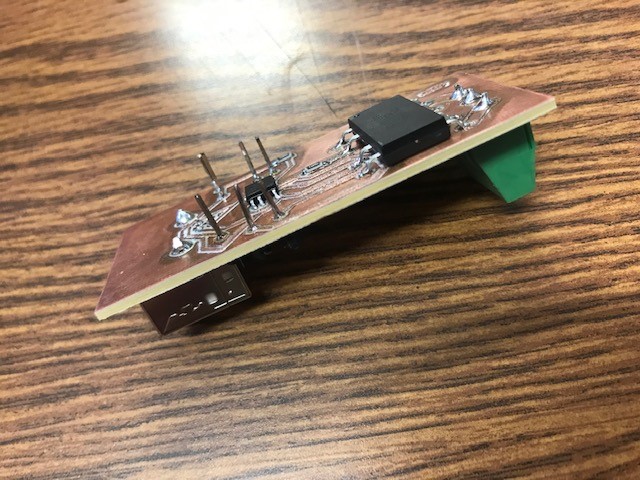
Outputs
Connected to inputs and to the app its able to trun on and off the lamp through software.
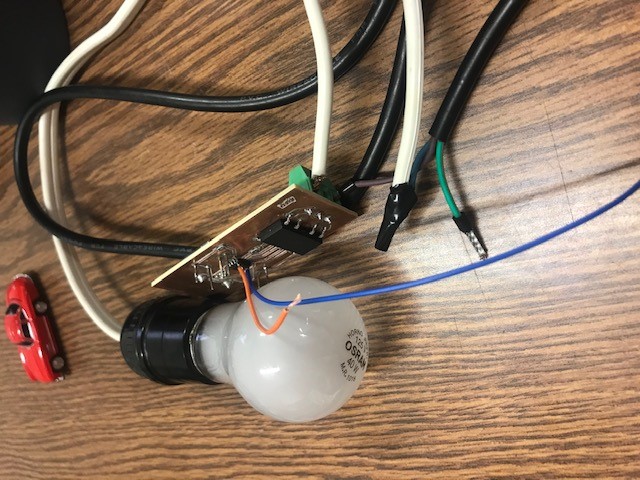
Light Bulb
Connect everything to the light socket.
Instructions
- Gurantee your INPUTS work
- Gurantee your OUTPUTS work
- Gurantee your NETWORKING and communication work
- Connect all pieces after being programmed
- Test, over and over again
Software
Part of the project includes an app that is connected to all the elctronics through bluetooth.

Instructions
- Define the technology to use, Flutter for this project.
- Install Flutter SDK on your computer as well as an IDE, I chose Android studio.
- Design your interface, include a place for configuration.
- I chose not to make it secure because there is no personal information on it, it just reads a QR Code to start a story.
- Design your scenarios and stories, they have to have the same look and feel to guarantee the user experience.
- Draw the scenarios and color them, as I've mentioned I chose to include traditional watercolor techniques to create the scenarios keeping up with mixing digital and real world.
- To make the user experience better design a logo with the same look and feel of the app.
- Include the code to read the QR Code into the app and check to see if it is lilnked adequately to each story.
- Connect your app to your electronics so it actually starts and stops with the lamp concept, for that you'll need a wifi or a bluetooth connection.
- The final code is on a the https://github.com/lettyrf/xook
- For bluetooth connection, since we didn´t have a low density bluetooth connector at the office I decided to make the connection just for android.
- It's important from the start that we should set the same baud rate on the PCB and on the Bluetooth module’s side
- Establishing a connection is based on the client-server model. The server creates a server socket which waits for incoming connection requests, then the client creates a client socket which sends a connection request to the server.
- To avoid memory leaks, we should close our connection socket when we leave the screen with the onPause method
- I found a page that reviews how to include audio assets into Flutter apps that plays bothon iOS and Android devices. Check it out.
Characters & Stories
The characters were chosen based on MExican Culture, since each story is really short to tell a full tale I decided to go with the basics of each legend. To identify the characters the easiest way to be able to play with different materials was to make a base with a QR Code that could be read by the app.
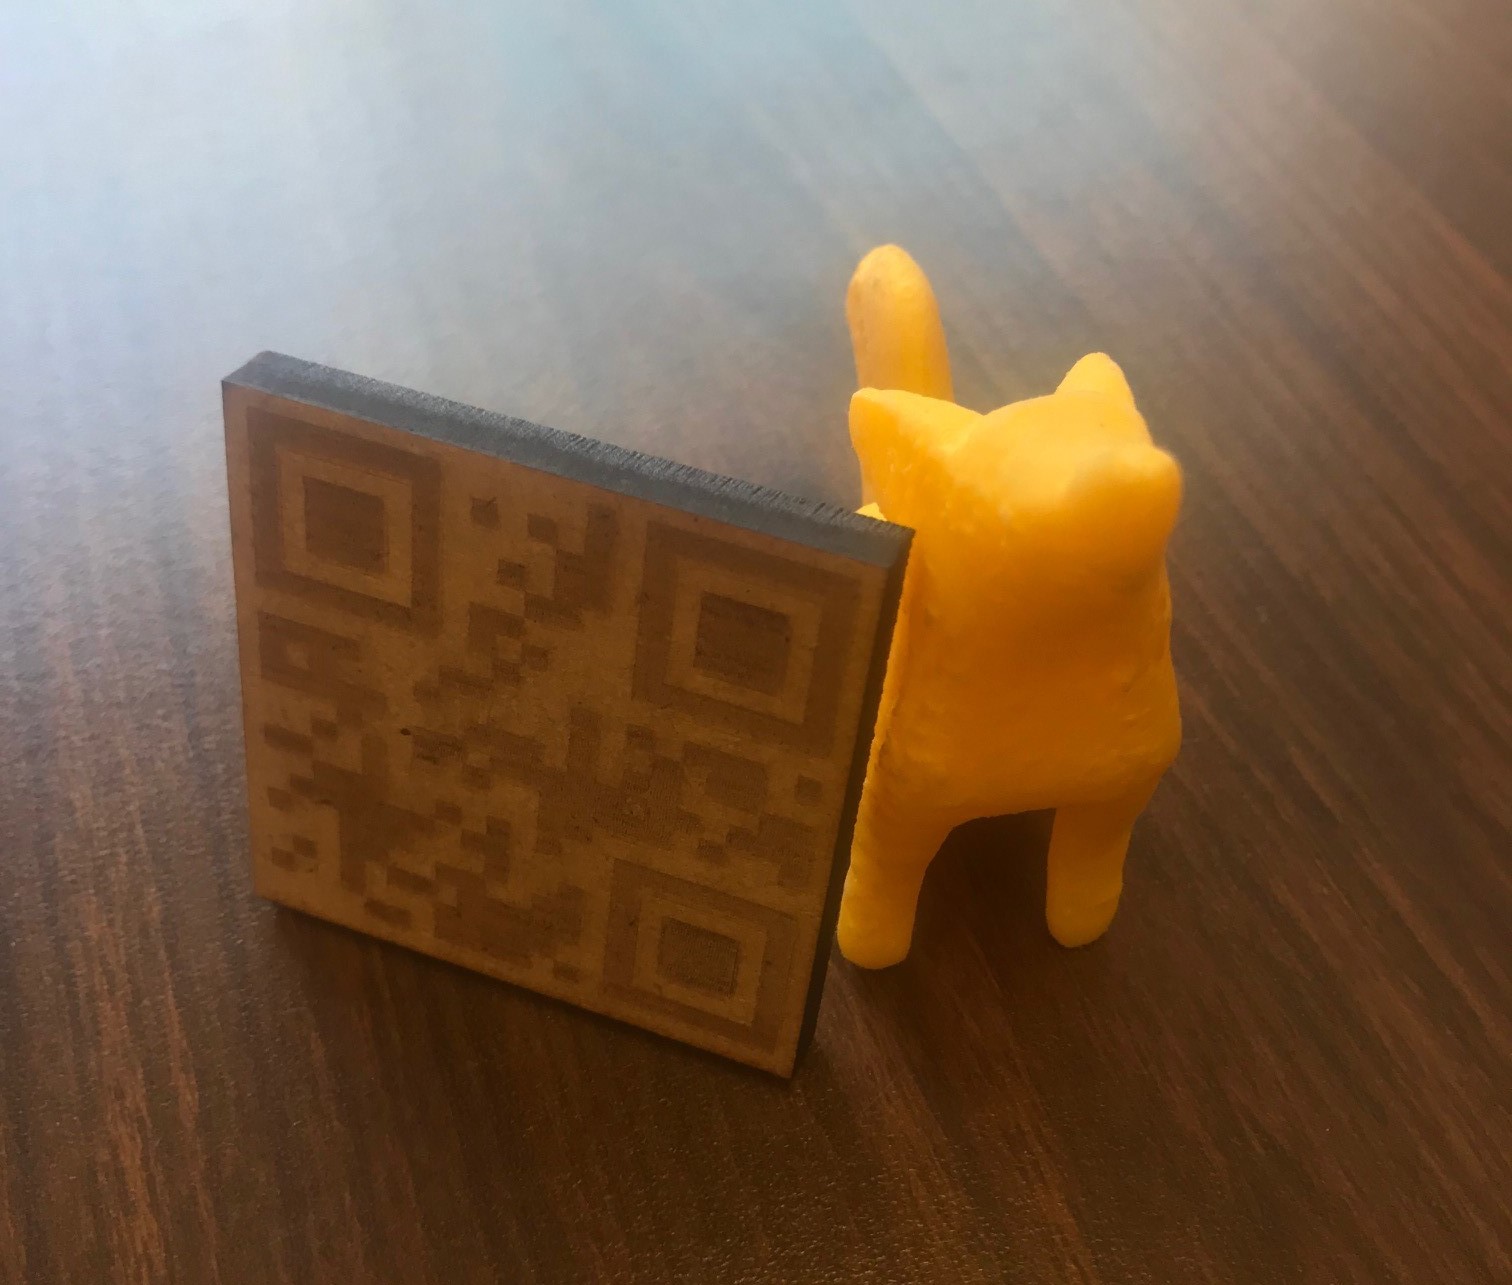
3D Printed Xoloizcuintle
I decided to reuse the piece I scanned and printed for my final project as one of the characters that will tell a story through the app.
QR Code
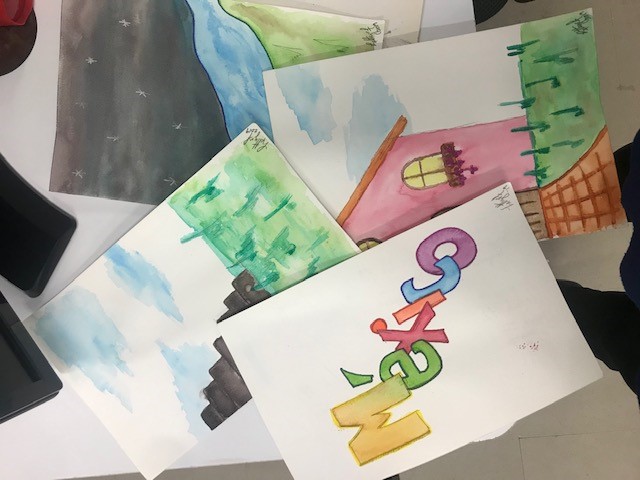
To identifyt each character I'll use a QR Code, this one returns the word "XOLO".
Scenarios
For the story's scenarios I made watercolors to depict each scene represented. For Xolo I included a pyramid, a river and a house.

Catrina
To symbolize Catrina I used a piece from home, that was originally made with molding and casting (not by me, it was a gift).

QR Code
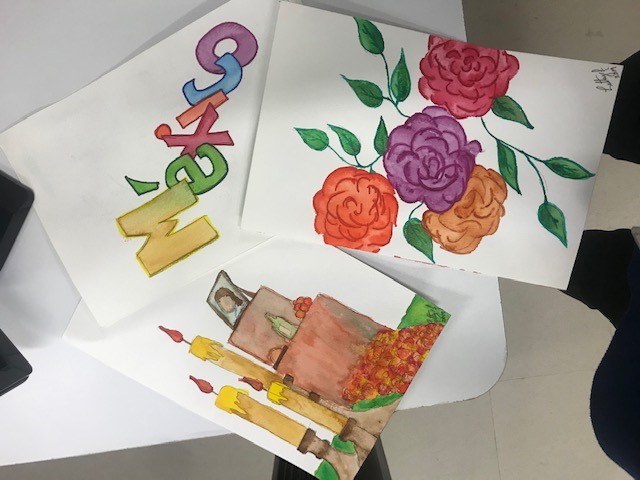
To identify each character I'll use a QR Code, this one returns the word "Catrina".
Scenarios
For the story's scenarios I made watercolors to depict each scene represented. For Catrina I included flowers and a typical altar.
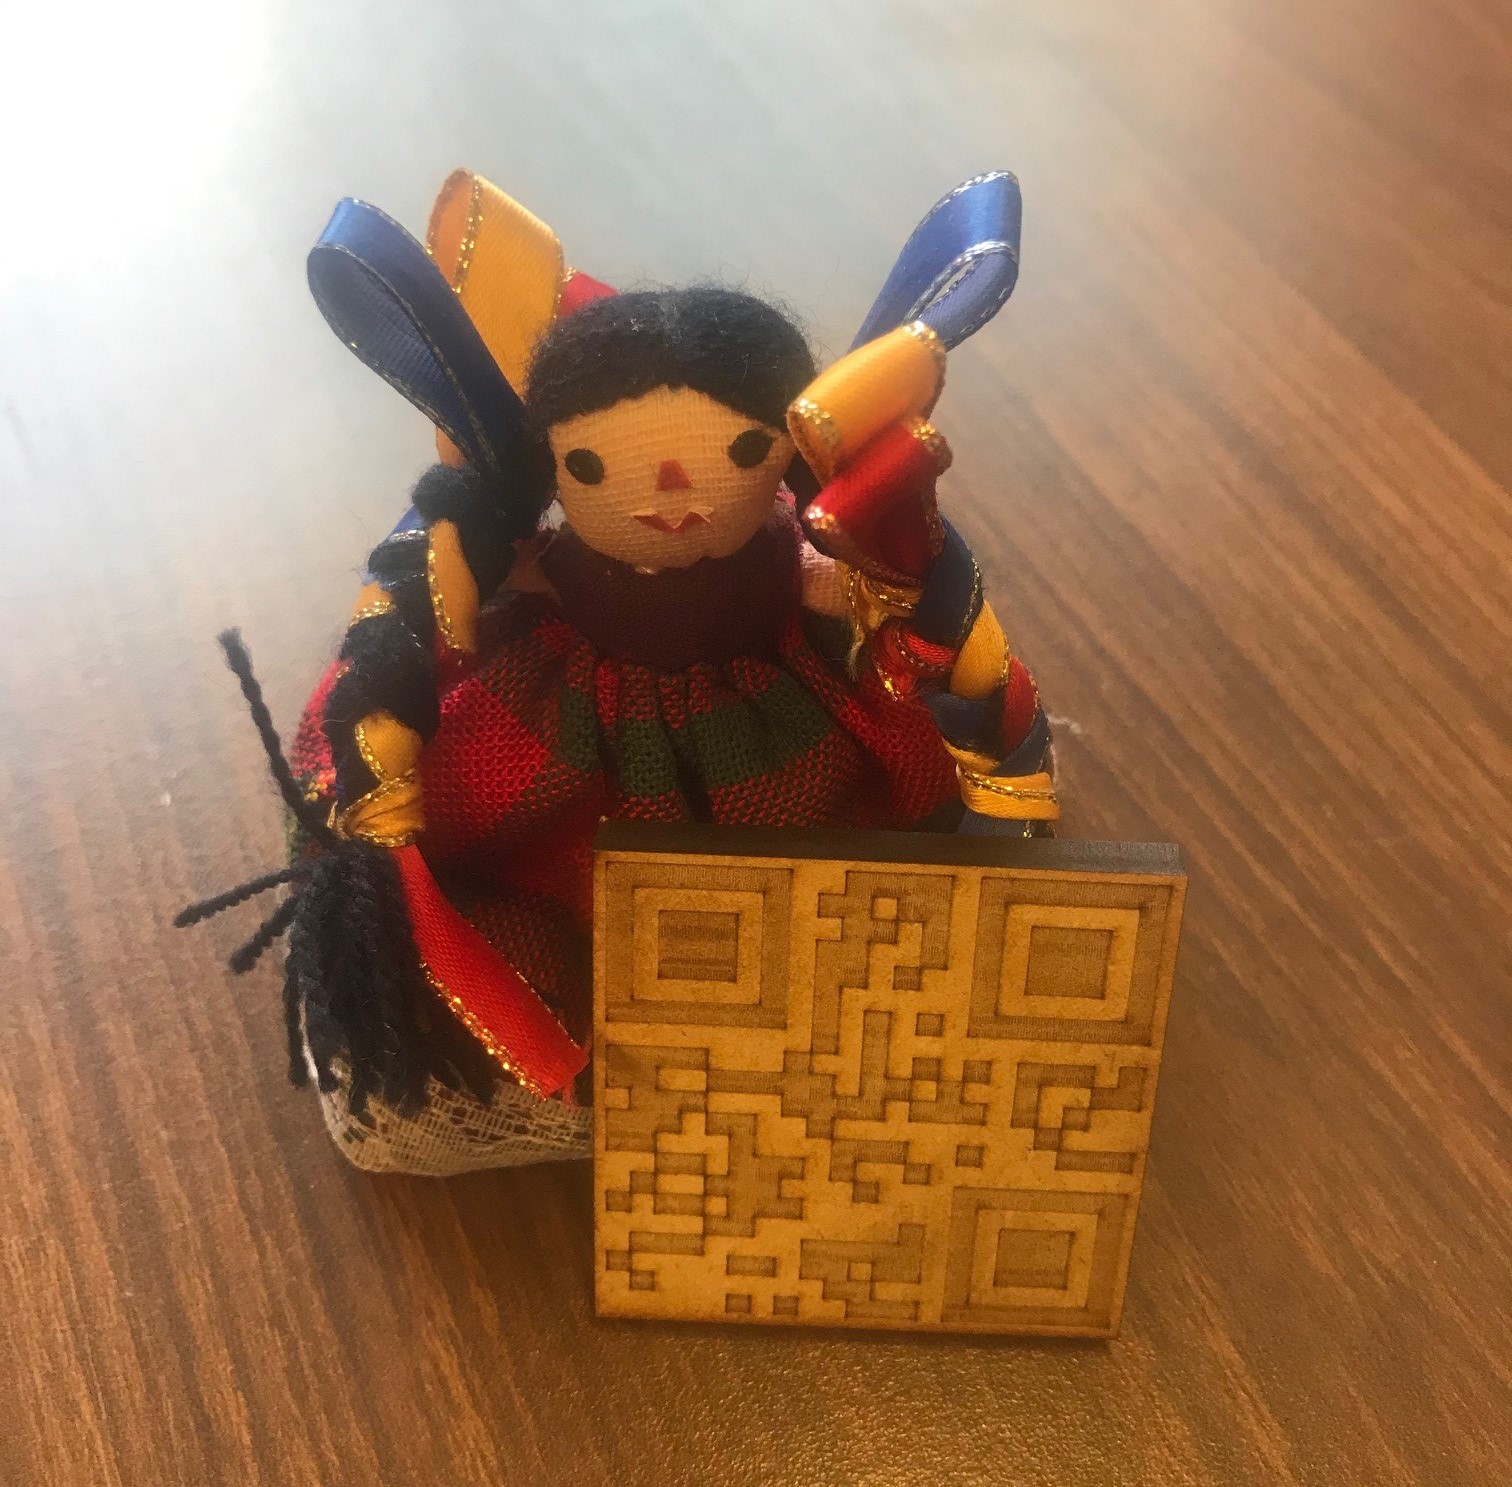
María
For María I used one of this small dolls, the one that I keep at the office at all times.

QR Code
To identify each character I'll use a QR Code, this one returns the word "María".

Scenarios
For the story's scenarios I made watercolors to depict each scene represented. For María I painted a field, a basket full of flowers and María ribbon crown.
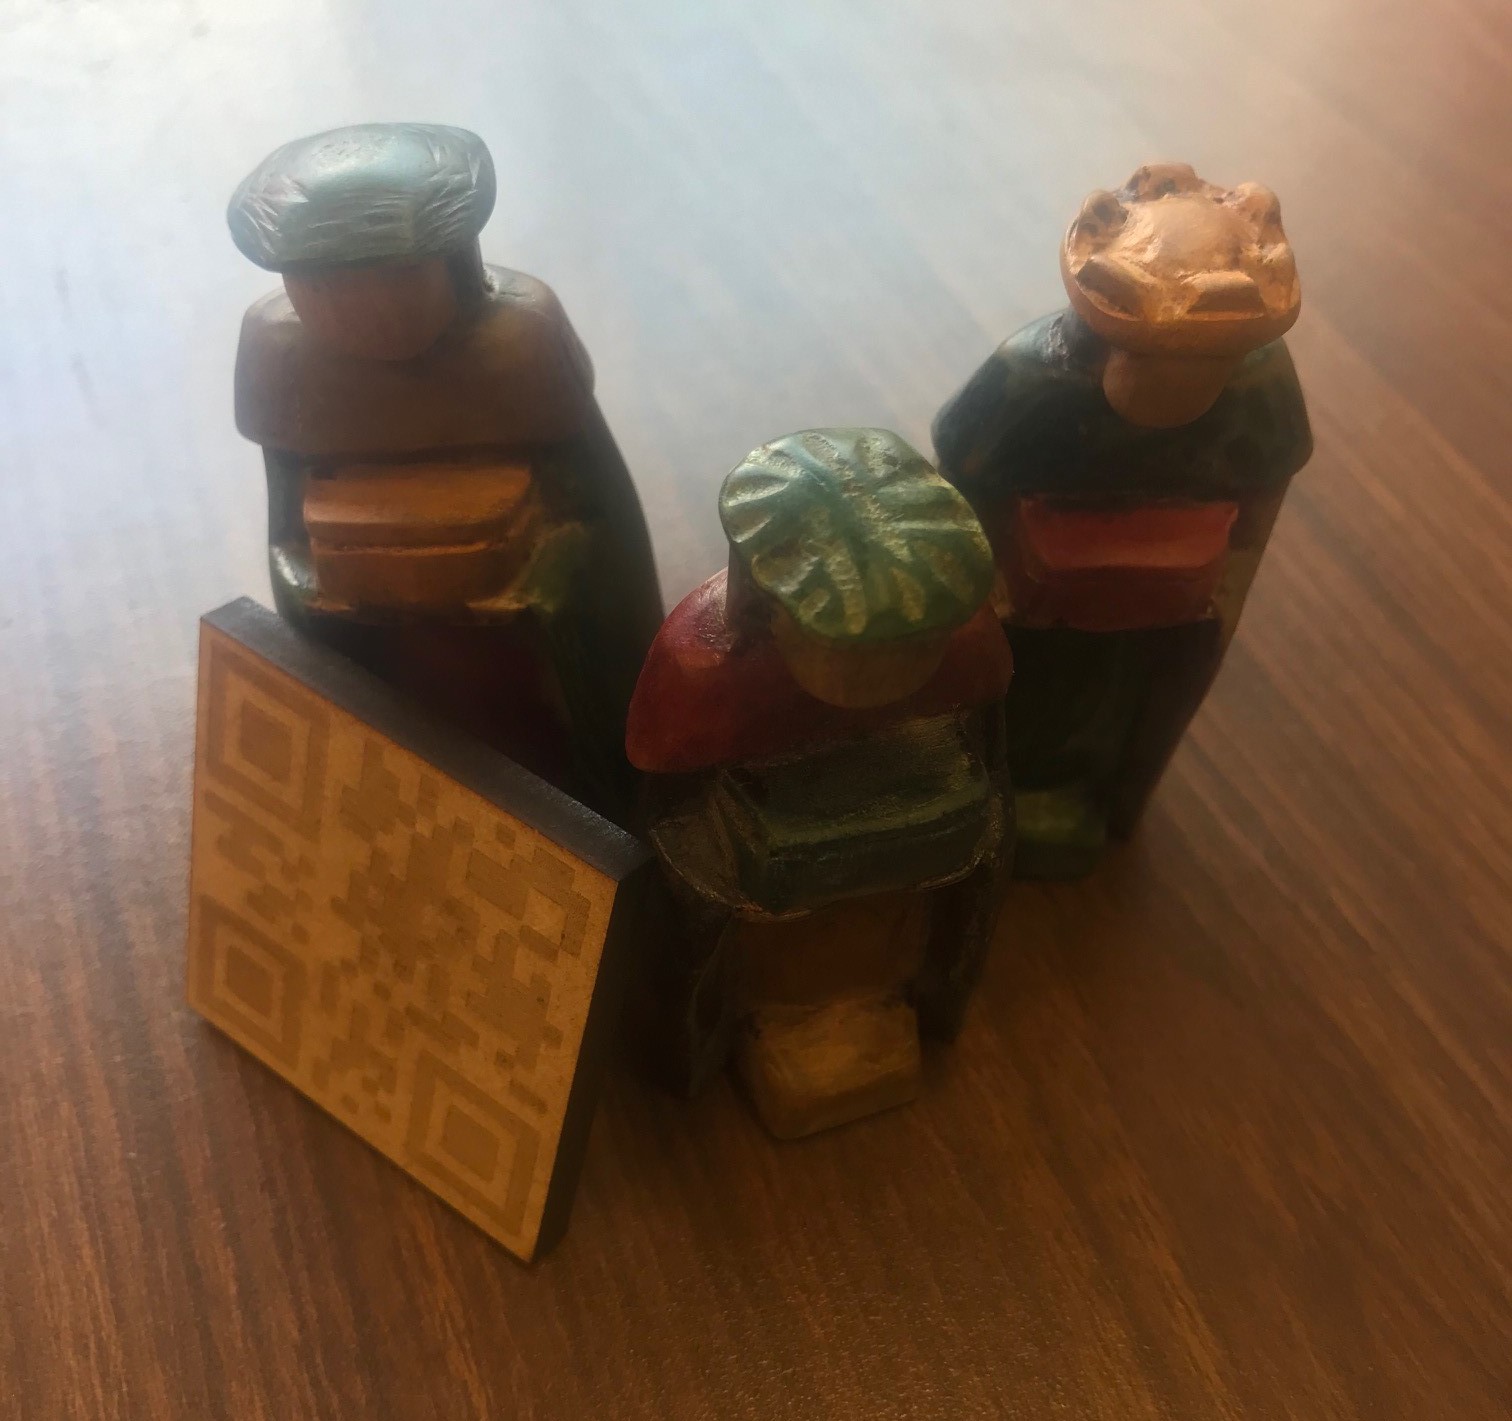
Three Wise Men
.

QR Code
To identify each character I'll use a QR Code, this one returns the word "Reyes".
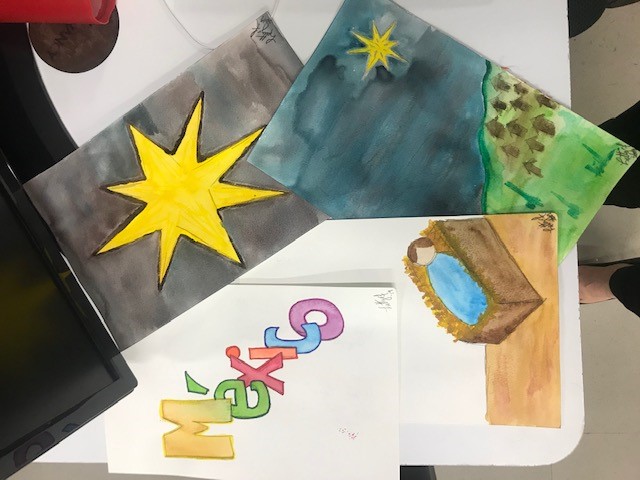
Scenarios
For the story's scenarios I made watercolors to depict each scene represented. For the Wise Men there is a starry sky, a bright star and a baby in a manger.
Instructions
- The first character is A Xoloitzcuintle, which is a mexican dog breed that is said to guide the dead into the other world.
- The story for Xolo:
- The leyend says that it was created from a spllint of the bone of life as a gift to humans.
- It was explained to humans that they should take care of the dog, because once they passed the Xoloitzcuintle would be in charge of guiding they're soul into the world of the dead.
- If a Xolo has spots it is said that it has already helped some other human into the other world.
- They also are said to protect homes from evil spirits and to have healing powers.
- To make it, I 3D scanned an albrije that is shaped as a Xoloitzcuintle and than I printed it and than set it on a MDF base.
- For more information on this process please go to Week 6 3D scanning and printing.
- To create the QR Code I usedthe free QR Code generator at QR Code Generator which allows you to download your QR code in JPG as well as other formats.
- The second character is a Catrina, which is a mexican cartoon of Lady Dead.
- The story for Catrina:
- Created by the cartoonist José Guadalupe Posada.
- It was originally used to depict people who ere ashames of their roots and dressed in French fashion isntead of simpler local clothing.
- It has been depicted in several murals by differetn artists and xcurrently is used as symbol of the day of the dead when our deceased loved ones come to visit.
- The Catrina is viewed as someone that enjoyed life and its skull reminds us we need to live in the here and now.
- To represent it I chose a Catrina that was given to me as a gift a few years back set on a MDF base.
- To create the QR Code I used the free QR Code generator at QR Code Generator which allows you to download your QR code in JPG as well as other formats.
- The third character is a Mexican Ragged Doll called María.
- The story for María:
- Made with rags and colorful ribbons.
- It's a traditional toy for girls in the center region of México, dressed in typical attire.
- Made originally by Mazahua people as an economic and traditional alternative to brand toys.
- María is called like that because it is the name given to the people that made them and sold them.
- Symbolizes the colors and happiness of the Mexican People.
- To represent it I chose a small traditional María doll set on a MDF base.
- To create the QR Code I usedthe free QR Code generator at QR Code Generator which allows you to download your QR code in JPG as well as other formats.
- The fourth character is a group, the Three Wise Men.
- The story for the Three Wise Men:
- Characters from the Catholic tradition
- The story says they all a star that moved them to follow the and meet the new born.
- They are all from different ethnicities and nationalities
- They found each other and arrived with gifts for the new born.
- To represent it I chose a small traditional wood set of three wise men set on a MDF base.
- To create the QR Code I used the free QR Code generator at QR Code Generator which allows you to download your QR code in JPG as well as other formats.
Final Product
Inside
All electronic components fit inside the box.
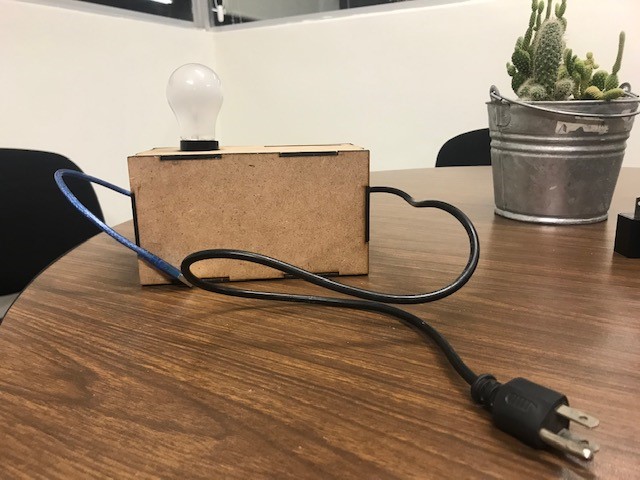
Lamp
The box without a cell phone set on it.
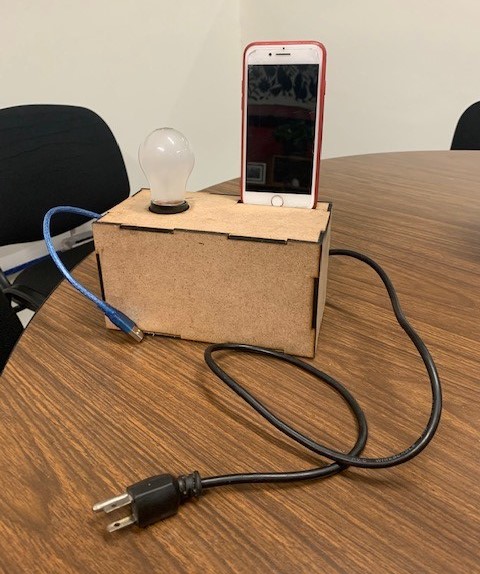
Lamp + Cell
The cellphone fits nicely.
Summary Video
Documents
My two cents
Through all of this process in Fab Academy I learned a couple of things that were not necessarily in the schedule but they are absolutely necessary in life.
- It's ok to make mistakes.
- In order to learn you need to fail.
- If you need help with something, ask, someone will aid you.
- You really don't need to know everything.
- Taking pictures it's not enough, you need to take notes, lots of them.
- Guard your notes, I lost my notebook and ended up having to rely on memory for some things.
- Document as you go, directly onyour web page.
- Sometimes good enough is exactly that: enough, you don't need perfect.
- Going through it with friends makes it much easier and enjoyable.
- If you enjoy the process the outcome comes.
- Having a full time job, teaching classes, maintaining your health, having a social life and on top of everything taking Fab Academy is difficult.
- Last but not least, and this I knew this since my bachelor's degree: I really don't like electronics.
Week 20 Update
- What tasks have been completed, and what tasks remain?
- The lamp is finished, some painting will be nice for a better look, as well as including a lamp shade.
- I would love to include longer stories on different phase.
- For my original idea it needs to allow for different languages, for Fab Academy's purpose it's only in English for short stories.
- What has worked?
- Using Flutter as the base worked marvels.
- Staying true to what I wanted to provide regardless of the technical diffculties with a full time job probed to be difficult but worth it.
- What hasn’t?
- Connecting the lamp via bluetooth and syncing the sound with the images using only flutter complicated things so I had to switch to native coding for those particular functionalities.
- What questions need to be resolved?
- How to use Flutter with sound syncing that works for both android and iOS.
- Is it worth going for the next phase? When I first started apps that told a story (like a narrated comic book) were few and scattered by now they have evolved and are new ones almost every week with full comic books, original stories and classic fairytales for both children and adults.
- What will happen when?
- The light bulb lights up when the story starts via bluetooth and turns off when the story finishes.
- The images change after each audio is finished, emulating someone reading a book and passing pages from it, to provide a unique experience for children.
- What have you learned?
- When developing an app time is of the essence.
- This ended being a great academic experience including a lot of what I learned through the 20 weeks that took for us to finish Fab Academy but I won't be pursuing this particular project further.
- If you are going to use new technologies try something that is extensely documented with a well known community that helps out, for example that happened with flultter even if it's still under development its ocmmunity is really helpful.
- Even if I think I have everything documented I still have problems with stating the obvious (some things for me are not worth documenting and for this proces is really important that you document every step of the way).
- It doesn't matter how many times you read your work somedaby will find an error or something you missed at first look.