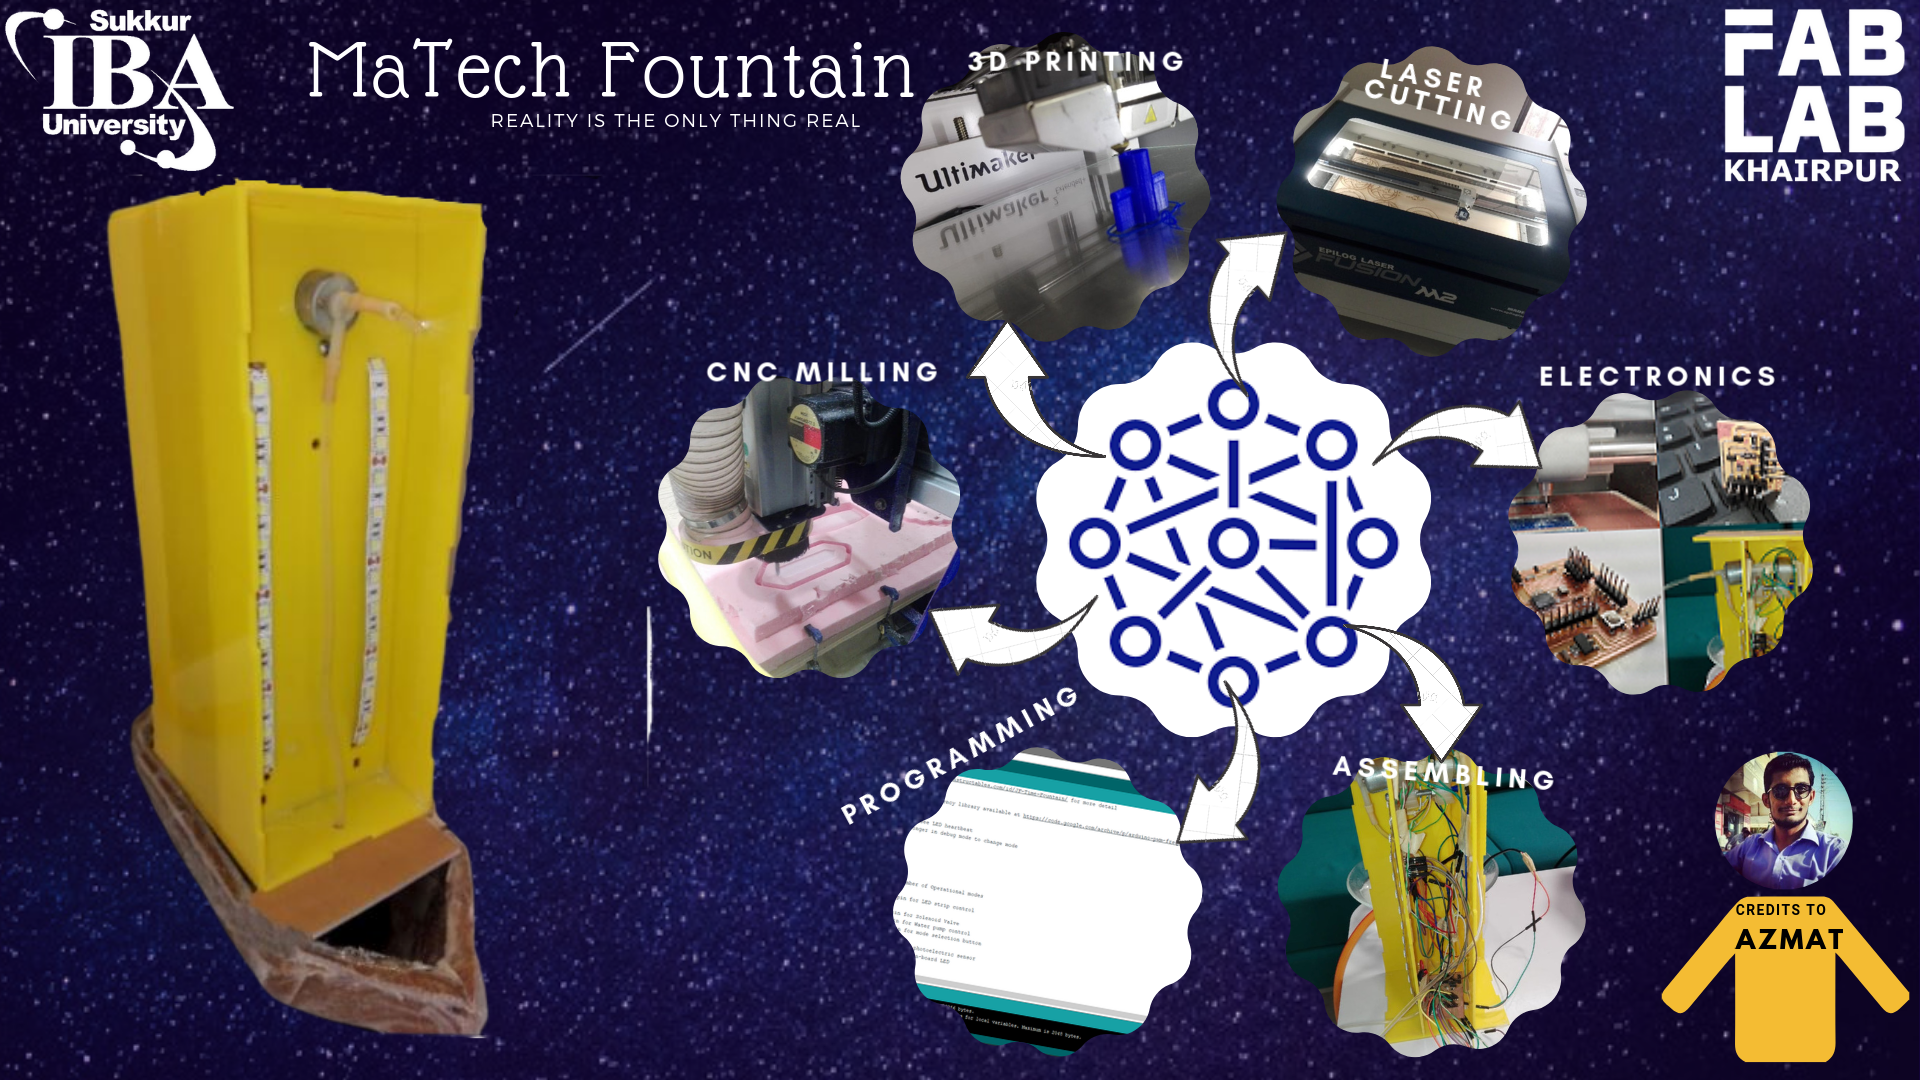
Poster
Poster
Video
Video
As for my final project i planned to make something that exploits time and hits human default perception. To do so i decided to make an illusive water fountain that demonstrates water droplets in discrete out of a continuous water, levitaing in mid air and even go against the inflow. Though initially thought of it being a pretty straight forward idea to implment as i had to exploit time/frequency alone, but believe me that is not the case. Electronics here is very very tricky.
Electronics
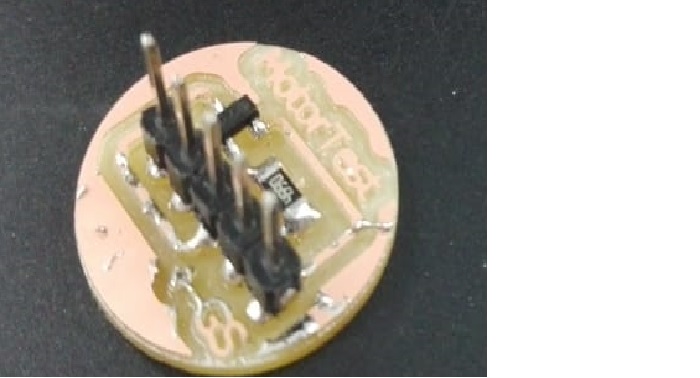
I started with the core part, electronics. I first designed a PCB in output week as shown below to control the water pump initially and then 12V highly bright LEDs.
Here it is..
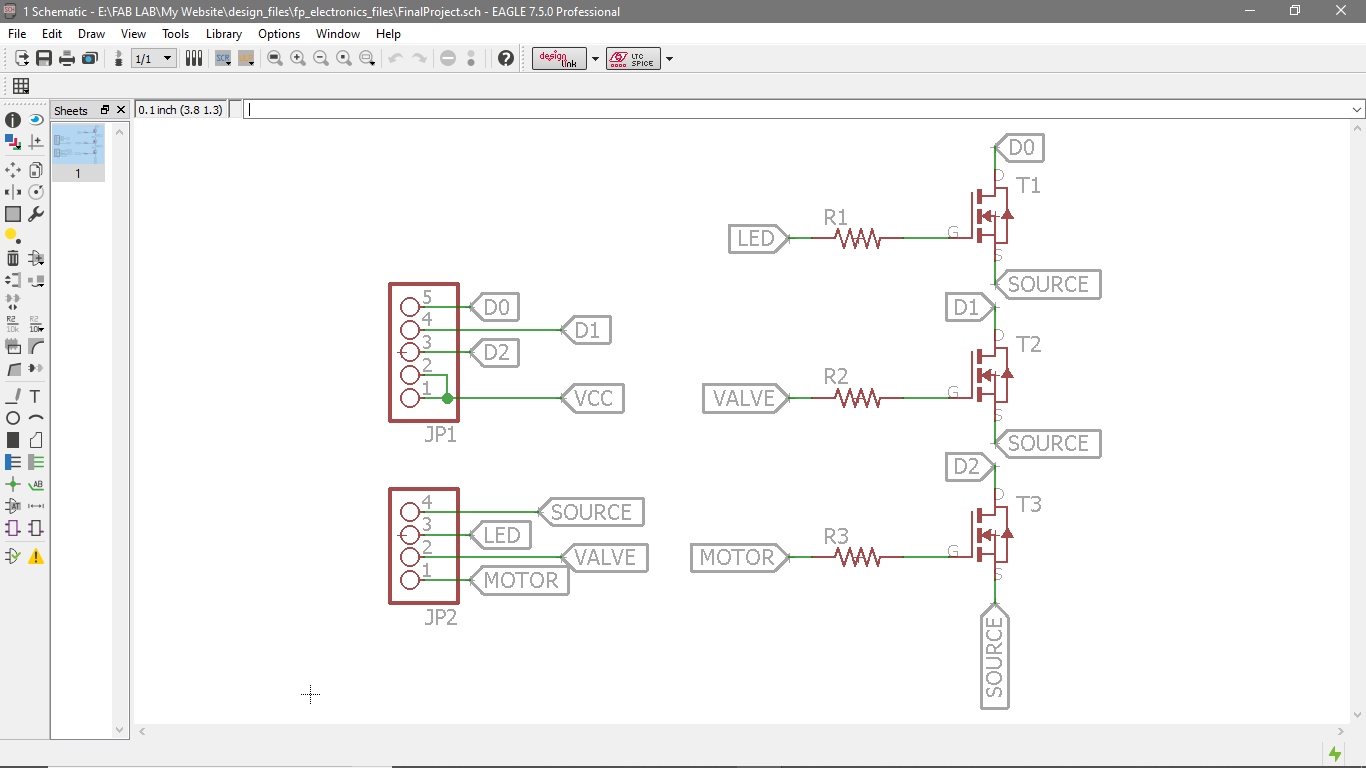
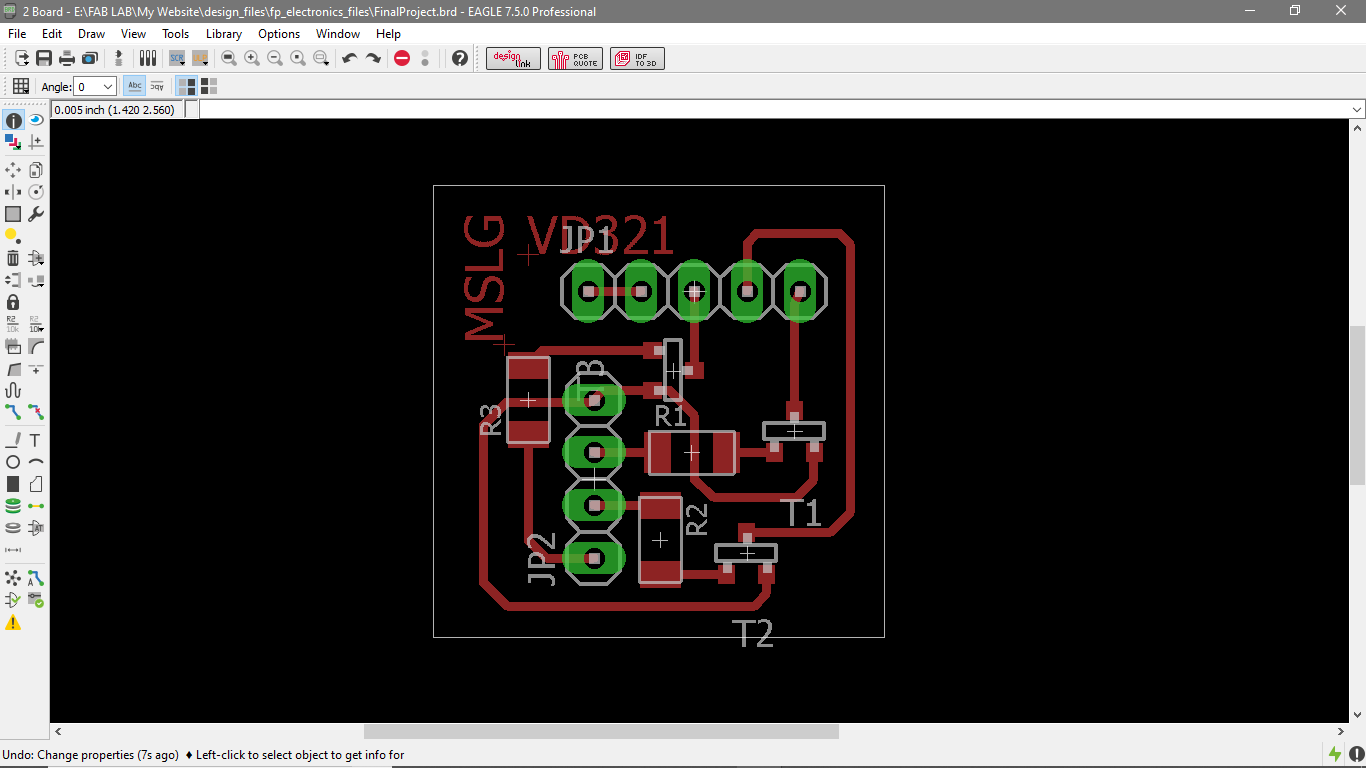
Summing up this initial electronics PCB work i scaled up above PCB to control 3 devices using only one PCB, as i had to control multiple things like leds, motor, and solenoid.
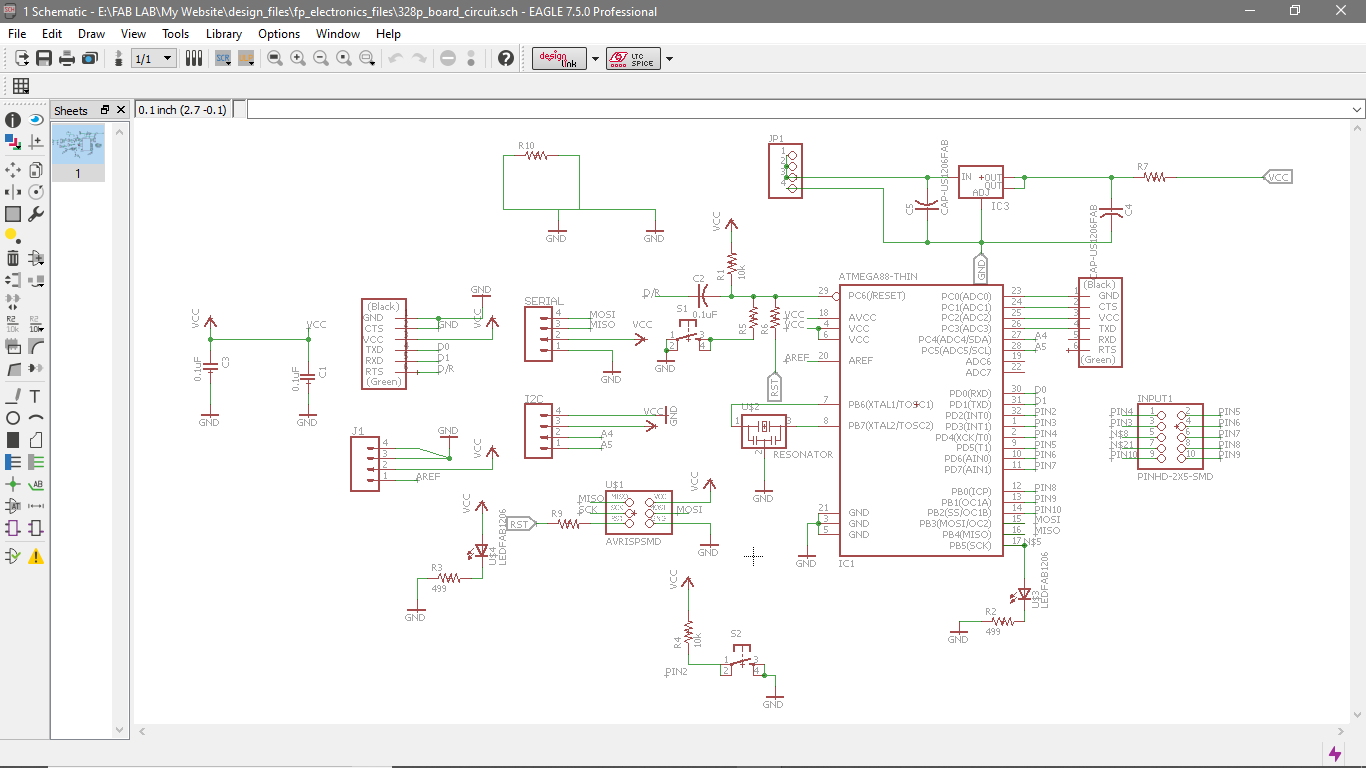
I first made the schematic with 3 n-channel mosfets as following.
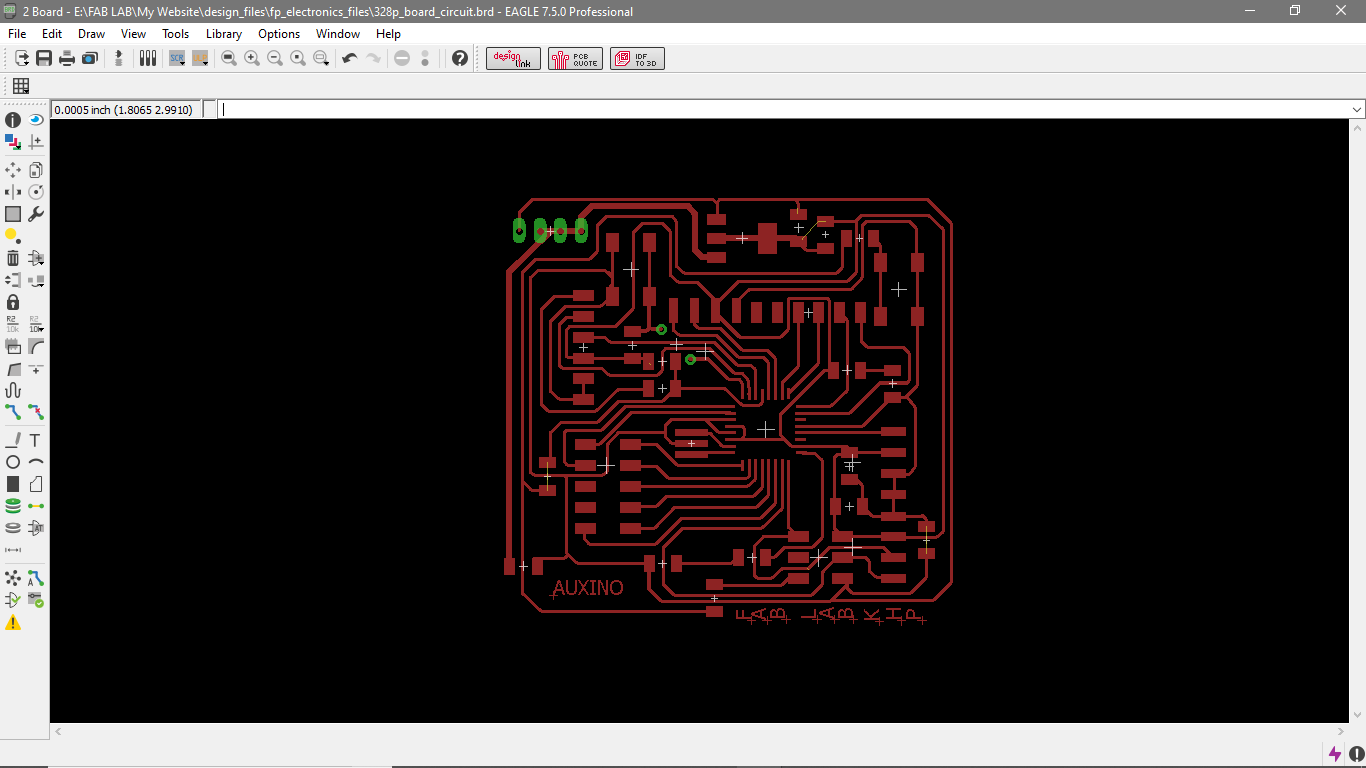
 Routed it,
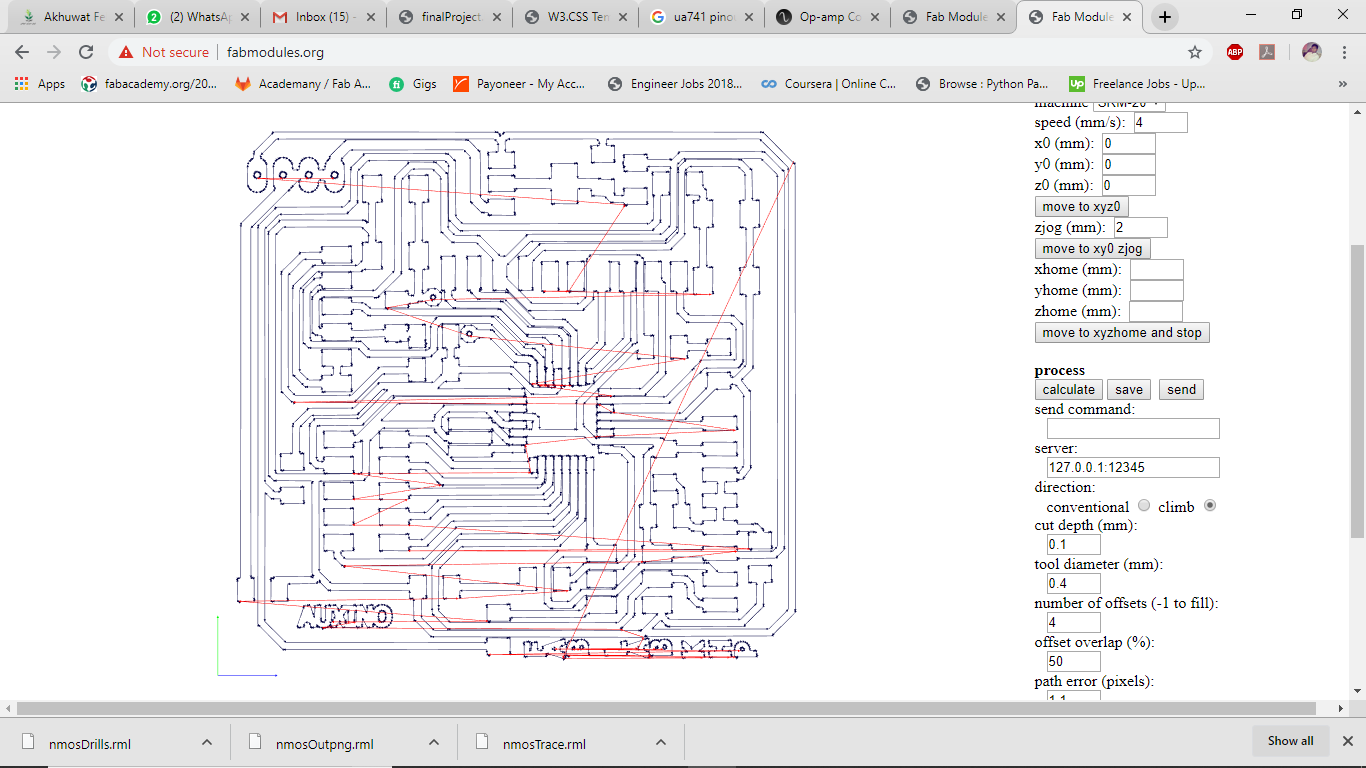
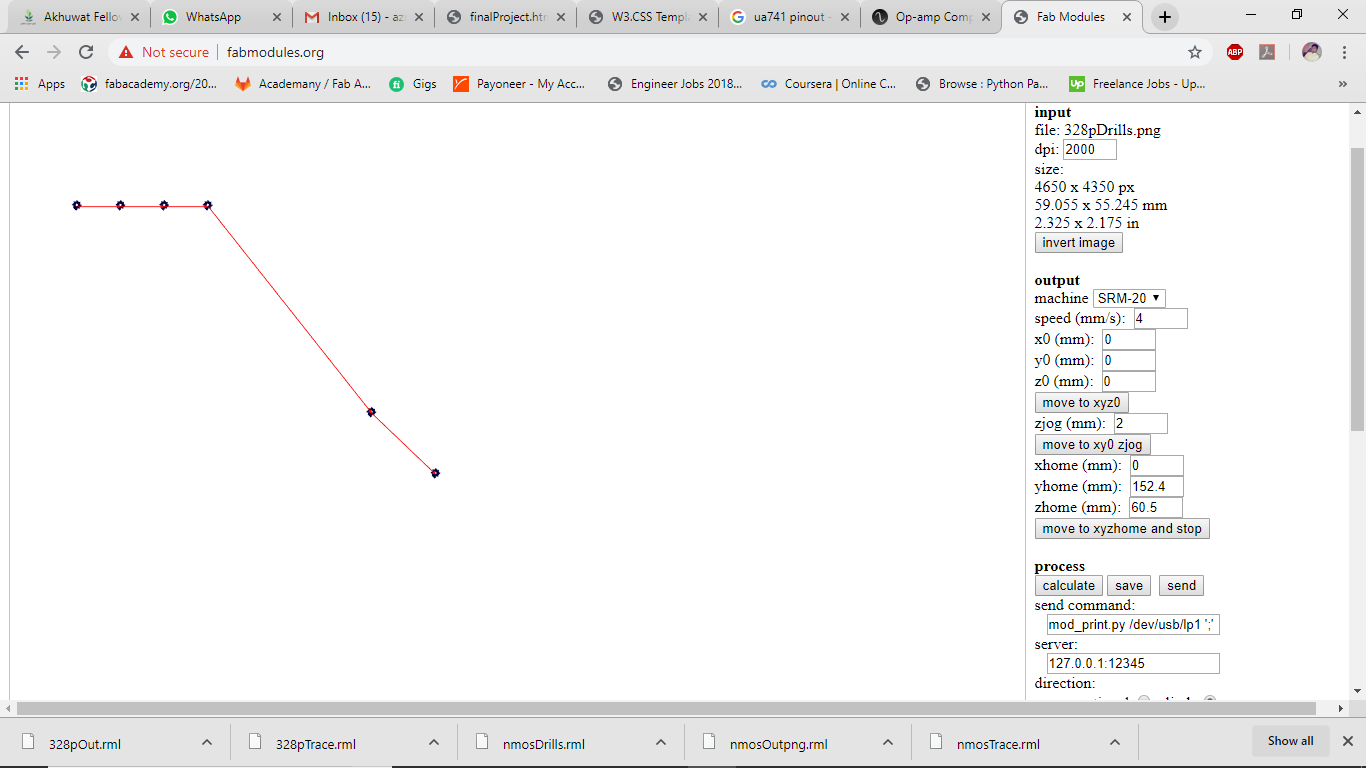
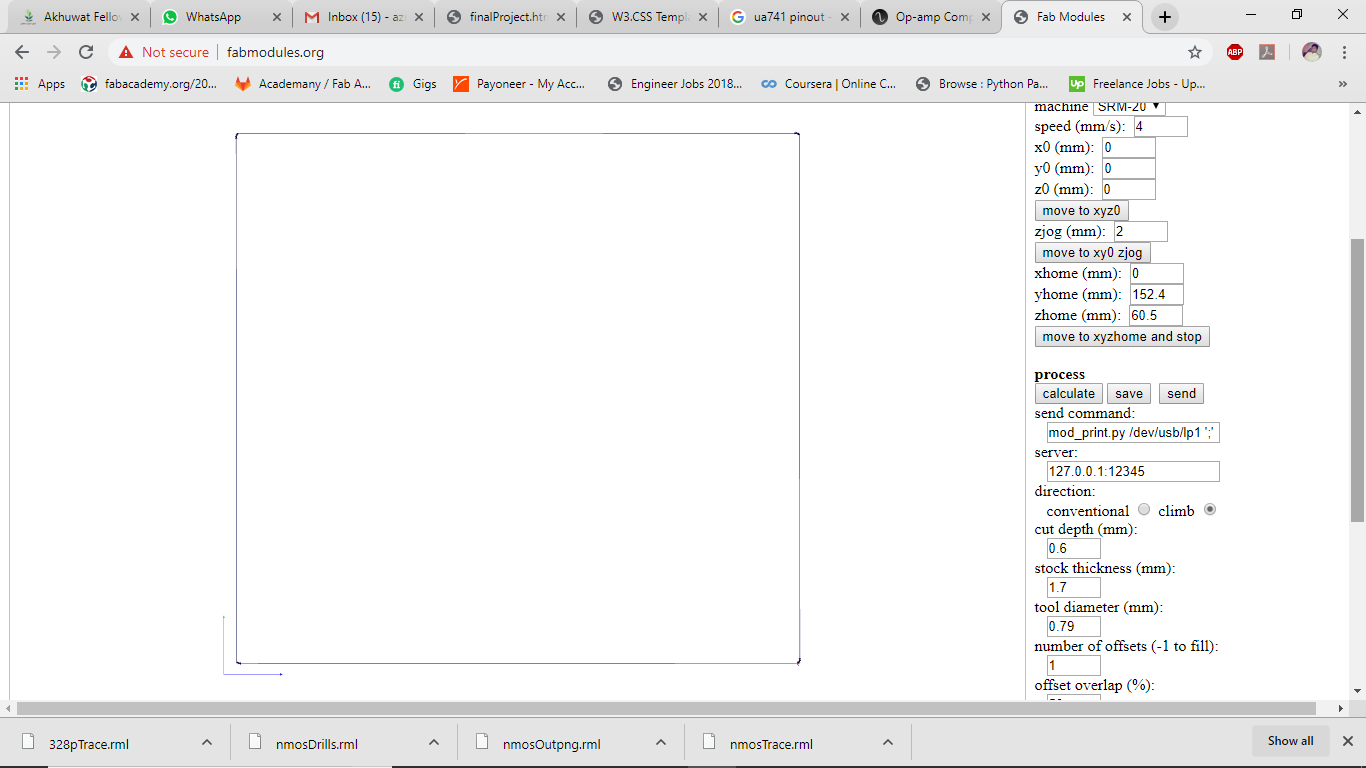
 Next i went on to make these design files machinable. To do so i went to fabmodules.org and generated rml files as shown below.
Traces
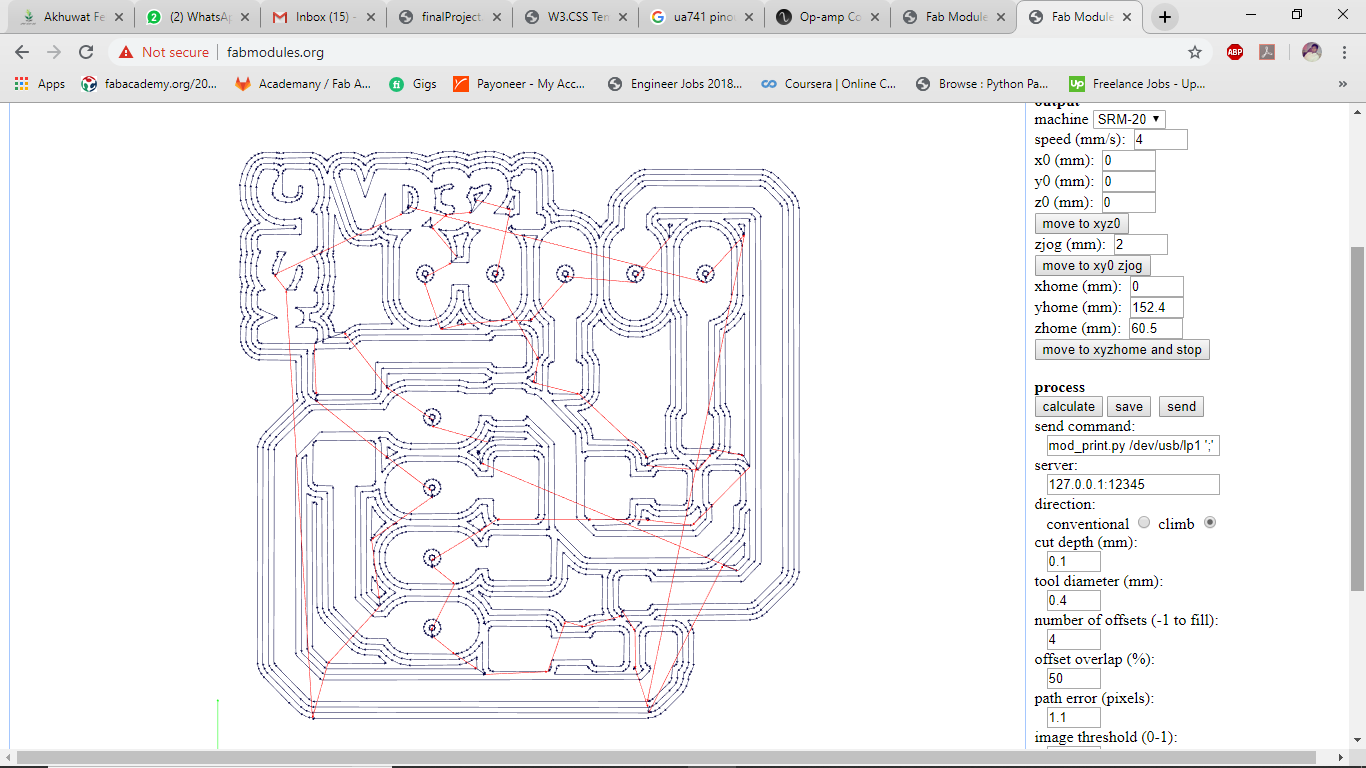
Drills
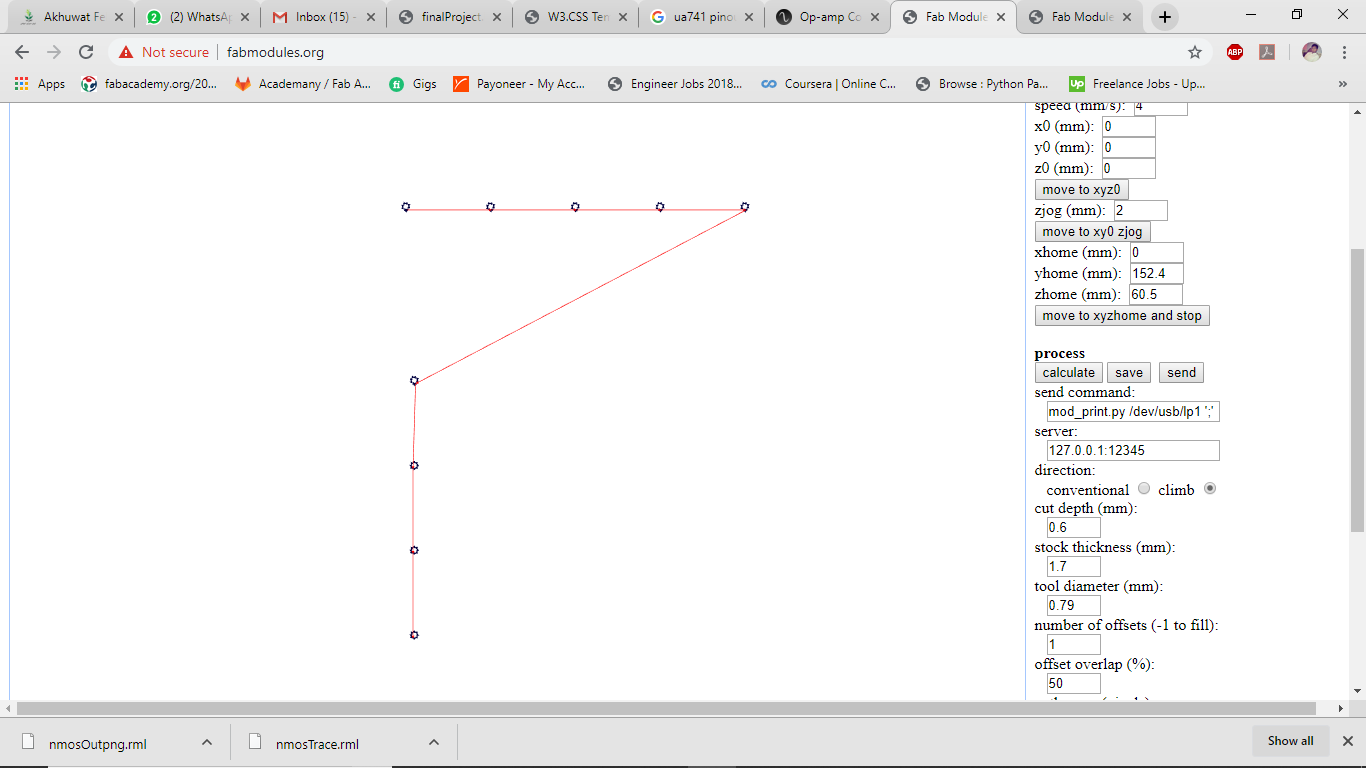
Outline
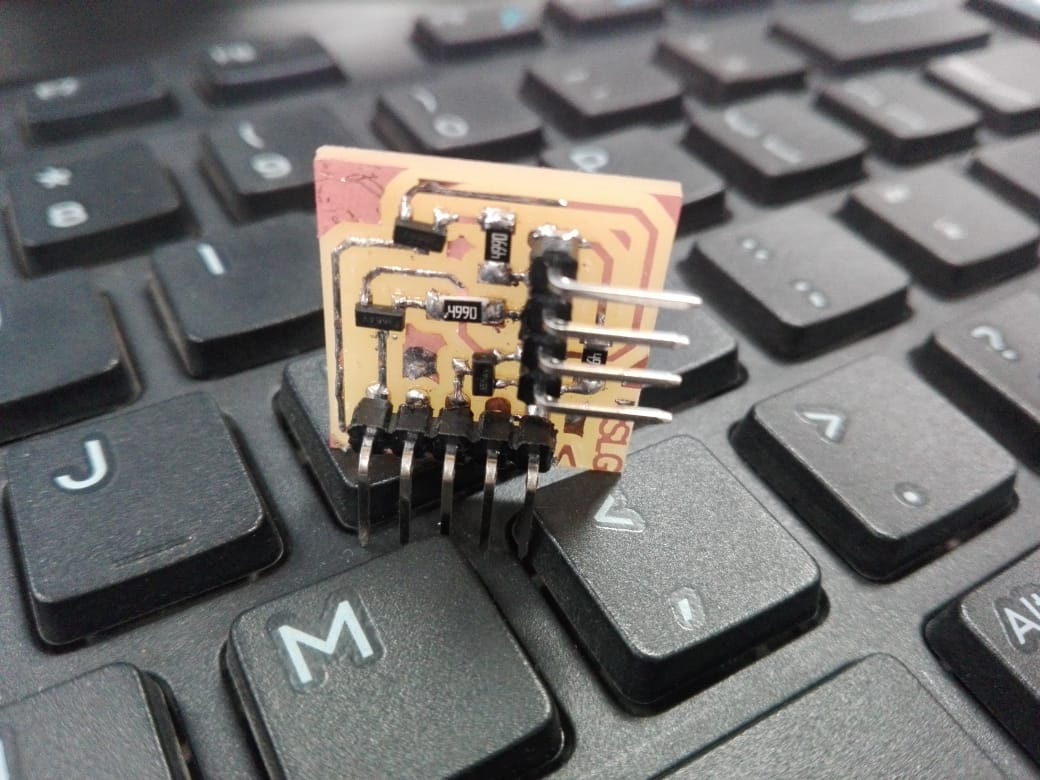
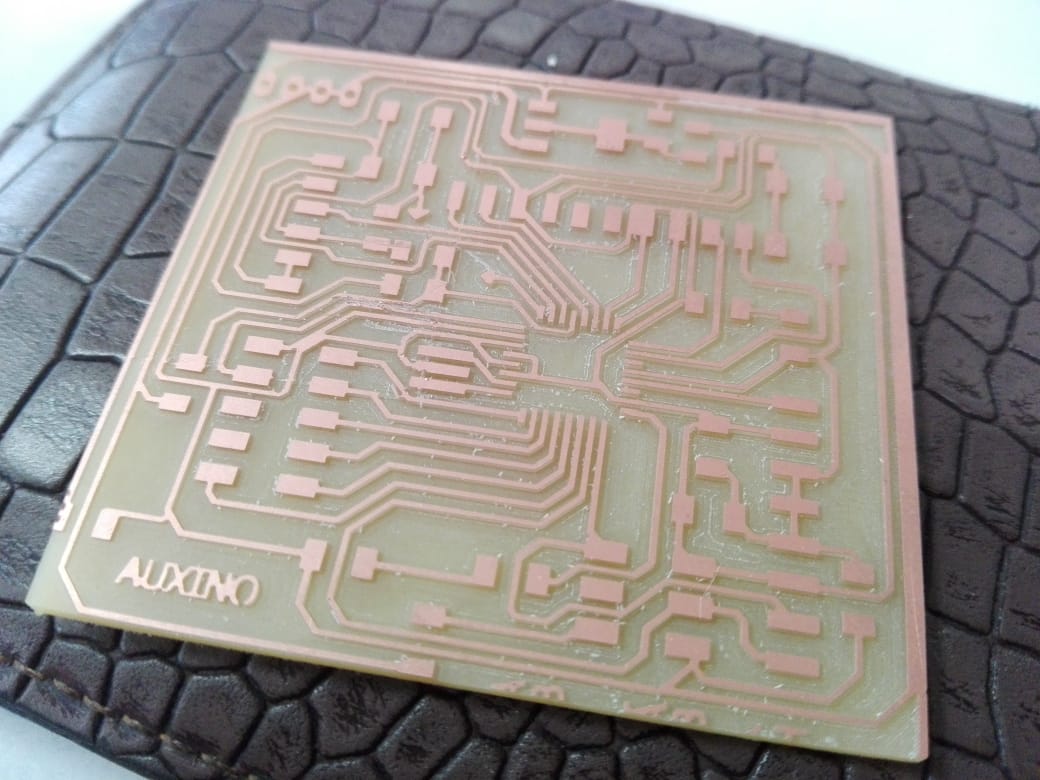
Next machined it
Soldered it, and here it is..
Moving on i faced a problem with my leonardo board (i made in embedded programming week) as it didn't support PWM.h liberary. So i made 328p general purpose board this time for my final project.
I took it from one of the senior fab student's page and modified it.
Schematic
Board
As usual made these design files machinable and here are its rml files..
Traces
Drills
Outline
 Machined it.. Soldered, tested.. Moved on to CAD
Laser Cutting
Next most of the part was about 3d designing so i moved to solidworks..
With laser cutting i made final frame/packaging for my model with acrylic.
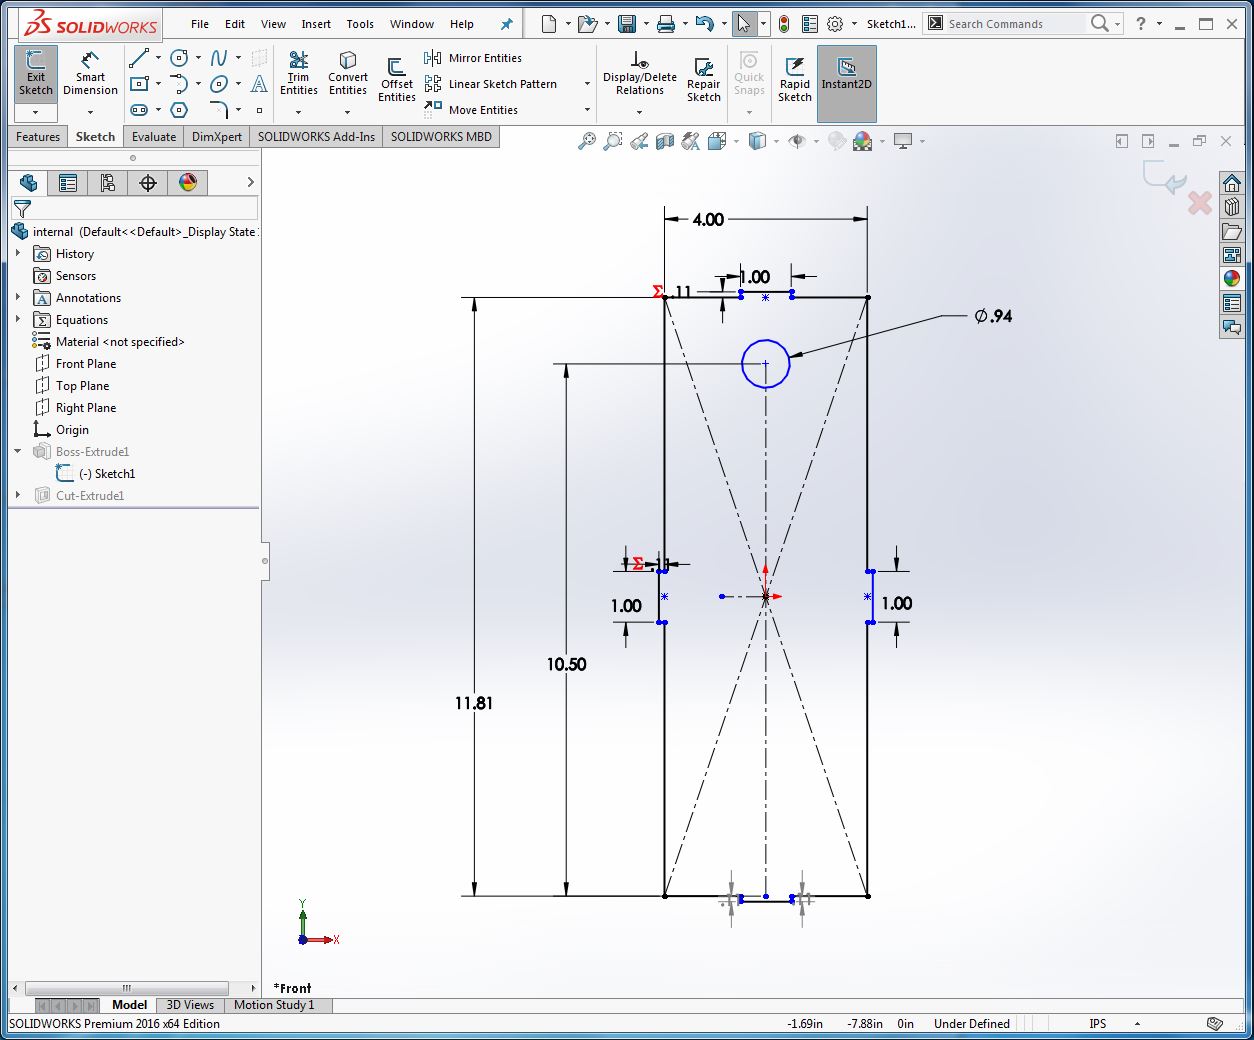
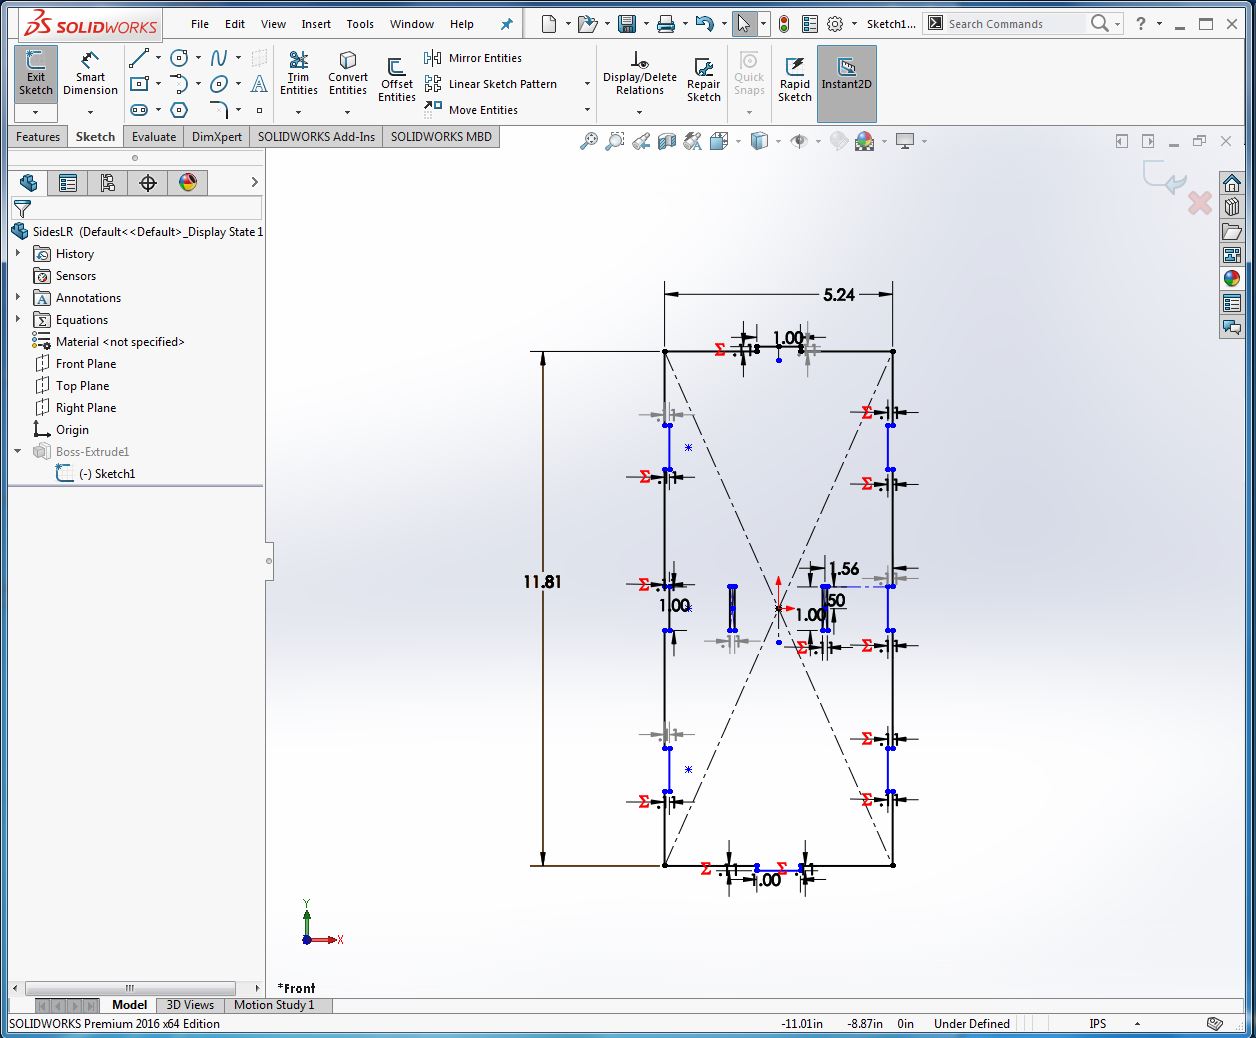
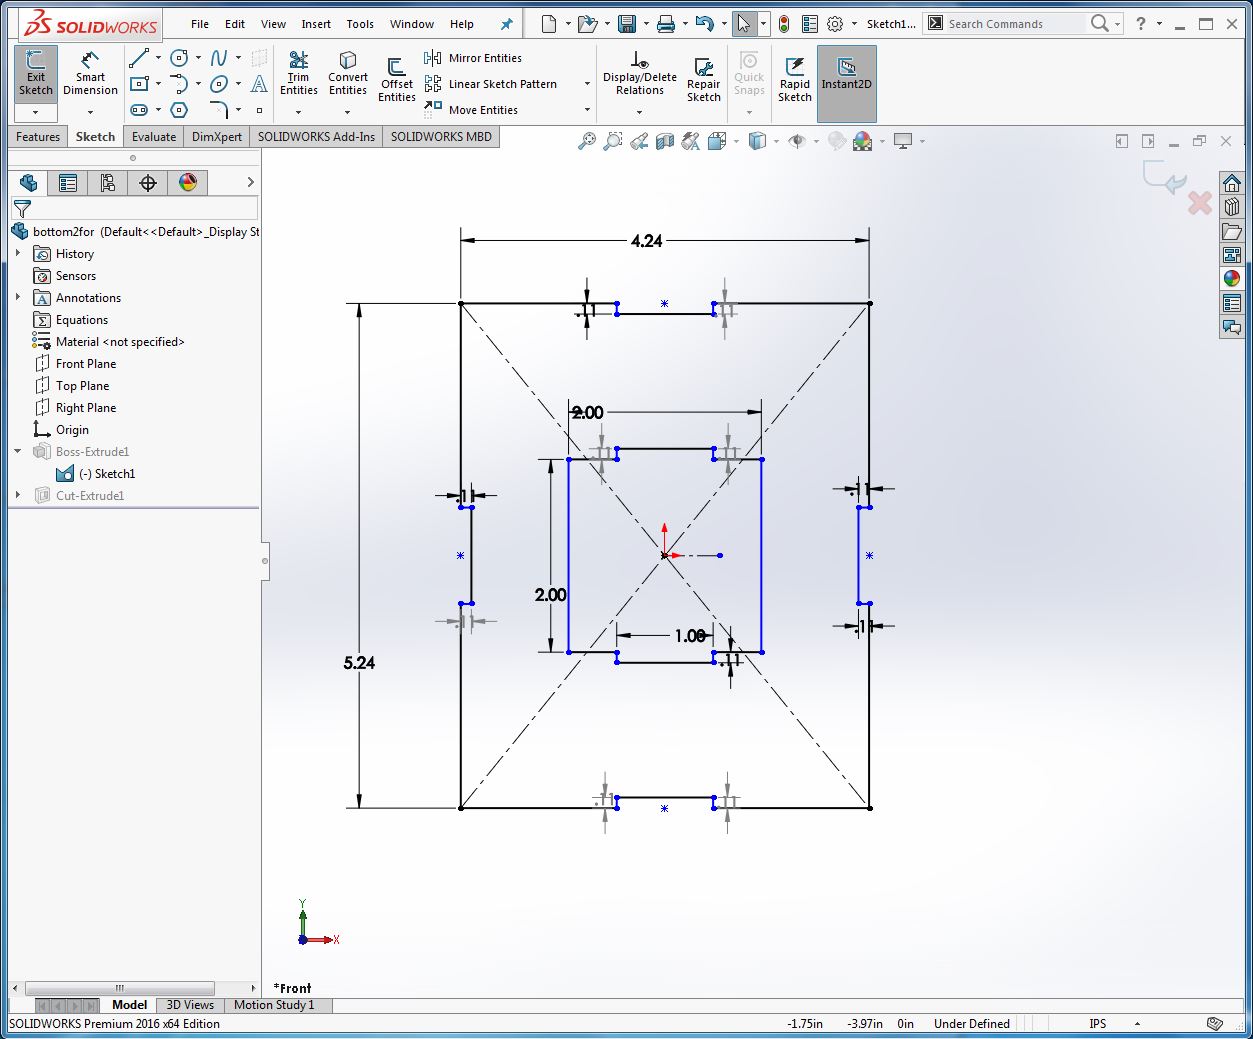
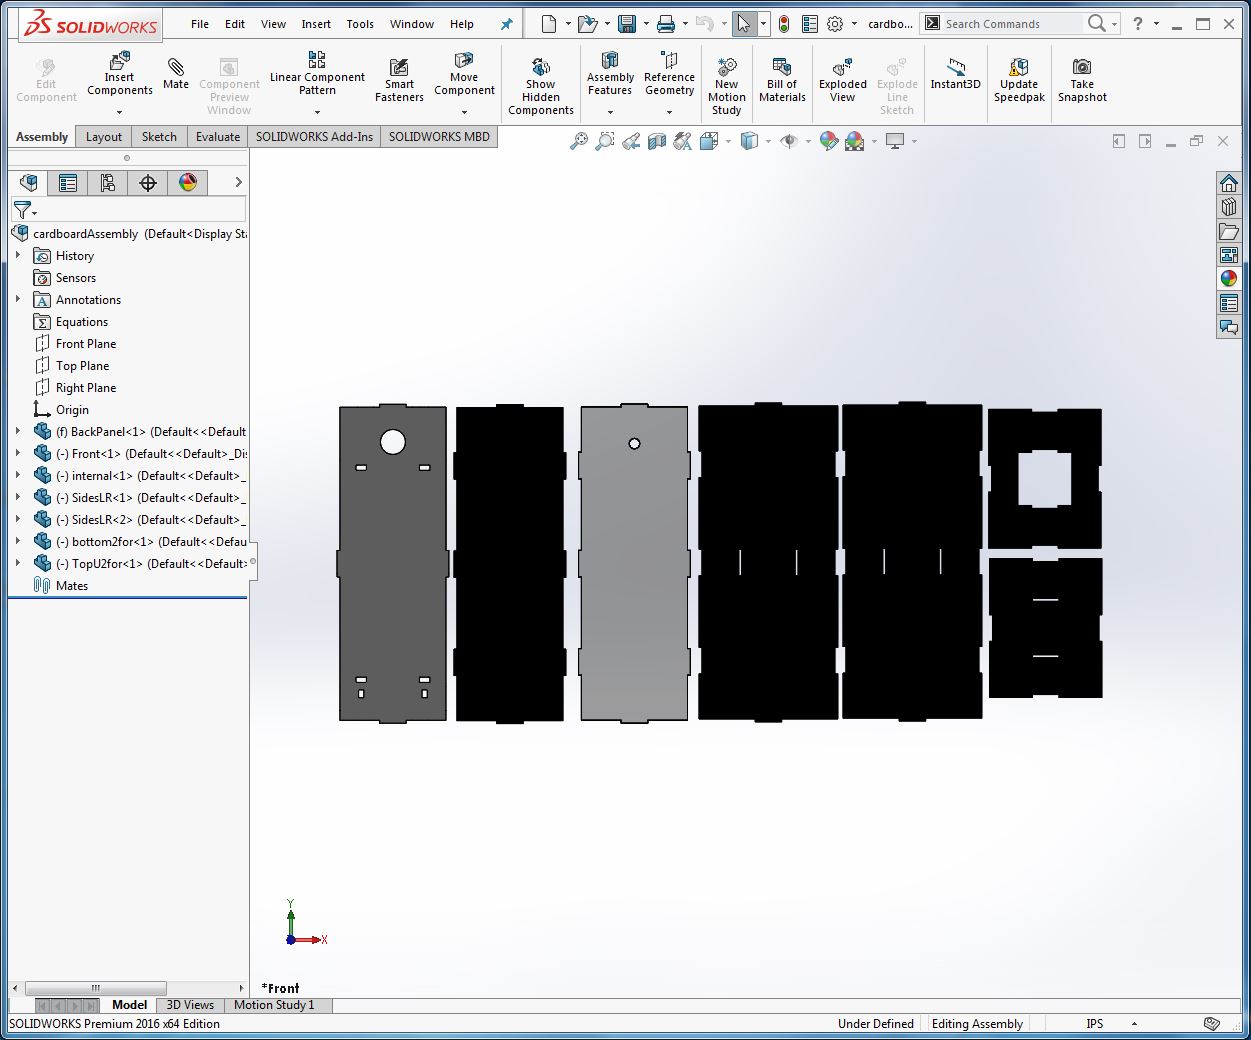
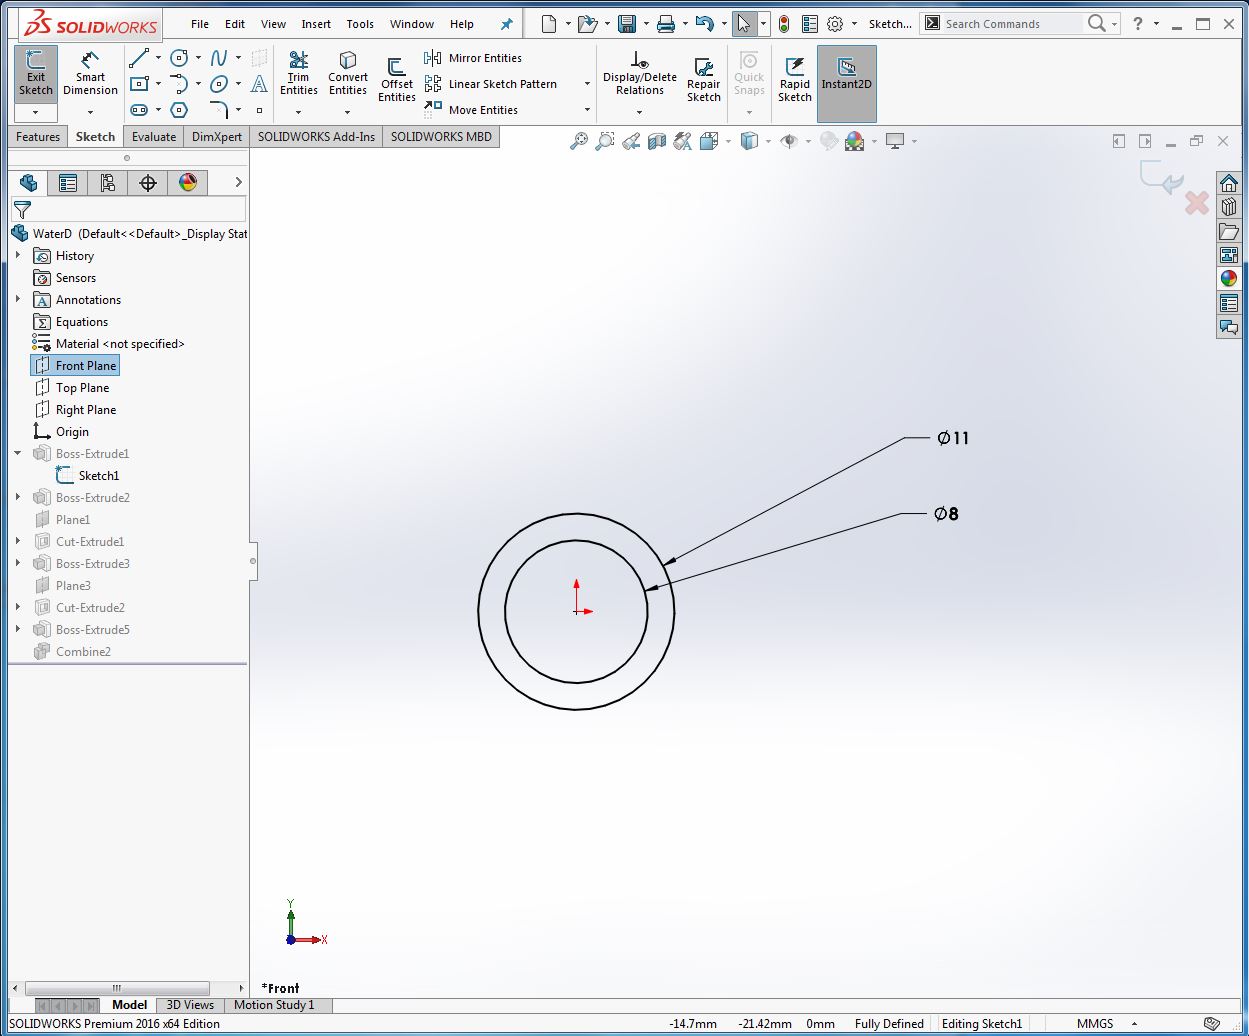
Started with designing in solidworks, and as design was a press-fit so it had multiple parts(2*sides, 2*fronts, 2*assembly parts, Top, and a bottom) as following.
Assemply Part (Main)
Sketched the main assembly part as following..
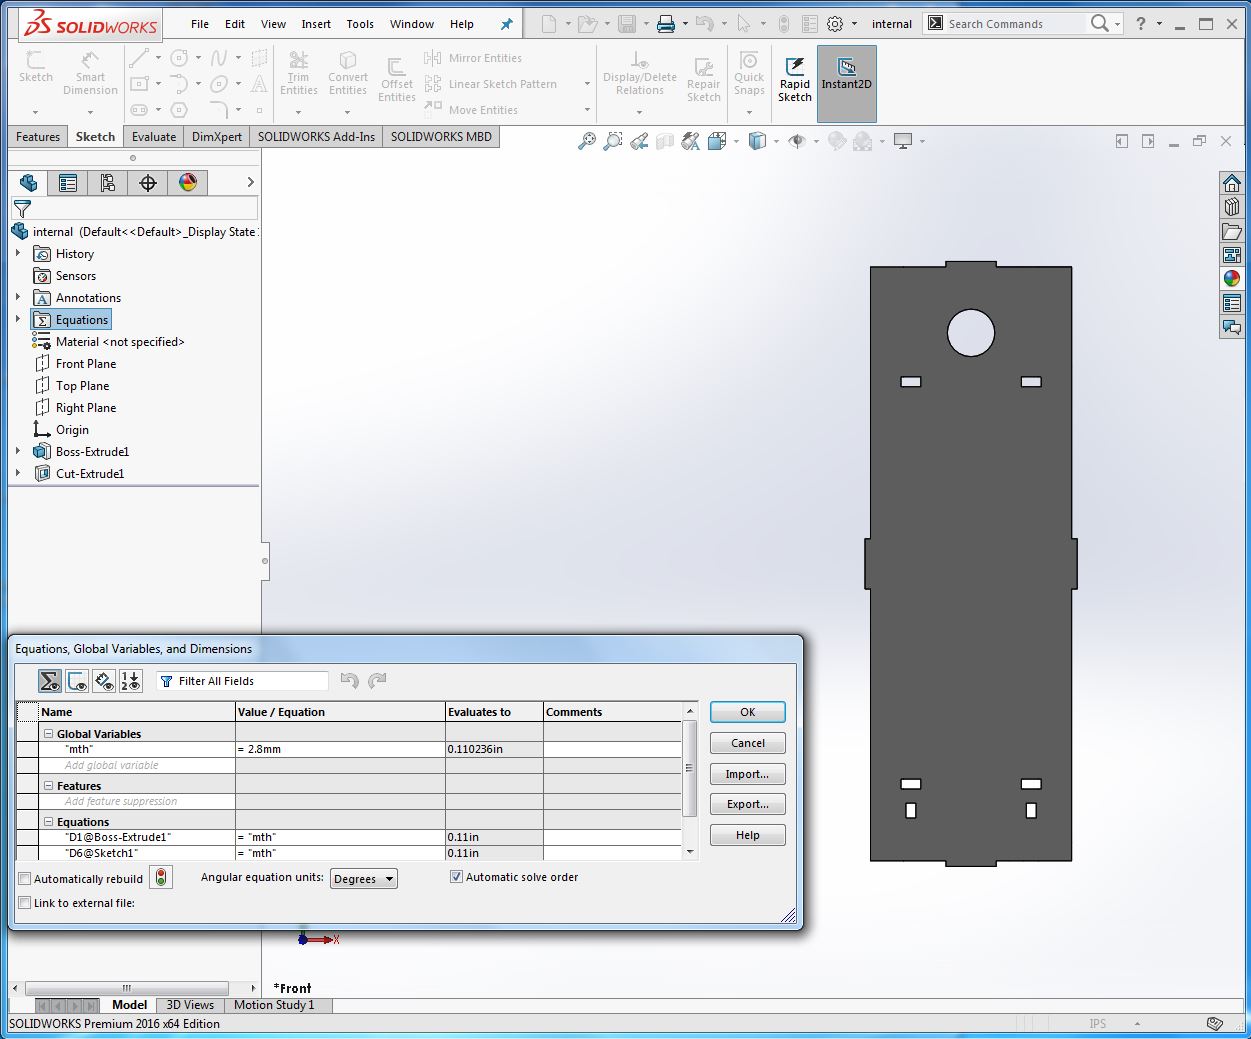
 Extruded it..
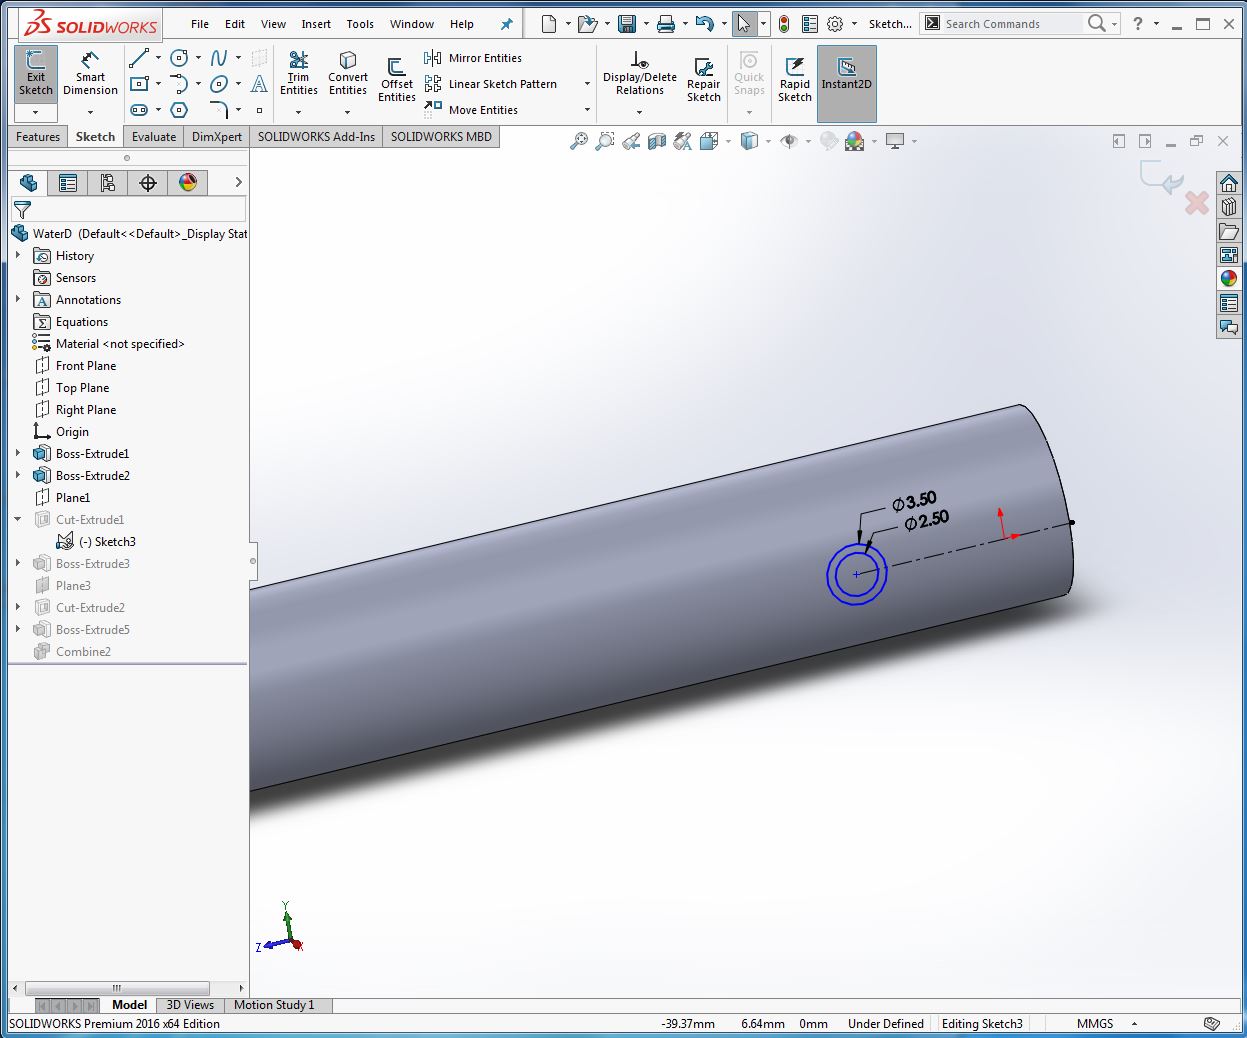
Side
Sketched side as following..
 Extruded it..
Top
Sketched the top as following..
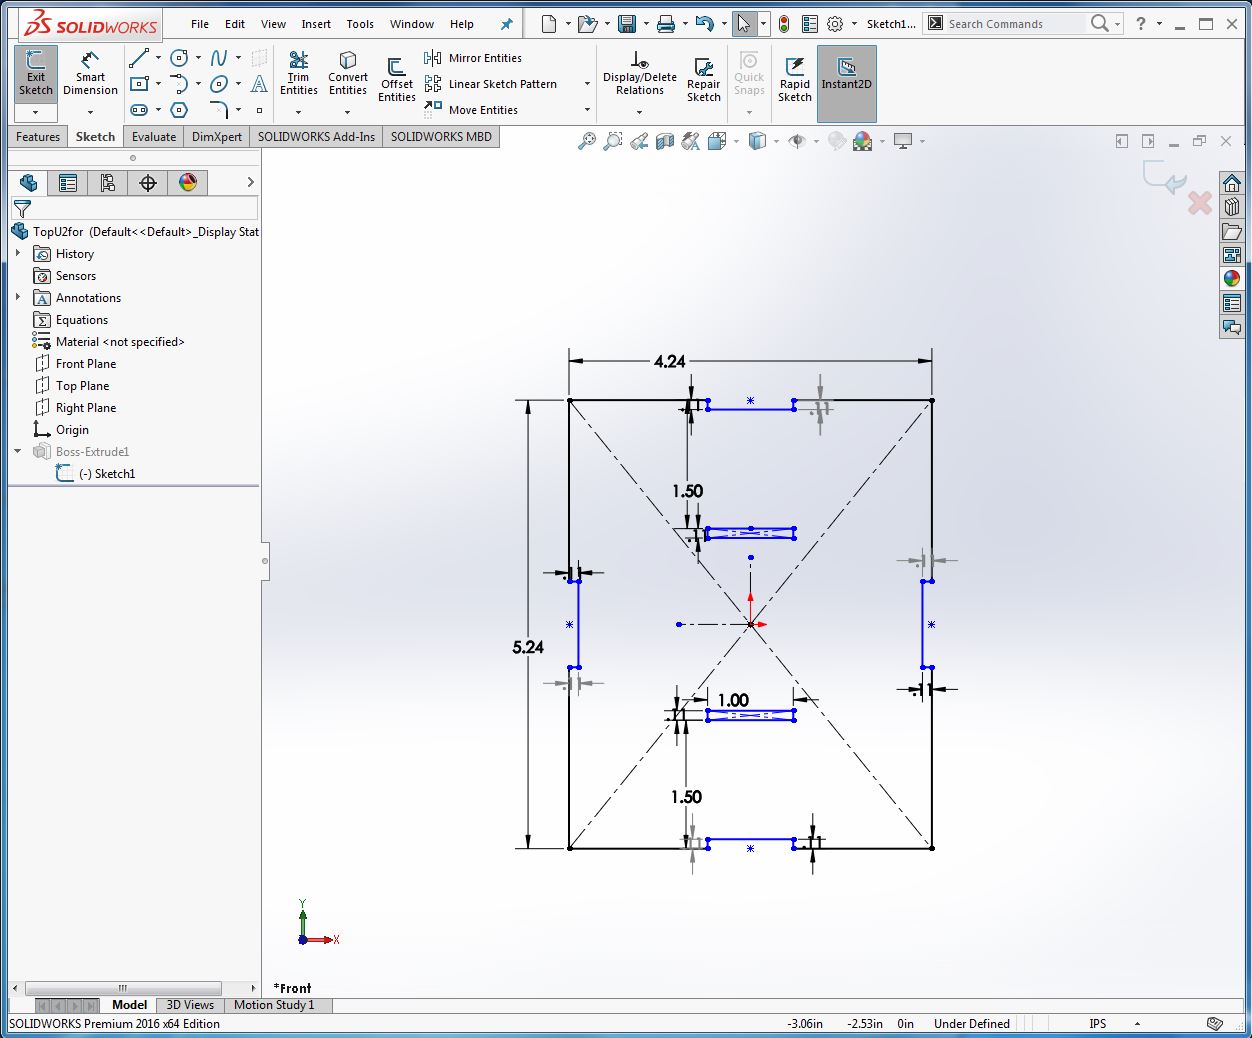 Extruded it..
Bottom
Sketched the bottom part as following..
 Extruded it..

Front
Sketched the front part as following..
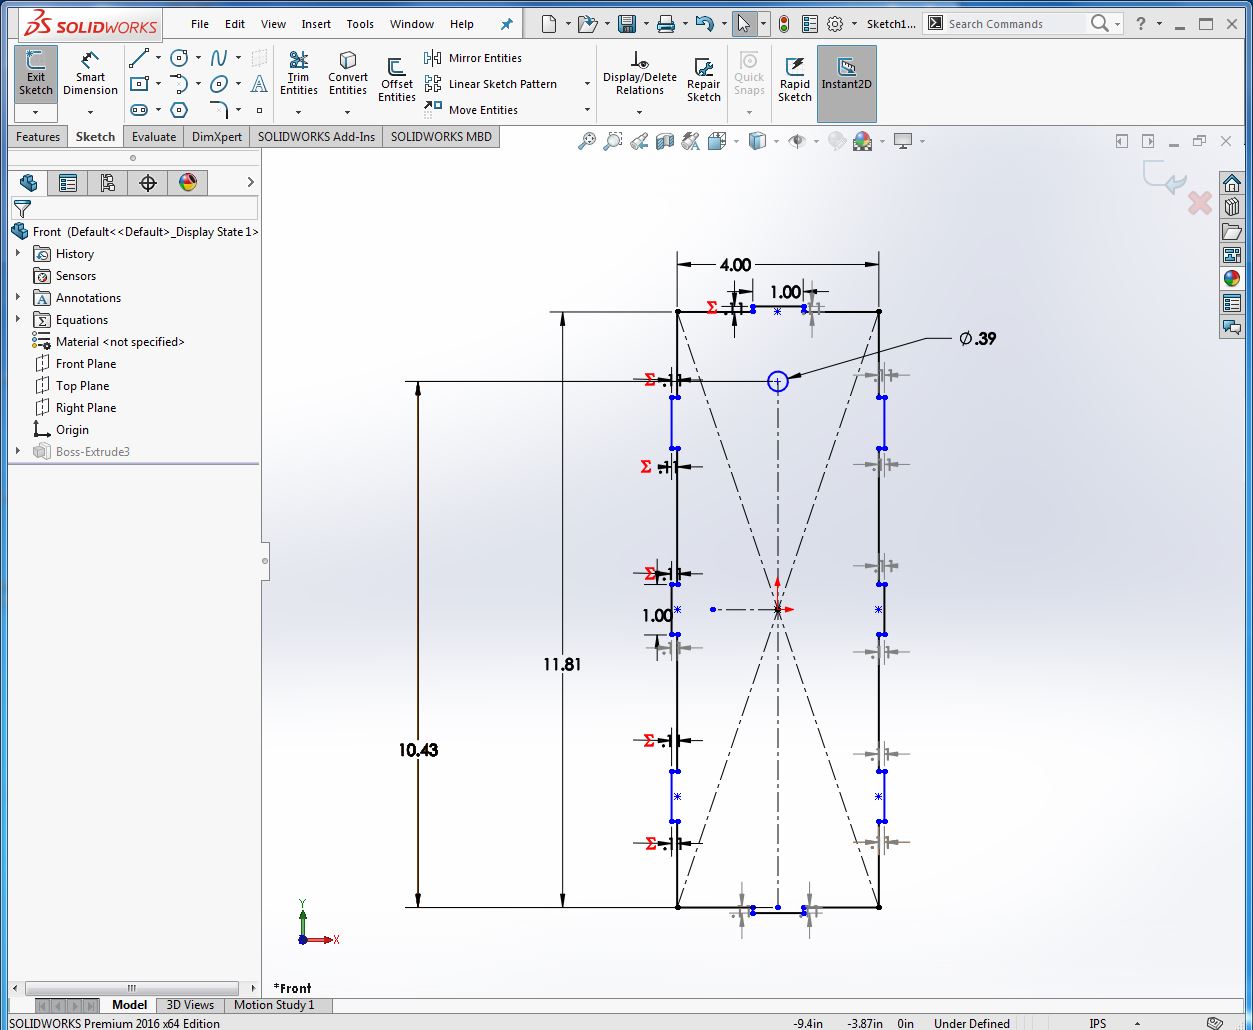 Extruded it..
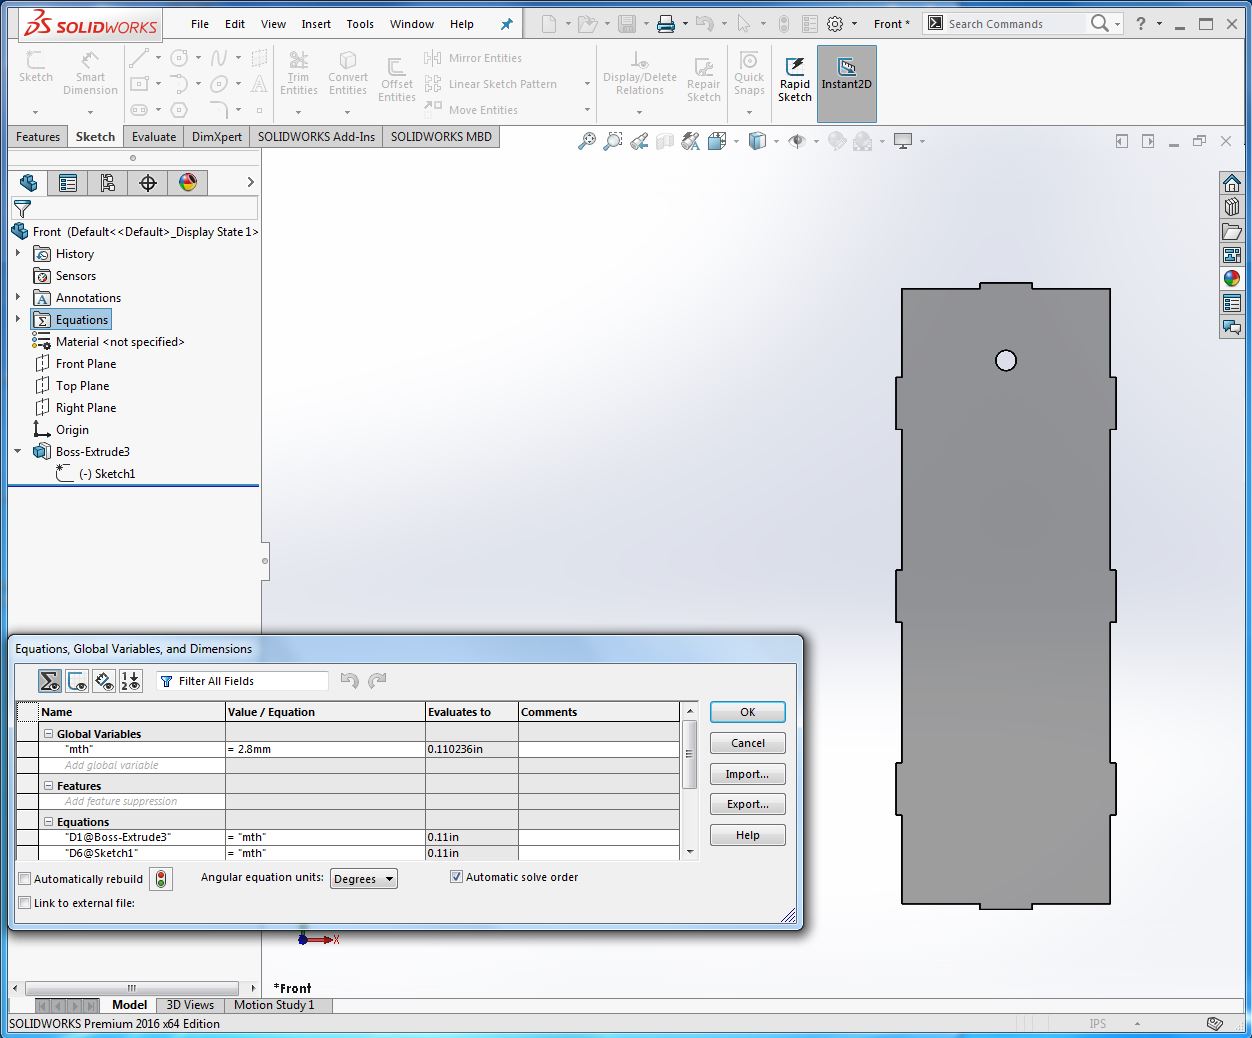
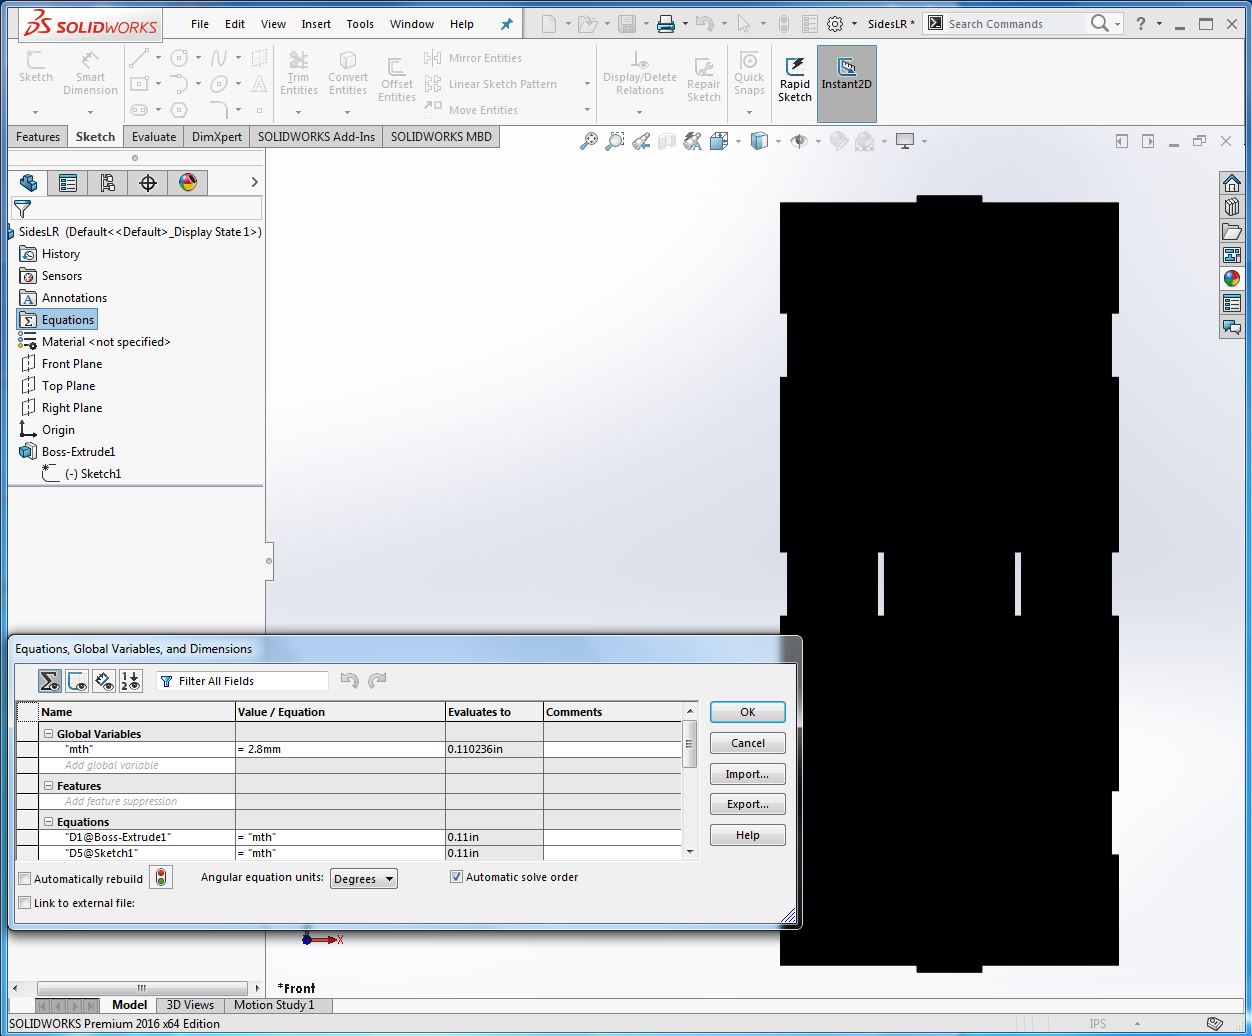
Note: Most of the above aprts are parametric.. so that i don't get sheet thickness or otherwise dimension problems.
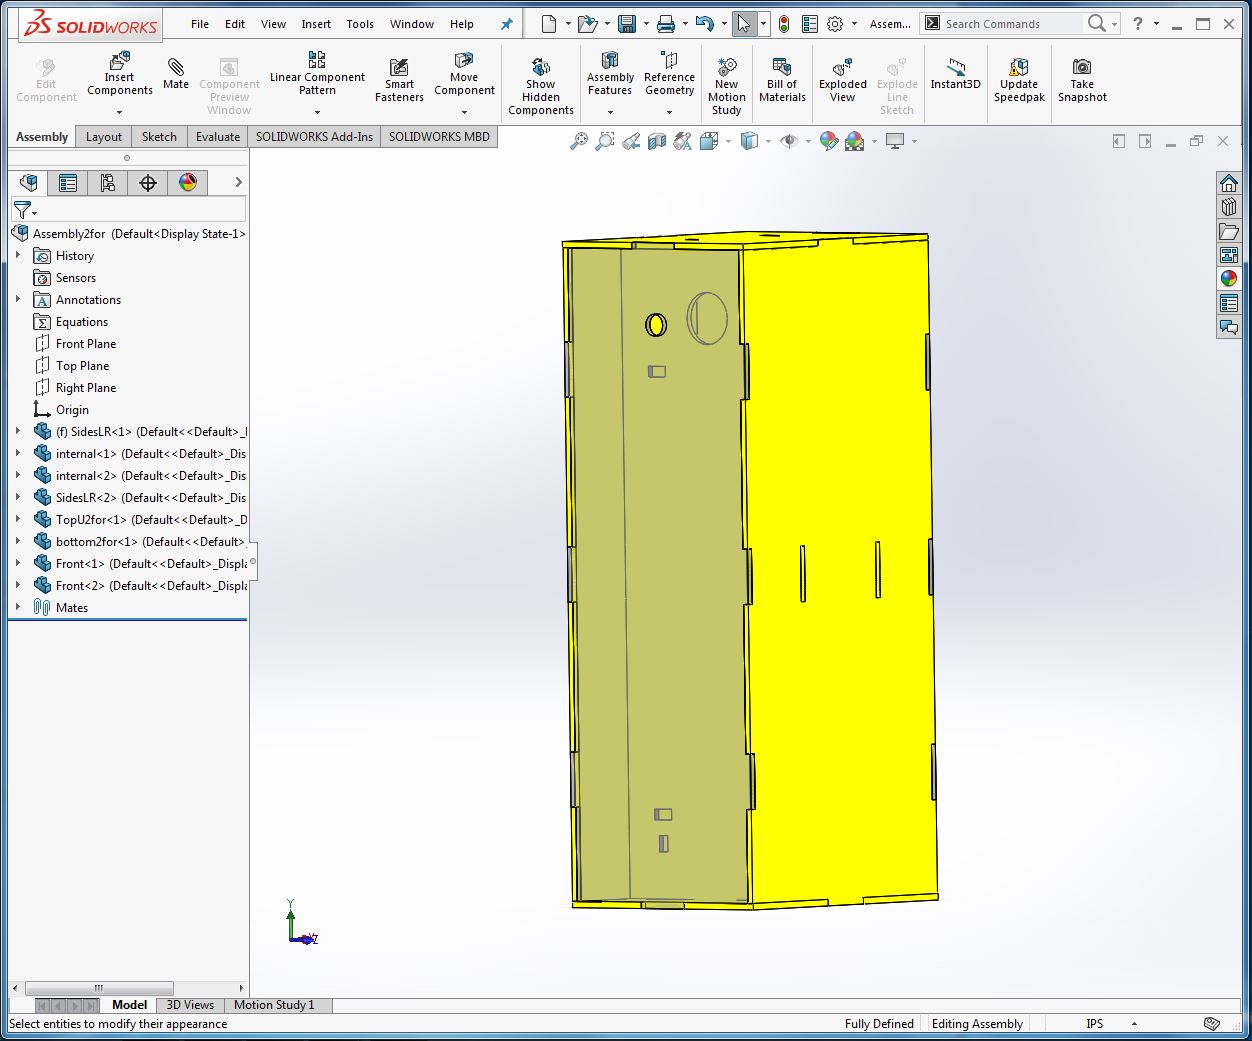
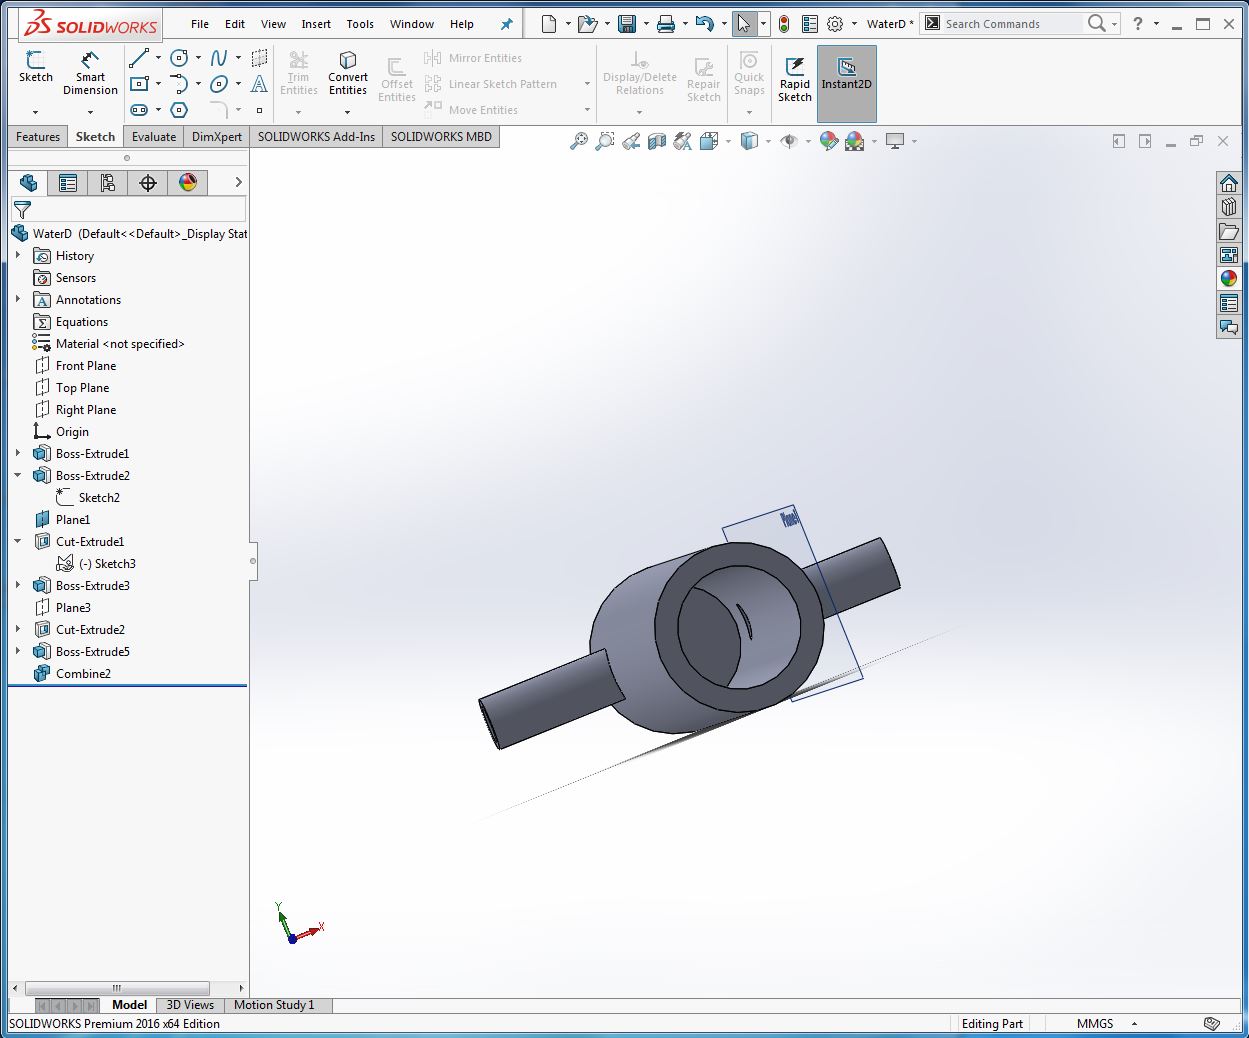
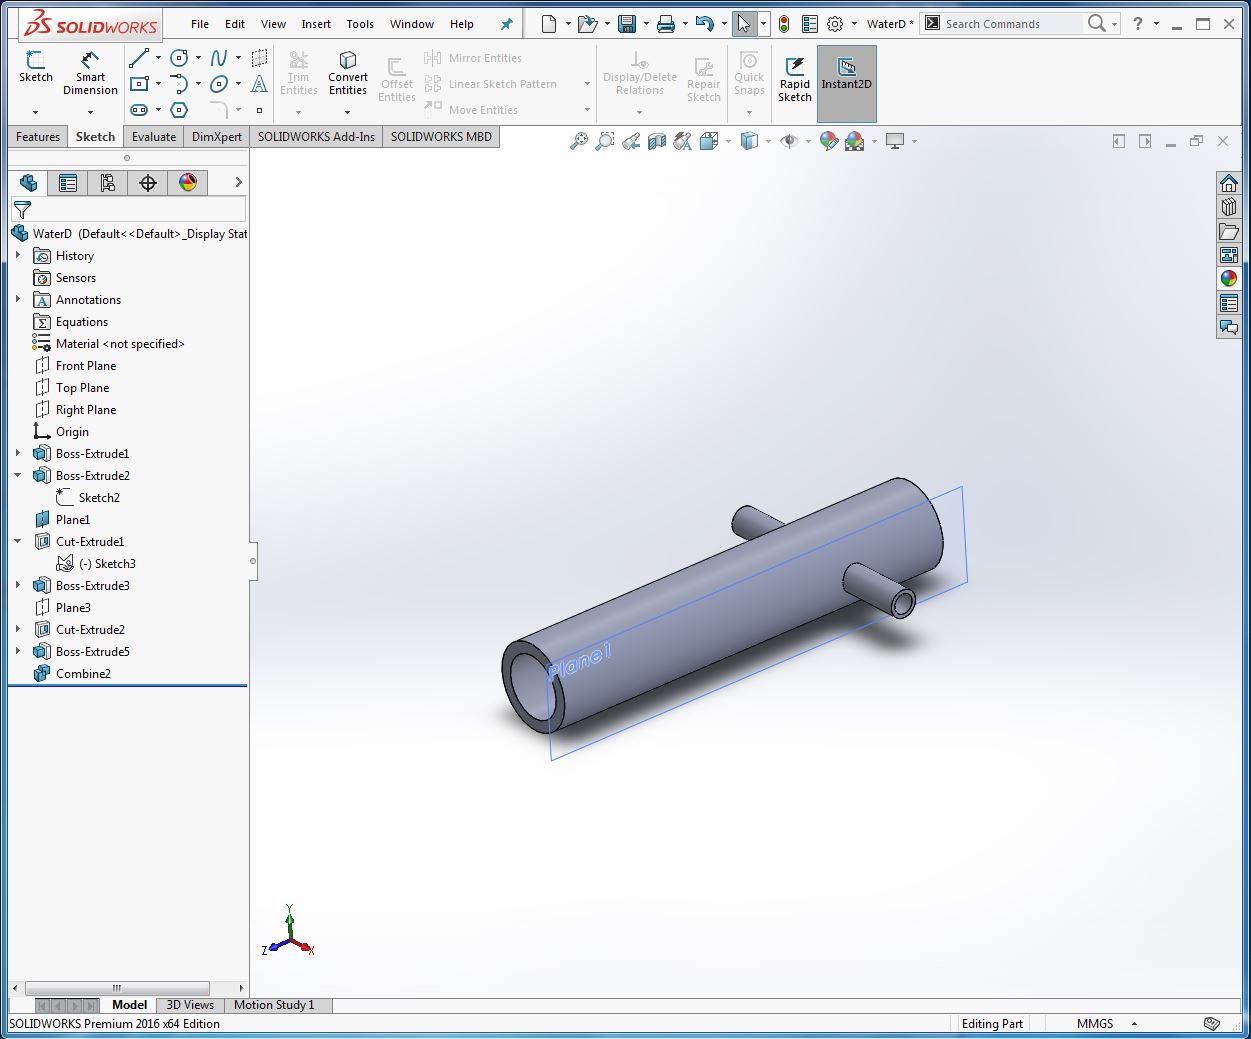
Next i assembled them to verify dimensions/designing.
 Now i had to make an assembly to be saved as a dxf.
To do so i made another file and assembled all above files as following.
Now i had to make an assembly to be saved as a dxf.
To do so i made another file and assembled all above files as following.
 opend drawing from assembly from this file dragged down a suitable view to make it look as follwoing
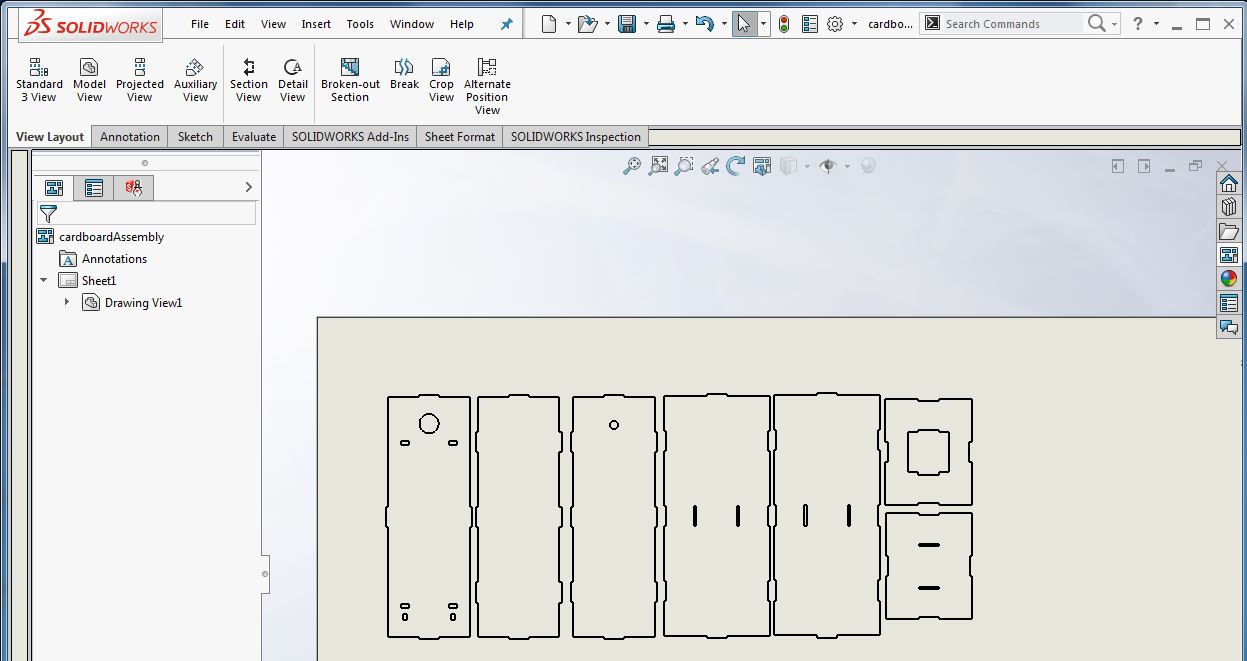 Saved it as dxf..
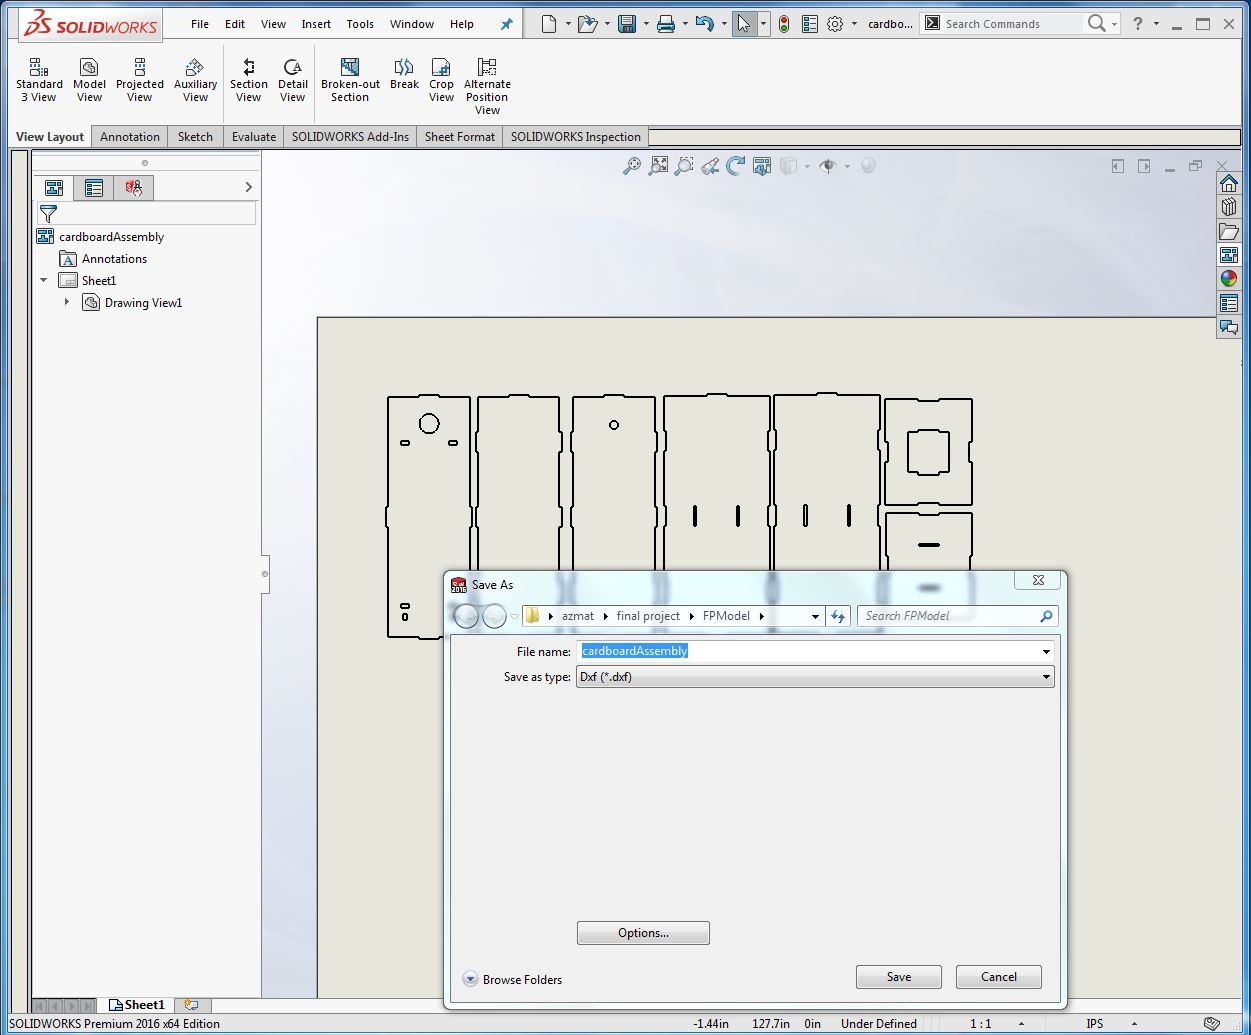 Now opend it in inkscape, set stroke for vector cutting as 0.001in and save file in a machine readable format.. I did use pdf as it is very simple and easy..
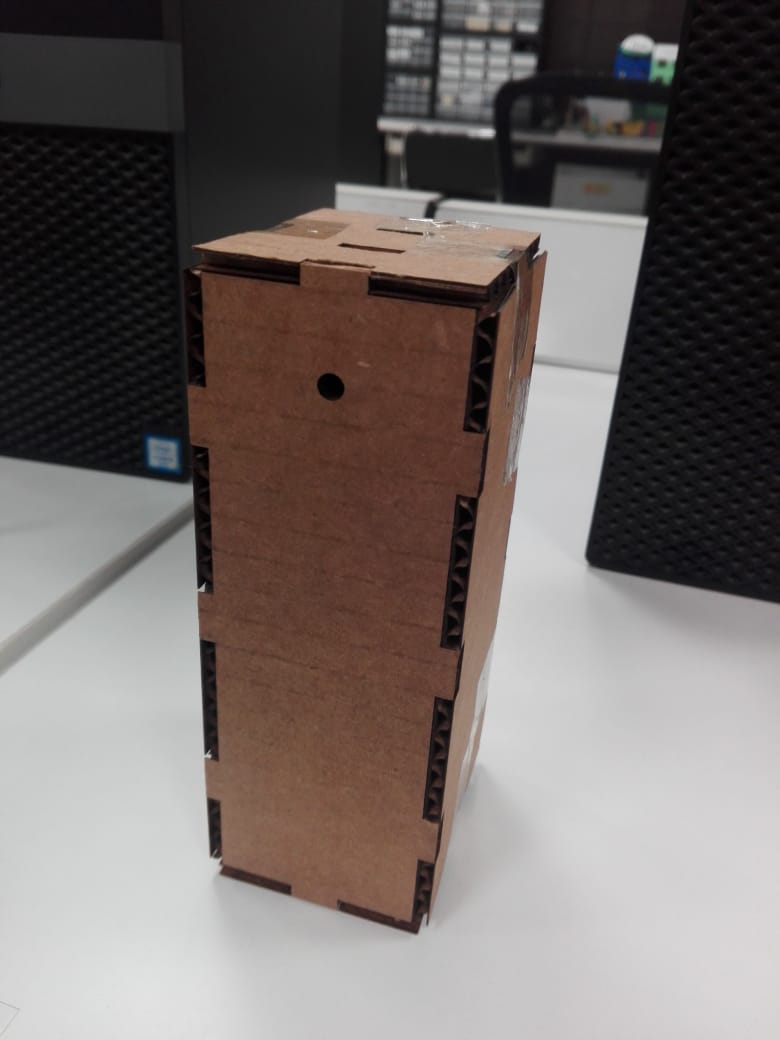
 I first made the test cut on cardboard and then did cut the my final model.
Machined the final model
I first made the test cut on cardboard and then did cut the my final model.
Machined the final model
 I first cutted my model on cardboard as a test model..
 and then went on to cut acrylic..
CNC Milling
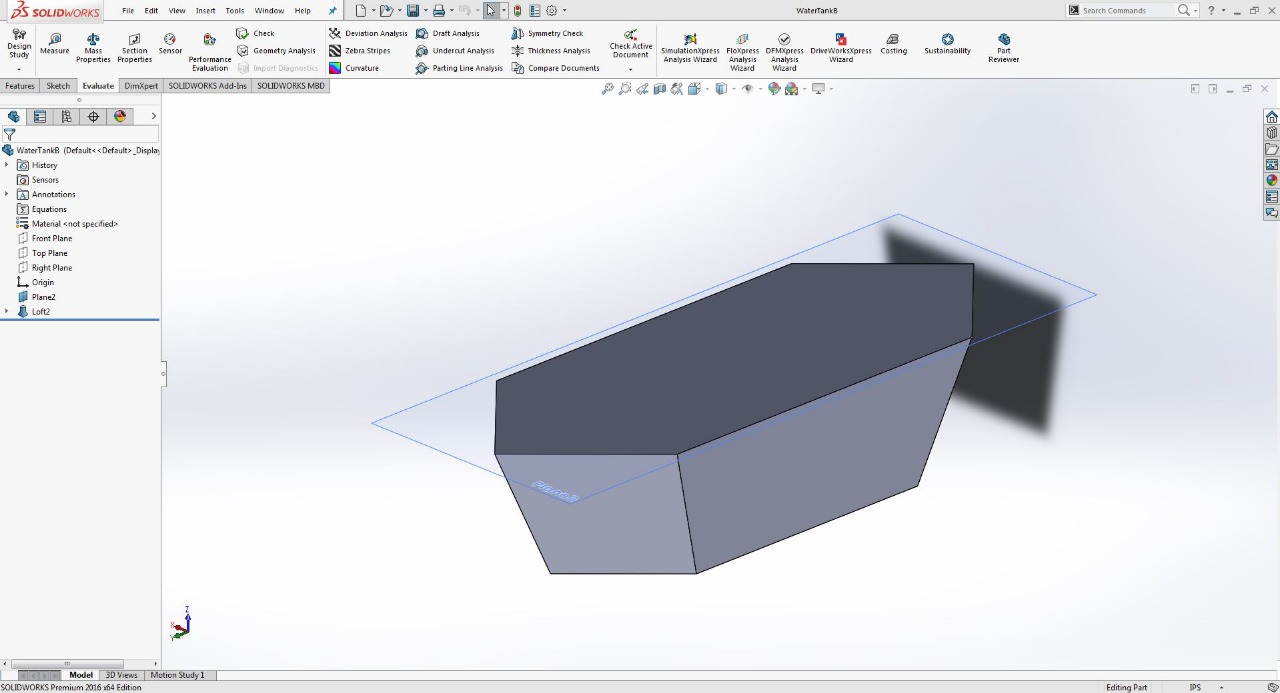
As i needed a water tank and that i made here.. With shopbot and composites.
I made the design in wildcard week and casted part as to be used as the water tank for my final project..
Please follow the detailed precess here..
I just scaled the wildcard design for my fnal project and documemted it in wildcard.
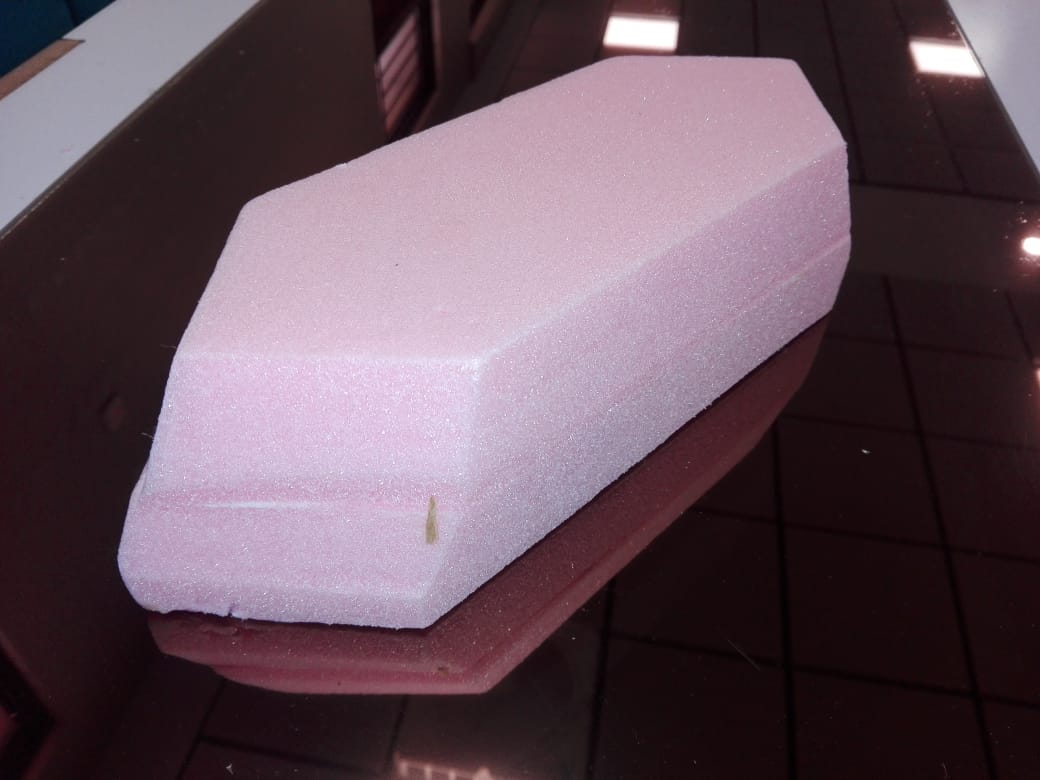
 Did mill it using shopbot, Note: This time as i increased its depth too, so i had to cut it in two parts
After milling the mold..
Did mill it using shopbot, Note: This time as i increased its depth too, so i had to cut it in two parts
After milling the mold..
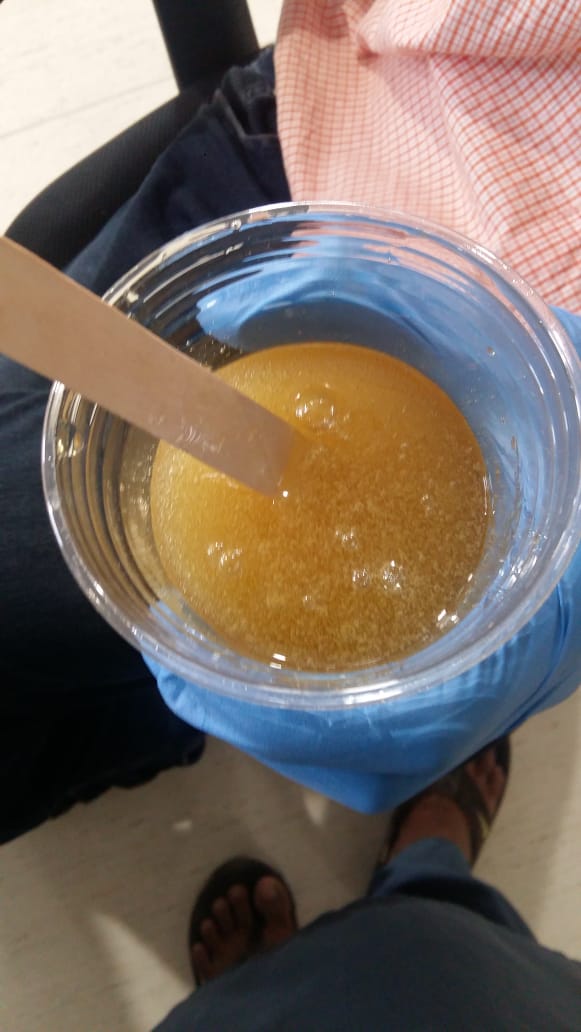
 Next i made solution to make cast the tank..
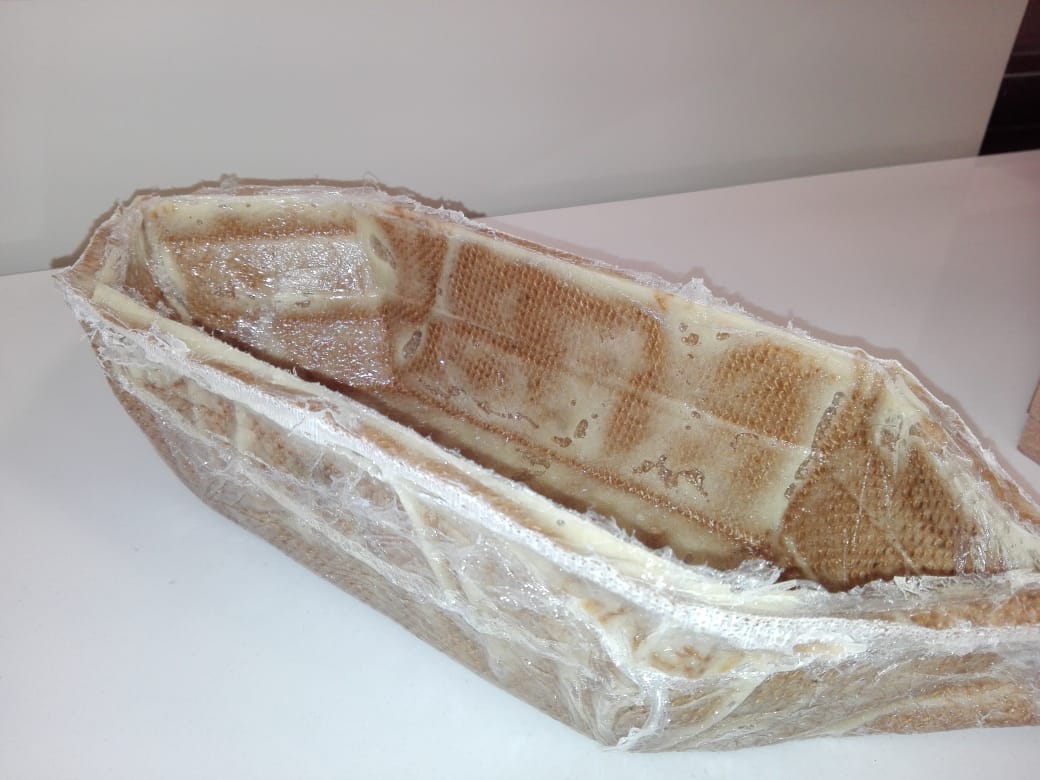
 casted it.. and final results were as following.
3d Printing
For 3d prinitng there was some parts too, as i needed water distributor to feed water in both valves and a stand also for solenoids.
For water distibutor again with solidworks i designed it as following. First the sketch.
 Extruded and sketched over it..
 Finally
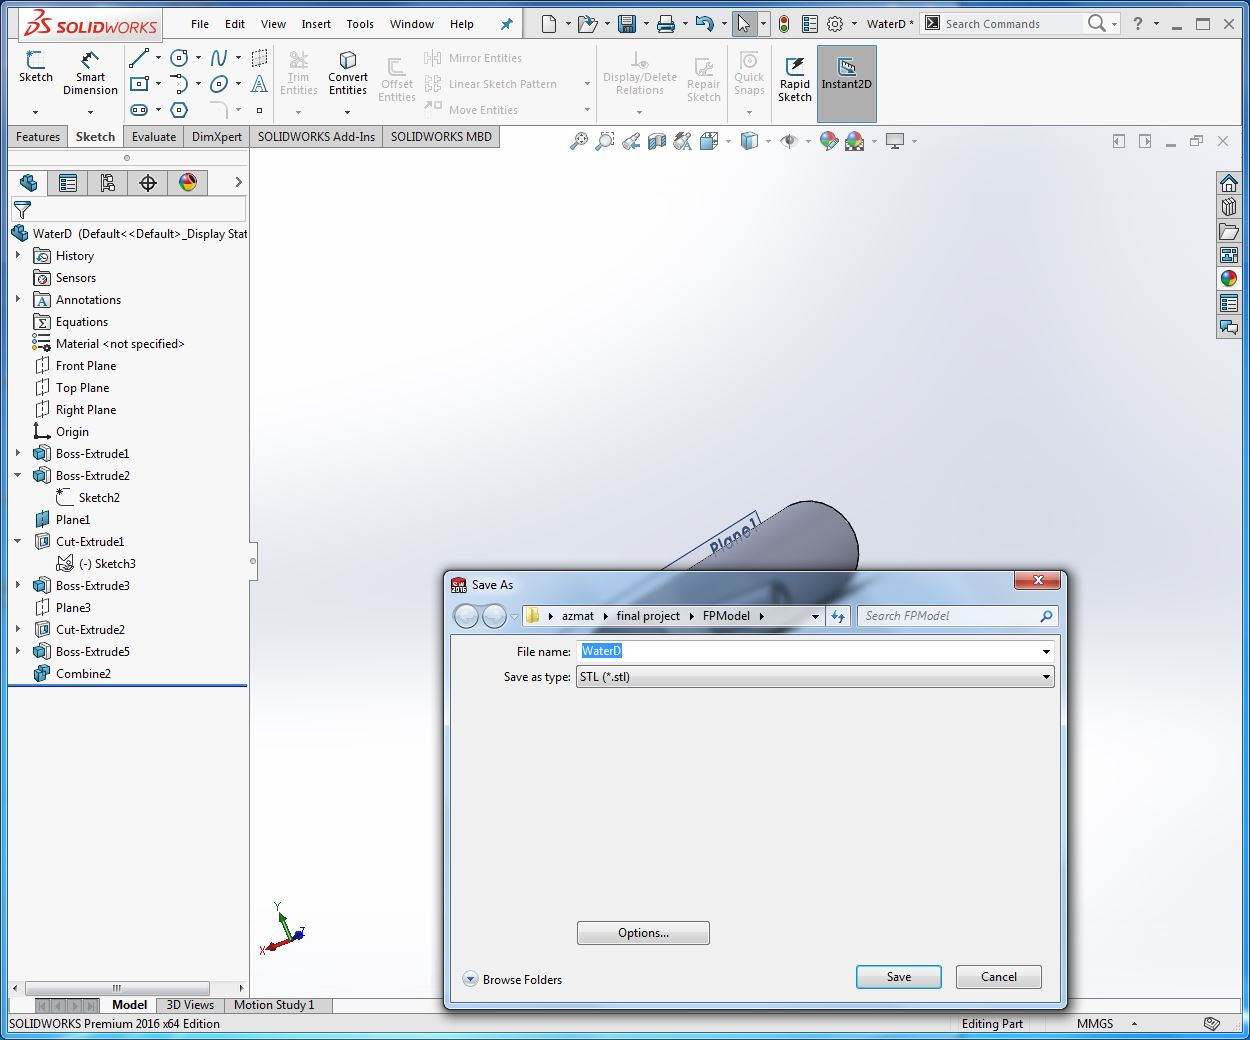
 Saved the 3d file as an stl,
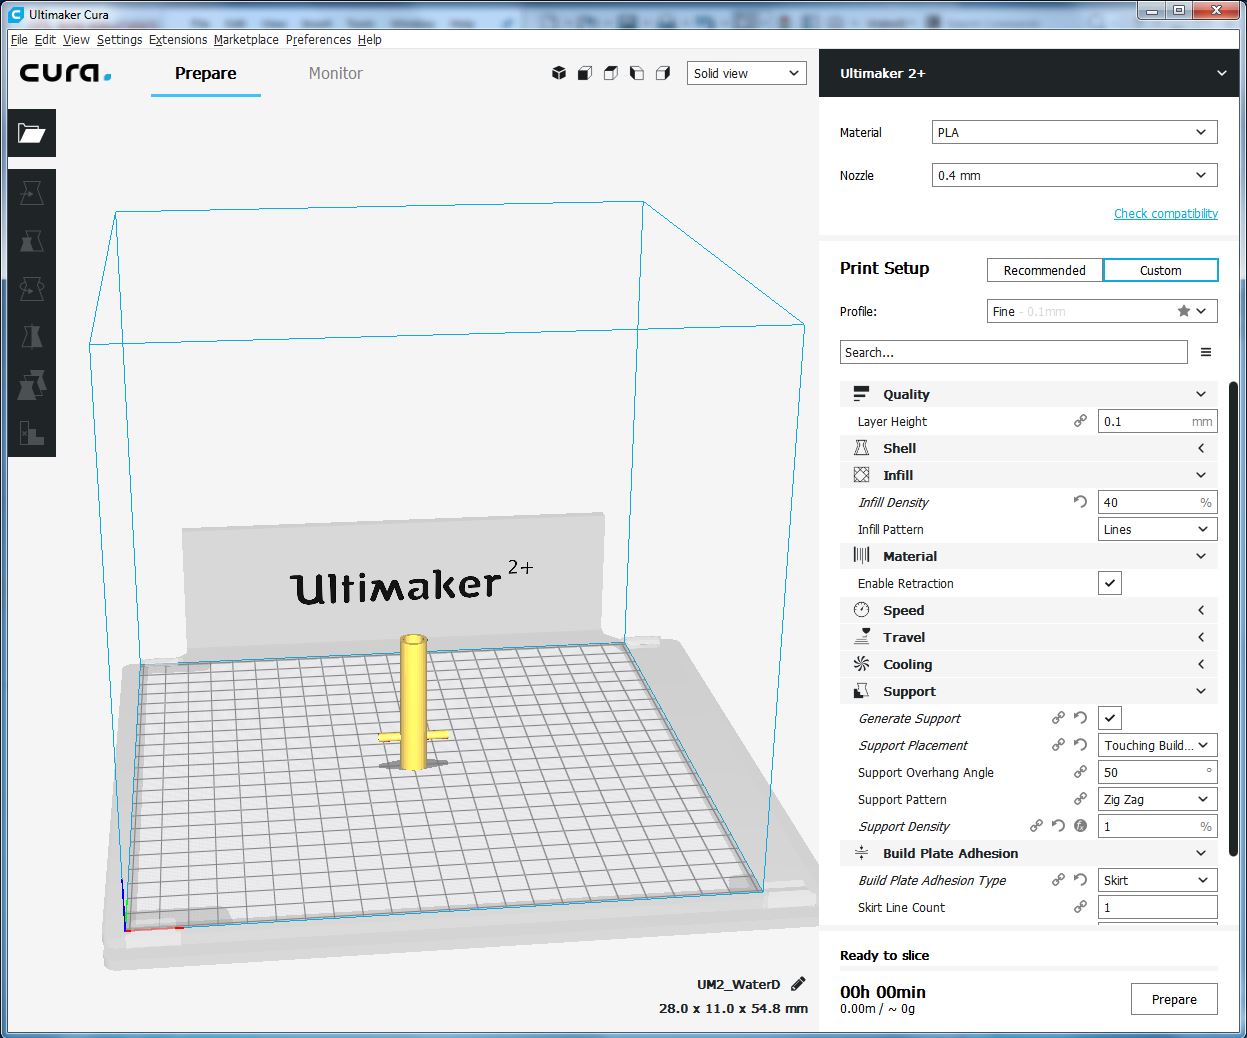
 opend it in cura customized some parameters like infill density, support etc.
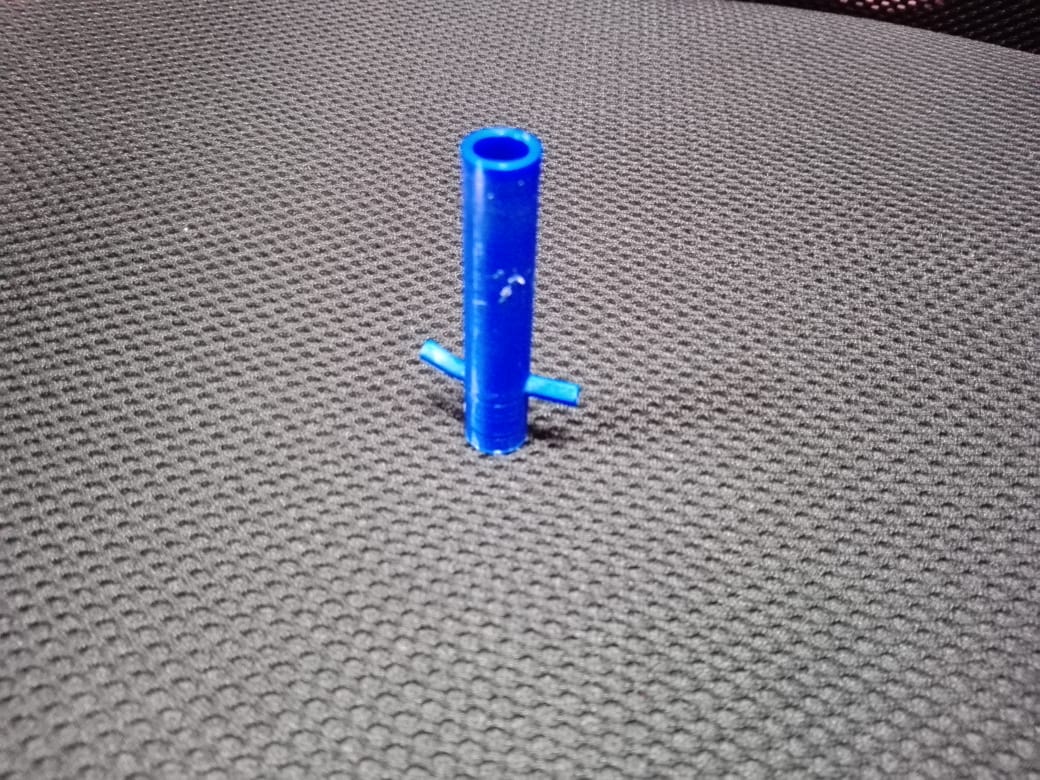
 Next is to wait.. untill its printed!
Here it is ready to go!
Next is to wait.. untill its printed!
Here it is ready to go!
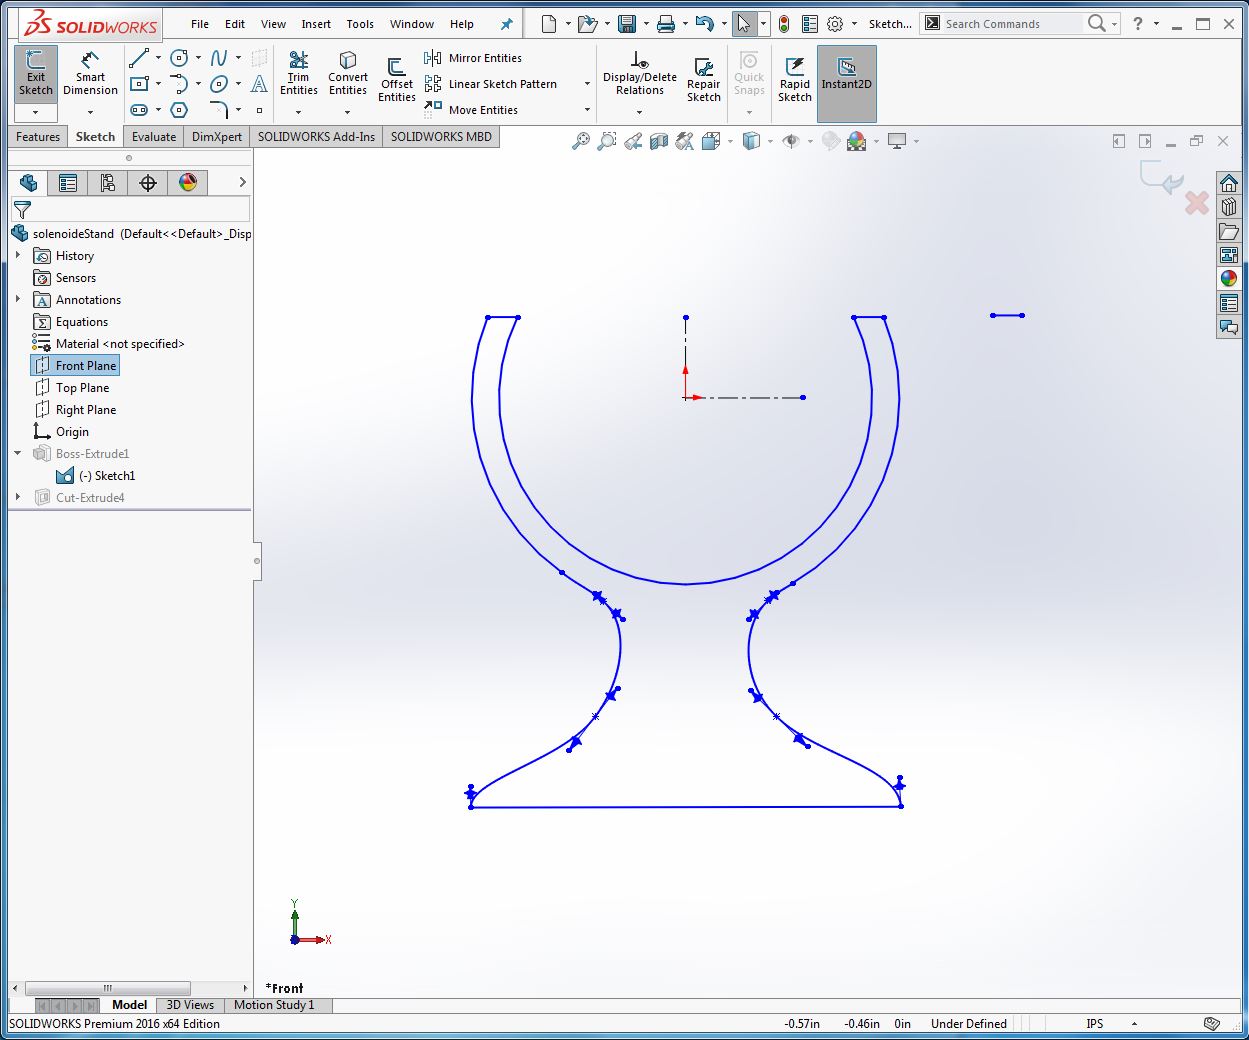
 Next was the stand, Designed in solidworks as following..
 Extruded/made 3d.
 Now repeat all the process for 3d printing.
Programming
For programming i started with the very basic draft also attached in output week.
Test Program
const byte Water_pump = 9;
const byte ledStrip = 10;
d = 11;
void setup() {
Serial.begin(9600);
pinMode(Water_pump, OUTPUT);
pinMode(ledStrip, OUTPUT);
waterPump_on();
}
void loop() {
digitalWrite(ledStrip, HIGH);
delay(d);
digitalWrite(ledStrip, LOW);
delay(d);
}
void waterPump_on(){
analogWrite(Water_pump, 115);
}
void waterPump_off(){
analogWrite(Water_pump,0);
}
With following results i had my mosfet PCB verified, with leds blinking. I also managed to control the flow of water but for that i had to change pwm everytime through program as it was just for testing.
Next i started workng on finalizing my program and i followed various articles from platforms like electroboom, servizmedia, and more.
Final Program
This is the final version modified for my application..
#include "PWM.h" //replace "" with <
#define BASE_FREQ 45
#define MIN_FREQUENCY_OFFSET -8.0
#define MAX_FREQUENCY_OFFSET 8.0
#define MIN_BRIGHTNESS 2
#define MAX_BRIGHTNESS 10.0
#define NumofModes 4 // Number of Operational modes
const byte LED_strip = 9; // pin for LED strip control
const byte LED_strip1 = 10;
const byte SValve = 6; // pin for Solenoid Valve
const byte Water_pump = 5; // pin for Water pump control
const byte ButtonSW = 3; // pin for mode selection button
const byte Sensor = 4; // pin for photoelectric sensor
const byte LED = 13; // pin for on-board LED
boolean led_on = true;
boolean mode_changed = true;
boolean increaseFrequency_led = true;
byte mode = 1; //toggle with button SW
//mode 1 = normal mode (power on)
byte buttonState = 0;
byte lastButtonState = 0;
byte val_Sensor = 0;
float frequency_offset = 0.1;
float duty_sValve = 18;
float frequency_sValve = BASE_FREQ;
float duty_led = 7;
float frequency_led = frequency_sValve+frequency_offset;
float totalcount = 0;
int lastBrightnessValue = 0;
int pumpIntensity = 0;
//********************************************************************
void setup()
{
Serial.begin(9600);
pinMode(LED, OUTPUT); // Heart Beat LED
pinMode(ButtonSW, INPUT_PULLUP); // Mode button
pinMode(Water_pump, OUTPUT); // Water_pump
pinMode(Sensor, INPUT); // Sensor
//initialize all timers except for 0, to save time keeping functions
InitTimersSafe();
//sets the frequency for the specified pin
bool success = SetPinFrequencySafe(LED_strip, frequency_led);
//bool success1 = SetPinFrequencySafe(LED_strip1, frequency_led);
bool success1 = SetPinFrequencySafe(SValve, frequency_sValve);
//bool success3 = SetPinFrequencySafe(SValve, frequency_sValve);
//if the pin frequency was set successfully, turn LED on
if(success and success1)
digitalWrite(LED, HIGH);
}
//********************************************************************
void loop()
{
if (mode_changed == true)
{
if (mode == 1) //normal mode
{
frequency_sValve = BASE_FREQ;
sValve_on();
sValve_on1();
led_on = true;
}
else if (mode == 2) // demo mode
{
//frequency_led shall change in main loop
}
else if (mode == 3) // levitation mode
{
frequency_led = BASE_FREQ;
}
else if (mode == 4) // Light off but water pump is still on
{
led_on = false;
}
mode_changed = false;
}
// *******************************************************************
pumpIntensity = map(analogRead(A2), 0, 1023, 100, 255);
waterPump_on();
// *******************************************************************
val_Sensor = digitalRead(Sensor); // read the sensor pin
if (mode == 1)
{
if (val_Sensor == 1) // sensor unblocked
{
frequency_offset = -(MAX_FREQUENCY_OFFSET-MIN_FREQUENCY_OFFSET)/1023L*analogRead(A1)+MAX_FREQUENCY_OFFSET;
totalcount = 0;
}
else //sensor blocked
{
totalcount = totalcount + 0.001;
frequency_offset = -(MAX_FREQUENCY_OFFSET-MIN_FREQUENCY_OFFSET)/1023L*analogRead(A1)+MAX_FREQUENCY_OFFSET + totalcount;
if (frequency_offset < MIN_FREQUENCY_OFFSET)
frequency_offset = MIN_FREQUENCY_OFFSET;
if (frequency_offset > MAX_FREQUENCY_OFFSET)
frequency_offset = MAX_FREQUENCY_OFFSET;
}
}
else
frequency_offset = -(MAX_FREQUENCY_OFFSET-MIN_FREQUENCY_OFFSET)/1023L*analogRead(A1)+MAX_FREQUENCY_OFFSET;
// *******************************************************************
if (led_on == true)
{
duty_led = -(MAX_BRIGHTNESS-MIN_BRIGHTNESS)/1023L*analogRead(A0)+MAX_BRIGHTNESS;
if (mode == 2) // demo mode
{
if (frequency_led <= (BASE_FREQ + MIN_FREQUENCY_OFFSET) + 2)
{
increaseFrequency_led = true;
totalcount = 0;
}
else if (frequency_led >= (BASE_FREQ + MAX_FREQUENCY_OFFSET) - 2)
{
increaseFrequency_led = false;
totalcount = 0;
}
else if ((frequency_led > (BASE_FREQ - 1)) and (frequency_led < (BASE_FREQ + 1)))
{
delay(360);
}
totalcount = totalcount + 0.001;
if (increaseFrequency_led == true)
frequency_led += totalcount;
else
frequency_led -= totalcount;
delay(120);
}
else if (mode == 1)
frequency_led = frequency_sValve+frequency_offset;
SetPinFrequencySafe(LED_strip, frequency_led);
SetPinFrequencySafe(LED_strip1, frequency_led);
if (lastBrightnessValue < round(duty_led*255/100)) //previously dimmer - gradually bright it
{
for (int i=lastBrightnessValue; i
{
pwmWrite(LED_strip, i);
pwmWrite(LED_strip1, i);
delay(30);
}
}
else if (lastBrightnessValue > round(duty_led*255/100)) //previously brighter - gradually dim it
{
for (int i=lastBrightnessValue; i>round(duty_led*255/100); i--)
{
pwmWrite(LED_strip, i);
pwmWrite(LED_strip1, i);
delay(30);
}
}
else //no change in brightness
pwmWrite(LED_strip, round(duty_led*255/100));
pwmWrite(LED_strip1, round(duty_led*255/100));
lastBrightnessValue = round(duty_led*255/100);
}
else
{
//gradually dim off
for (int i=round(duty_led*255/100); i>0; i--)
{
pwmWrite(LED_strip, i);
pwmWrite(LED_strip1, i);
delay(30);
}
duty_led = 0;
pwmWrite(LED_strip, 0);
pwmWrite(LED_strip1, 0);
lastBrightnessValue = 0;
}
// ******************************************************************
// read the button SW
buttonState = digitalRead(ButtonSW);
// compare the buttonState to its previous state
if (buttonState != lastButtonState)
{
// if the state has changed, increment the mode count
if (buttonState == LOW)
{
mode++;
if (mode > NumofModes)
mode = 1; //rotary menu
mode_changed = true ;
}
// delay a little bit for button debouncing
delay(50);
}
lastButtonState = buttonState;
}
//********************************************************************
void sValve_on()
{
pwmWrite(SValve, 115);
}
void sValve_on1()
{
pwmWrite(SValve1, 115);
}
//****************************************************************
void sValve_off()
{
pwmWrite(SValve, 0);
}
void sValve_off1()
{
pwmWrite(SValve1, 0);
}
//********************************************************************
void waterPump_on()
{
analogWrite(Water_pump,pumpIntensity);
}
//********************************************************************
void waterPump_off()
{
analogWrite(Water_pump,0);
}
Assembling & Integration
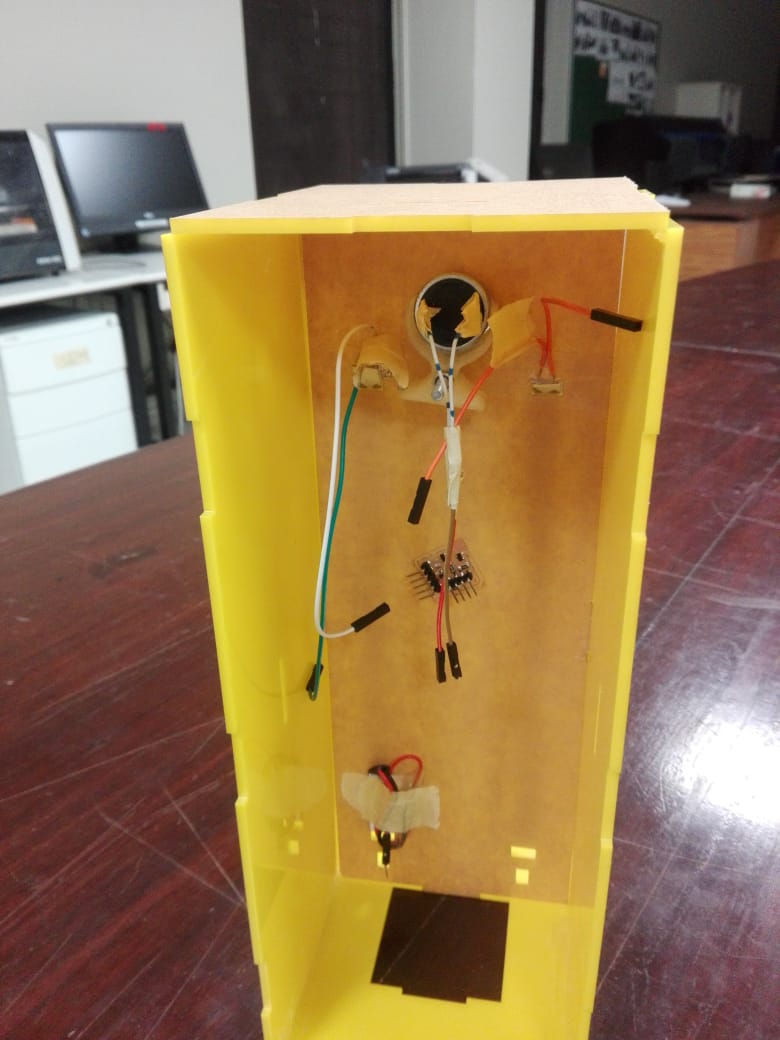
Mainely it was electronics here in assembling. So i will just take you through the a few glimpses while integration.
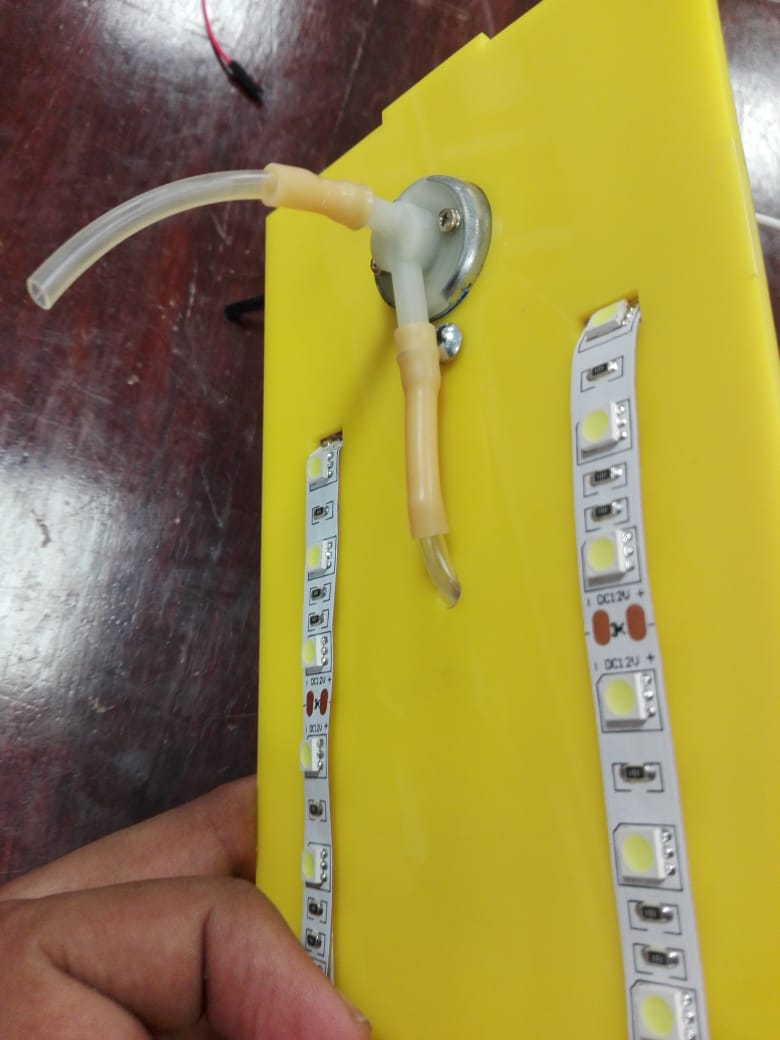
Just after assembling laser cutted press-fit frame i started integrating all output devices (solenoids, led strips, and water pump) with 328p board mentioned in elecronics portion.
 I continued with connections..
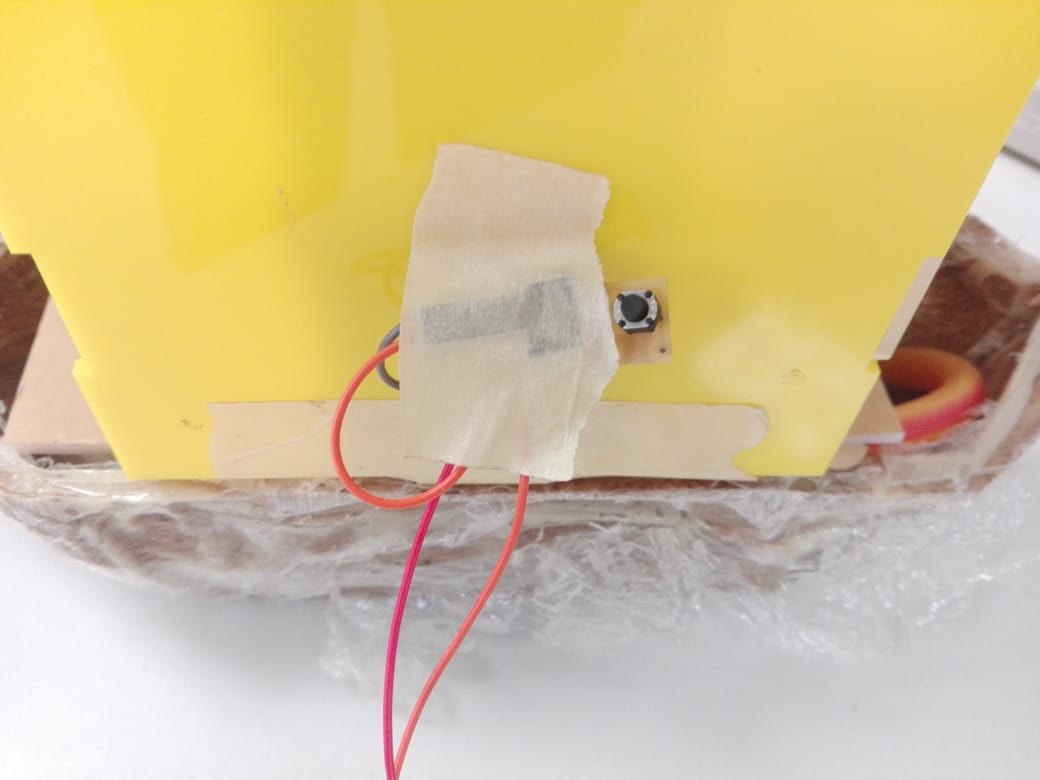
 I also added a button to tune frequency of led to make the effect more accurate.
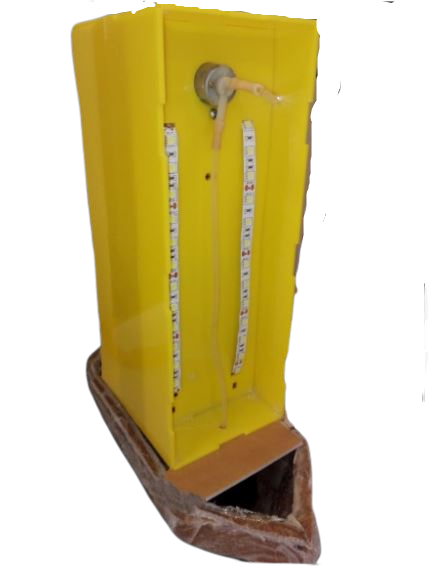
That was it..
Below attached is the bill of material,
Bill of Material
Electronics
Traces
Drills
Outline
Schematic
Board
Traces
Drills
Outline
Laser Cutting
Assemply Part (Main)
Side
Top
Bottom
Front
CNC Milling
3d Printing
Programming
Test Program
const byte ledStrip = 10;
d = 11;
void setup() {
Serial.begin(9600);
pinMode(Water_pump, OUTPUT);
pinMode(ledStrip, OUTPUT);
waterPump_on();
}
void loop() {
digitalWrite(ledStrip, HIGH);
delay(d);
digitalWrite(ledStrip, LOW);
delay(d);
}
void waterPump_on(){
analogWrite(Water_pump, 115);
}
void waterPump_off(){
analogWrite(Water_pump,0);
}
Final Program
#define BASE_FREQ 45
#define MIN_FREQUENCY_OFFSET -8.0
#define MAX_FREQUENCY_OFFSET 8.0
#define MIN_BRIGHTNESS 2
#define MAX_BRIGHTNESS 10.0
#define NumofModes 4 // Number of Operational modes
const byte LED_strip = 9; // pin for LED strip control
const byte LED_strip1 = 10;
const byte SValve = 6; // pin for Solenoid Valve
const byte Water_pump = 5; // pin for Water pump control
const byte ButtonSW = 3; // pin for mode selection button
const byte Sensor = 4; // pin for photoelectric sensor
const byte LED = 13; // pin for on-board LED
boolean led_on = true;
boolean mode_changed = true;
boolean increaseFrequency_led = true;
byte mode = 1; //toggle with button SW
//mode 1 = normal mode (power on)
byte buttonState = 0;
byte lastButtonState = 0;
byte val_Sensor = 0;
float frequency_offset = 0.1;
float duty_sValve = 18;
float frequency_sValve = BASE_FREQ;
float duty_led = 7;
float frequency_led = frequency_sValve+frequency_offset;
float totalcount = 0;
int lastBrightnessValue = 0;
int pumpIntensity = 0;
//********************************************************************
void setup()
{
Serial.begin(9600);
pinMode(LED, OUTPUT); // Heart Beat LED
pinMode(ButtonSW, INPUT_PULLUP); // Mode button
pinMode(Water_pump, OUTPUT); // Water_pump
pinMode(Sensor, INPUT); // Sensor
//initialize all timers except for 0, to save time keeping functions
InitTimersSafe();
//sets the frequency for the specified pin
bool success = SetPinFrequencySafe(LED_strip, frequency_led);
//bool success1 = SetPinFrequencySafe(LED_strip1, frequency_led);
bool success1 = SetPinFrequencySafe(SValve, frequency_sValve);
//bool success3 = SetPinFrequencySafe(SValve, frequency_sValve);
//if the pin frequency was set successfully, turn LED on
if(success and success1)
digitalWrite(LED, HIGH);
}
//********************************************************************
void loop()
{
if (mode_changed == true)
{
if (mode == 1) //normal mode
{
frequency_sValve = BASE_FREQ;
sValve_on();
sValve_on1();
led_on = true;
}
else if (mode == 2) // demo mode
{
//frequency_led shall change in main loop
}
else if (mode == 3) // levitation mode
{
frequency_led = BASE_FREQ;
}
else if (mode == 4) // Light off but water pump is still on
{
led_on = false;
}
mode_changed = false;
}
// *******************************************************************
pumpIntensity = map(analogRead(A2), 0, 1023, 100, 255);
waterPump_on();
// *******************************************************************
val_Sensor = digitalRead(Sensor); // read the sensor pin
if (mode == 1)
{
if (val_Sensor == 1) // sensor unblocked
{
frequency_offset = -(MAX_FREQUENCY_OFFSET-MIN_FREQUENCY_OFFSET)/1023L*analogRead(A1)+MAX_FREQUENCY_OFFSET;
totalcount = 0;
}
else //sensor blocked
{
totalcount = totalcount + 0.001;
frequency_offset = -(MAX_FREQUENCY_OFFSET-MIN_FREQUENCY_OFFSET)/1023L*analogRead(A1)+MAX_FREQUENCY_OFFSET + totalcount;
if (frequency_offset < MIN_FREQUENCY_OFFSET)
frequency_offset = MIN_FREQUENCY_OFFSET;
if (frequency_offset > MAX_FREQUENCY_OFFSET)
frequency_offset = MAX_FREQUENCY_OFFSET;
}
}
else
frequency_offset = -(MAX_FREQUENCY_OFFSET-MIN_FREQUENCY_OFFSET)/1023L*analogRead(A1)+MAX_FREQUENCY_OFFSET;
// *******************************************************************
if (led_on == true)
{
duty_led = -(MAX_BRIGHTNESS-MIN_BRIGHTNESS)/1023L*analogRead(A0)+MAX_BRIGHTNESS;
if (mode == 2) // demo mode
{
if (frequency_led <= (BASE_FREQ + MIN_FREQUENCY_OFFSET) + 2)
{
increaseFrequency_led = true;
totalcount = 0;
}
else if (frequency_led >= (BASE_FREQ + MAX_FREQUENCY_OFFSET) - 2)
{
increaseFrequency_led = false;
totalcount = 0;
}
else if ((frequency_led > (BASE_FREQ - 1)) and (frequency_led < (BASE_FREQ + 1))) {
delay(360);
}
totalcount = totalcount + 0.001;
if (increaseFrequency_led == true)
frequency_led += totalcount;
else
frequency_led -= totalcount;
delay(120);
}
else if (mode == 1)
frequency_led = frequency_sValve+frequency_offset;
SetPinFrequencySafe(LED_strip, frequency_led);
SetPinFrequencySafe(LED_strip1, frequency_led);
if (lastBrightnessValue < round(duty_led*255/100)) //previously dimmer - gradually bright it
{
for (int i=lastBrightnessValue; i
pwmWrite(LED_strip, i);
pwmWrite(LED_strip1, i);
delay(30);
}
}
else if (lastBrightnessValue > round(duty_led*255/100)) //previously brighter - gradually dim it
{
for (int i=lastBrightnessValue; i>round(duty_led*255/100); i--)
{
pwmWrite(LED_strip, i);
pwmWrite(LED_strip1, i);
delay(30);
} }
else //no change in brightness
pwmWrite(LED_strip, round(duty_led*255/100));
pwmWrite(LED_strip1, round(duty_led*255/100));
lastBrightnessValue = round(duty_led*255/100);
}
else
{
//gradually dim off
for (int i=round(duty_led*255/100); i>0; i--)
{
pwmWrite(LED_strip, i);
pwmWrite(LED_strip1, i);
delay(30);
}
duty_led = 0;
pwmWrite(LED_strip, 0);
pwmWrite(LED_strip1, 0);
lastBrightnessValue = 0;
}
// ******************************************************************
// read the button SW
buttonState = digitalRead(ButtonSW);
// compare the buttonState to its previous state
if (buttonState != lastButtonState)
{
// if the state has changed, increment the mode count
if (buttonState == LOW)
{
mode++;
if (mode > NumofModes)
mode = 1; //rotary menu
mode_changed = true ;
}
// delay a little bit for button debouncing
delay(50);
}
lastButtonState = buttonState;
}
//********************************************************************
void sValve_on()
{
pwmWrite(SValve, 115);
}
void sValve_on1()
{
pwmWrite(SValve1, 115);
}
//****************************************************************
void sValve_off()
{
pwmWrite(SValve, 0);
}
void sValve_off1()
{
pwmWrite(SValve1, 0);
}
//********************************************************************
void waterPump_on()
{
analogWrite(Water_pump,pumpIntensity);
}
//********************************************************************
void waterPump_off()
{
analogWrite(Water_pump,0);
}
Assembling & Integration
| Component | Quantity | Price |
|---|---|---|
| Highly Bright LEDs | 60 (4 strips, 15 leds each) | PKR:34.87 , 0.23USD (approx) |
| Solenoid Valves | 2 | PKR:350, 2.3USD (approx) |
| Water Pump | 1 | PKR:450, 3USD (approx) |
| N-Channel MOSFETS | 4 (2 side leds, 1 solenoid, 1 pump) | PKR:83.39 , 0.55USD (approx) |
| ATMEGA328 | 1 | PKR:209.24 , 1.38USD (approx) |
| ACRYLIC | 2 (transparent-yellow) | PKR:450 , 3USD (approx) |
| 3d Prinitnng Material | 1g | PKR:21.23 , 0.14USD (approx) |
| Copper sheets for PCB Milling | 1 | PKR:30.33 , 0.2USD (approx) |
| Misscelinious | N/A | PKR:1516.25 , 10USD (approx) |
| Total | 9 different components | PKR:6065.00 , 40USD (approx) |
Concluding Remarks
I am very happy to be able to complete this project and that it works. This has been a great opportunity for me to experiment and learn from my mistakes. I have acquired working know-how of several design and manfucturing techinques and I have developed understanding to decide which design techinques, processes and materials would be suitable for what application.Being an engineer another great outcome from this academy is that i have come to recognize the business plan and cost considerations. I beleive tech entrepeneurship is the way forward for my country and my people to progress, and fab academy has really upscaled me in every aspect, whether it be moral or technical. Hence i look forward to serve the community with all the skills i posses. There are many positives but being part of this great community of makers, makes me feel privileged.
I plan to take my project ahead to commercial grade by introducing illusive displays, and expect more such innovative and chellanging ideas coming my way in future; as precisely now I am confident that i have all the requisite skills and understanding to make almost anything.
Thank you
Downloads
Find shopbot files here
Find laser cut files here
Find 3d print files here
Find program files here

This work is licensed under a Creative Commons Attribution-ShareAlike 4.0 International License
Copyright © 2019 Azmat Hussain