Build Something Big/Computer Controlled Machining
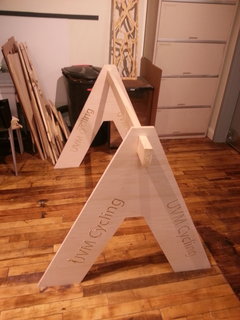
The assignment this week was to use the shopbot to create something large. The shopbot we have in Providence has a 4x8 foot platform that is capable of cutting/routing plywood, foam, many plastics, as well as a variety of other materials. I decided I wanted to make a stand/rack to hold a large amount of bikes at a bike race. I decided to use a simple design, basically creating a long sawhorse with two sides made of plywood, and a piece of 2X4 in between it.
First, I designed the two sides in Adobe Illustrator. I needed to be careful to make sure that the hole in the side pieces fit a 2x4 tightly, so as to not get messed up when it is under load, but not too tight to make it hard to get on and off when transporting between races. I first had the hole measuring 2 inches by 4 inches, but then I remembered that those are not the actual dimensions, but the rough dimensions before the lumber is finsished. I measured a peice, and it turned out to be 1.5 to 3.5 inches.
After I finished the designing, making sure to have a 4x8 foot border around the file, I exported it to a flash drive and brought it to the shopbot. Once on the shopbot pc, I opened up partsworks and chose my toolpaths. I learned the difference between pocket cuts and profie cuts. Pocket cuts create a pocet in the wood, as in they don't cut all theway through. A profile cut goes all the way through the material. They can be used for many different things, but they each have different options when choosing the toolpaths. Once I chose the toolpaths, I put a downcut endmill in the chuck of the shopbot. A downcut bit pushes the shavings and chips created by routing downwards so that they get compacted, and actually help the cut out pieces stay in place.
After this, I used the shopbot software to zero out the machine in the x,y and z axis. The z axis zeroing tool is pretty smart. Basically it uses a circuit that is completed when the bit of the machine is lowered onto a metal plate that is placed on top of the cutting material. The machine stops when the circuit is completed, and it knows how thick the plate is, so it can calculate the exact plane that the material is on.
Once zeroed, I ran the job. I ran into a few problems when running it however. First, the shobot didn't spin the bit, and drove the endmill into the material. This happened because the control box that runs the router function of the machine has been a bit finnicky, and didn't actually turn on when the key was in, and the switch was in the on position. We quickly stopped the job, and reset, making sure the control box for the router turned on.
After this, the machine ran the majority of the job smoothly, but near the end of the job the bit slipped downwards out of the collet, and messed up the cut it was doing. Also, because of the slip, the machine slipped gears, and lost its zero, or home postion, so I had to re-zero before finishing. I think the slip ahppened because of the first mishap, as I tightened the collet pretty tight in the beggining, and when we checked afterwords, the bit was still tight in the collet, although it slipped downwards about 3 quarters of an inch.
After I fixed this, and rezeroed, I finished the job, and tried out my design. It fits a 2x4 very well, and seems to hold a lot of weight!