This week, our team built a CNC Sand Plotter (Sisyphus style) where a neodymium magnet moves a steel ball through sand to draw patterns.
My specific role: I was responsible for the software architecture and communications. I designed a custom web-based CAM tool ("Sand-Path Mission Control") that runs entirely on the browser to convert images into continuous G-Code, and developed the OTA (Over-The-Air) communication protocol to send this data wirelessly to the ESP32-C6 controller.
CO-OP MISSION: TEAM PROTOCOLS
To see the full mechanical design, electronic wiring, and assembly of our machine, please visit our Group Project Page.
Instead of relying on external software, I built my own **Client-Side Web Application**. This tool allows the user to upload a PNG image, adjust the contrast threshold, preview the generated path, and send the G-Code wirelessly to the ESP32 CNC controller.
*Note: The CNC machine and the laptop must be connected to the same Wi-Fi network for the wireless transmission to work.
THE DUMMY'S GUIDE: HOW EVERYTHING WORKS
Programming a CNC machine sounds like rocket science, but it’s actually just like passing secret notes in class. Here is the entire process of how our machine works, explained simply!
1. JOINING THE WI-FI PARTY (The 2.4GHz Network)
Our machine’s brain is a tiny chip called the ESP32. Just like your phone, it needs to connect to the house Wi-Fi. But it specifically uses the 2.4GHz Wi-Fi band (not the 5G one). Why? Because 2.4GHz waves travel further and can go through walls easily, which is perfect for machines that might be far from the router.
When the ESP32 successfully connects to the router using your password, the router gives it a nametag. This nametag is called an IP Address (like 192.168.1.50). It’s basically the machine's local phone number. Without this number, my laptop wouldn't know who to call!
2. THE TRANSLATOR APP (Image to Math)
The machine only speaks math (coordinates like X:10, Y:20), but we want to draw cool pictures. So, I built a Web App to act as the translator.
When you upload a picture to the app, the app looks at every single dot (pixel) on the screen. It finds the dark pixels and says, "Okay, the magnet needs to go here." But remember the Magnet Paradox: we can't lift the magnet! So the app plays a game of "Connect the Dots", always finding the closest next dot using the Pythagorean theorem, making sure the line never breaks. Once it maps the whole drawing, it writes down a long list of instructions called G-Code.
3. THE STRICT BODYGUARD (Bypassing CORS)
Now we have the G-Code instructions on the laptop, and we need to send them to the ESP32's IP address over the Wi-Fi. Sounds easy, right? Well, Web Browsers (like Chrome or Safari) have a built-in bodyguard called CORS (Cross-Origin Resource Sharing).
If a random web page tries to send data to a device on your home network, the browser panics and blocks it to keep you safe from hackers. To get past the bodyguard, we taught our ESP32 to send a "VIP Pass" (special HTTP headers) back to the browser. The ESP32 basically says: "It's cool, I know Javi, let the data through!"
4. FIRING THE PAYLOAD (Wireless Transmission)
Once the bodyguard steps aside, the app packages the massive list of G-Code instructions into a digital box (a payload). When you hit the "SEND TO ESP32" button, the laptop shoots that box through the invisible Wi-Fi waves directly to the ESP32's IP address.
The ESP32 catches the box, opens it, reads the first coordinate, and tells the motors to start spinning. The magnet moves, the sand shifts, and the drawing comes to life. Zero cables required!
02. THE APP INTERFACE (UI/UX)
Instead of relying on clunky desktop software or installing dependencies, I wanted a modern, accessible, and frictionless solution. I built a Client-Side Web Application using HTML, CSS, and Vanilla JavaScript.
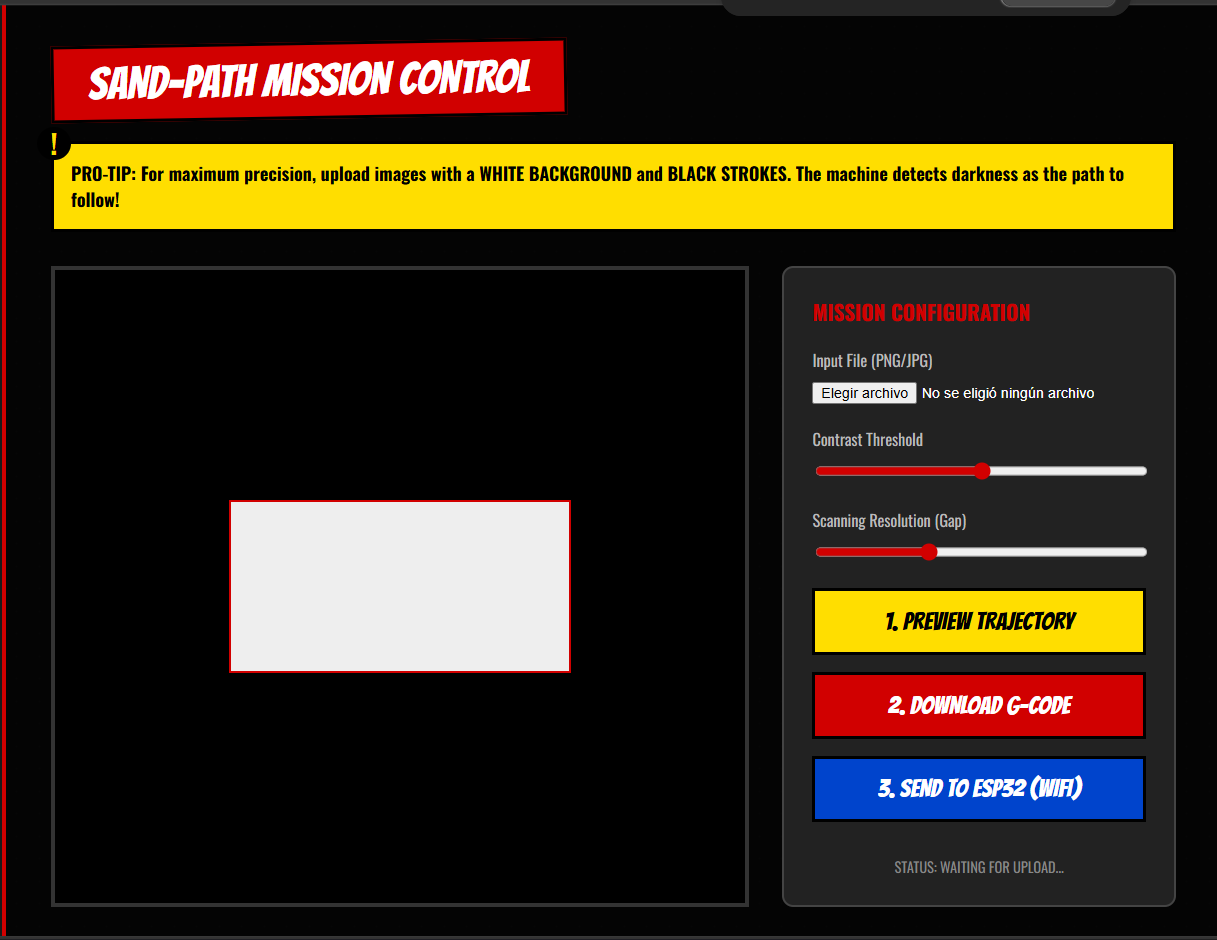
The interface allows users to upload a PNG/JPG file, adjust the contrast threshold via a slider (to define what is considered a "drawing path"), and preview the trajectory. The core technical achievement here is using the HTML5 <canvas> API to read the raw pixel data arrays directly in the browser. By extracting the RGBA values of each pixel, the script identifies the dark paths that the physical magnet should follow, translating digital pixels into a virtual coordinate map without needing any backend server processing.
The Sand-Path Mission Control interface running locally in the browser.
03. THE LOGIC: IMAGE TO G-CODE
THE PERMANENT MAGNET PARADOX
Generating G-Code for a traditional CNC or 3D printer is straightforward: you lift the Z-axis, move to the next coordinate, and lower it. However, dealing with a permanent neodymium magnet beneath a table presents a unique physical limitation: we don't have a Z-Axis. Everything the machine does leaves a mark in the sand. If the magnet jumps from one corner to another, it will draw a straight line through the artwork.
To solve this paradox, I had to write a custom mathematical algorithm in JavaScript:
Edge Detection & Mapping: It scans the canvas to find the boundaries between dark and light pixels, generating an array of valid target coordinates.
Nearest Neighbor Algorithm: Instead of jumping randomly through the array, the code starts at the origin coordinate (0,0). It then mathematically searches the entire array for the closest next point using the Pythagorean distance formula (dx²+dy²). Once found, it moves there and repeats, forcing a single, continuous, non-lifting toolpath.
Physical World Scaling: Finally, a formula scales the 500x500 web pixels into the 180x180 millimeters of our physical CNC bed: ((pixelX / 500) * 180), outputting standard G0/G1 commands.
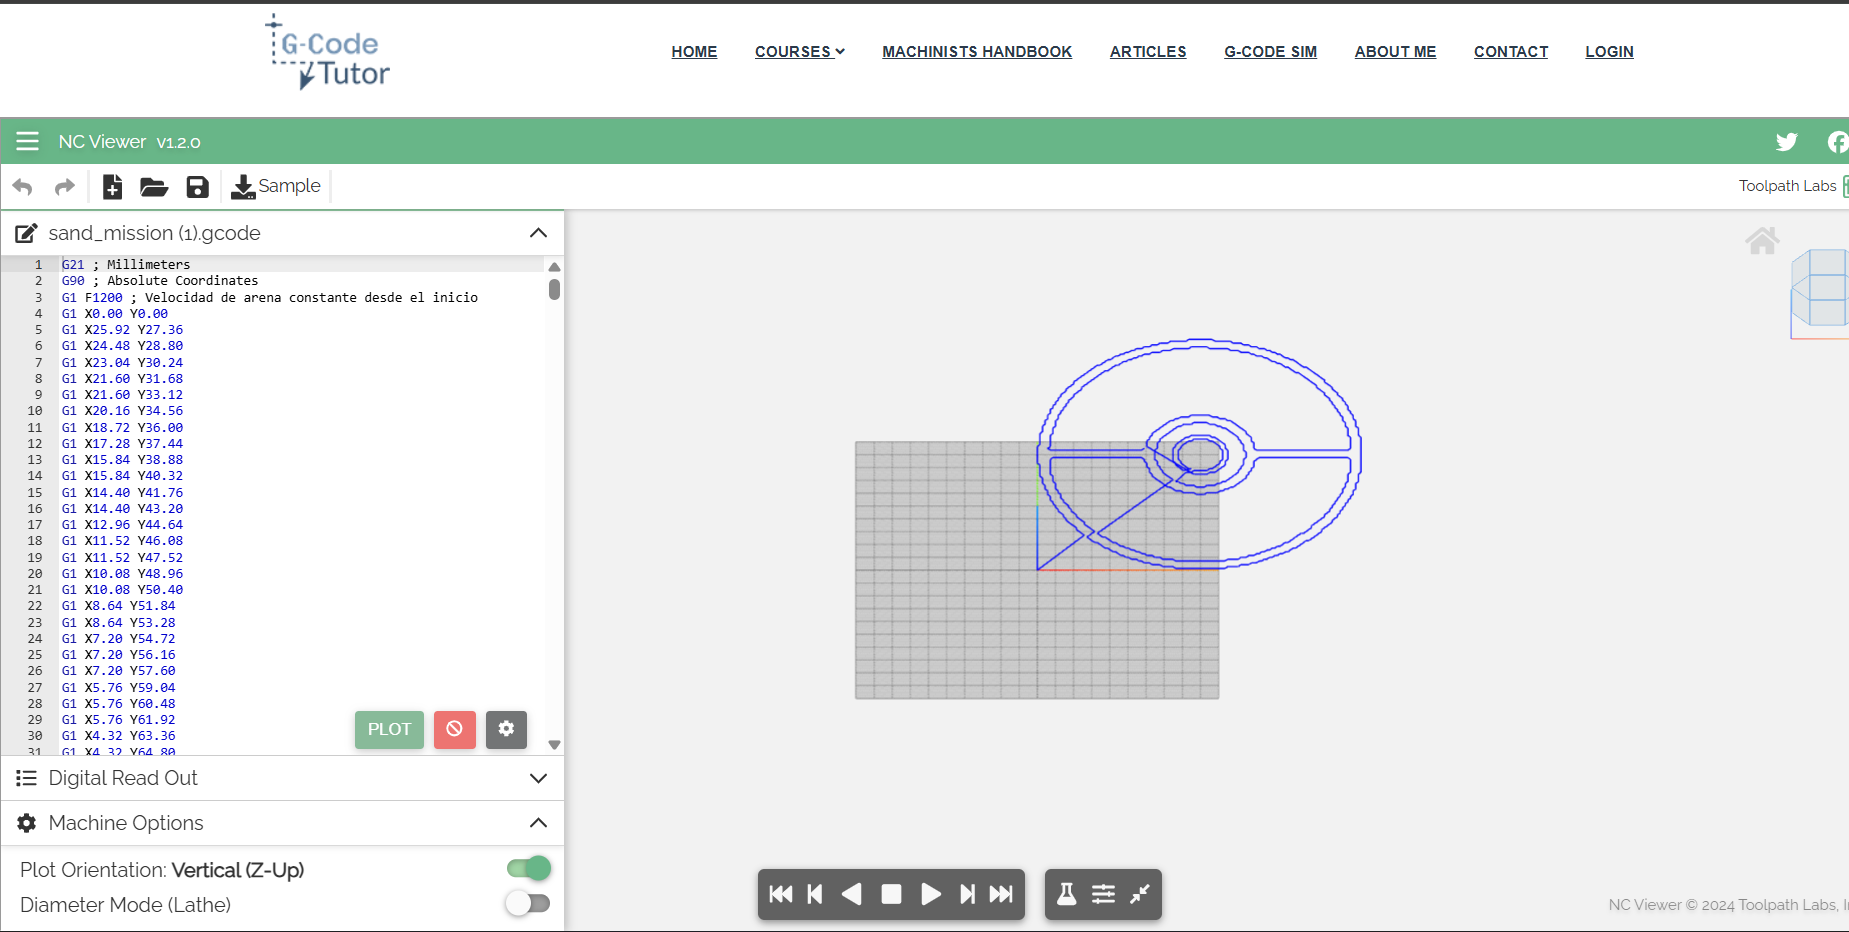
Simulating the continuous G-Code. Notice how it enters from the origin (0,0) and traces everything without breaks.
04. WIRELESS NETWORKING (OTA)
To completely eliminate the need for a USB connection (since the machine sits on a standalone table), I programmed the ESP32-C6 to act as an asynchronous HTTP Server on our local 2.4GHz Wi-Fi network.
When the user clicks the "Send to ESP32" button on the webpage, a JavaScript fetch() request packages the entire G-Code string and sends an HTTP POST request to the microcontroller's IP address.
Overcoming the CORS Block: One of the biggest challenges in this step was dealing with browser security. Modern browsers block HTTP requests sent from local files (or local web servers) to external IP addresses due to CORS (Cross-Origin Resource Sharing) policies. To bypass this, I had to program the ESP32 to explicitly handle HTTP OPTIONS requests and reply with the headers Access-Control-Allow-Origin: *. This tells the browser that the ESP32 is a safe device, allowing the G-Code payload to pass through flawlessly.
05. HERO SHOT
Testing the full integration: From image upload, to local continuous G-Code processing, to wireless transmission, and finally, physical movement in the sand!
Software and Hardware working together perfectly.
06. THE CODE VAULT
// 1. NEAREST NEIGHBOR ALGORITHM (JAVASCRIPT)
// Finding the closest next pixel to create a continuous line
while (edgePoints.length > 0) {
    let nearestIdx = 0;
    let minDist = Infinity;

    for (let i = 0; i < edgePoints.length; i++) {
        let dx = current.x - edgePoints[i].x;
        let dy = current.y - edgePoints[i].y;
        let d = dx*dx + dy*dy;
        if (d < minDist) {
            minDist = d;
            nearestIdx = i;
        }
    }
    current = edgePoints.splice(nearestIdx, 1)[0];
    path.push(current);
}
// 2. ESP32 OTA RECEIVER & CORS HANDLING (C++)
#include <WiFi.h>
#include <WebServer.h>

const char* ssid ="WIFI NAME";
const char* password ="PASSWORD";

WebServer server(80);

void setup() {
  Serial.begin(115200);
  delay(1000);

  WiFi.begin(ssid, password);
  Serial.print("Conectando al Wi-Fi");
  //THE LAPTOP AND THE ESP32 MUST BE ON THE SAME WIFI NETWORK FOR THIS TO WORK
  while (WiFi.status() != WL_CONNECTED) {
    delay(500);
    Serial.print(".");
  }

  Serial.println("\n¡Conexion exitosa!");
  Serial.print("=== TU IP DE HOY ES: ");
  Serial.print(WiFi.localIP());
  Serial.println(" ===");

  // PREFLIGHT CORS HANDLER
  server.on("/upload", HTTP_OPTIONS, []() {
    server.sendHeader("Access-Control-Allow-Origin", "*");
    server.sendHeader("Access-Control-Max-Age", "10000");
    server.sendHeader("Access-Control-Allow-Methods", "POST,GET,OPTIONS");
    server.sendHeader("Access-Control-Allow-Headers", "*");
    server.send(204);
  });

  // GCODE PAYLOAD HANDLER
  server.on("/upload", HTTP_POST, []() {
    server.sendHeader("Access-Control-Allow-Origin", "*");

    if (server.hasArg("plain")) {
      String gcodeRecibido = server.arg("plain");
      Serial.println("\n=== NUEVA MISION RECIBIDA ===");
      Serial.println(gcodeRecibido);
      Serial.println("=============================");

      server.send(200, "text/plain", "¡Mision Recibida por la ESP32 de Javi!");
    } else {
      server.send(400, "text/plain", "Error: El payload llego vacio");
    }
  });

  server.enableCORS(true);
  server.begin();
}

void loop() {
  server.handleClient();
}