11. Networking and Communications
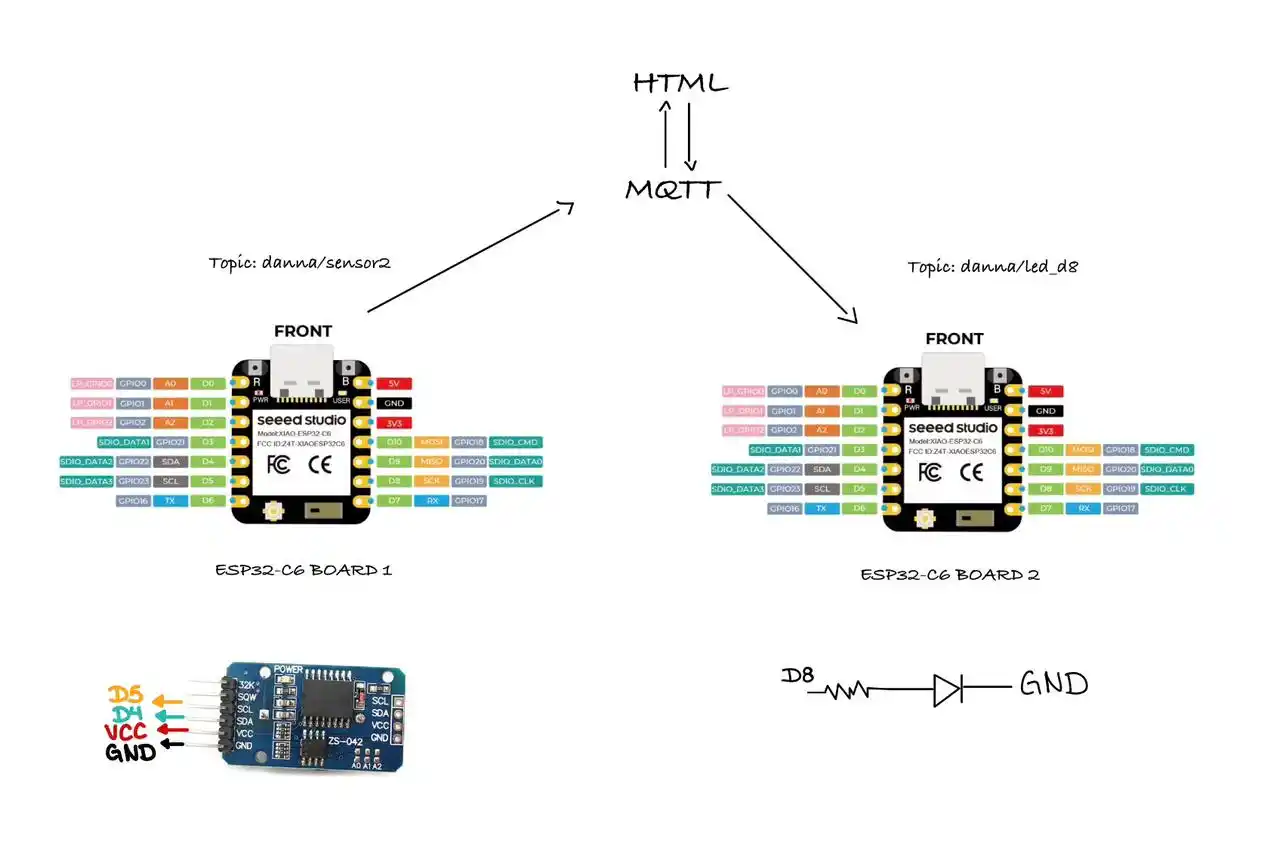
For this week's assignment, I developed an IoT communication system that connects a XIAO ESP32-C6 (using the same design as week 8, only replacing the RP2350 with the ESP32-C6; my friend Oscar lent me the other board) to an HTML interface via the MQTT protocol. I implemented a publish-subscribe architecture that allows for real-time data exchange.
1. Emitting Node (Publisher)
For data capture, I used a XIAO ESP32-C6 that communicates with a DS3231 RTC sensor via the I2C protocol. The microcontroller extracts the real-time clock and formats it into a text string. Once the Wi-Fi connection is established, the device acts as a Publisher, sending this information to the HiveMQ broker under the topic danna/sensor2 for visualization in an HTML interface.
2. Control Interface (Subscriber/Publisher)
The web page functions as a central monitoring and control node. On one hand, it is subscribed to the topic danna/sensor2 to show the RTC time in real time. On the other hand, it integrates a control function that allows the user to interact with the system; by pressing buttons on the interface, the page acts as a Publisher, sending text commands ("ON" / "OFF") to the broker under the topic danna/led_d8 to control an LED.
3. Receiving Node (Subscriber)
For the execution of alerts, a second XIAO ESP32-C6 is implemented, which functions exclusively as a Subscriber. This microcontroller remains connected to the HiveMQ broker listening to the topic danna/led_d8. Upon receiving a message, the code executes a callback function that activates or deactivates an LED connected to pin D8.
The webpage uses the mqtt.js library to connect to the same broker via WebSockets (port 8884) depending on which broker you are using. The page functions as a Subscriber. To learn more information, you can see the GROUP PAGE.
4. MQTT
MQTT (Message Queuing Telemetry Transport) is a lightweight messaging protocol designed for machine-to-machine (M2M) communication. It works under a Publish/Subscribe model:.
- Broker: It is the central server (in my case, broker.hivemq.com).
- Publisher: My XIAO ESP32-C6, which sends the data.
- Subscriber: My HTML page, which listens to the data.
- Topic:The "address" or label where the information is posted (danna/sensor2).
For this project, I chose MQTT over other protocols like HTTP for the following technical reasons:
- Efficiency and Packet Size: Unlike HTTP, which sends large headers and text-based data, MQTT uses a very small fixed header (only 2 bytes). This minimizes the overhead, making it ideal for the limited memory and processing power of the XIAO ESP32-C6.
- Speed and Latency: MQTT is designed for real-time applications. Since it maintains an open connection to the broker, the initial handshake only occurs once. This allows the RTC time updates and the speaker commands to travel almost instantly, whereas HTTP would require a new connection for every single message.
- Power Consumption: Due to its lightweight nature and reduced transmission time, MQTT helps conserve energy.
5. ARDUINO CODE (EMITING NODE)
#include <WiFi.h>
#include <PubSubClient.h>
#include <Wire.h>
#include "RTClib.h"


const char* ssid = "INFINITUM0B53_2.4";
const char* password = "fTUXCH4CMR";


const char* mqtt_server = "broker.hivemq.com";
const char* topic_time  = "danna/sensor2";

WiFiClient espClient;
PubSubClient client(espClient);
RTC_DS3231 rtc;

void setup_wifi() {
  delay(10);
  Serial.print("\nConnecting to WiFi...");
  WiFi.begin(ssid, password);
  while (WiFi.status() != WL_CONNECTED) {
    delay(500);
    Serial.print(".");
  }
  Serial.println("\nWiFi connected!");
}

void reconnect() {
  while (!client.connected()) {
    Serial.print("Attempting MQTT connection...");

    if (client.connect("XIAO_C6_Clock_Only")) {
      Serial.println("Connected!");
    } else {
      Serial.print("Error: ");
      Serial.print(client.state());
      delay(5000);
    }
  }
}

void setup() {
  Serial.begin(115200);
  setup_wifi();
  client.setServer(mqtt_server, 1883);

  // Initialize I2C on pins D4 (SDA) and D5 (SCL)
  Wire.begin();

  if (!rtc.begin()) {
    Serial.println("RTC module not detected. Check SDA/SCL wires.");
    while (1);
  }

  // Only if the clock lost power, sync with the computer's time
  if (rtc.lostPower()) {
    rtc.adjust(DateTime(F(__DATE__), F(__TIME__)));
  }
}

void loop() {
  if (!client.connected()) {
    reconnect();
  }
  client.loop();

  // GET TIME FROM I2C SENSOR
  DateTime now = rtc.now();
  char horaFormateada[12];


  sprintf(horaFormateada, "%02d:%02d:%02d", now.hour(), now.minute(), now.second());

  // SEND TO MQTT (Topic: danna/sensor2)
  client.publish(topic_time, horaFormateada);


  Serial.print("Time sent to Dashboard: ");
  Serial.println(horaFormateada);

  delay(1000);
}
Explanation
Libraries
WiFi.h: Enables the board to connect to the internet.
PubSubClient.h: The library that manages the MQTT protocol.
Wire.h: Allows I2C communication.
RTClib.h: Specific for reading the clock sensor (RTC).
Next, we define our network name, password, and server address along with the topic.
Network Configuration
setup_wifi(): Attempts to connect to your local network.
reconnect(): If connection to the HiveMQ server is lost, it tries to reconnect every 5 seconds.
Setup Block
rtc.begin(): Initializes communication with the clock.
client.setServer(mqtt_server, 1883);: We indicate where the data will be sent.
Loop Block
The time is obtained, and the data is formatted to be readable.
client.publish(topic_time, horaFormateada): Publishes the data to the topic we previously defined.
6. ARDUINO CODE (RECEIVING NODE)
#include <WiFi.h>
#include <PubSubClient.h>


const char* ssid = "INFINITUM0B53_2.4";
const char* password = "fTUXCH4CMR";


const char* mqtt_server = "broker.hivemq.com";
const char* topic_led = "danna/led_d8"; // The same topic we configured in the HTML

WiFiClient espClient;
PubSubClient client(espClient);


const int ledPin = D8;

void setup_wifi() {
  delay(10);
  Serial.print("\nConnecting to WiFi...");
  WiFi.begin(ssid, password);
  while (WiFi.status() != WL_CONNECTED) {
    delay(500);
    Serial.print(".");
  }
  Serial.println("\nWiFi connected!");
}

// Function that executes when an MQTT message arrives
void callback(char* topic, byte* payload, unsigned int length) {
  String messageTemp;

  Serial.print("Message received on topic: ");
  Serial.print(topic);
  Serial.print(". Message: ");

  for (int i = 0; i < length; i++) {
    Serial.print((char)payload[i]);
    messageTemp += (char)payload[i];
  }
  Serial.println();

  // Check if the message is for our topic
  if (String(topic) == topic_led) {
    if (messageTemp == "ON") {
      digitalWrite(ledPin, HIGH); // Turns the LED on
      Serial.println("-> LED On");
    }
    else if (messageTemp == "OFF") {
      digitalWrite(ledPin, LOW);  // Turns the LED off
      Serial.println("-> LED Off");
    }
  }
}

void reconnect() {
  while (!client.connected()) {
    Serial.print("Attempting MQTT connection...");
    // Create a random client ID to avoid conflicts with the other board
    String clientId = "XIAO_C6_LEDClient_";
    clientId += String(random(0xffff), HEX);

    if (client.connect(clientId.c_str())) {
      Serial.println("Connected!");
      // Once connected, subscribe to the LED topic
      client.subscribe(topic_led);
    } else {
      Serial.print("Failed, rc=");
      Serial.print(client.state());
      Serial.println(" trying again in 5 seconds");
      delay(5000);
    }
  }
}

void setup() {
  Serial.begin(115200);


  pinMode(ledPin, OUTPUT);
  digitalWrite(ledPin, LOW);

  setup_wifi();

  client.setServer(mqtt_server, 1883);
  client.setCallback(callback); // Assign the function that will read the messages
}

void loop() {
  if (!client.connected()) {
    reconnect();
  }
  client.loop();
}
Explanation
Libraries
WiFi.h: Enables the board to connect to the internet.
PubSubClient.h: The library that manages the MQTT protocol.
Next, we define our network credentials, server address, and the topic we will listen to (danna/led_d8). We also declare pin D8 as the LED output.
Callback Function
callback(): This is a crucial function for a Subscriber node. It executes automatically every time a new message arrives at the subscribed topic. It reads the payload character by character, stores it in a string, and evaluates if the command is "ON" or "OFF" to change the LED state using digitalWrite().
Network Configuration
setup_wifi(): Attempts to connect to your local network.
reconnect(): Reconnects to the HiveMQ server using a randomly generated Client ID to prevent conflicts with the emitting board. Once connected, it uses client.subscribe(topic_led) to start listening for messages.
Setup Block
We configure pin D8 as an OUTPUT and set its initial state to LOW.
client.setCallback(callback);: This line links our previously defined callback function to the MQTT client, telling it how to handle incoming data.
Loop Block
client.loop(): This function must be called regularly. It keeps the connection alive, processes incoming messages, and triggers the callback function when necessary.
7. HTML CODE (CONTROL INTERFACE)
<!DOCTYPE html>
<html lang="es">
<head>
    <meta charset="UTF-8" />
    <meta name="viewport" content="width=device-width, initial-scale=1.0" />
    <title>Dashboard - Danna</title>
    <script src="https://unpkg.com/mqtt/dist/mqtt.min.js"></script>
    <style>
        :root {
            --bg: #C9EEFB;
            --strong-blue: #004B75;
            --text-main: #000000;
            --text-label: #888888;
        }

        * {
            box-sizing: border-box;
            margin: 0;
            padding: 0;
        }

        body {
            font-family: 'Inter', -apple-system, system-ui, sans-serif;
            background-color: var(--bg);
            color: var(--text-main);
            min-height: 100vh;
            display: flex;
            align-items: center;
            justify-content: center;
            padding: 20px;
        }

        .dashboard {
            text-align: center;
            width: 100%;
            max-width: 600px;
            display: flex;
            flex-direction: column;
            gap: 30px;
        }

        .label {
            font-size: 0.8rem;
            font-weight: 800;
            color: var(--strong-blue);
            text-transform: uppercase;
            letter-spacing: 5px;
            margin-bottom: 20px;
        }

        .panel {
            padding: 40px;
            border: 4px solid var(--text-main);
            border-radius: 50px;
            transition: all 0.3s ease;
            background-color: rgba(255, 255, 255, 0.3);
            display: flex;
            flex-direction: column;
            align-items: center;
            gap: 20px;
        }

        .panel:hover {
            border-color: var(--strong-blue);
            transform: translateY(-5px);
        }

        .cat-img {
            width: 150px;
            height: 150px;
            object-fit: cover;
            border-radius: 30px;
            transition: border-color 0.3s ease;
        }

        .panel:hover .cat-img {
            border-color: var(--strong-blue);
        }

        .time-value {
            font-size: 6rem;
            font-weight: 900;
            letter-spacing: -3px;
            line-height: 0.9;
        }

        /* Contenedor de botones */
        .btn-container {
            display: flex;
            gap: 20px;
            margin-top: 10px;
        }

        /* Estilos base del botón */
        .btn {
            padding: 15px 40px;
            font-size: 1.2rem;
            font-weight: 800;
            border-radius: 20px;
            cursor: pointer;
            transition: all 0.3s ease;
            text-transform: uppercase;
            border: 4px solid var(--strong-blue);
        }

        /* Clases dinámicas para el estado del botón */
        .btn-active {
            background-color: var(--strong-blue);
            color: white;
            transform: scale(1.05); /* Efecto de que está "presionado" o resaltado */
            box-shadow: 0 4px 15px rgba(0, 75, 117, 0.3);
        }

        .btn-inactive {
            background-color: transparent;
            color: var(--strong-blue);
        }

        .btn:hover:not(.btn-active) {
            background-color: rgba(0, 75, 117, 0.1);
        }

        @media (max-width: 600px) {
            .time-value { font-size: 4rem; }
            .panel { padding: 30px 20px; border-width: 3px; border-radius: 30px; }
            .cat-img { width: 100px; height: 100px; }
            .btn { padding: 12px 30px; font-size: 1rem; }
        }
    </style>
</head>
<body>

    <div class="dashboard">
        <div class="panel">
            <div class="label">Hora enviada desde el RTC</div>
            <img src="cat.png" alt="Gato Jumper" class="cat-img">
            <div id="reloj" class="time-value">--:--:--</div>
        </div>

        <div class="panel">
            <div class="label"> LED </div>
            <div class="btn-container">
                <button id="btn-on" class="btn btn-inactive">ON</button>
                <button id="btn-off" class="btn btn-active">OFF</button>
            </div>
        </div>
    </div>

    <script>
        const broker = "wss://broker.hivemq.com:8884/mqtt";
        const client = mqtt.connect(broker);

        const topicTime = "danna/sensor2";
        const topicLed = "danna/led_d8";

        // Botton elements
        const btnOn = document.getElementById("btn-on");
        const btnOff = document.getElementById("btn-off");

        client.on("connect", () => {
            console.log("Conectado al broker MQTT");
            client.subscribe(topicTime);
        });

        client.on("message", (topic, message) => {
            if (topic === topicTime) {
                document.getElementById("reloj").innerText = message.toString();
            }
        });

        // Botton logic ON
        btnOn.addEventListener("click", () => {
            client.publish(topicLed, "ON");

            // Actualizar interfaz
            btnOn.classList.remove("btn-inactive");
            btnOn.classList.add("btn-active");

            btnOff.classList.remove("btn-active");
            btnOff.classList.add("btn-inactive");
        });

        // Botton Logic OFF
        btnOff.addEventListener("click", () => {
            client.publish(topicLed, "OFF");

            btnOff.classList.remove("btn-inactive");
            btnOff.classList.add("btn-active");

            btnOn.classList.remove("btn-active");
            btnOn.classList.add("btn-inactive");
        });
    </script>
</body>
</html>
Explanation
NOTE:: If you want to know more about the basics of how to program an interface with HTML and CSS, you can check my Week 1 where I cover the structure and styling fundamentals.
Updating the HTML (DOM Manipulation)
document.getElementById("reloj"): This function searches the entire HTML document to find the specific element that has the ID reloj.
.innerText = message.toString(): Once the script finds the element, it replaces the text inside it with the new payload received from the MQTT broker, converting it to a readable text string. This is how the placeholder (--:--:--) gets replaced by the real time.
Button Events & Visual Feedback
addEventListener("click", () => { ... }): This method attaches an invisible "listener" to the button. It waits for the user to click the element, and when that event happens, it triggers the block of code inside the arrow function (like publishing the MQTT message).
classList.add("btn-active") and .remove("btn-inactive"): After the message is sent, these lines dynamically modify the CSS classes applied to the HTML buttons in real-time. By swapping these classes, we instantly change the button's appearance (colors, size, and shadow) to give the user clear visual feedback that the action was registered, all without reloading the page.
MQTT Connection & Topics
const broker: Defines the HiveMQ WebSocket address to enable MQTT directly in the web browser.
topicTime and topicLed store the specific paths we use to listen for the time data and send the LED commands, respectively.
Subscribing (Receiving Data)
client.on("connect", ...): Once the webpage successfully connects to the broker, it automatically subscribes to the topicTime.
client.on("message", ...): This event listener triggers every time a new message arrives. If the message belongs to our time topic, it grabs the HTML element with the ID reloj and updates its inner text with the new time string.
Publishing (Sending Commands)
addEventListener("click", ...): We attach click events to both buttons. When the "ON" button is clicked, it executes client.publish(topicLed, "ON"), sending that exact string to the Receiving Node.
After publishing, the code modifies the CSS classes (classList.add / .remove) to visually highlight the pressed button and deactivate the other one, providing immediate visual feedback to the user.