Week 13
Moulding and Casting
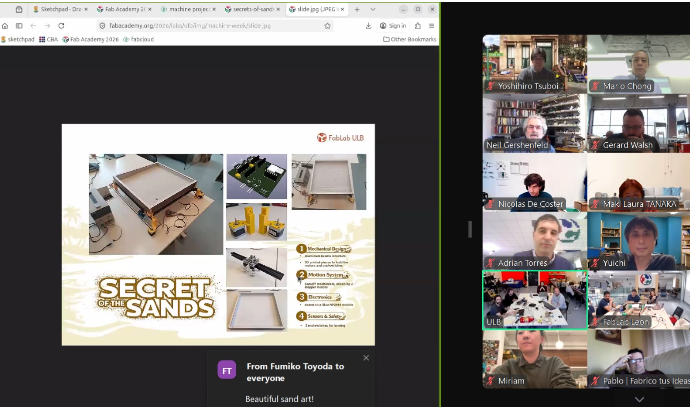
Class with Neil.
During Week 11 – Networking and Communications, the main objective was to understand how different electronic systems can communicate with each other through wired or wireless connections. This involved working with microcontrollers to send and receive data, enabling interaction between multiple devices instead of operating as standalone systems.
The workflow included key stages such as selecting the communication protocol, configuring connections, programming data exchange, and testing communication between devices. Through this process, I learned how to establish reliable communication, manage data transmission, and ensure proper synchronization between systems.
This assignment helped me understand how electronic devices can share information and work collaboratively, strengthening my skills in communication protocols, programming, and embedded system integration. 🌐⚡
Assignment Moulding and Casting
For this section, I created a visual composition using a photograph taken at the Faculty of Architecture of the National University of Engineering. In the image, I appear interacting with a scaled version of the Lanzón Monolith, which helps to give a better sense of proportion and presence of the piece in a real environment. This approach allowed me to connect my digital fabrication work with a physical and contextual setting.
To enhance the visual impact, I edited the image in Photoshop, integrating the 3D model into the scene in a realistic way. I adjusted lighting, perspective, and shadows so that the piece blends naturally with the environment. This final composition not only presents the project in a more engaging way but also reinforces the concept and cultural inspiration behind the design.

Group Assignment:
°Send a message between two projects
° Document your work to the group work page and reflect on your individual page what you learned
Have you answered these questions?
- I. Linked to the group assignment page. ✅
- II.Documented your project and what you have learned from implementing networking and/or communication protocols. ✅
- III.Explained the programming process(es) you used.. ✅
- IV. Ensured and documented that your addressing for boards works✅
- V. Outlined problems and how you fixed them. ✅
- VI.Included design files (or linked to where they are located if you are using a board you have designed and fabricated earlier) and original source code.✅
- VII.Included a ‘hero shot’ of your network and/or communications setup✅
Group Assignment Sumary
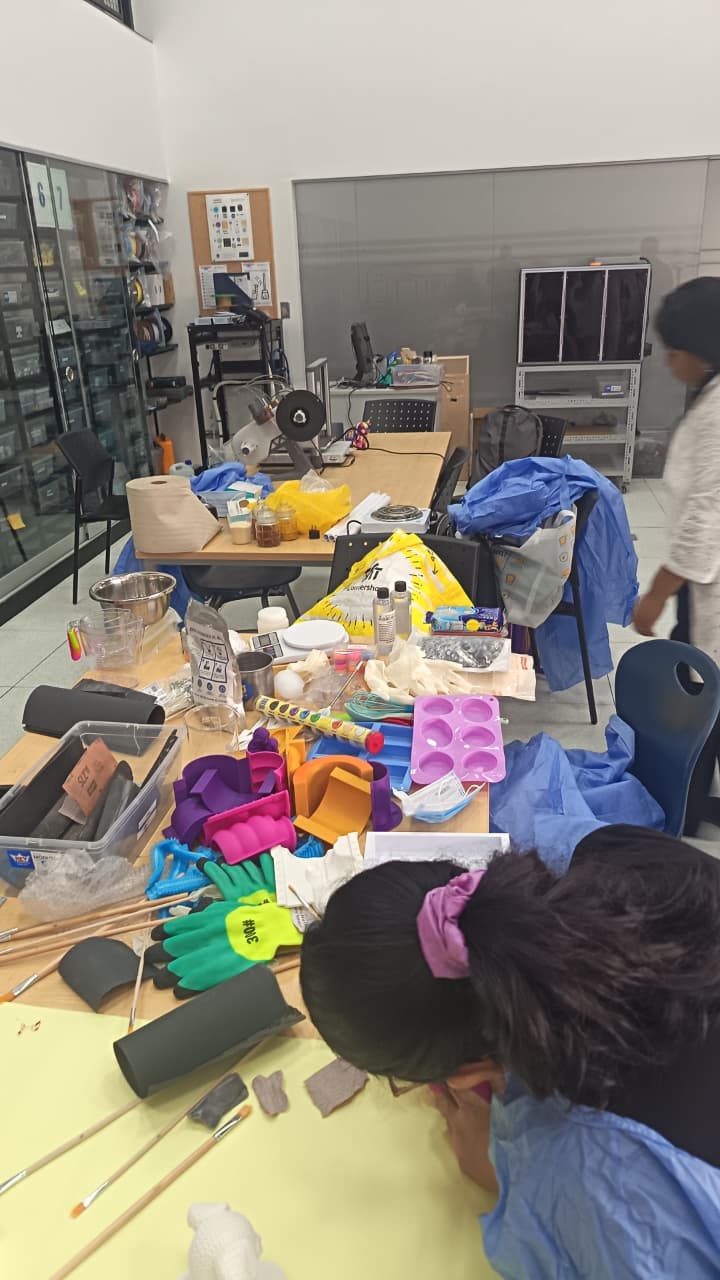
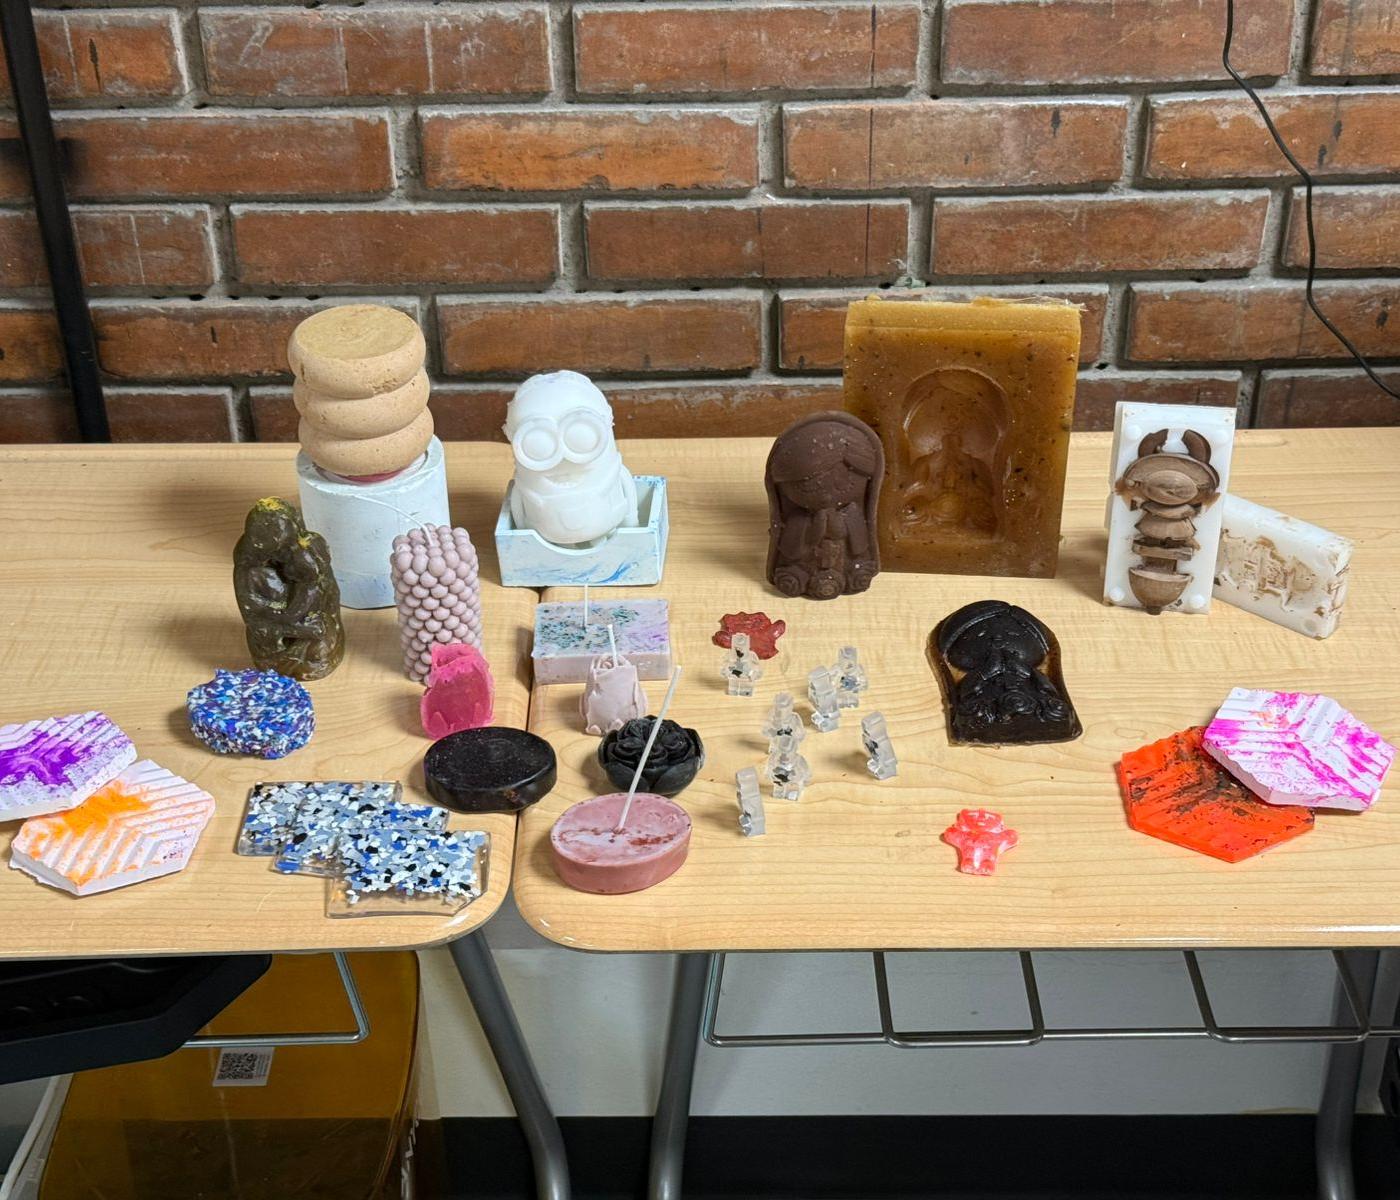
For the group assignment, we explored different materials and techniques related to moulding and casting. As a team, we acquired a variety of materials such as soy wax, resin, and gypsum (plaster), allowing us to test and compare their behavior during the casting process. In addition, we experimented with biomaterials combined with resin, which gave us a broader understanding of sustainable alternatives in digital fabrication.
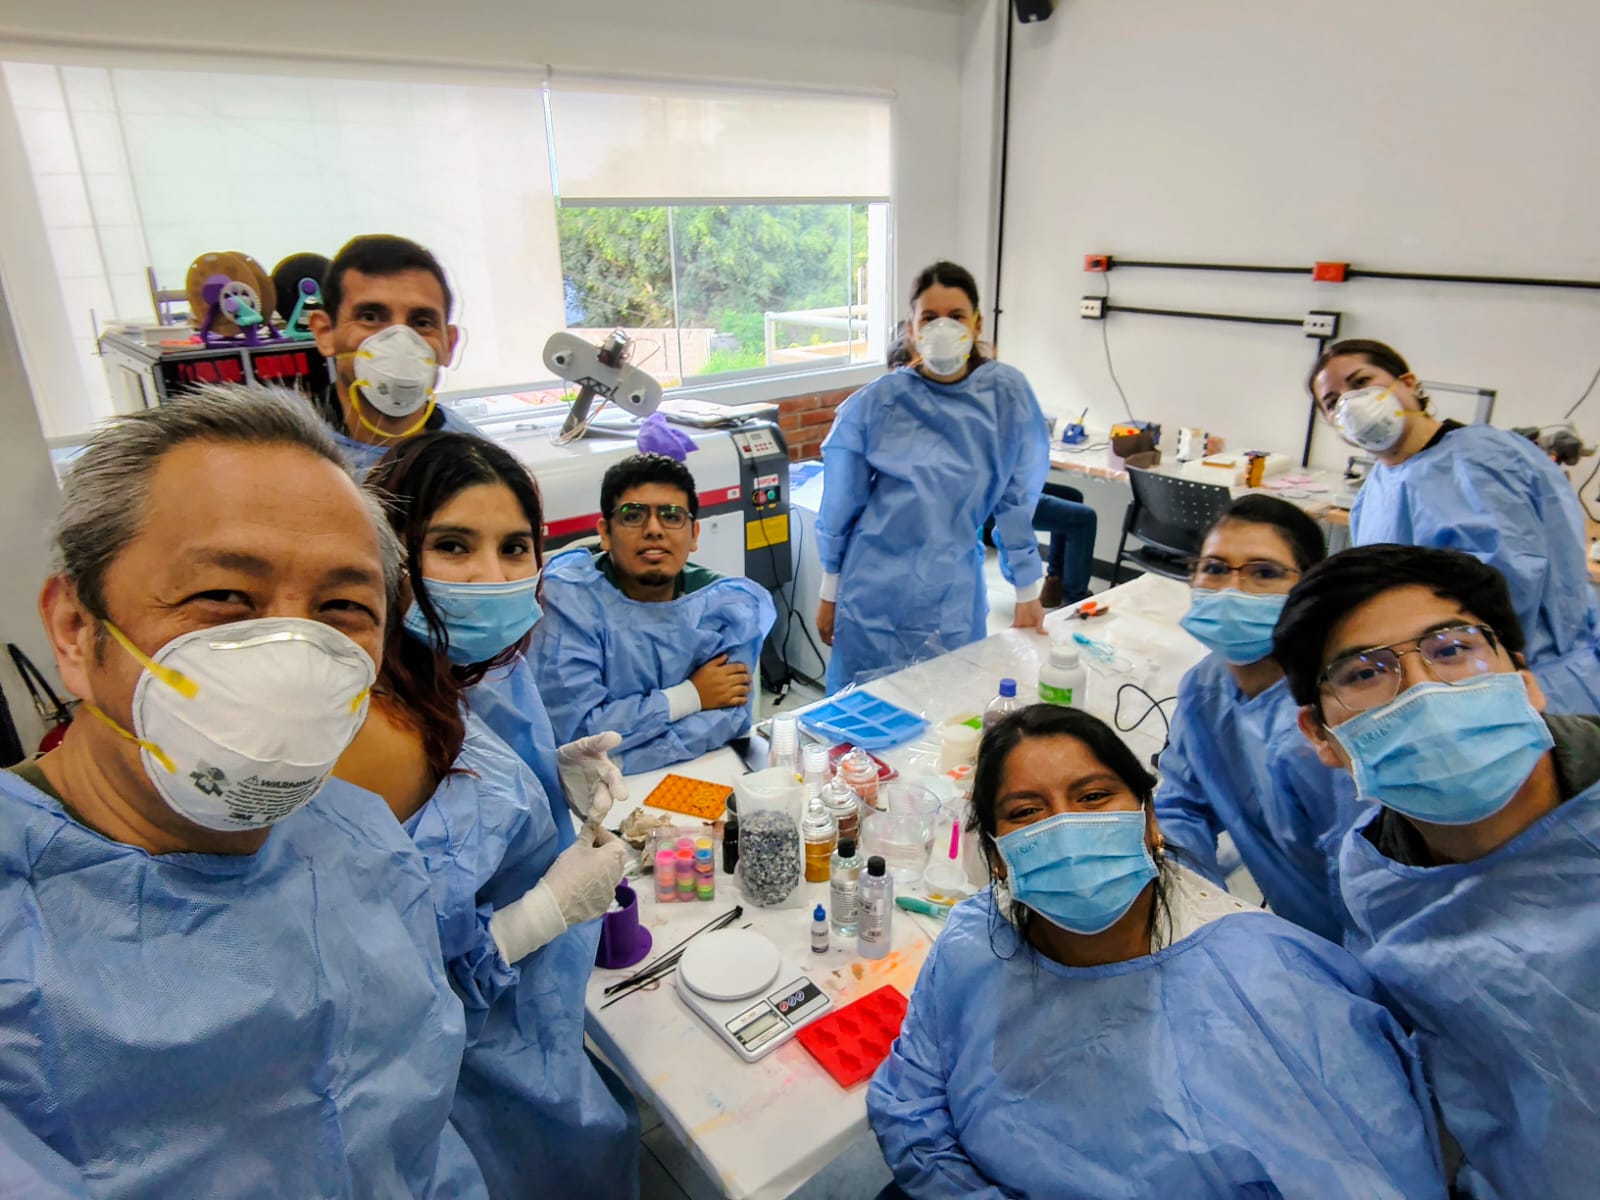
All the activities were carried out at the Fab Lab of the Universidad del Pacífico, where we had access to the necessary tools and workspace. During the process, we produced multiple test casts using different materials, analyzing aspects such as curing time, surface finish, flexibility, and ease of demolding. We also compared mold fabrication methods, including 3D printing and CNC milling, evaluating their advantages in terms of precision, surface quality, and production time.
Here is the link to learn more about the group project.
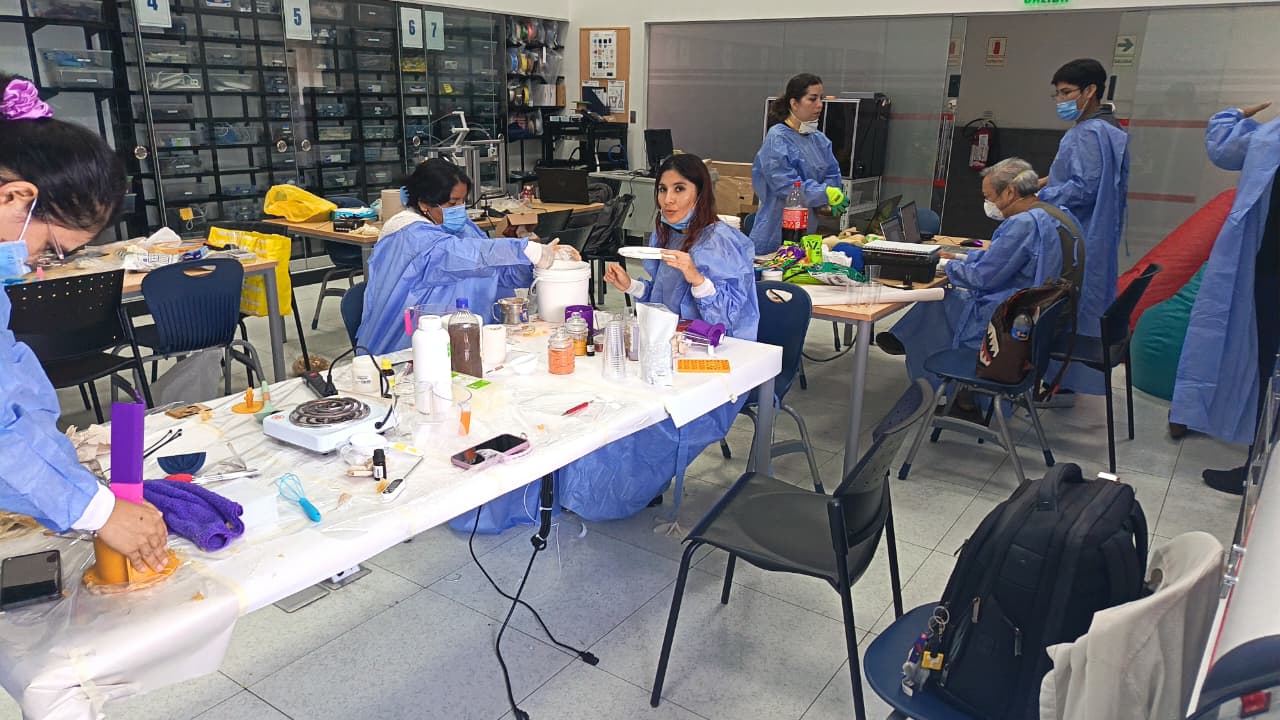
Laboratory Safety in Moulding and Casting🦺
Safety was a key aspect throughout the entire process. Before starting, we reviewed the safety data sheets (SDS) of each material to understand their properties, risks, and proper handling procedures. We worked using personal protective equipment (PPE), including gloves, masks, and safety glasses, especially when handling resin and chemicals that could release fumes or cause skin irritation.We ensured proper ventilation in the workspace and avoided direct contact with uncured materials. Additionally, we followed safe practices when mixing components, controlling proportions carefully to prevent unwanted reactions. Maintaining a clean and organized workspace was also essential to reduce risks and ensure a safe working environment for everyone involved.
Group Reflection
This group assignment allowed us to better understand the behavior of different casting materials and how each one responds to the moulding process. By testing soy wax, resin, gypsum, and biomaterials, we were able to compare their properties and identify which materials are more suitable depending on the application, whether for flexibility, strength, or surface detail.
We also learned the importance of experimentation and iteration. Not all test casts were successful on the first attempt, but each result provided valuable information that helped us improve. Comparing molding techniques such as 3D printing and milling also gave us a clearer perspective on how fabrication methods influence the final quality of the mold and the casted piece.
Individual Reflection (Group Work)🧠
From my perspective, this experience reinforced the importance of teamwork and material understanding in digital fabrication. Being involved in the testing and comparison of different materials allowed me to observe how small variations in preparation, mixing, or temperature can significantly affect the final result.
Additionally, working in a controlled and safe lab environment helped me develop better habits when handling materials that require special care. This assignment not only improved my technical knowledge about moulding and casting, but also strengthened my ability to analyze results, solve problems, and adapt to different fabrication scenarios.
Individual Assignment:
° design, build and connect wired or wireless node(s) with network or bus addresses and a local input and/or output device(s)
1. Introduction
In this individual assignment, I focused on networking and communication between devices by developing a system that connects two boards through a wireless network. The objective was to understand how a microcontroller can send and receive data, enabling interaction between independent systems instead of working in isolation.
Through this process, I used MQTTX as a communication platform to transmit messages between two XIAO ESP32 S3 boards. One device was responsible for sending data based on a pushbutton input, while the other received the information and displayed it, allowing me to explore real-time data exchange and system synchronization.
This assignment helped me strengthen my understanding of communication protocols and IoT concepts, bringing me closer to developing more advanced, connected, and interactive systems for my final project. 🌐📡
Concept and Design Inspiration
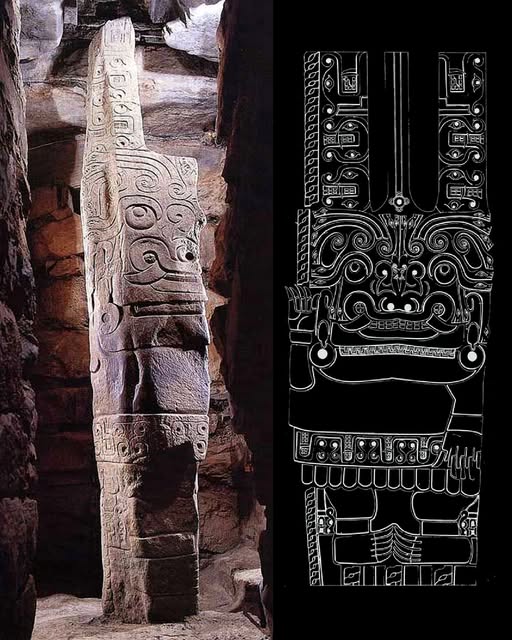
Cultural reference: Chavín Monolithic LanzónFor this assignment, I decided to base my design on the Monolithic Lanzón from the Chavín culture, an important archaeological and symbolic piece from ancient Peru. I chose this reference because of its strong geometric and sculptural characteristics, which make it an interesting object to replicate through digital fabrication processes such as moulding and casting.
Additionally, this design allowed me to explore organic shapes combined with structural details, making it a good challenge for both 3D modeling and mold creation. By working with a culturally significant element, I aimed not only to practice technical skills but also to incorporate a meaningful concept into my fabrication workflow.
Concept and Design Inspiration
Purpose of the pieceI chose the Monolithic Lanzón from the Chavín culture because I find it to be a highly interesting sculpture due to its level of detail, symbolic complexity, and strong visual presence. Its intricate carvings and expressive features reflect the advanced artistic and spiritual development of the Chavín civilization, making it a powerful representation of their identity and worldview.

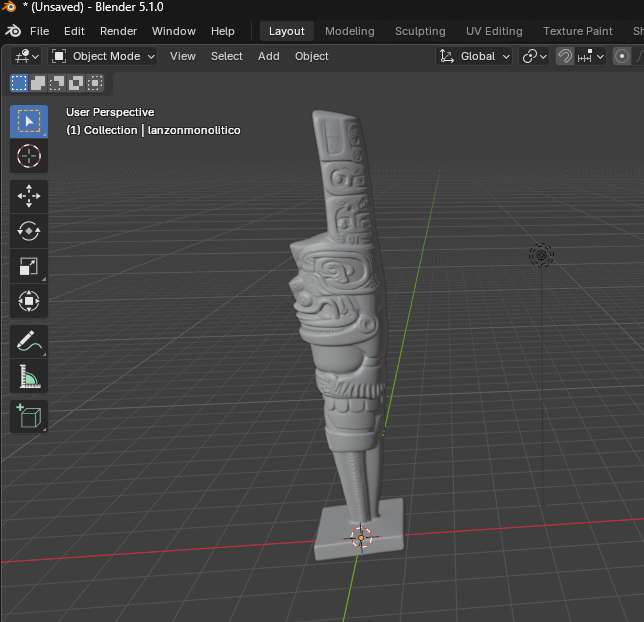
3D Modeling Process (Blender)
Para el modelado base del Monolito de Lanzón, utilicé Blender como mi principal herramienta de diseño 3D. Partí de una forma primitiva básica y la modifiqué progresivamente para adaptarla a la estructura general de la escultura, centrándome primero en las proporciones y la forma global. Mediante herramientas de escalado, extrusión y esculpido, pude dar forma al cuerpo alargado y definir los rasgos principales de la pieza.
Una vez establecida la geometría base, perfeccioné el modelo añadiendo elementos más detallados inspirados en la escultura original, prestando atención a la simetría y la continuidad de la superficie. Blender me permitió trabajar con flexibilidad con formas orgánicas, lo cual fue esencial para recrear el diseño complejo y expresivo del Lanzón, preparándolo al mismo tiempo para el proceso de moldeo y fundición.
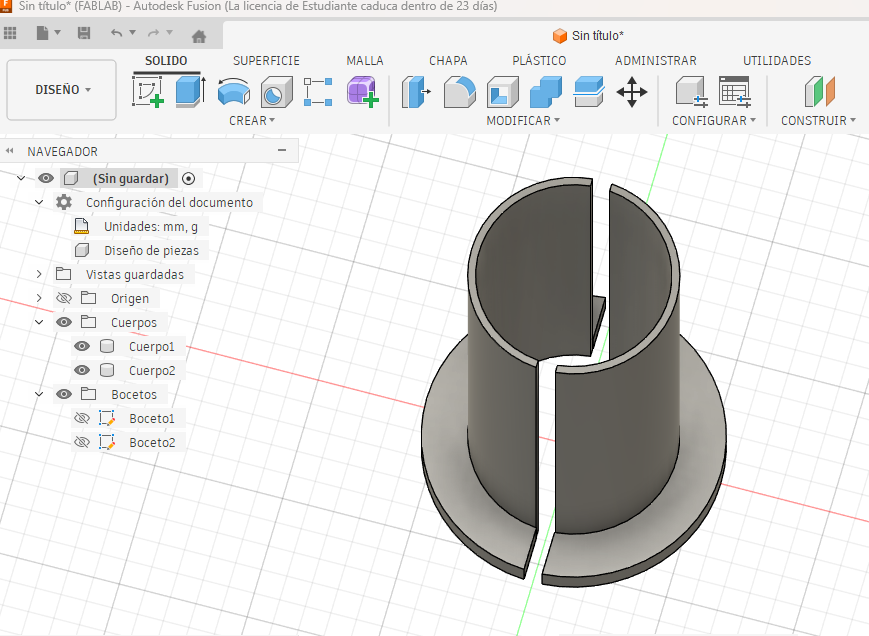
Preparing the Model for Mold Design
Once the 3D model of the Lanzón was completed in Blender, I proceeded to prepare it for the mold design stage. For this part, I decided to use Fusion 360, since the mold structure requires more precise, geometric, and mechanical features. Fusion 360 allowed me to design the containment walls and define accurate dimensions, ensuring a proper fit between all the components.
In this stage, I created the external walls that would contain the casting material and support the silicone mold. Using a parametric approach, I was able to control dimensions such as thickness, height, and clearances, which are critical for avoiding leaks and ensuring proper assembly. This combination of Blender for organic modeling and Fusion 360 for mechanical design helped me achieve a more efficient and accurate mold preparation process.
Mold Fabrication (3D Printing)
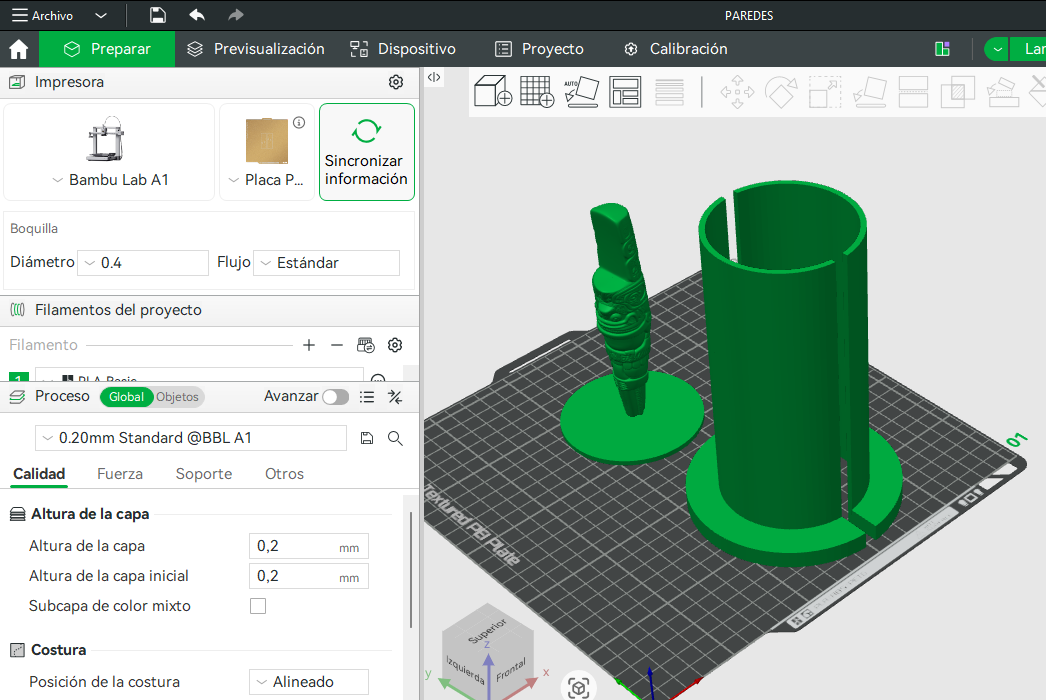
Exporting files (STL)Once both models were completed— the Lanzón Monolith in Blender and the mold walls in Fusion 360— I exported them in STL format, which is the standard file type for 3D printing. This format allows the geometry of the models to be properly interpreted by slicing software, ensuring that all details and dimensions are preserved for fabrication.
After exporting the files, I imported them into Bambu Studio, the slicing software I usually use. In this stage, I prepared the models for printing by checking their orientation, scale, and placement on the build plate. This step is essential to optimize print quality, reduce support material if needed, and ensure that both parts are ready for a successful 3D printing process.
Mold Fabrication (3D Printing)
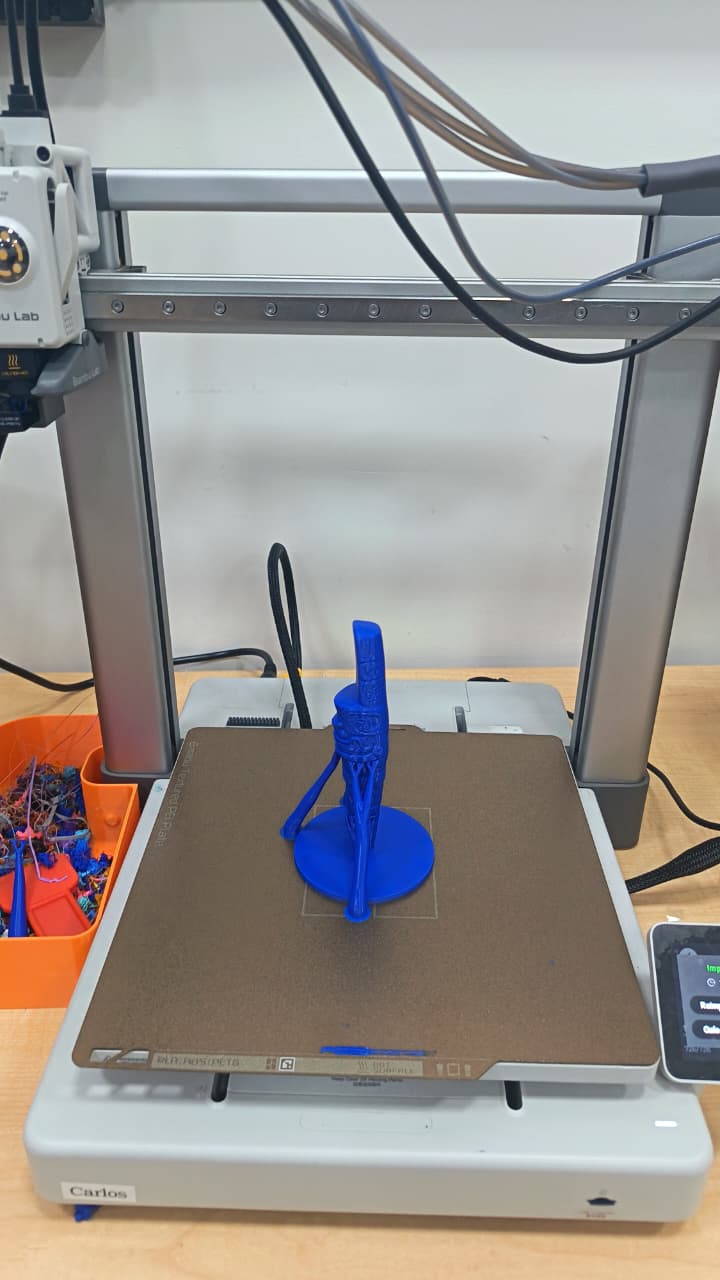
Printer and material usedFor the fabrication of the mold components, I used a Bambu Lab 3D printer, which allowed me to achieve good precision and consistent results during the printing process. This type of printer is well-suited for producing detailed parts with reliable layer adhesion, which is important when creating molds that require dimensional accuracy and proper fitting between components.
Regarding the material, I chose PETG filament because it offers a good balance between strength, durability, and safety. Compared to PLA, PETG is more resistant to temperature and mechanical stress, making it more suitable for mold applications. At the same time, it is less toxic and easier to handle than ABS, which makes it a practical and safer option for this type of fabrication process.
Mold Fabrication (3D Printing)
Surface finish considerationsTo achieve a smooth surface finish and avoid visible layer lines in the mold, I configured the 3D printing parameters with a layer height of 0.08 mm. This fine resolution allowed me to capture more detail from the model and significantly reduce the appearance of the printing toolpath on the surface. As a result, the printed parts had a much smoother finish compared to standard layer heights.
Mold Assembly
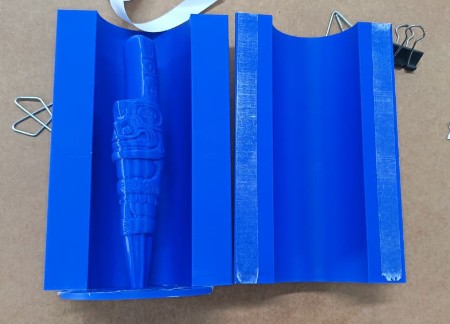
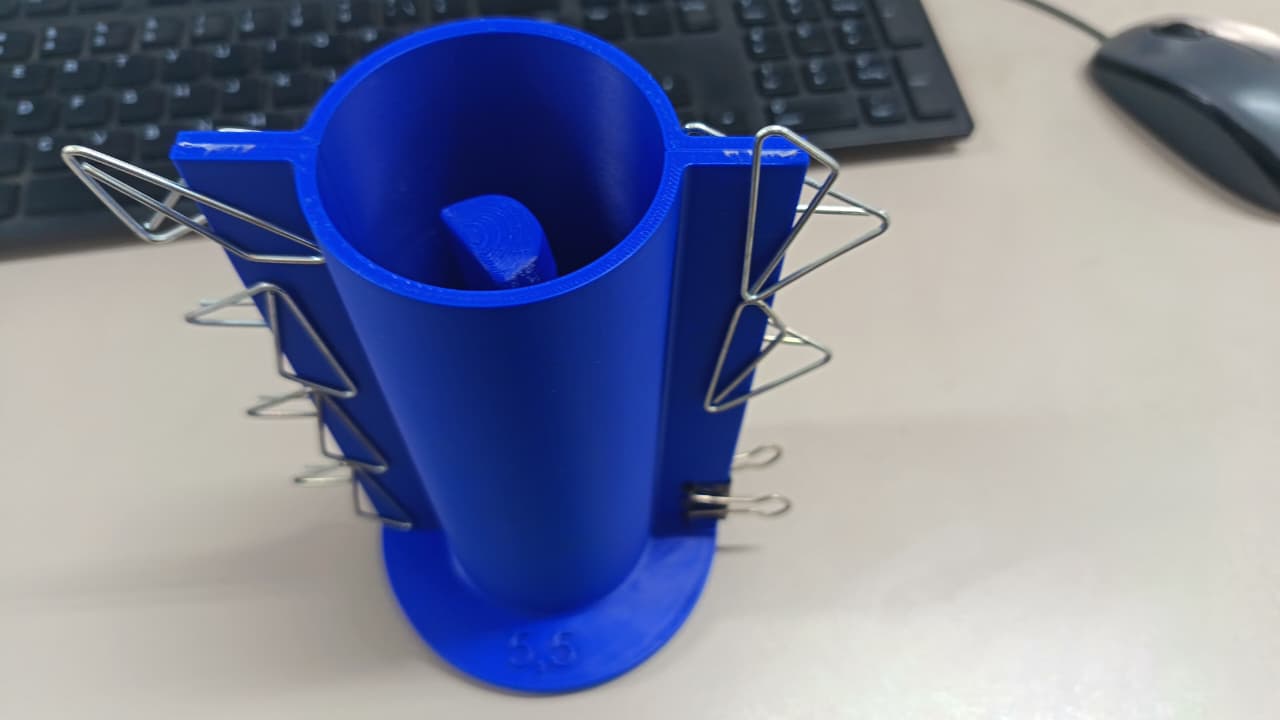
Joining parts and use of pressure clipsOnce all the parts were 3D printed, I proceeded to assemble the mold by carefully aligning each component to ensure a proper fit. To keep the structure firmly in place, I used metal clips (pressure clips), which allowed me to securely hold the parts together during the casting process. This method provided enough pressure to prevent movement or separation between the mold walls.
To prevent any leakage during the pouring process, I applied double-sided tape along the joints and contact areas of the mold. This helped seal small gaps that could allow the liquid material to escape. Ensuring a tight and sealed mold was essential to maintain the shape of the cast and avoid material loss or defects in the final piece.
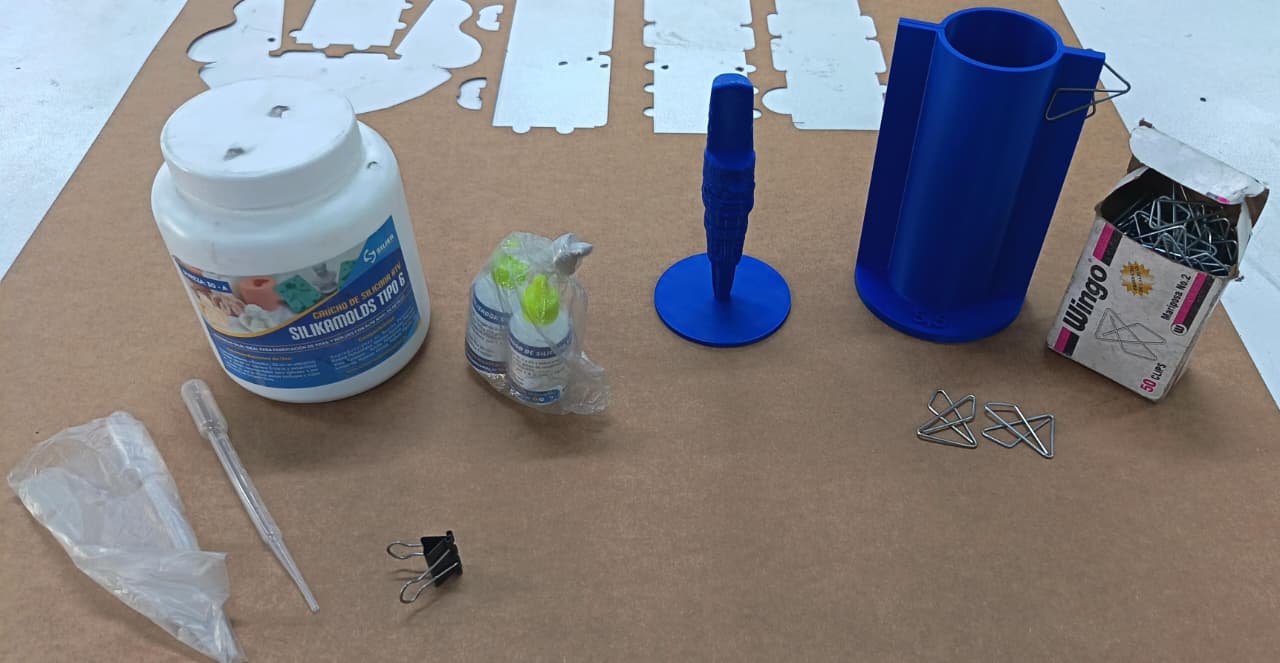
Silicone Mold Creation🧪
For the creation of the mold, I used silicone rubber (Component A) combined with its corresponding activator, specifically a RTV silicone suitable for molding applications. Before mixing, I ensured that both components were measured according to the manufacturer’s recommended ratio to guarantee proper curing and optimal mechanical properties of the mold. The mixture was stirred slowly and consistently to achieve a homogeneous liquid while minimizing the formation of air bubbles.
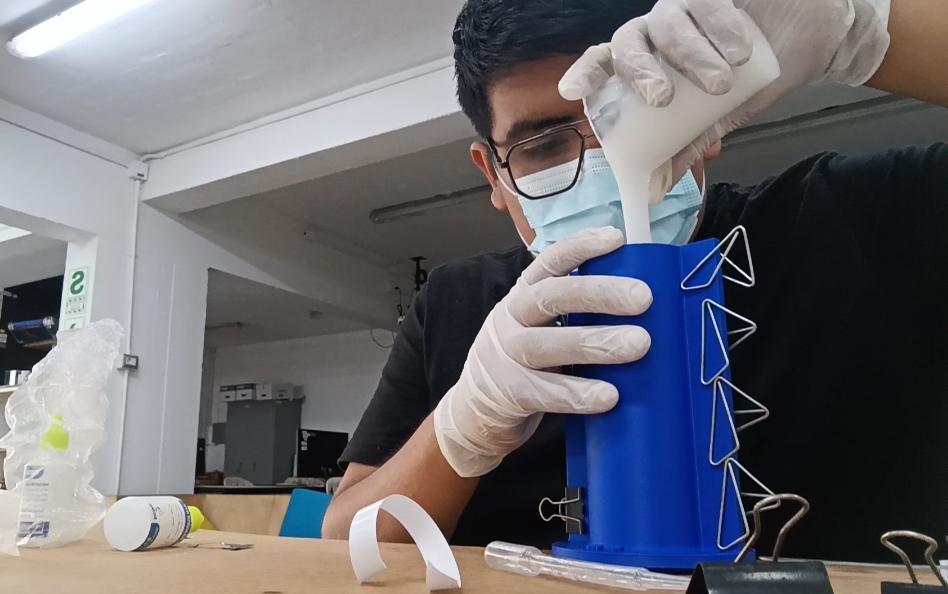
Once the silicone was properly mixed, I carefully poured it into the assembled mold, starting from one corner and allowing the material to flow naturally around the geometry. This technique helps reduce trapped air and improves surface detail reproduction. After pouring, the mold was left undisturbed to cure at room temperature for the recommended time until it fully solidified. Finally, once cured, I gently removed the external structure and extracted the flexible silicone mold, verifying that it accurately captured the details of the original model and was ready for the casting stage.
🧪 Silicone RTV Mold Preparation Parameters
| ⚙️ Parameter | 📏 Configuration | 📝 Description |
|---|---|---|
| 🧱 Mold Shape | 🟡 Cylindrical Mold | A cylindrical container with dimensions of 18 cm height and 10 cm diameter was used for the silicone casting process. |
| 📐 Approximate Mold Volume | 🧮 1413 cm³ (1.4 L) | The mold volume calculation helped determine the correct amount of silicone material required. |
| 🪣 RTV Silicone Quantity | ⚖️ 1.4 kg – 1.5 kg | Enough silicone was prepared to completely fill the mold and avoid missing sections. |
| ⚗️ Catalyst Ratio | 📊 2% – 3% | The catalyst was added according to the manufacturer’s recommendation to ensure proper curing. |
| 💧 Catalyst Amount | 🧴 28 g – 42 g | The amount varies depending on the selected curing speed and environmental conditions. |
| 🔄 Mixing Time | ⏱️ 1 – 2 Minutes | The silicone and catalyst were mixed slowly until a homogeneous texture was obtained. |
| ⌛ Working Time | 🕒 10 – 20 Minutes | This is the available time before the silicone starts the curing process. |
| 🧊 Full Curing Time | ⏳ 4 – 6 Hours | The mold was left untouched during this time to achieve complete curing. |
| 🌊 Pouring Technique | ➡️ Slow Side Pouring | The silicone was poured slowly from one side of the mold to reduce air bubbles. |
| 🫧 Bubble Reduction | 📳 Manual Vibration | The mold was gently tapped to release trapped air bubbles inside the silicone. |
| 🌡️ Recommended Temperature | 🌡️ 20°C – 25°C | A stable room temperature improved the curing consistency and final mold quality. |
| 🛡️ Safety Measures | 🧤 Gloves & Ventilation | Protective equipment and a ventilated workspace were used during the mixing and pouring process. |
Surface Finish Consideration
Final mold qualityThe final silicone mold achieved a high level of detail and accuracy, successfully capturing the geometry of the original Lanzón model. The surface finish was smooth and consistent, with minimal visible imperfections, which is essential for producing clean casted parts. Thanks to the fine printing resolution and proper mold preparation, the internal surfaces of the mold did not show noticeable toolpaths, allowing for a better final result.
In addition, the mold demonstrated good flexibility and structural integrity, making it easy to demold the casted piece without causing damage. The sealing strategy also worked effectively, preventing leaks during the pouring process. Overall, the mold quality met the requirements of the assignment, providing a reliable and reusable tool for casting with good surface detail and finish.
Casting Process🔥
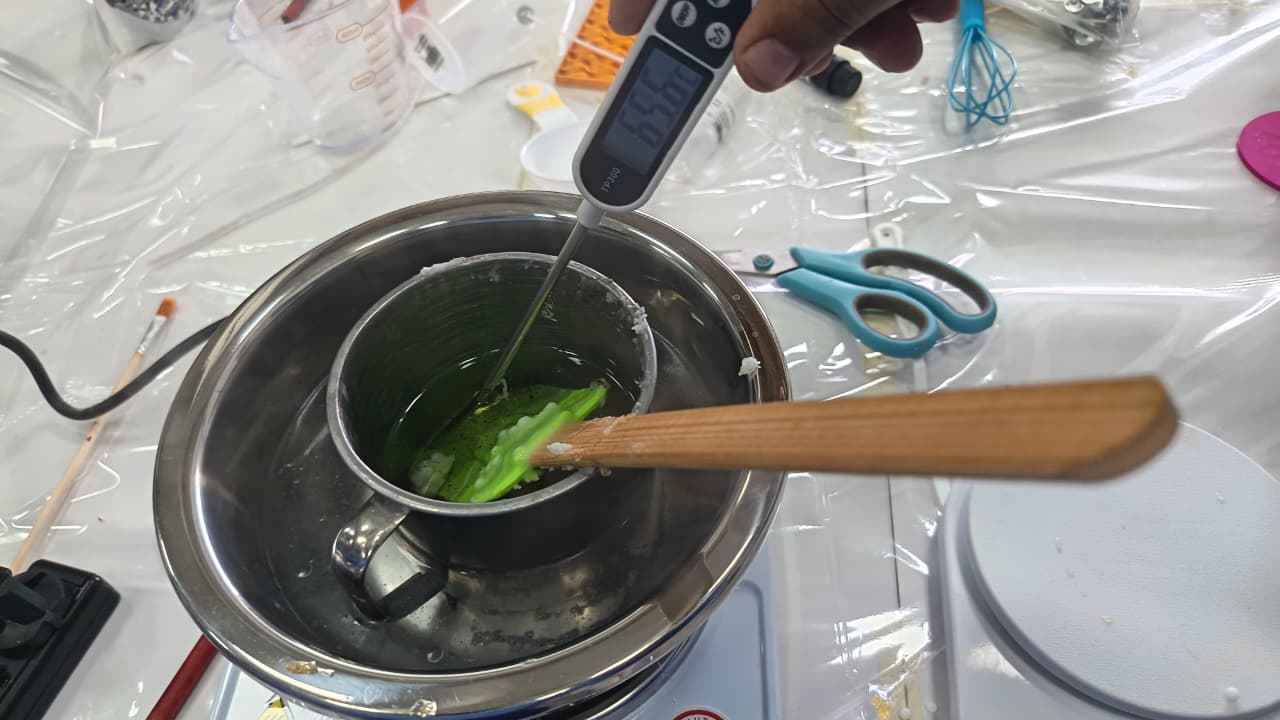
Material preparation (melting process)For the casting stage, I used soy wax as the material, which required a controlled melting process before pouring. To achieve this, I applied the double boiler method (bain-marie), where the wax was placed in a container inside another container filled with heated water. This indirect heating method allowed me to melt the material safely and uniformly without exposing it to direct heat, reducing the risk of burning or degradation.
During the process, I monitored the temperature until the wax reached approximately 65°C, which is within its optimal melting range. At this point, the material became fully liquid with a smooth and homogeneous consistency, ready to be poured into the silicone mold. Proper temperature control was essential to ensure good flow, avoid bubbles, and achieve a high-quality final cast.
Casting Process🔥
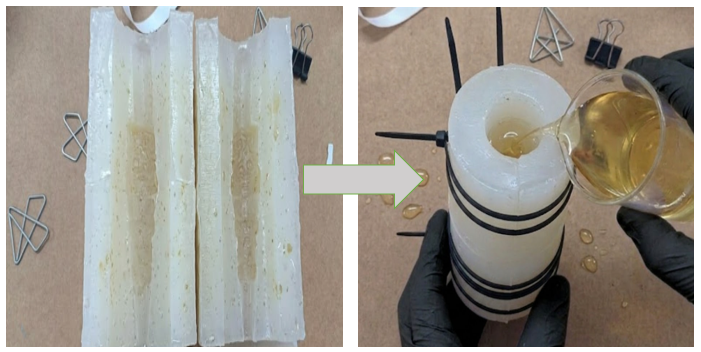
Pouring into the Silicone MoldOnce the soy wax reached the proper liquid state, I proceeded to pour it into the silicone mold. The pouring was done slowly and from a single point, allowing the material to flow naturally of the mold. This technique helps to reduce the formation of air bubbles and ensures that the wax reaches every part of the geometry.
During this step, I made sure that the mold was placed on a stable and level surface to avoid uneven distribution of the material. The fluidity of the wax at the correct temperature allowed it to adapt easily to the internal shape of the mold, capturing fine details of the Lanzón design. This stage is critical, as a controlled and careful pour directly influences the quality of the final casted piece.
Casting Process🔥
Cooling processAfter pouring the melted soy wax into the silicone mold, I allowed it to cool down naturally at room temperature without moving the mold to avoid deformations or internal defects. This gradual cooling process is important to ensure uniform solidification and to prevent cracks, shrinkage, or surface imperfections. Once the material was completely solidified, the piece reached enough rigidity to be safely removed from the mold while maintaining its final shape and captured details.
Demolding and Result
Removing the cast pieceOnce the soy wax had completely cooled and solidified, I carefully proceeded to demold the piece by gently separating the silicone mold from the cast. Due to the flexibility of the silicone, this process was smooth and did not require excessive force, allowing the piece to be removed without damage. I made sure to handle it carefully to preserve the fine details of the Lanzón design, verifying that the geometry and surface quality were properly replicated from the mold.

Demolding and Result
Observations of Detail and QualityAfter inspecting the final casted piece, I noticed that most of the geometric details were successfully reproduced, maintaining the overall shape and features of the Lanzón model. The surface quality was generally smooth, thanks to the good mold finish and controlled casting process. However, I did observe the presence of some small air bubbles on certain مناطق of the piece, which slightly affected the surface uniformity.
These bubbles were likely caused during the mixing or pouring stage, where air may have been trapped inside the material. Although they did not significantly impact the structural integrity of the piece, they highlight the importance of improving pouring techniques or considering methods such as slower pouring or vibration to reduce air entrapment in future iterations.
Post-Processing and Finishing
Painting processAfter inspecting the final casted piece, I noticed that most of the geometric details were successfully reproduced, maintaining the overall shape and features of the Lanzón model. The surface quality was generally smooth, thanks to the good mold finish and controlled casting process. However, I did observe the presence of some small air bubbles on certain مناطق of the piece, which slightly affected the surface uniformity.
These bubbles were likely caused during the mixing or pouring stage, where air may have been trapped inside the material. Although they did not significantly impact the structural integrity of the piece, they highlight the importance of improving pouring techniques or considering methods such as slower pouring or vibration to reduce air entrapment in future iterations.
Final Result 🏁
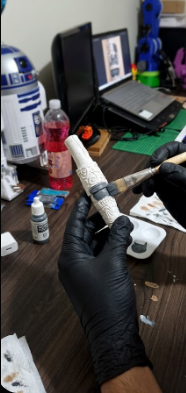
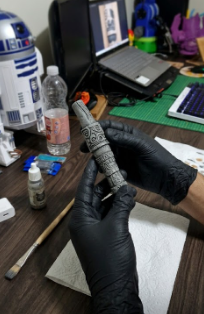
For the final presentation, I showcased the casted Lanzón piece as the main hero shot, highlighting the overall result of the moulding and casting process. I captured the piece from different angles and included close-up shots to emphasize the level of detail, surface finish, and the areas where the geometry was successfully replicated. These views help to clearly demonstrate the quality of the mold and the effectiveness of the casting process.
Additionally, I placed the piece in a clean and well-lit setup, using a neutral background and proper lighting to enhance visibility and contrast. Presenting the object on a flat surface, such as a table, allowed for a more professional and clear visualization of the final result, making it easier to appreciate both the technical execution and the aesthetic outcome of the project.
Reflection – Individual Assignment
During this assignment, several aspects worked well, especially the combination of tools and processes . Modeling the organic shape in Blender and designing the mold structure in Fusion 360 allowed me to achieve both detail and precision. The 3D printing with a fine layer height also contributed to a smooth surface finish, which was correctly transferred to the silicone mold and later to the final casted piece. Overall, the workflow from design to casting was effective and allowed me to obtain a good-quality result.
However, I faced some challenges during the process, mainly related to the appearance of small air bubbles in the final piece and the need to carefully control the pouring and temperature of the material. Although the mold worked properly, these details showed that the casting process can still be improved. In future iterations, I would focus on improving the pouring technique, possibly using methods to reduce air entrapment, and refining temperature control for more consistent results. This assignment helped me understand the full workflow of moulding and casting, reinforcing the importance of precision, material behavior, and iterative improvement in digital fabrication.