I am told with AI's help this week is gonna be one easy week. Hope so!
How the week ended
Well the tool we use is as good as the person who uses it, except some tools. After many conversations with each Ai. I found a method that works with less errors. Never underestimate the time taken to document.!
Week 15’s Assignment
Interface and Application Programming
Group assignment:
Compare as many tool options as possible.
Document your work on the group work page and reflect on your individual page what you learned.
An interface is simply the bridge that allows two different systems to communicate with each other. Interface and Application Programming focuses on creating these connections between people, software, and hardware.
User Interface (UI): The visual screens, buttons, menus, and controls that allow a human to interact with a system. For example, in a vending machine, the touch screen used to select an item is the user interface.
Application Programming Interface (API): Code that allows two different software programs to communicate with each other. For example, a mobile app fetching weather data from an online weather service uses an API.
Device to Device Interface Programming: Communication between hardware devices. This is what we explored in Week 11: Networking and Communications, where devices exchanged data directly with each other.
Wireless Interface Programming: Devices communicate without physical wires using technologies such as WiFi, Bluetooth, or ESP NOW.
Web Application Programming Interfaces (API): A software application controls hardware through communication methods such as WiFi, Bluetooth, or USB. Examples include a mobile app controlling lights, a phone controlling a robot, or an app updating a smart clock.
Application to Application Programming: Two software applications exchange information with each other. For example, sharing an Instagram post to WhatsApp involves two applications communicating. Common methods include APIs, Web Services, REST APIs, and GraphQL.
Web Interface Programming: Applications communicate through the internet using web technologies. This allows users to interact with devices and services remotely through a web browser.
Firmware is a specific type of software written directly onto a hardware device's memory. In our case, we use Arduino IDE to program the XIAO ESP32S3. Firmware tells the physical hardware how to operate and acts as the bridge between the hardware and higher level software.
In this project, the technologies used move beyond traditional software and into the fields of Embedded Systems and the Internet of Things (IoT).
The HTML file acts as the Frontend User Interface (UI) or Control Panel.
The ESP32 code written using Arduino acts as the Firmware.
ESP NOW is the communication protocol used to transfer data between boards.
The XIAO ESP32S3 boards act as the Microcontrollers that execute the instructions.
The application is the complete software system working behind the scenes to make the data transfer happen. While the user mainly interacts with the interface, the application includes the firmware, communication protocols, and software logic that make the entire system function.
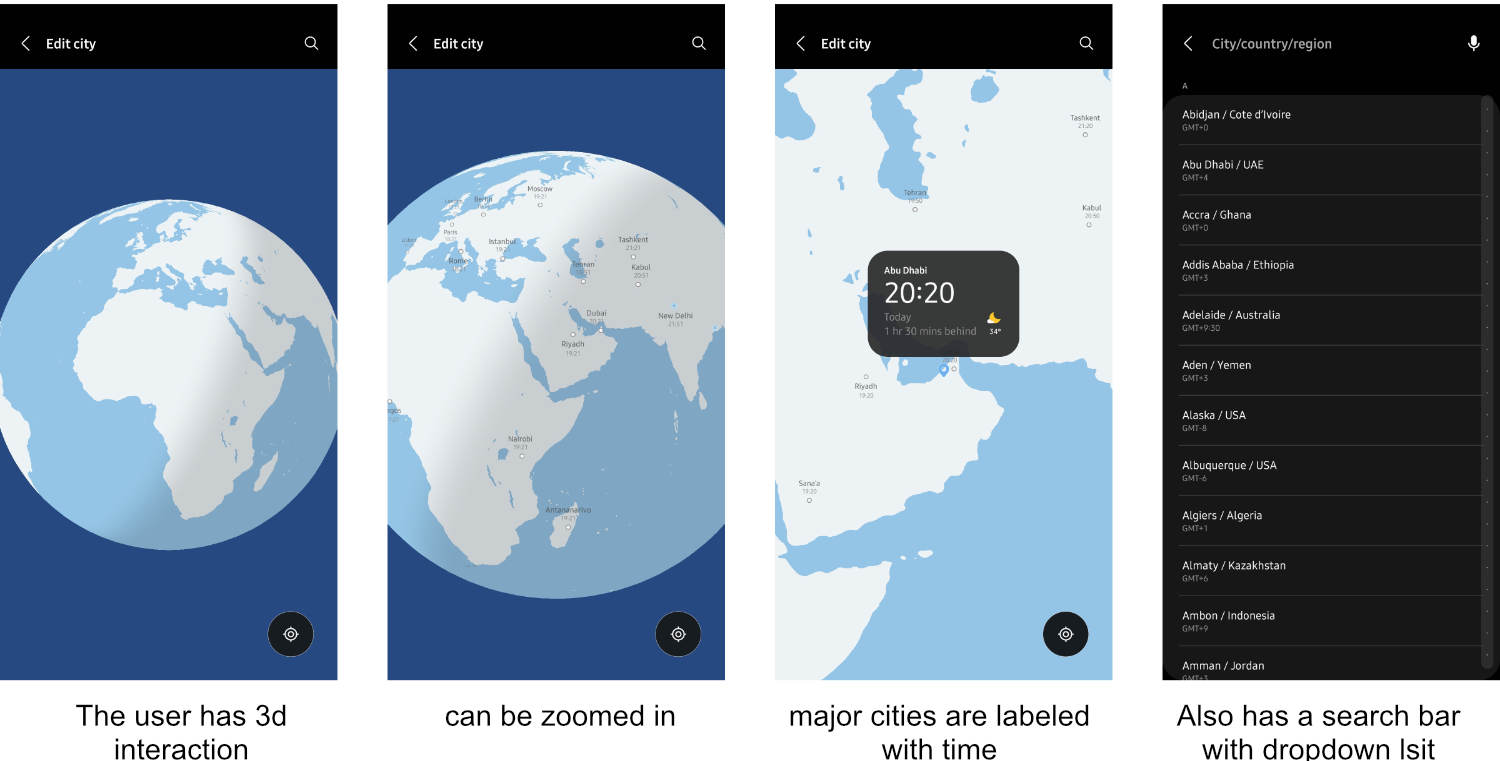
I had been using the app "Clock" by Samsung Electronics Co. Ltd. I liked the user interface for setting time in a dual clock, so I designed my interface around it.
I used this interaction with AI as a means to understand and create an interface, so that I could get a prompt for creating the app. This actually helps to get specifics correct and guides us and the AI to choose what we want. It also tells us about the options available.
I mentioned my project and described it. Then I mentioned that the page should open into a world map with locations. The locations should be pinned. I added features like rotate and zoom in. I mentioned the need for a search bar so one can search for a location on it. I had asked for a space to enter the name of the person for whom the location is chosen. I did mention the board setup.
The product is synced to the time zone of a friend or loved one living in another part of the world. Within the frame, a band of light moves gradually to reflect their current time of day, rising and falling in response to the sun cycle of that location.
This slow and continuous movement acts as a subtle indicator of presence, allowing the user to remain quietly aware of the other person’s time and routine. Rather than functioning as a conventional clock, the product creates an ambient sense of being with them or thinking of them occasionally throughout the day.
this my idea for final project.
if am to ask you for a promt to design an app, where you write full stack code. WRite the prompt for me after we complete our discussion.
i am brainstroming for ideas to create an app its more like a case study. i need an app so the user can select the location of their friend or other person. the page should open into a world map with locations pined on it like with rotatable and zoom feature. There has to a search bar on top so one can type in the location, the drop down in that search bar much contain city/country/region
Also after choosing the location there should be an option for the user to enter thier friedn's or familys's name in it.
thereafter this should show the real time.
I have a pcb board with xiao esp 32 in it. with rtc, stepper motor. i would like to connect teh product and the app via wifi or bluetooth., whcih is better to use and suggestthingstaht i ahve missed out.
ask questions fo rbetter claritty iof you need
Build a complete full stack mobile application called “Shared Daylight” for a Fab Academy final project.
The app is an emotional ambient companion app that connects to a physical wall mounted kinetic light device using Bluetooth Low Energy (BLE). The product represents the daylight cycle of a loved one or friend living in another part of the world. The physical device uses an ESP32 Xiao, RTC module, LEDs, and a stepper motor that moves a glowing “sun” in an arc from sunrise to sunset.
The app is NOT a messaging or social media platform. It is a calm, minimal, atmospheric interface focused on emotional awareness through shared daylight rhythms.
TECH STACK REQUIREMENTS
Frontend:
* Flutter
* Material 3
* Riverpod for state management
* flutter_blue_plus for BLE
* Mapbox or interactive 3D globe implementation
* smooth animations and dark atmospheric UI
Backend:
* Local only architecture
* No cloud backend
* No authentication
* No accounts
* Use local storage on device
* SQLite or Hive for persistence
Device:
* ESP32 Xiao
* BLE communication
* RTC synchronization
* Stepper motor control
* LED brightness and arc position data
APP STRUCTURE
The app must contain these screens:
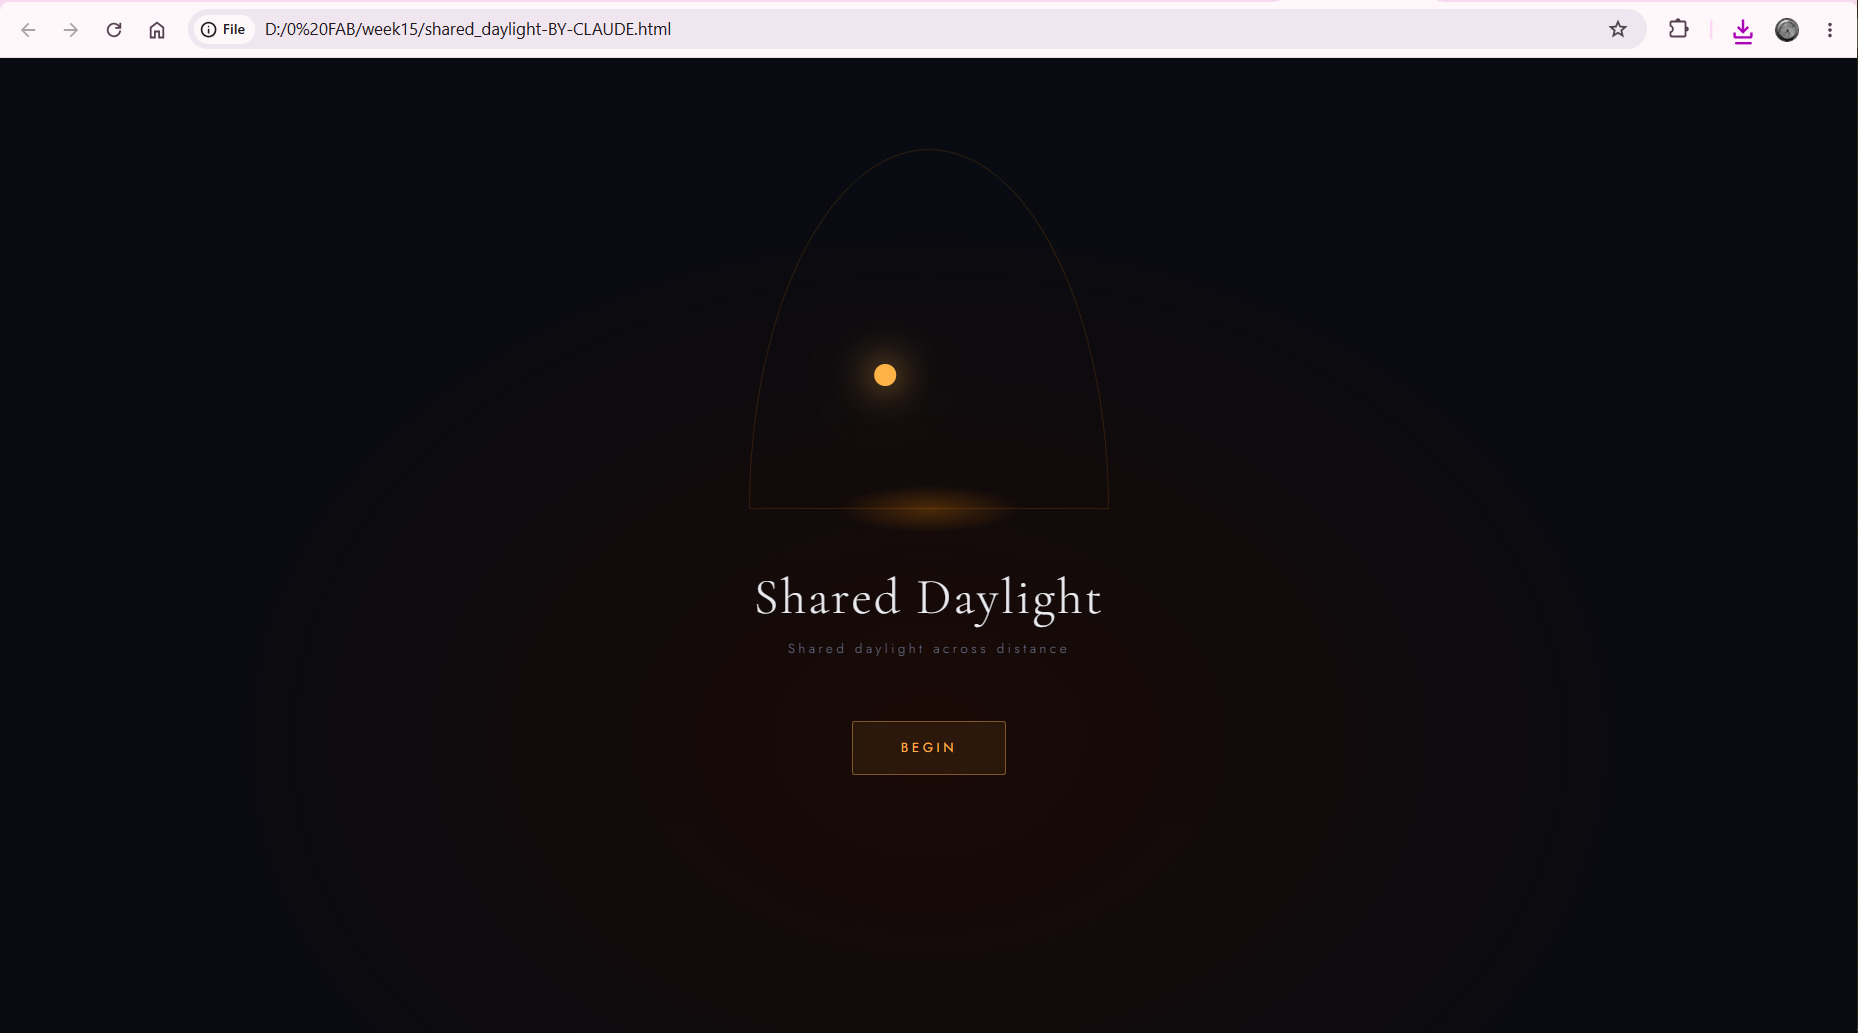
1. Splash Screen
* Animated ambient intro
* Minimal glowing sun arc animation
* Text:
“Shared daylight across distance”
* Button:
“Begin”
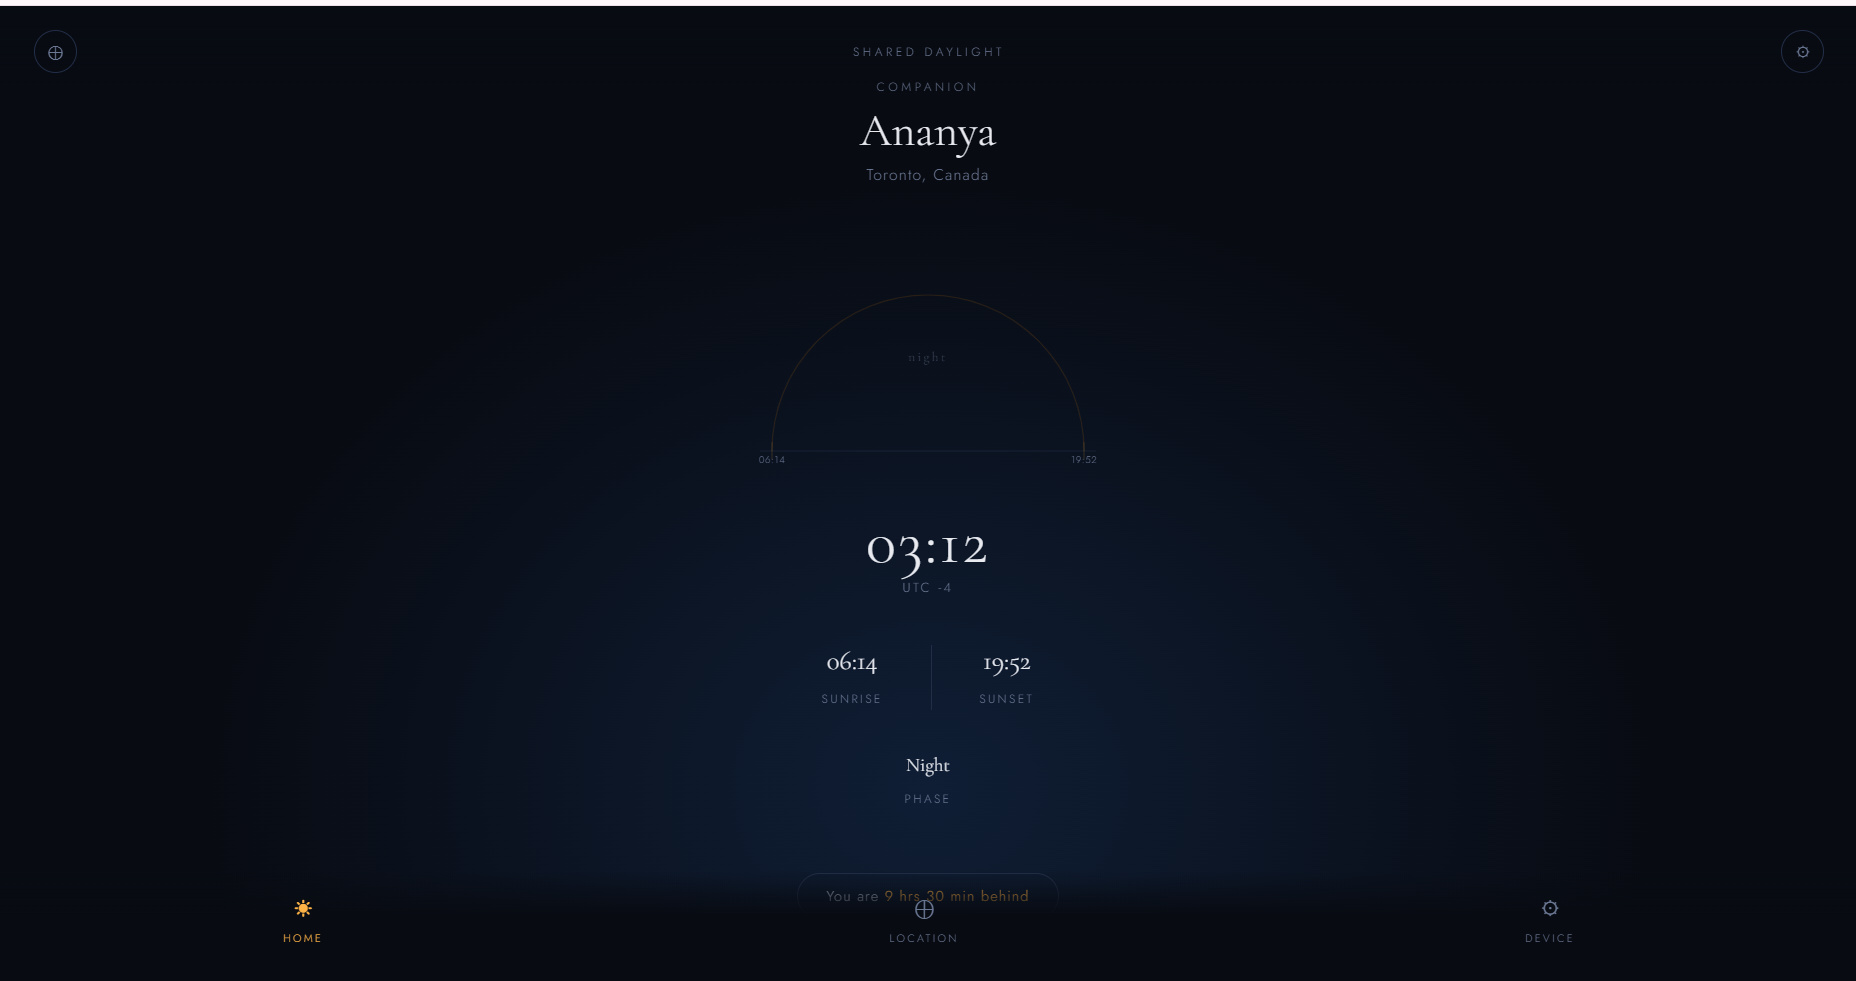
2. Home Screen
This is the primary emotional visualization screen.
Layout:
* Friend/person name
* Selected city and country
* Large ambient daylight arc visualization
* Animated glowing sun position
* Real time local time at selected location
* Sunrise and sunset information
* Subtle dynamic background based on current daylight phase
* Display:
“You are X hours apart”
The design should feel cinematic, calm, and minimal.
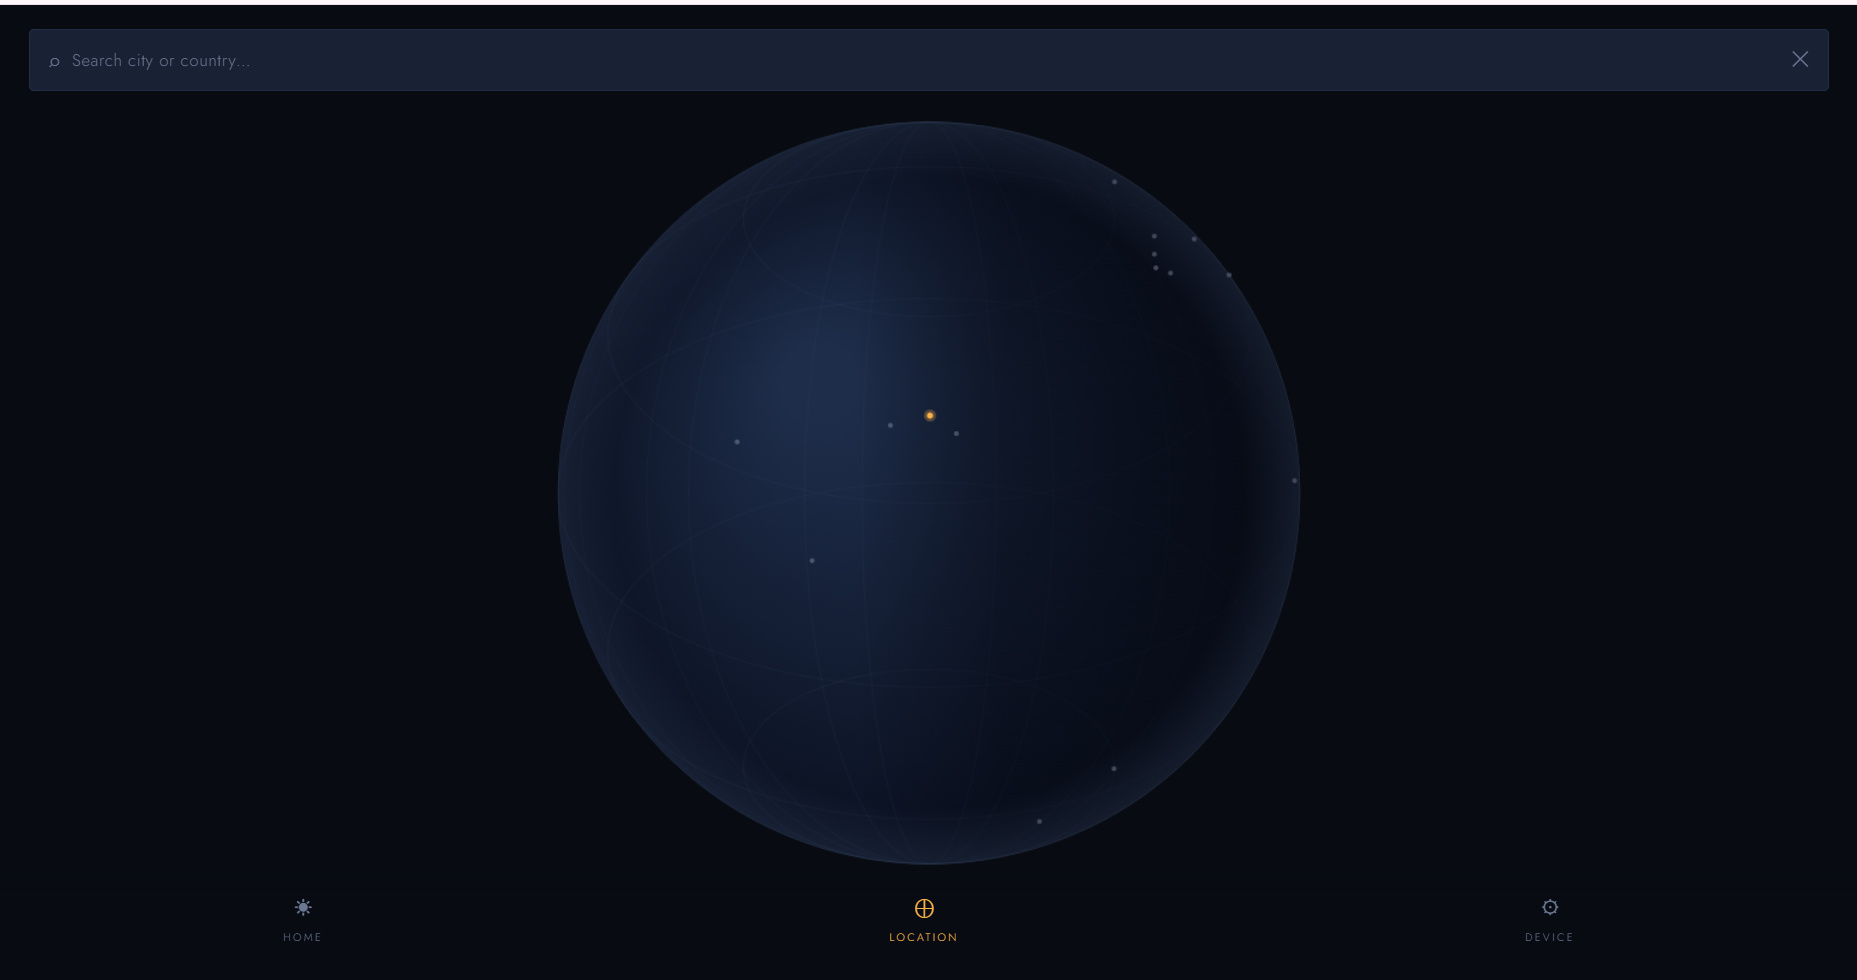
3. Globe Screen
Interactive globe or world map with:
* rotate
* zoom
* drag
* smooth animations
* day/night earth shading
* glowing pinned locations
Top floating search bar:
* autocomplete support
* accepts city, country, region
When user selects a location:
* store latitude
* longitude
* timezone offset
* sunrise/sunset data
Bottom sheet appears showing:
* city
* country
* UTC offset
* sunrise
* sunset
Button:
“Continue”
4. Companion Setup Screen
Fields:
* person name
* optional relationship type
Include:
* animated sunlight cycle preview
* summary of selected location
Button:
“Pair Device”
5. Device Pairing Screen
BLE scanning interface.
Features:
* search nearby ESP32 devices
* show available device list
* connect to selected device
* animated connection status
Once connected:
send configuration data through BLE.
BLE PAYLOAD FORMAT
Send structured JSON:
{
"name": "Ananya",
"city": "Toronto",
"country": "Canada",
"timezone": -4,
"latitude": 43.65,
"longitude": -79.38,
"sunrise": "06:14",
"sunset": "19:52"
}
6. Device Settings Screen
Features:
* reconnect device
* resync RTC time
* LED brightness slider
* motor calibration controls
* set sunrise motor position
* set sunset motor position
* reset device
DESIGN REQUIREMENTS
The UI aesthetic must feel:
* atmospheric
* calm
* cinematic
* emotional
* minimal
Use:
* dark navy
* charcoal
* muted warm orange
* soft whites
* dusk inspired gradients
Avoid:
* clutter
* dashboard style layouts
* social media aesthetics
* bright colors
* excessive buttons
ANIMATION REQUIREMENTS
Animations must be:
* smooth
* slow
* ambient
* floating
* subtle
No harsh transitions.
FUNCTIONAL REQUIREMENTS
The app must:
* work offline after setup
* locally save selected companion data
* reconnect to ESP32 automatically when nearby
* sync RTC time during reconnection
* calculate daylight phase from timezone and local time
* support BLE communication only
* no WiFi required
MAP REQUIREMENTS
The globe/map should:
* show live day/night shading
* allow pinch zoom
* support rotation
* show glowing selected pin
* smoothly animate transitions
ESP32 DEVICE LOGIC REQUIREMENTS
Provide ESP32 firmware code as well.
Firmware should:
* receive BLE payload
* store settings in memory
* sync RTC
* calculate current daylight phase
* move stepper motor slowly through sun arc
* fade LED brightness based on daylight cycle
* support recalibration commands
The motor movement must:
* feel continuous
* avoid ticking motion
* update gradually over time
CODE REQUIREMENTS
Generate:
* complete Flutter project structure
* all screens
* navigation
* Riverpod providers
* BLE service layer
* local persistence layer
* globe/map implementation
* animation system
* ESP32 firmware
* reusable widgets
* theme system
* models
* utility functions
The codebase should be:
* clean
* modular
* production style
* fully commented
* scalable
Include:
* folder structure
* setup instructions
* required packages
* BLE UUID examples
* sample mock data
* calibration logic
* timezone utility functions
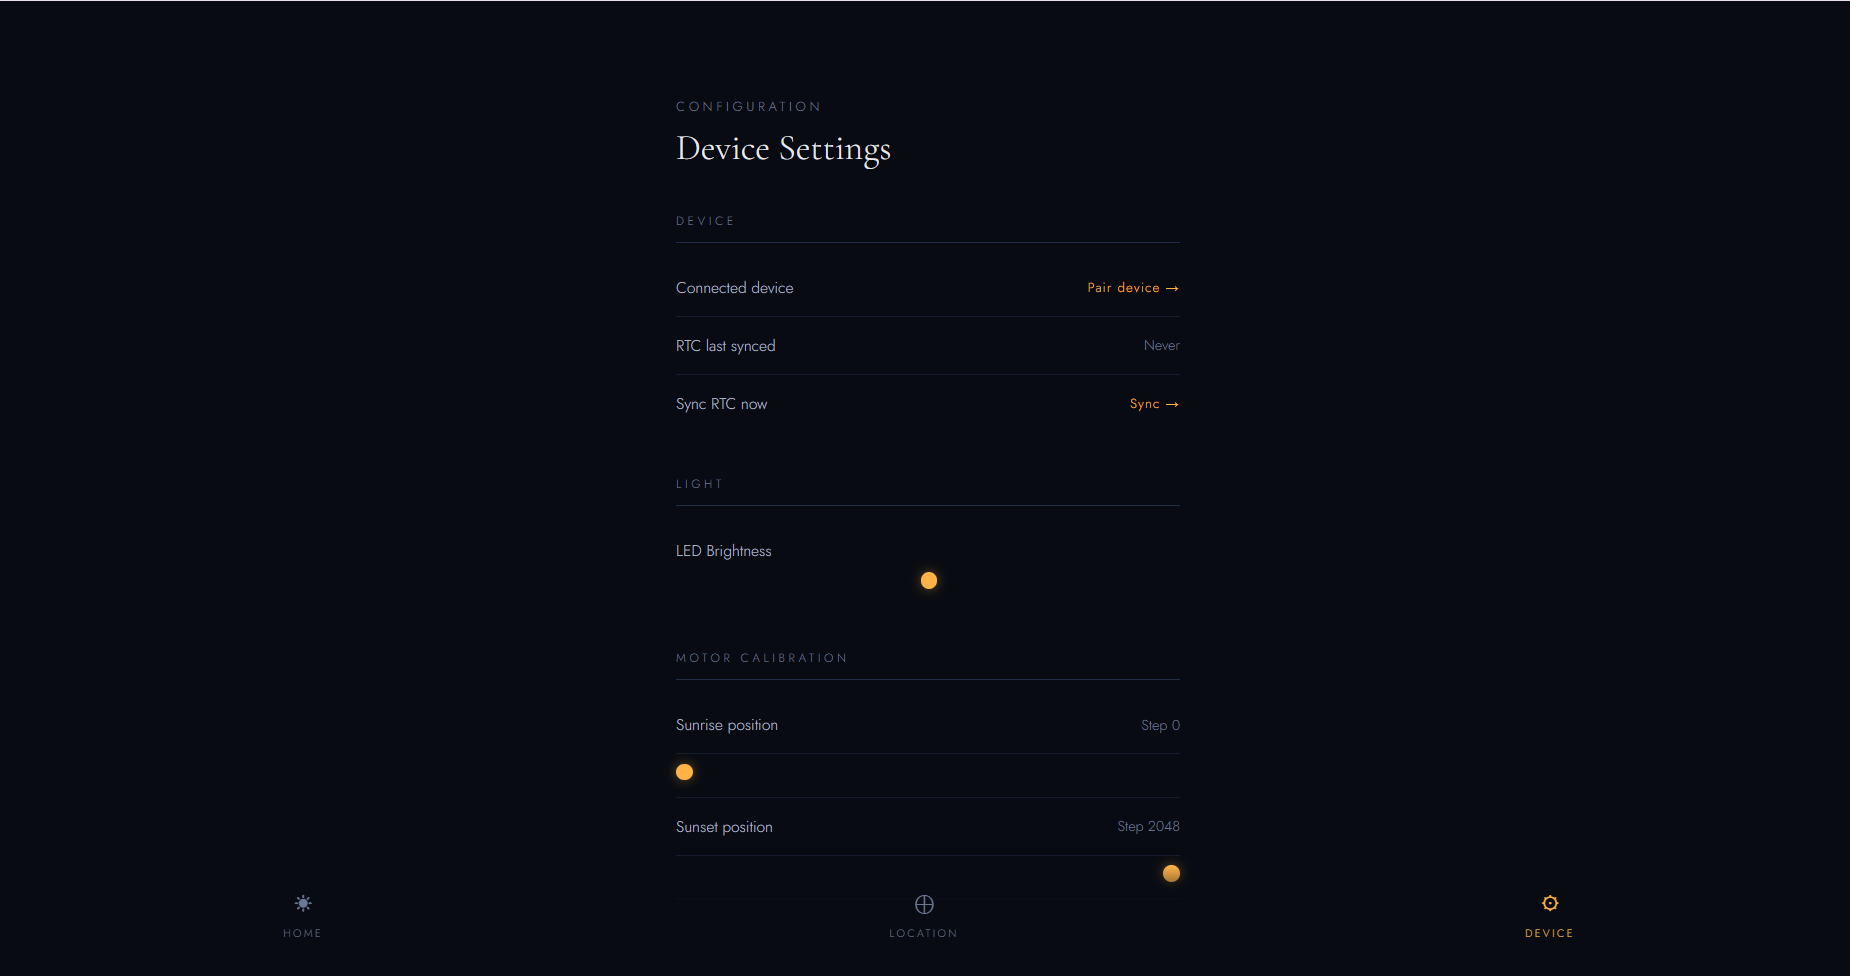
I then continued the conversation with Claude using the prompt generated above. It initially created a complete Flutter project, and I did not understand the difference at first. Later, I specifically requested a web application, and it generated one in HTML. I downloaded the file and opened it in a browser. I liked the interface and the overall user experience. It was missing certain features.
Click to open the Web Application by Claude - Shared Daylight
I moved the html file i got into a folder named "ble". Moved that into week-15 folder linked in git repository. I linked the html file by <a href=""></a>
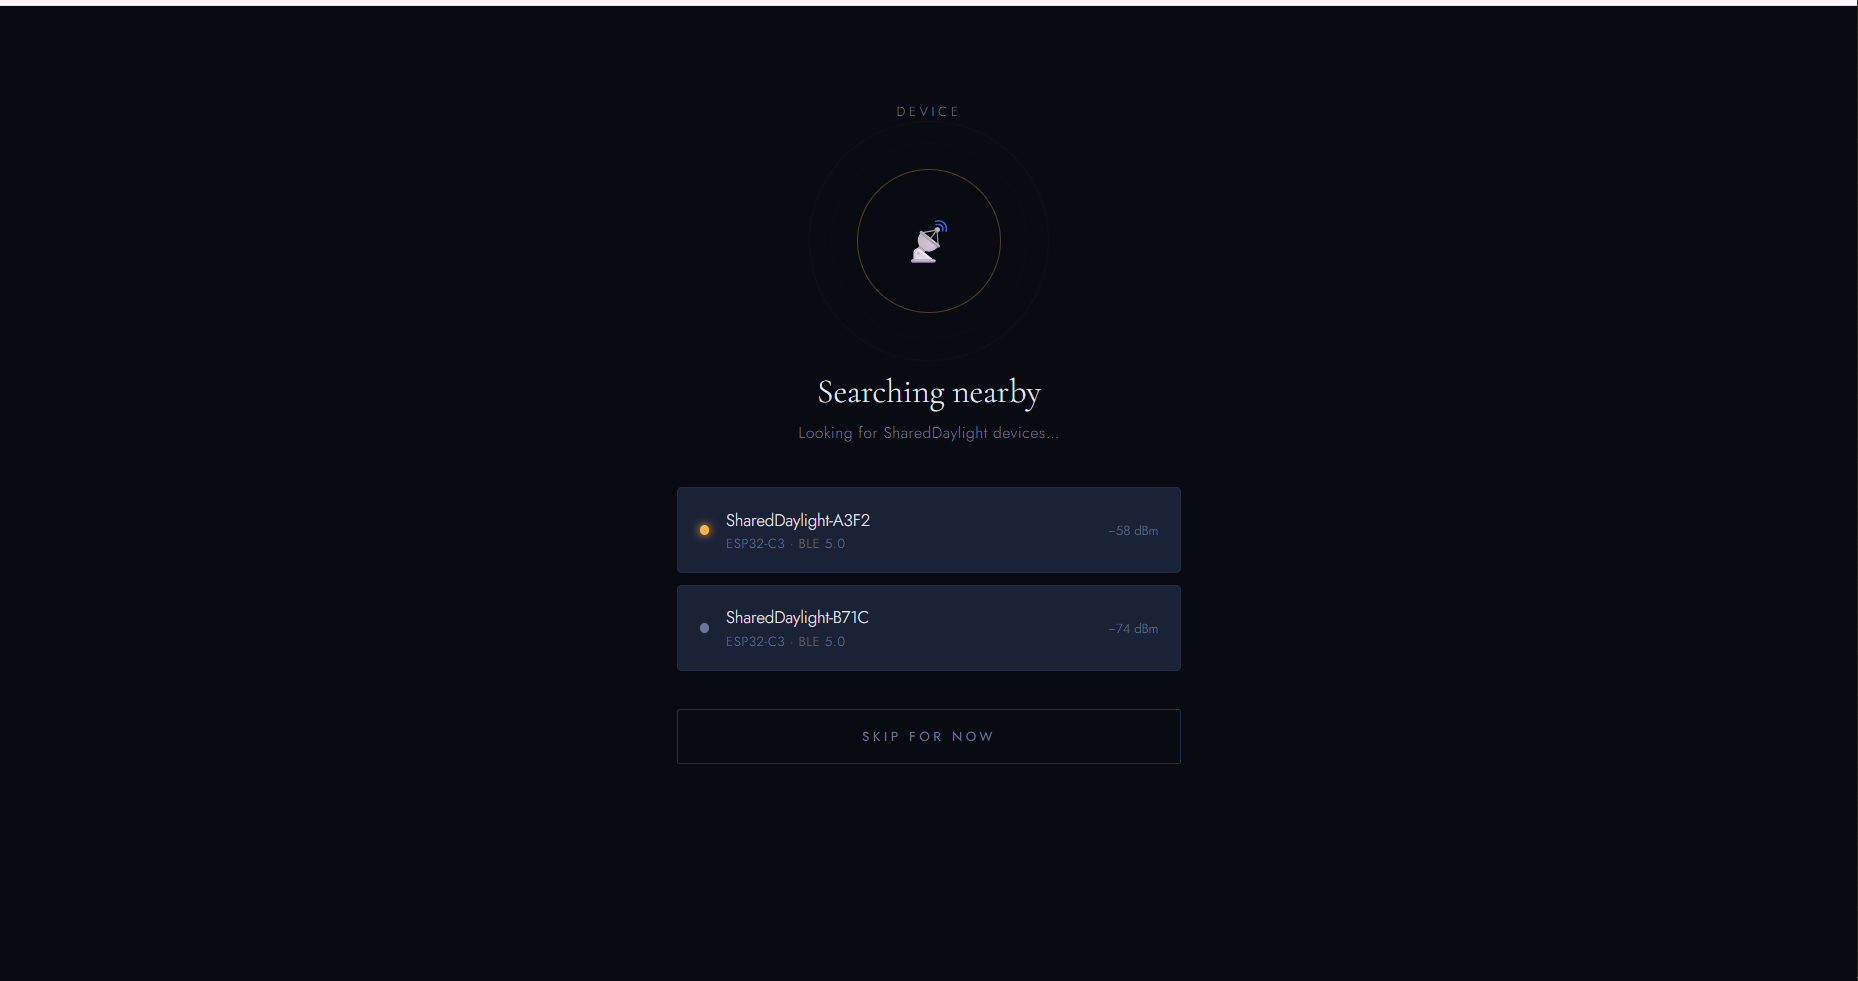
Claude's Interface
1 / 5
2 / 5
3 / 5
4 / 5
5 / 5
Browser Compatibility
I opened it in Chrome. I did not try to create a BLE connection. Apparently, not all browsers support BLE connections. Google Chrome has support for the Web Bluetooth API, while some browsers have limited or no support. This means the same application may behave differently depending on the browser being used.
Learning
The segments Home, Location, and Device pages were saved under an "id".
<div class="screen" id="home"></div>
This page would not have communicated with the ESP32S3, as there was no code to connect to it. There was only a visual connection and no real BLE or Bluetooth communication.
This is the most important section for your documentation.
Currently, this app does not actually communicate with the ESP32.
It only simulates communication.
Example: function connectDevice(el, deviceId). When the user taps a device, such as SharedDaylight-A3F2, the app pretends to connect.
It saves: state.settings.pairedDevice = deviceId; and displays: Connected. But there is:
No Bluetooth code
No WiFi code
No API
No WebSocket
No BLE service
So the communication is only visual.
Data Flow of the App
  User Opens App
       ↓
Splash Screen
       ↓
Choose City
       ↓
Calculate Sunrise/Sunset
       ↓
Save Companion Details
       ↓
Pair Device (simulated)
       ↓
Show Time and Sun Position
       ↓
Adjust Brightness / Calibration
Made a new folder for the web app inside my Week 15 folder.
Made a single file, index.html.
The issue was that when I first described the project, I talked about the final project itself, which included motors and LEDs. However, I was not using those components for this week's assignment. For this week, I was only using an RTC and a Seeed Studio XIAO ESP32S3. Later, I updated the prompt to reflect those conditions.
Firmware
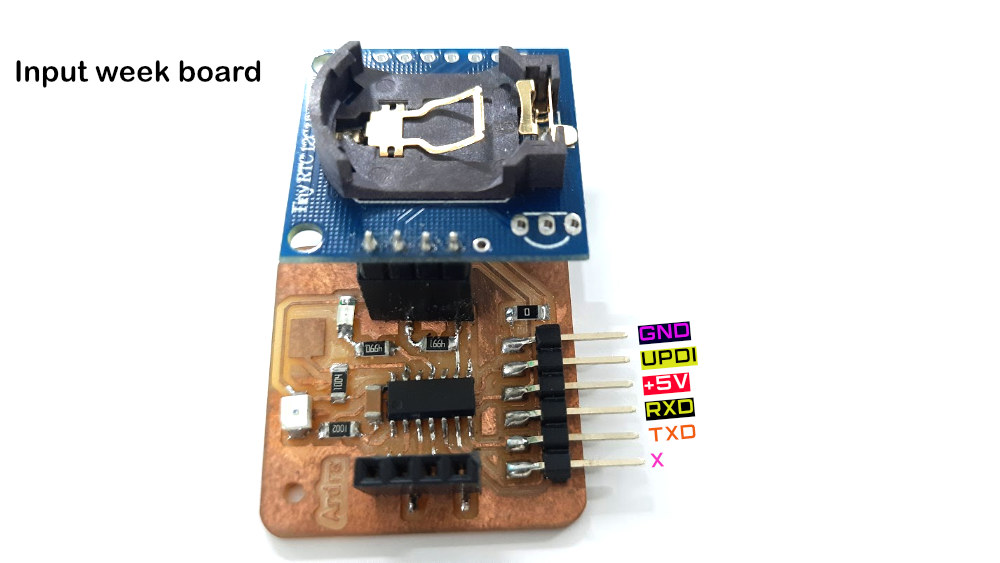
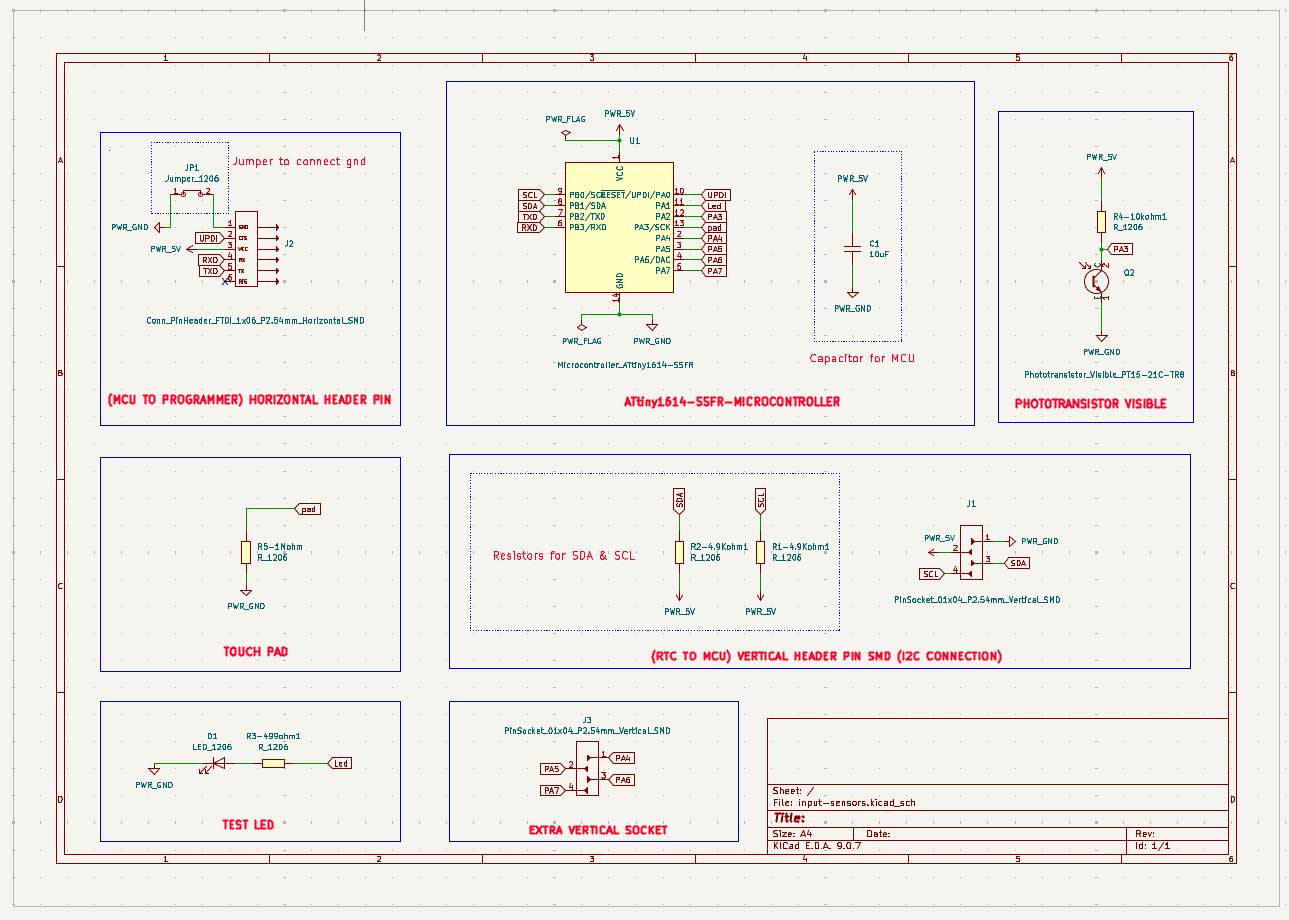
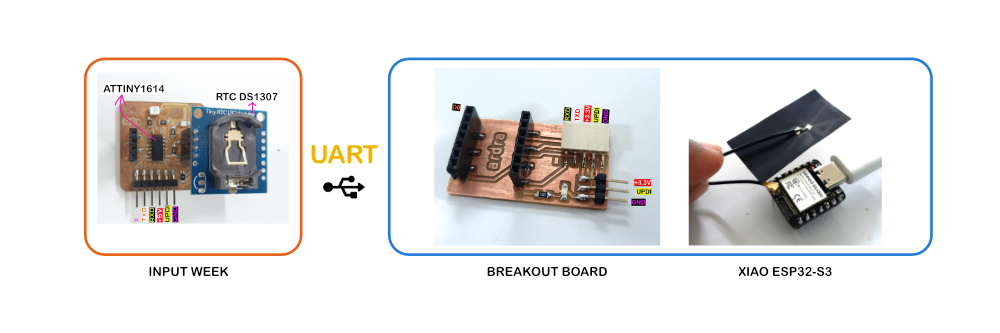
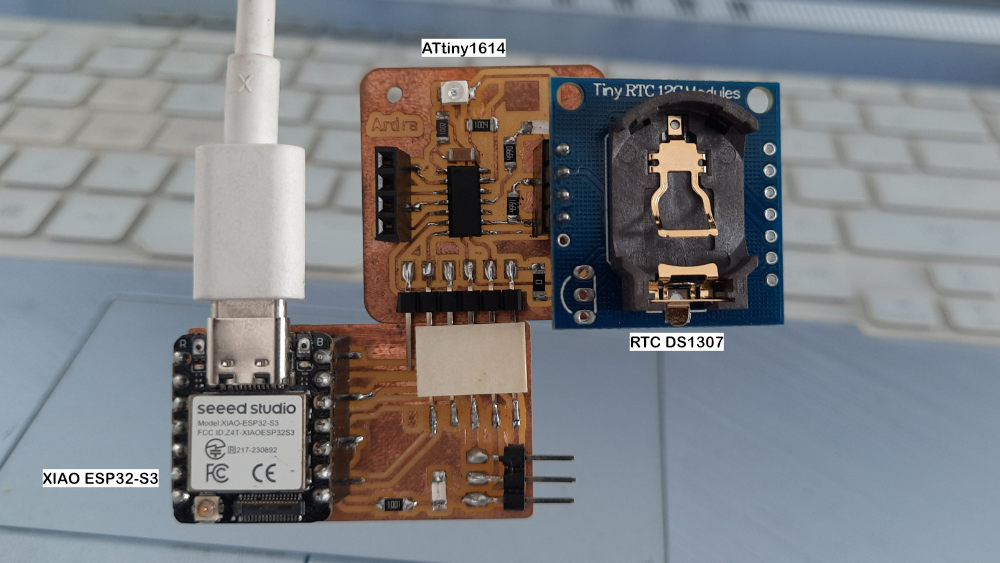
I am using my Input sensor week's
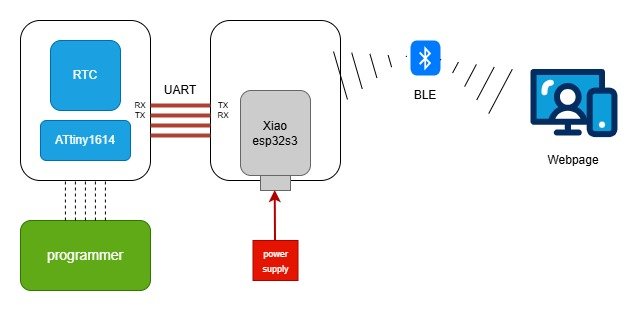
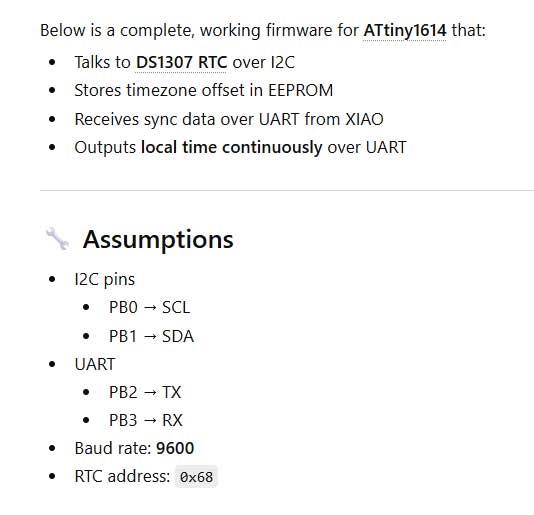
board which has RTC and Attiny connected with UART pins. Since ATtiny1614 does not have bluetooth or wifi I am pairing it with the breakout
board I created in Embedded Networking
and Communications week I am using Xiao esp32s3 in that so I can use wifi or bluetooth
This is how I did this week. I used ChatGPT and communicated my idea on what I want.
I told the basic flow of how I wanted the communications.
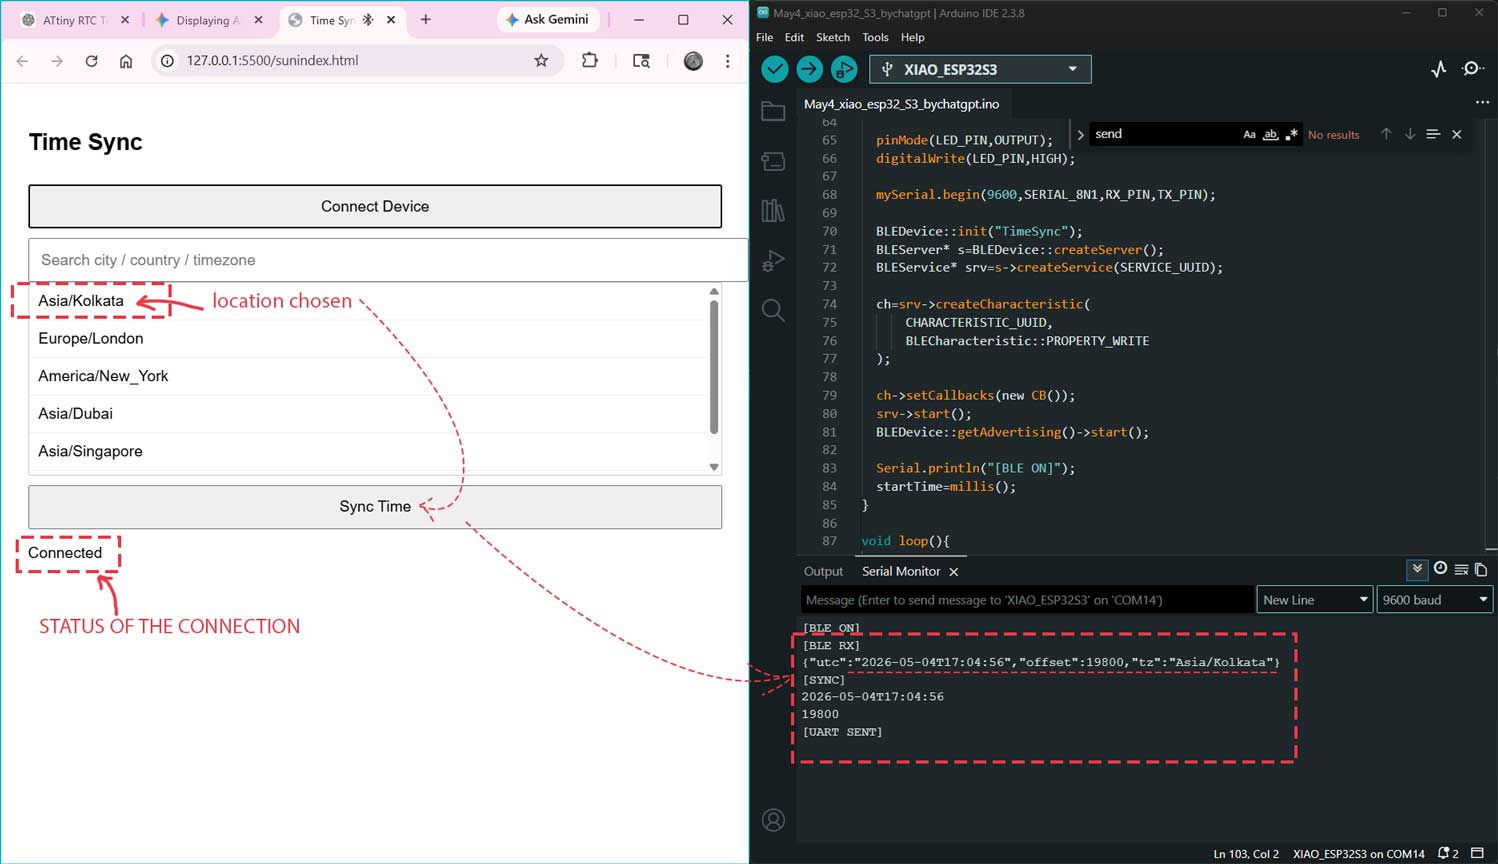
"I have an RTC DS1307 connected to ATtiny1614 with UART pins. On another board, I got a XIAO ESP32S3 which has UART pins and an LED. I need the RTC to
send time to the XIAO. I need this to be connected to a web application via Bluetooth. When I select a timezone in that, it should change the time in the
RTC to that location."
I mostly used conversations like these and shared KiCad schematic images of the boards, then asked for complete code.
That approach did not work well. The code had issues, did not run properly, and it became overwhelming because I could not track which AI generated which part.
So I decided to work only with ChatGPT to better understand what it handles well and where I need more clarity. I will use Gemini or Claude only when ChatGPT
cannot provide a better solution.
I have an attiny 1614 with rtc DS1307 with coin cell.
these are connected.
now i need the rtc to be programmed that i can get the real time. it should give out the region:time: date>
I want the attiny to connect to xiao esp32s3 and give the time.
All the timezones have to be added.
Now the attiny is connected to xiao via the uart pins.
connec the xiao over ble to a webpage which can be opened in phone or mobile.
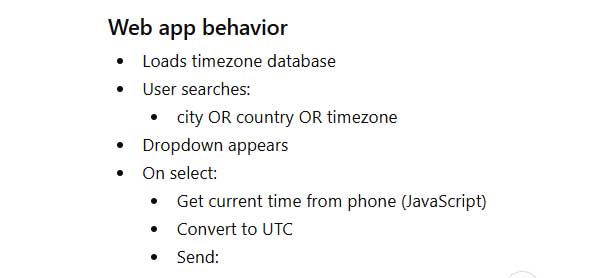
and I get the list of the cities, countires and timezones so i can either type and search for the city, region or time zone, and it shows a dropdown of these options.
i need the xiao get get the correct curretn time of the timezone it is in an dhten change to the timezone set.
attiny:
PA1:LED
PA0:UPDI
PB2:TXD
PB3:RXD
PB0:SCL
PB1:SDA
XIAO ESP32S3
D6:TXD
D7:RXD
D9:LED
tell me what you understood from this, what are the places IN WHICH clarity is need.
keep it short , simple and clear.
I discussed this further and shared my preferences based on the questions it asked. This gave me clarity on my choices rather than blindly trusting AI. It helped customize the responses and code, leaving less room for error. I learned this the hard way after trying many code versions without understanding what I was missing while creating prompts.
- Source of correct time is from the web application, sent over Bluetooth
- DS1307 is the primary time source after initial sync
- The timezone is handled by the web application (recommended)
- Data format over UART (this was missing earlier)
- ATtiny responsibility: only read/write RTC or also apply timezone offsets (I chose whichever is better)
- BLE communication includes full timestamp + timezone (to verify if the change is applied)
- Initial setup: runs on first power. After the first connection with XIAO, it gets the current time and runs on it. After that, it continues based on the set timezone
- Accuracy concerns: when connected to XIAO, it should get time from the internet
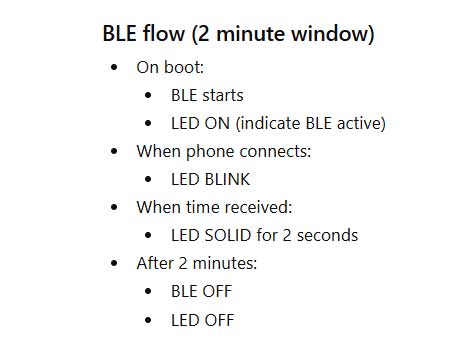
- When XIAO and ESP32-S3 are connected, I need that connection over BLE. The connection can last for 2 minutes when powered on or when code is uploaded in Arduino
- During that time, the webpage should fetch live time from an online source
Is this possible? I need the serial monitor to show these updates when connected to BLE and when BLE is active
Decisions
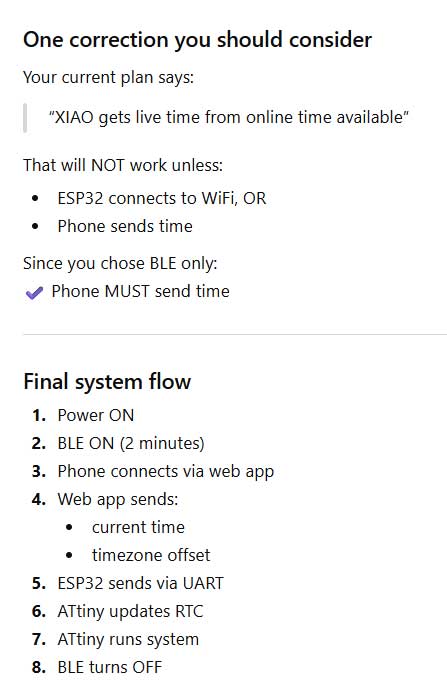
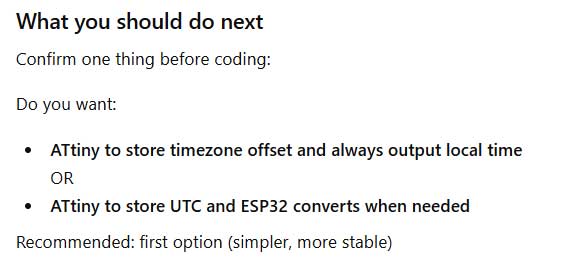
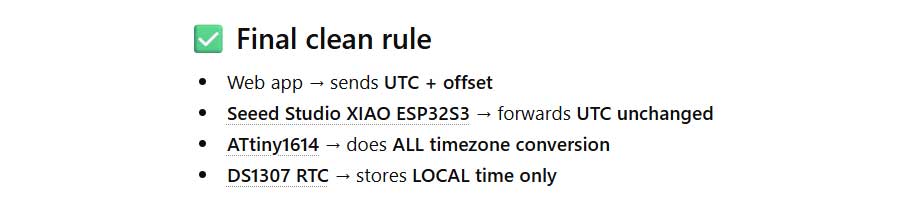
Based on the clarified approach, the system logic was refined. The ATtiny maintains time in UTC, and timezone adjustments are applied based on the selected region. Since only Bluetooth is used, the phone sends the correct time to the XIAO, which then passes it to the ATtiny. This avoids relying on WiFi for online time access.
1 / 3
2 / 3
3 / 3
Final Workflow
1 / 3
2 / 3
3 / 3
After confirming the workflow of the boards, I requested the code in stages. Earlier, when I asked for all the code together, an error
in one part meant I had to modify the others as well. So I am now isolating errors and fixing them incrementally, editing as I go.
ATtiny full firmware (RTC + EEPROM + UART)
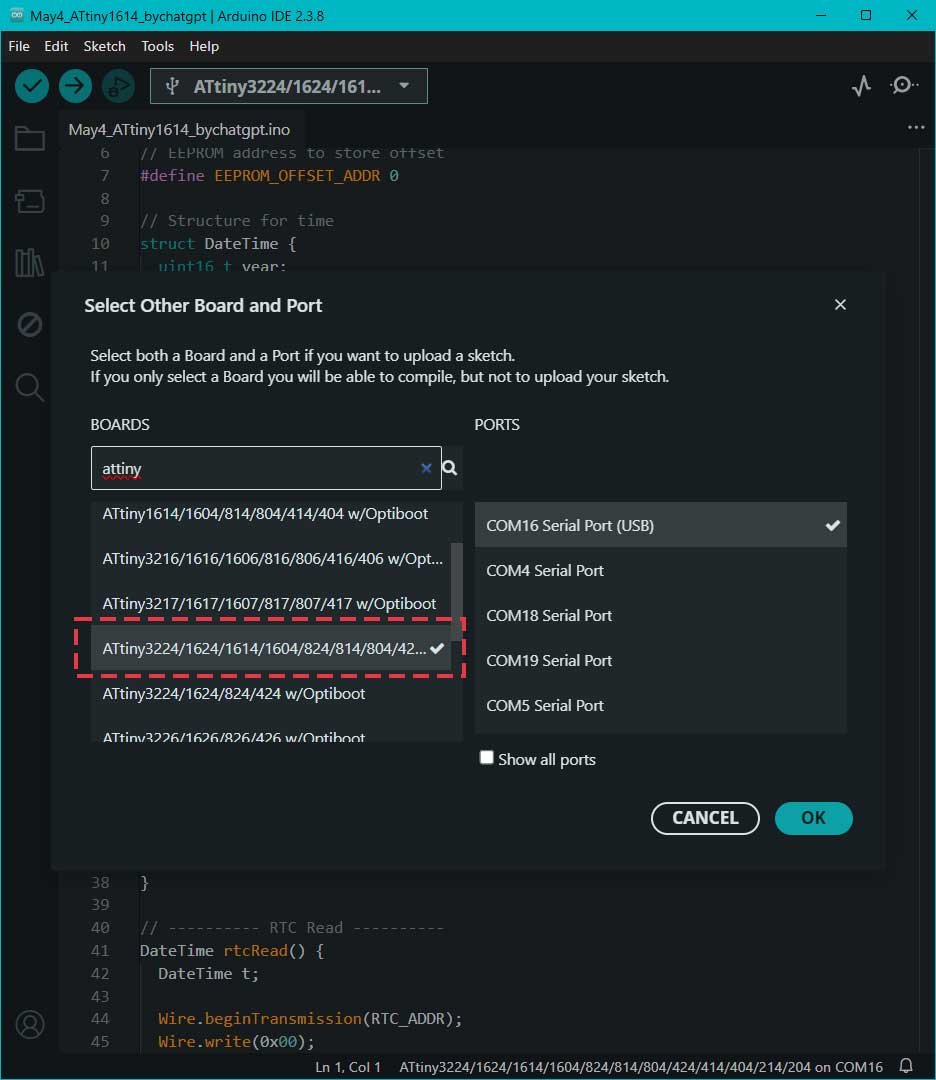
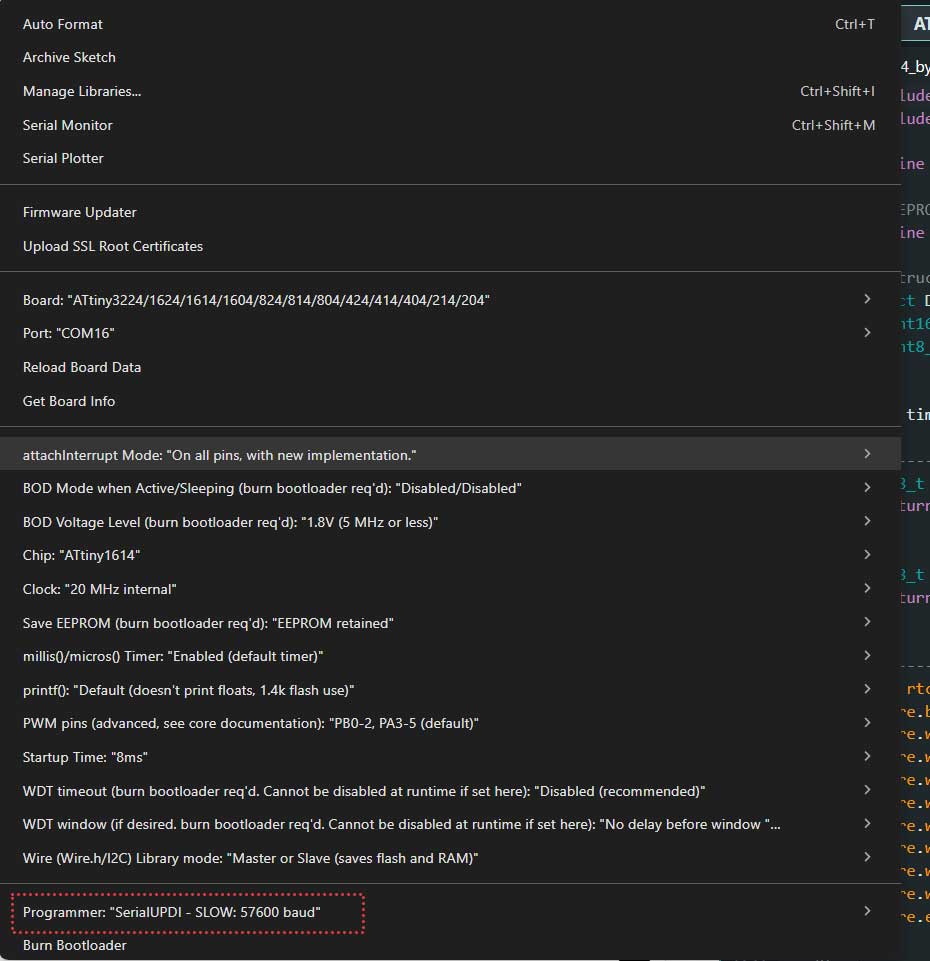
ATtiny1614 Board Setup
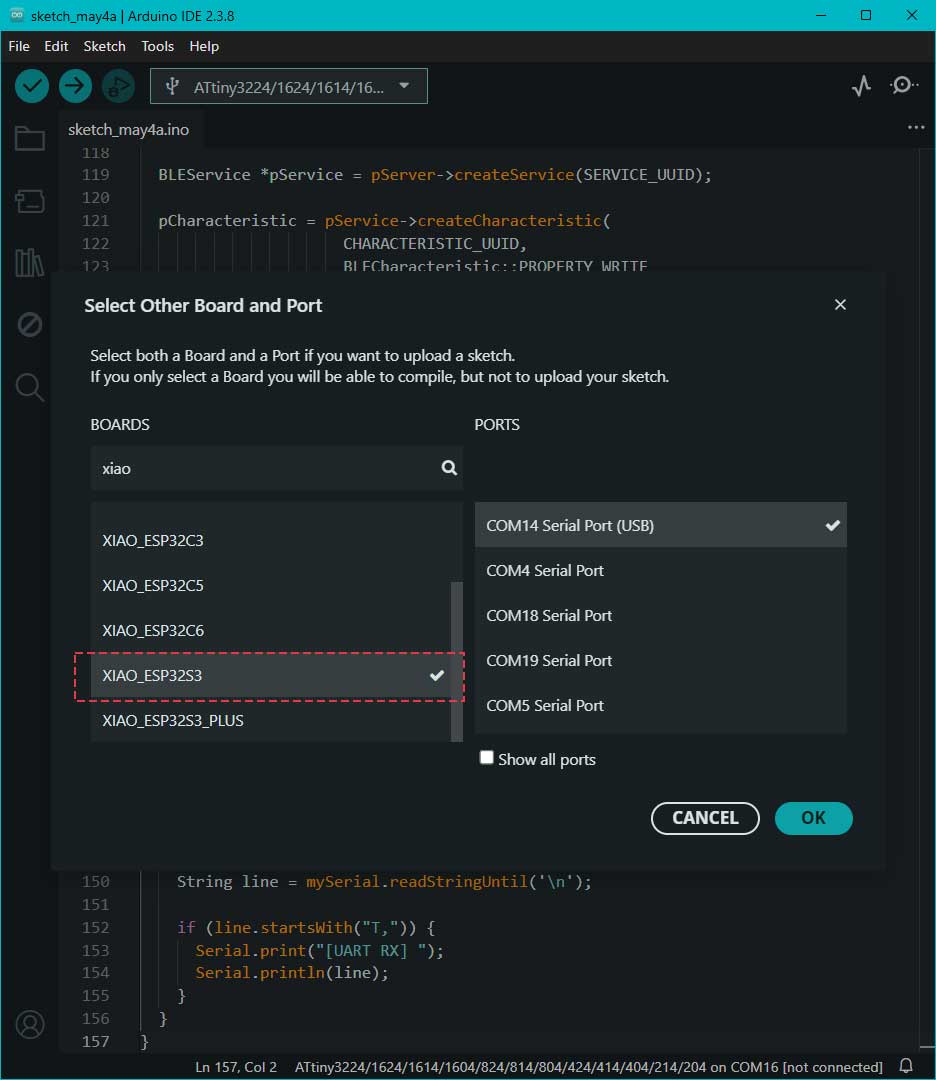
While setting up the board, I selected the ATtiny1614 without Optiboot. The port was chosen based on the connection being used. In the Tools menu, I set the programmer to SerialUPDI with a baud rate of 57600. However, the Serial Monitor was running at 9600 baud.
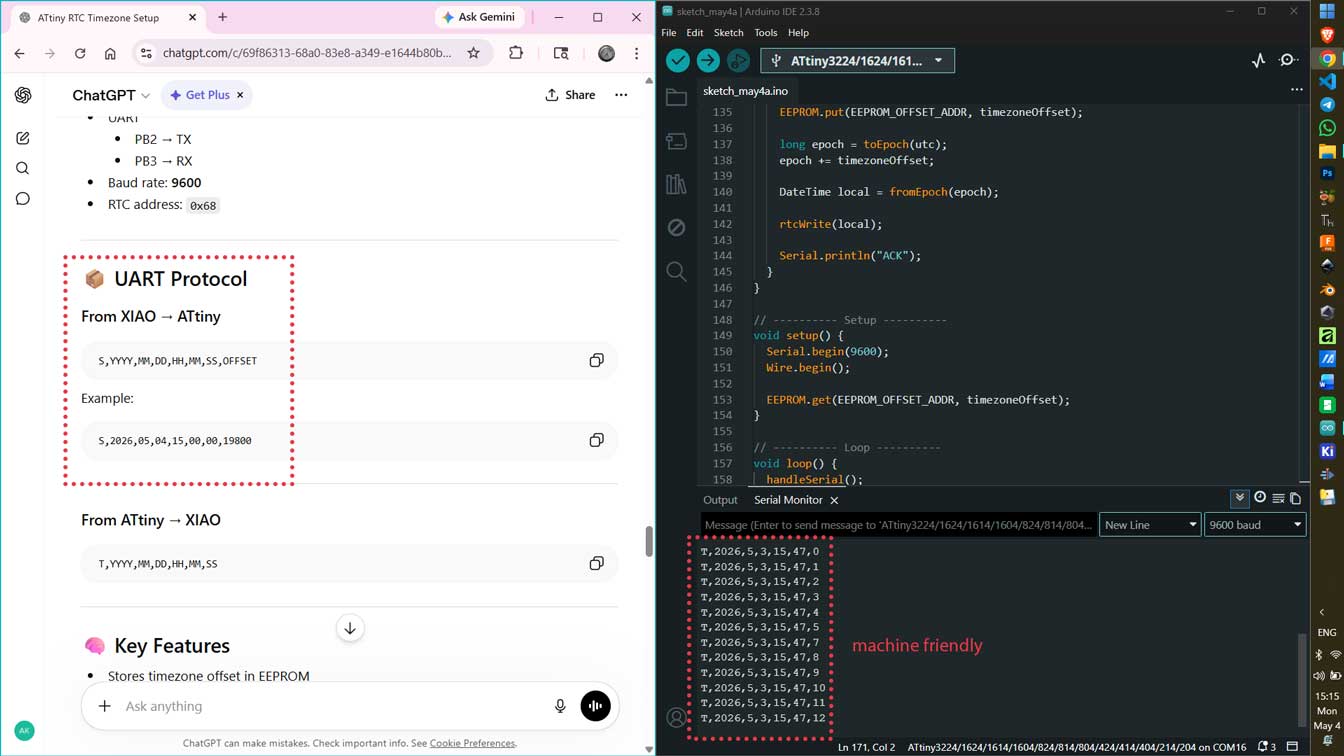
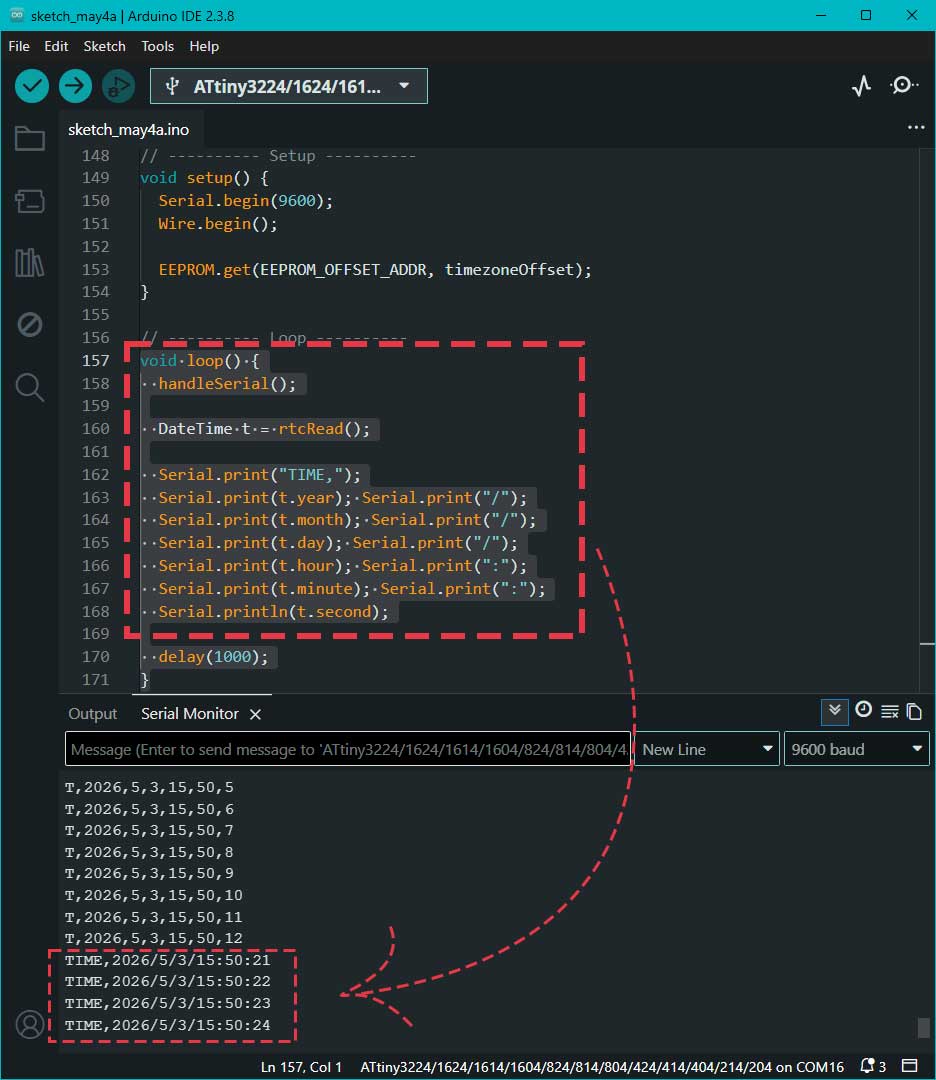
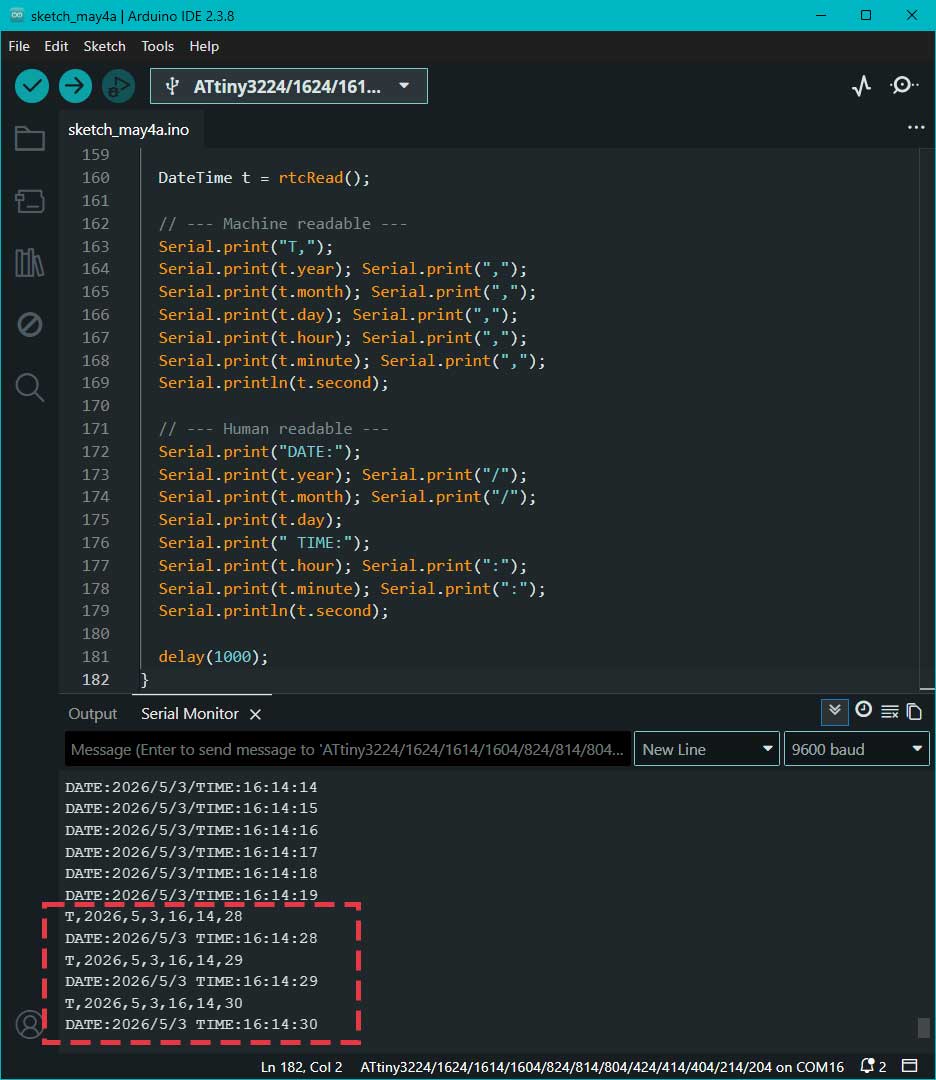
After uploading the Arduino code to ATTiny.I prompted ChatGPT for "XIAO-esp32s3 Arduino code," which I got, and the code worked.
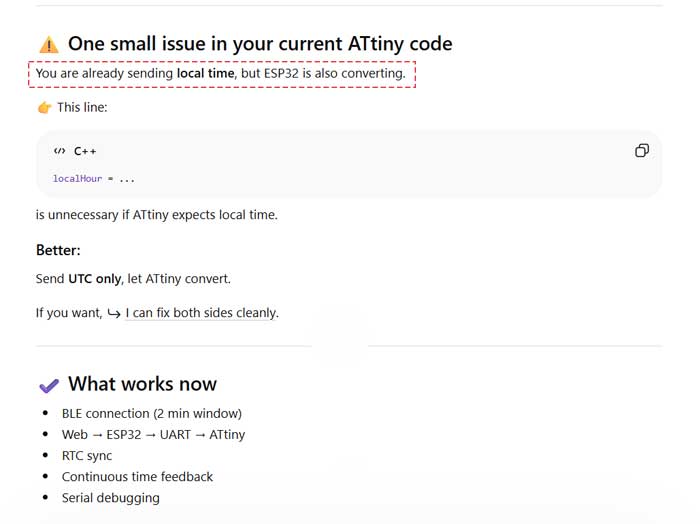
Issue pointed out:
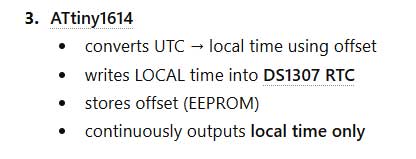
At the same time, ChatGPT pointed out that ATtiny wants the local time. What was happening was that the web will
already be sending the local time; e.g., it is 10:00 AM now. The ESP receives this and then it thinks it got the UTC,
so it converts to IST (10:00 AM will become 3:30 PM). This step shouldn't happen. Because of this, ATtiny receives the wrong time.
ChatGPT fix:
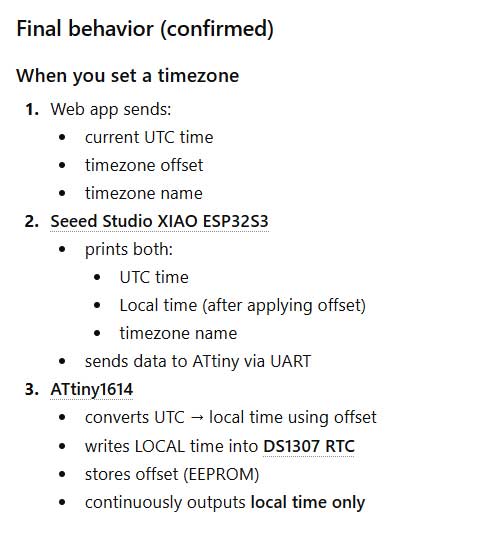
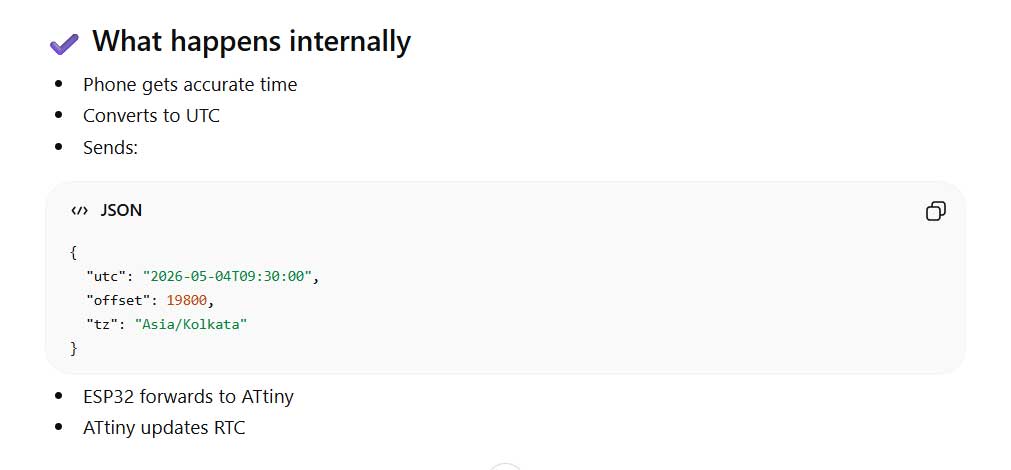
Web will send UTC + offset.
XIAO-ESP32S3: will forward the UTC.
ATtiny will convert it.
XIAO-esp32s3 Arduino code
By now, ChatGPT did give the Arduino code for XIAO ESP32S3.
I was unable to follow the instructions ChatGPT gave me on where to change and delete the code in ATtiny's Arduino code and XIAO ESP32S3's Arduino code.
It gave me the choice to fix both codes. So I prompted it to "Fix both sides cleanly."
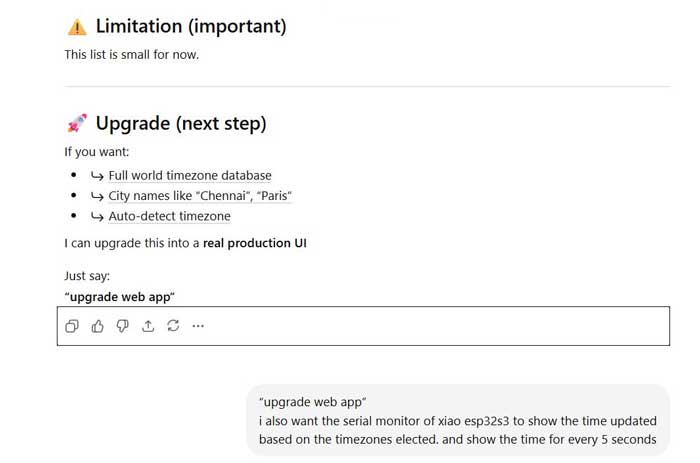
I wanted to add more locations and I wanted to know if the time was updated after the sync. so I added the below promt.
“upgrade web app”
i also want the serial monitor of xiao esp32s3 to show the time updated based on the timezones elected. and show the time for every 5 seconds
Click to open the Web Application by ChatGPT - Time Sync
Webpage Explanation
The styles and JavaScript were all in the HTML. Usually, it would be 3 files. Here, it is combined into 1.
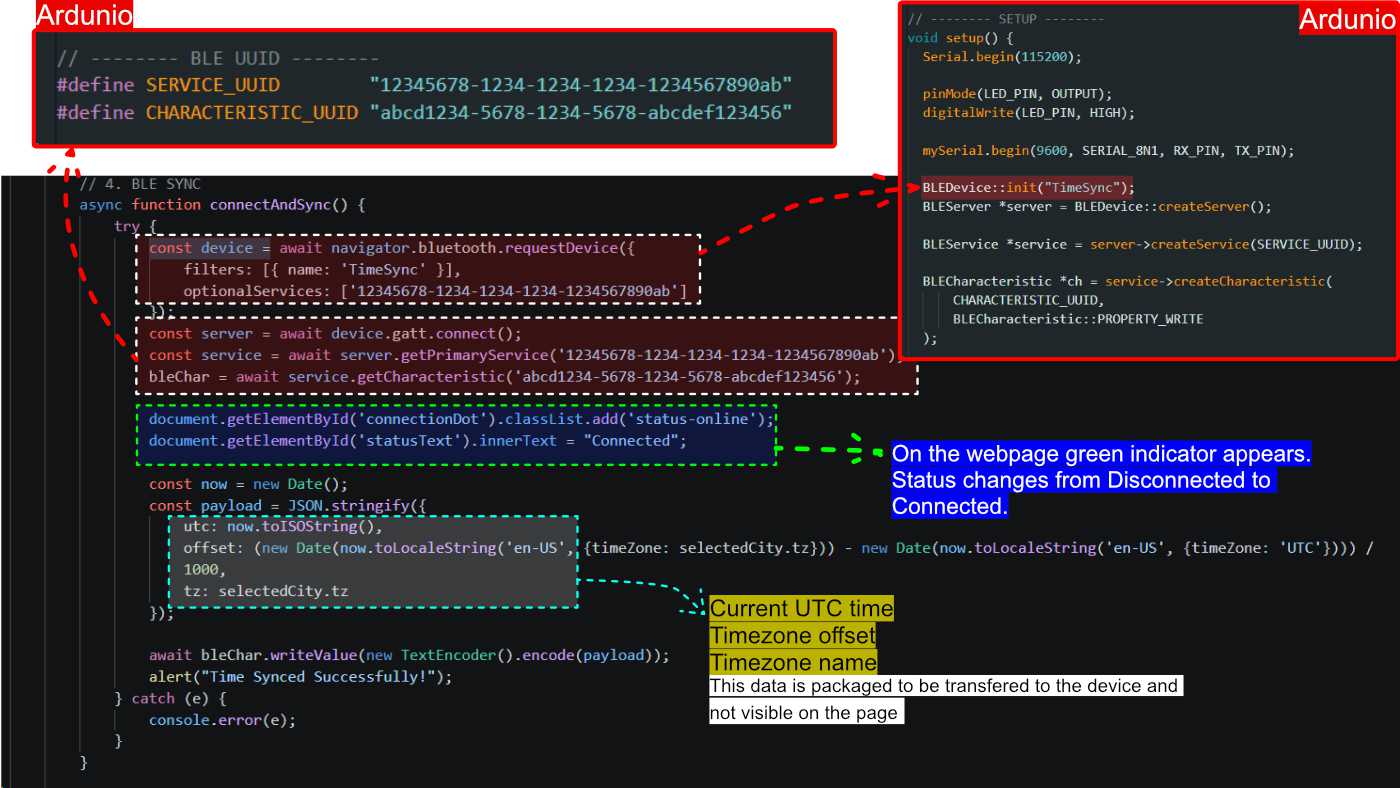
How Bluetooth works: the below code is the main Bluetooth communication function. It finds the device, connects to it, creates the time data, and sends that data to the hardware.
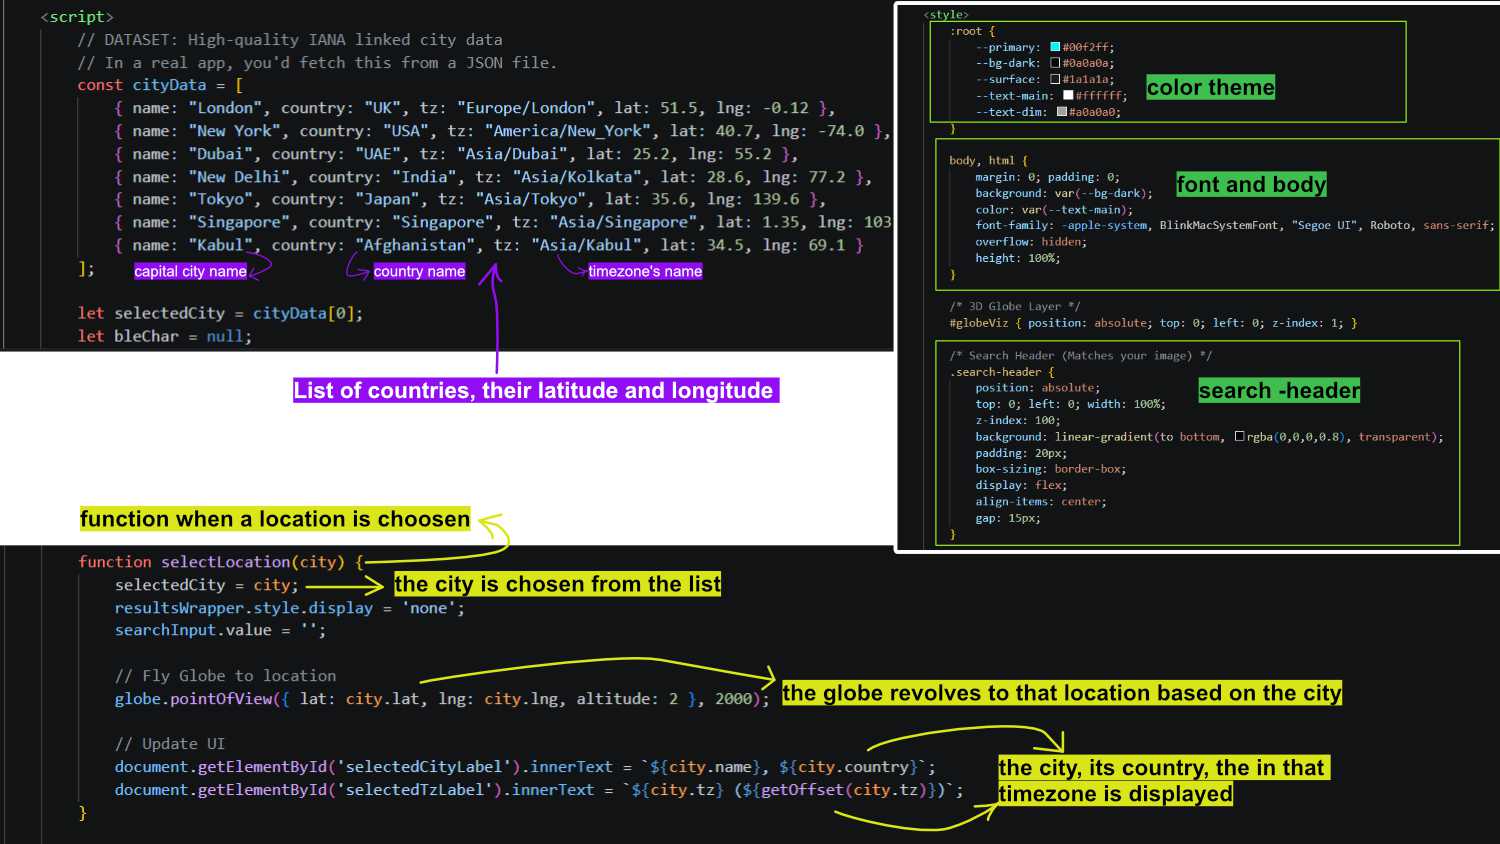
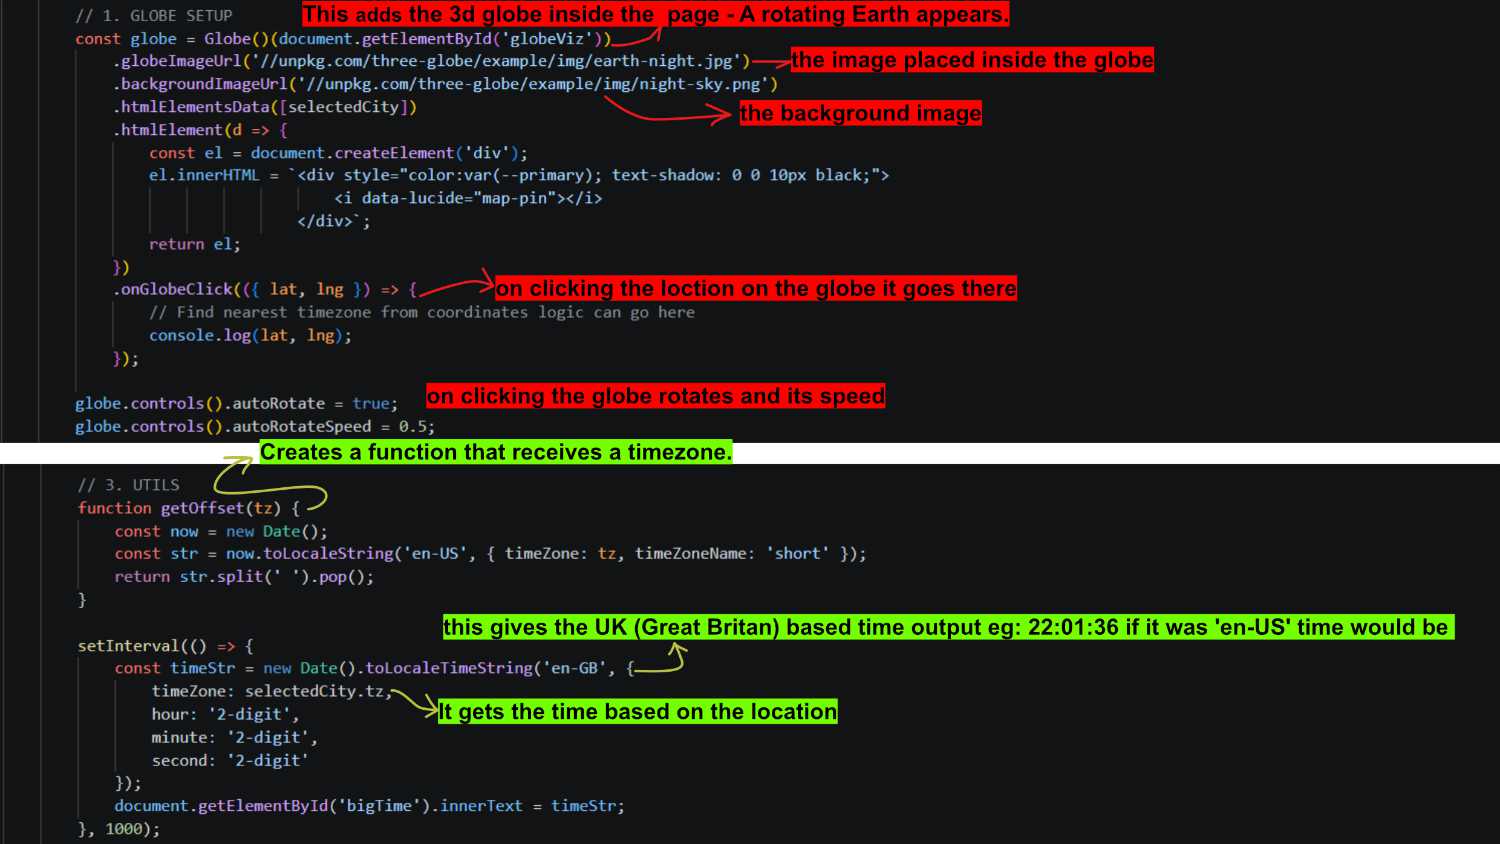
Style, list of cities, and how the location function is applied.
How the globe animates and how it rotates to the chosen location.
The above code means that the page will only pair with the device if the BLE name is "TimeSync". If the device ID is different, it would not detect it.
I didnt notice an issue which was right in front of me. The pins were named
#define TX_PIN 6
#define RX_PIN 7
#define LED_PIN 9
and therefore there were no data being send. then I remembered and changed the pins to
#define TX_PIN D6
#define RX_PIN D7
#define LED_PIN D9
Final Workflow Demonstration
The video below demonstrates the complete live synchronization process.
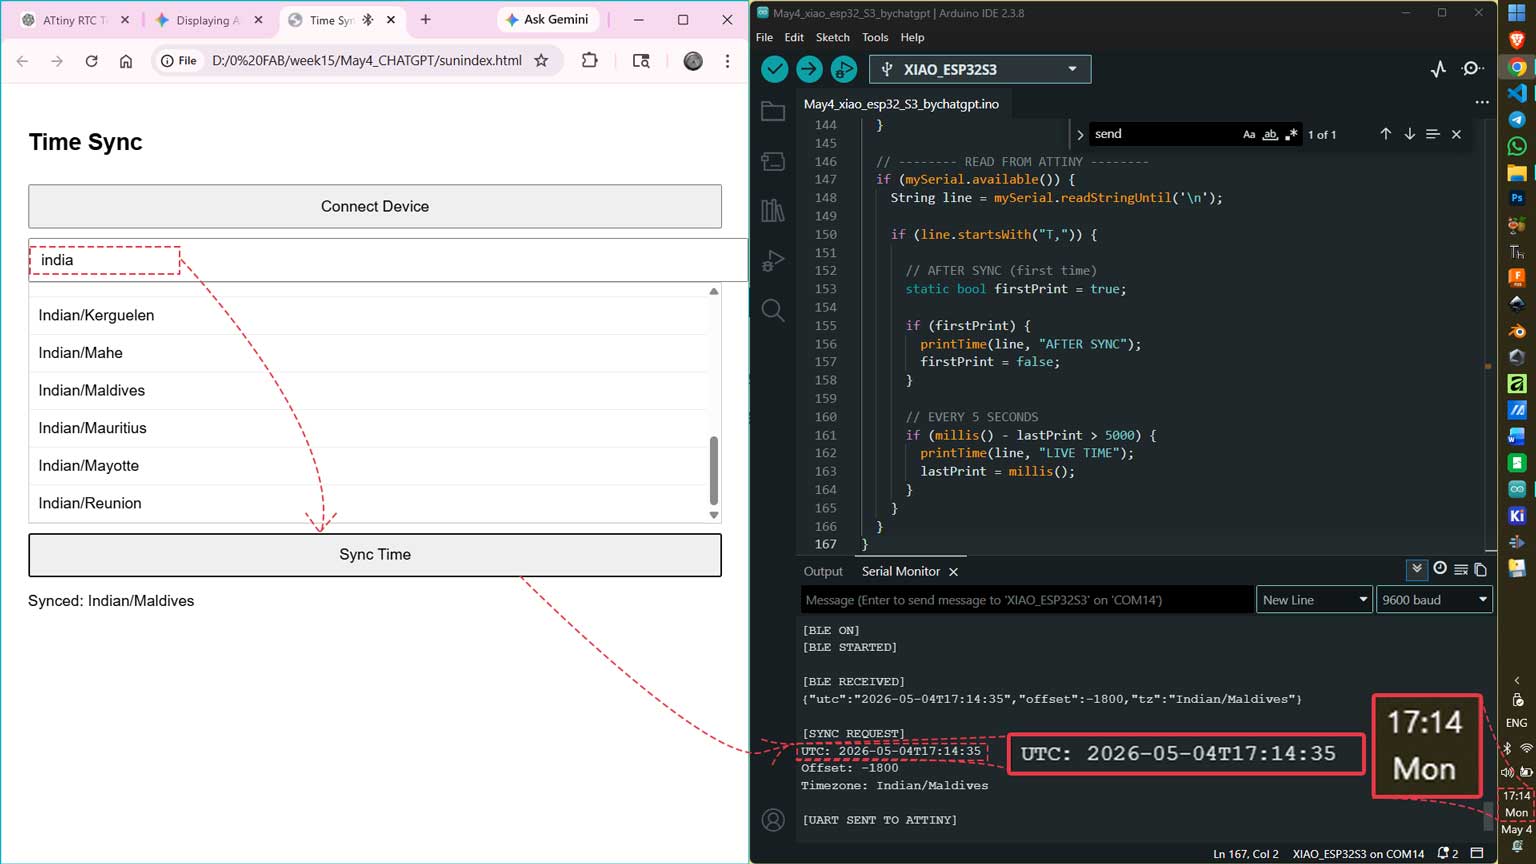
I opened both the Arduino Serial Monitor and the web interface side by side on my laptop to observe the communication between the webpage and the XIAO ESP32.
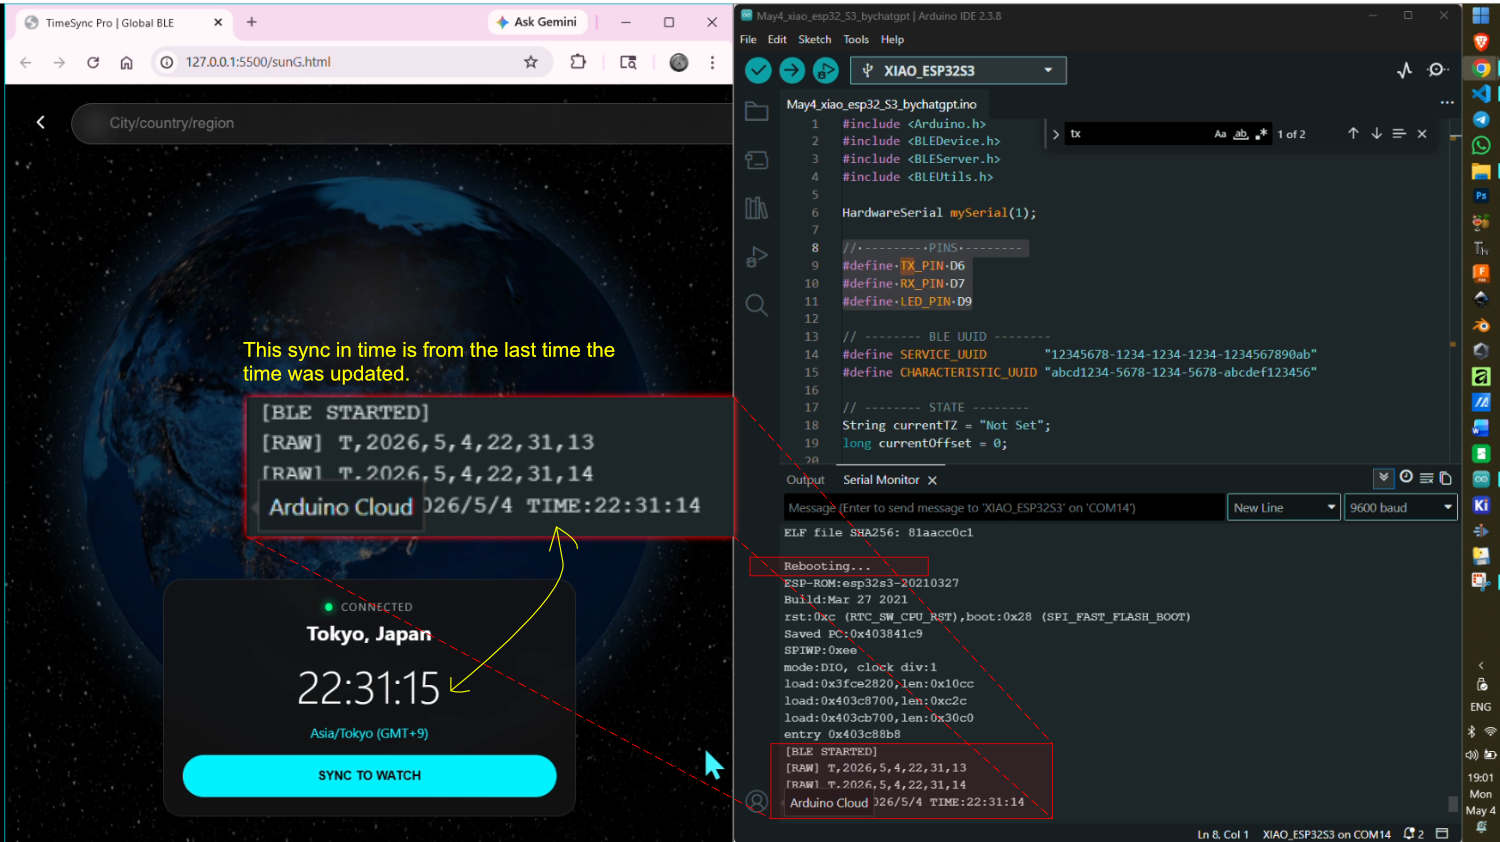
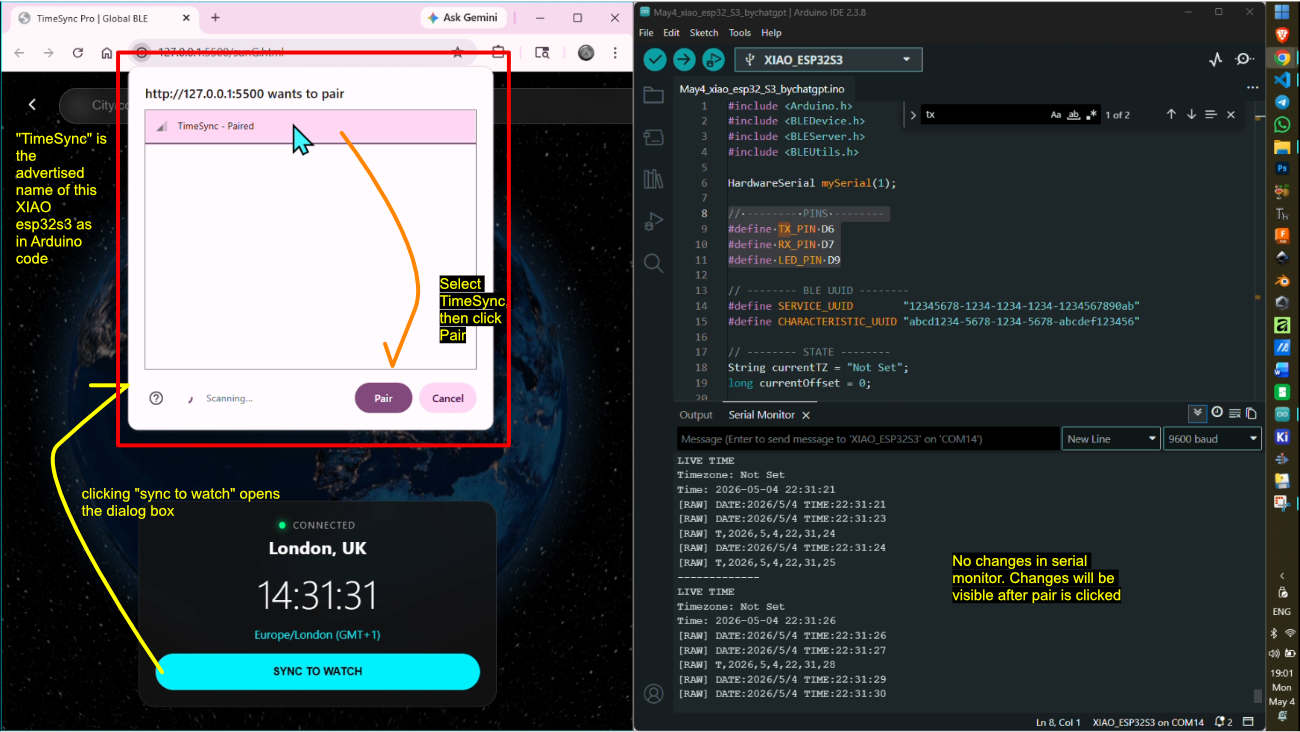
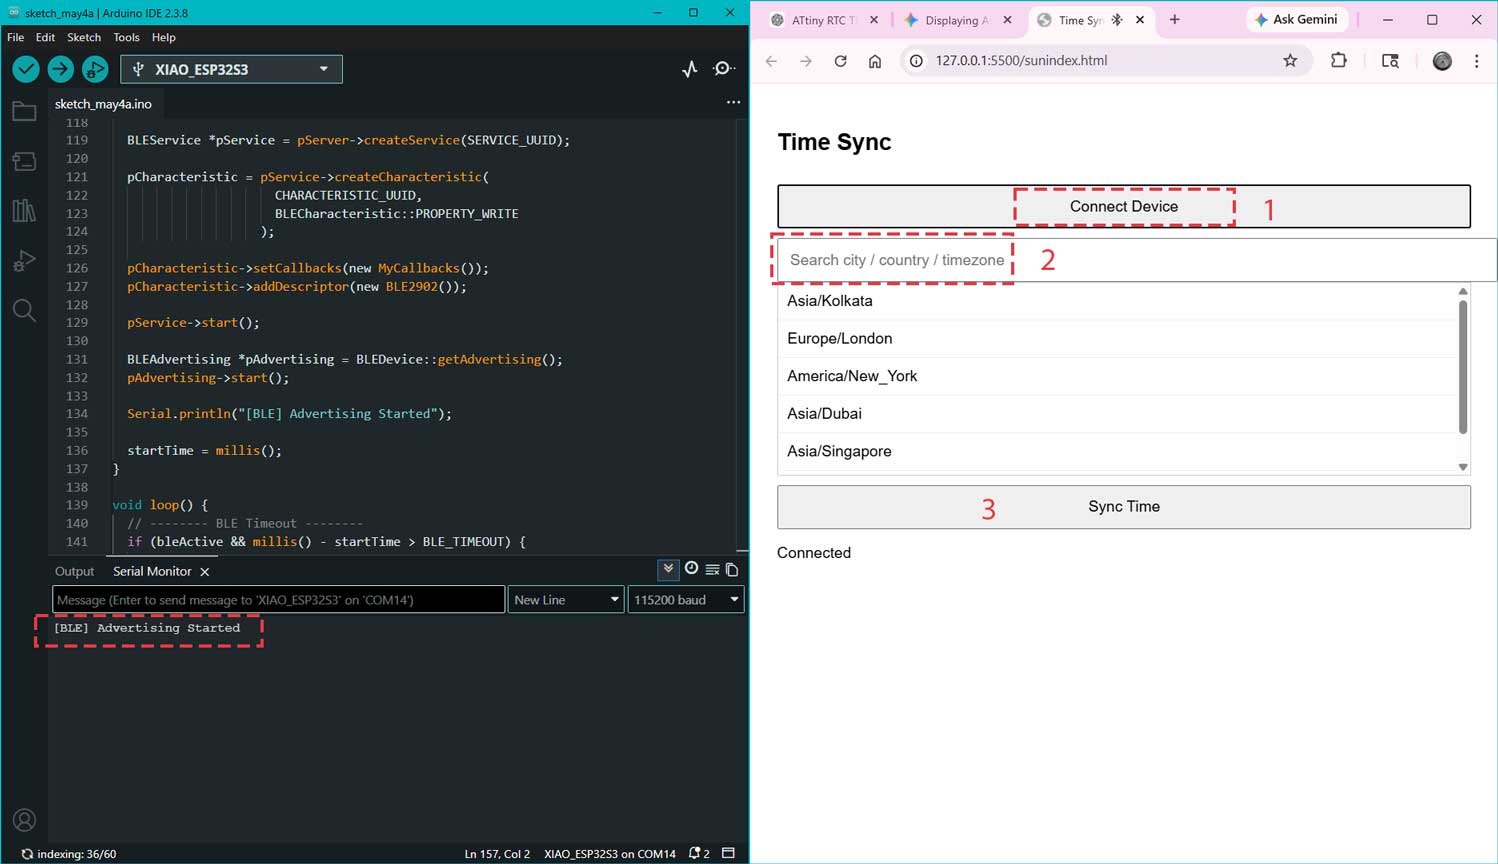
1. Webpage Opened, BLE Advertising Started
The webpage displays the last location that was previously synchronized. The code has already been uploaded to the XIAO ESP32. BLE advertising starts as shown in the Serial Monitor. The Serial Monitor also displays the time corresponding to the last synchronized location.
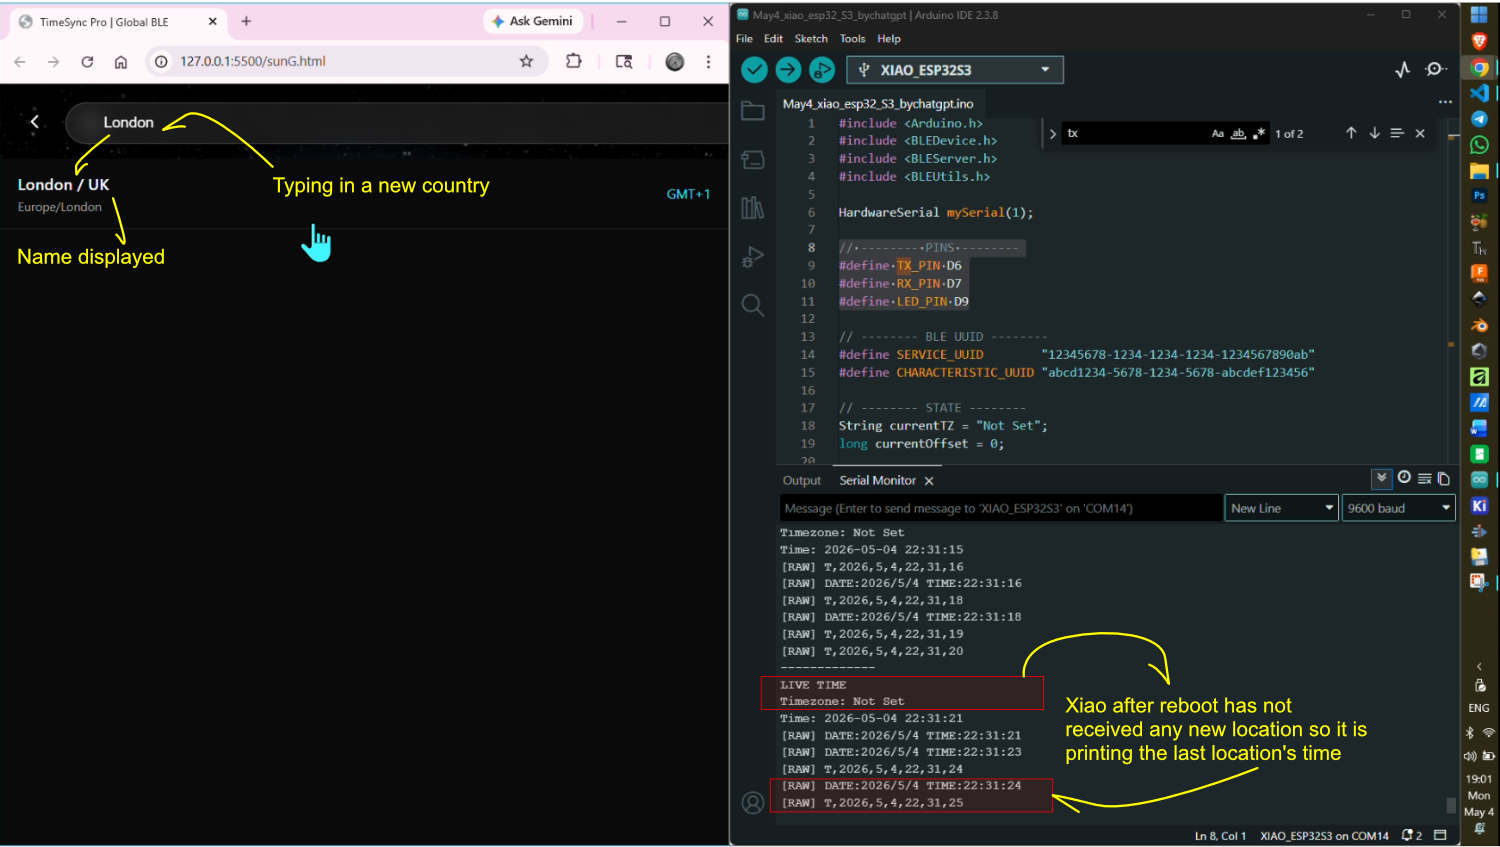
2. User Selects a New Time Zone
A new location is selected by entering it into the search bar. At this stage, the Arduino is still displaying the time from the previously synchronized location. No changes are visible in the Serial Monitor because the webpage has not yet communicated with the XIAO ESP32.
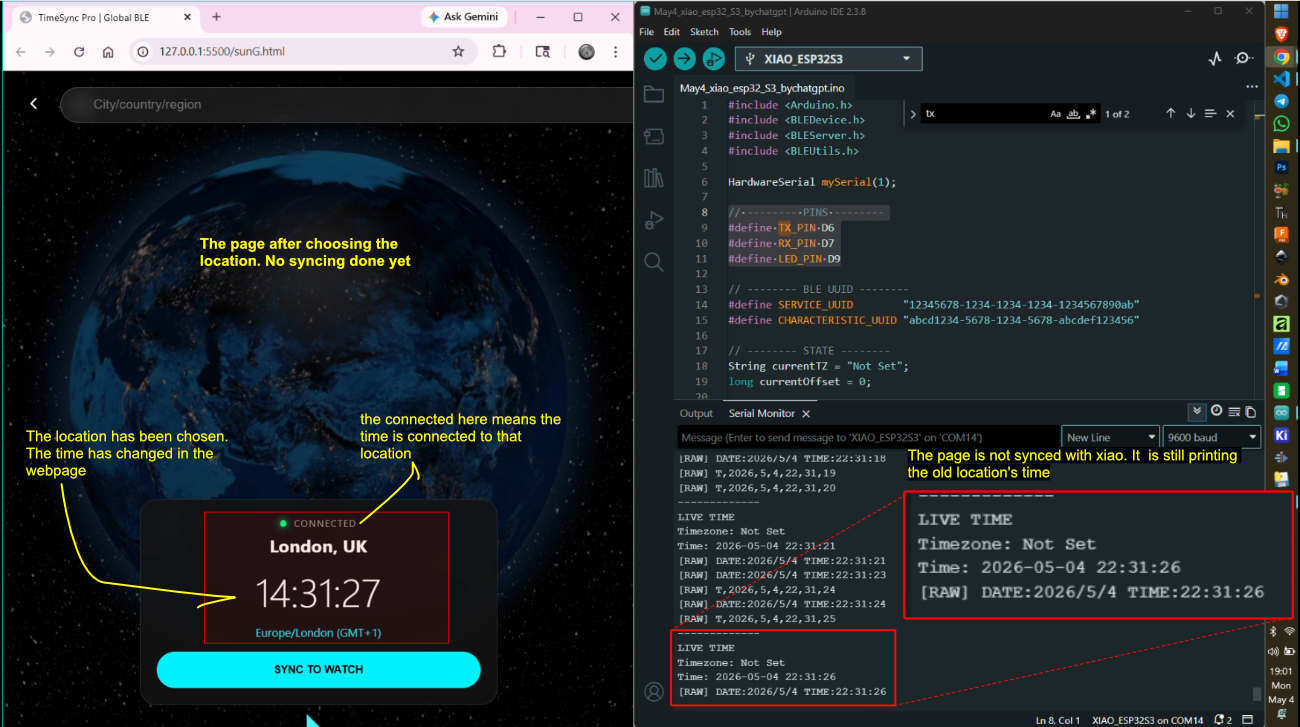
3. Webpage Updates to the Selected Time Zone
London is selected as the new location. The webpage immediately updates and displays the local time for that time zone, showing 14:31:27. The Serial Monitor remains unchanged because the webpage has not yet been paired with the XIAO ESP32.
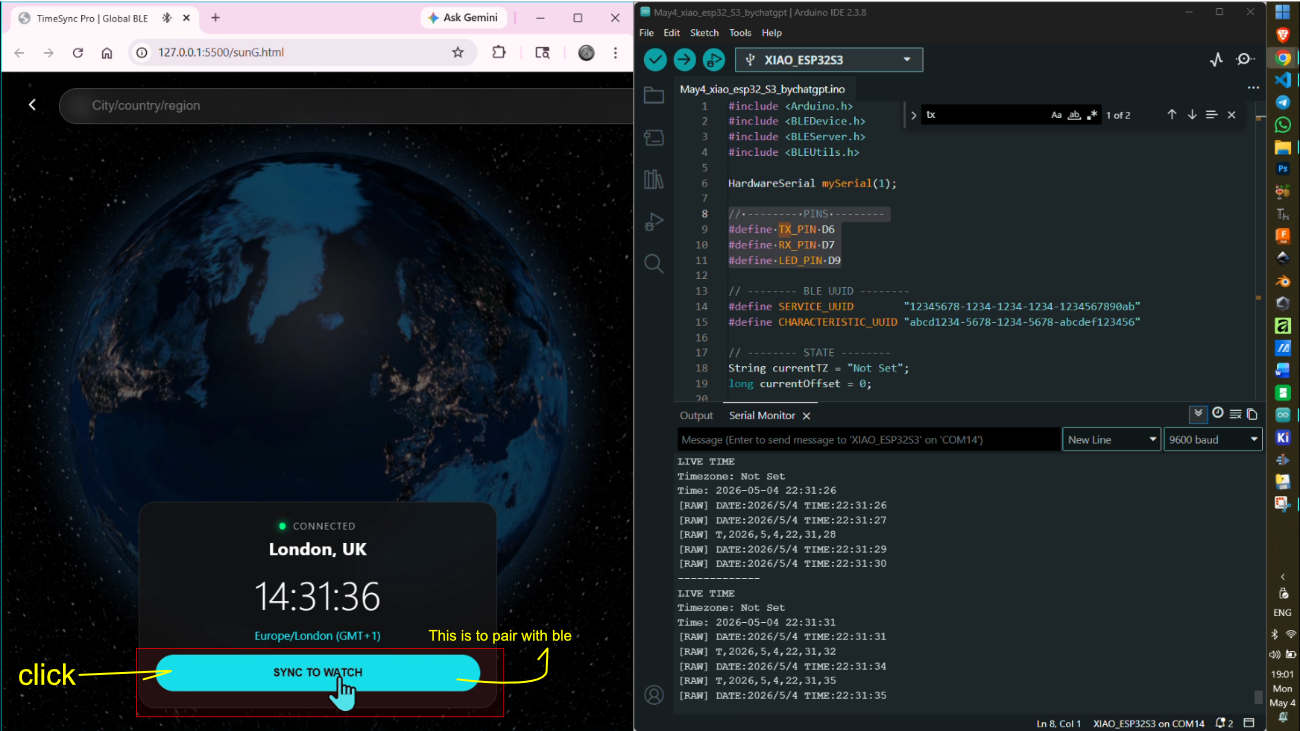
4. Initiating BLE Pairing
The "SYNC TO WATCH" button is clicked. At this point, there is still no change in the Serial Monitor because the Bluetooth pairing process has not yet started.
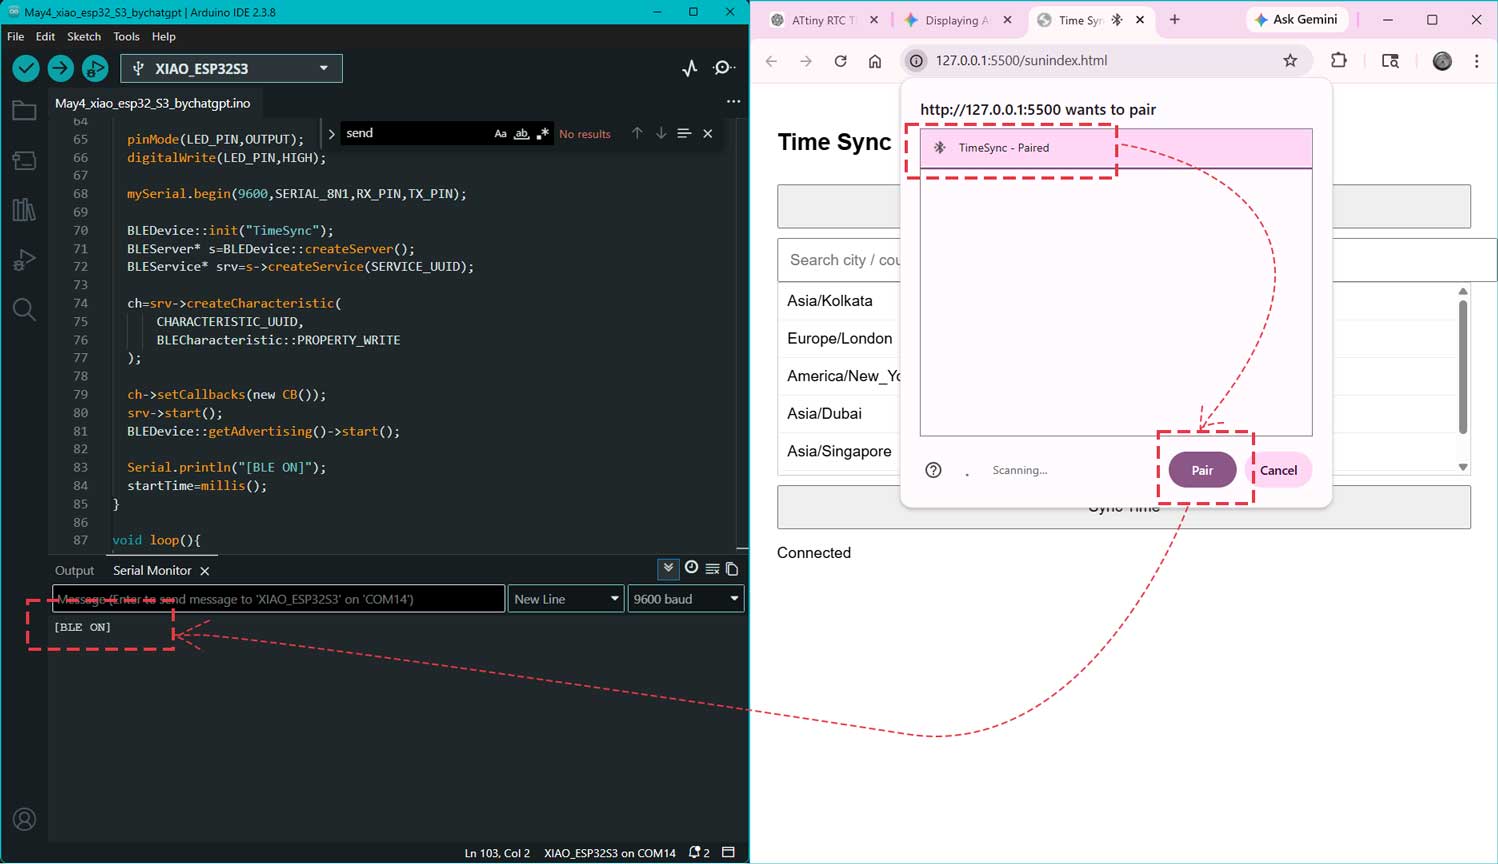
5. Selecting the BLE Device
A device selection dialog opens in the webpage. The "TimeSync" device appears because the XIAO ESP32S3 is actively advertising over BLE. The device is selected and paired.
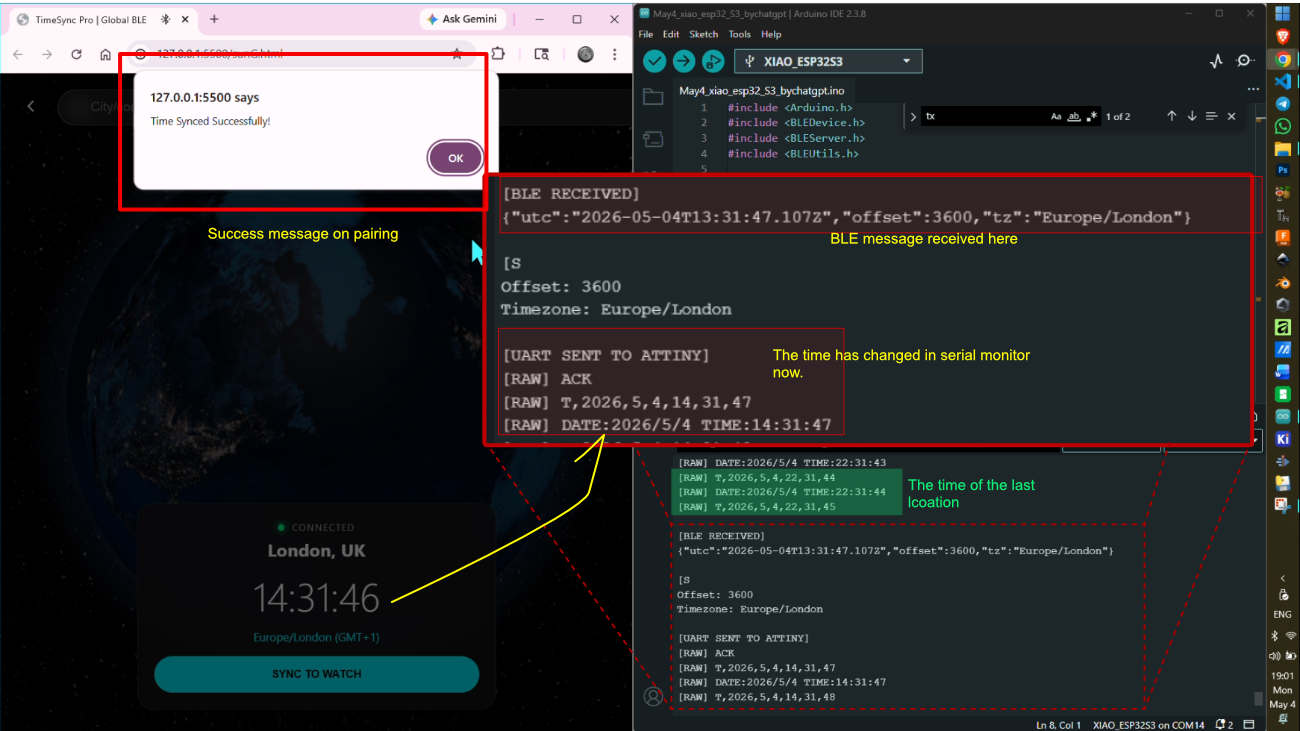
6. Time Synchronization and RTC Update
A successful pairing message appears on the webpage. At the same moment, the Serial Monitor prints "BLE RECEIVED", confirming that the data has been received by the XIAO ESP32. The device then updates the selected location, applies the corresponding UTC offset, and transmits the corrected local time to the ATtiny-controlled RTC. The RTC subsequently outputs the updated local time for the selected time zone.
Final workflow - video
I had added the location as Tokyo and clicked Sync to test it. Since the pairing had not been done, the app asked to pair with the device again. After pairing, the device connected successfully, and the time was changed in the Serial Monitor. I then changed the location again, this time to Dubai. You can see that the time was updated accordingly in the Serial Monitor.
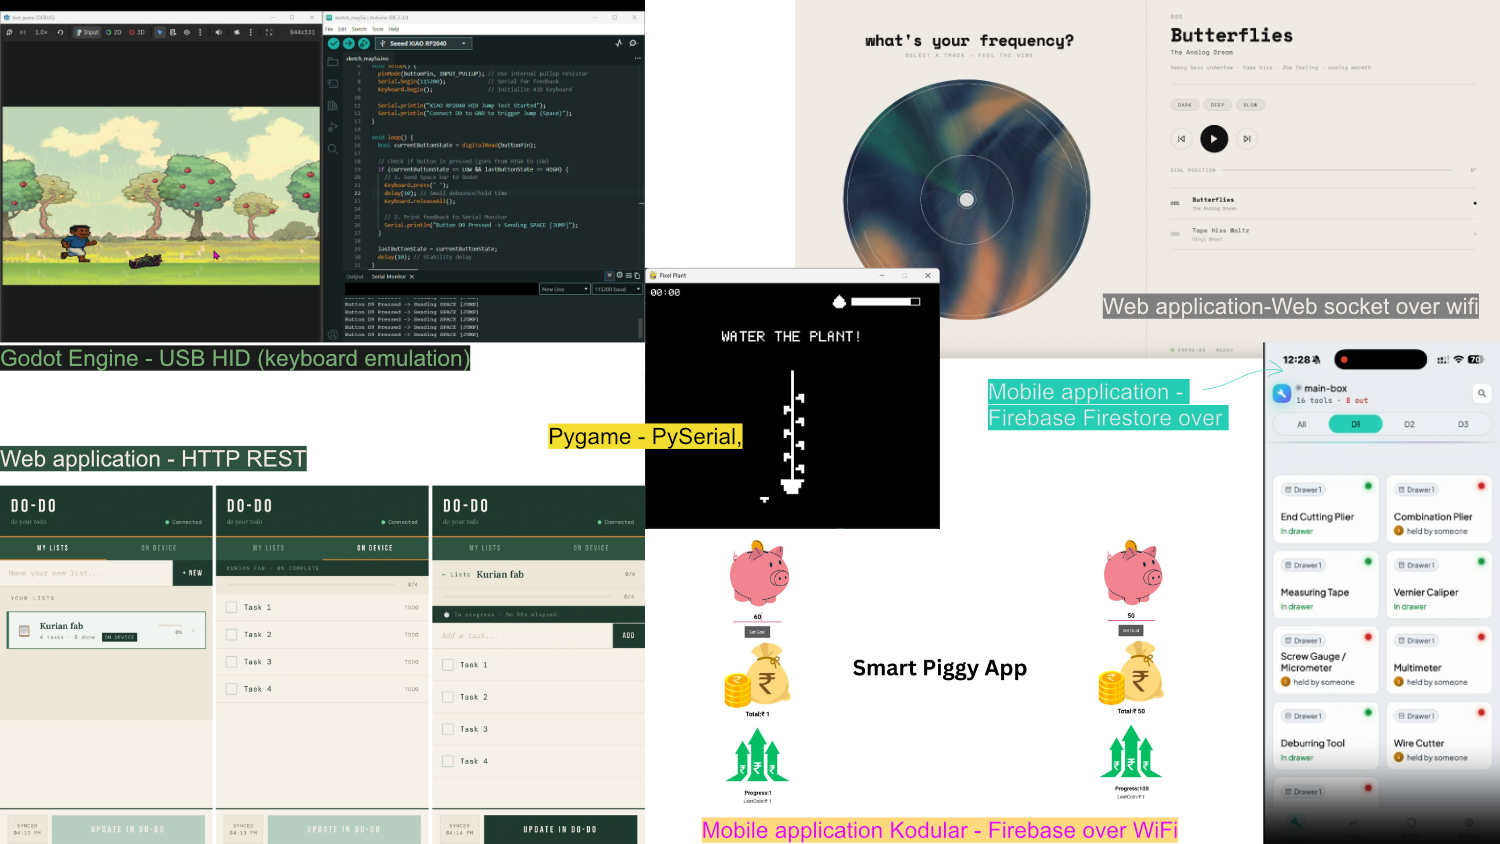
This week everyone builtinterfaces and commnunications with their hardware project, most of us designined an interface application conected to our final project.Every one tried a differnet method from the other. the apllication might be same but teh communication would differ.
Web Application
Butterflies - Architha: A web application that functions as a music playing platform. It uses WebSocket communication over WiFi, providing a two way, always open connection between the browser and the device. DODO - Kurian: A web application that communicates with the device using HTTP REST over WiFi, allowing data to be sent and received through web requests. Time Sync - Ardra: A web application that communicates with the device using Bluetooth Low Energy (BLE).
Mobile Application
SmartToolBox - Nadec: A mobile application that uses Firebase Firestore to exchange data between the application and the device. Smart Piggy App - Michale: A mobile application built with Kodular that uses Firebase over WiFi for communication between the application and the hardware.
Desktop Game
Pixel Plant - Kevin: A desktop game developed with Pygame that uses Serial Communication through PySerial to exchange data with the hardware. Pixel Game - Ashtami: A 2D pixel art game developed using the Godot Engine and GDScript for gameplay programming and logic development. The PCB functions as a USB Human Interface Device (HID), allowing it to behave like a keyboard.
It shows that similar interfaces can use different communication methods depending on the project and its requirements. The choice of communication depends on the interactions needed and the actions the interface must perform with the device.

.jpg)
.jpg)