Molding and Casting — Beeswax Candle Molds

Final beeswax candle mold design

Final candle mold design and cast candles

For this week's assignment, I designed and fabricated a two-stage mold system to cast beeswax candles using excess wax from my beehives. The process involves 3D printing a master mold, casting a silicone mold from it, and then using the silicone mold to cast beeswax candles.

Assignment Requirements

Group Assignment:

Individual Assignment:

Project Overview — Beeswax Candle Molds

I keep bees and harvest honey from my hives, which leaves me with excess beeswax that I wanted to put to good use. Making candles seemed like the perfect application — beeswax candles burn clean, smell great, and are a sustainable way to use a byproduct from my beekeeping.

The challenge: I can't use a 3D printed mold directly for casting beeswax. Beeswax melts at around 145°F (63°C), and PLA starts to soften around 140–150°F (60–65°C). Even if the PLA doesn't fully melt, the wax won't release cleanly from the printed surface — it sticks to the layer lines and texture of FDM prints.

Two-Stage Molding Process

The solution is a two-stage molding process:

  1. Stage 1: 3D print a master mold (positive) with a smooth surface finish
  2. Stage 2: Cast a silicone mold (negative) from the 3D printed master
  3. Stage 3: Cast beeswax candles using the silicone mold

Silicone rubber is heat-resistant (up to 400°F / 200°C), flexible for easy part removal, and has a smooth surface that produces clean casts. It's the ideal material for a reusable candle mold.

Design Files

Download the design files to view, modify, or 3D print the mold yourself:

📥 Download STL

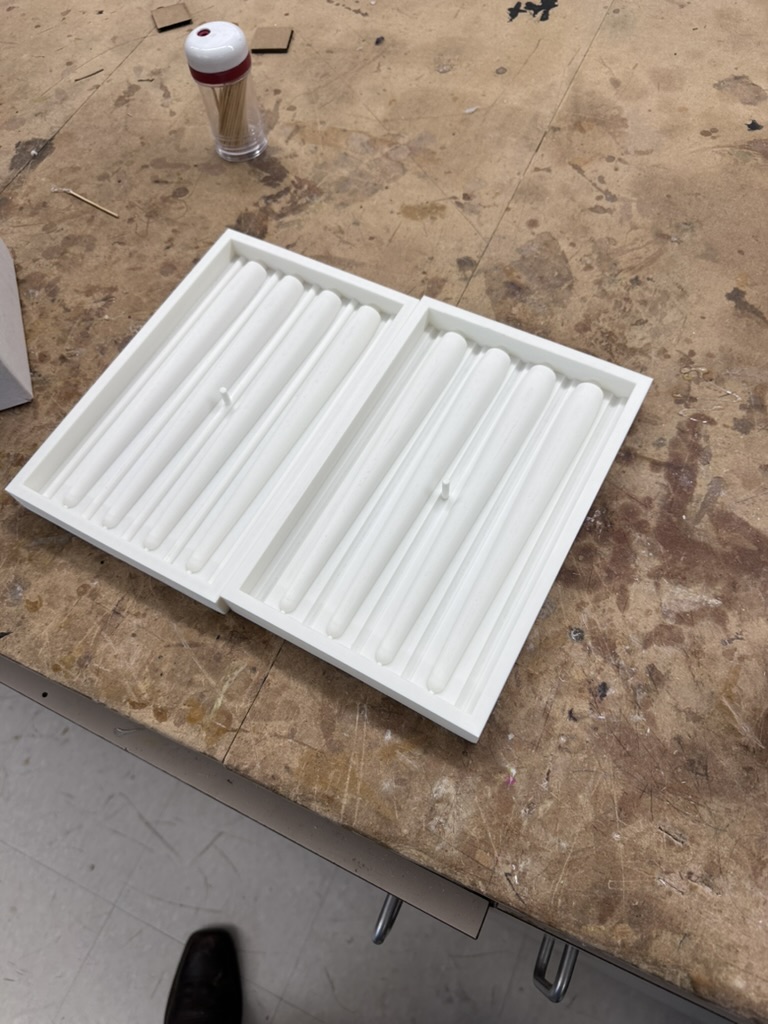
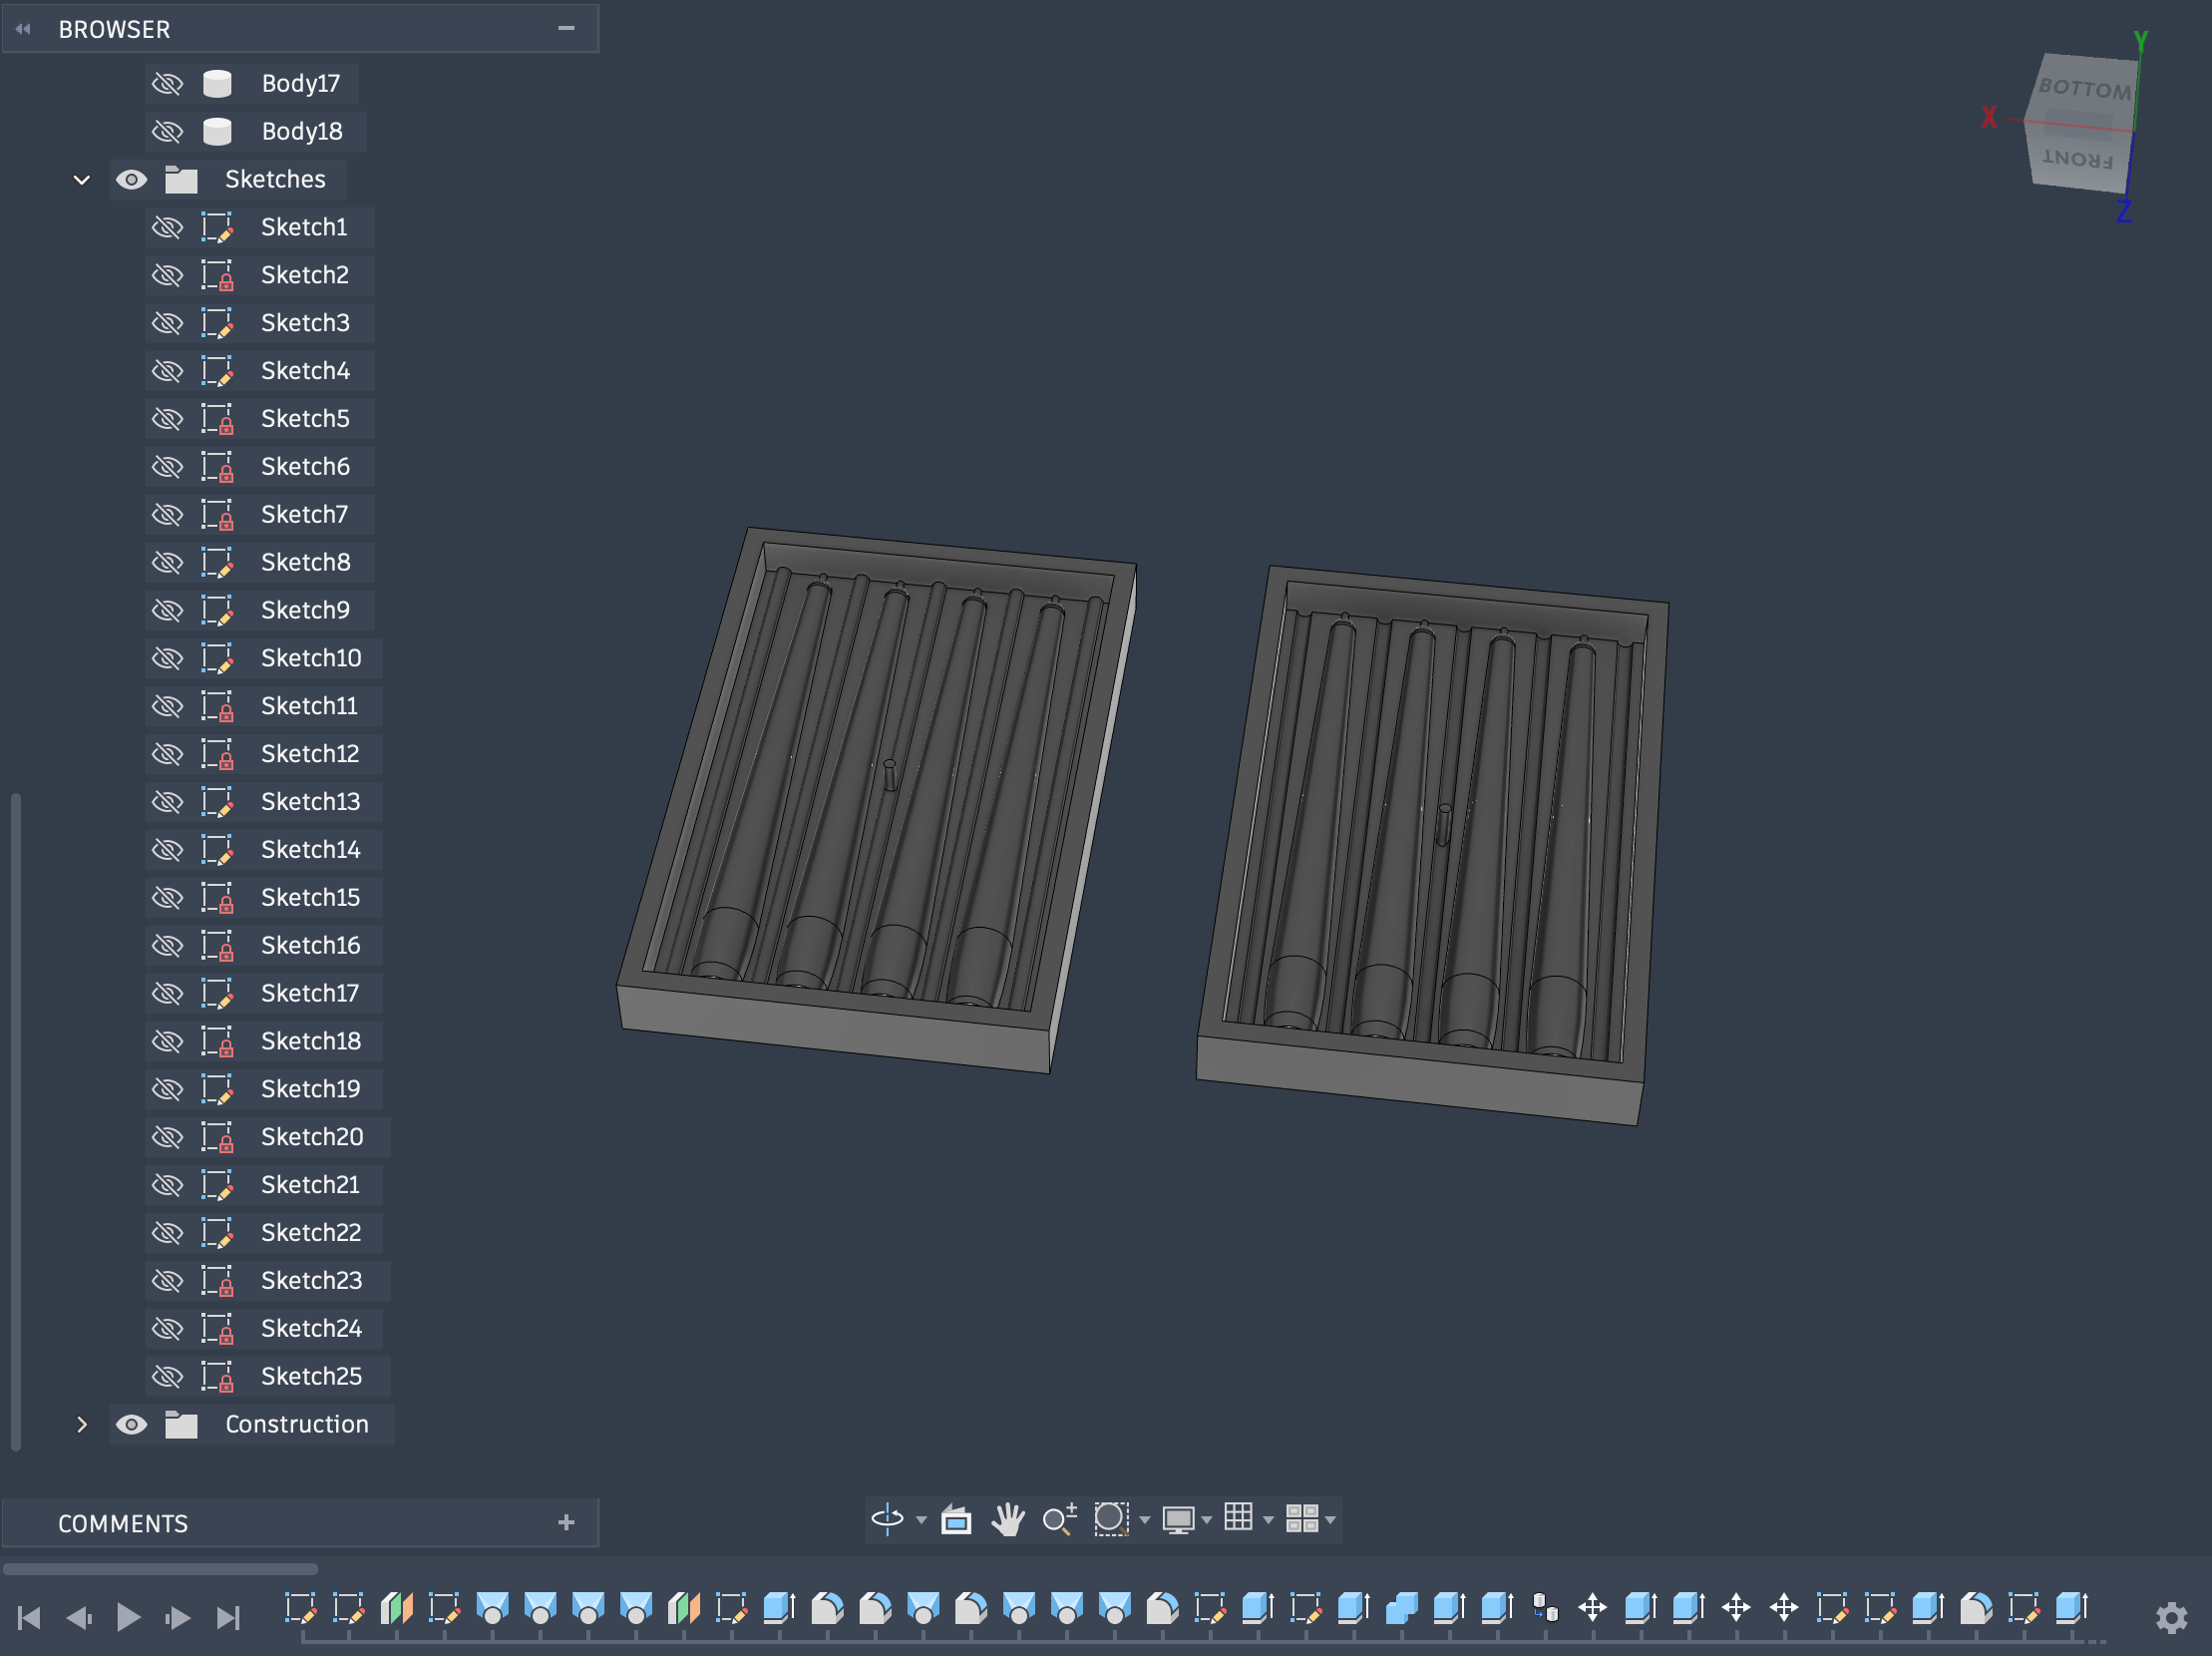
I designed a two-part 3D printed mold in Fusion 360 that will be used to cast the silicone mold. The design process started with the candle shape I wanted to create.

Design Approach

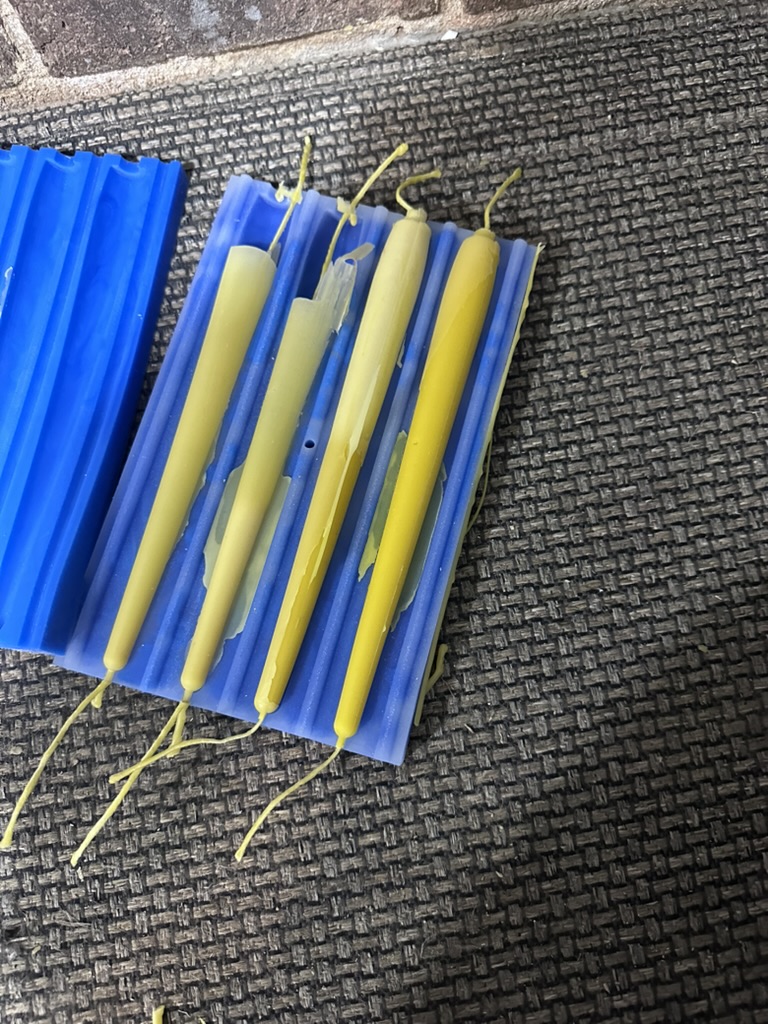
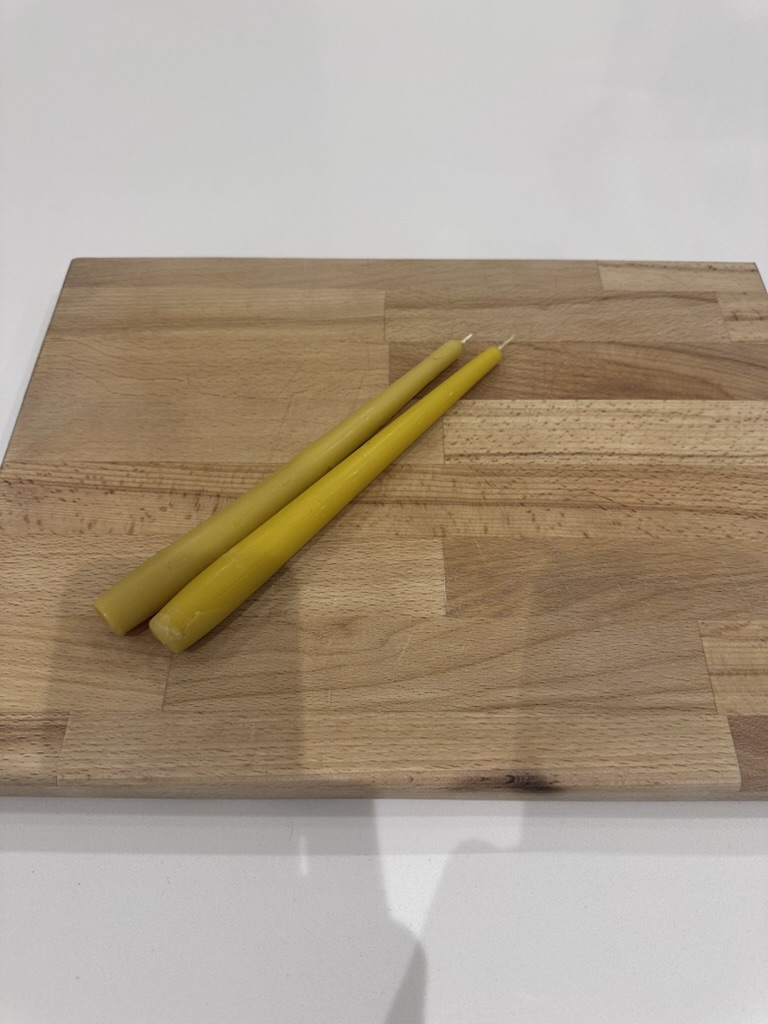
I designed the candle shapes I wanted — four candles in a row. Then I created a negative mold by cutting those shapes out of a solid block. This creates the cavity where the silicone will be poured.

Two-Part Mold with Alignment Features

The mold consists of two halves that fit together precisely:

  • Alignment Arches: One side has long arches that protrude, and the other side has matching grooves. The arches sit inside the grooves to ensure perfect alignment between the two halves.
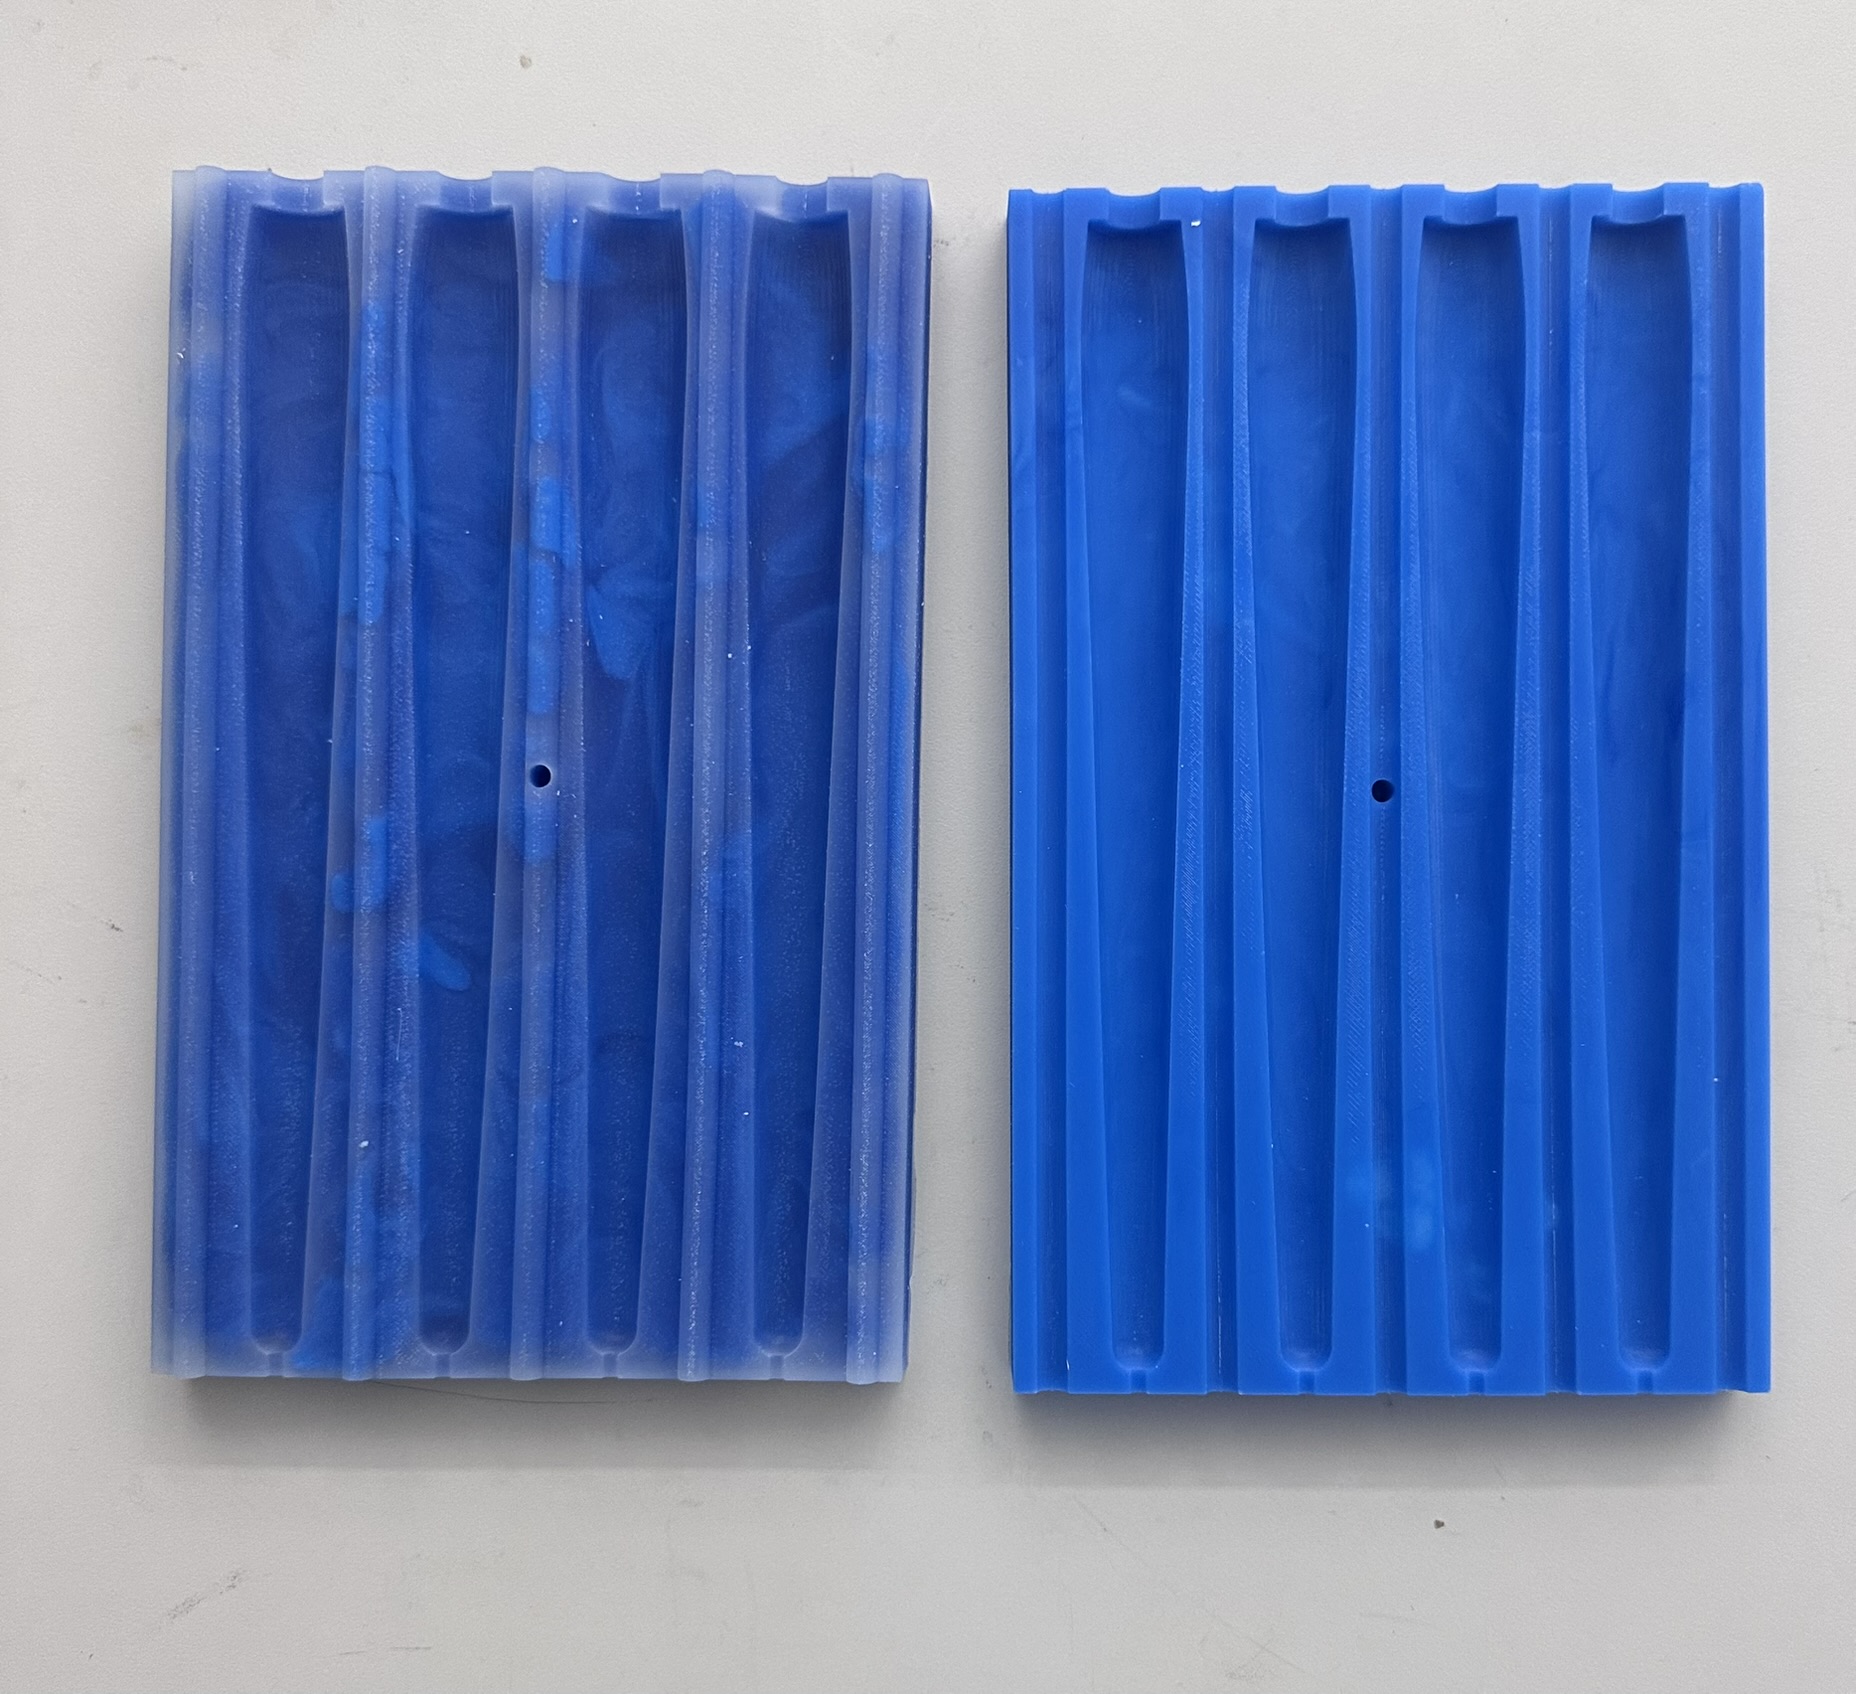
  • Center Clamping Hole: I added a cylindrical hole through the center of both halves. This allows me to clamp the two halves together tightly during the silicone pour. The cylinder shape creates a hole in the silicone mold (not a solid post), which is intentional for the design.
  • Precision Fit: The alignment system ensures the two halves line up perfectly every time, which is critical for creating a clean silicone mold without seams or misalignment.

3D Printing Settings for Smooth Finish

Since the silicone will pick up every detail from the 3D printed surface, I needed the smoothest possible finish. Each half took about 20 hours to print due to the precision settings:

  • Printer: Bambu A1
  • Quality Setting: High Precision mode — finer layer heights mean smoother surfaces and less visible layer lines
  • Wall Thickness: Increased wall thickness for structural rigidity and to ensure the two halves align properly
  • Why Precision Matters: Every layer line on the 3D print will transfer to the silicone mold, and then to the final wax candles. The finer the print, the less post-processing (sanding and filling) is needed.
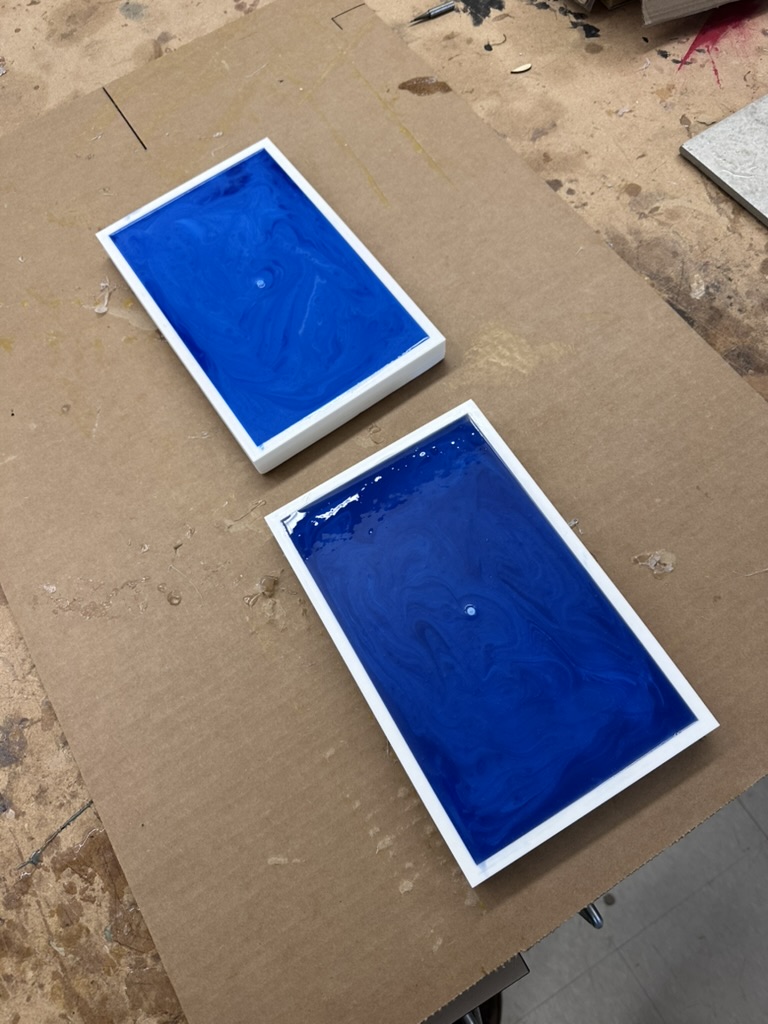
Even with high-precision printing, I'll still need to fill and sand the 3D printed molds to eliminate any remaining layer lines before casting the silicone. The smoother the 3D printed surface, the smoother the silicone mold will be, and the better the final candles will look.

Mold Box for Wax Casting

I'm currently designing a 3D printed box to hold the two silicone mold halves compressed together during the wax pour. The box also needs to hold the candle wick string in place. Since the box needs to be larger than the silicone mold itself — and the mold already takes up nearly the entire print bed — the box will need to be split and printed in multiple sections, then assembled.

Add photos of Fusion 360 design screenshots and 3D printed mold halves here

After printing the mold halves on the Bambu A1 using High Precision mode (each half took about 20 hours), I spent a significant amount of time sanding them by hand to achieve a smooth surface finish that wouldn't show the 3D printing toolpath.

Sanding Process

I worked through progressively finer grits of sandpaper to remove the layer lines:

  1. 220 grit: First pass to knock down the visible layer lines and rough texture from the print
  2. 330 grit: Second pass to smooth out the scratches left by the 220 grit
  3. 440 grit: Final pass to achieve a very nice, smooth finish ready for silicone casting

This was a time-consuming process, but it's critical — every imperfection on the 3D printed surface transfers directly to the silicone mold, and then to every candle cast from it. The time spent sanding pays off in the quality of every future cast.

Add photos of 3D printed master mold and sanding process here

With the master mold printed and sanded smooth, I poured the silicone and left it to cure overnight.

Silicone Casting Process

  1. Prepare the Master: Applied mold release to the sanded 3D printed master to prevent the silicone from bonding to it.
  2. Mix & Pour the Silicone: Mixed the two-part silicone and poured it into the mold cavities, then left it to cure overnight.
  3. Demold: The next day, I removed the cured silicone molds from the 3D printed masters.

Two Different Silicone Batches — Lessons Learned

When I demolded the silicone, I noticed that the two mold halves had noticeably different textures and properties. This happened because I used a different container of silicone mixture for each half:

  • Hazy/Clear Mold: One half has a hazy appearance with parts that look clear. This silicone came out much softer and more flexible.
  • Solid Blue Mold: The other half has a consistent, solid blue color. This one is firmer and more rigid.

For candle making, I prefer the solid blue silicone — it's more durable, holds its shape better when clamped together, and should be more resistant to the heat of molten beeswax over repeated use. The softer, hazy silicone would likely deform more easily and may not last as many casting cycles.

Add photos of the two silicone mold halves showing the texture difference here

Second Attempt — Remaking the Failed Mold

Since the softer, hazy mold wasn't going to work well for candle making, I remade it using the correct silicone. However, the second pour didn't come out perfect either:

  • Patchy Surface: Some sections of the new mold have a patchy, uneven texture rather than the smooth consistent finish I was hoping for.
  • Shape Issues: The mold didn't capture the perfect shape of the 3D printed master in all areas.
  • Twisted Alignment Groove: One section of the alignment grooves (used to line up the two mold halves) appears to be twisted. This is likely because someone tried to remove the mold from the master before the silicone was fully cured, which deformed the still-soft silicone.

I'll need to remake this mold half again, making sure it cures completely before anyone touches it. Patience is key with silicone — pulling it out early saves a few hours but ruins the whole cast.

Safety Notes

  • Work in a well-ventilated area
  • Wear gloves and safety glasses
  • Review the Safety Data Sheet (SDS) for your specific silicone product
  • Some silicones are inhibited by sulfur, latex, or certain 3D printing resins — check compatibility

Before casting, I needed to render (melt and filter) the raw beeswax from my hives. Raw beeswax contains debris, propolis, and other impurities that need to be filtered out.

Instant Pot setup for rendering beeswax

Instant Pot with water bath for safe beeswax rendering

I used an Instant Pot as a double boiler to safely melt the wax. The setup:

  • Water Bath: Fill the Instant Pot with water (about 2–3 inches)
  • Glass Jar: Place a heat-safe glass jar filled with raw beeswax in the water
  • Rag Filter: Place a clean rag or cheesecloth on top of the jar to filter out debris as the wax melts
  • Low Heat: Set the Instant Pot to "Keep Warm" or low heat — never melt wax over direct high heat as it's flammable
Glass jar with rag filter on top

Glass jar with rag filter to strain impurities from melted beeswax

As the wax melts, it passes through the rag filter, leaving behind debris and impurities. The clean, filtered wax collects in the jar and can then be poured into molds.

I've processed a good amount of beeswax using this method and it came out really well — clean, golden, and ready for casting once the silicone mold is finalized.

Safety Notes

  • Never melt wax over direct high heat — it's flammable above 400°F (200°C)
  • Always use a double boiler or water bath method
  • Keep a thermometer handy to monitor temperature (ideal: 145–150°F / 63–65°C)
  • Work in a well-ventilated area

With the silicone mold complete and the beeswax rendered, I can now cast beeswax candles. Beeswax is a natural, renewable material that burns cleanly and smells great — perfect for using up excess wax from my beehives.

Materials

  • Beeswax: Filtered and cleaned beeswax from my hives (rendered using the process above)
  • Candle Wick: Cotton or hemp wick sized appropriately for the candle diameter
  • Double Boiler: Instant Pot with water bath and glass jar (never melt wax over direct heat — it's flammable)
  • Thermometer: To monitor wax temperature
  • Mold Release (optional): Silicone molds usually don't need release agent, but a light spray can help

Beeswax Casting Process

  1. Prepare the Wick: Thread the wick through the wick channel in the silicone mold. Secure the top end with a wick holder or pencil laid across the mold opening. Pull the bottom end taut and secure it.
  2. Melt the Wax: Place beeswax in the glass jar in the Instant Pot water bath. Heat gently until fully melted (145–150°F / 63–65°C). Do not overheat — beeswax can scorch or ignite above 400°F (200°C).
  3. Pour the Wax: Slowly pour the molten wax into the silicone mold. Pour in a thin stream to minimize air bubbles. Fill to the top of the mold.
  4. Cool: Let the wax cool and solidify at room temperature. Beeswax shrinks as it cools, so you may need to top off the mold with additional molten wax after 15–20 minutes.
  5. Demold: Once fully cooled and solid (1–2 hours), gently flex the silicone mold and pop out the candle. Trim the wick to 1/4 inch above the candle surface.

Wick Holder — Design Challenge

I still need to get candle wick and figure out a way to hold it centered in the mold during the wax pour. I was originally planning to 3D print a holder/box that would clamp the mold halves together and hold the wick string in place, but the mold is too large to fit the holder on the printer bed. I'll need to find an alternative approach — possibly a multi-part printed holder that assembles together, or a simpler solution using clamps and a wick bar across the top of the mold.

Why Silicone Instead of 3D Printed Molds?

As I mentioned earlier, you can't cast beeswax directly in a 3D printed PLA mold because:

  • Heat Sensitivity: PLA softens at 140–150°F, right around the melting point of beeswax (145°F). The mold could warp or deform.
  • Surface Texture: FDM layer lines create texture that the wax sticks to, making demolding nearly impossible without damaging the candle.
  • Reusability: Even if you get one candle out, the mold will likely be damaged or coated in wax residue.

Silicone solves all these problems — it's heat-resistant, flexible, smooth, and reusable for hundreds of casts.

Add photos of wax pouring and finished candles here

As a group, we tested multiple molding and casting materials and compared different mold fabrication methods.

Materials Tested

Add details about the materials your group tested (e.g., different silicones, resins, plasters, etc.)

Safety Data Sheets (SDS) Review

Add notes about reviewing SDS for each material — key safety concerns, PPE requirements, ventilation needs, disposal procedures

3D Printing vs CNC Milling Molds

Add comparison of 3D printed molds vs CNC milled molds — surface finish, accuracy, speed, material options, post-processing requirements

Test Cast Comparison

Add photos and notes comparing test casts from different materials and mold types

Results & Reflection

Add final thoughts on the project — what worked well, what challenges you faced, what you'd do differently next time, and how you might use this process for future projects

Useful Links