I learned about OpenWakeWord during my research in earlier weeks, but had actually forgotten about it until recently when I was ready to do my wake up command.
While browsing Youtube I had found this video of someone making their own desk robot and when they mentioned OpenWakeWord my brain said, “Oh wait we looked into this weeks ago!”
I figured it was time to actually get started on this task.
I created an account to get started.
Funny enough, it has an option to try as guest, but if you use that option is basically says "Just Kidding", you need to log in or make an account.
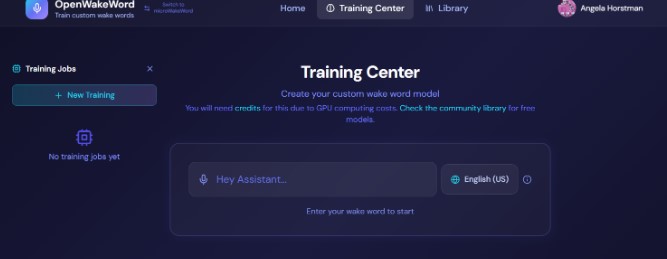
I went through the entire process of using the training center on the site.
It is fairly straight forward to use the training center.
Step one is to write out your wake word.
For my project, the wake word is Triss.
Then you can click on the different clips below the wake word to hear out it sounds in different voices.
I highly suggest clicking all of the buttons, I was surprised by how some of the voices were really far off from the name.
Instead of Triss, with a “t” sound, the Morgan and Casey voice sounds like its using a “P” sound.
James, just says “Ja,” Emma says “Feh,” Oliver sounds like hes saying the word with marbles in his mouth, and Sophie sounds like she has a “th” sound at the end instead of an “ess” sound.
It was amusing to listen to the variations, to say the least.
I did start a new session, and changed the command to “Hi Triss” and that actually made most of the voices sound correct.
It is interesting how adding “Hi” in front fixed all the strange readings.
The next step is for data generation.
It defaults to “Hey Jarvis” settings.
I had to look up what these settings meant, because I didn’t know if i needed as high as it suggested and it seemed like it was a lot of tokens.
I decided to check how much tokens cost and was surprised it wasn’t really that expensive.
The cost is in CHF which is Swiss Franks and 3 CHF is approximately 4 USD.
I kept the defaults and moved on to the next section which was Training Configurations.
I changed the layer option to 32, because it says 32 is better for smaller and or faster models.
Layer size, NH Depth, and False Positive Penalty did not change the credit cost, so I did choose to increase the false positive to a higher value which gives better accuracy.
For 250 credits you do have the option to keep your wake word private.
When I got to the end, I wasn’t ready to pay for credits just yet.
I decided to look at other possible options to see if I can find a free option as well as one that I can use my own voice to help train.
Alternatives to Open Wake Word
There was MicroWakeWord on this site, so I went to try that one out to see if it costs less maybe, but it currently doesn’t work at all.
I also checked the community LIbrary in OpenWakeWord to see if Triss somehow was already in the library to download and use.
It was not, but there are some cool ones already available.
From my earlier weeks research I also know there is a way to train the model through Esspressif ESP SR.
However, it seemed pretty difficult to set up and it needed 20,000 samples.
To get a custom trained model was not cheap and I saw additional fees mentioned being charged at various times in the documentation I read about it.
It also says it takes weeks to complete the process, so this method definitely won’t work for me.
I also asked ChatGPT if their were any other suggestions for free or open source options for training a model.
It suggested a variety of options, including some hacks for the MicroWakeWord and OpenWakeWord tools.
Creating my Own Training Model
It was at this point I decided to try to create my own training model using a custom version of OpenWakeWord with the help of Chat GPT.
This required me to create a specific folder heriarchy on my computer, create a python training script, generate 100's of sound clips, and use command line code to compile and traing my model.
This is not for the faint of heart, but I was able to get it to work and train a model using my own voice which I am really proud of.
The folder structure requires a main folder to hold all the training files and python file.
Inside the main training folder I made a data set folder and a Models folder.
The python file also goes into this main part of the folder.
Inside the data set folder I had to create a positive and negative folder to hold my voice files.
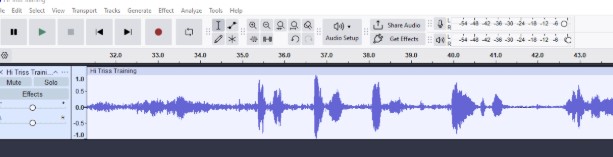
To set up my clips, I used my phone to record myself saying "Hi Triss" hundreds of times, and things that sound like "Hi Triss" hundreds more times.
Each Hi Triss, or Hi Chris, needs to be its own individual clip instead of a 5-10 minute voice recording.
I used Audacity to precisely cut the long recordings into hundreds of short clips of just the wake word and just the false positives.
To get the precision I needed, I zoomed in on the wave forms and started cutting the clips.
I heavily relied on keyboard commands and my programmable 9 key stream deck to make the process faster and less tedious.
For snipping the clips, I used Ctrl-I to split the clip at my cursor.
Then I delted the unwanted silences using the delete key.
Then I used Ctrl-B to add a blank label to my clip at the starting point.
I manually moved the end point of the label to the end of the clip.
After all of my clips were cropped and labeled, I used the label table to give them a number as thier label.
In the export options of Audacity thier is also a way to have the software automatically label your clips, but I wanted control over this action so I did it manually.
When exporting my clips I had to be careful to ensure I set the correct folder destination for my positive and negative clips.
I also needed to make sure I used a .wav format, a sample rate of 16,000Hz, and mono audio.
When it came time to actually train my model, I ran into several hiccups.
Most were due to the fact that I had mismatches in the versions of the openWakeWord files, my version of python, the custom training verifiers, using TFLite versus ONNX, and mismatches in my python code based on all of these other mismatches.
Theier was a lot of back and forth with Chat GPT to troubleshoot and get everything worthing together.
In the end I used 150 positive clips, and 240 negative clips to train my model.
I was able to test my model using a test script in Bash and it worked (well enough)!
I need a bigger data set, because it still confuses very close words like Chris but I am still incredibly happy with this outcome!
Week 15 Update
Using Processing to Visualize my Robot
During week 15, we were tasked with trying out different methods of creating user interface designs.
One of the programs I was strongly suggested to try by Dr Taylor was Processing IDE.
I decided to try and check it out for myself.
I started by playing with and reviewing some of the built in example codes and then following a simple tutorial from the Processing website.
Once I felt comfortable and more confident with the software, I decided to create something for my final project!
I started working on visualizing my robots emotion and interaction system.
I created a project to match my screen size of 320 x 240 pixels.
You can review this Google Doc I created as my version control for all of my robots code in Processor.
Versions 1 and 2
I vibe coded with ChatGPT and started to design my robots face and eyes to match the same desgn I have been using on my site since the beginging of the project. .
Once I had a basic program wokring I then added some early stage features.
The first features I added was blinking and idle movements.
Then I added interactions with the mouse to simulate touch sensors.
Versions 3 and 4
In versions 3 and 4 I worked on adding in different mood and emotion states for my robot.
My robot has a normal state, a heart eyes state, a scary red lizard eye state, and a crazy rainbow eye state.
These were all programmed to be triggered by diufferent mouse clicks and will eventually be triggered by different sensors or actions on the robot.
Idle or normal state will be the default state of the robot when it is on and not interacting with anything.
Heart eyes will be triggered when the robots top touch sensor is being pet or touched.
The scarey red lizard eyes will be triggered when the robot is squeezed, which will be detected by both the left and right head buttons being pressed at the same time.
The crazy rainbow eyes will be triggered when the robot is turned upside down, which will be detected by the time of flight or tilt ball switch in the head.
Versions 5 and 6
These versions were just fixing bugs and making the code more efficient.
Version 7
In this version I added a sound reactive mode which I called assistant mode.
I added the necessary libraries, shown below, to Processor to registor microphone inputs and I created an eye state that shows the robot is listening and reacting to sound.
Versions 8 through 10
In these versions I created a hidden game mode, transistions in and out of the game mode, and started to create menu placeholders for different feature screens.
Versions 11 and 12
In these versions I created the Study Mode menu screen and added in timer features and an ambiant background.
Versions 13 and 14
In these versions I created the Virtual Assistant mode to simulate using my robot as a desk companion and assistant.
The processing code uses the mic to "hear" but currently only works with key presses to actually simulate an assistant like affect.
Final Project Documentation Questions 1-3
Document a final project masterpiece that integrates the range of units covered, answering:
1. What does it do?
This is a ball jointed doll that incorporates a brain system in the head portion of the doll.
The doll includes a variety of input devices such as touch sensors, magnetic sensors, microphone, an accelerometer, etc.
The doll also includes a variety of output devices such as an LCD/OLED screen and a speaker.
With the combination of these sensors and devices alongside a custom virtual assistant setup, my traditional art doll becomes a true desk buddy who can sit, stand, and interact with myself and the world around her.
2. Who's done what beforehand?
Articulated dolls have been around since 200BCE.
The modern ball jointed doll was popularized in the 19th century.
The modernized Asian Ball Jointed Doll, which my doll design is based off of, was popularized in 1999 by Volks with the Super Dollfie Line.
The modern ball jointed doll is a collectable art doll with prices ranging from hundreds to thousands of dollars.
My doll is based off of the ⅙ barbie scale size which equates to about ⅙ standard human size or around 12inches in height.
Commonly ball jointed dolls would be made of resin or porcelain and hand crafted then mold and casted.
There are currently no ball jointed style dolls which integrate electronics or circuits to truly bring them to life as a desk companion.
In the doll world, the closest similarities to my project would be interactive play dolls with speakers and buttons, the 1990’s Furbies by Hasbro, the mind 2000’s internet connected My Friend Cayla/Teddy Doll by Genesis Dolls, and the new Hello Barbie AI integrated play doll.
In the robot and desk pet world, the closest similarities to my project would be a standard desk pet companion like Eilike by Energizer Labs, EMO by Living AI, and Ortomi.
3. What did you design?
In my project, I designed a custom 3D printed doll body based off a traditional ball jointed doll design.
I added a robot theme to the body sculpt and incorporated a movable heart into the torso while being able to maintain the elastic stringing system needed to assemble the ball jointed doll.
I also designed a custom pcb using a microcontroller and my connected input and output devices to act as the “brain” for my doll.
This is encased in the slightly oversized head of my doll.
In addition to the doll and the custom electronics, I created a wireless charging system integrated in the doll and a custom chair for the doll to sit in for charging.
Hidden inside the chair is also a raspberry pi, which has a custom server set up, using Home Assistant, that communicates with my microcontroller to act as a custom virtual assistant robot.
I trained my robot to have a custom wake up command using my robot's name: Triss.
What Weeks are Utilized in my Project
3D Printing / CAD : Robot Body
Electronic Design and Production : PCB Design / Robot Brain
Networking: Raspberry Pi to Microcontroller , Server
I started doing some more in depth research on the electronics and tools I would need to use in my projects.
I am still working through which input sensors I want to include in my robot, but I have been testing out a variety of inputs and outputs to see what feels right.
I ahve also been doing a lot of research in this stage, below is a list of my resources I have used for my research.
I started brainstorming ideas to name the robot.
If I plan to have any sort of virtual assistant activity I want to have a custom name as a wake up call.
I was really blanking on the name so I asked some friends for some suggestions.
I also asked my 6th grade advisory students for some name suggestions for my robot character.
For everyone I asked, I kept it open and vague to see what people would come up with.
All I told them was that it was a girl robot.
Below are a few of the names, some silly and some serious, I received and notes or my thoughts about each name.
Banana - My 6th grade boys thought this was a great name, me not so much.
Alexa - My 6th grade girls suggested this one and I discussed with them why I can't use a name that is already in use.
Robot - Too vague.
Rob - This was the follow from the same friend above. It is short for robot.
Build-A-Bot - I love this for a company name considering you decorate the robot!
Botty - A librarian friend of mine suggested this one. They said it’s like Betty, but for a robot.
BoBo - Suggested by a collegue, I thought this was such a cute name, but didn’t feel right for this bot. Maybe a future robot doll friend?
Gear - Too simple.
Click - Too simple.
Mags - I didn't hate this one. The concept is short for magnets, since the robot uses magnets for customization.
Overall the names were good, but not quite feeling right yet to me.
Two of my advisees said they really wanted to help name the robot so they sat and brainstormed some other names together and came back to me the next day with their top name.
They said it's like electric, but with an A: Alectric.
I wasn't sold on the name, but I did actually feel like it was on the right path.
I decided to workshop that name later that evening and came up with a variation of the name: Alectriss and Triss for short.
I really like how this one sounds when said outloud.
It rolls of the tongue nicely and I practiced saying it a few times with commands like I would an Alexa and I really think this is it!
So, welcome to the world: Triss
Week 5 Update: Concept Update
During week five I decided to mix my robot project idea with some of my hobbies.
I collect ball jointed dolls which is a type of fully customizable doll that is strung with elastic to allow it to hold poses and stand unsupported.
The tension in the string and the way it is strung through the body joints are key to the doll holding poses versus falling over.
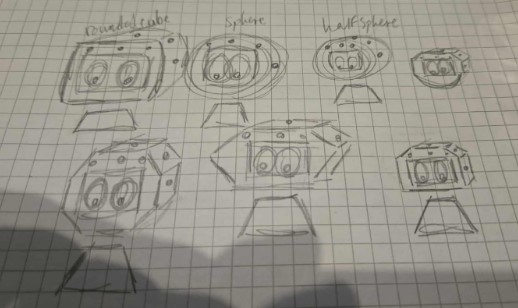
I decided to use the 3d model design I made in week one of my possible robot head style and shrunk it down to make it the head of my own custom robot themed ball joint doll.
I then made a basic body sculpt with the necessary channels for stringing and the neck attachment for the doll head and test printed it.
I think the robot head on the slightly anthropomorphic robot body looked absolutely adorable and since it is only about 9 inches from top to bottom it is still a great desk companion size.
This had me thinking, that maybe I want to redesign the concept of the robot to be more than just a head.
If I scale the doll up a bit bigger, closer to a Barbie size scale, I would give myself more room in the hollowed robot head to fit the electronics.
This could make it feasible to turn my robot desk pet into an intelligent/smart ball join doll desk friend instead.
The current design can't sit, so I am still working on redesigning different portions of the doll body, but I want the doll to be able to sit and stand so that it can be posed on one's desk or just sitting on the side of the monitor stand hanging out with you.
Also, now that I have given my robot arms and legs, I can create hand attachments to allow the robot friend to be useful to hold stuff!
Week 5 Update: New Charger Concept
Since my new robot design now has legs and a body, I was trying to figure out how I would integrate that back into my original design for the charging block.
While thinking about ways to essentially chop the robot in half, I had a more aesthetically pleasing design idea.
Instead of having the robot split in half to attach to the charger, why not turn the charger into a chair design that the robot can sit in on one's desk!
It would be functional and have a pleasing design when not in use, plus my robot friend wouldn't need to be split in two for charging!
Week 5 Update: Robot Brain Research
I found this interesting video from a content creator who created his own AI voice assistant.
The video was about 40 minutes long, and he walked through the basics of how he set up his system, what apps/software he used, and his experience with it.
The Home Assistant documentation and download page only has instructions for using a raspberry pi.
While I know how powerful this board is, I also know it would be way too big for even my planned scaled up design.
I had a quick conversation with chatGPT to see if it could suggest a capable board that is closer to the size of the Xiao Seed ESP32 that I was testing and playing with in Week 4.
Unfortunately, it said their smaller boards just wont work.
It did give me a suggestion though of using a combination of the Raspberry pi to run the local server and the xiao being the robot brain connected over wifi.
Week 4 update: Embedded Programming
In week four were tasked with exploring different microcontrollers and trying out some basic imput and outputs.
Since I knew I was going to need a handful of input sensors for my robot design, I decided to test some of the ones I had available as part of my week 4 individual activity.
Since I had them available to me, I tested out using a basic push button switch, a reed switch, and a touch sensor.
You can check out my week 4 page for more in depth details on my exploration of these basic sensors.
Week 2 Update: 2D and 3D Project Designs
For week two , we were tasked with exploring a variety of 2D and 3D software, then picking the ones we worked the best with.
We were also tasked with creating a model of our final project using our chosen software(s).
I chose to use Blender since it is a software that I am comfortable with and have been using for some time now.
I started with creating the head, since in my opinion that is the most important feature on the robot.
I started with adding a cube to the design field by accessing the Add menu by using the keyboard command Shift-A.
I adjusted the shape of the cube, starting in the front view, by adding more edges using loop cut, and then editing the shape by scaling and moving the vertices.
I did the same on the side view, but moving the back vertices inwards closer to the front of the head.
Then I added an additonal cube and did the same process but made it slightly smaller.
For this smaller cube I also added an inset face on the front and extruded the face outwards.
This smaller cube is used as a boolean object to hollow out the inside of the robot head and make a cutout for the screen placement.
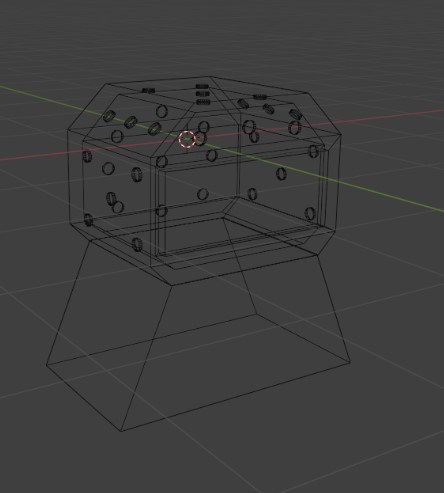
Next I added a cylinder to my design field and shrunk it down in size to represent the magnets I plan to add to the inside of the head.
I did not use a real world size at this time, as I am just trying to plan out the magnet placement.
I moved and copied the magnet and played around with the placement around the top, sides, front, and back of the head.
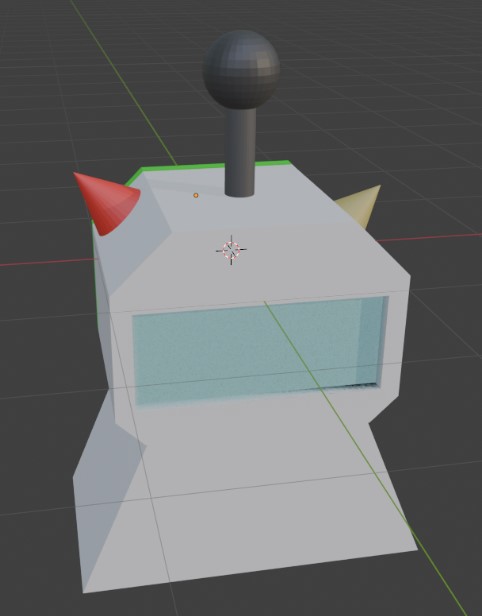
Next I added another cube which I squished to make thin and stretched to elongate to use as the screen for the robot.
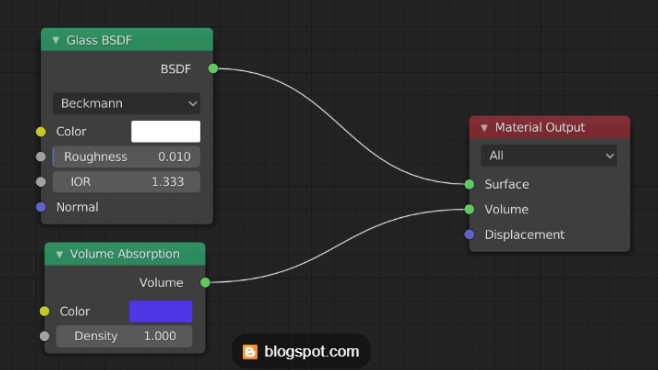
I wanted to explore materials a bit more, so I found an example image of a glass like material and tried my best to use the material editor and recreate the nodes.
Below, you can see three screenshots of what my robot project could look like when it is complete.
The main body shape most likely won't change significantly, but I do plan to incorporate a clock so there may be changes to the front.
The head shape may change if needed to fit the electronics, but the chosen head shape was my favorite and also favored by my family and friends whom I shared my sketches with.
In the first image, you can see the possible placement of the magnets for decorative attachments.
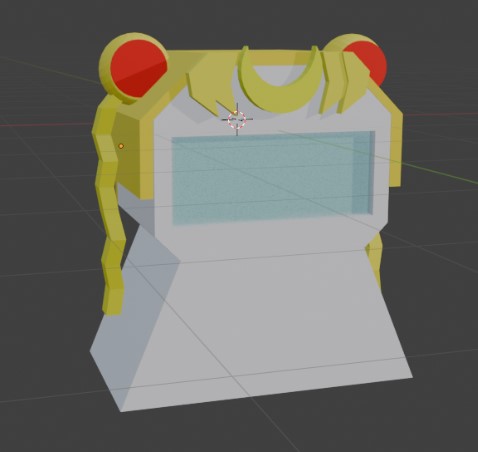
In images two and three, you can see examples of how one could customize their desk robot to match their personality with printed or sculpted attachments like sailormoon themed toppers or antennae.
My Final Project Sketches and Idea
For week one, we were tasked with defining our final project and showing some initial sketches.
What is my project idea?
For my project, I want to create a little desk robot companion.
The main robot electronics will be fully enclosed in the head portion, making it portable with an optional clip for a bag.
It will have a base as its body which I plan to call desk mode.
In desk mode, the robot will be able to charge from the base body.
To make the body functional as more than just a charger, I plan to add in a simple clock so with or without the head it can be used as a functional desk clock.
Additionally, I want my robot to be fully customizable on the outside.
I plan to embed a series of magnets into the head frame that can be used to attach decorative parts.
My Project goal for Fab Academy:
My goal for this project over the next several weeks is to create my desk companion and give it a custom personality to match my own.
I want my robot companion to be customizable, and I want to create a set of sample customization parts.
I want my robot to be interactable with at least one touch sensor and one magnet based sensor. (possibly using a reed switch?)
I want to design a silicon carry case with a bag clip to hold the head in.
I want to create a charging body base with the clock feature.
Main Robot Features
General companion features
Animated eyes
Responses to sensors like touch and sound
Bonus actions when certain magnets are connected to a customization
Charging Base
Project Stretch Goals:
Additional sensor input and outputs.
Motor controls when attached to the base to allow the head to turn.
 Below, you can see three screenshots of what my robot project could look like when it is complete.
The main body shape most likely won't change significantly, but I do plan to incorporate a clock so there may be changes to the front.
The head shape may change if needed to fit the electronics, but the chosen head shape was my favorite and also favored by my family and friends whom I shared my sketches with.
In the first image, you can see the possible placement of the magnets for decorative attachments.
In images two and three, you can see examples of how one could customize their desk robot to match their personality with printed or sculpted attachments like sailormoon themed toppers or antennae.
Below, you can see three screenshots of what my robot project could look like when it is complete.
The main body shape most likely won't change significantly, but I do plan to incorporate a clock so there may be changes to the front.
The head shape may change if needed to fit the electronics, but the chosen head shape was my favorite and also favored by my family and friends whom I shared my sketches with.
In the first image, you can see the possible placement of the magnets for decorative attachments.
In images two and three, you can see examples of how one could customize their desk robot to match their personality with printed or sculpted attachments like sailormoon themed toppers or antennae.