Objectives

Individual assignment: write an application that interfaces a user with an input &/or output device that you made

Group assignment: compare as many tool options as possible

Group assignment

Group assignment page

14. Interface and application programming

UI and its types

A User Interface (UI) is the medium through which a user interacts with a device, software application, or system. It includes all the controls and visual elements that allow users to:

The goal of UI design is to make these interactions intuitive, efficient, and visually pleasing ultimately enhancing the overall User Experience (UX).

Graphical User Interface (GUI): Uses visual components like windows, icons, buttons, and menus. Users interact via mouse, keyboard, touchscreen, etc.

Command-Line Interface (CLI): A text-based interface where users type commands. Efficient for experienced users, especially in system administration and development.

Touchscreen Interface: Found in phones, tablets, kiosks, and more. Enables intuitive interaction through gestures like tapping, swiping, and pinching.

Voice User Interface (VUI) Allows users to interact using spoken commands. Examples: Siri, Alexa, Google Assistant.

Virtual and Augmented Reality Interfaces (VR/AR)

UI for interactive website

As a part of explaining interface, I tried the codes provided by the instructor.

1.Button


      <!DOCTYPE html>
      <html lang="en">
         
      <head>
      <meta charset="utf-8">
      <meta name="viewport" content="width=device-width, initial-scale=1.0">
      <title>Button</title>
      </head>
      <body>
          button style="margin: auto;" id="press">Click me/button>
          <p id="para">

<script> const button = document.getElementById('press'); const para = document.getElementById('para'); button.addEventListener('click' , function(e){ para.textContent = para.textContent + 'Clicked'; document.getElementById('para').style.color = 'red' button.style.backgroundColor = button.style.backgroundColor === 'red' ? 'gray' : 'red'; });

2.Realtimeinput

        
        <input type="text" id="myInput" name="myInput">
        <div id="output"></div>
        
        <script>
            const inputElement = document.getElementById('myInput');
            const outputElement = document.getElementById('output');
        
            inputElement.addEventListener('input', function(event) {
                const inputValue = event.target.value;
                outputElement.textContent = 'My name is ' + inputValue;
            
            //const input = (e.target.Value).split("");
            if (inputValue.length>8){
              outputElement.style.color = 'red'
            }else if(inputValue.length>4){
              outputElement.style.color = 'blue';
            }else{
              outputElement.style.color = 'green'
        
              }
            });


            </script> 
      

KODULAR

Kodular is a free, drag-and-drop platform that enables users to create Android applications without writing traditional code. It features a visual interface where users can design apps by assembling components like buttons, sensors, and layouts, and it employs a block-based programming system based on Google’s Blockly, similar to MIT App Inventor and Scratch. This approach allows beginners and non-programmers to build functional Android apps using visual logic blocks instead of text-based code. While Kodular itself operates through these visual blocks, the apps created with it are ultimately compiled into Java code for Android. To facilitate real-time testing and debugging, Kodular provides a companion app called Kodular Companion. This app allows developers to instantly preview and interact with their projects on an Android device without the need to compile and install the APK each time. By scanning a QR code or entering a code generated in the Kodular creator interface, users can connect their device to the project and see live updates as they modify their app, making the development process more efficient and user-friendly.

To use kodular, I signed in to kodular. I didn't had an idea about how to use Kodular. So I referred Fabacadamey 2024 student Ansu Thomas's documentation.


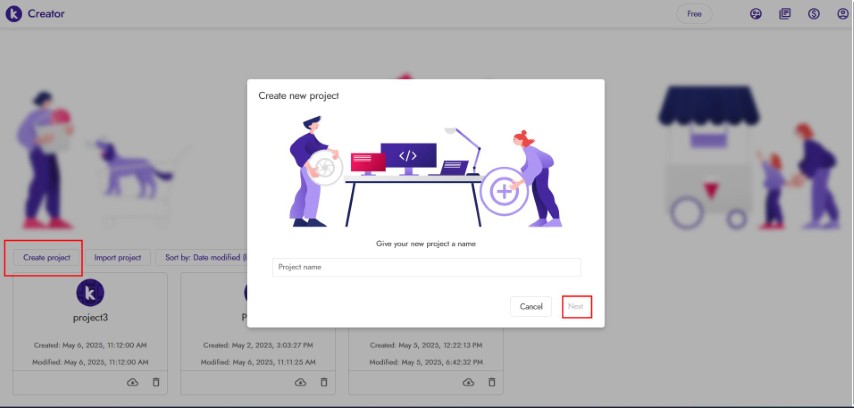
After creating project a new window opens. Kodular Creator has two main views:

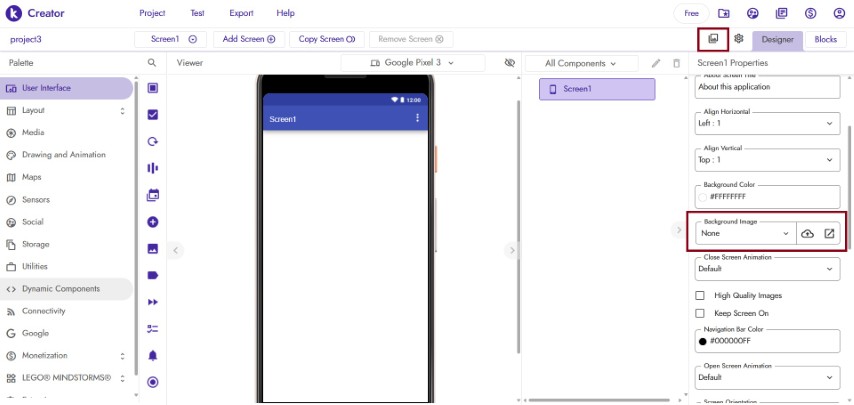
I wanted to add a background image for my app. So i downloaded an, image . From the image icon The image is uploded. The changes were made in the background image option.

I dragged the horizontal arrangement from the layout. From properties panel I aligned it in the center. Then I draged button From user interface, and placed it inside the horizontal arrangement.I named button 1 as "Turn on" and button 2 as "turn off". I also draged Web from connectivity. Components like Buttons, Labels, Text Boxes etc..can be dragged from the Palette to the Viewer. Non-visible components like Bluetooth, Sensors, or Notifiers are avilable in the bottom of the palette. We can customize properties (text, color, size, etc.) using the Properties panel.

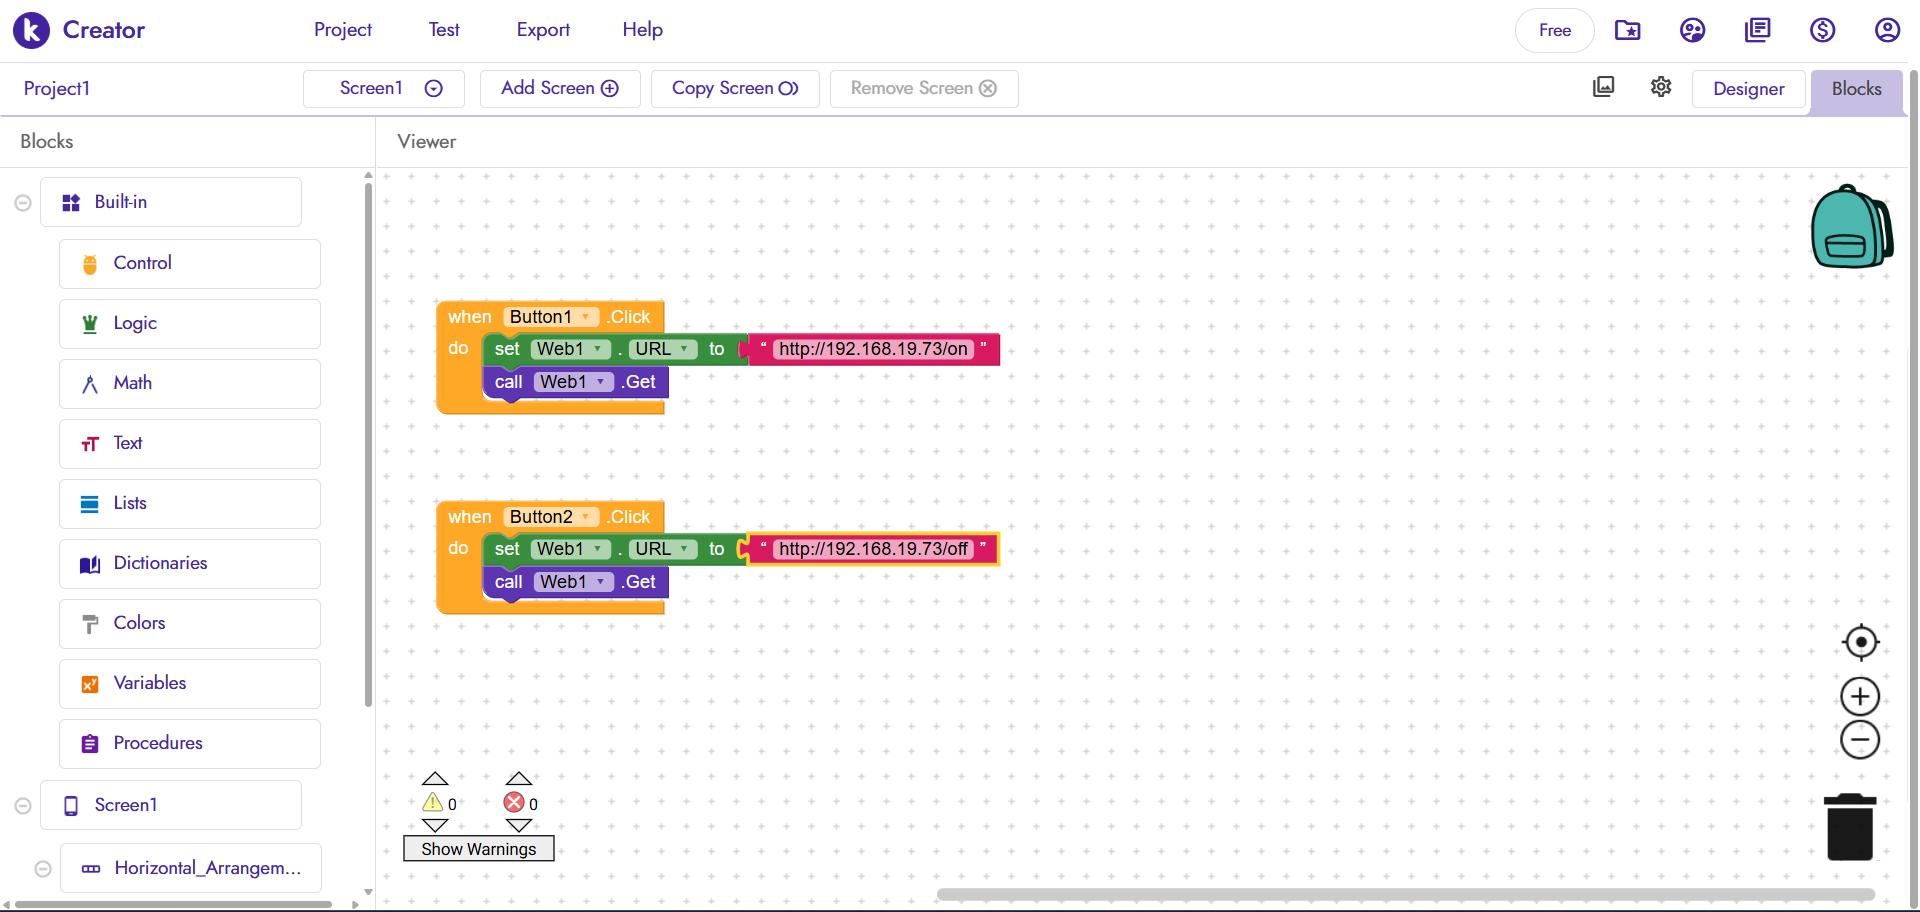
Then I switched to blocks tab. The block tab consists of event blocks, in the left panel. Drag event blocks and add logic.I copied the IP address Of XIAO board from the code and pasted it in the block.

I needed to upload the code in xiao Esp32 C6. To get the code , I used chatgpt.

The code is given below

        #include <WiFi.h>
        #include <WebServer.h>
        
        #define LED_PIN 18  // Define your LED pin
        
        // Replace with your network credentials
        const char* ssid = "yourSSID";
        const char* password = "Yourpassword";
        
        WebServer server(80);
        
        void handleRoot() {
          String html = "<html><head><title>ESP32-C6 LED Control</title></head><body>";
          html += "<h1>ESP32-C6 LED Control";
          html += "<p><a href=\"/on\"><button>Turn ON</button></a></p>";
          html += "<p><a href=\"/off\"><button>Turn OFF</button></a></p>";
          html += "</body>";
          server.send(200, "text/html", html);
        }
        
        void handleOn() {
          digitalWrite(LED_PIN, HIGH);
          server.sendHeader("Location", "/");
          server.send(303);
        }
        
        void handleOff() {
          digitalWrite(LED_PIN, LOW);
          server.sendHeader("Location", "/");
          server.send(303);
        }
        
        void setup() {
          Serial.begin(115200);
          pinMode(LED_PIN, OUTPUT);
          digitalWrite(LED_PIN, LOW);
        
          WiFi.begin(ssid, password);
          Serial.print("Connecting to Wi-Fi");
          while (WiFi.status() != WL_CONNECTED) {
            delay(500);
            Serial.print(".");
          }
        
          Serial.println("\nConnected! IP address: ");
          Serial.println(WiFi.localIP());
        
          server.on("/", handleRoot);
          server.on("/on", handleOn);
          server.on("/off", handleOff);
          server.begin();
          Serial.println("HTTP server started");
        }
        
        void loop() {
          server.handleClient();
        }
        

I uploaded the code in XIAO ESP32 C6

Next we need to test the app. I downloaded kodular companion app in my phone. Then I clicked the test option. I got a QR code. I scanned the code using mobile app.

The result is shown below

Changing the colour of neopixel using kodular

The pcb board from communication week was used here. I used chatgpt to get the code and logic. The initial setup were done as above.

The code I uploaded on esp32 c6 is given below. In place for ssid and password you need to upload the credinials of your wifi.

        #include <WiFi.h>
        #include <WebServer.h>
        #include  <Adafruit_NeoPixel.h>
        
        #define NEOPIXEL_PIN 18         // βœ… Using GPIO 18 for NeoPixel
        #define NUMPIXELS 1             // Number of NeoPixels
        
        const char* ssid = "SSID";         // πŸ” Replace with your Wi-Fi SSID
        const char* password = "PASSWORD"; // πŸ” Replace with your Wi-Fi password
        
        Adafruit_NeoPixel pixels(NUMPIXELS, NEOPIXEL_PIN, NEO_GRB + NEO_KHZ800);
        WebServer server(80);
        
        // Function to set NeoPixel color
        void setColor(uint8_t r, uint8_t g, uint8_t b) {
          pixels.setPixelColor(0, pixels.Color(r, g, b));
          pixels.show();
        }
        
        // HTTP handler to receive RGB values
        void handleColor() {
          if (server.hasArg("r") && server.hasArg("g") && server.hasArg("b")) {
            int r = server.arg("r").toInt();
            int g = server.arg("g").toInt();
            int b = server.arg("b").toInt();
            setColor(r, g, b);
            server.send(200, "text/plain", "Color changed to R:" + String(r) + " G:" + String(g) + " B:" + String(b));
          } else {
            server.send(400, "text/plain", "Missing RGB parameters");
          }
        }
        
        void setup() {
          Serial.begin(115200);
          pixels.begin();
          pixels.show(); // Turn off all pixels at startup
        
          WiFi.begin(ssid, password);
          Serial.print("Connecting to Wi-Fi");
          while (WiFi.status() != WL_CONNECTED) {
            delay(500);
            Serial.print(".");
          }
          Serial.println("\nConnected! IP address:");
          Serial.println(WiFi.localIP());
        
          server.on("/color", handleColor);
          server.begin();
          Serial.println("Web server started");
        }
        
        void loop() {
          server.handleClient();
        }
        

I used vertical arrangement and added buttons.I dragged web from palette. Colour palette was not avilable. So I manually added buttons for each colour.

I tested it in the app.

Creating a gradient in neopixel

As there wasn't any colour palette available, I had to create one. I searched in youtube and find a tutorial. I followed it to connect the blocks. The designer and blocks view are given below.


The tutorial didin't showed how to connect it to a board. So I used chatgpt to get the code. The promt and responses are provided in the bottom part of the page. The code is given below.

          #include <WiFi.h>
          #include <WebServer.h>
          #include <Adafruit_NeoPixel.h>
          
          #define LED_PIN    18
          #define NUM_LEDS   1
          
          const char* ssid = "SSID";
          const char* password = "PASSWORD";
          
          Adafruit_NeoPixel pixels(NUM_LEDS, LED_PIN, NEO_GRB + NEO_KHZ800);
          WebServer server(80);
          
          void handleRoot() {
            server.send(200, "text/plain", "ESP32 NeoPixel Color Controller");
          }
          
          void handleSetColor() {
            if (server.hasArg("r") && server.hasArg("g") && server.hasArg("b")) {
              int r = server.arg("r").toInt();
              int g = server.arg("g").toInt();
              int b = server.arg("b").toInt();
          
              pixels.setPixelColor(0, pixels.Color(r, g, b));
              pixels.show();
          
              server.send(200, "text/plain", "Color set!");
            } else {
              server.send(400, "text/plain", "Missing RGB arguments");
            }
          }
          
          void setup() {
            Serial.begin(115200);
            pixels.begin();
            pixels.show();
          
            WiFi.begin(ssid, password);
            Serial.print("Connecting to Wi-Fi");
          
            while (WiFi.status() != WL_CONNECTED) {
              delay(500);
              Serial.print(".");
            }
          
            Serial.println("\nConnected to WiFi.");
            Serial.print("IP address: ");
            Serial.println(WiFi.localIP());
          
            server.on("/", handleRoot);
            server.on("/setcolor", handleSetColor);
            server.begin();
            Serial.println("HTTP server started");
          }
          
          void loop() {
            server.handleClient();
          }
          

To test the code I opened the Kodular companion app.

The result is shown below.

Files

Files

The chatgpt prompt and responses are given below