Week 14
Interface and Application Programming
This weeks Assignment is to write an application that interfaces a user with an input &/or output device that you made.
For this week my idea was to make an interface for my final project which should be an HTML page which can send my input data to a micro controller and get data back from the micro controller.
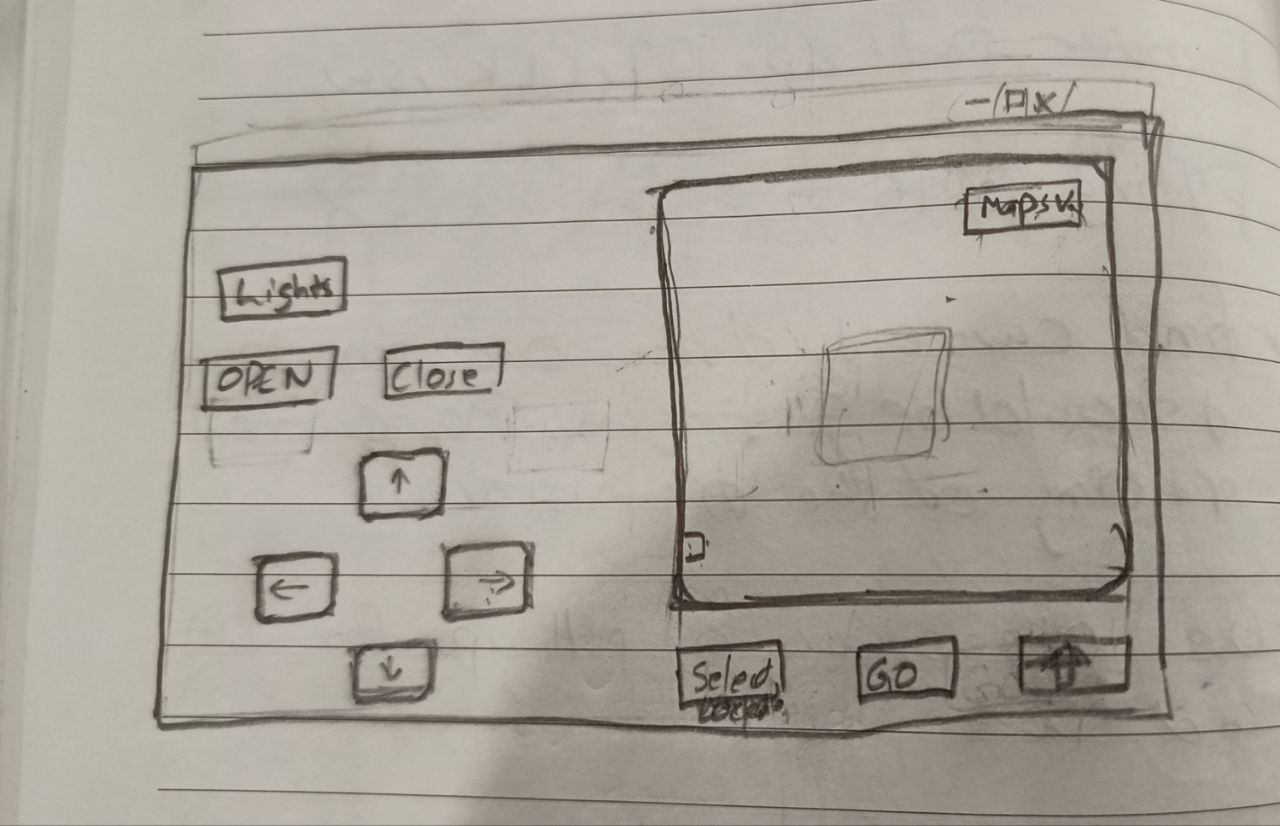
For this I had made a simple wire frame for the interface. Here the controls are button are used to control the motors also to control the direction.It also has two switches to control the opening and closing of the door.I have also added some additional buttons to control other functions.
Learning
For the first two days of the week our instructors give a class about the basics of the JavaScript and how to make a simple interface using HTML and CSS After we were introduced to web usb , web serial and web socket
Web Serial
Web Serial is a web API that allows websites to directly communicate with serial devices (like microcontrollers, sensors, and other hardware) through the user's computer using a serial port (such as USB or UART). With Web Serial, developers can build web applications that interact with hardware devices in real-time, without needing additional software or drivers. This is especially useful for IoT projects, robotics, and embedded systems programming. The API is available in modern Chromium-based browsers (like Chrome and Edge) and requires user permission to access connected devices for security reasons.
AI Prompt: Give a brief about web serial in paragraph
Web USB
Web USB API is a JavaScript API that allows web applications to communicate with USB devices directly from the browser. It provides a way for developers to access and interact with USB peripherals, such as microcontrollers, printers, and other USB-enabled devices, without the need for additional drivers or software.
AI Prompt: Give a brief about web USB in paragraph
Web Socket
WebSocket is a communication protocol that provides full-duplex communication channels over a single TCP connection. It is designed to be used in real-time web applications, allowing for efficient and low-latency data exchange between a client (usually a web browser) and a server.
AI Prompt: Give a brief about web socket in paragraph
Test 1
First i wanted to learn the basics of the JavaScript and how web usb works for this i took an interface that our instructors made.The provided HTML and JavaScript code implements a simple web-based interface that communicates with an ESP32 microcontroller using the Web Serial API. It allows users to connect or disconnect from the ESP32, send custom text messages, and toggle an LED via serial communication directly from the browser. The interface includes buttons for connecting/disconnecting the serial port, a text input for sending messages, and a toggle button that switches an LED state by sending binary signals ("0" or "1"). Data received from the ESP32 is displayed in a text area in real time.
<!doctype html> <html lang="en"> <head> <meta charset="UTF-8" /> <link rel="icon" type="image/svg+xml" href="/vite.svg" /> <meta name="viewport" content="width=device-width, initial-scale=1.0" /> <title>ESP32 Web Serial</title> <!-- Font Awesome Icons --> <link rel="stylesheet" href="https://cdnjs.cloudflare.com/ajax/libs/font-awesome/6.5.1/css/all.min.css" integrity="sha512-DTOQO9RWCH3ppGqcWaEA1BIZOC6xxalwEsw9c2QQeAIftl+Vegovlnee1c9QX4TctnWMn13TZye+giMm8e2LwA==" crossorigin="anonymous" referrerpolicy="no-referrer" /> <style> :root { font-family: Inter, system-ui, Avenir, Helvetica, Arial, sans-serif; line-height: 1.5; font-weight: 400; color-scheme: light dark; color: rgba(255, 255, 255, 0.87); background-color: #242424; font-synthesis: none; text-rendering: optimizeLegibility; -webkit-font-smoothing: antialiased; -moz-osx-font-smoothing: grayscale; } body { background-color: #e5e5f7; background-image: radial-gradient(#444df726 0.9px, #ffffffb0 0.9px); background-size: 18px 18px; margin: 0; min-width: 320px; min-height: 100vh; } .header { background-color: white; padding: 1px 2rem; height: 5rem; color: #213547; } .main { height: 91vh; display: flex; justify-content: center; align-items: center; } .window { background-color: white; padding: 20px 30px; box-shadow: 1px 2px 10px 1px #00000029; border-radius: 12px; } .window span { font-weight: 600; } .window div:nth-child(1) { display: flex; align-items: center; } .window div:nth-child(2) { padding: 20px 0px; min-width: 30vw; } .window div:nth-child(3) { display: flex; align-items: center; } .window div:nth-child(3) input[type="file"] { display: none; } .window textarea { width: 100%; background-color: #e5e5f796; border: 0; box-shadow: inset 0px 0px 10px 1px #00000007; border-radius: 5px; } .window button { transition: 0.5s; } .disconnectBtn { display: none; } .lightBtn { color: #bfc20da8; } #input { background: #fff; color: black; padding-inline: 5px; padding-block: 5px; border: 1px solid rgba(0, 0, 0, 0.192); border-radius: 5px; outline: none; } button { border-radius: 8px; border: 1px solid transparent; font-size: 1em; font-weight: 500; font-family: inherit; background-color: #1a1a1a; cursor: pointer; transition: border-color 0.25s; } button:hover { border-color: #646cff; } button:focus, button:focus-visible { outline: 4px auto -webkit-focus-ring-color; } @media (prefers-color-scheme: light) { :root { color: #213547; background-color: #ffffff; } a:hover { color: #747bff; } button { background-color: #f9f9f9; } } </style> </head> <body> <div class="header"> <h2>Web Serial <img src="https://img.icons8.com/?size=256&id=41183&format=png" style="width: 25px;" alt=""></h2> </div> <div class="main"> <div class="window"> <div class="btnDiv"> <span>ESP32</span> <button id="serial" style="margin-left:auto;transition: 0.5s;padding: 5px 25px;"><i class="fa-solid fa-plug-circle-check" style="color: #34ea58;"></i> Connect</button> <button id="disconnect" style="display: none;margin-left:auto;transition: 0.5s;padding: 5px 25px;"><i class="fa-solid fa-plug-circle-xmark" style="color: #c92626;"></i> Disconnect</button> <button id="toggle" class="" style="margin-left:10px;padding: 5px 25px;"><i class="fa-solid fa-lightbulb" style="color: #c20d0da8"></i></button> </div> <div> <textarea id="outputMsg" cols="30" rows="10" disabled></textarea> </div> <div> <input type="text" id="input" placeholder="Enter your Data Here..."/> <button id="upload" class="" style="margin-left: auto;padding: 5px 25px;"><i class="fa-solid fa-upload"></i></button> </div> </div> </div> <script> let port; let writer; let reader; let toggle; // Connect to serial port async function connectToSerial() { port = await navigator.serial.requestPort(); await port.open({ baudRate: 9600 }); writer = port.writable.getWriter(); reader = port.readable.getReader(); const decoder = new TextDecoder(); while (true) { const { value, done } = await reader.read(); if (done) break; const string = decoder.decode(value); document.getElementById('outputMsg').textContent += string; } } // Send input to serial device async function sendMessage() { const input = document.getElementById('input').value; if (!writer) return; const encoder = new TextEncoder(); await writer.write(encoder.encode(input + '\n')); document.getElementById('input').value = ""; } // Toggle LED using serial signal async function toggleLED() { if (!writer) return; const dataToSend = toggle ? '1' : '0'; const encoder = new TextEncoder(); writer.write(encoder.encode(dataToSend)).then(() => { if (dataToSend === '0') { document.getElementById('toggle').innerHTML = '<i class="fa-solid fa-lightbulb" style="color: #c20d0da8"></i>'; } else { document.getElementById('toggle').innerHTML = '<i class="fa-solid fa-lightbulb" style="color: #2f5917"></i>'; } toggle = !toggle; }); } // Event listeners document.getElementById('serial').addEventListener('click', connectToSerial); document.getElementById('upload').addEventListener('click', sendMessage); document.getElementById('toggle').addEventListener('click', toggleLED); </script> </body> </html> This webpage provides a graphical interface for communicating with an ESP32 board using the Web Serial API. It features a modern layout with a header and a central control window styled using CSS and includes icons from Font Awesome for better visual interaction. Users can connect to the ESP32 by clicking the "Connect" button, which establishes a serial connection at 9600 baud. Once connected, users can send custom text input to the ESP32 via the input field and receive responses shown in a read-only textarea. Additionally, the lightbulb toggle button sends a binary signal (0 or 1) to control an LED on the ESP32, with the icon color changing to reflect its state. The interface is designed to be responsive, with clear visuals, intuitive controls, and dynamic updates based on serial communication events.
Test 2
Here i have creates a simple interactive web page where users can type their name into an input field, and the entered text is instantly displayed within a heading. As the user types into the text box labeled #name, the value updates the content of a with the ID namer, which is embedded in the sentence “My Name is.” Additionally, if the name exceeds four characters, the displayed name text changes color to red for visual feedback. A button labeled "Click Me" is also included on the page, although it currently has no attached functionality.
<!DOCTYPE html> <html lang="en"> <head> <meta charset="UTF-8"> <meta name="viewport" content="width=device-width, initial-scale=1.0"> <title>Test Page</title> </head> <style> #name { position: fixed; width: 300px; height: 30px; top: 50%; left: 30%; font-size: 20px; border: 1px solid black; } #MyName { display: flex; font-size: 20px; } #clickMe { position: fixed; top: 60%; left: 45%; width: 100px; height: 30px; } </style> <body> <div id="MyName"> <h1>My Name is <span id="namer"></span></h1> </div> <button id="clickMe" style="width: 100px; height: 30px">Click Me</button> <input type="text" id="name" /> <script> document.getElementById('name').addEventListener('input', function(event) { document.getElementById('namer').innerText = event.target.value; const array = event.target.value; if (array.length > 4) { document.getElementById('namer').style.color = 'red'; } }); </script> </body> </html> Interface
Here i was planning to create an interface where i would be able to display the 2D location of the robot using the data from UWB sensor and the interface can be used to control the the direction of the move movement it can also control the doors and other function on the robot. For this i started by first making buttons using HTML then Then using CSS i made them design of the button and also placed them in the desired locations.After that I have also added the clicking actions to the buttons.
As the next step i defined functions for each actions then as the next step i added the functions to the buttons like when the button is pressed a specific action is triggered and when the button is released another action is triggered. in addition to that i have also mapped some keys from keyboard so that the buttons can be controlled using the buttons from keyboard
AI Prompt: Add the comments to the code below
<!DOCTYPE html> <html lang="en"> <head> <meta charset="UTF-8"> <meta name="viewport" content="width=device-width, initial-scale=1.0"> <title>Test Page</title> </head> <style> /* ----------- BUTTON STYLES ----------- */ /* Up button styling */ #UpButton { background-color: red; position: fixed; left: 15%; top: 50%; width: 100px; height: 100px; border-radius: 20%; } /* Visual scale down when pressed */ #UpButton:active { scale: 0.9; } /* Left button styling */ #LeftButton { background-color: yellow; position: fixed; left: 5%; top: 60%; width: 100px; height: 100px; border-radius: 20%; } #LeftButton:active { scale: 0.9; } /* Right button styling */ #RightButton { background-color: yellow; position: fixed; left: 25%; top: 60%; width: 100px; height: 100px; border-radius: 20%; } #RightButton:active { scale: 0.9; } /* Down button styling */ #DownButton { background-color: red; position: fixed; left: 15%; top: 70%; width: 100px; height: 100px; border-radius: 20%; } #DownButton:active { scale: 0.9; } /* Utility buttons (Home, Go, Clear) */ #Home, #Go, #Clear { background-color: rgb(10, 209, 77); position: fixed; width: 100px; height: 40px; border-radius: 10px; } /* Individual positioning */ #Home { left: 60%; top: 80%; } #Go { left: 75%; top: 80%; } #Clear { left: 90%; top: 80%; } #Home:active, #Go:active, #Clear:active { scale: 0.9; } /* ----------- HEADER STYLES ----------- */ /* Header container */ #header { width: 100%; height: 70px; background-color: grey; top: 0px; } /* Logo inside header */ #logo { width: 50px; padding-top: 10px; } /* Title text inside header */ #heading { padding-left: 50px; font-size: 30px; font-family: 'Segoe UI', Tahoma, Geneva, Verdana, sans-serif; } /* ----------- OPEN, CLOSE & CONNECT ----------- */ /* Open/Close button styling */ #open, #close { position: fixed; width: 100px; height: 40px; border-radius: 10px; } /* Open = green, Close = blue */ #open { background-color: rgb(10, 209, 77); left: 8%; top: 30%; } #close { background-color: blue; left: 24%; top: 30%; } /* Scale on click */ #open:active, #close:active { scale: 0.9; } /* Connect button styling */ #connect { background-color: grey; position: fixed; left: 24%; top: 40%; width: 100px; height: 40px; border-radius: 10px; } </style> <body style="margin: 0px; width: 100vw; height: 100dvh;"> <!-- Header section --> <div id="header"> <img id="logo" src="/Game-Controller-PNG-Clipart.png"> <h3 id="heading">Control Center</h3> </div> <!-- Control buttons --> <button id="UpButton">Up</button> <button id="LeftButton">Left</button> <button id="RightButton">Right</button> <button id="DownButton">Down</button> <button id="Home">Home</button> <button id="Go">Go</button> <button id="Clear">Clear</button> <button id="open">Open</button> <button id="close">Close</button> <button id="connect" onclick="connectToSerial()">Connect</button> <script> // Get references to buttons const UpButton = document.getElementById('UpButton'); const LeftButton = document.getElementById('LeftButton'); const RightButton = document.getElementById('RightButton'); const DownButton = document.getElementById('DownButton'); const HomeButton = document.getElementById('Home'); const GoButton = document.getElementById('Go'); const ClearButton = document.getElementById('Clear'); const OpenButton = document.getElementById('open'); const CloseButton = document.getElementById('close'); // Serial communication setup let port; let writer; let reader; // Connect to serial port using Web Serial API async function connectToSerial() { port = await navigator.serial.requestPort(); // Request port from user await port.open({ baudRate: 9600 }); // Open port with baud rate writer = port.writable.getWriter(); reader = port.readable.getReader(); const decoder = new TextDecoder(); // Continuously read incoming serial data while (true) { const { value, done } = await reader.read(); if (done) break; const string = decoder.decode(value); document.getElementById('outputMsg').textContent += string; } } // Function to send a string to serial port async function sendValue(value) { if (!writer) return; const encoder = new TextEncoder(); await writer.write(encoder.encode(value + '\n')); // Append newline } // Functions for visual feedback on button press/release function pressup() { UpButton.style.backgroundColor = 'blue'; } function releaseup() { UpButton.style.backgroundColor = 'red'; } function pressleft() { LeftButton.style.backgroundColor = 'blue'; } function releaseleft() { LeftButton.style.backgroundColor = 'yellow'; } function pressright() { RightButton.style.backgroundColor = 'blue'; } function releaseright() { RightButton.style.backgroundColor = 'yellow'; } function pressdown() { DownButton.style.backgroundColor = 'blue'; } function releasedown() { DownButton.style.backgroundColor = 'red'; } function PressHome() { HomeButton.style.backgroundColor = 'blue'; } function releaseHome() { HomeButton.style.backgroundColor = 'rgb(10, 209, 77)'; } function PressGo() { GoButton.style.backgroundColor = 'blue'; } function releaseGo() { GoButton.style.backgroundColor = 'rgb(10, 209, 77)'; } function PressClear() { ClearButton.style.backgroundColor = 'blue'; } function releaseClear() { ClearButton.style.backgroundColor = 'rgb(10, 209, 77)'; } // Toggle between open and close visual states function pressOpen() { OpenButton.style.backgroundColor = 'blue'; CloseButton.style.backgroundColor = 'rgb(10, 209, 77)'; } function pressClose() { CloseButton.style.backgroundColor = 'blue'; OpenButton.style.backgroundColor = 'rgb(10, 209, 77)'; } // Mouse interactions for directional buttons UpButton.addEventListener('mousedown', pressup); document.addEventListener('mouseup', releaseup); LeftButton.addEventListener('mousedown', pressleft); LeftButton.addEventListener('mouseup', releaseleft); RightButton.addEventListener('mousedown', pressright); RightButton.addEventListener('mouseup', releaseright); DownButton.addEventListener('mousedown', pressdown); DownButton.addEventListener('mouseup', releasedown); HomeButton.addEventListener('mousedown', PressHome); HomeButton.addEventListener('mouseup', releaseHome); GoButton.addEventListener('mousedown', PressGo); GoButton.addEventListener('mouseup', releaseGo); ClearButton.addEventListener('mousedown', PressClear); ClearButton.addEventListener('mouseup', releaseClear); // Click events for door control OpenButton.addEventListener('click', pressOpen); CloseButton.addEventListener('click', pressClose); // Keyboard controls for directional actions document.addEventListener('keydown', function(event) { if (event.key === 'ArrowUp' || event.key.toLowerCase() === 'w') pressup(); if (event.key === 'ArrowLeft' || event.key.toLowerCase() === 'a') pressleft(); if (event.key === 'ArrowRight' || event.key.toLowerCase() === 'd') pressright(); if (event.key === 'ArrowDown' || event.key.toLowerCase() === 's') pressdown(); if (event.key.toLowerCase() === 'h') PressHome(); if (event.key.toLowerCase() === 'g') PressGo(); if (event.key.toLowerCase() === 'c') PressClear(); }); document.addEventListener('keyup', function(event) { if (event.key === 'ArrowUp' || event.key.toLowerCase() === 'w') releaseup(); if (event.key === 'ArrowLeft' || event.key.toLowerCase() === 'a') releaseleft(); if (event.key === 'ArrowRight' || event.key.toLowerCase() === 'd') releaseright(); if (event.key === 'ArrowDown' || event.key.toLowerCase() === 's') releasedown(); if (event.key.toLowerCase() === 'h') releaseHome(); if (event.key.toLowerCase() === 'g') releaseGo(); if (event.key.toLowerCase() === 'c') releaseClear(); }); // Send serial commands when open/close buttons are clicked document.getElementById('open').addEventListener('click', () => { sendValue("1"); }); document.getElementById('close').addEventListener('click', () => { sendValue("0"); }); </script> </body> </html> The video below shows the control interface here when the page loads the door will be always closed so the close button is always ble and when the open button is pressed the button trs blue and when the close button is pressed the button turns blue.
The other buttons when pressed the button turns blue and when released the button turns back to its original color also when the keys on the keyboard which is mapped to the button the buttons turns blue.I have also provided a connect button which is used to initialize the web usb and show the port that are connected
I had used chat gpt to learn how to connect the interface with the Keyboard inputs and Used the example code provided by instructor for getting the needed syntax for creating the interface
Hardware Setup
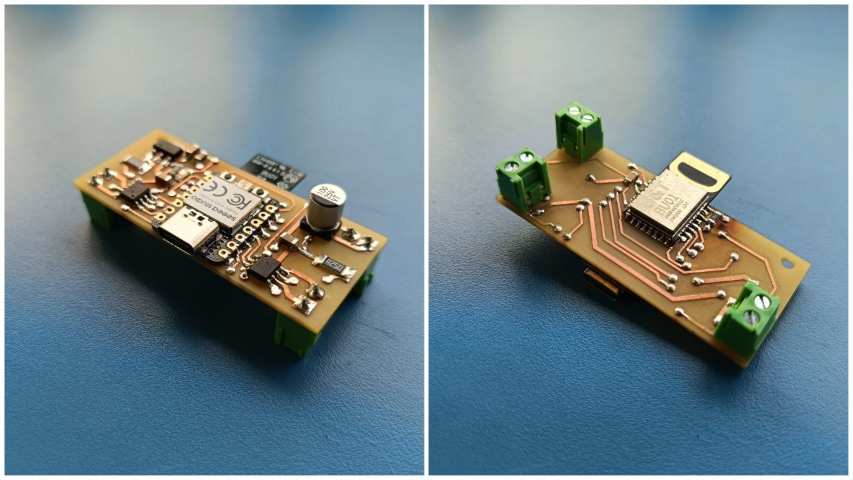
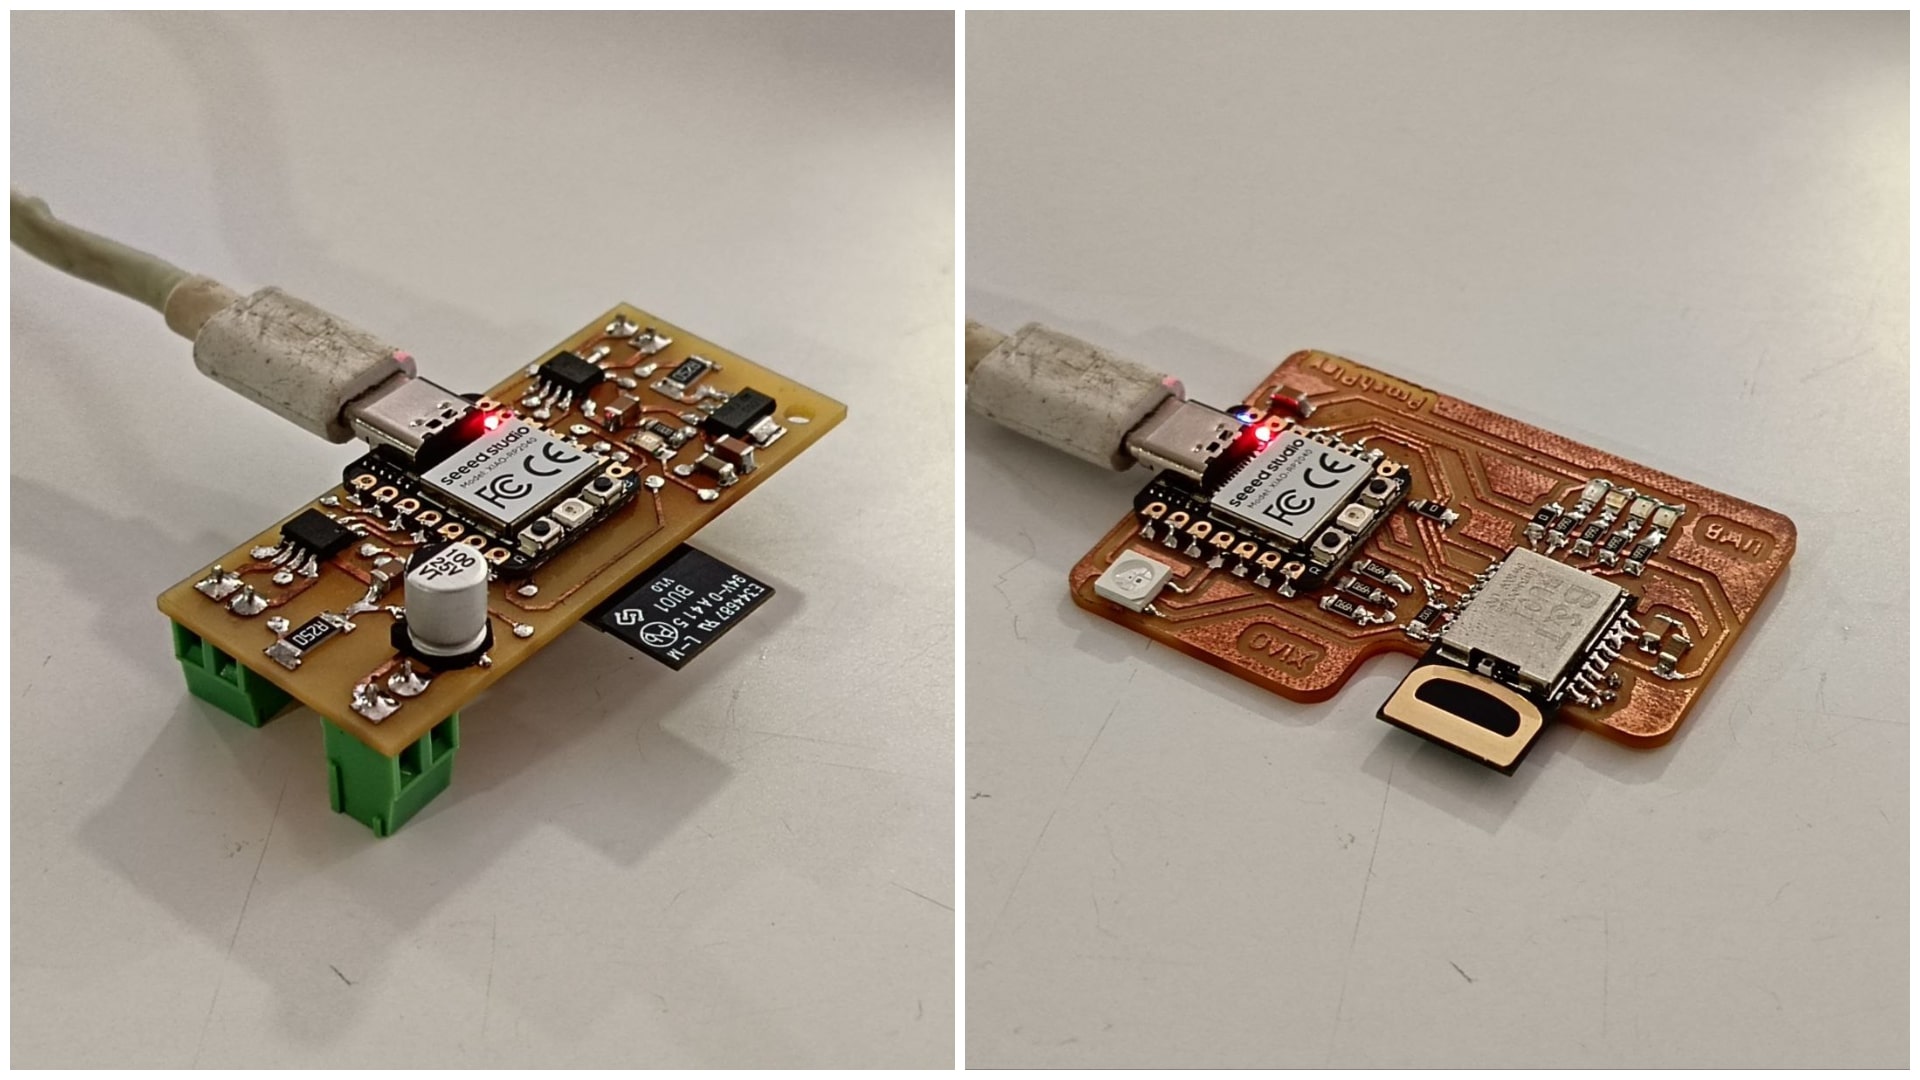
For the hardware setup i used the same that was made for UWB that was made in the Week 11 i used the built in LED on the custom UWB board.
This is a video that shows the LED being controlled using the interface.
UWB testing and calibration
For this week i wanted to get data from the UWB sensor to the RP2040 and this data should be shared to an interface so that the data can be visualized,But from the week 10 i was not able to get proper accurate data from the sensor.
For getting more accurate readings from the UWB sensor I followed the Maker fab documentation and calibrated the UWB sensor
- Download the Jim Remington DW1000 library to replace the original DW1000 library.
- Upload the
ESP32_UWB_setup_tag.inosketch to the Tag device after making some changes in the sketch so that it works properly. - Place the Tag and Anchor at a fixed distance her i kept both devices at 1 m apart.
- Open
ESP32_anchor_autocalibrate.ino, set the distance to 1 meters, and upload the sketch to the Anchor device. - Record the Adelay value from the Anchor's serial output.
- Update the Adelay parameter in the Anchor firmware (default value is
16384) for further measurements.
Tag Code
This code is for setting up a UWB (Ultra-Wideband) distance measurement system using DW1000 modules. It includes three parts: one for the tag, one for calibrating anchors, and one for the final anchor setup. The tag sends signals and receives distance readings from anchors. The calibration code adjusts each anchor’s antenna delay to match a known distance, improving accuracy. Once calibrated, anchors use the final code with the correct delay values to measure distances from the tag. The system uses SPI communication and special libraries to handle the ranging process and device connections.
AI Prompt : Give a brief about the code
// currently tag is module #5 // The purpose of this code is to set the tag address and antenna delay to default. // this tag will be used for calibrating the anchors. #include <SPI.h> // SPI communication library #include "DW1000Ranging.h" // DW1000 ranging functions #include "DW1000.h" // DW1000 core functions // Connection pin definitions const uint8_t PIN_RST = 27; // Reset pin for DW1000 const uint8_t PIN_IRQ = 26; // Interrupt pin for DW1000 const uint8_t PIN_SS = 1; // SPI Chip Select pin // TAG antenna delay defaults to 16384 // Leftmost two bytes define the "short address" char tag_addr[] = "7D:00:22:EA:82:60:3B:9C"; // Tag address void setup() { Serial.begin(115200); // Start serial communication delay(1000); // Give some time to stabilize // Initialize SPI and DW1000 communication SPI.begin(); DW1000Ranging.initCommunication(PIN_RST, PIN_SS, PIN_IRQ); // Reset, CS, IRQ pins // Attach callback functions for events DW1000Ranging.attachNewRange(newRange); // When new range is received DW1000Ranging.attachNewDevice(newDevice); // When a new device is detected DW1000Ranging.attachInactiveDevice(inactiveDevice); // When a device becomes inactive // Start the module as a TAG // Do not assign a random short address — use the one specified DW1000Ranging.startAsTag(tag_addr, DW1000.MODE_LONGDATA_RANGE_LOWPOWER, false); } void loop() { // Continuously handle ranging communication DW1000Ranging.loop(); } // Callback when a new distance measurement is available void newRange() { Serial.print(DW1000Ranging.getDistantDevice()->getShortAddress(), HEX); Serial.print(","); Serial.println(DW1000Ranging.getDistantDevice()->getRange()); } // Callback when a new device is added void newDevice(DW1000Device *device) { Serial.print("Device added: "); Serial.println(device->getShortAddress(), HEX); } // Callback when a device is no longer active void inactiveDevice(DW1000Device *device) { Serial.print("delete inactive device: "); Serial.println(device->getShortAddress(), HEX); }
Anchor Calibration Code
This code is for setting up a UWB (Ultra-Wideband) distance measurement system using DW1000 modules. It includes three parts: one for the tag, one for calibrating anchors, and one for the final anchor setup. The tag sends signals and receives distance readings from anchors. The calibration code adjusts each anchor’s antenna delay to match a known distance, improving accuracy. Once calibrated, anchors use the final code with the correct delay values to measure distances from the tag. The system uses SPI communication and special libraries to handle the ranging process and device connections.
AI Prompt: Give a brief about the code
#include <SPI.h> // Include SPI communication library #include "DW1000Ranging.h" // Include DW1000 UWB Ranging library #include "DW1000.h" // Include core DW1000 driver library // Define the pin assignments const uint8_t PIN_RST = 27; // Reset pin const uint8_t PIN_IRQ = 34; // Interrupt pin const uint8_t PIN_SS = 4; // SPI chip select pin // Set this anchor's UWB address char this_anchor_addr[] = "84:00:22:EA:82:60:3B:9C"; // The target distance from tag to this anchor (in meters), converted from inches float this_anchor_target_distance = 1; // Initial antenna delay value (used for calibration) uint16_t this_anchor_Adelay = 16600; // Step size used for binary search during Adelay calibration uint16_t Adelay_delta = 100; void setup() { Serial.begin(115200); // Start the serial monitor while (!Serial); // Wait until the Serial monitor is ready SPI.begin(); // Initialize SPI communication DW1000Ranging.initCommunication(PIN_RST, PIN_SS, PIN_IRQ); // Initialize DW1000 with given pins Serial.print("Starting Adelay "); Serial.println(this_anchor_Adelay); Serial.print("Measured distance "); Serial.println(this_anchor_target_distance); // Set the initial antenna delay value DW1000.setAntennaDelay(this_anchor_Adelay); // Attach callback functions DW1000Ranging.attachNewRange(newRange); // Called when a new range measurement is available DW1000Ranging.attachNewDevice(newDevice); // Called when a new device is detected DW1000Ranging.attachInactiveDevice(inactiveDevice); // Called when a device becomes inactive // Start the DW1000 module in anchor mode DW1000Ranging.startAsAnchor(this_anchor_addr, DW1000.MODE_LONGDATA_RANGE_LOWPOWER, false); } void loop() { // Continuously handle ranging communication DW1000Ranging.loop(); } // Callback: Called when a new range is available void newRange() { static float last_delta = 0.0; Serial.print(DW1000Ranging.getDistantDevice()->getShortAddress(), DEC); float dist = DW1000Ranging.getDistantDevice()->getRange(); // Measured distance Serial.print(","); Serial.print(dist); if (Adelay_delta < 3) { // Stop calibration when the step is small enough Serial.print(", final Adelay "); Serial.println(this_anchor_Adelay); while (1); // Halt execution } // Calculate the error between measured and target distances float this_delta = dist - this_anchor_target_distance; // If sign of delta changes, reduce step size if (this_delta * last_delta < 0.0) Adelay_delta = Adelay_delta / 2; last_delta = this_delta; // Adjust Adelay based on measurement if (this_delta > 0.0) this_anchor_Adelay += Adelay_delta; else this_anchor_Adelay -= Adelay_delta; Serial.print(", Adelay = "); Serial.println(this_anchor_Adelay); // Apply the new antenna delay DW1000.setAntennaDelay(this_anchor_Adelay); } // Callback: Called when a new device is detected void newDevice(DW1000Device *device) { Serial.print("Device added: "); Serial.println(device->getShortAddress(), HEX); } // Callback: Called when a device becomes inactive void inactiveDevice(DW1000Device *device) { Serial.print("delete inactive device: "); Serial.println(device->getShortAddress(), HEX); } Anchor Code
This code is for setting up a UWB (Ultra-Wideband) distance measurement system using DW1000 modules. It includes three parts: one for the tag, one for calibrating anchors, and one for the final anchor setup. The tag sends signals and receives distance readings from anchors. The calibration code adjusts each anchor’s antenna delay to match a known distance, improving accuracy. Once calibrated, anchors use the final code with the correct delay values to measure distances from the tag. The system uses SPI communication and special libraries to handle the ranging process and device connections.
AI Prompt: Give a brief about the code
// Anchor #4 setup // Be sure to edit anchor_addr and select the previously calibrated anchor delay // Naming convention: anchors 1, 2, 3... use the lowest byte of the MAC address as 81, 82, 83... #include <SPI.h> // SPI library for communication #include "DW1000Ranging.h" // High-level DW1000 ranging functions #include "DW1000.h" // Low-level DW1000 control // Leftmost two bytes define the "short address" char anchor_addr[] = "84:00:5B:D5:A9:9A:E2:9C"; // Anchor #4 // Calibrated antenna delay for this specific anchor uint16_t Adelay = 16570; // Previously determined antenna delays: // #1 16630 // #2 16610 // #3 16607 // #4 16580 // Calibration distance used for testing float dist_m = 1; // in meters // Pin assignments const uint8_t PIN_RST = 6; // Reset pin const uint8_t PIN_IRQ = 28; // Interrupt pin const uint8_t PIN_SS = 1; // SPI chip select pin void setup() { Serial.begin(115200); // Start serial communication delay(1000); // Wait for Serial Monitor to connect Serial.println("Anchor config and start"); Serial.print("Antenna delay "); Serial.println(Adelay); Serial.print("Calibration distance "); Serial.println(dist_m); // Initialize SPI and DW1000 SPI.begin(); DW1000Ranging.initCommunication(PIN_RST, PIN_SS, PIN_IRQ); // Reset, CS, IRQ pins // Set the antenna delay - only for anchors DW1000.setAntennaDelay(Adelay); // Attach callback functions DW1000Ranging.attachNewRange(newRange); // Called when a new range is received DW1000Ranging.attachNewDevice(newDevice); // Called when a new device is detected DW1000Ranging.attachInactiveDevice(inactiveDevice); // Called when a device becomes inactive // Start this device as an anchor (no random short address) DW1000Ranging.startAsAnchor(anchor_addr, DW1000.MODE_LONGDATA_RANGE_LOWPOWER, false); // Alternative modes (commented): // DW1000Ranging.startAsAnchor(ANCHOR_ADD, DW1000.MODE_SHORTDATA_FAST_LOWPOWER); // DW1000Ranging.startAsAnchor(ANCHOR_ADD, DW1000.MODE_LONGDATA_FAST_LOWPOWER); // DW1000Ranging.startAsAnchor(ANCHOR_ADD, DW1000.MODE_SHORTDATA_FAST_ACCURACY); // DW1000Ranging.startAsAnchor(ANCHOR_ADD, DW1000.MODE_LONGDATA_FAST_ACCURACY); // DW1000Ranging.startAsAnchor(ANCHOR_ADD, DW1000.MODE_LONGDATA_RANGE_ACCURACY); } void loop() { // Handle ongoing DW1000 communication and ranging DW1000Ranging.loop(); } // Callback when a new range is available void newRange() { Serial.print(DW1000Ranging.getDistantDevice()->getShortAddress(), HEX); Serial.print(", "); #define NUMBER_OF_DISTANCES 1 float dist = 0.0; // Average over NUMBER_OF_DISTANCES readings for (int i = 0; i < NUMBER_OF_DISTANCES; i++) { dist += DW1000Ranging.getDistantDevice()->getRange(); } dist = dist / NUMBER_OF_DISTANCES; Serial.println(dist); } // Callback when a new device connects void newDevice(DW1000Device *device) { Serial.print("Device added: "); Serial.println(device->getShortAddress(), HEX); } // Callback when a device becomes inactive void inactiveDevice(DW1000Device *device) { Serial.print("Delete inactive device: "); Serial.println(device->getShortAddress(), HEX); } Group Assignments
As part of this week's group assignment, we explored multiple tools such as Kodular, Pygame, Processing, Flutter, and HTML with CSS.
Link : week 14 Group Assignment
Conclusion
For this week i learned about the basics of JavaScript & I have tested the use of webserial in JavaScript ,I made a simple interface using HTML,CSS & JavaScript and made a simple interface. I tried to calibrate the UWB sensor and get a good result, But i was not able to get a good satisfactory result from the data.