Microcontrollers
Introducing our microcontrollers
Here is an overview of the microcontrollers you have in your Fab Lab Inventory. Hopefully this will help you choose a microcontroller for your final project.
Trusty
- The Arduino Uno is the most popular microcontroller board in the world. It's a good idea to have an Arduino Uno, even though it's no longer in the Fab Lab Inventory. The ATmega328 microcontroller in the Arduino Uno is getting old and isn't as powerful as the latest ones, but it has the most information, instructions, and software available for it of all the microcontrollers. It can therefore be a good idea to try things out with the Arduino Uno first, because then you can always rule out the microcontroller as the problem.
Cheap
- The ATtiny412 is a very cheap, but surprisingly capable microcontroller. It's well suited for doing something simple. Hafey, Andri and Svavar used the ATtiny412 demo from Adrian Torres to design boards that send messages to each other during Networking and Communications week.
- When connecting more components to the microcontroller, you can use the ATtiny1614 or ATtiny3226, which have more pins and connectors.
- The AVR128DB32 is inexpensive but very good at accepting measurements from analog sensors (probably has the best analog-to-digital ratio).
- SAMD11 is a modern ARM microcontroller that can be connected directly to USB, but what makes it difficult is that it has as little memory as the cheap ATtiny microcontrollers. Software libraries either use various tricks to fit into the ATtiny's limitations or they are written for powerful ARM microcontrollers and assume plenty of memory. Students in Fab Academy have documented that the memory in the SAMD11 quickly overflows if you add one or two software packages, for example to control a display or Neopixel diodes. If the memory overflows, the microcontroller becomes useless (then you have to shorten the code to make it work). Perhaps it's best to think of the SAMD11 as an ATtiny412 that can talk directly to USB. USB communication is the main thing; and it's good to give this microcontroller one relatively simple task (and by the way: the analog-to-digital converter in it is as good as in the SAMD21).
Powerful
You can put pin headers on these boards and connect them to a breadboard for experimentation, or you can solder them directly onto your own board; which is what we do in the Fab Academy:
- Xiao RP2040 for processing power
- Xiao ESP32-C3 for WiFi
- The Xiao SAMD21 has a very good analog-to-digital converter for reading from sensors (the SAMD21 is also available as a standalone microcontroller in the Fab Lab Inventory).
- We often give students a Raspberry Pi Pico W to put on a breadboard and try connecting things to, to get started. It has the RP2040 microcontroller, lots of pins, and WiFi.
Recommendation
We recommend using a standalone microcontroller like ATtiny or SAMD21 for your final project, rather than a board like Xiao. The reason is that then you reach the highest level of circuit design in Fab Academy. Until 2023, it was always required to put the microcontroller on the board, but now you can use Xiao boards and Raspberry Pi Pico W. It is very convenient to use these ready-made boards, but then you will not be introduced to certain fundamentals.
The SAMD21 can do everything except connect to WiFi. The SAMD21 is really the successor to the ATmega328P microcontroller found in the Arduino Uno.
The ATmega328P cannot stand alone; it needs a crystal to be used as a clock, and it also needs a USB-to-serial converter so that it can be programmed via a USB port.
The SAMD21 is much more powerful and convenient. It has all this built in. The SAMD21 can stand alone; the only extra step you need to take when using the SAMD21 is to install a bootloader on it with a programmer. After that, you can program it directly via USB, and it supports both Arduino IDE and MicroPython. It also has a very good analog-to-digital converter, which makes all measurements with analog sensors better.
But first and foremost, the coolest thing is to use the microcontroller alone and put it on the board.
Programming the microcontrollers
Here are guides to programming the trickiest microcontroller families in the Fab Academy:
1 and 2 series ATtiny
These are the ATtiny412, 1614, 1624, 3216 and 3226.
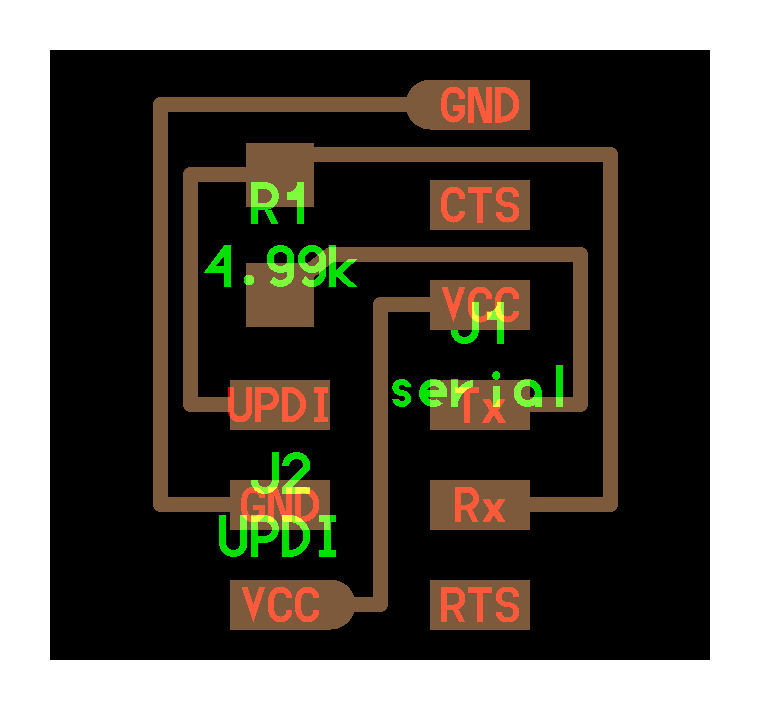
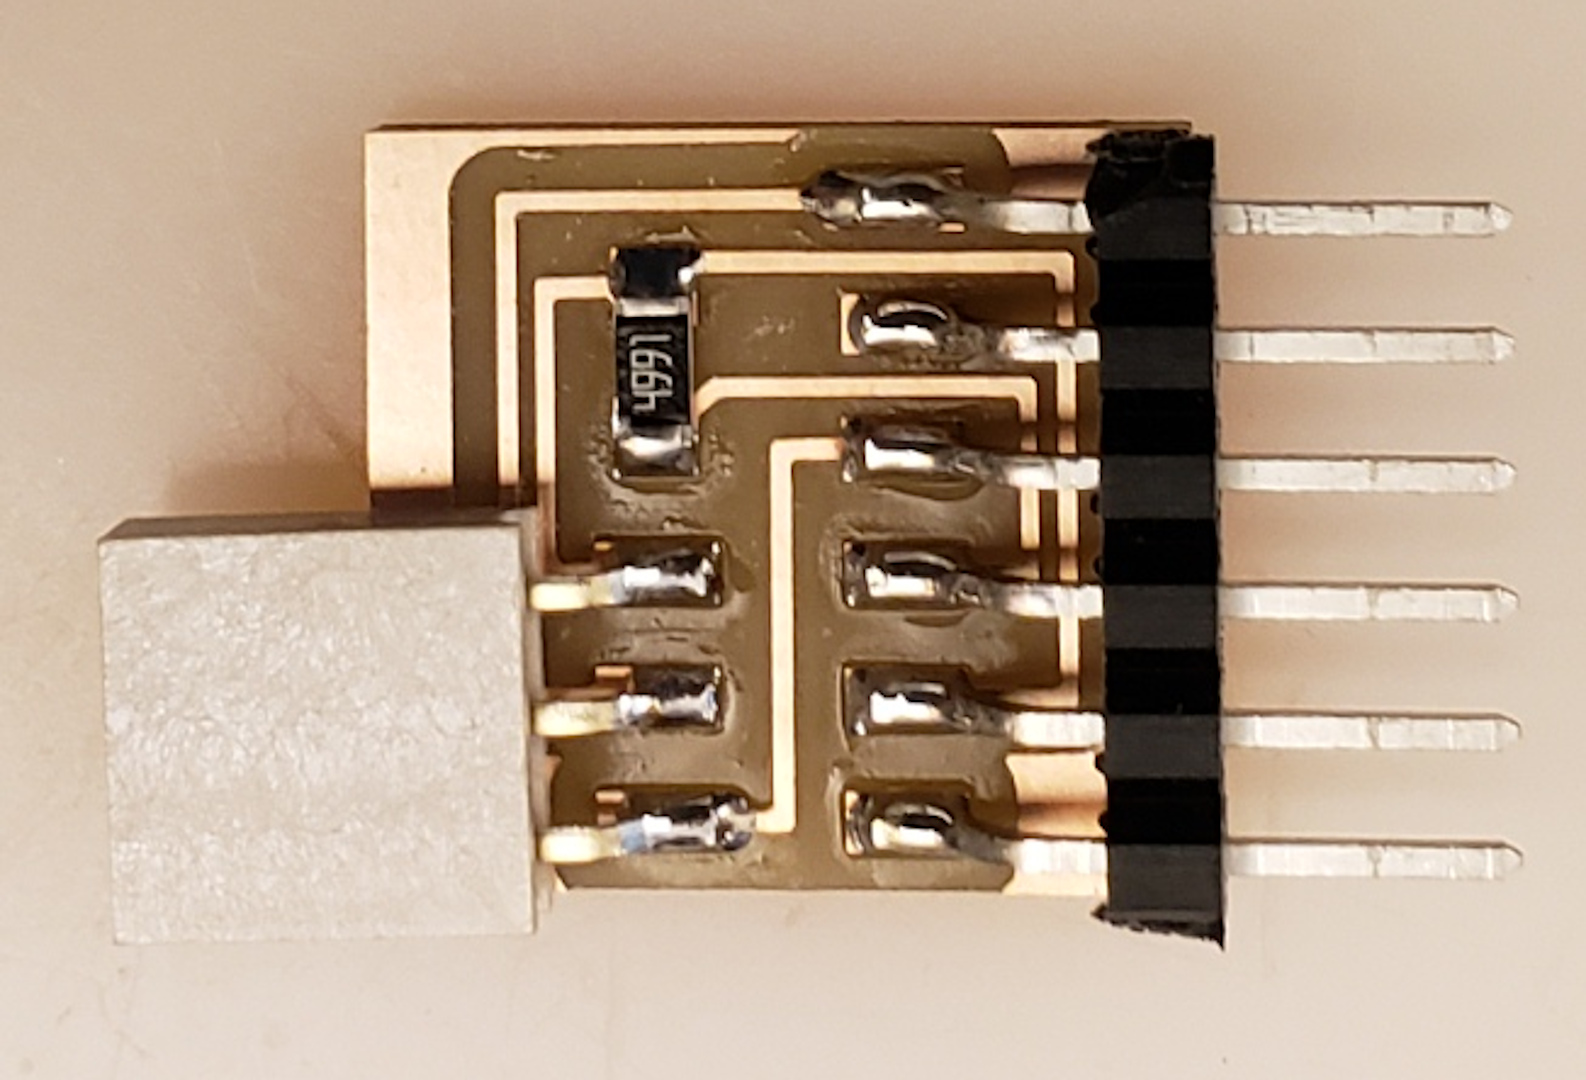
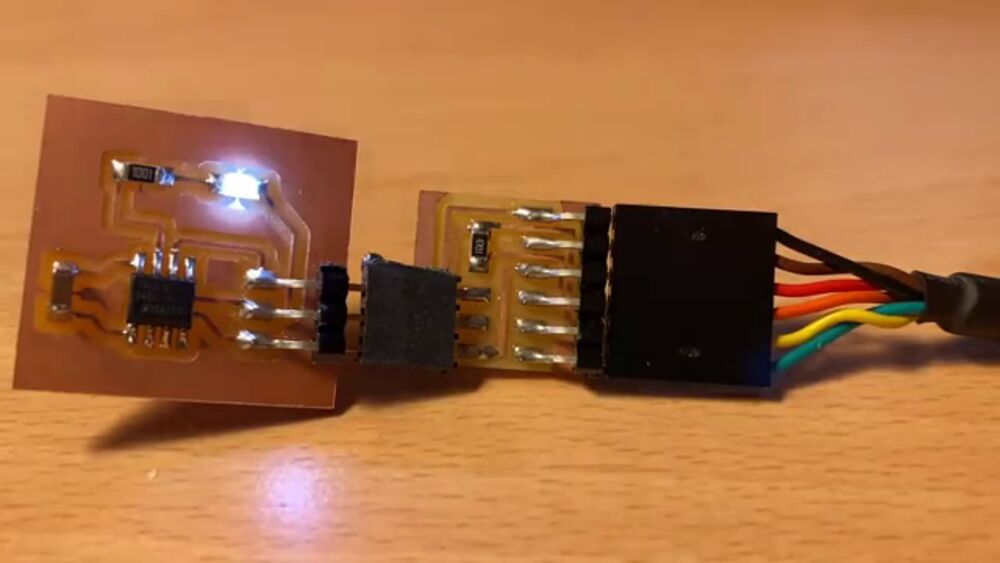
To connect your ATtiny to the computer you need the serial UPDI-3 pin connector board from Neil (teikning, components, traces, traces+exterior, interior) to an FTDI cord like in the image below. Take care that the order of colors is correct:
If you don't have an FTDI cord, there are other ways to make an USB-to-serial converter to connect to your board:
- If you have the FT230XS FTDI chip, you can make the Bridge Serial FT230XS
- If you have a SAMD11 you can make the Bridge Serial D11C or the SAMD11 dual serial
- If you have a Xiao RP2040 you can make the Quentorres.
- If you have none of these, you can actually use a regular Arduino board to program an ATtiny, see the following video (the video also shows why we need these adapters):
Here are written instructions showing how to use an Arduino Nano to program an ATtiny.
ATtiny45

This one is a classic Fab Academy microcontroller. These days it's bit old fashioned, but still in production and but Neil still has example boards using it. We've successfully programmed Neil's t45-echo (board, components, traces, traces + exterior, interior) using this video and Neil's Arduino sketches (echo, echo.serial):
Here are the settings we used (they are all explained in the video):

SAMD
We've successfully used Yuichi's guide to using the Xiao SAMD21 as a programmer. Yuichi's documentation is usually really good, and this guide is no exception.
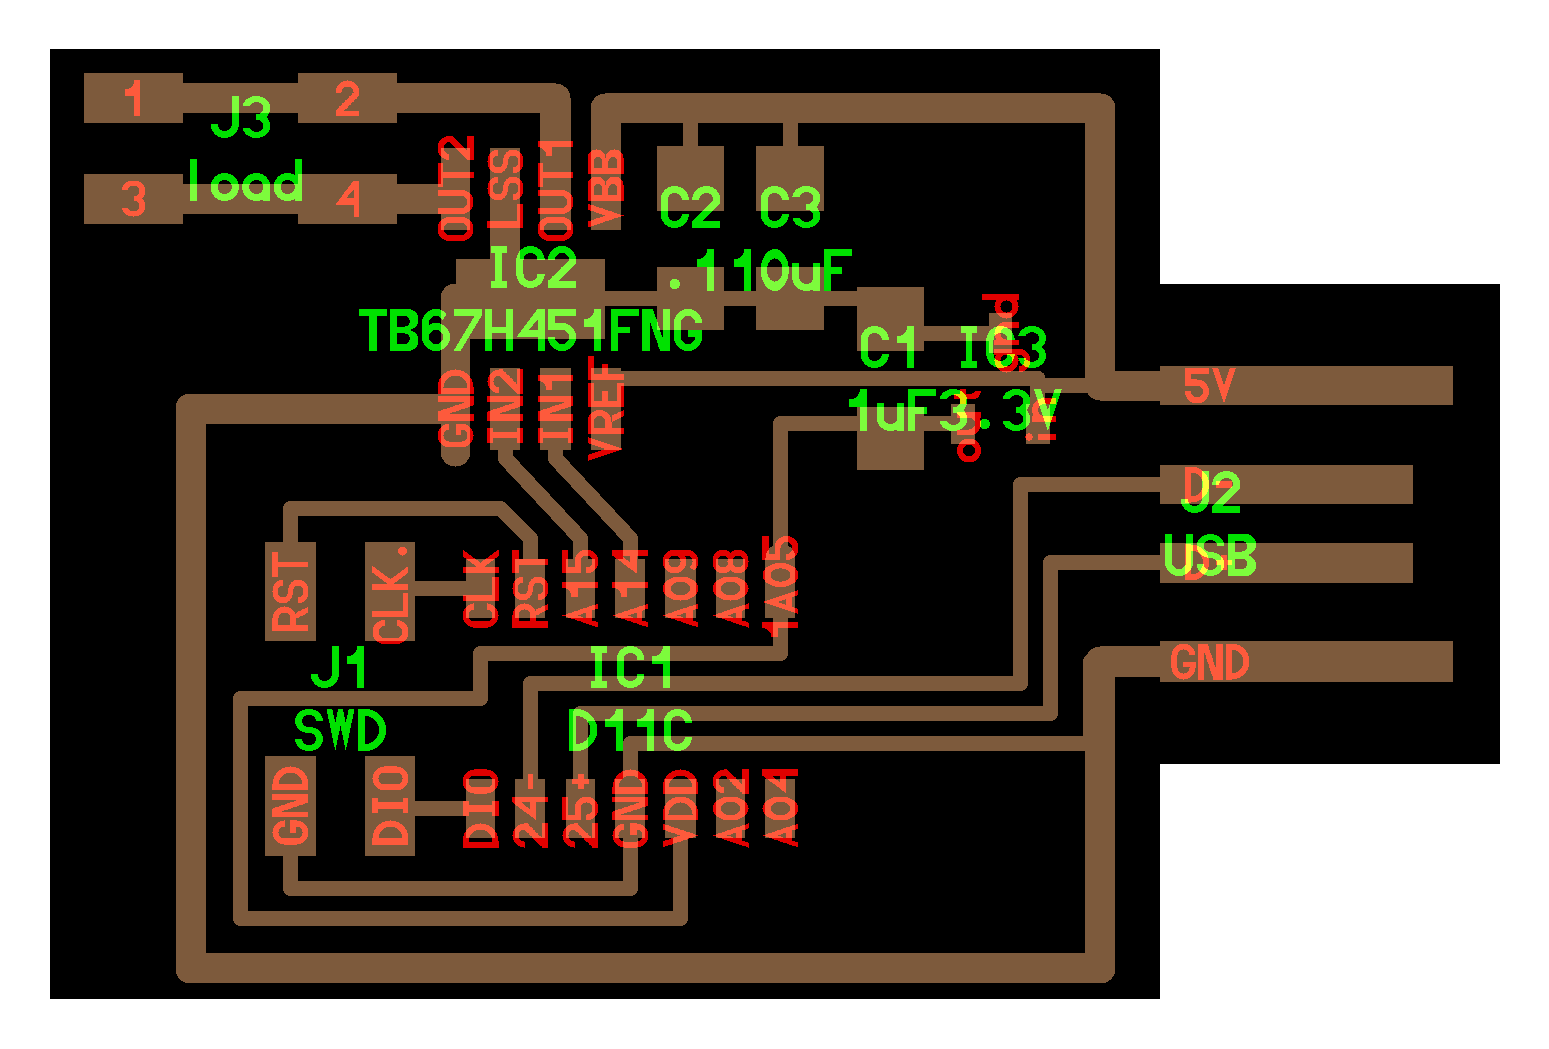
 Note how the wires are connected. This is Neil's hello.H-bridge.D11C board in Output Devices week.
You set the Xiao SAMD21 to bootloader mode and drag the CMSIS-DAP firmware into the folder that opens. That is enough enough to make the Xiao a programmer. Then you connect the pins as shown in the guide and used the Generic D11C14A board definition in the Fab SAM core for Arduino. Remember to select TWO_UART... Tools->Serial Config and choose CMSIS-DAP as the programmer. Then burn the bootloader.
Then you can disconnect the Xiao and the SAMD11 board. When you reconnect the SAMD11 board it gets recognized and you can now program it over USB! So convenient with such a small and cheap chip!
We couldn't get the SAMD11-based programmer to work until we tried connecting the target board to a USB power brick instead of the computer. If the target board has already been programmed, then it shows up as a COM port and that can confuse the computer.
 The SAMD11 programmer from Fab Fest Bali is now working. Note how the wires are connected.
You can also use the Raspberry Pi Pico/Raspberry Pi Pico W as a programmer and it also works, when you connect the target board to a USB power brick. Then you should have no shortage of programmers for the SAMD chips.
 Raspberry Pi Pico W being used as a programmer.
Here is a summary of the Fab Academy programmers.
AVR128DB32

We've confirmed that Neil's hello.128DB32.echo (board, components, traces, traces + exterior, interior) can be programmed over UPDI using Spence Konde's DxCore. We programmed it with the Blink sketch with these settings:
 If the Upload button doesn't work, use Sketch -> Upload Using Programmer.
According to the pin mapping, pin PA7 is the built-in LED. We measured the pin being toggled on and off at 5V.
The unique built-in opamps can be accessed in the Arduino IDE using the megaavr Opamp library, which has a few example sketches that you can try.
Ísafjörður dev kit
Svavar whipped up a dev kit for the AVR128DB32, so that the Machine Week team could try out I2C communication on this microcontroller. It worked! So they changed from the SAMD21 to the AVR128DB32 in their machine.
Schematic:

PCB layout:

Traces:

Interior:

Ísafjörður dev kit KiCad project
Toolchains and Workflow
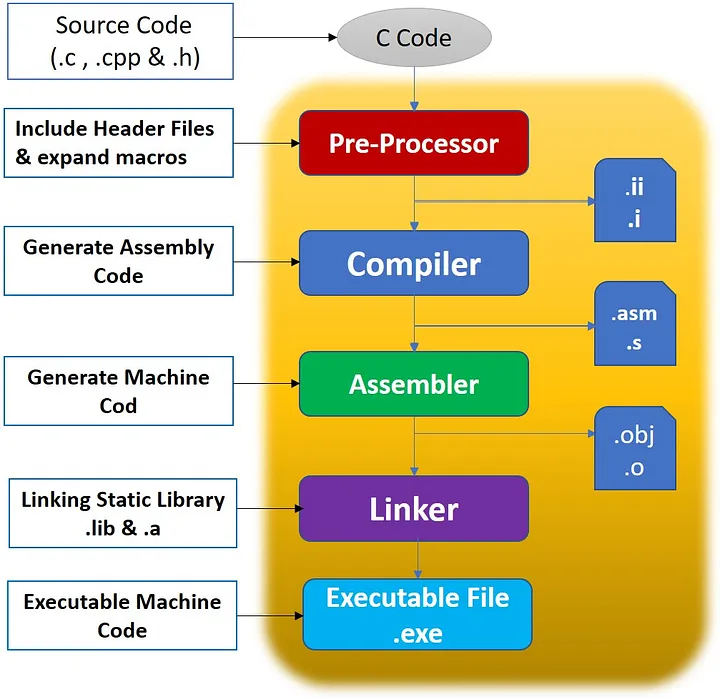
When talking about toolchains, it basically refers to the process of transforming your code into something the hardware can understand and execute.
The video below explains what happens under the hood in the Arduino IDE.
video if the embedded is broken
The image below shows a typical toolchain from C code to hardware.
Terms and Tools
Here are some key terms and tools to get familiar with.
Terms
- IDE (Integrated Development Environment, such as the Arduino Editor)
- Compiler – Translates high-level code (C, C++) into machine code.
- Assembler – Converts assembly language into machine code.
- Machine code – The binary instructions executed by the hardware.
- Bootloader – A small program that allows microcontrollers to be programmed.
Tools
- AVR-GCC – A compiler for AVR microcontrollers.
- AVRDUDE – A tool used to upload compiled code to AVR-based hardware.
File Formats
- .c – C source code file.
- .ino – Arduino sketch file.
- .hex – Compiled machine code file used for flashing onto microcontrollers.
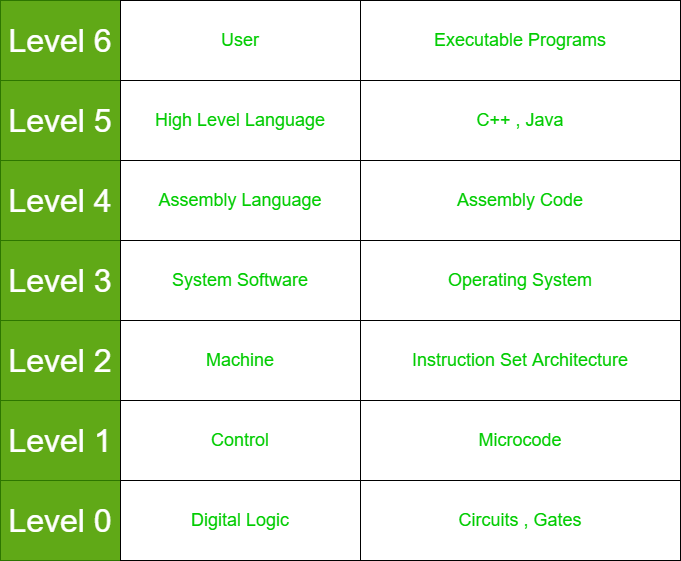
Computer System Level Hierarchy
The Computer System Level Hierarchy represents the different levels of abstraction between the user interface and the hardware itself. This can include the CPU inside your computer or external hardware like a keyboard or a microcontroller (MCU).
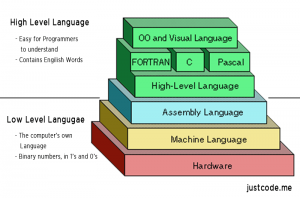
Low-Level and High-Level Programming
When talking about low-level programming, we usually refer to assembly code, though C is considered very close to low-level programming, even though it is categorized as a high-level language.
How Low Can You Go? Logic Gates
Logic gates are the building blocks of computing, made up of tiny transistors that control the flow of electrical signals.
At the lowest level, computers and microcontrollers process information using logic gates. These gates take in binary inputs (1s and 0s) and produce an output based on simple rules.
Logic gates form the basis of all digital circuits, from simple switches to microprocessors and memory chips
Here are some basic logic gates:
- AND Gate – Outputs 1 only if both inputs are 1.
- OR Gate – Outputs 1 if at least one input is 1.
- NOT Gate – Flips the input (1 becomes 0, 0 becomes 1).
- XOR Gate – Outputs 1 only if inputs are different.
