Week 11: Interface and Application Programming
Compare as many tool options as possible.
Document your work on the group work page and reflect on your individual page what you learned.
This week's group assignment required us to explore and compare as many tool options as possible for communicating with a microcontroller. We will be comparing the Arduino Serial Monitor with Tkinter.
Arduino Serial Monitor
Webserver for RFID module
To explore on how to program the Arduino IDE and work with communicating it with a microcontroller board using hte Arduino Serial Monitor, we decided to learn how to create a webserver which interacts with an RFID module. The webserver should be able print the UID of the RFID card scanned and refresh the page when a new one is being scanned. It will print the UID of the latest RFID card scanned.
The connections made:
| RFID module | Xiao board |
|---|---|
| VCC | 3V3 |
| GND | GND |
| TXD | D5 |
| RXD | D4 |
NOTE: set the mode of the RFID module to UART mode. Learn more about it here.
We uploaded the following code to the XIAO ESP32-C3.
#include <WiFi.h>
        #include <WebServer.h>
        #include <Adafruit_PN532.h>

        // Wi-Fi credentials
        const char* ssid = "STUDENT";
        const char* password = "LetMeIn!";

        // Web server on port 80
        WebServer server(80);

        // Create PN532 instance on Serial1 (UART)
        #define PN532_RX D5
        #define PN532_TX D4
        HardwareSerial mySerial(1);
        Adafruit_PN532 nfc(PN532_TX, &mySerial);

        // To store latest UID
        String lastUID = "No card scanned yet";

        void handleRoot() {
        String html = "<!DOCTYPE html><html><head><meta http-equiv='refresh' content='2'/>"
                        "<title>RFID Log</title></head><body>"
                        "<h1>Last scanned RFID UID:</h1>"
                        "<p>" + lastUID + "</p>"
                        "</body></html>";
        server.send(200, "text/html", html);
        }

        void setup() {
        Serial.begin(115200);
        delay(1000);

        // Start Wi-Fi
        Serial.println("Connecting to WiFi...");
        WiFi.begin(ssid, password);
        while (WiFi.status() != WL_CONNECTED) {
            delay(500);
            Serial.print(".");
        }
        Serial.println("\nConnected to WiFi");
        Serial.print("IP address: ");
        Serial.println(WiFi.localIP());

        // Start web server
        server.on("/", handleRoot);
        server.begin();
        Serial.println("Web server started");

        // Start RFID on Serial1
        mySerial.begin(115200, SERIAL_8N1, PN532_RX, PN532_TX);
        nfc.begin();

        uint32_t versiondata = nfc.getFirmwareVersion();
        if (!versiondata) {
            Serial.println("Didn't find PN532");
            while (1) delay(10);
        }

        // Configure board to read RFID tags
        nfc.SAMConfig();
        Serial.println("Waiting for RFID card...");
        }

        void loop() {
        server.handleClient();

        // Check for an RFID card
        uint8_t success;
        uint8_t uid[7];    // Buffer to store UID
        uint8_t uidLength; // UID length

        success = nfc.readPassiveTargetID(PN532_MIFARE_ISO14443A, uid, &uidLength);

        if (success) {
            Serial.print("RFID UID: ");
            String uidStr = "";
            for (uint8_t i = 0; i < uidLength; i++) {
            uidStr += String(uid[i], HEX);
            uidStr += " ";
            }
            Serial.println(uidStr);
            lastUID = uidStr;
            delay(1500); // debounce time
        }
        }
This is the result:
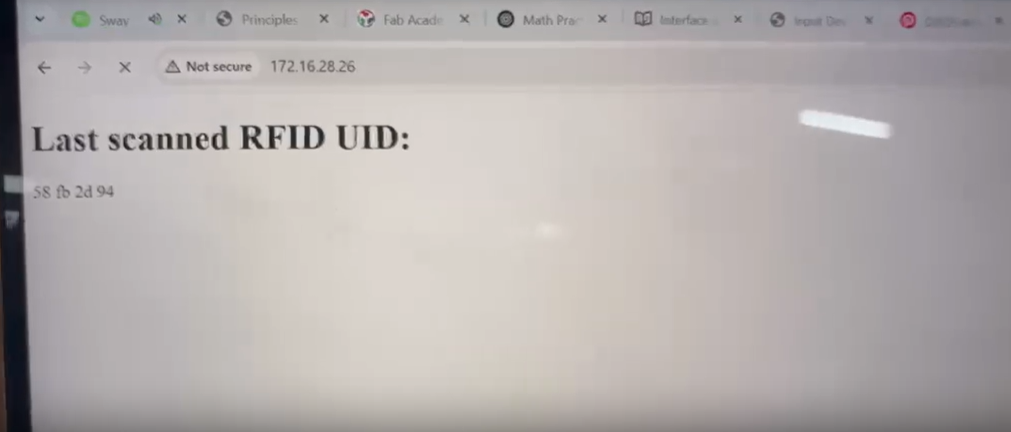
It was a success!
Tkinter
Tools Explored
- Tkinter (Python GUI Toolkit)
- Pros: Easy to use, great for creating basic GUI applications
- Cons: Limited styling and design flexibility compared to modern web frameworks
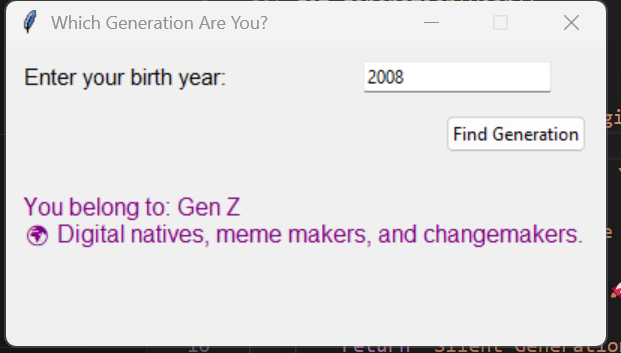
- Use case: We created a generation identifier app where users input their birth year and get the corresponding generational group
import tkinter as tk
from tkinter import ttk
def get_generation(year):
if year >= 2013:
return "Gen Alpha", "📱 Born into iPads and AI."
elif 1997 <= year <= 2012:
return "Gen Z", "🌍 Digital natives, meme makers, and changemakers."
elif 1981 <= year <= 1996:
return "Millennial (Gen Y)", "💻 Grew up with the rise of the internet."
elif 1965 <= year <= 1980:
return "Gen X", "📼 The cassette generation – cool and independent."
elif 1946 <= year <= 1964:
return "Baby Boomer", "🚀 Post-war optimism and rock ’n’ roll."
elif 1928 <= year <= 1945:
return "Silent Generation", "🎩 Grew up in hardship and discipline."
elif year < 1928:
return "Greatest Generation", "🌎 World War II heroes and survivors."
else:
return "Unknown", "🤷♂️ Generation not identified."
def show_generation():
try:
year = int(year_var.get())
if year < 0:
raise ValueError
gen_name, description = get_generation(year)
result_label.config(
text=f"You belong to: {gen_name}\n{description}"
)
except ValueError:
result_label.config(
text="❌ Please enter a valid year."
)
# GUI setup
win = tk.Tk()
win.title("Which Generation Are You?")
win.geometry("400x200")
win.resizable(False, False)
# Input
ttk.Label(win, text="Enter your birth year:", font=('Arial', 11)).grid(column=0, row=0, padx=10, pady=10, sticky='w')
year_var = tk.StringVar()
year_entry = ttk.Entry(win, textvariable=year_var, width=20)
year_entry.grid(column=1, row=0, padx=10, pady=10)
# Button
generate_btn = ttk.Button(win, text="Find Generation", command=show_generation)
generate_btn.grid(column=1, row=1, padx=10, pady=5, sticky='e')
# Output
result_label = ttk.Label(win, text="", font=('Arial', 12), foreground="purple")
result_label.grid(column=0, row=2, columnspan=2, padx=10, pady=20)
win.mainloop()
Explanation of the Generation Identifier Python Code
1. Importing Modules
The code begins by importing tkinter and ttk from tkinter to create the graphical user interface.
2. Generation Logic
The function get_generation(year) checks which generational group the given year falls into. It uses if-elif conditions to return both the generation name and a short description.
3. Displaying the Result
The show_generation() function is triggered when the button is clicked. It tries to convert the user input to an integer, passes it to the get_generation() function, and displays the result using the label.
4. Creating the GUI Window
The window is created using tk.Tk(). Title, size, and resizing behavior are defined.
5. User Input
A label and entry box are created for the user to input their birth year. StringVar() is used to link the entry to a variable.
6. Button
A button labeled "Find Generation" is placed. When clicked, it calls show_generation().
7. Result Display
An empty label is created where the generation and its description will be shown after the button is clicked.
8. Main Event Loop
win.mainloop() starts the GUI event loop so the window stays open and interactive until the user closes it.
Tkinter with LEDs
Tkinter is a built-in Python library that facilitates the creation of graphical user interfaces (GUIs) for applications. It provides a variety of widgets such as buttons, text boxes, labels, and menus, allowing developers to design interactive interfaces for their programs.
We downloaded the Python application first.
This is the code we uploaded generated with the help of AI, in order to create a webserver which controls an LED.
import serial
        from tkinter import *
        from tkinter import font

        def led_on():
        arduino_data.write(b'1')

        def led_off():
        arduino_data.write(b'0')

        # Set up the Tkinter window
        led_control_window = Tk()
        led_control_window.title('LED Control')

        # Set background color to pink
        led_control_window.configure(bg='pink')

        # Use a different font for buttons and labels
        my_font = font.Font(family='Helvetica', size=14, weight='bold')

        # Create the "Turn LED On" button with a different style
        btn_on = Button(led_control_window, text='Turn LED On', command=led_on, font=my_font, bg='lightgreen', fg='black', padx=20, pady=10)
        btn_on.pack(pady=10)

        # Create the "Turn LED Off" button with a different style
        btn_off = Button(led_control_window, text='Turn LED Off', command=led_off, font=my_font, bg='lightcoral', fg='black', padx=20, pady=10)
        btn_off.pack(pady=10)

        # Initialize the serial connection to Arduino
        arduino_data = serial.Serial('COM13', 9600)

        # Run the Tkinter event loop
        led_control_window.mainloop()
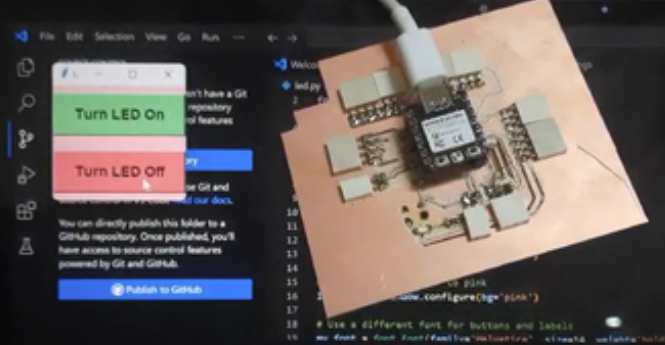
It was a success as it was able to control an LED without any problem.
Comparision table
| Arduino Serial Monitor | Tkinter | |
|---|---|---|
| Platform | Desktop | Desktop |
| Language | C++ | Python |
| Communication Method | Serial via USB | Serial via USB |
| Pros | Easy to use, great for debugging | User-friendly interface, visually interactive |
| Cons | Not user-friendly for non-developers | Requires Python setup and programming |
Reflection
Working with Tkinter showed us how powerful simple programming tools can be for creating interactive applications. It was exciting to connect coding with real-world concepts like generations, making the app both fun and educational.
Overall, this experience improved our technical skills, deepened our appreciation for teamwork, and inspired us to explore both programming and fabrication tools more confidently in future projects.
Thank You!