9. Output devices
On this week we worked on connecting an output device to a microcontroller board. On this case I'll be working with the last week board, which have the necessary pin outs for this.
The group assignment
Here is the group assignment task where we learn together.
Starting defining output devices
An output device is any hardware component that receives digital data from a computer or microcontroller and translates it into a tangible form that users can perceive or interact with. These devices play a critical role in turning digital designs or instructions into physical actions or feedback.
On Fab Academy we are allowed to use an speaker, a motor or an OLED display. Knowing that, I'm going to go with the OLED Display.
The OLED Display
The OLED Display (Organic Light-Emitting Diode) display is an alternative for LCD display. The OLED is super-lighnt, almost paper-thin, flexible, and produce a brighter and crisper picture. [*]

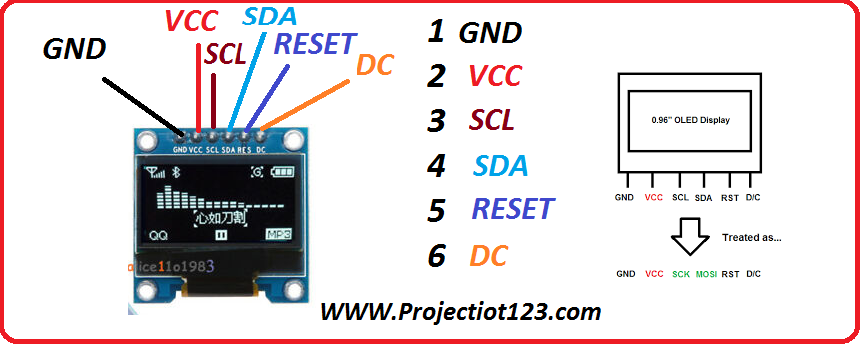
This display is used frequently in displaying texts, bitmap images, shapes, and different types of clocks. They offer good view angles and pixel density in a cost-effective manner. At first, we will take a look at the 0.96-inch OLED display, its pinout, connections with the Arduino board, and then use Arduino IDE to program our module to display texts, different shapes, and bitmap images on the OLED display.
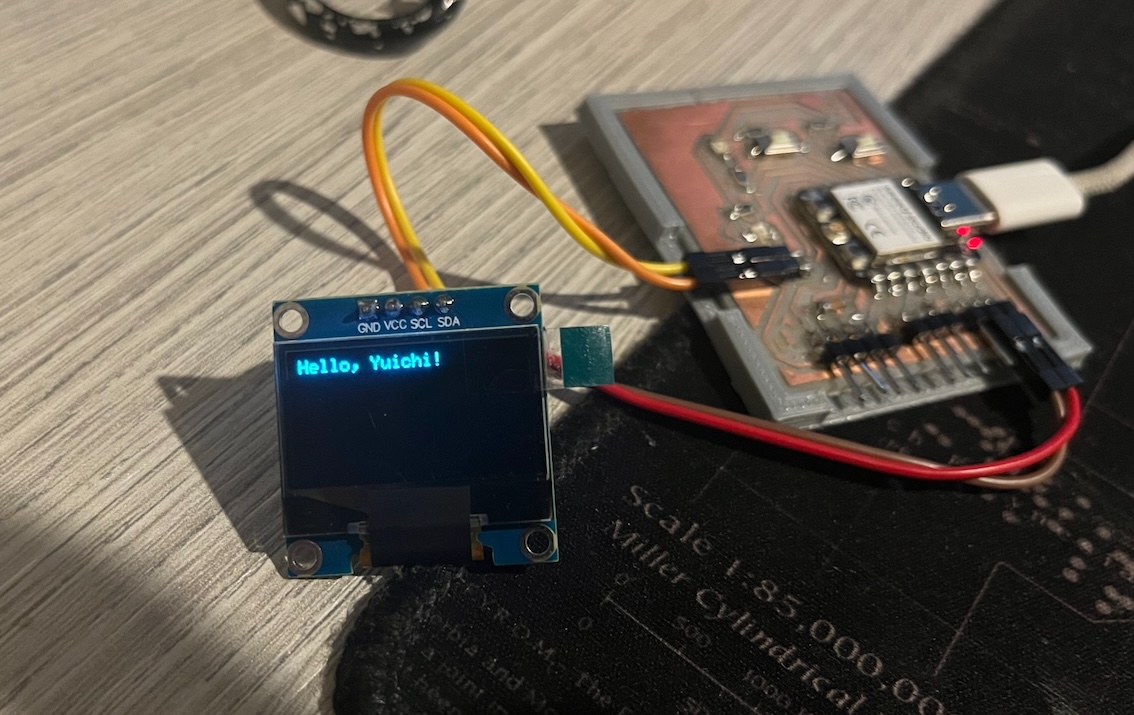
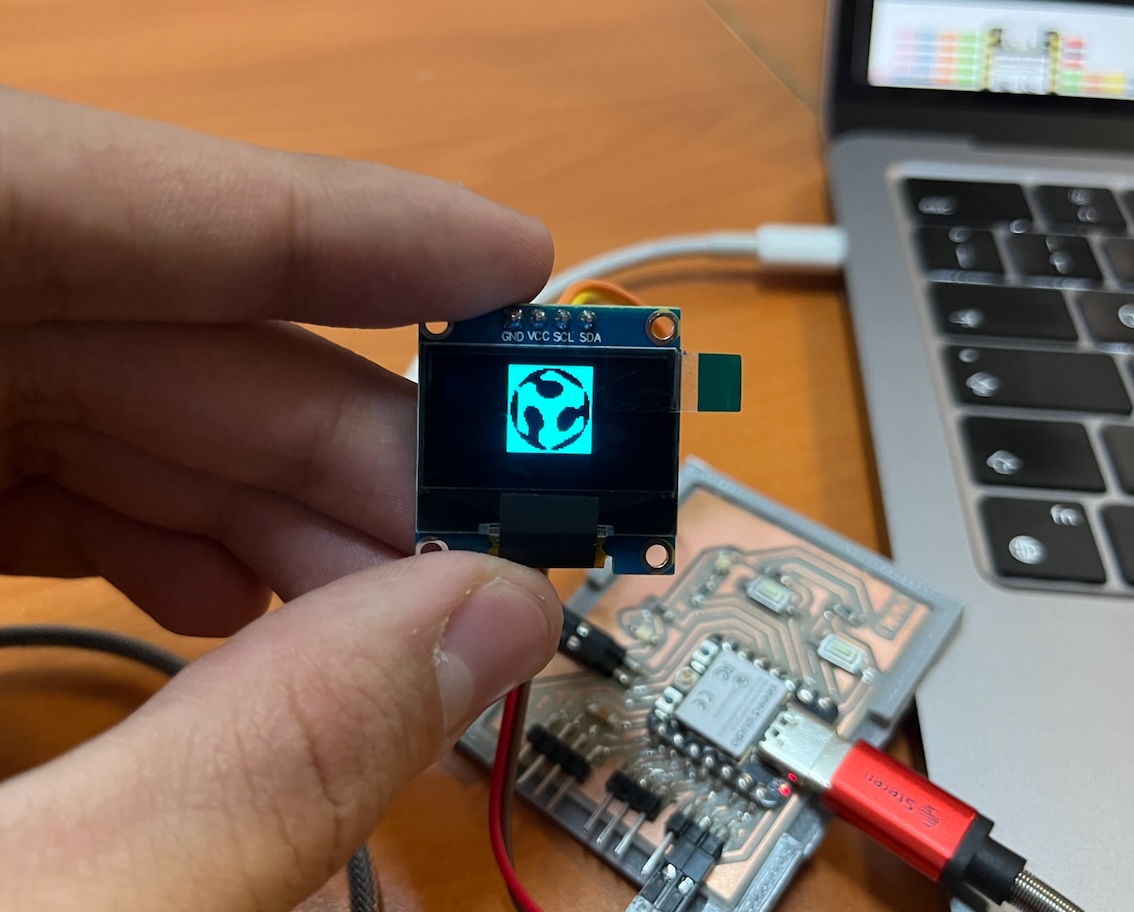
This is how I'm going to connect my PCB with the OLED Display:
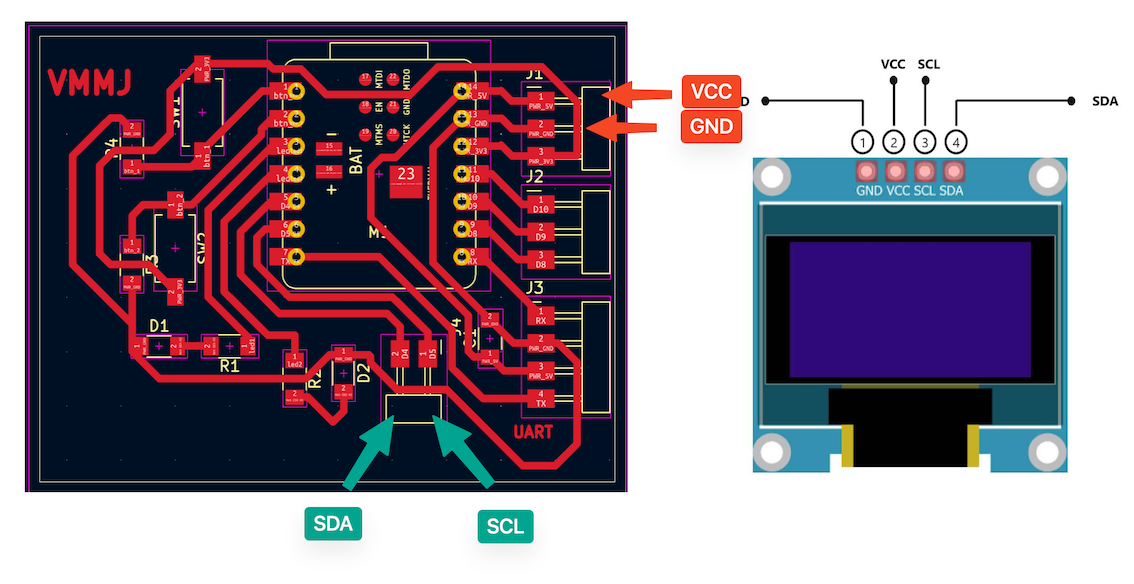
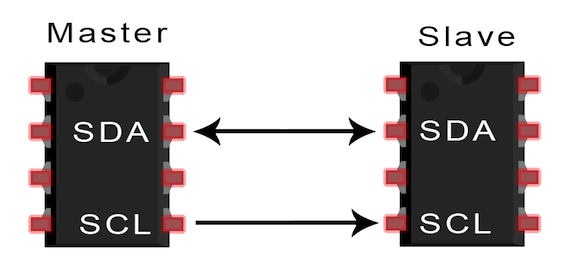
This OLED display's communication method is I2C communication protocol. I2C combines the best features of SPI and UARTs. With I2C, you can connect multiple slaves to a single master (like SPI) and you can have multiple masters controlling single, or multiple slaves. This is really useful when you want to have more than one microcontroller logging data to a single memory card or displaying text to a single LCD.
SDA (Serial Data) The line for the master and slave to send and receive data.
SCL (Serial Clock) The line that carries the clock signal.
I2C is a serial communication protocol, so data is transferred bit by bit along a single wire (the SDA line).
Starting with the display: the Hello World! On this first try of using the display, I tried the Hello world code which displays Hello world on the display.
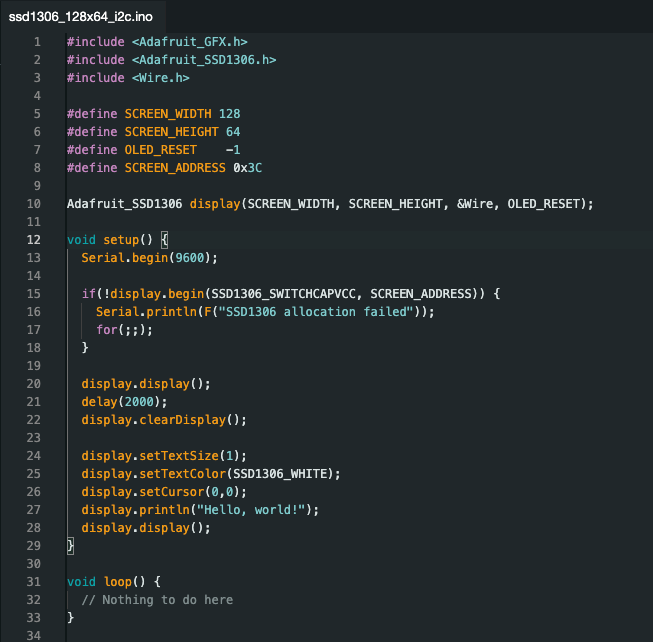
And the result was:

Now let's talk about bitmaps. A bitmap is a type of digital image format built from a grid of tiny squares called pixels. Each pixel stores color information, and by combining these colored pixels, the image is formed. Here's a breakdown of how bitmaps work: Grid of pixels: Imagine a checkerboard where each square is a pixel. The more pixels an image has, the higher its resolution and the sharper it will look. Color information: Each pixel holds a value that determines its color. In simpler bitmaps, there might be just black and white pixels. Complex ones can have millions of color possibilities. Think of a mosaic – tiny colored tiles coming together to create a bigger picture. In a bitmap, the tiles are the pixels and their colors combine to form the image.
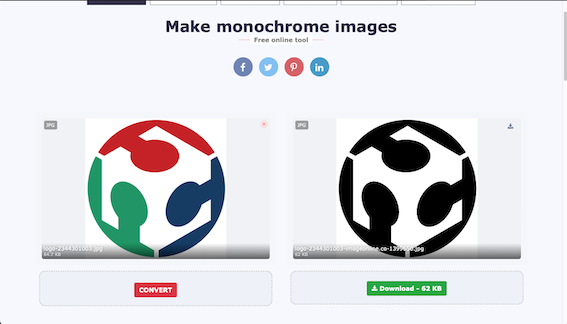
I wanted to create an example of a bitmap, so for this I'm going to use the Fab Lab logo and show how to display it on the OLED display.
1. Transform the image to monochromatic. For this process I used this page that allow me to transform the image.
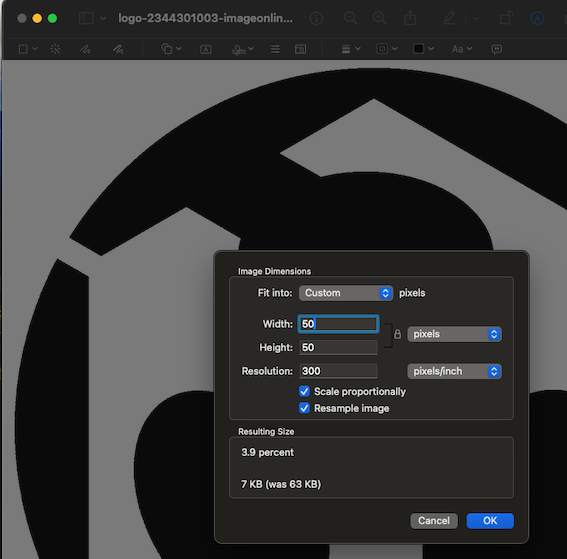
2. After downloading the image, the next step is to resize it. On macOS we can resize images on the menu when we open it, so in this case I'm going for 50 x 50 pixels
3. Having the image resized, the next step is to create the bitmap. For this I used this page that provides the bitmap on cpp code.

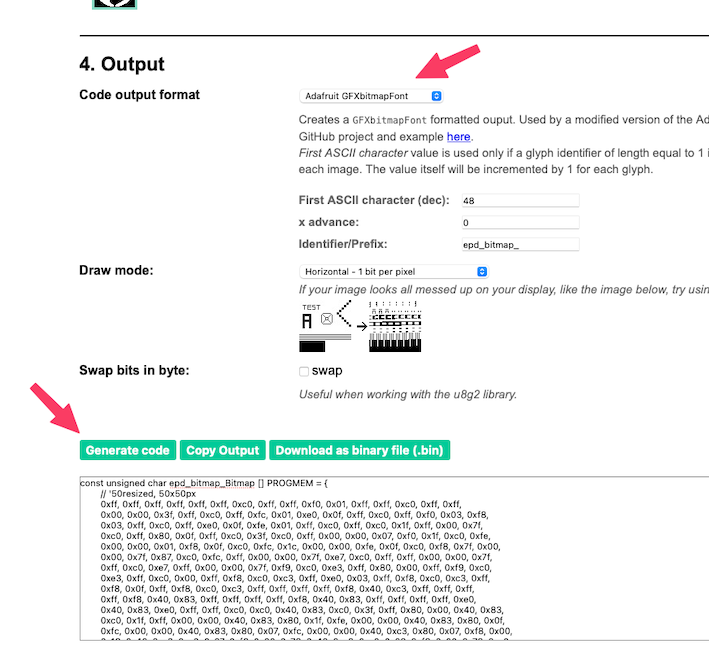
4. Almost done we paste that into the code:
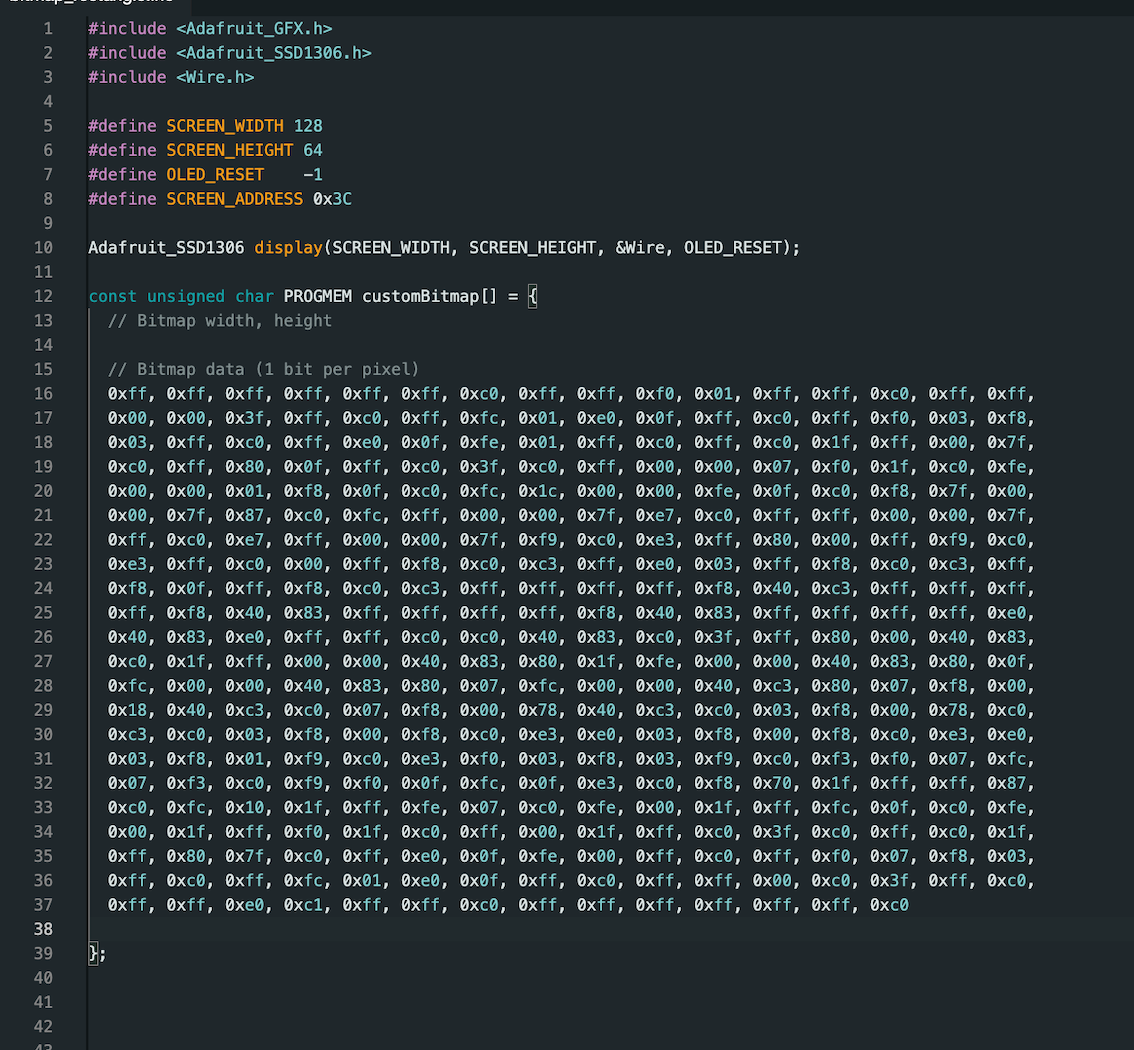
5. Finally we got the Fab Lab logo on the screen!!!
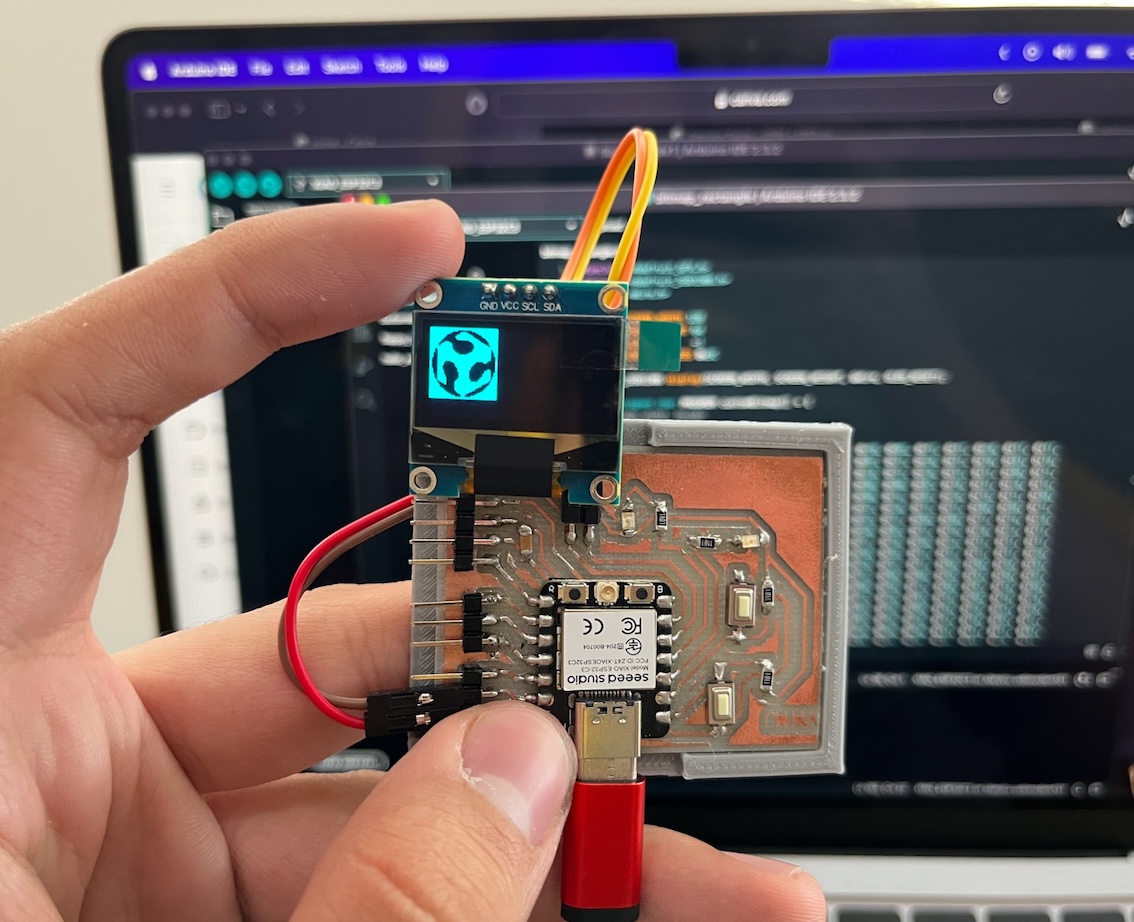
Correcting the code I changed the position to show the logo in the middle of the display:
After doing this, I feel that something fun could be done, so after a lot of research and looking througt a lot of websites, I created a Flappy Bird Game. This was a little bit difficult but because in internet we have a lot of resources, I got this:
Here is the arduino Code of the flappy bird. Every line is explained. You can find all the codes on the Files section:
#include  // Include the SPI library for SPI communication
#include  // Include the Wire library for I2C communication
#include  // Include the Adafruit GFX library for graphics functions
#include  // Include the Adafruit SSD1306 library for OLED display control

#define SCREEN_WIDTH 128 // Define the width of the OLED display
#define SCREEN_HEIGHT 64 // Define the height of the OLED display

#define OLED_RESET    -1 // Define the reset pin for the OLED display
#define SCREEN_ADDRESS 0x3C  // Define the I2C address of the OLED display
Adafruit_SSD1306 display(SCREEN_WIDTH, SCREEN_HEIGHT, &Wire, OLED_RESET); // Create an instance of the Adafruit_SSD1306 class for OLED display control

#define BUTTON_PIN_PLAY D0 // Define the pin for the play button
#define BUTTON_PIN_JUMP D1 // Define the pin for the jump button

#define BIRD_SIZE 4 // Define the size of the bird sprite
#define BIRD_START_X 10 // Define the initial X position of the bird
#define BIRD_START_Y 20 // Define the initial Y position of the bird
#define GRAVITY 0.5 // Define the gravity force affecting the bird
#define JUMP_STRENGTH -3 // Define the jump strength of the bird

#define PIPE_WIDTH 10 // Define the width of the pipes
#define PIPE_GAP 20  // Define the gap between pipes
#define PIPE_SPEED 1 // Define the speed of the pipes

int birdX, birdY; // Variables to store the position of the bird
float birdYSpeed; // Variable to store the vertical speed of the bird
bool gameover; // Flag to indicate if the game is over

int pipeX; // Variable to store the X position of the pipes
int pipeGapPosition; // Variable to store the Y position of the gap between pipes

int score; // Variable to store the player's score

void setup() {
    pinMode(BUTTON_PIN_PLAY, INPUT_PULLUP);  // Set the play button pin as input with pull-up resistor
    pinMode(BUTTON_PIN_JUMP, INPUT_PULLUP);  // Set the jump button pin as input with pull-up resistor

    Serial.begin(9600); // Initialize serial communication

    if(!display.begin(SSD1306_SWITCHCAPVCC, SCREEN_ADDRESS)) {  // Initialize the OLED display
    Serial.println(F("SSD1306 allocation failed")); // Print an error message if display initialization fails
    for(;;); // Loop indefinitely
    }

    display.display(); // Initialize the display
    delay(2000); // Delay for 2 seconds
    display.clearDisplay(); // Clear the display

    // Display the custom message
    display.setTextSize(1);  // Set text size to 1
    display.setTextColor(SSD1306_WHITE);  // Set text color to white
    display.setCursor(10, 20); // Set cursor position for the first line of text
    display.println("Fab Lab Puebla."); // Print the first line of text
    display.setCursor(10, 30); // Set cursor position for the second line of text
    display.println("By: Victor"); // Print the second line of text
    display.display();  // Display the text on the OLED display

    delay(4000); // Delay for 4 seconds

    startGame(); // Start the game
}

//=============================
void startGame() {
    // Initialize game parameters
    birdX = BIRD_START_X; // Set the initial X position of the bird
    birdY = BIRD_START_Y; // Set the initial Y position of the bird
    birdYSpeed = 0; // Reset the vertical speed of the bird
    gameover = false; // Reset the gameover flag

    pipeX = SCREEN_WIDTH; // Set the initial X position of the pipes
    pipeGapPosition = random(10, SCREEN_HEIGHT - PIPE_GAP - 10); // Set the initial Y position of the gap between pipes

    score = 0; // Reset the score

    display.clearDisplay(); // Clear the display
}

void loop() {
    // Start a new game if play button is pressed and game is over
    if (digitalRead(BUTTON_PIN_PLAY) == HIGH && gameover) {
    startGame();
    }

    if (!gameover) {
    // Game loop
    handleInput(); // Handle player input
    updateBird();  // Update bird position
    updatePipes(); // Update pipes position
    checkCollisions(); // Check for collisions
    draw(); // Draw game elements
    delay(50); // Delay for smoother gameplay
    }
}

void handleInput() {
    // Make the bird jump if jump button is pressed and bird is above the ground
    if (digitalRead(BUTTON_PIN_JUMP) == HIGH && birdY > 0) {
    birdYSpeed = JUMP_STRENGTH; // Set the vertical speed of the bird for jump
    }
}

void updateBird() {
    birdYSpeed += GRAVITY; // Apply gravity to the bird
    birdY += birdYSpeed;                     // Update bird's vertical position

    // Keep the bird within the screen bounds
    if (birdY > SCREEN_HEIGHT - BIRD_SIZE) {
    birdY = SCREEN_HEIGHT - BIRD_SIZE;
    birdYSpeed = 0; // Stop the bird from falling through the ground
    }

    if (birdY < 0) {
    birdY = 0;
    birdYSpeed = 0; // Stop the bird from going above the screen
    }
}

void updatePipes() {
    pipeX -= PIPE_SPEED;  // Move the pipes to the left

    // Reset pipe position if it goes off-screen
    if (pipeX < -PIPE_WIDTH) {
    pipeX = SCREEN_WIDTH;
    pipeGapPosition = random(10, SCREEN_HEIGHT - PIPE_GAP - 10); // Randomize the position of the gap between pipes
    score++;  // Increase the score when a new pipe appears
    }
}

void checkCollisions() {
    // Check for collisions between bird and pipes
    if ((birdX + BIRD_SIZE > pipeX && birdX < pipeX + PIPE_WIDTH) &&
        (birdY < pipeGapPosition || birdY + BIRD_SIZE > pipeGapPosition + PIPE_GAP)) {
    gameOver(); // If collision detected, end the game
    }
}

void gameOver() {
    gameover = true; // Set gameover flag to true
    display.setTextSize(1); // Set text size to 1
    display.setTextColor(SSD1306_WHITE); // Set text color to white
    display.setCursor(SCREEN_WIDTH / 4, SCREEN_HEIGHT / 4); // Set cursor position for "GAME OVER" message
    display.println("GAME OVER"); // Display "GAME OVER" message
    display.setCursor(SCREEN_WIDTH / 4, SCREEN_HEIGHT / 4 + 20); // Set cursor position for
    display.print("Score: ");
    display.println(score); // Display the final score
    display.display(); // Display the content on the OLED screen
    delay(2000); // Delay for 2 seconds
}

void draw() {
    display.clearDisplay(); // Clear the display buffer

    display.fillRect(birdX, birdY, BIRD_SIZE, BIRD_SIZE, SSD1306_WHITE);  // Draw the bird

    // Draw the upper part of the pipe
    display.fillRect(pipeX, 0, PIPE_WIDTH, pipeGapPosition, SSD1306_WHITE);
    // Draw the lower part of the pipe
    display.fillRect(pipeX, pipeGapPosition + PIPE_GAP, PIPE_WIDTH, SCREEN_HEIGHT - pipeGapPosition - PIPE_GAP, SSD1306_WHITE);

    display.display(); // Display the content on the OLED screen
}