11. Input devices
As in Outputs week the assign was to add extra pieces to our pre-designed PCBs and meassure the values they give or need, because of my final project, for this week i will need to meassure distance and maybe a touch sensor.
For the group job we reviewed a blood oxigen and a heart monitor sensor, one outputs a signal and the other communicates using IIC, WITH the help of a oscilloscope we compared and analyzed the results shown looking to the size of the data in bits: Group assignment.
The PCB
Using the board fabricated in Week 8 i tried to use the first input, however i found many difficulties.
The beginning of chaos
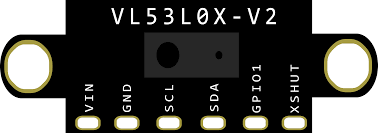
First Input: VL53L0X infrared time of flight sensor
This week final code for the VL53L0X time of flight sensor in arduino to download: Single.ino.

Here we have another I2C device, for this week i needed a combination of sensors to enssure a good position of the phone in order to start the process, that's why i choose this infrared, a common sonar ultrasonic sensor and a touch sensor.
The common use uf the infrared sensor is in line following aplications where they can detect the difference between black and white roads, however this is one of kind where the sensor meassures the time of flight of a little pulse to calculate the distance.
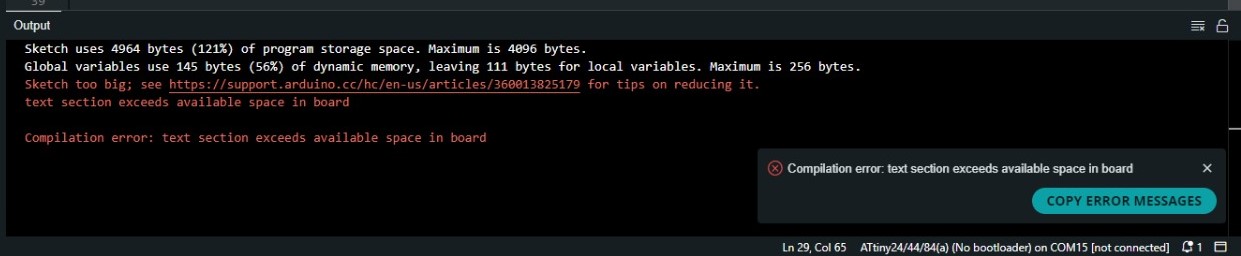
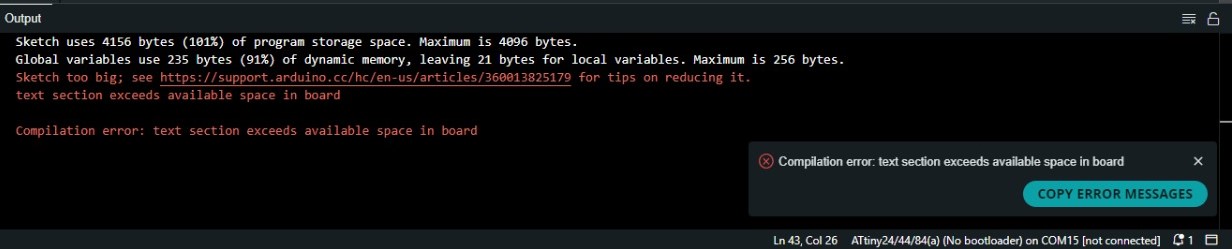
the last two pins in the VL53L0X are used to send a digital signal from there and to send an interrupt function quickly, to control the sensor you have to use a library from the fabricants, the issue now is the size an memmory consumption, i tested many libraries from Adafruit, polulu and open source but they are really heavy, even written in base C, i followed all the instructions and methods provided to reduce the amount of memmory, i get close but not enough.

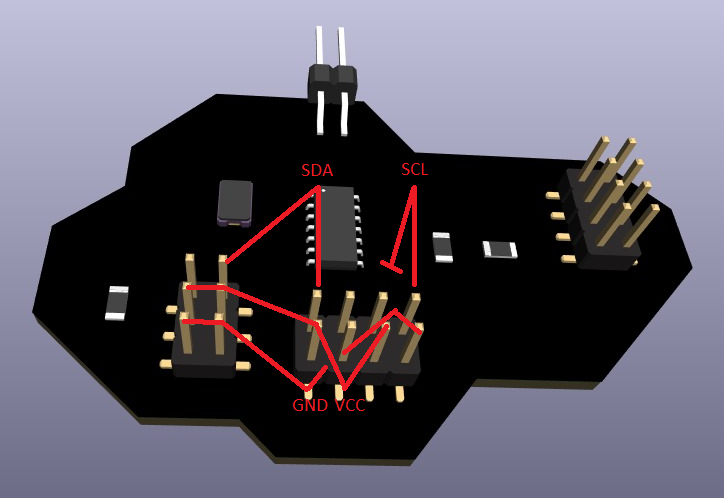
That's why i needed to make a new board and looked foward to the intercomunication week where i saw a need of I2C channels and created the next board: kiCad zip this one is just a connection hub as the xiao esp32 and any xiao is a super compact Board with all the components needed.

With this board i connected the sensor and loaded the next code:
#include "Wire.h"
#include "VL53L0X.h" //Polulu library for this sensor

VL53L0X sensor;
#define HIGH_ACCURACY

void setup()
{
Serial.begin(9600);
Wire.begin();
#if defined HIGH_ACCURACY
  // increase timing budget to 200 ms
  sensor.setMeasurementTimingBudget(200000);
#endif
}

void loop()
{
  Serial.print(sensor.readRangeSingleMillimeters());
  //No need for a delay as the library already includes and need one for better takes
  Serial.println();
}
Hero shots
To test this sensor i made different meassures to a carboard box, what i can determine is that it lacked a little of precision in the close quartets, and then up to 400mm it measurred what was meanned.
For my project this doesn't represent any harm as it will stay static and i will know the undesired variation, just to fix it in the program.
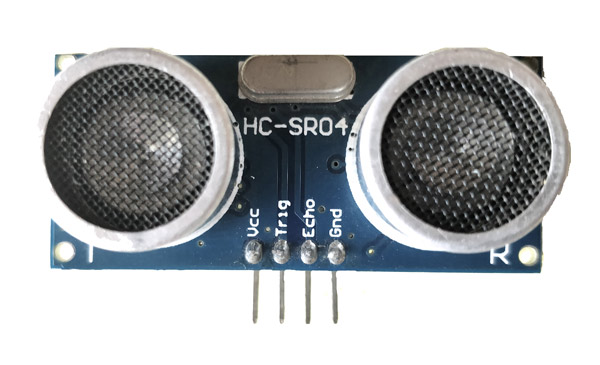
Second Input: ultrasonic sensor
This week final code for the ultrasonic sensor sensor in arduino to download: ultrason.ino.
one of the many advantages that this sensor offers is the easy connection as you only need the power and two digital pins, in addition this can measure on translucent surfaces and do not require libraries, unless you want one for it to do things in the background (not blocking).
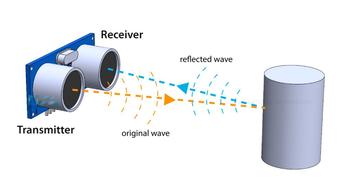
The way it works is by sending a sonic pulse with a certain inclination over one of its coils so that it then rebounds and reaches the other, so that the wave expands and can measure as much as possible to calculate the distance.
The code
const int trigPin = D4;   // Define the trigger pin (D4, GPIO 4)
const int echoPin = D5;   // Define the echo pin (D5, GPIO 5)

void setup() {
  Serial.begin(9600);     // Initialize serial communication
  pinMode(trigPin, OUTPUT);  // Set the trigger pin as an output
  pinMode(echoPin, INPUT);   // Set the echo pin as an input
}

void loop() {
  long duration, distance_cm;

  // Send a short pulse to trigger the sensor
  digitalWrite(trigPin, LOW);
  delayMicroseconds(2);
  digitalWrite(trigPin, HIGH);
  delayMicroseconds(10);
  digitalWrite(trigPin, LOW);

  // Measure the duration of the pulse on the echo pin
  duration = pulseIn(echoPin, HIGH);

  // Calculate distance from the pulse duration (in cm)
  distance_cm = duration / 58.0;

  // Print the distance to the serial monitor
  Serial.print("Distance: ");
  Serial.print(distance_cm);
  Serial.println(" cm");

  delay(100);  // Wait for stability
}
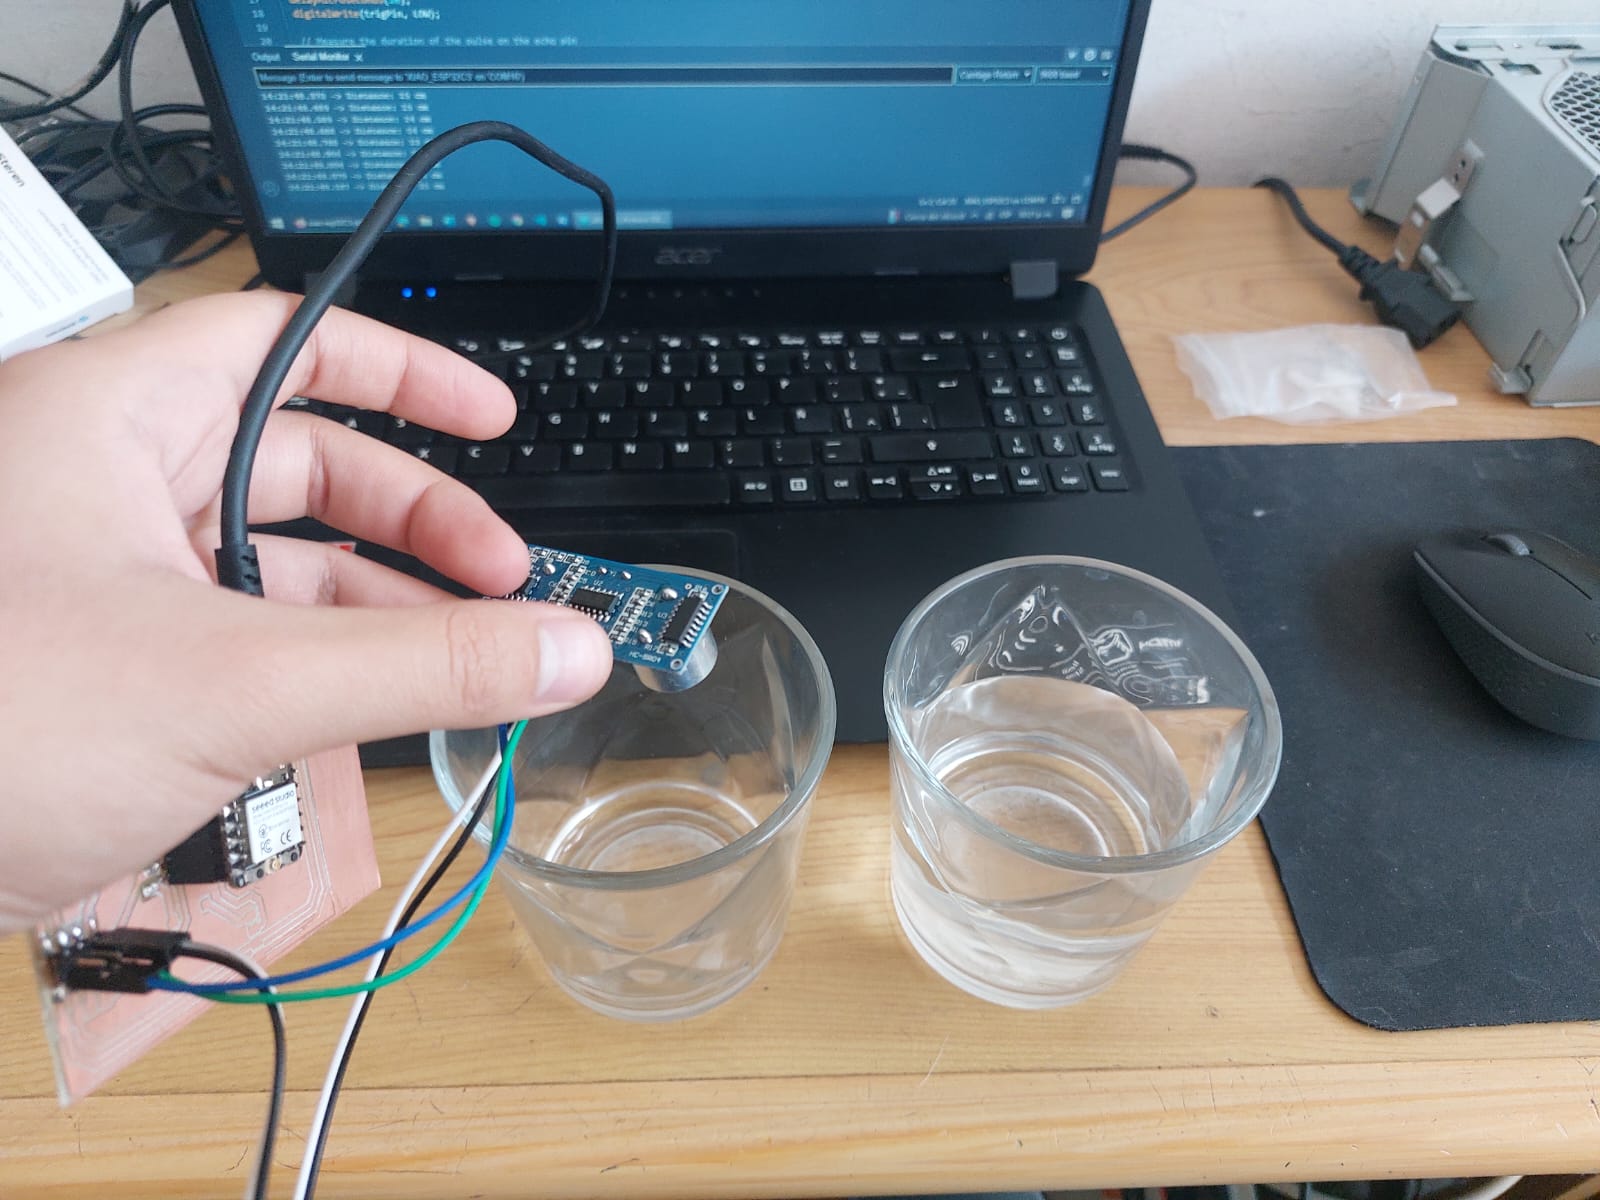
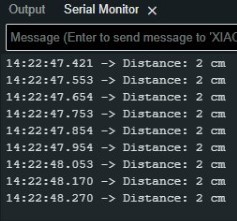
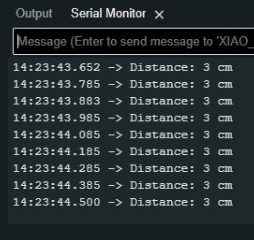
Hero shots part 2
to test this sensor i meassured the amount of water in two glasses, one empty and the other at half, make the meassures and the drink an amount of the second to see if correctly changed, this sensor executed the task perfectly as with the help of a ruler the meassure it did waas correct.

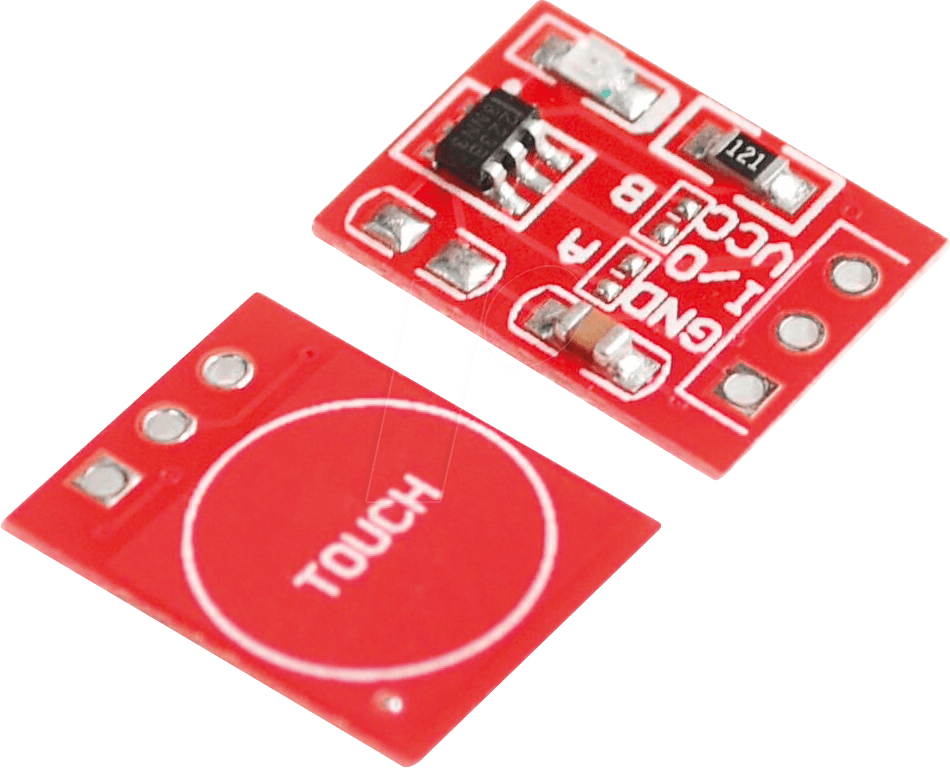
Third Input: ttp223 touch sensor
This week final code for the ttp223 touch sensor in arduino to download: touch.ino.
this sensor follows the same principle as a basic capacitor where there are energy saved in the plates, at the time of touching it passes a very small current necessary to detect a change to generate a signal, it is not necessary to buy a sensor for it, however this sensor is very well built and has a range of detection that is not always necessary to touch it.

Again this sensor doesn't requiere a specific library, just a gpio pin, but for the servo i tried many an this one worked perfectly.
#include "pwmWrite.h" //library for servo in xiao esp32
Pwm pwm = Pwm(); //kind of signal to send
const int servoPin5 = D5; //attacht servo
const int touchsens = D4; //attacht touch
void setup() {
  pinMode(touchsens,INPUT); //set touch sensor as input
}

void loop() {
  int position;  // position in degrees
  int val = digitalRead(touchsens); //save the value of touch sensor
  if (val == HIGH){ //if pressed
    for (position = 0; position <= 180; position += 30) {
      pwm.writeServo(servoPin5, position); //specify the kind of signal where to send
      delay(500);
    }
  }
}
Hero shots part 3
The idea to test the sensor is a circuit in which when touching the sensor command to rotate a servo, as you can see in the video it is not necessary to touch the sensor so I plan to use it at 90° where a sprayer is touched and it is detected by the touch sensor.
Like i said before the pwm library worked fine, but with an update of the board now in the construction of the final project it failed so i choose the esp32servo library now:
Second code for the ttp223 touch sensor in arduino to download: touch2.ino.
#include "ESP32Servo.h"
Servo myservo;  // create servo object to control a servo
const int touchsens = D4; //attacht touch
const int minPos = 0;  // define the step size
const int maxPos = 180;   // maximum servo angle
const int Pos = 0;   // maximum servo angle

void setup() {
  myservo.attach(D5);  // attaches the servo on pin 9 to the servo object
  myservo.write(pos);
  pinMode(touchsens,INPUT); //set touch sensor as input
}

void loop() {
  int val = digitalRead(touchsens); //save the value of touch sensor
  if (val == HIGH){ //if pressed
    for (pos = 0; pos <= 180; pos += 30) {
      myservo.write(pos);
      delay(500);
    }
  }
}
Final reflection
the touch sensor seemed to me like a simple device that does not require a direct interaction with it, more than a finger proximity sensor, I plan to use it to detect an interaction with another mechanism in my project, while between the two distance sensors vl53 seemed very useful to me as it allows very precise measurements without the need to occupy a lot of space that is something I am looking for for my project. However, it was a real problem the amount of space their libraries require. While working with my project I saw that what I really needed was an interruption sensor but I can work with the vl53 adjusting the meassures in the programming besides that it's cheaper.