Week 14: Interface and application programming
Checklist for this week:
- ☑ Linked to the group assignment page
- ☑ Documented your process
- ☑ Explained the GUI that you made and how you did it
- ☑ Explained how your application communicates with your MCU board
- ☑ Explained any problems you encountered and how you fixed them
- ☑ Included orginal source code (or a screenshot of the app code if that's not possible)
- ☑ Included a 'hero shot' of your board
Group Assignments
- Compare as many tool options as possible
- Document your work on the group work page and reflect on your individual page what you learned
Individual Assignments
- Write an application that interfaces a user with input and/or output device(s) on a board that you made
Blynk IoT solutions
This week, I commenced my work on interface and application programming, specifically focusing on developing an application that interacts with a user through an input and/or output device of my own creation.
My thoughts are consumed by the Whale project constantly (of course). I am currently struggling (again) to generate a compelling idea for this week's assignment. Consequently, I turned to Blynk, a platform that offers a drag-and-drop interface for creating mobile applications to control and monitor other microcontrollers like ESP32Cs. Blynk provides a library of pre-built widgets such as buttons, sliders, graphs, and gauges, which can be customized to meet specific requirements.
To use Blynk, I followed the instructions outlined in the explanatory document. The process was straightforward, involving the creation of an account, downloading the Blynk App on my android phone, and creating a project. Each project consists of a mobile app and a hardware component. Blynk offers a range of libraries and APIs that facilitate the connection between hardware and the Blynk Cloud, enabling two-way communication between the app and the device. The app's widgets can be utilized to control devices, receive sensor data, and send alerts or notifications. Collaboration is also possible through Blynk's project sharing feature, allowing for the joint development of IoT solutions.
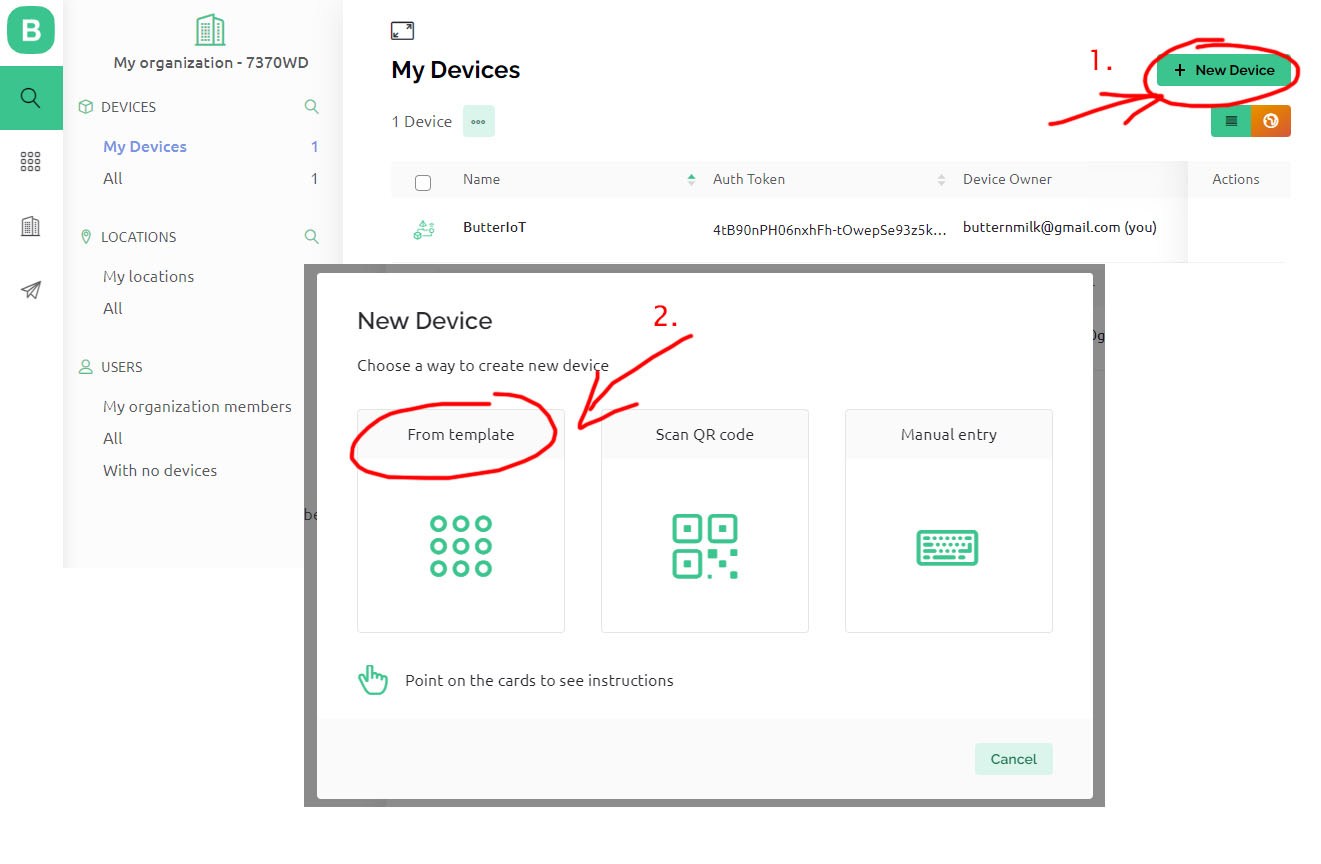
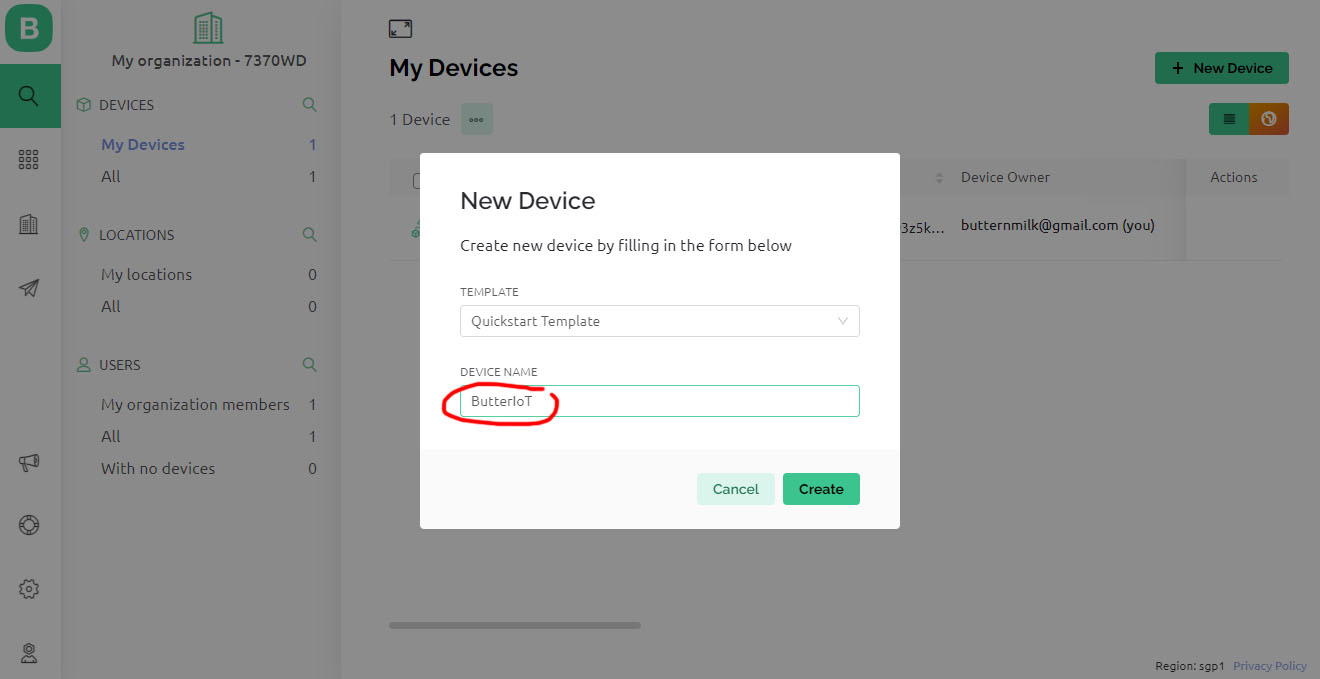
As mentioned earlier, creating an account with Blynk is necessary, and it is a free process that requires a valid email address. Once the account is created, you will be guided to create a new device (which I named "ButterIoT"), where you can select a template to initiate the application creation process. In the setting panel, we need to select ESP32 as our hardware and WiFi as the connection type.

The next step is to create Datastreams for our application. This involves defining the components such as digital or analog pins. I want to create an online ON/OFF control switch for my LED. For this, I simply need an LED and a digital pin assigned to it. To create a new datastream, I select "Digital."
Upon selecting "Digital," a new interface appears, allowing me to choose the pin number (D10). Click "Create" button to complete the step.

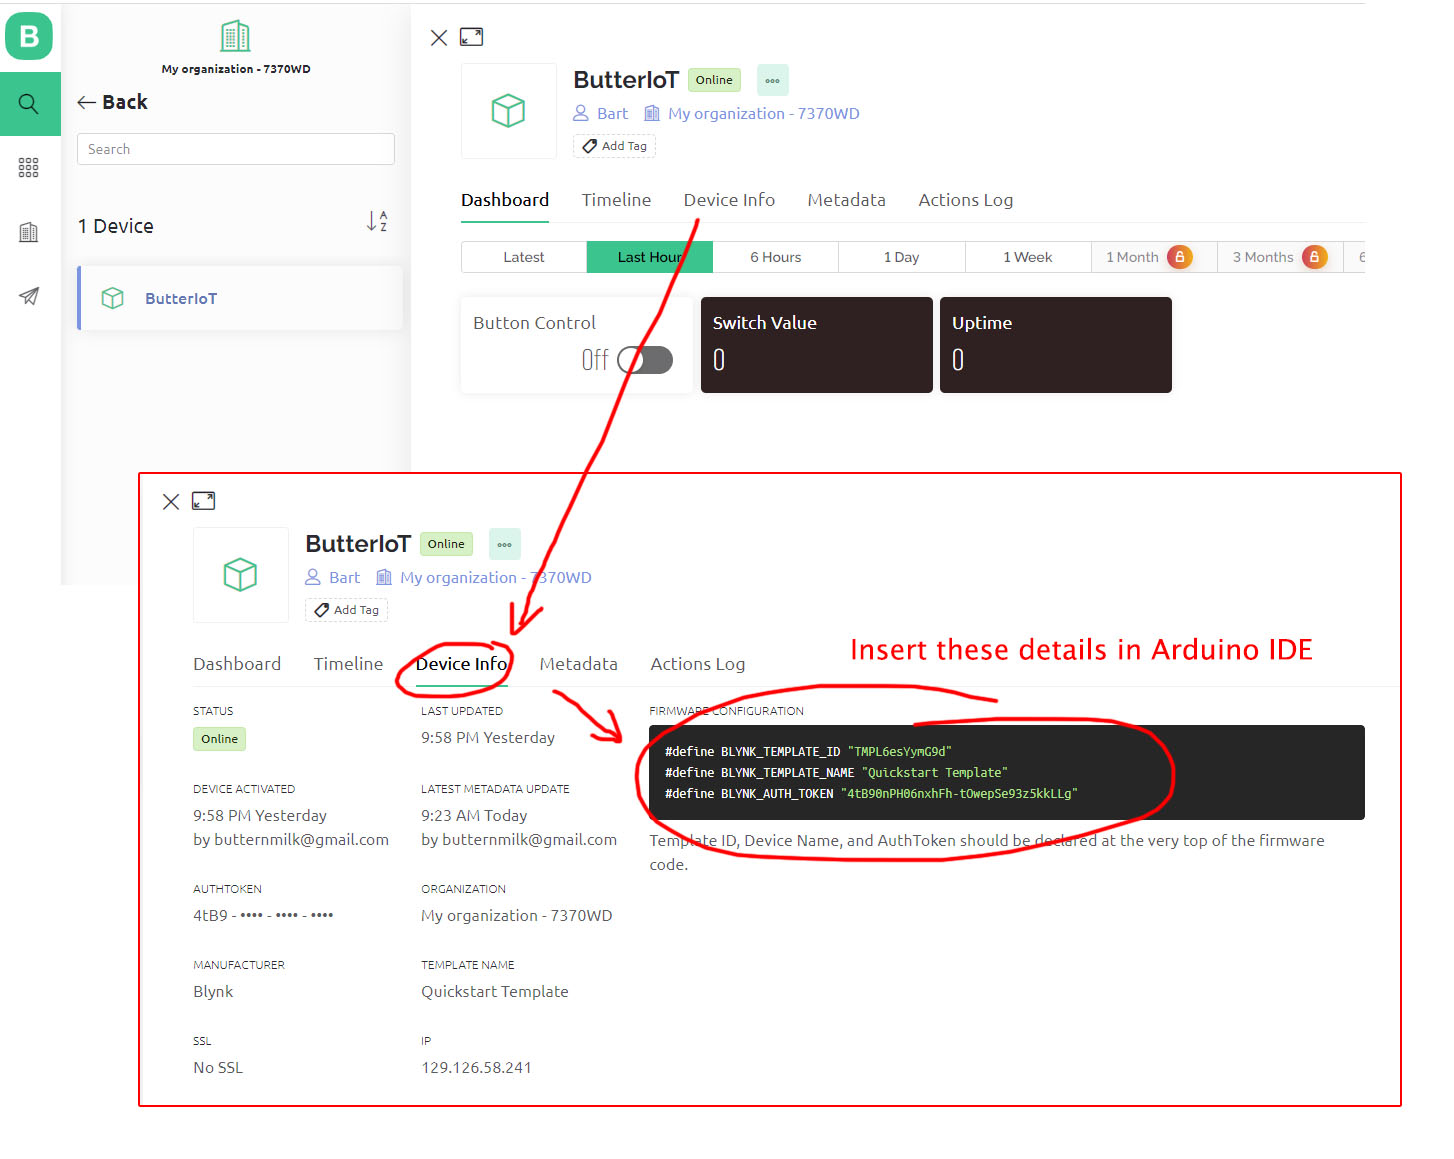
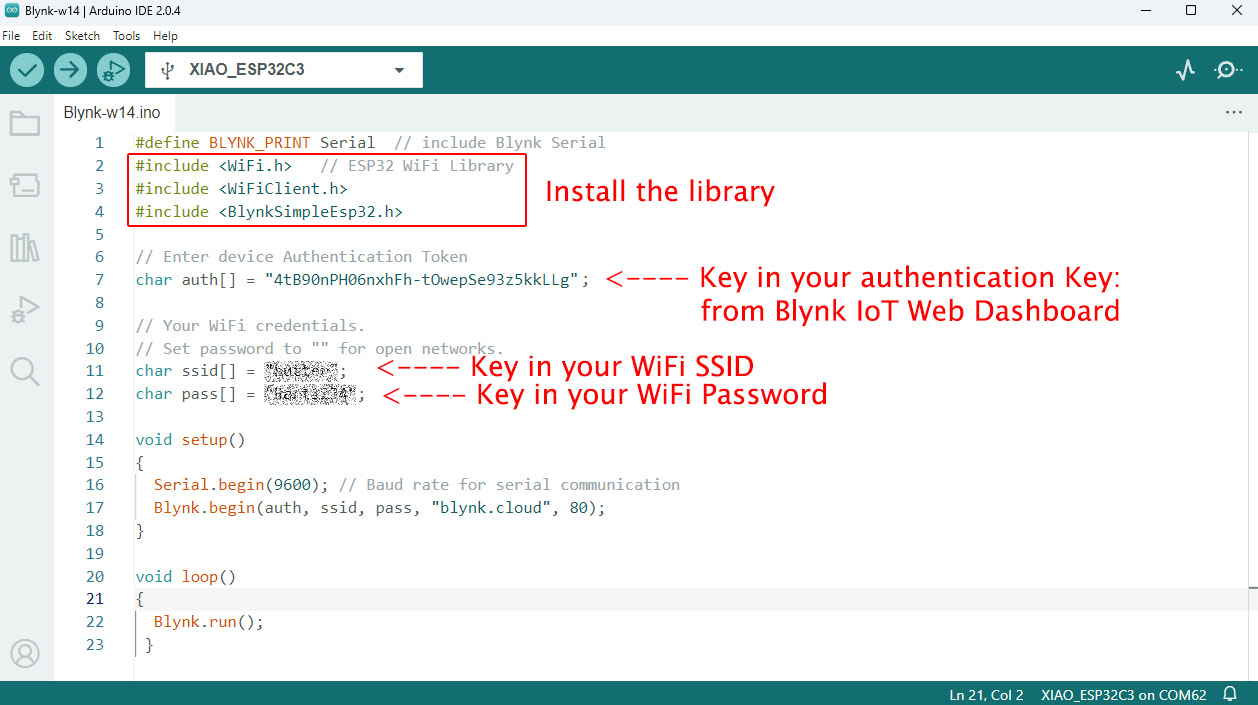
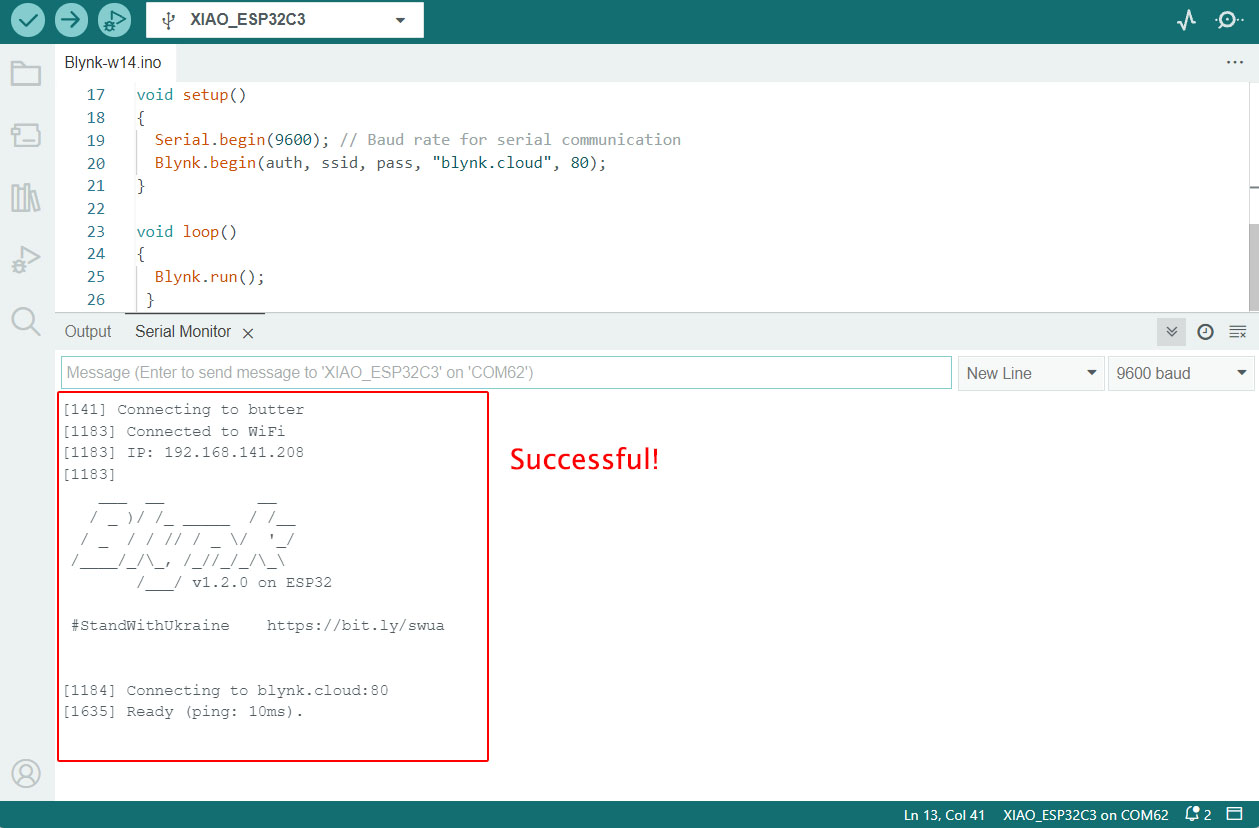
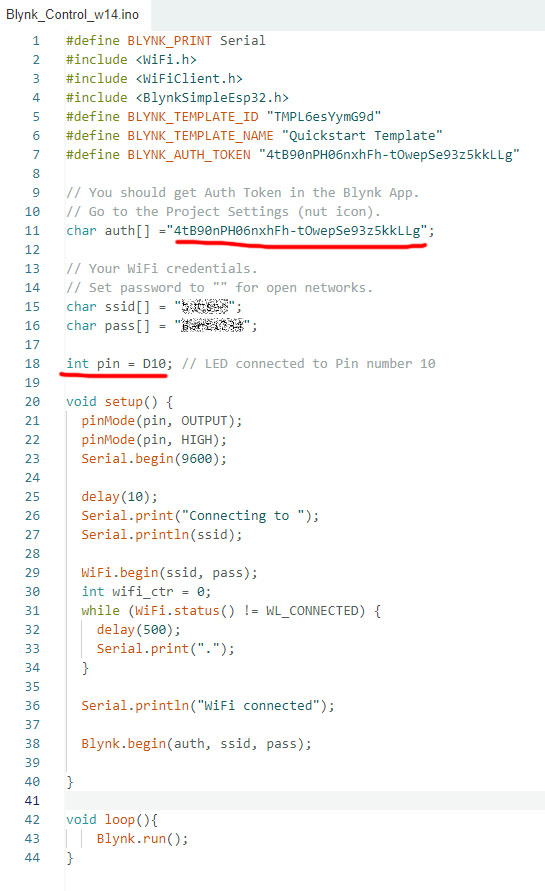
After creating the first device, you will be directed to an interface displaying the device information. Accessing the Device Info section will provide you with the required Authentication Key, which needs to be copied and pasted into the IDE code. After completing the code setup, it's time to test the connection to WiFi with my XIAO ESP32C3 microcontroller. By compiling and uploading the code, the serial monitor should display a list of details and information, including the WiFi connection, IP address, connection to the Blynk Cloud, and the Blynk logo design.
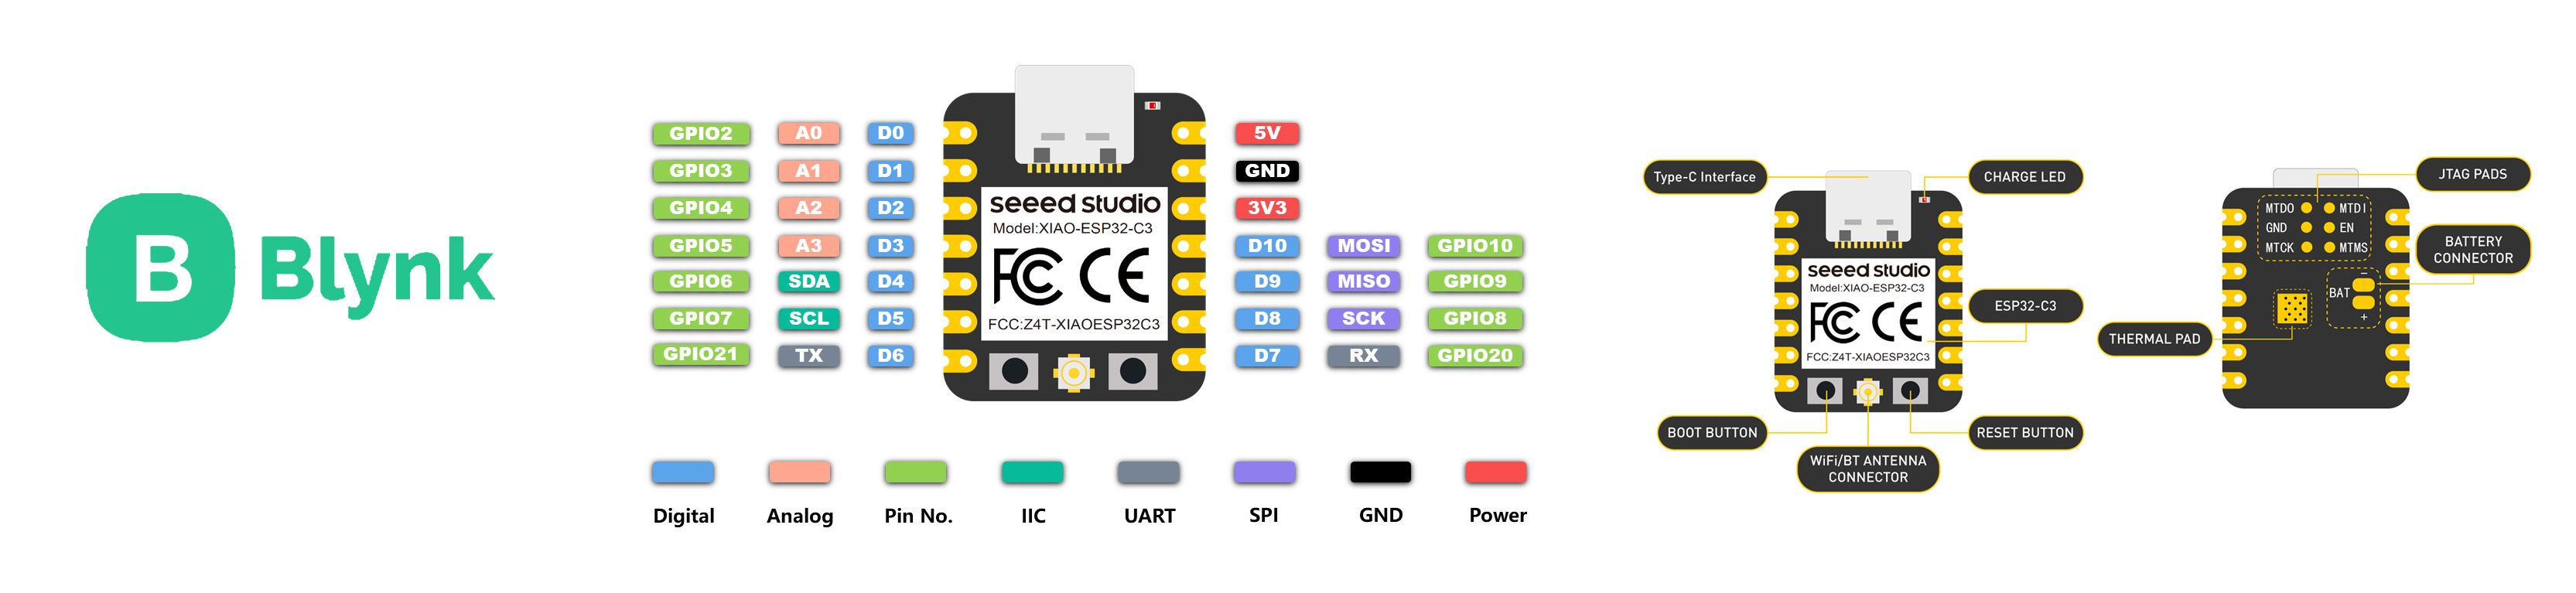
Setup XIAO ESP32C3
XIAO ESP32C3 is utilized for its feature of WiFi/ Bluetooth dual-mode chip and remote communication. The hardware overview images of the XIAO ESP32C3 and software setup in the Arduino IDE program (which involved downloading the additional board manager JSON file) are shown below.
https://raw.githubusercontent.com/espressif/arduino-esp32/gh-pages/package_esp32_index.json
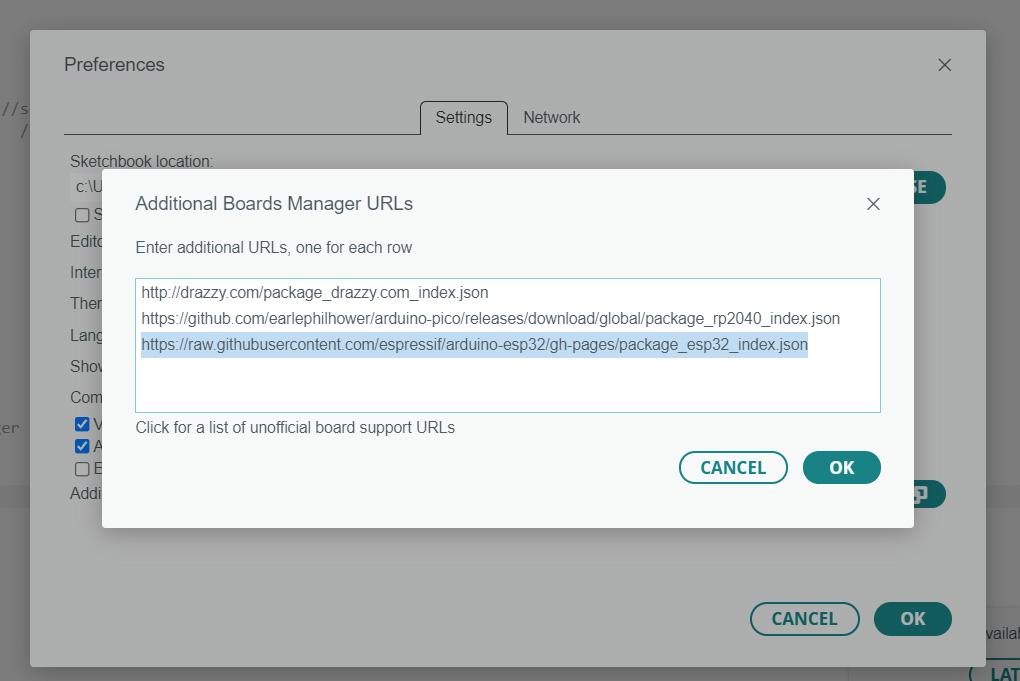
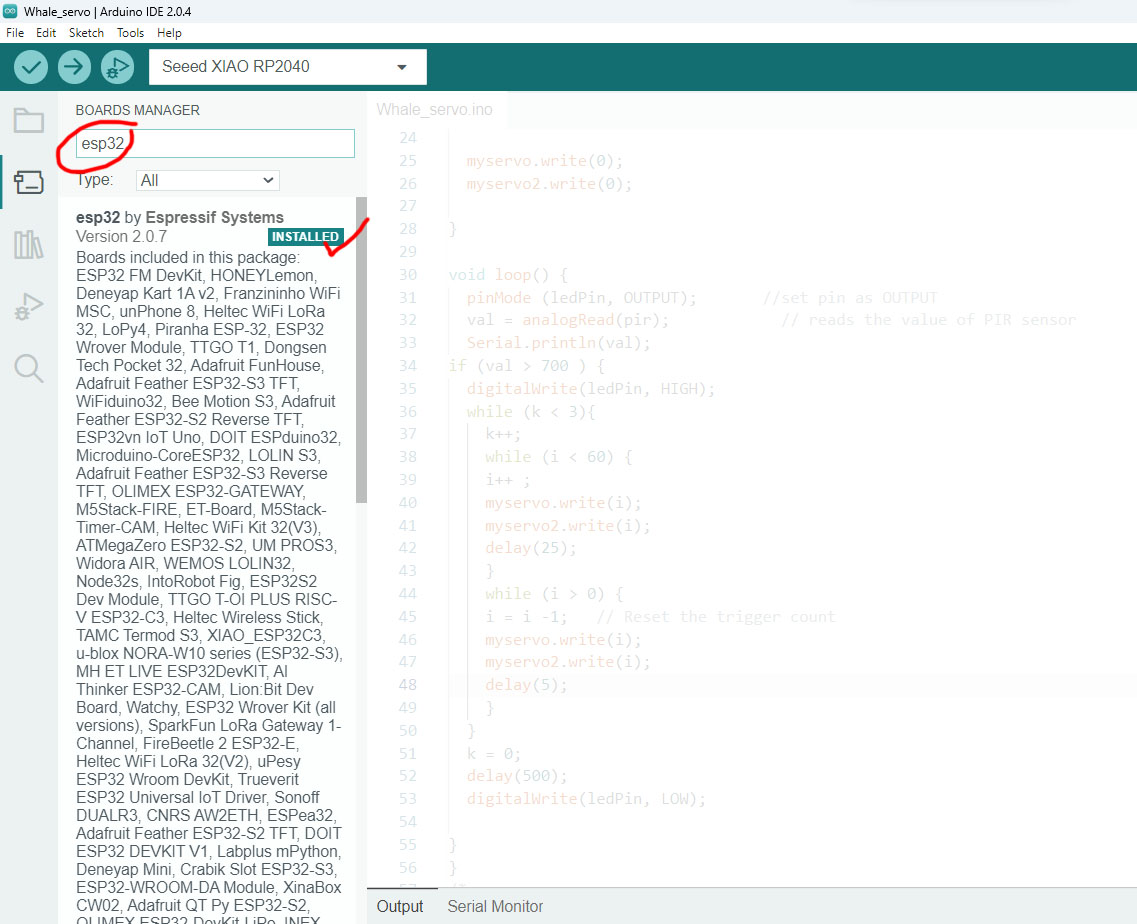
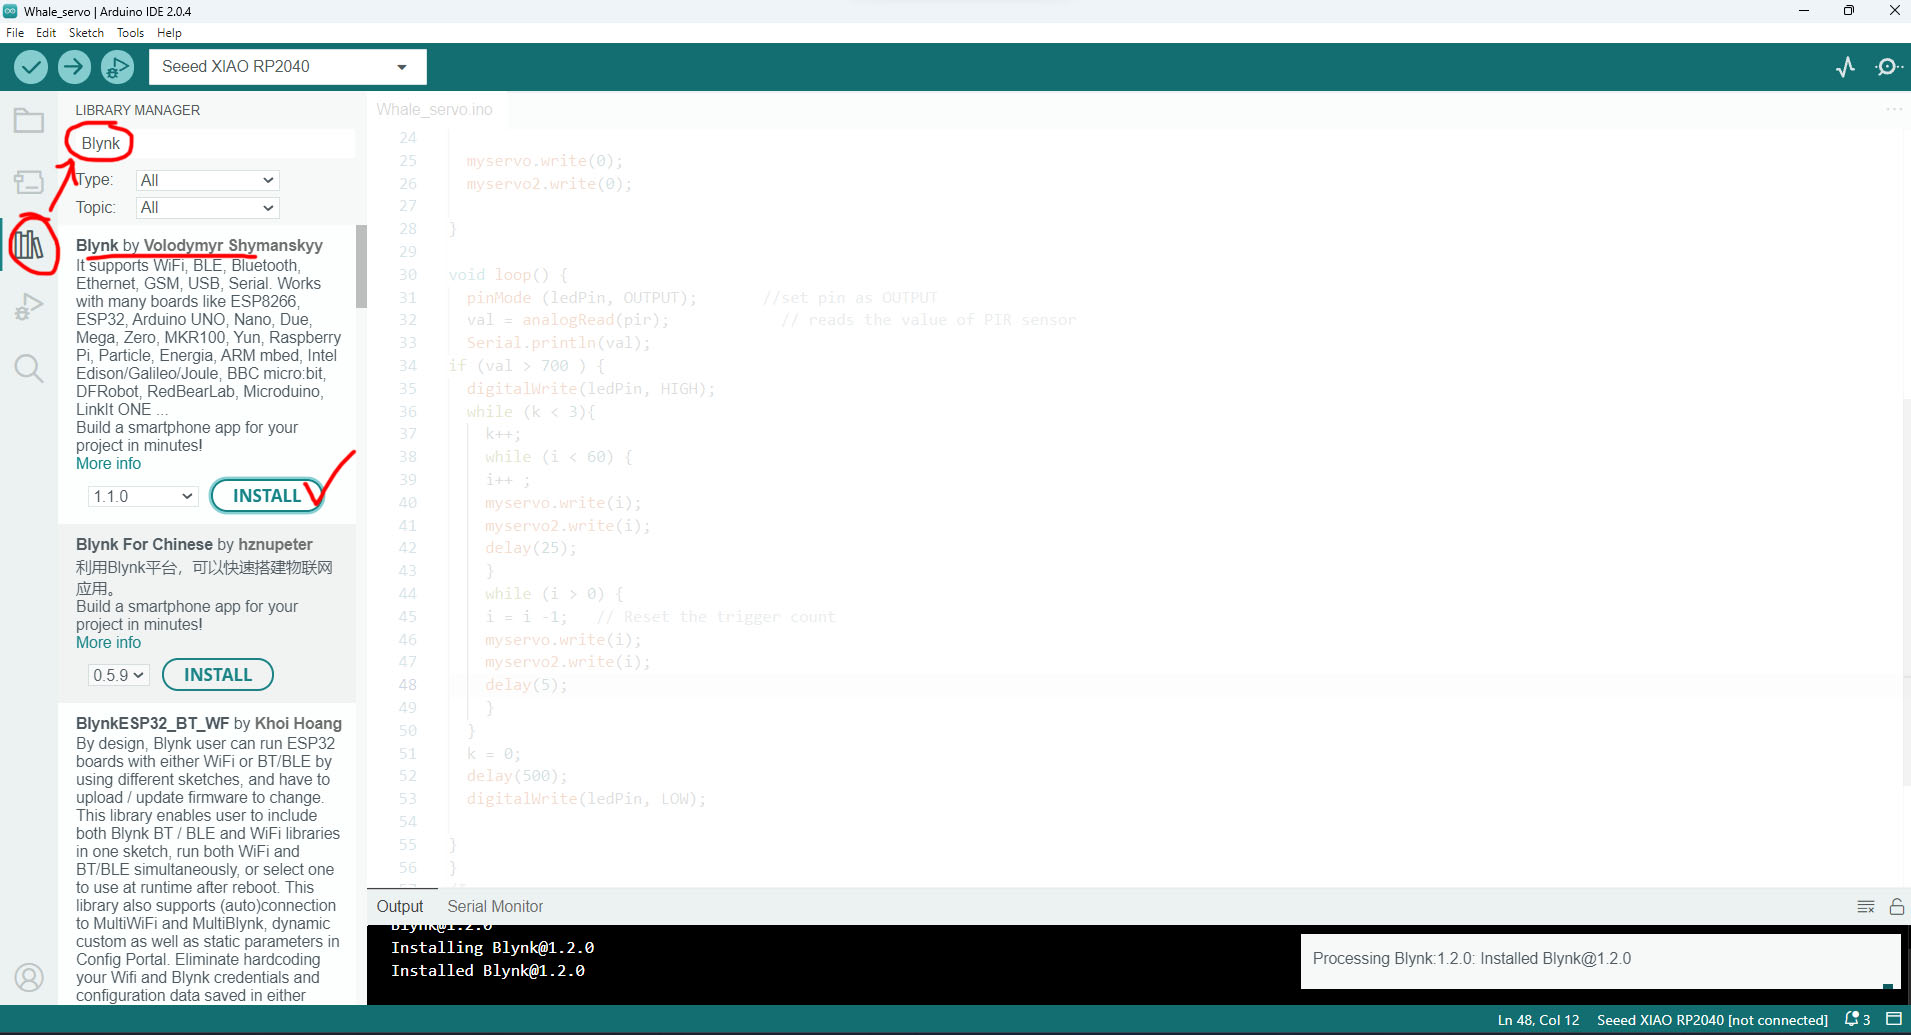
Following the software setup, I installed the ESP32 Board to enable code uploading to the XIAO ESP32C3 microcontroller. After the board installation, I selected XIAO ESP32C3 from the board library. Subsequently, I downloaded the Blynk library from the library manager within the IDE program. This library provides the necessary components for integrating Blynk into the project.
After the library installation, I tested a code snippet received from Blynk after registering an account. This code allowed me to establish a connection with the Blynk Cloud Server, a crucial step in linking the device and the app. I also entered my WiFi SSID and password (if applicable) in the provided fields. Obtaining the authentication key was the next step, which could only be obtained through the Blynk Web Dashboard after registration.
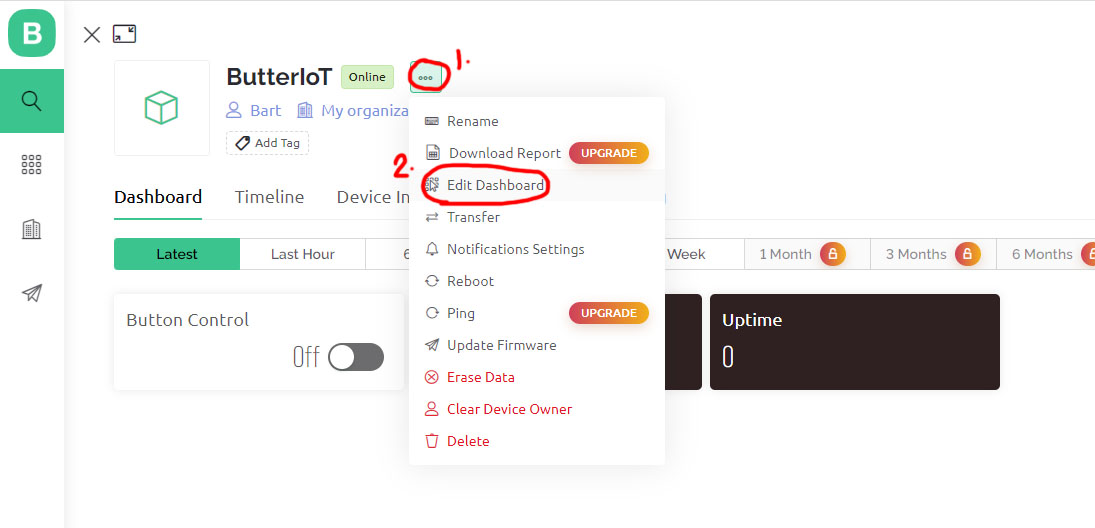
Back to Blynk on the Browser
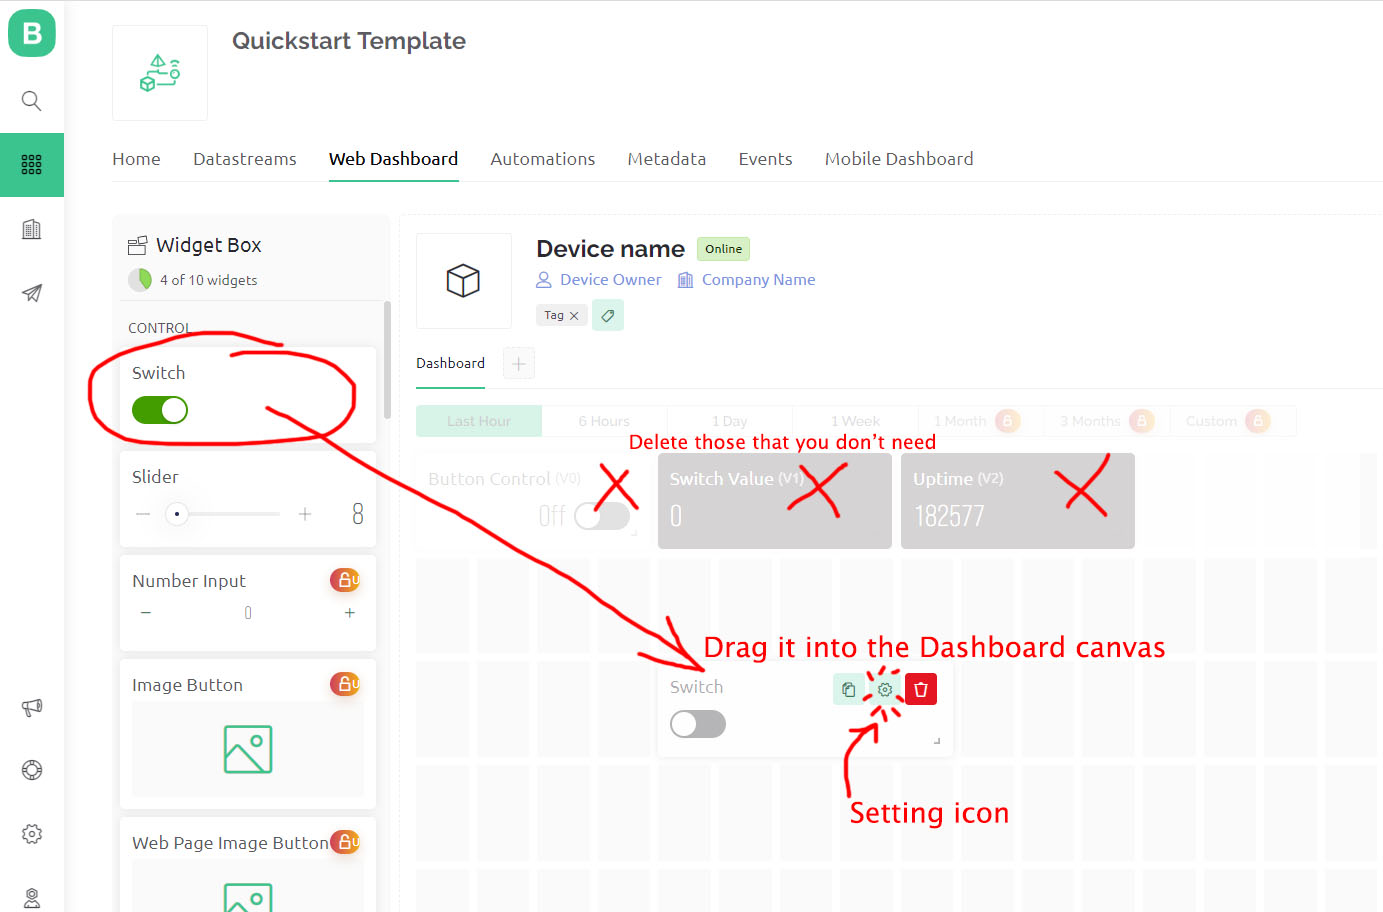
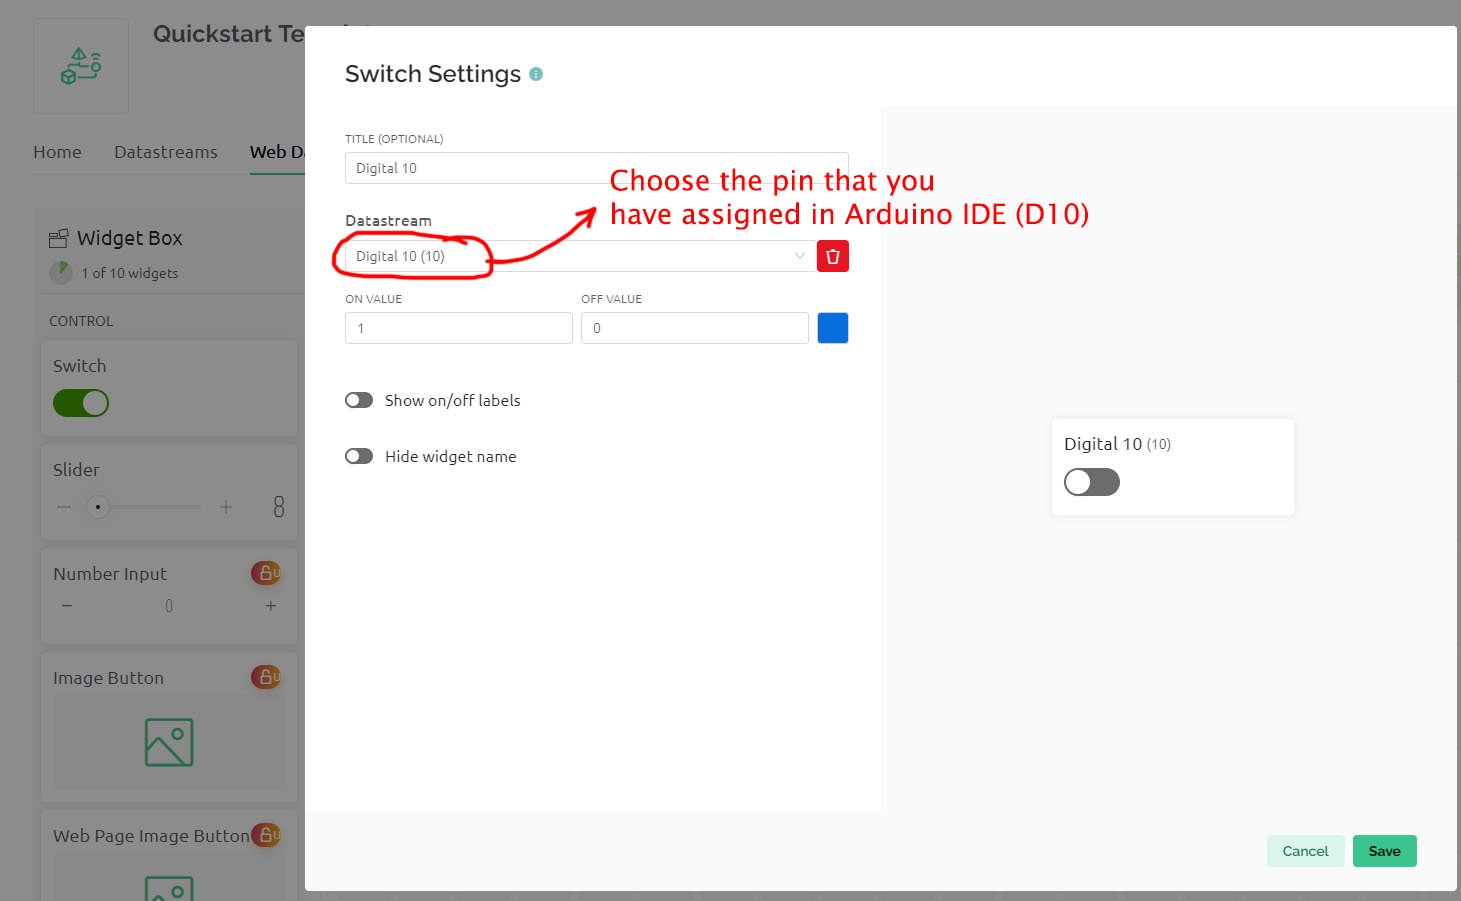
With the Datastreams set up, we proceed to the Web Dashboard to design the interface controller. The Widget Box provides a selection of controls and components for app design. In my case, I only require a switch control to turn the LED on and off. I choose the Switch Control from the left column box and drag it onto the dashboard canvas. Then, I select the green Setting Icon.
Upon selecting the Setting Icon, a new interface appears, presenting the Switch Setting options. Here, I assign the correct Pin (D10) to the switch and click "Save". Finally, we return to the Arduino IDE program and upload the code.
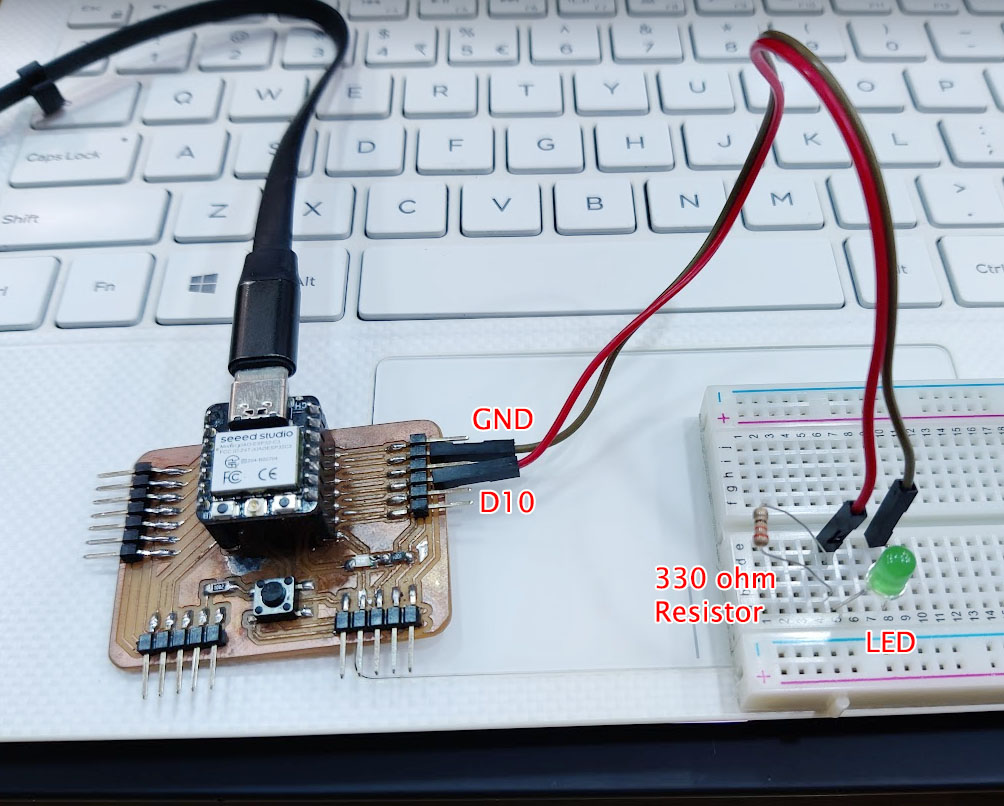
The last step is to test if our application is working. We navigate to the Blynk IoT Web Dashboard, select the switch, and toggle it on and off to observe if the LED responds according to our application. Additionally, I should mention that we need to prepare the hardware components as well. The required hardware components include an LED, a resistor (330Ω), a breadboard, jumper wires, and the PCB and microcontroller for the simple application test.
To wire up the components, we connect the Pin D10 of the PCB and XIAO ESP32C3 microcontroller, as well as the GND pin. It's crucial to place a resistor between the LED and the digital pin (D10) to prevent the LED from burning out.
Voila! It did NOT work! Sadly but truly, it failed. I try to go back to the steps and check for any mistake. I will have to come back to this in future.
Blynk.Console App on Mobile Phone
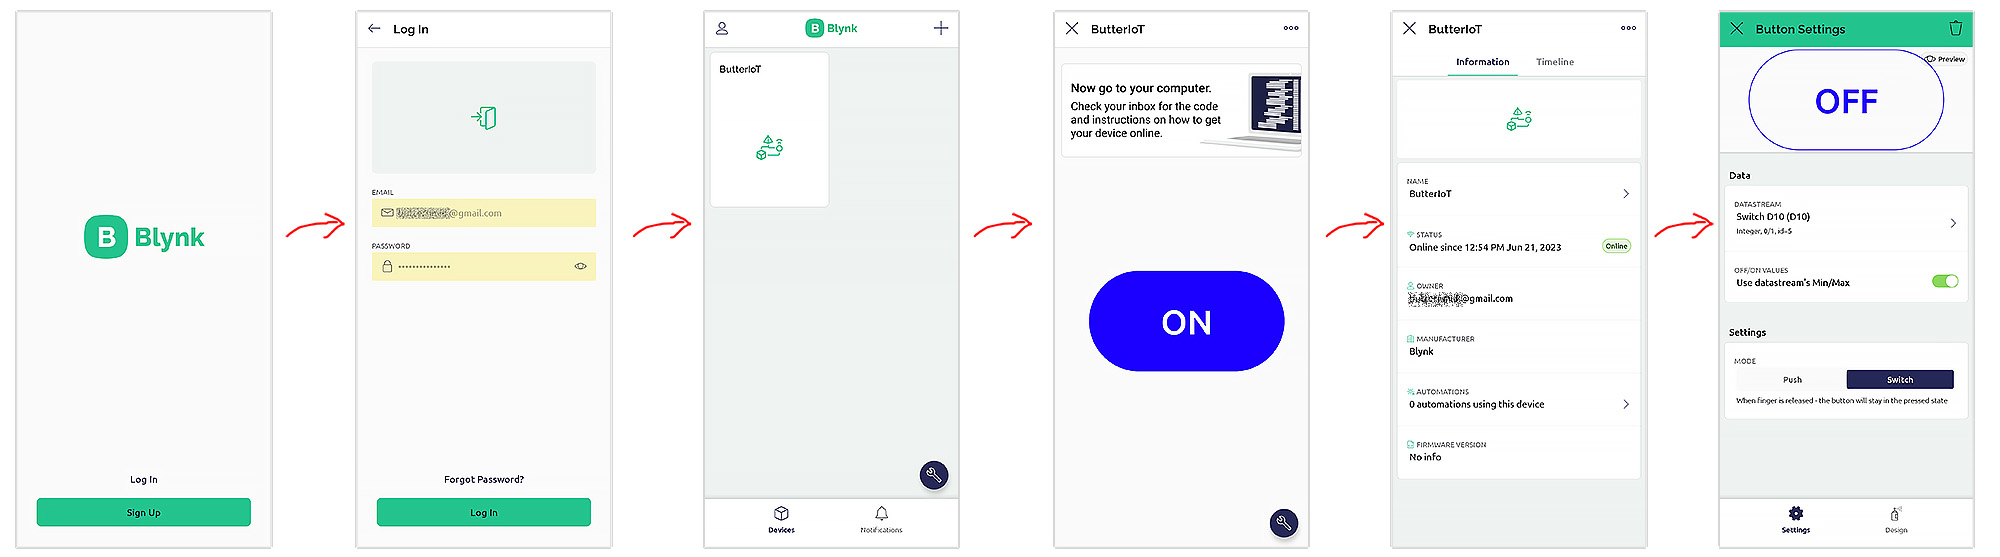
The first test is UNsuccessful though I manage to get my device online! Now, the next step is to bring the application to our mobile devices. We start by installing the Blynk App, which can be downloaded for free from the Apple Store or Play Store. After installation, we just need to login and the device "ButterIoT" is synchronized on the mobile screen. This is very different experience from the tutorial I am following. We don't need to create a new template again.
Developer Mode
To access the developer mode, we click on the small Spanner Icon located at the bottom-right corner. This mode allows us to explore all the features and functions of "Blynk.Console". Within the developer mode, we are presented with an empty canvas page with a grid. To add control components to our app design, we click on the small "+" icon in the top-right corner, which opens the Widget Box.
As mentioned earlier, for my application, I only require a switch to turn the LED on and off. Therefore, I select the Button control from the Widget Box and drag it onto the canvas. After placing the button control, I click on it, which opens a new interface displaying data and settings. Here, I assign the designated digital pin (D10) to the button, which we created earlier in the Blynk IoT Web Dashboard. Once the digital pin assignment is complete, we exit the Developer Mode, and now we can test the application. The following video demonstrates the application in action.
Oh No! The LED On/Off app is NOT working.
Reflection
This week's assignment posed some difficulties for me, even though I found it interesting and full of potential in my future projects. It took me long enough to grasp the concepts of Blynk IoT alone. Additionally, I faced difficulties in getting my device up and running, which proved frustrating at times. Nevertheless, with determination, I will succeed in the creation of a simple LED On/Off app. This exercise has given me the confidence to tackle more IoT projects (in future) and utilize this newfound knowledge to create a smart system for controlling various home appliances.
As is frequently the case in life, achieving success is NOT always guaranteed. It is imperative for us to acknowledge the inherent limitations in our abilities. Nonetheless, it is crucial that we remain committed to a continuous process of learning and growth.
Hero Shot
This week lacks a hero shot, yet we successfully achieved the one of the objectives of bringing the device online through Blynk.
Continuos Learning after 23 June 2023
Our instructor graciously dedicates time to review the weekly assignment with me. The video provided below showcases bidirectional data flow between the hardware and the server.
Reflection: Some of the Blynk tutorials on the internet can be quite misleading because they are based on Blynk 1.0, which has been discontinued. We need to look for Blynk 2.0 examples. Blynk 1.0 servers were shutdown in December 2022 and no longer available. Blynk 1.0 used virtual pins while Blynk 2.0 uses Datastreams.