W15. INTERFACE AND APPLICATION
We experimented with some web-based applications that were not only enjoyable, but also very user-friendly.
The first was ”MIT App Inventor”, which is an intuitive and visual programming environment that allows everyone – even children – to build fully functional apps for Android phones, iPhones, and Android/iOS tablets.
To use this web program, you need to open an account. Once you sign in, you can create apps by accessing your library or starting a new one. If you're new to the program, a good starting point is to go to the ”Try a Tutorial” section on the front page. From there, you can choose a tutorial. I selected "Hello Purr", it is a fun and basic-level tutorial to get you started.
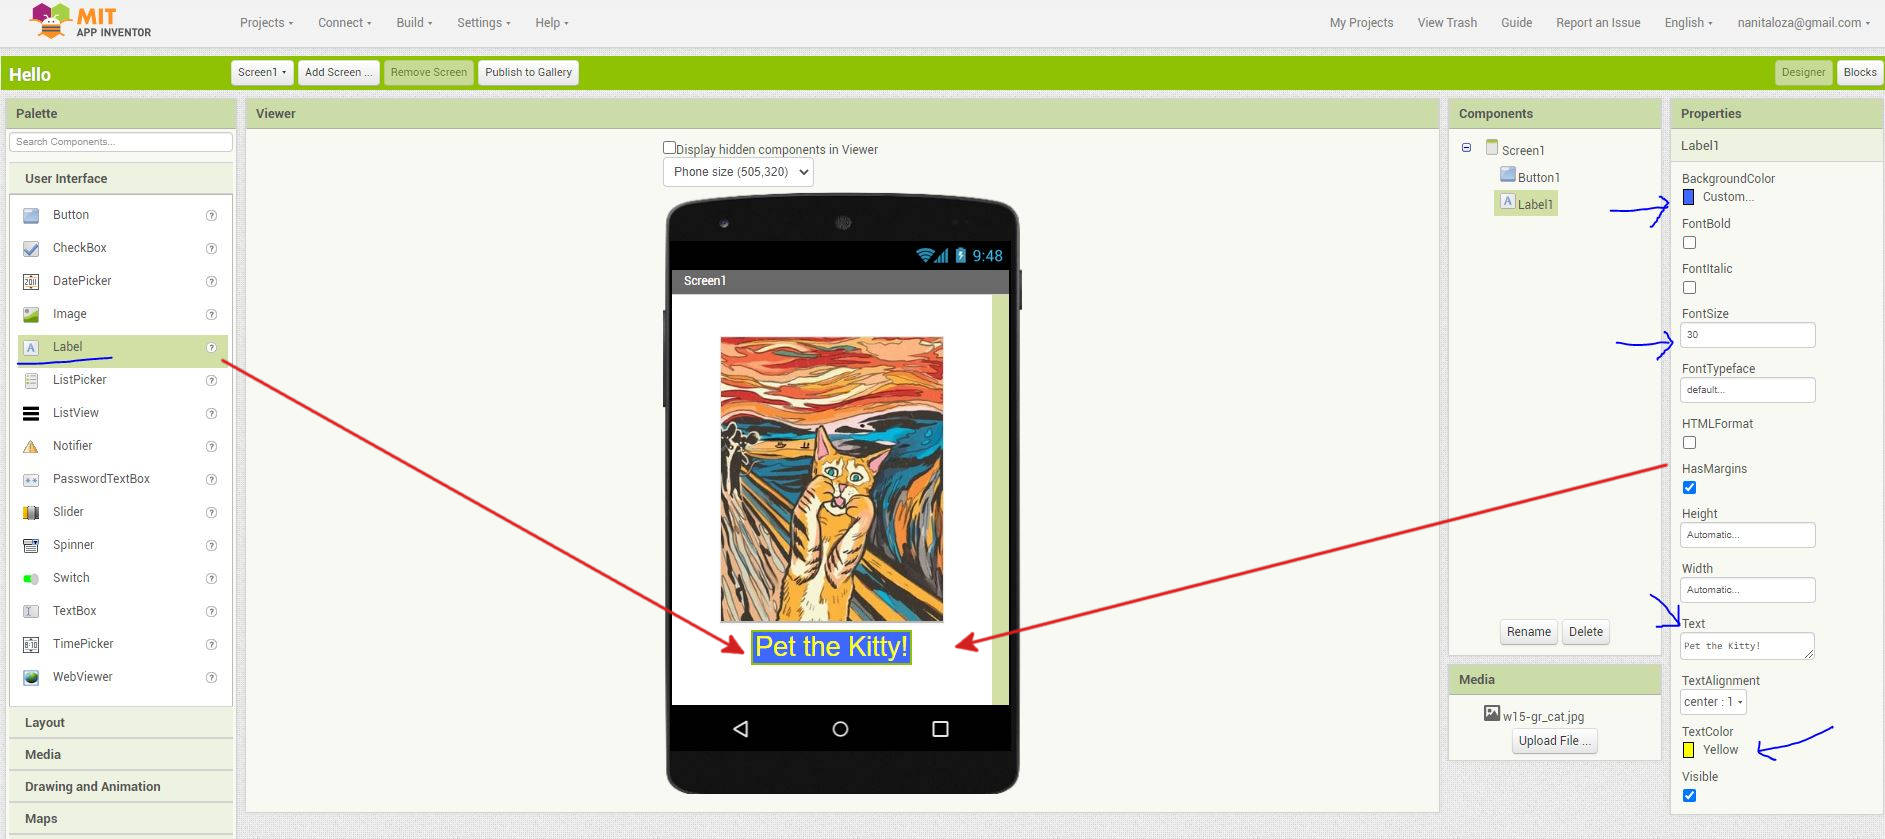
When you create an app, you will mainly work with two windows - the “Designer” and the “Blocks”. In the Designer window, you can add various components to your app such as images, media, text, and maps using the palette on the left-hand side.
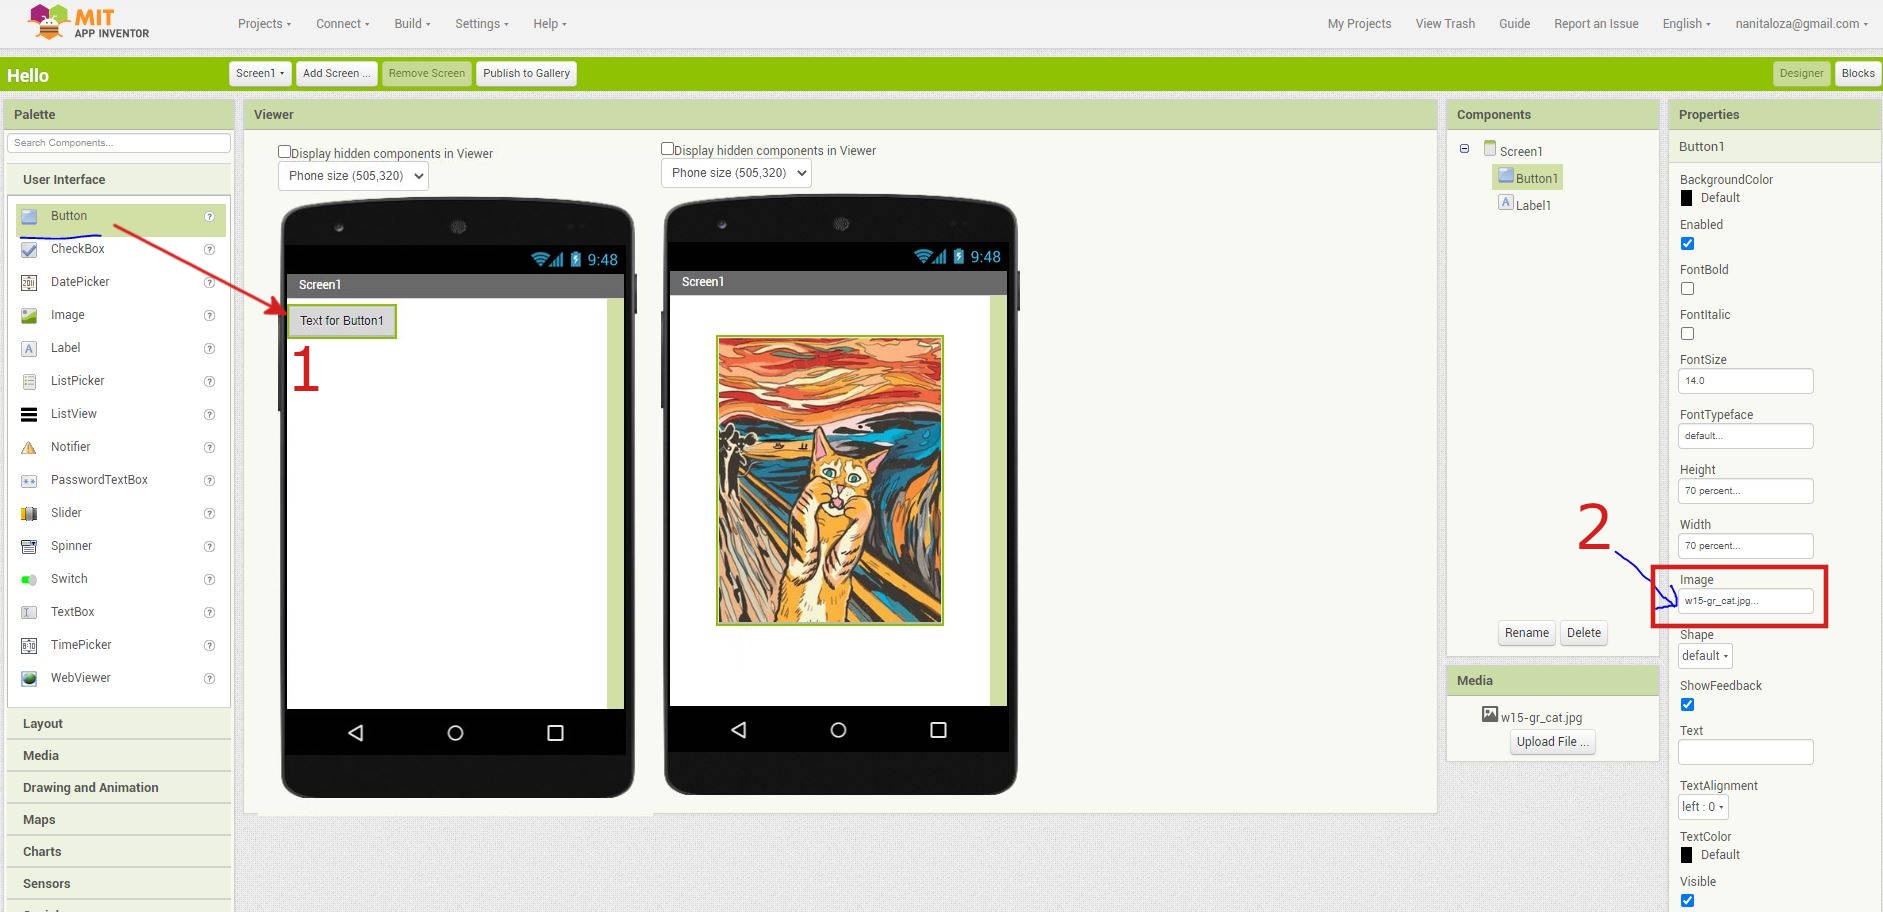
The “Designer” window has a column on the right-hand side where you can modify the properties of the components in your app. This includes changing colors, adjusting sizes, and adding files, among other options.
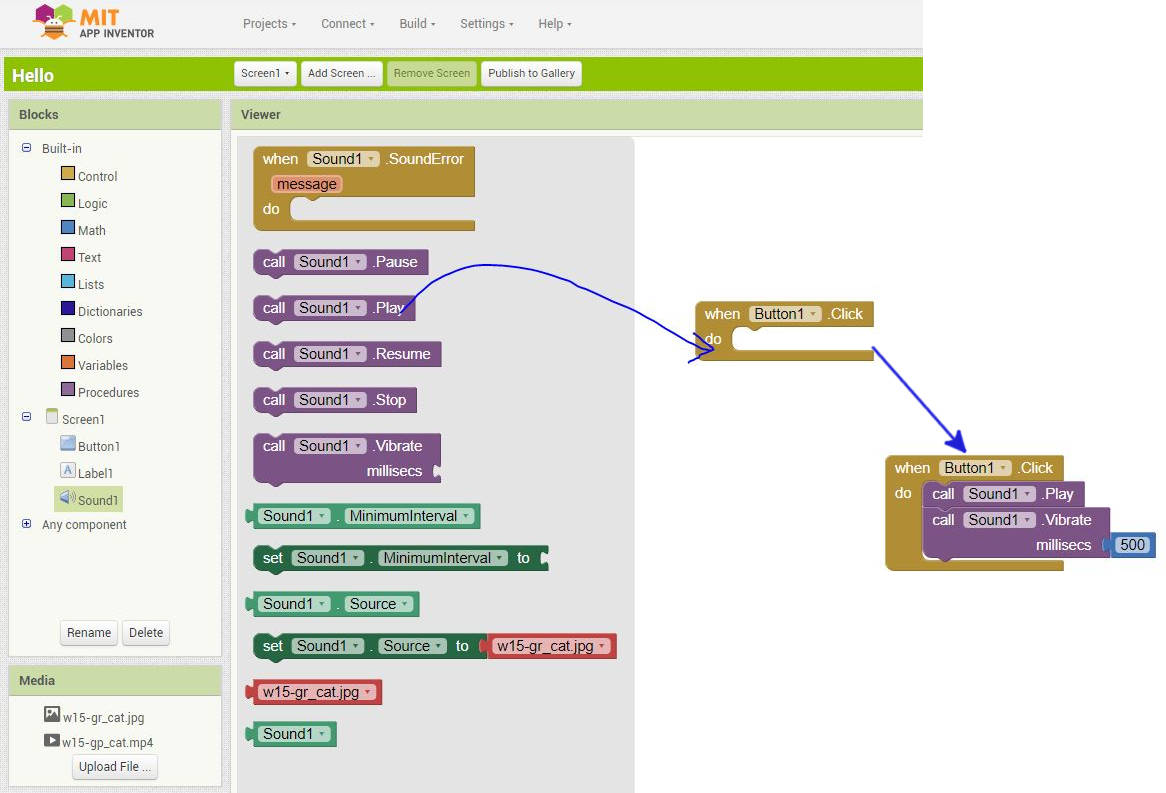
The Blocks window is where you can write the code for your app. On the left-hand side of the window, there is a column where you can select the type of "Event Handler" and the "Command" that you want to assign to that event. These blocks are connected to create a desired outcome. In this case, it is to make a sound when the cat is stroked when using the App.
As you design and code your app, you have the option to test it in real-time by uploading it onto a tablet or mobile phone. Once the app is complete, you can share it with others.
The next application we experimented with is Processing.
Processing is an open source IDE that is able to create GUI for applications like Arduino. It is aso being describe as a digital sketchbook where coders can create interactive graphics.
Taking reference from a project found in hackster.io, a simple GUI to control servo motors was created.
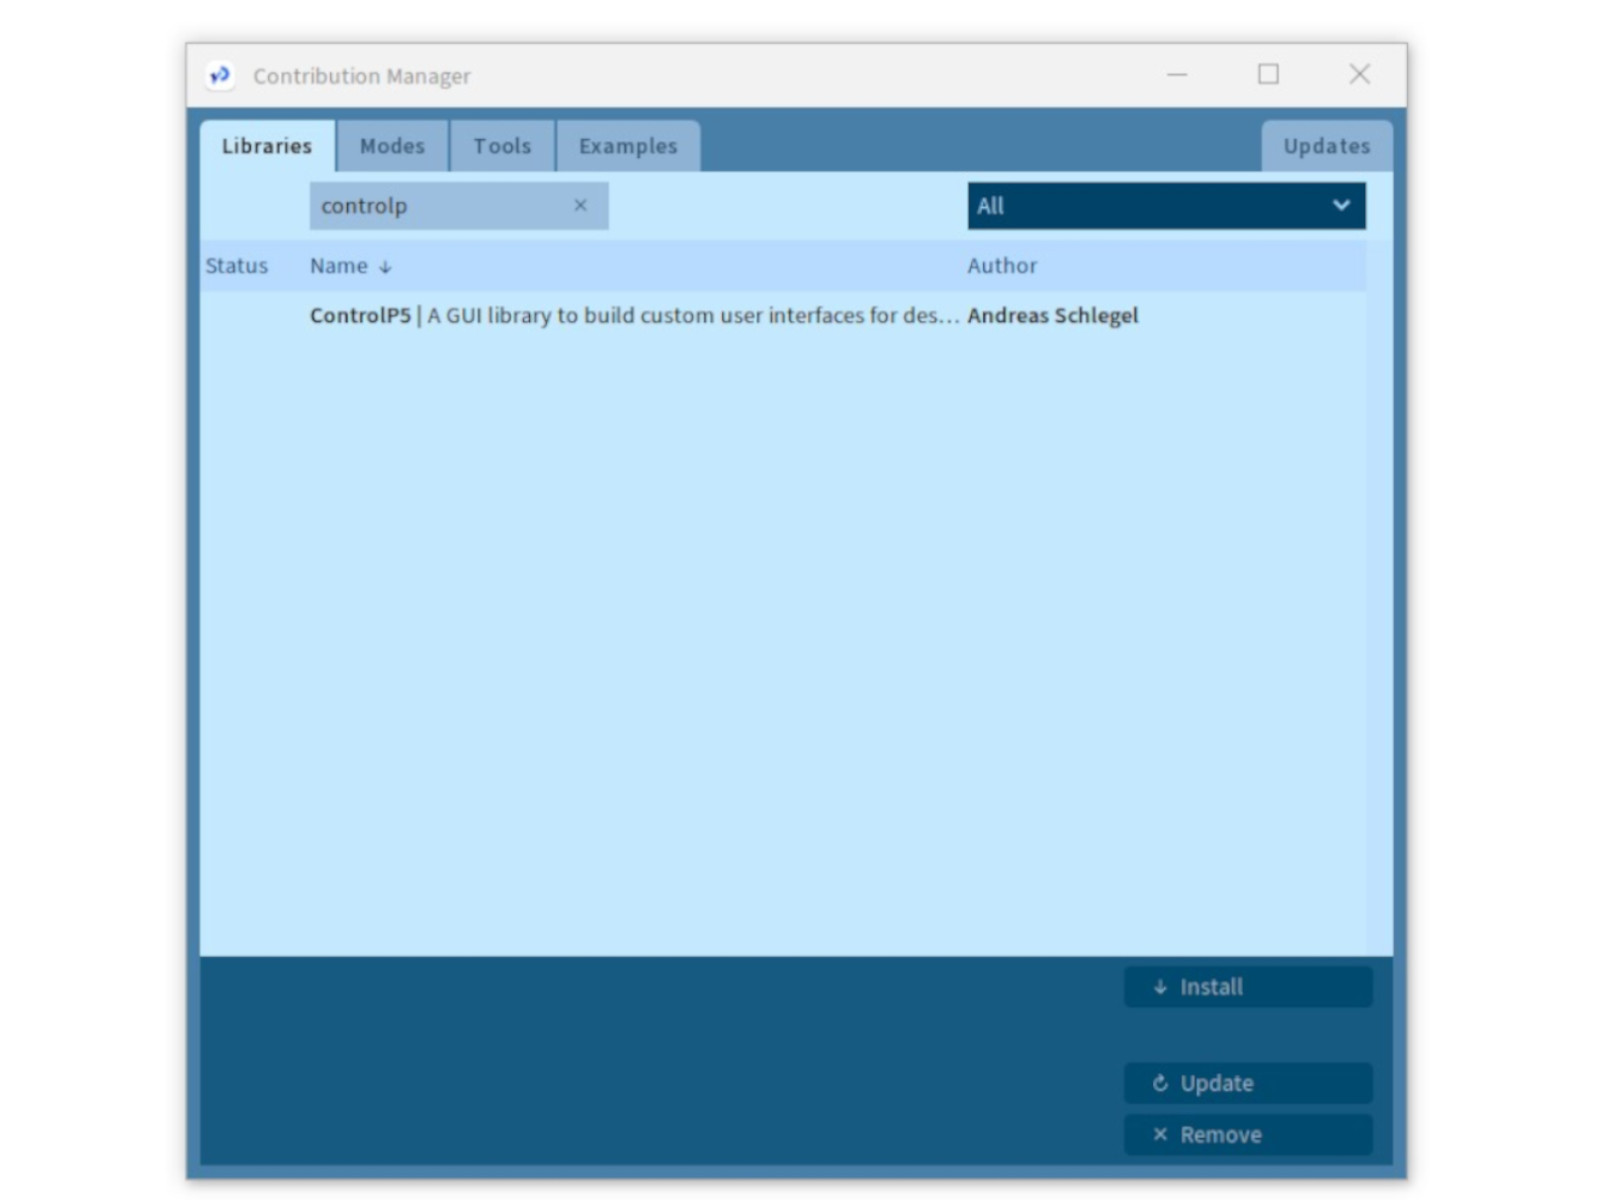
First, the processing IDE was downloaded and installed. Then the ControlP5 library was added into the Processing by selecting Sketch>>Import Library...>>Add library, then searching for the ControlP5.
After the controlled5p library was installed, the sketches found on the from hackster.io reference were ran in Arduino and Processing respectively. The GUI was then tested with a red LED circuit.
Next, the processing sketch was changed to control the servo motors, using the robotic hand Seh Yong used in his output device assignment. The command buttons were changed to Open, Close and Flex.
import controlP5.*; //import ControlP5 library
import processing.serial.*;

Serial port;

ControlP5 cp5; //create ControlP5 object
PFont font;

void setup(){ //same as arduino program

  size(300, 350);    //window size, (width, height)

  printArray(Serial.list());   //prints all available serial ports

  port = new Serial(this, "COM3", 9600);

  //i have connected arduino to com3, it would be different in linux and mac os

  //lets add buton to empty window

  cp5 = new ControlP5(this);
  font = createFont("calibri light bold", 20);
  // custom fonts for buttons and title

  cp5.addButton("Close")     //"Close" is the name of button
    .setPosition(100, 50)  //x and y coordinates of upper left corner of button
    .setSize(120, 70)      //(width, height)
    .setFont(font)
  ;

  cp5.addButton("Open")     //"Open" is the name of button
    .setPosition(100, 150)  //x and y coordinates of upper left corner of button
    .setSize(120, 70)      //(width, height)
    .setFont(font)
  ;

  cp5.addButton("Flex")     //"Flex" is the name of button
    .setPosition(100, 250)  //x and y coordinates of upper left corner of button
    .setSize(120, 70)      //(width, height)
    .setFont(font)
  ;


}

void draw(){  //same as loop in arduino

  background(100, 150 , 150); // background color of window (r, g, b) or (0 to 255)

  //lets give title to our window
  fill(0, 255, 0);               //text color (r, g, b)
  textFont(font);
  text("HAND CONTROL", 80, 30);  // ("text", x coordinate, y coordinat)
}

//lets add some functions to our buttons
//so whe you press any button, it sends perticular char over serial port

void Close(){
  port.write('C');
}

void Open(){
  port.write('O');
}

void Flex(){
  port.write('F');
}
The Arduino sketch was also changed to control the servo.
#includeServo myservo; // create servo object to control a servo int pos = 0; // variable to store the servo position void setup() { myservo.attach(9); // attaches the servo on pin 9 to the servo object Serial.begin(9600); //start serial communication @9600 bps } void loop(){ if(Serial.available()){ //id data is available to read char val = Serial.read(); if(val == 'C'){ //if C received myservo.write(170); ; //servo motor moves to 170 degree position } if(val == 'O'){ //if O received myservo.write(0); ; //servo motor moves to 0 degree position } if(val == 'F'){ //if F received myservo.write(170); //servo motor moves to 170 degree position delay(500); //servo motor hold position for 0.5 sec myservo.write(0); //servo motor moves to 0 degree position } } }
The robotic arm circuit was then set up. After setting up the circuit, the sketches were then uploaded one by one, first onto Arduino then Processing. It is important to upload the Arduino sketch first before launching processing to upload the processing sketch. This way it can avoid the situation of the arduino failing to upload use to serial being busy.
After the processing code was uploaded, the resulting GUI was able to control the servo motors on the robotic hand.
Comparing the MIT App Inventor with Processing, While the App Inventor is fast and easy to use, it is more suitable for quick prototyping. On the other hand, though Processing allows for more customization and design of the GUI, it requires at least some basic knowledge in coding.
Source Code
Arduino code for the servo motor circuit.
Processing code for the servo motor circuit.