Week 13: Networking and communications
Checklist for this week:
- ☑ Linked to the group assignment page
- ☑ Documented what you learned form interfacing an input device(s) to microcontroller and how the physical property relates to the measured results
- ☑ Documented your design and fabrication process or linked to the board you made in a previous assignment
- ☑ Explained the programming process/es you used
- ☑ Explained any problems you encountered and how you fixed them
- ☑ Included original design files and source code
- ☑ Included a 'hero shot' of your board
Group Assignments
- Send a message between two projects
- Document your work to the group work page and reflect on your individual page what you learned
- Group project reference from Instructables
Individual Assignments
- Design, build, and connect wired or wireless node(s) with network or bus addresses
Serial Communication between XIAO ESP32C3 and Arduino UNO
This week, we focused on networking and communication, specifically working on the design, construction, and connection of wired or wireless nodes with network or bus addresses.
My thoughts are consumed by the Whale project constantly (of course). I am currently struggling (again) to finish my weekly assignment.
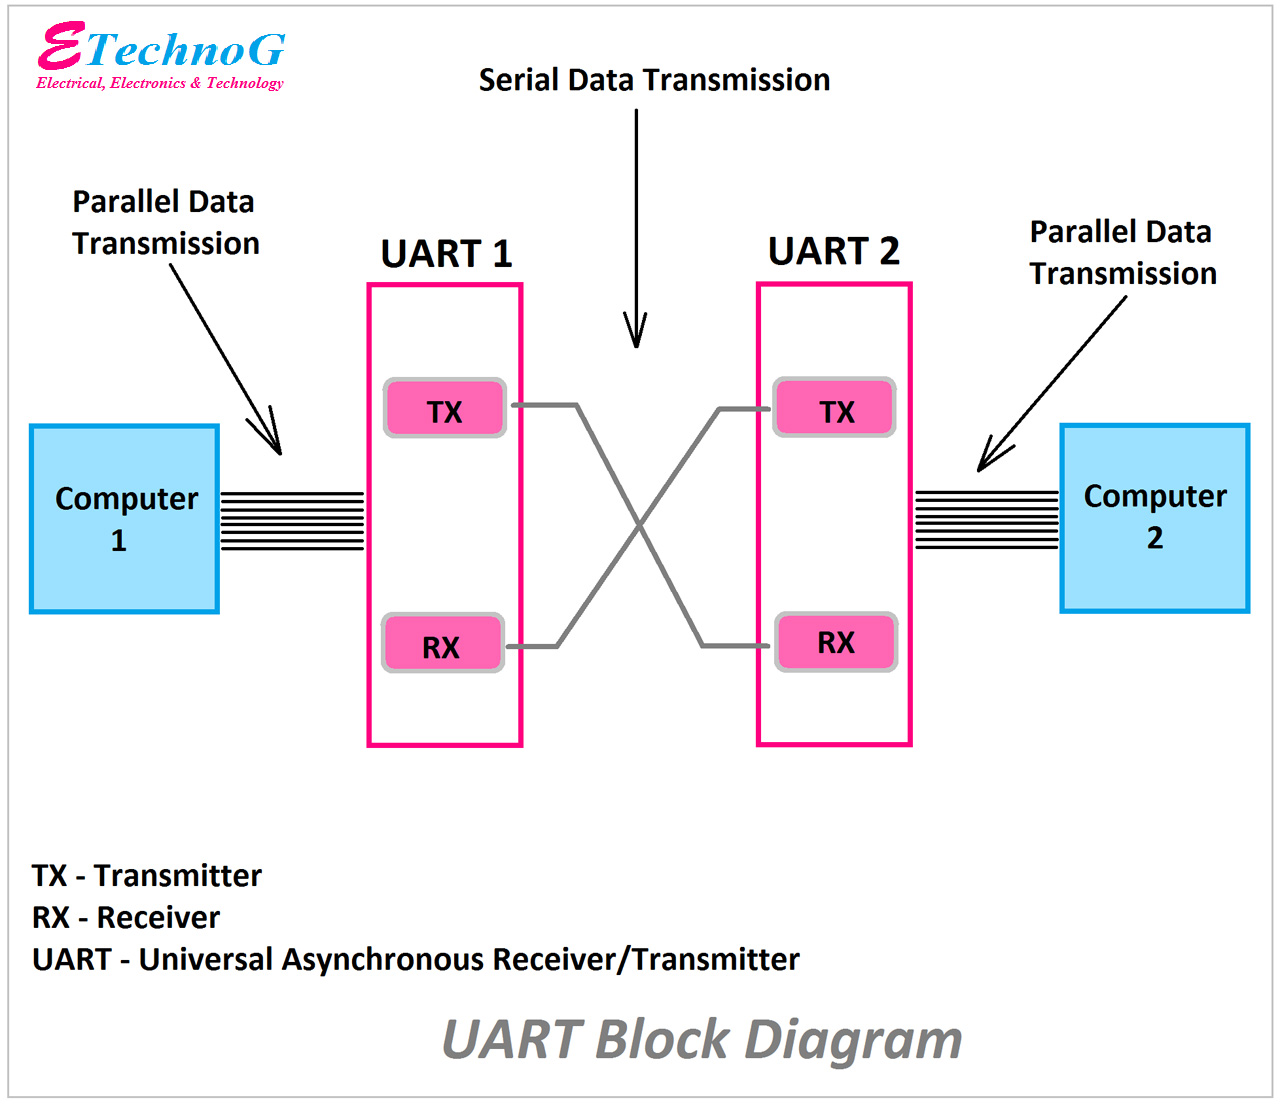
For my Networking and Communications assignment, I delved into Serial Communication. This process involves the sequential transmission of data through a communication channel or bus. In serial communication, data is sent one bit at a time. Serial transmission can be accomplished using either a single wire or four wires. UART or USART communication is another term used to refer to serial communication. The following diagram (from www.etechnog.com) illustrates the working principle of a serial connection.
To comprehend serial communication, it is essential to identify the connection pins for establishing a serial connection between a XIAO ESP32C3 and an Arduino UNO microcontroller. The Arduino UNO has at least one available serial pin designated as TX (Pin 1) for transmitting and RX (Pin 0) for receiving. Similarly, the XIAO ESP32C3 also features TX and RX pins, although the serial pin numbers may vary depending on the model. To establish a serial connection between the XIAO ESP32C3 and Arduino UNO microcontrollers, it is necessary to cross-link the TX and RX pins of the XIAO ESP32C3 with those of the Arduino UNO. Additionally, a common ground (GND) connection is required between the two microcontrollers.
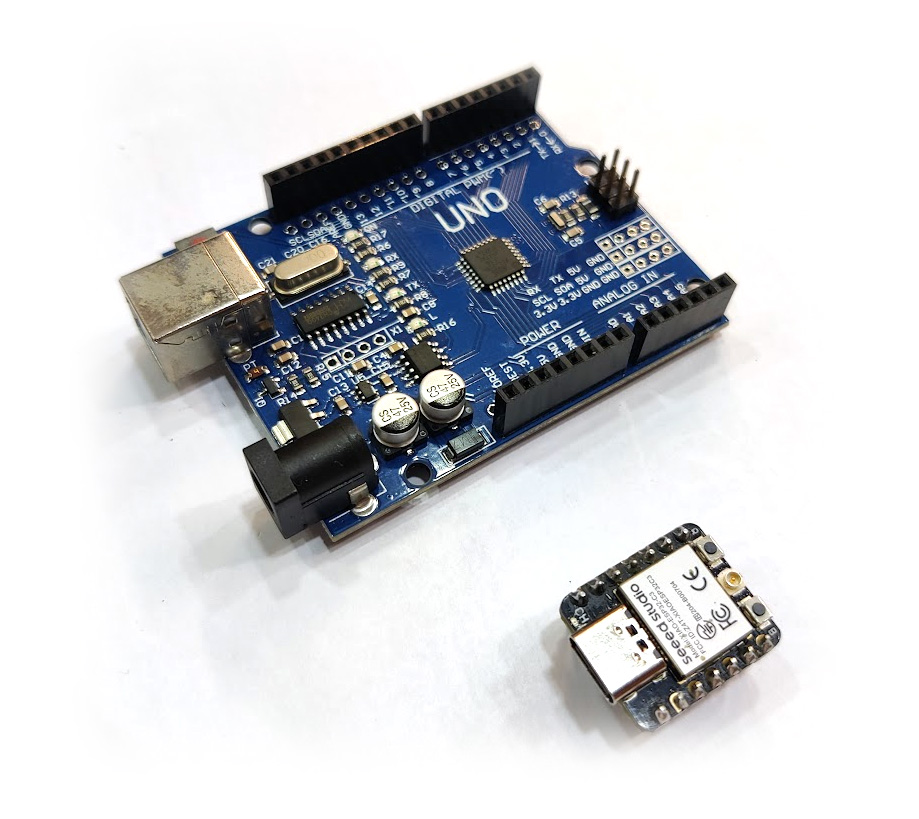
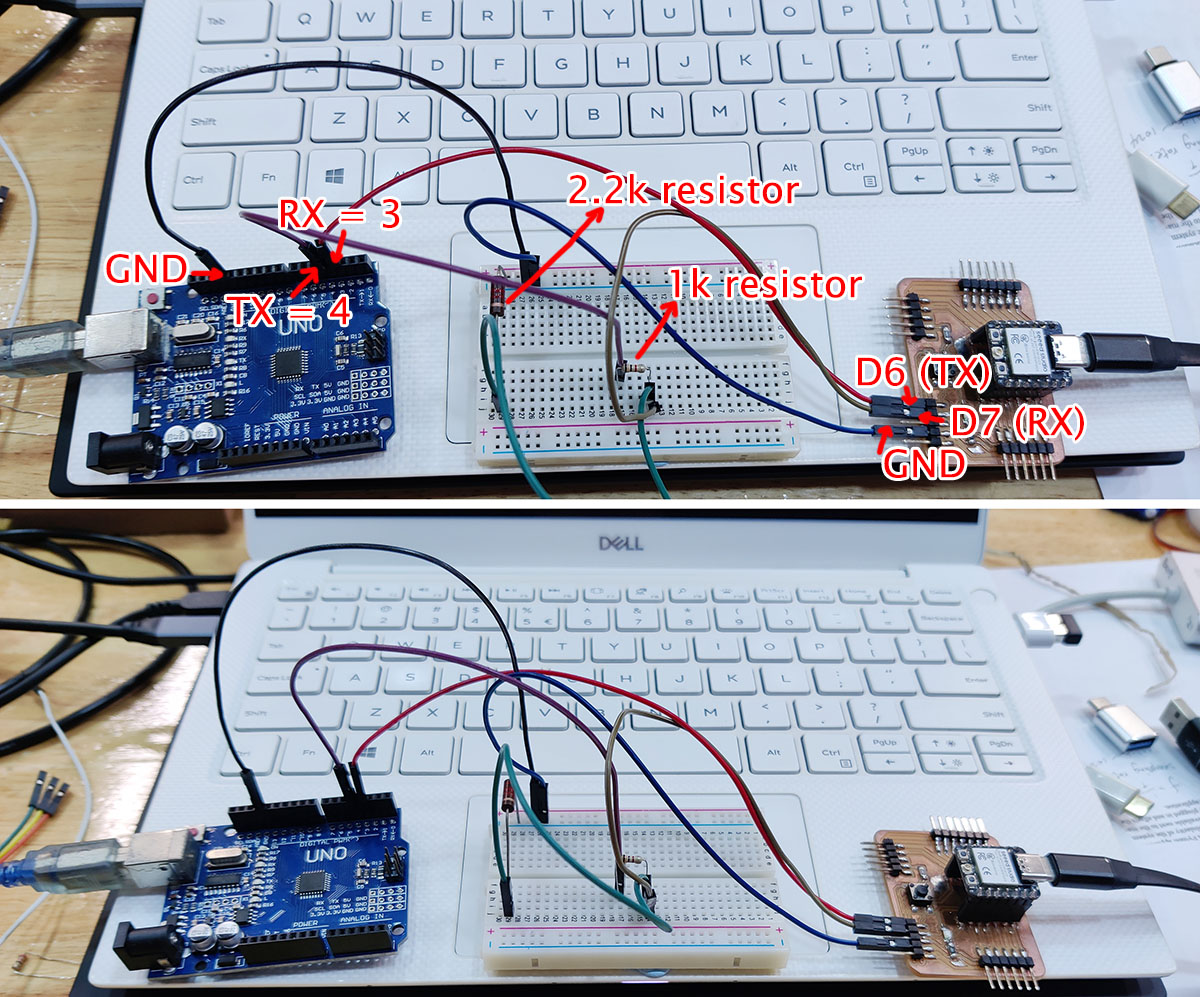
To begin, I utilized my PCB design and replaced the XIAO RP2040 controller with a XIAO ESP32C3 to establish a serial connection with the Arduino UNO microcontroller. The following image depicts the hardware and components necessary for this simple serial communication project.
After gathering the required hardware and components, I proceeded to connect them using jumper wires. However, an issue arises due to the Arduino UNO operating at 5 volts while the XIAO ESP32C3 operates at 3.3 volts. Directly connecting them would risk damaging the XIAO ESP32C3 microcontroller. To overcome this, our instructor suggested using a voltage divider circuit with resistors to step down the voltage, as illustrated in the image below.
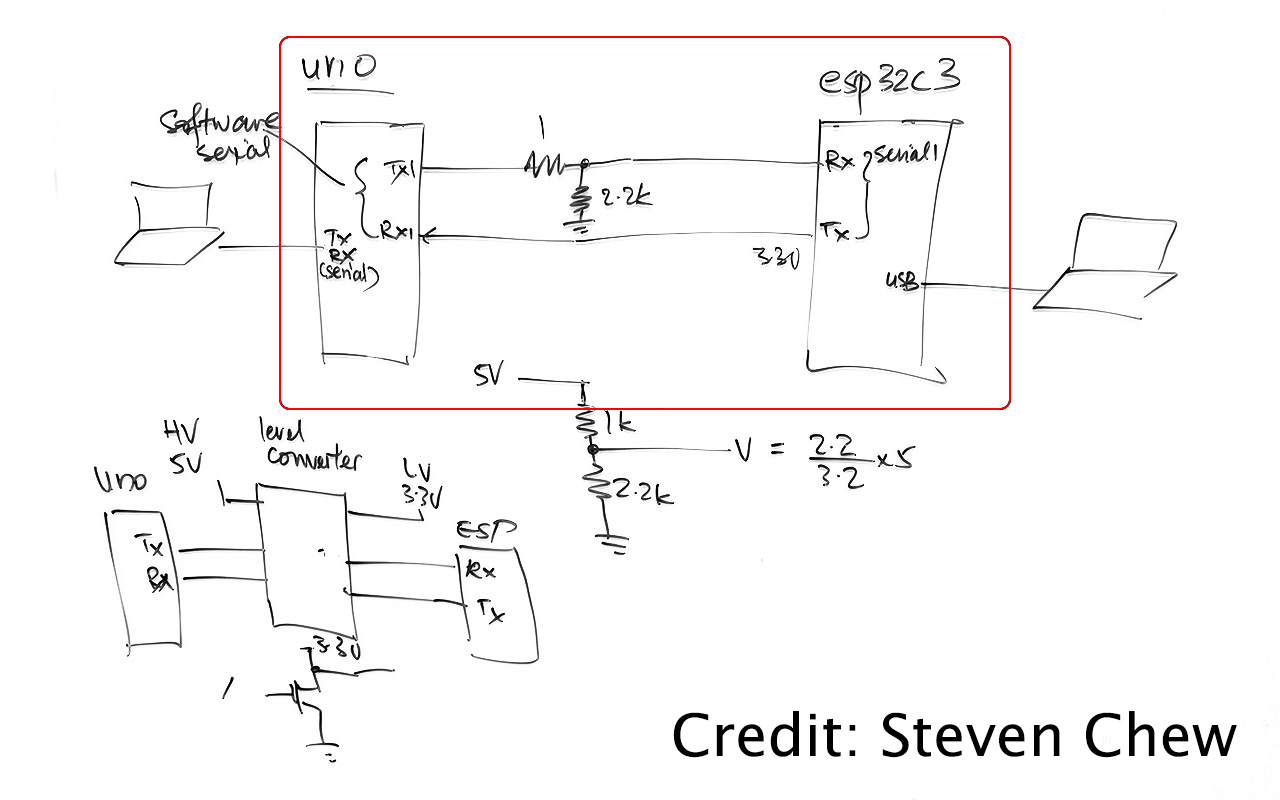
Another solution to address the voltage difference would be to utilize a level converter. However, since we didn't have one available in our lab, I opted for the voltage divider circuit. With the circuit diagram in place, I successfully completed the wiring connections. The following image shows the final connection between my XIAO ESP32C3 and Arduino UNO microcontrollers.
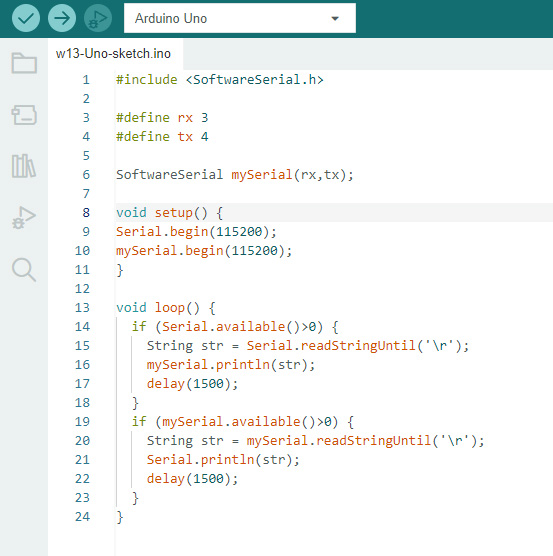
Once the hardware setup was complete, I moved on to the software aspect. To establish serial communication, two codes needed to be created: one for the Arduino UNO and the other for the XIAO ESP32C3 microcontroller. The objective was to utilize serial communication to send and receive messages between the two microcontrollers. I began by writing the code for the Arduino UNO, using the Software Serial library to enable data transmission and reception. Since the Arduino UNO has only one serial port, using Software Serial allows for both sending and receiving data. The following screenshot provides a sample of the code for the Arduino UNO.

After completing the Arduino UNO code, I proceeded to write the code for the XIAO ESP32C3 microcontroller. This code differed slightly, as it required the inclusion of the Hardware Serial library to establish communication with the Arduino UNO microcontroller, encompassing both hardware and software serial ports. The following screenshot provides a sample of the code for the XIAO ESP32C3.
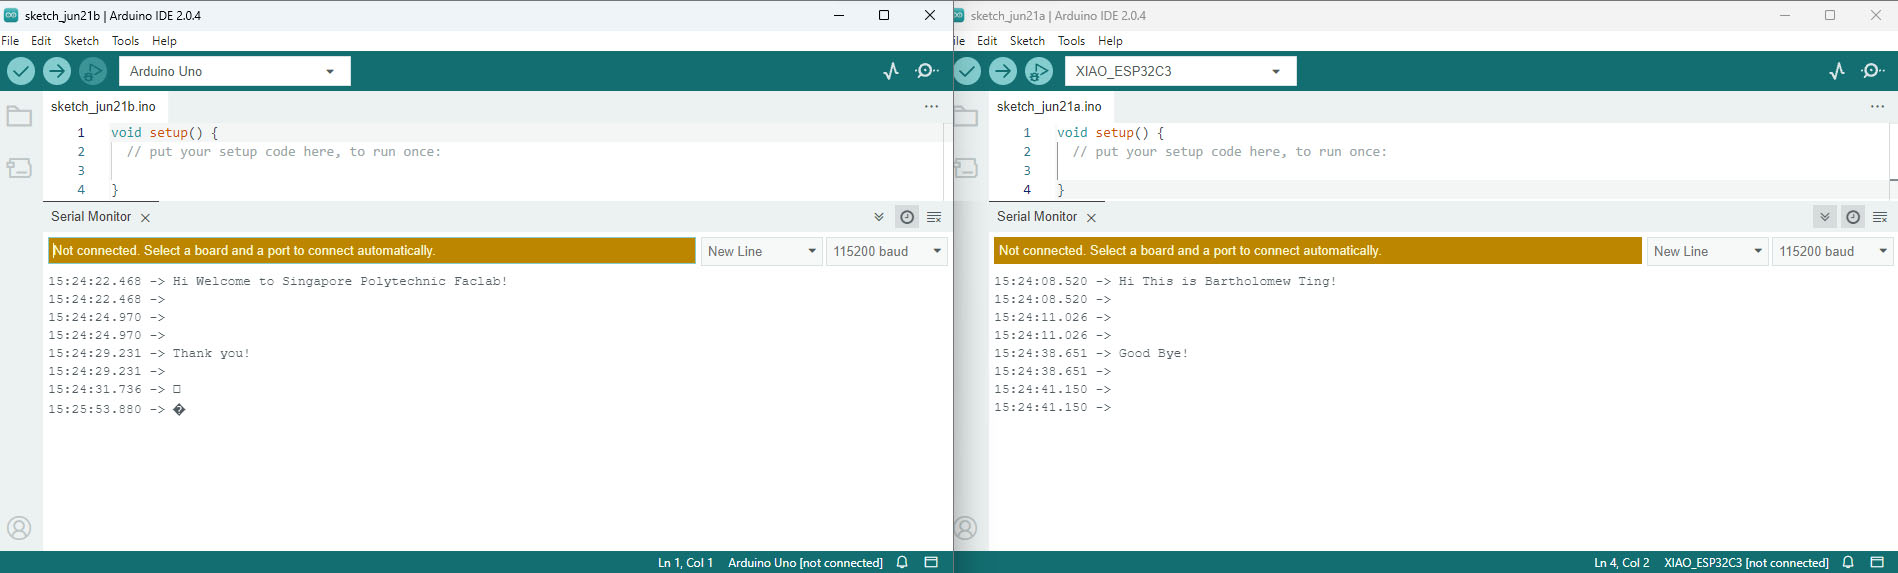
Once both codes were written, I proceeded to perform a simple serial test. Firstly, the codes needed to be compiled and uploaded to both the XIAO ESP32C3 and Arduino UNO microcontrollers. It's important to note that while uploading the codes to the Arduino UNO microcontroller, the TX and RX connections should be temporarily removed to avoid any uploading errors. After successful uploading, the TX and RX jumper wires could be reconnected.
Finally, I conducted a test of the serial communication code. The following video demonstrates the serial communication between the XIAO ESP32C3 and Arduino UNO microcontrollers. The test was successful, and I was able to send and receive text messages between both microcontrollers. This experience provided me with a deeper understanding of serial/UART communication in the context of device and network communication.
Reflection
Working on networking and communication this week proved to be a challenging endeavor as it was outside my (and everyone else) comfort zone of understanding. Throughout the process, numerous questions arose regarding hardware connections and software coding for establishing serial communication between two different microcontrollers. Fortunately, with the invaluable guidance of our instructor, we was able to make progress and get both the circuit and codes to work. While networking and communication remain a work in progress for me, this experience has been a valuable learning opportunity. Overall, it was a demanding week, and I struggled to grasp the intricacies of networking and communication. However, with perseverance and guidance, I successfully achieved a functional serial communication test. This experience has motivated me to continue exploring and learning about networking and communication, expanding my knowledge in this field.
Hero Shot
The following video has been accelerated with a 2X speed, providing an insightful portrayal of the communication process between the ESP32C3 and the Arduino Uno. During the initial 12 seconds, an overarching view is presented, followed by a zoomed-in focus on the text messages exchanged between the two boards.
Continuos update after 23 June 2023
Continue working on the ESP32 networking. Online reference: Randomnerdtutorials.com
Fabacademy Community Manager Adrian's reference.