Week 4: Embedded Programming
Checklist for this week:
- ☑ Linked to the group assignment page
- ☑ Documented what you learned from browsing through a microcontroller datasheet
- ☑ Programmed your board to interact and communicate
- ☑ Described the programming process(es) you used
- ☑ Included your source code
- ☑ Included 'hero shot(s)'
Group Assignment
- Compare the performance and development workflows for other architectures (Arduino, micro:bit and M5stack)
- Document your work to the group work page and reflect on your individual page what you learned
Individual Assignments
- Browse through the datasheet for your microcontroller- Seeed Studio XIAO RP2040
- Program a microcontroller development board to interact and communicate
1. Reflection on workflows of other architectures
I am relatively fresh to the development kit using microcontroller. I attended an arduino class many years ago but I was not confident to pick it up until micro:bit came along. I found out about micro:bit in 2018 and it gave me a lot of confident that I could learnt visual coding. Also about the same year, I was introduced to M5stack during a trip to Taipei Maker Faire. M5stack is a technology company that produce beginner-friendly development kits.
For this particular assignment, I am going to share my experience with M5stack. In Singapore, one of our business associates brought in 10 thousand sets of M5Stack products to secondary schools since 2020. It's easy on secondary school students or any beginner without prior experience with other development kits.
What I like about M5Stack is all-in-one kit and the USB type C for connection (since 2018, where micro USB is still the norm, e.g. Micro:bit). It's using ESP32 chip and once you update the firmware (through cable), you can unplug the kit and load the subsequent code through WiFi.
I bought my first M5stack development kit- M5StickC at about USD 10 only in 2018. Subsequently, I move on to M5Go because it is more versatile (bigger screen, more ports and larger battery, etc). It includes internal battery pack (550mAh @ 3.7V), 2” full-colour LCD screen, 3 ports with fool proof grove connectors (One of them being I2C), 5 sets of LEDs on each sides, built-in microphone, speaker, micro-SD card slot, and 3 programmable buttons. The M5Stack Core2 series (second generation) come with touchscreen now.
M5Stack has taken away the fear of hardware setup that most beginners struggle with. Often, it's the wires that connected to the wrong pins that cause some of the issue. The grove connector solved this issue and many other products of M5Stack give beginners a boost of confident to learn electronics. After the hardware is successfully setup, we need to work on the code. Luckily for M5Stack they followed the steps of Scratch or Makecode to make it easy to code using visual block.
2. About XIAO RP2040's datasheet
With almost 650 pages in volume, the datasheet is definitely overwhelming for any amateur like myself. Luckily, Mr. Rico Kanthatham gave a good list of tips for a starter:
- What is the name of the microcontroller (MCU)?
- What type of "architecture" is it?
- What is its Clock Speed?
- What different types of memory does it have? How much of each?
- How many pins does the MCU have?
- How many GPIO pins?
- How many Digital pins? What are their pin numbers?
- How many Analog pins? What are their pin numbers?
- How many pins capable of PWM (Pulse Width Modulation)?
- What types of Communication Protocol can the MCU do (ISP, UPDI, Serial, etc.)?
- What extra (fancy) features (hardware peripherals) does the MCU have (DAC, ADC, etc)?
- What are the power requirements and limitations?
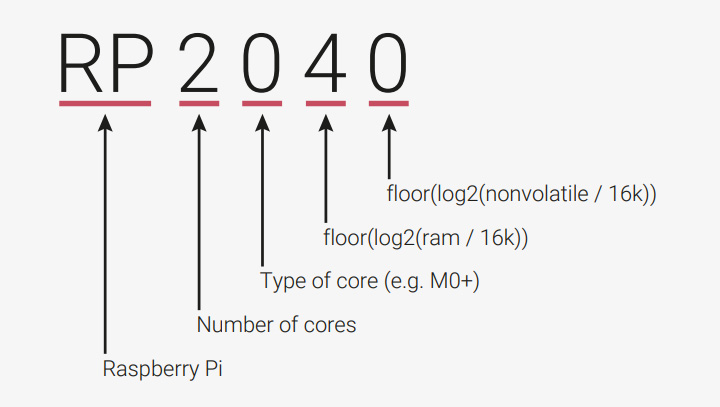
With the list in mind, it's a good start to browse through the datasheet. Start with the name of XIAO. In chinese language, "XIAO" means tiny (yet powerful) which is exactly the form factor of the MCU. It's almost as big (or as little) as a size of a stamp (21mm x 17.5mm x 3.5mm). XIAO is a series of development boards manufactured by Seeed Studio. In our class, we use RP2040 chip. The "RP" means Raspberry Pi and the rest of the characters mean number of cores, type of core, and number of internal RAM. The figure below gives a clear idea (extracted from the datasheet). Floor RAM means internal RAM.
XIAO RP2040 is a Harvard architecture type microcontroller where the program instruction and data are separated. It is different from von Neumann architecture type MCU where there is only one single memory space for both program instruction and data. Both architecture types have their advantages and disadvantages, but as far as my short experience with MCU, almost all the MCU I am introduced to use Harvard architecture.
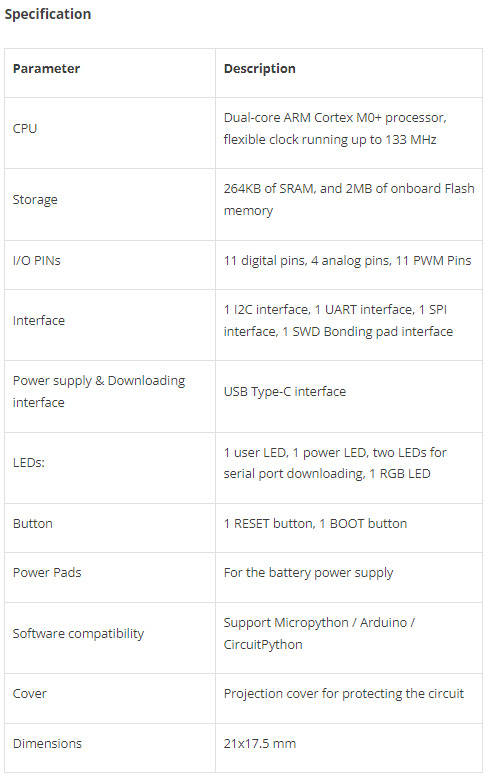
XIAO RP2040 has Dual Cortex M0+ processor cores with clock speed of up to 133 Mhz. It's advertised as a high performance chip with 264KB of SRAM and 2MB of onboard flash memory. During the Week 3 online class, one instructor mentioned that the chip could play complex and graphical intensive 3D game ("Doom", released in 1993) to illustrate the point. I myself looking forward to experience this myself in near future. Thinking back the game console that costed a few hundreds dollars back then, has gone down to just USD 5.
RP2040 has 30 multifunctional GPIO according to the datasheet. But in ARduino IDE, We could utilize 4 Analog pins (ADC from A0 to A3), 11 Digital pins (DAC from D0 to D10), and 11 PWM (Pulse Width Modulation) pins. It has one each of the I2C, IPC (Inter-Process Communication), and UART interface. I2C, IPC and UART are communication protocols between electronics devices.
I2C is pronounced as "i square c" and it uses two wires interface consisting of a clock line (SCL) and data line (SDA) to transmit data between devices. It is a popular choice for Internet of Things (IoT) applications. UART is Universal Asynchronous Receiver/ Transmitter and its a type of serial communication protocol between two devices (microcontroller and a computer) through two wires (TX, RX). Meanwhile, IPC (Inter-Process Communication) is just additional communication protocol option.
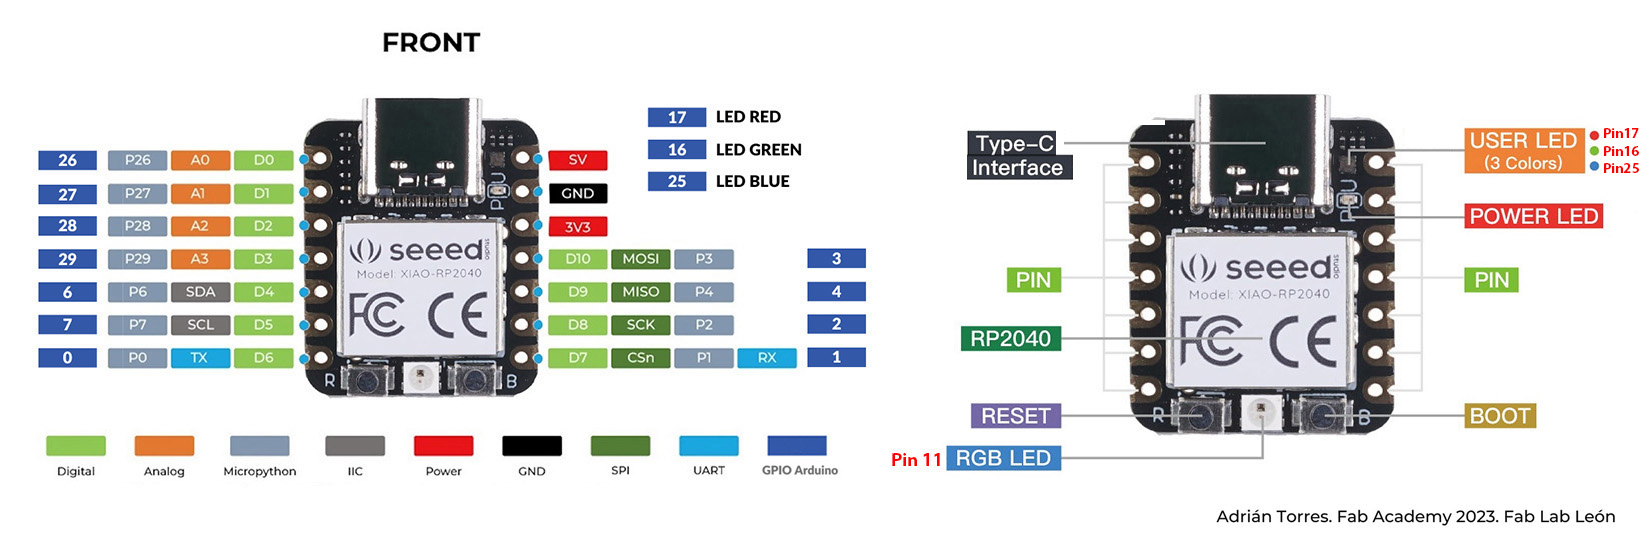
XIAO RP2040 connects to PC through a USB type-C cable, and take in (or supply) power of 3.3/5V. It got two buttons (one "reset" and one "boot" button). It has multiple LEDs on board as well. Figure below is extracted from Seeed Studio website.
3. Program XIAO RP2040 to interact and communicate through UART
We are given a set of MCU mentioned above and a few other actuators like servo, LED, potentiometer and a buzzer. There are a lot of sensors and actuators to play with in the Fab Lab but we are going to experiment with them a few at a time.
We have a few options when it comes to programming XIAO RP2040:
- C / C++
- MicroPython
- CircuitPython
- Rust
- Go Lang
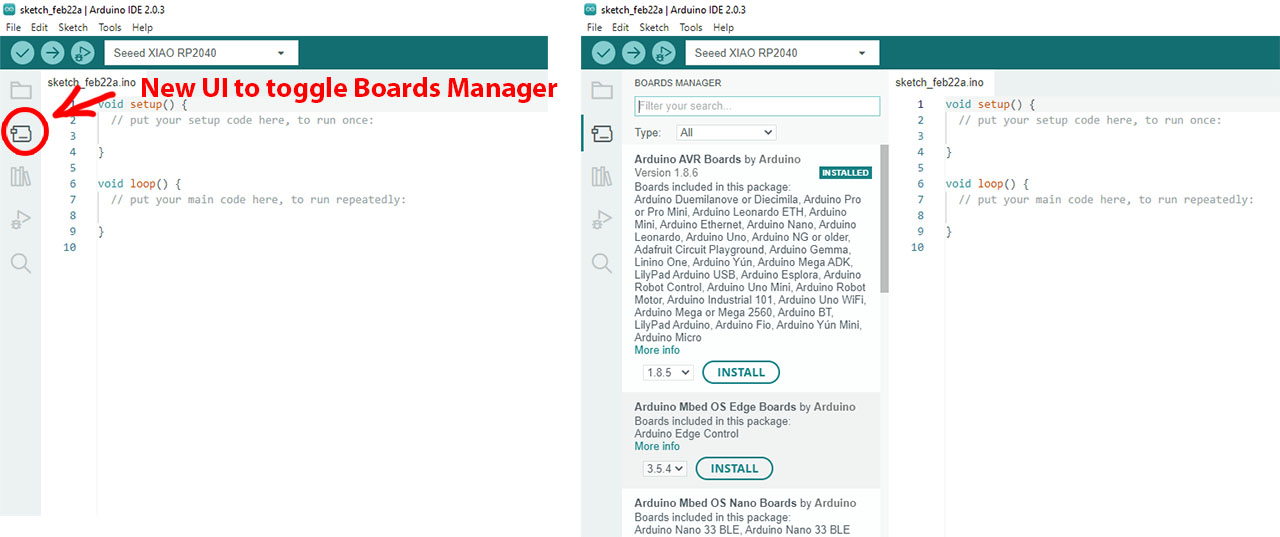
For our practice, we are going to use Arduino IDE which is based on the language C. First, we download the latest version of the Arduino IDE 2.0.3 from the website. It's relatively easy to google and the download it. Within minutes, the IDE is installed. I have installed Arduino IDE 1.8.19 last year and uploaded a few programs from the library for M5stack development kits. So, installation of the latest version is smooth. On the other hand, the version 2.0.3 has improved on the UI but also took a few more seconds to load up in my Windows 10 laptop. Below are the hero shots.
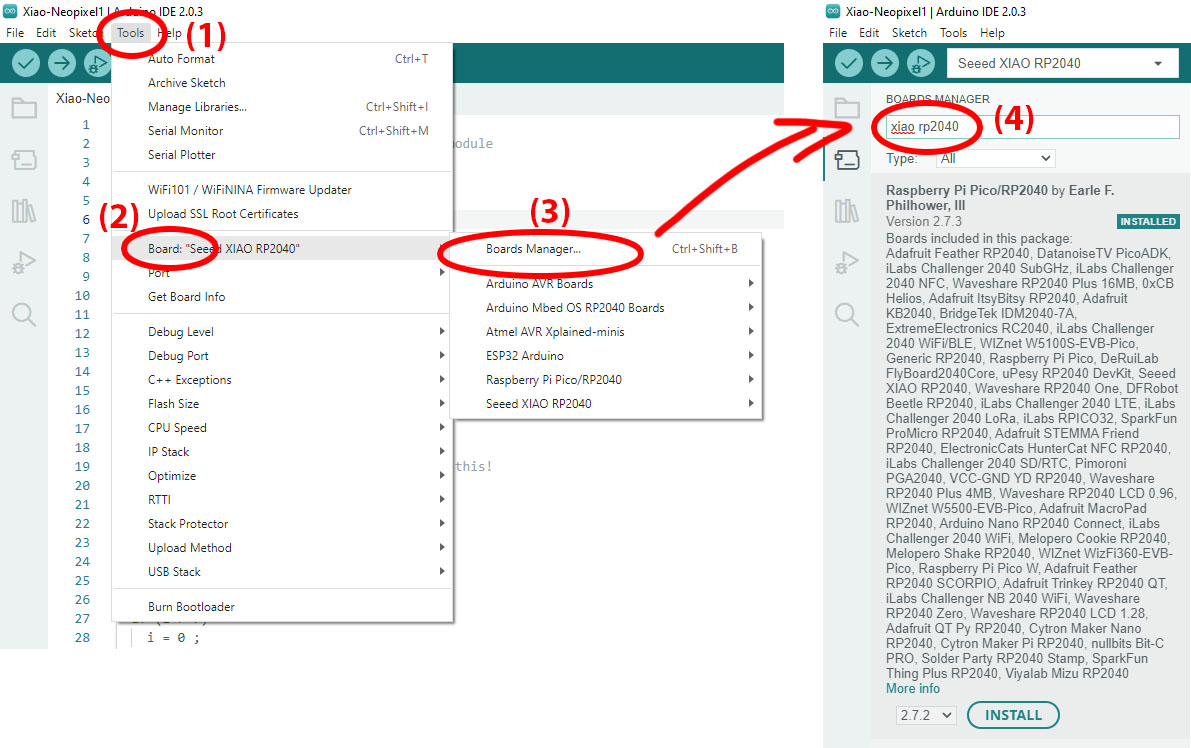
Next, we need to add an URL https://github.com/earlephilhower/arduino-pico/releases/download/global/package_rp2040_index.json in order to search for the additional "Boards Manager". This is provided by the instructor and we need to paste it in the preference before it would show up in the search list inside Boards Manager. After a few day of usage, I realize that there is a short-cut button on the left panel for Boards Manager. Nice improvement on the UI for ver. 2.0.3.
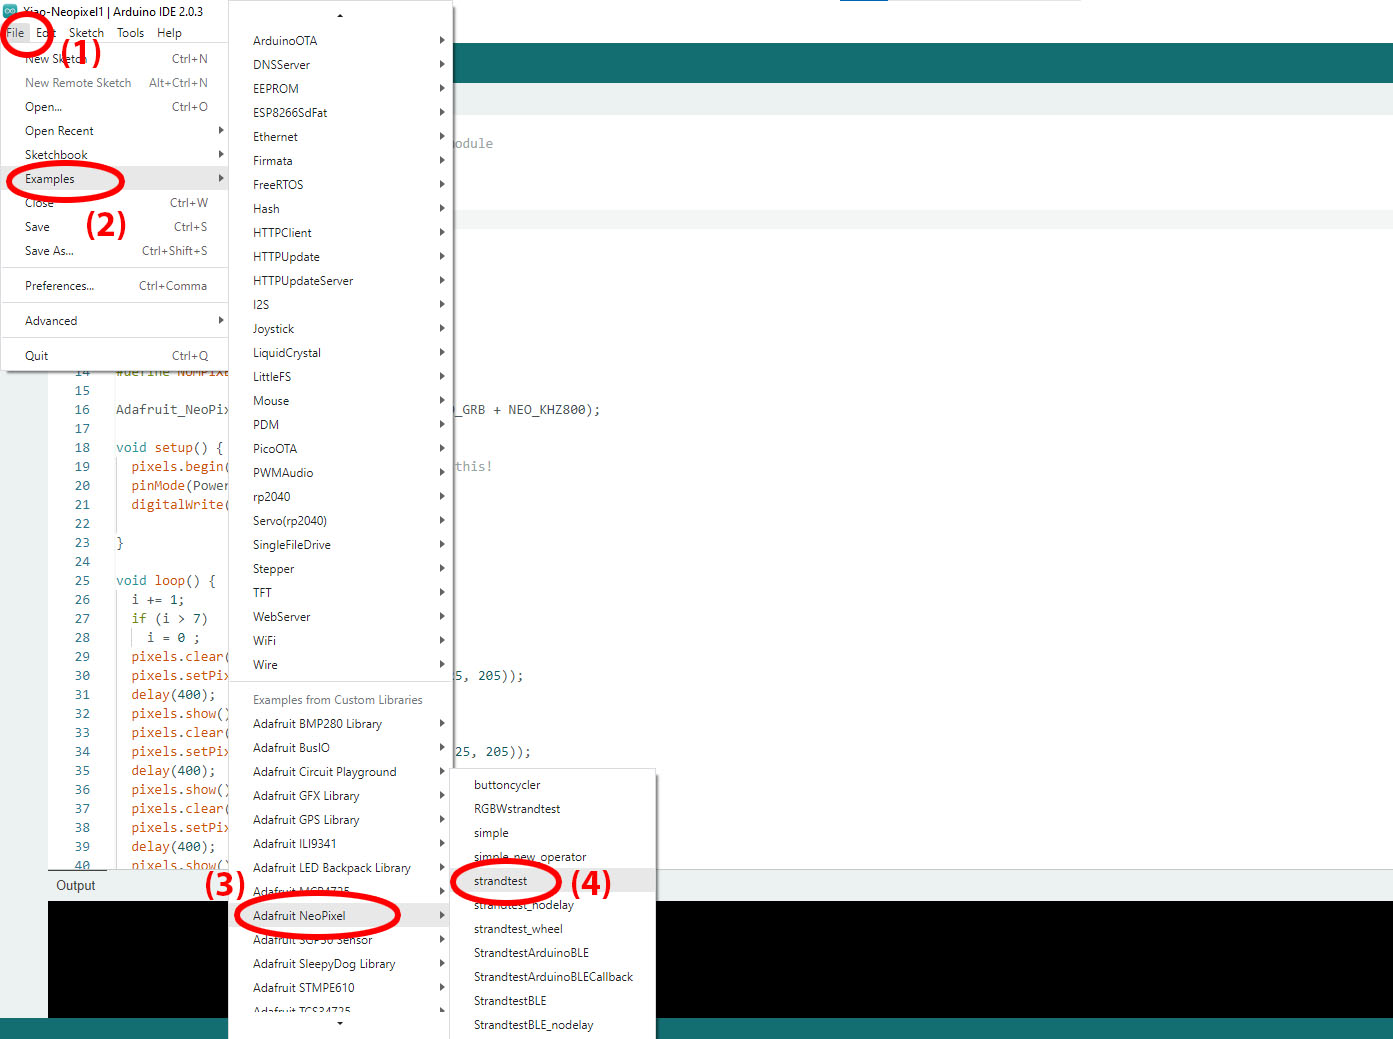
Below is a diagram shared by Adrian Torres from Fab Lab Leon. This is useful when we need to connect and key in the correct Pin number into Arduino IDE. With the diagram in one hand, we loaded a few programs from the library to test the development kit. Some of the programs we modify from the library includes:
- Adafruit Neopixel "strandtest" of LED.
- Xiao Blink Echo for communication
- Analog input with the Potentiometer
- Servo
- yet to try the HC-05 (Bluetooth communication)

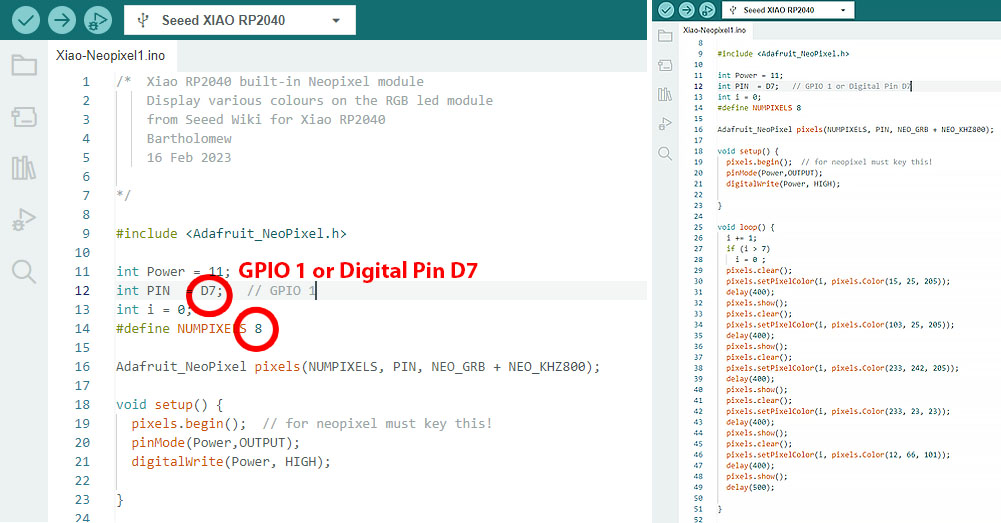
4. Adafruit Neopixel strandtest
There are two important parts to make a successful project, first is to setup the hardware correctly and then load the right code. For the LED strandtest, we connect the circular LED (with 8 counts) into 3.3V (+) and GND (-). For the signal pin ("Din" or "Digital In"), we connect to Digital Pin "D7" on XIAO RP2040.
There are two parameter need to be change: one is the
5. Program XIAO RP2040 to interact and communicate
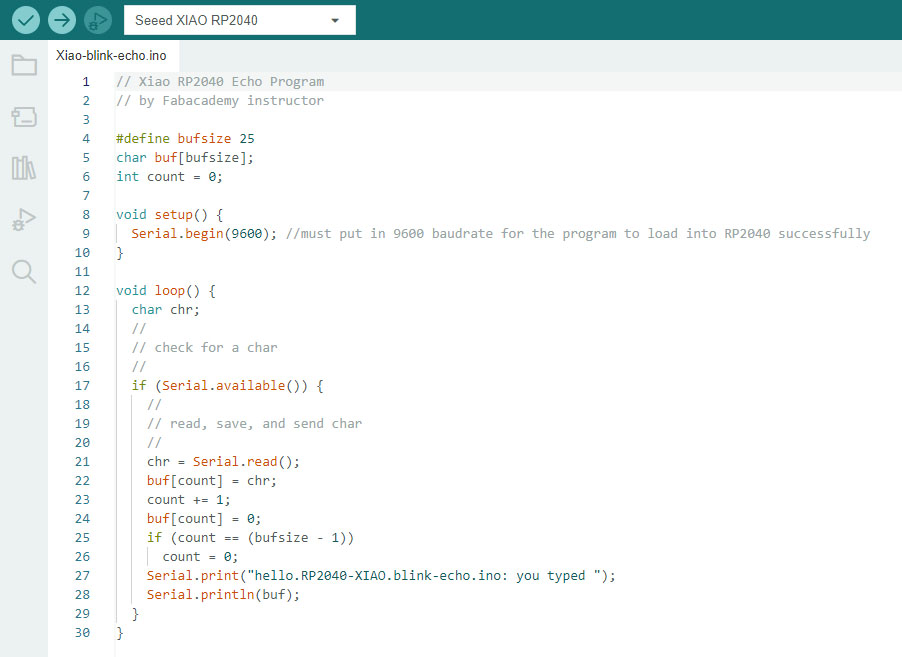
We modify the code RP2040-XIAO-Blink-echo.ino provided by Prof. Neil Gershenfeld. We load the code successfully and then start typing in the serial monitor within our Arduino IDE. The MCU responded back inside the serial monitor.
We use the rp2040 Servo code from the Arduino library to test our servo motor. Below is another hero shot!