Week 3: Computer-Controlled Cutting
Checklist for this week:
- ☑ Linked to the group assignment page
- ☑ Explained how you created your parametric design
- ☑ Documented how you made your press-fit kit
- ☑ Documented how you made something with the vinyl cutter
- ☑ Included your original design files
- ☑ Included hero shots of your results
Group Assignment
- Characterization of laser-cutter's focus, power, speed, rate, kerf and joint clearance.
- Document your work to the group work page and reflect on your individual page what you learned
Individual Assignments
- Design, laser cut, and document a parametric press-fit construction kit, which can be assembled in multiple ways. Account for the laser-cutting kerf.
- Cut something on the vinyl cutter (Silhouette Cameo).
- Bonus: using Jwei cutting machine for large format cutting (1.8m x 1.6m)
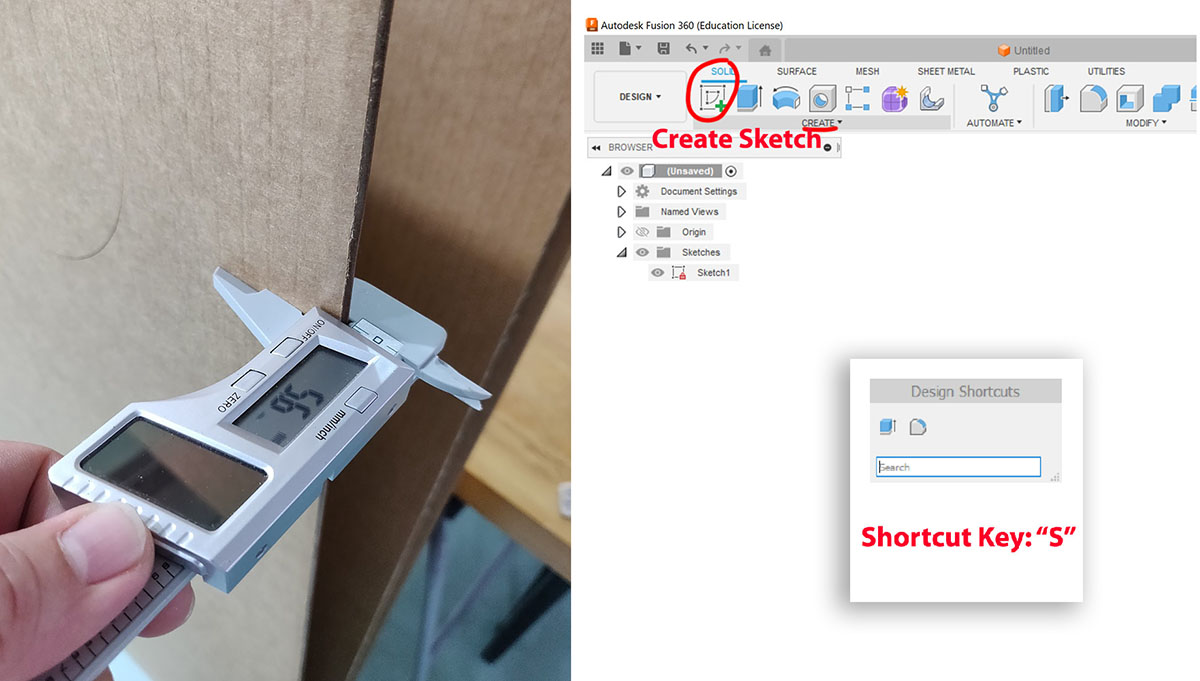
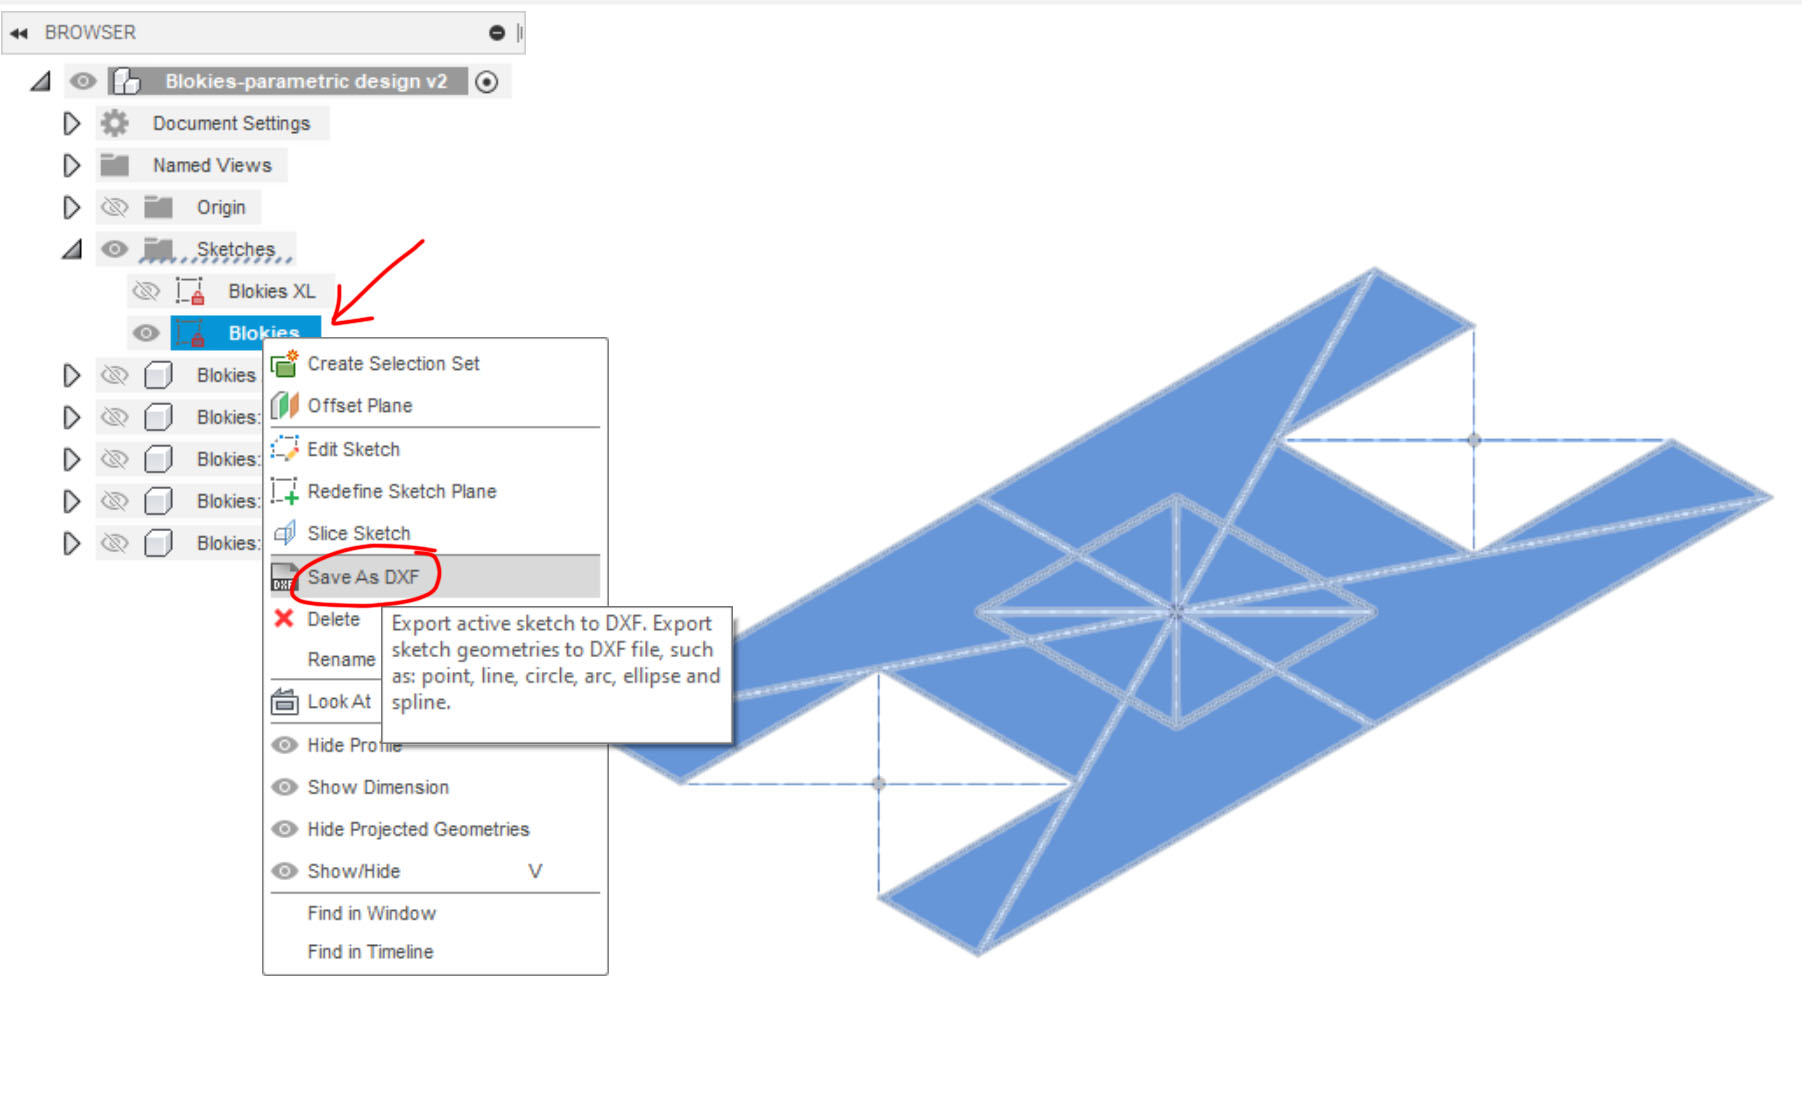
1. Parametric Design using Fusion 360
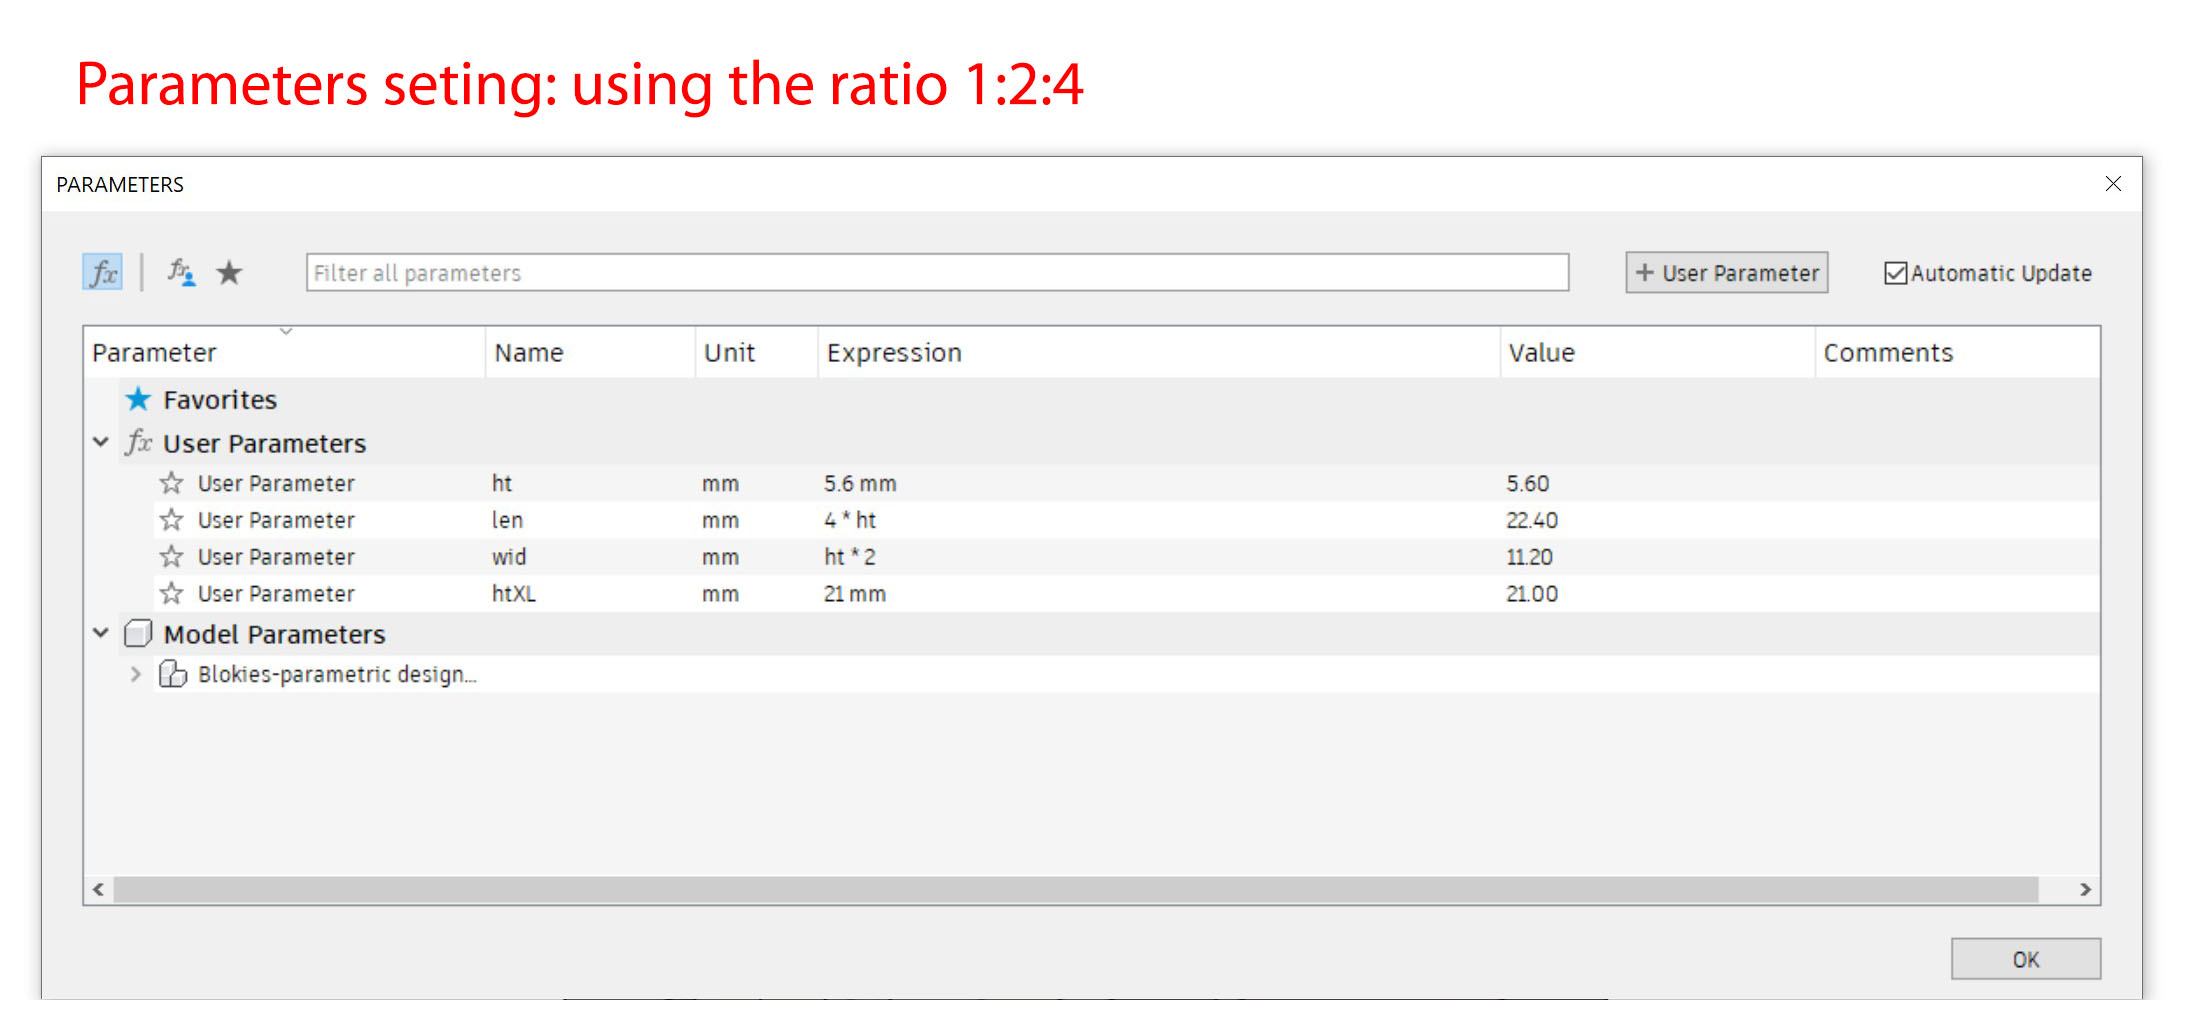
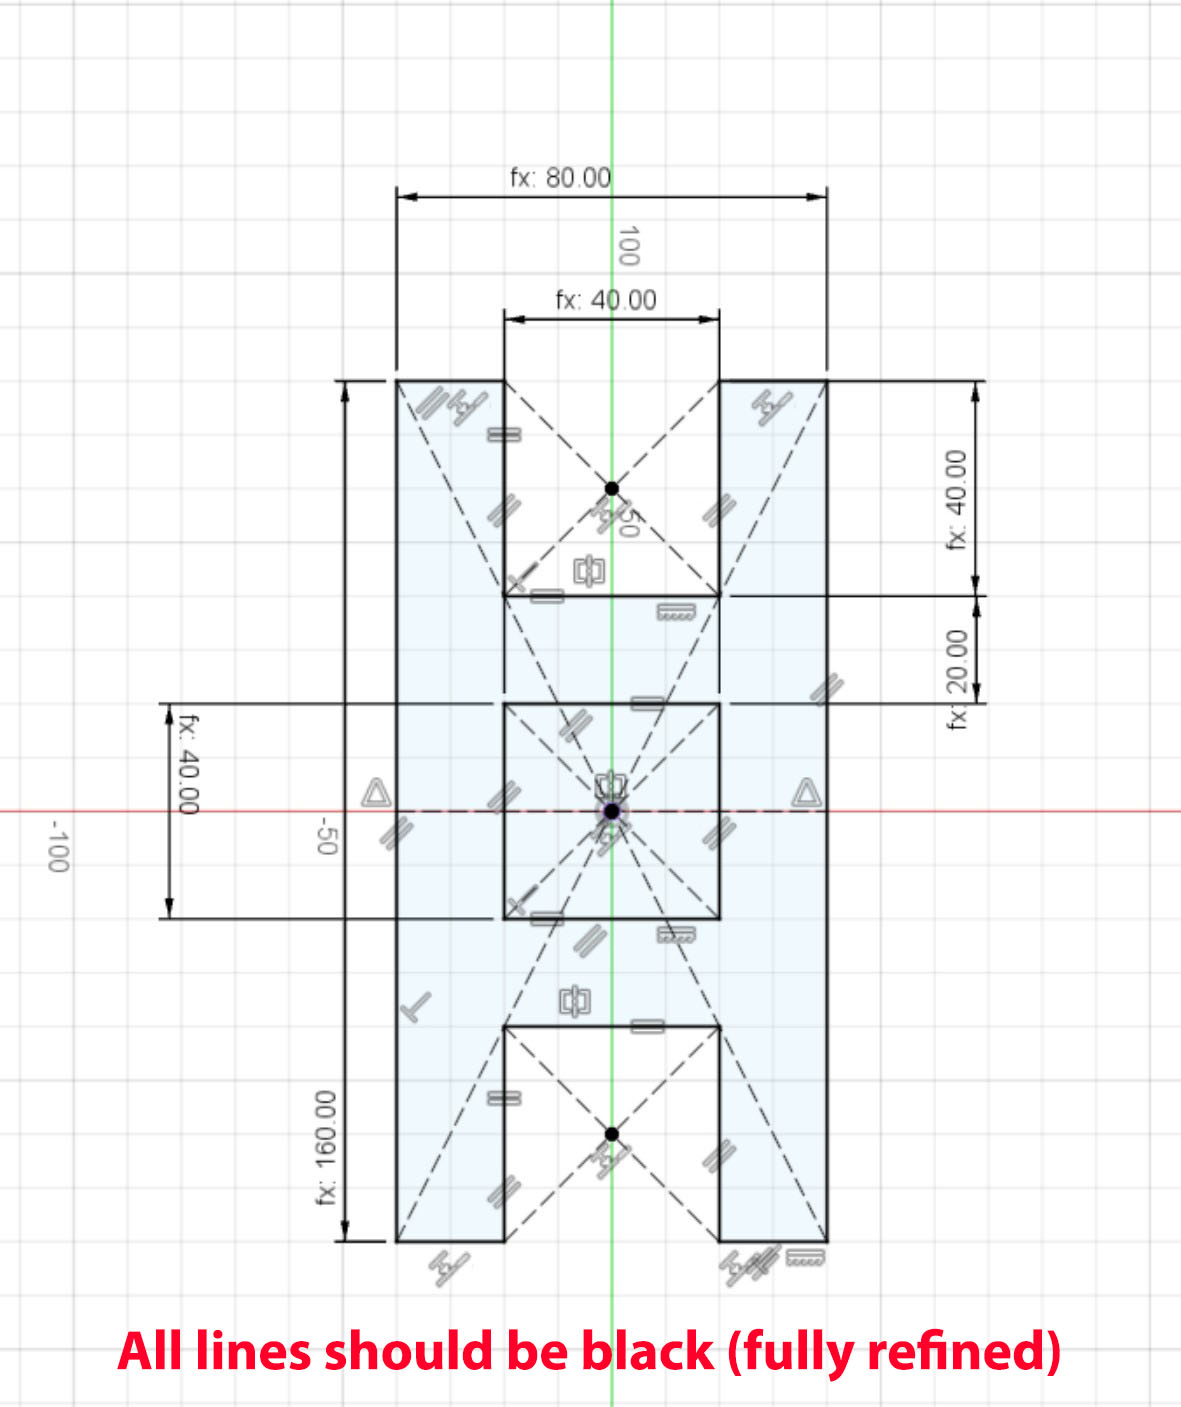
The design is inspired by a childhood toy that came with my breakfast cereal box. The size of the toy was about 10mm ~ 15mm only (pretty tiny size) in my memory. The key idea is the ratio of 1:2:4 with relative to the height of the cutting material. I measured the single-wall A-flute cardboard of 5.6mm using a digital caliper. With that, I draw the sketch in Fusion 360 with assigned parameters ("ht" and "htXL"). htXL is for double-wall AA-flute of 10.5mm thickness.
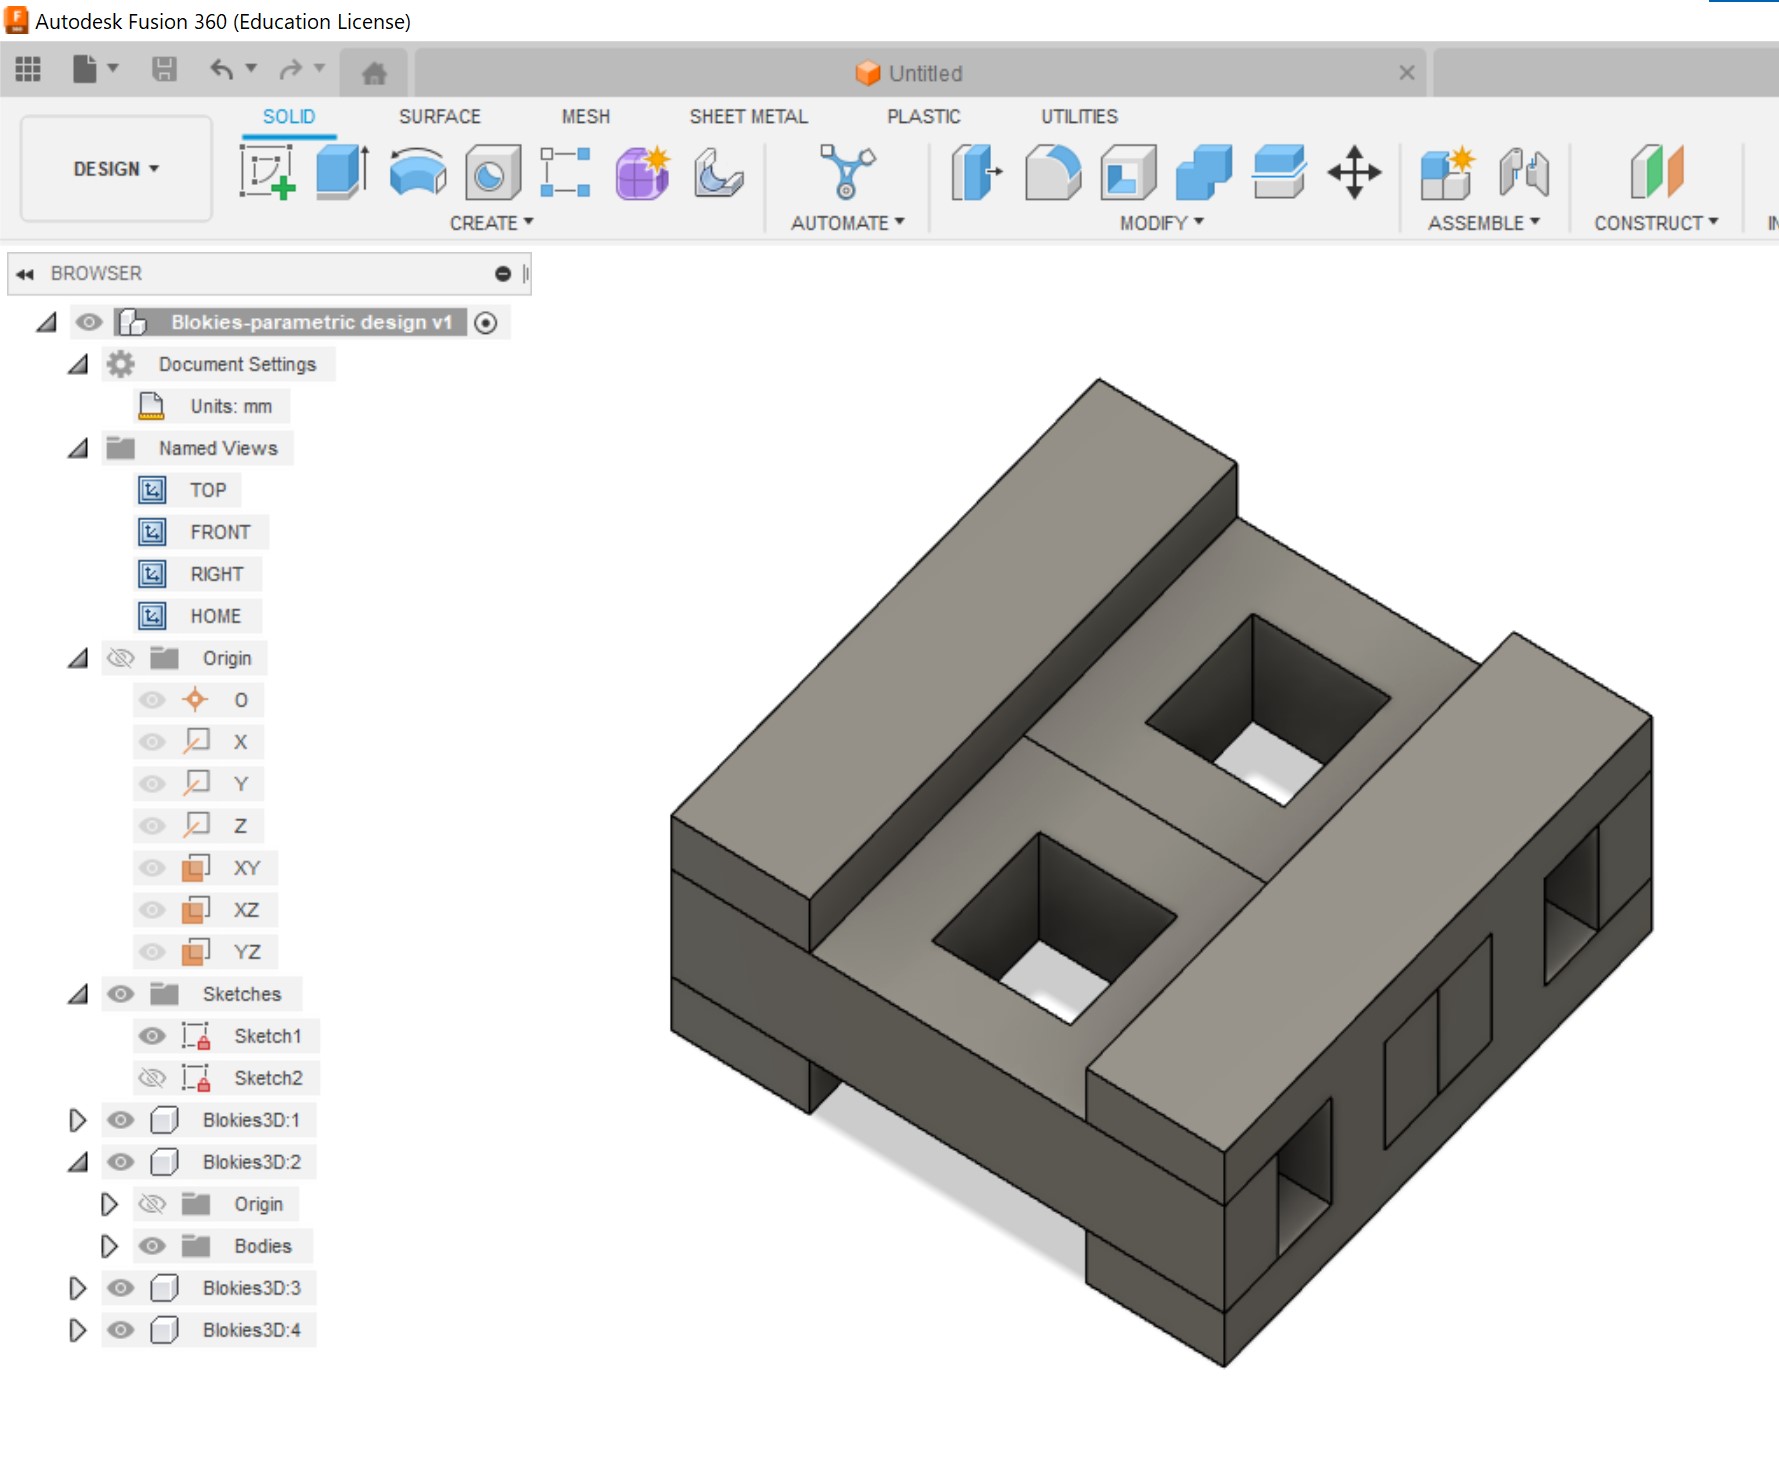
After defining all the lines in the Sketch mode, extrude the 2D sketch with the material thickness (ht and htXL). Convert the "body" into components to a few simulation of assembly steps in Fusion 360.
Going back to the sketch, I export the H-shape as dxf to layout multiple templates in Adobe Illustrator. I use the calculated kerf (0.13mm) to off-set the cutting path before sending to laser-cutting.
We are required to use laser cutting to produce the press-fit kit and no adhesive is allowed (self-locking).
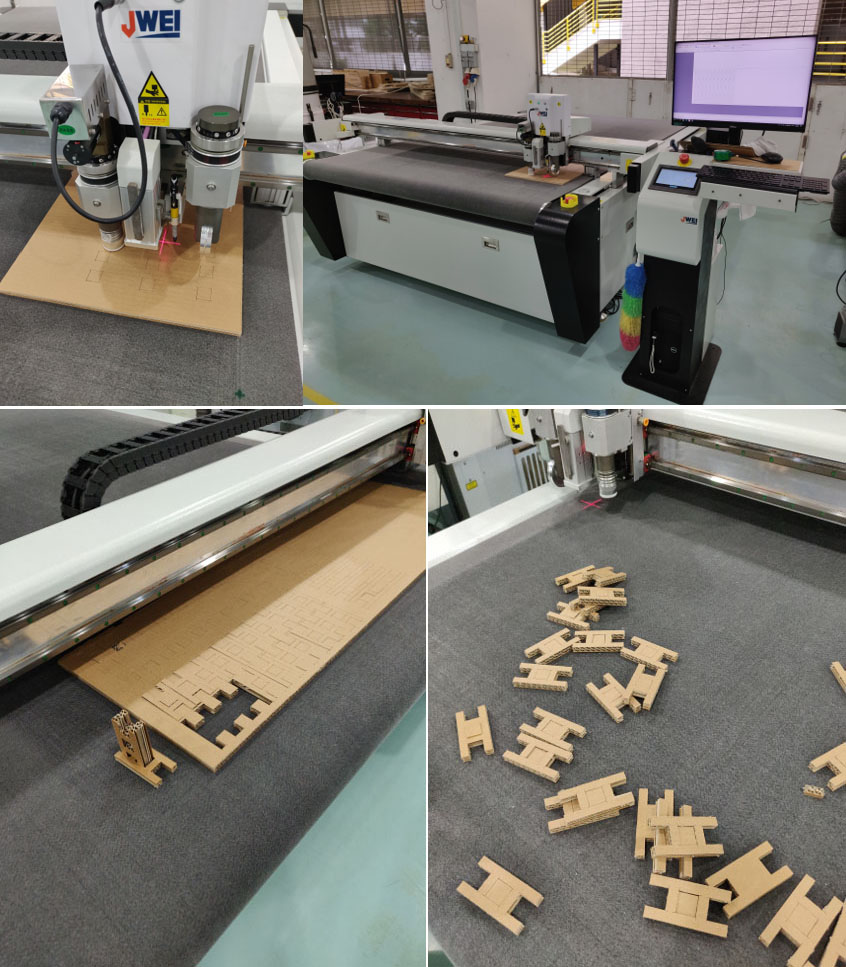
2. Laser cutting the press-fit construction kit
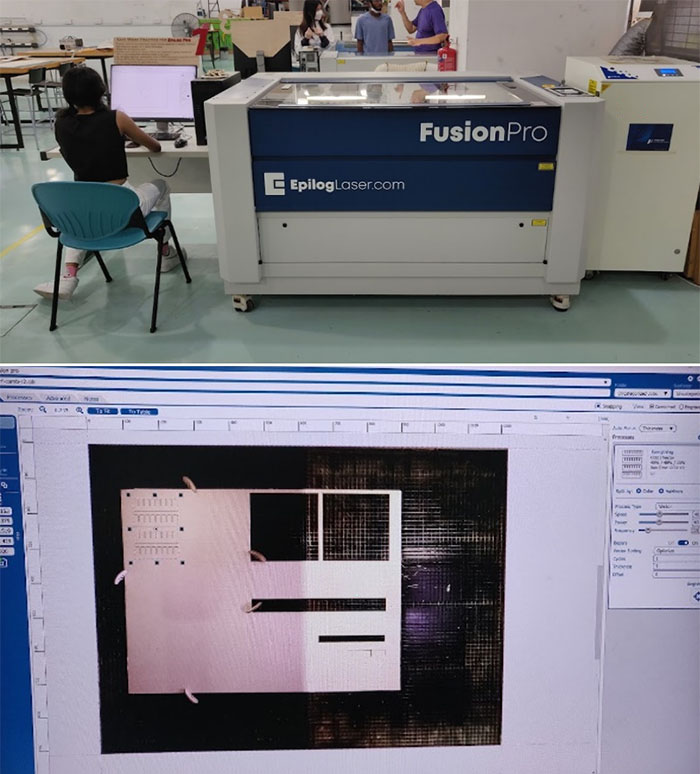
Epilog Fusion PRO (80W) the biggest and most powerful laser cutter available in the Fablab. The maximum cutting size is 1219mm x 914mm (48" x 36"). The other laser cutter available is Epilog M2 with maximum cutting size 1016mm x 711mm (40" x 28"). For Epilog pro, it comes with an in-build camera for alignment of material so we don't have to manually gauge the material boundaries before cutting. This is a nice feature for beginner when dealing with off-cut (irregular sized) materials.
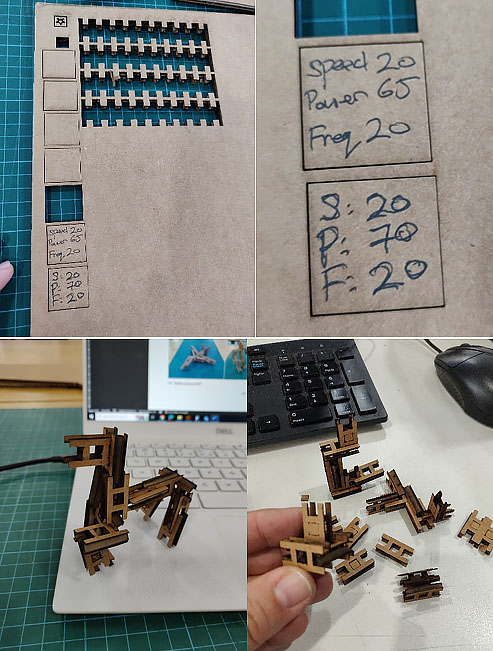
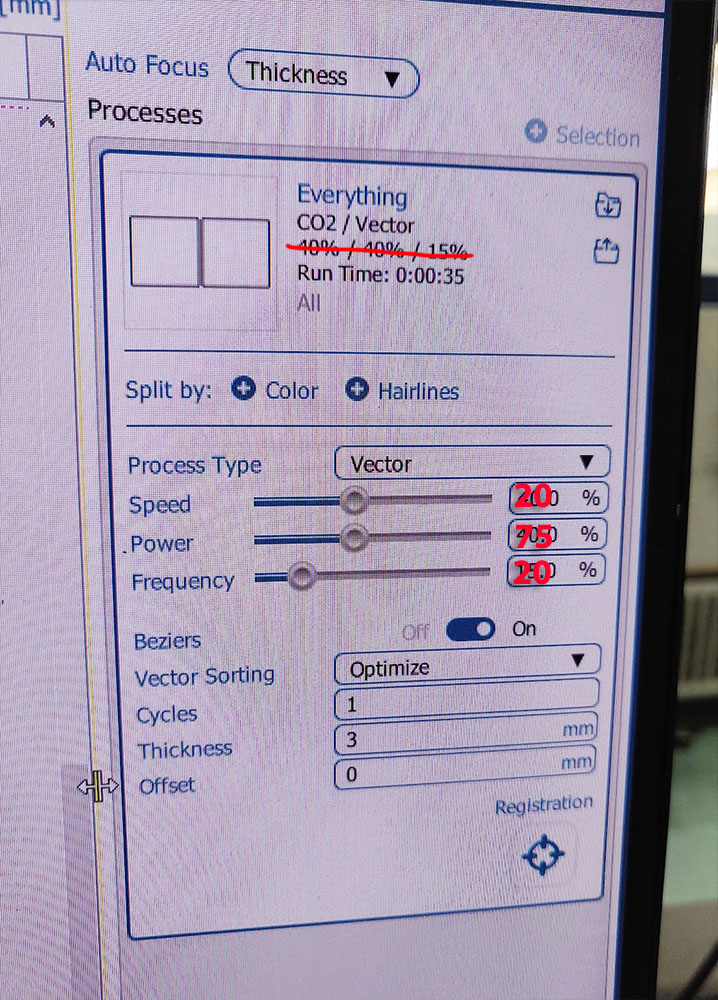
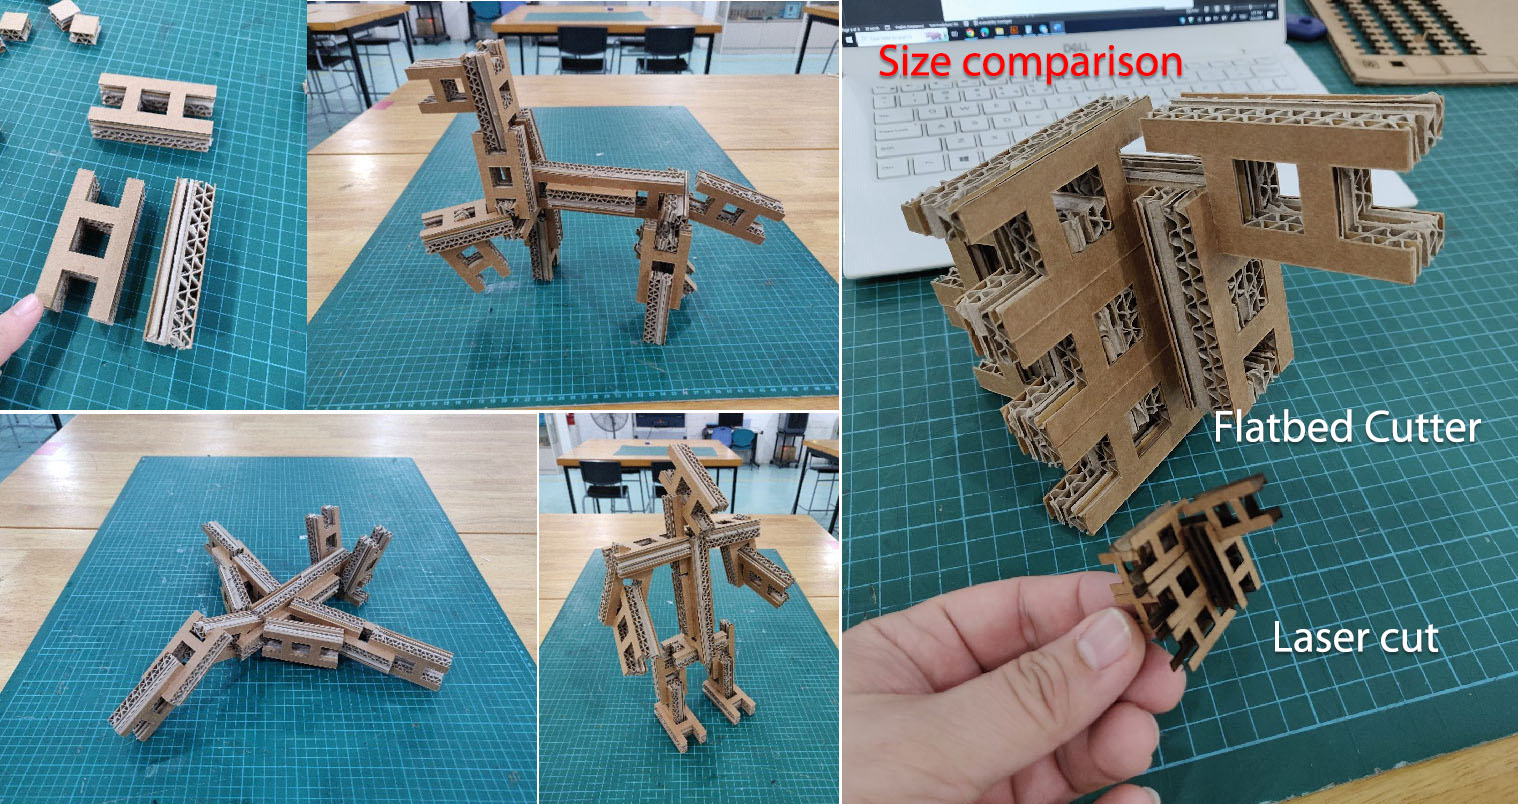
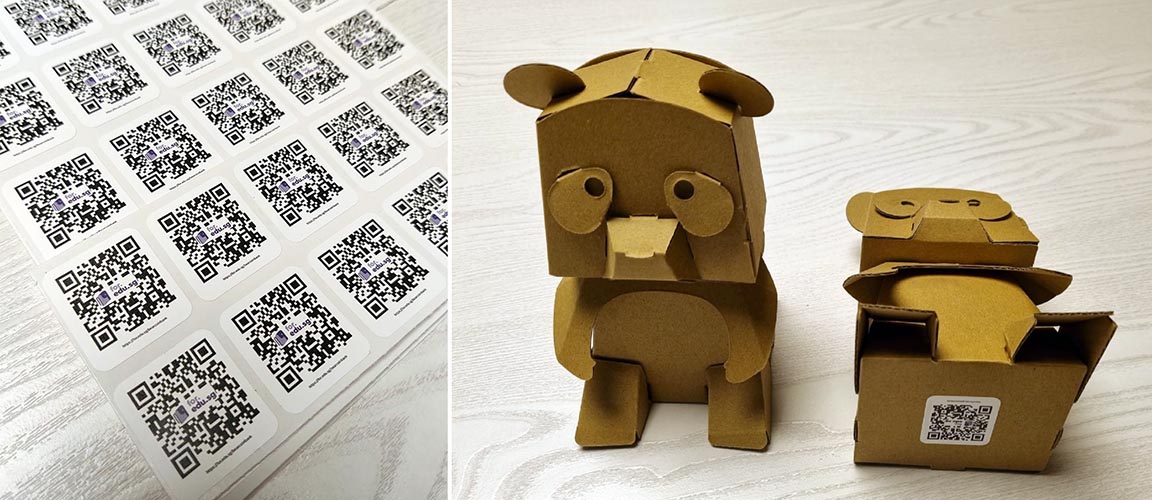
I did a few test on the Speed, Power and Frequency of the laser cutter on the single-wall A-flute cardboard. I found the optimal cutting is 20, 75, 20 (SPF). With the setting I cut about 40 tiny little "Blokies" to test it out. They passed the shaking test (to make sure it is tight fit).
3. Enlarge the Blokies size using double-wall cardboard
The laser-cut blokies are too small to my liking. The recommended thickness for laser cutting is not more than 5mm (Although there are techniques for cutting thicker materials, e.g. double pass). Moving on to use the flatbed cutting machine (Jwei), I cut a bigger version of the press-fit kit (Blokies) using double wall AA-flute with thickness of 10.5mm. The final size of the "Blokies" is 42mm x 21mm x 10.5mm per piece. Below is a time-lapse video of past project using the Jwei machine.
Here are the actual setup for the Cardboard Blokies and variations and the shaking test (in video below). Link to more Blokies (Google Photos) in action.
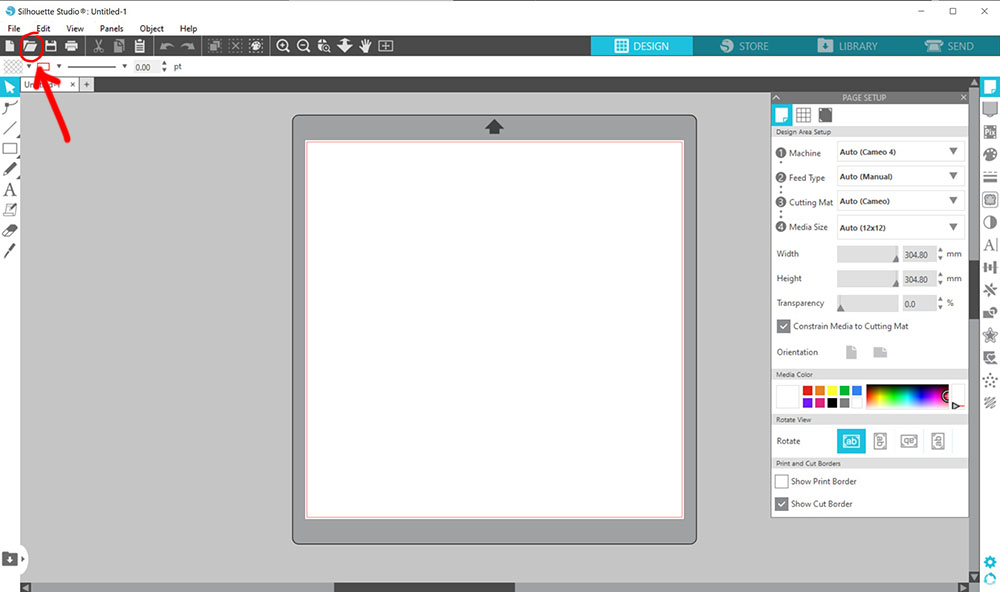
4. CAMEO Silhouette Studio - Vinyl stickers
I create a simple rabbit design in preparation for vinyl cutting.
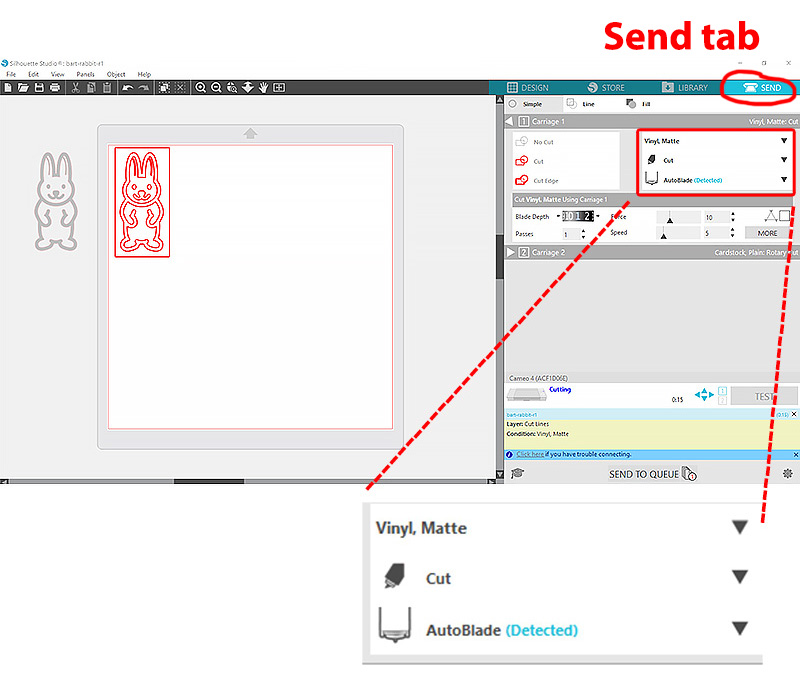
Below are important setting on the top right corner of the application (Silhouette Studio) under "Design" and "Send" tabs.
"Design" Tab: Import the PNG file and use the trace function in the app. The basic membership (FREE) of the app only allow to import raster images. Click on the Trace panel, and then Trace outline. The raster images will be converted into a vector file inside the application.
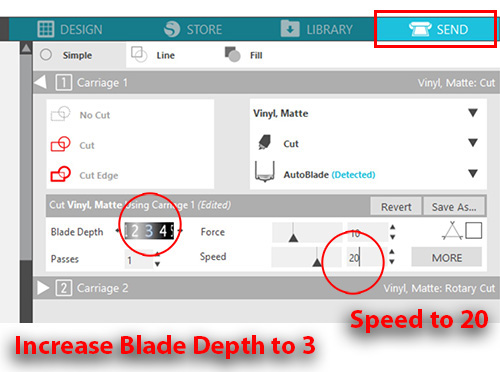
"Send" tab: Set the cutter setting to Vinyl (Matte), Blade depth and Speed. Increase the Blade depth to 3 and the Speed to 20.
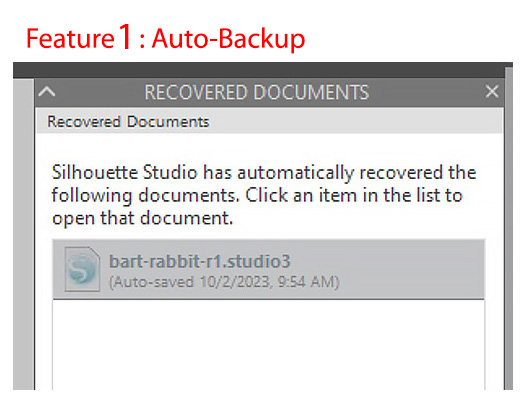
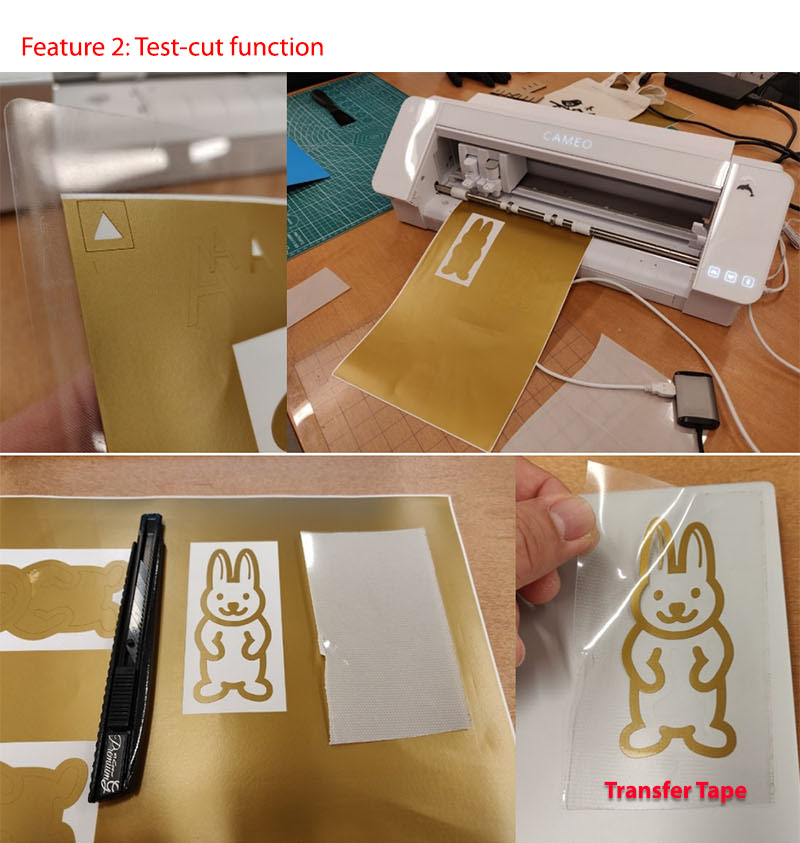
Silhouette Studio come with a document back-up system in case it crashed. There is also a test cut function (A triangle and square) to check the blade (and cut depth) before starting to job.
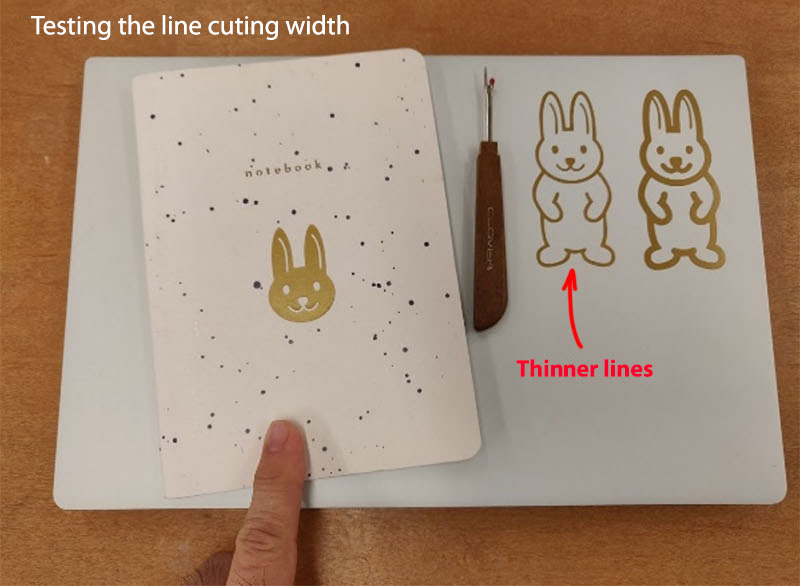
I tested the limitation of sticker cutting line width. the original rabbit has thicker lines and subsequently I switched to thinner line in Adobe Illustrator. The test width is successful.

(Additional information after week 3)
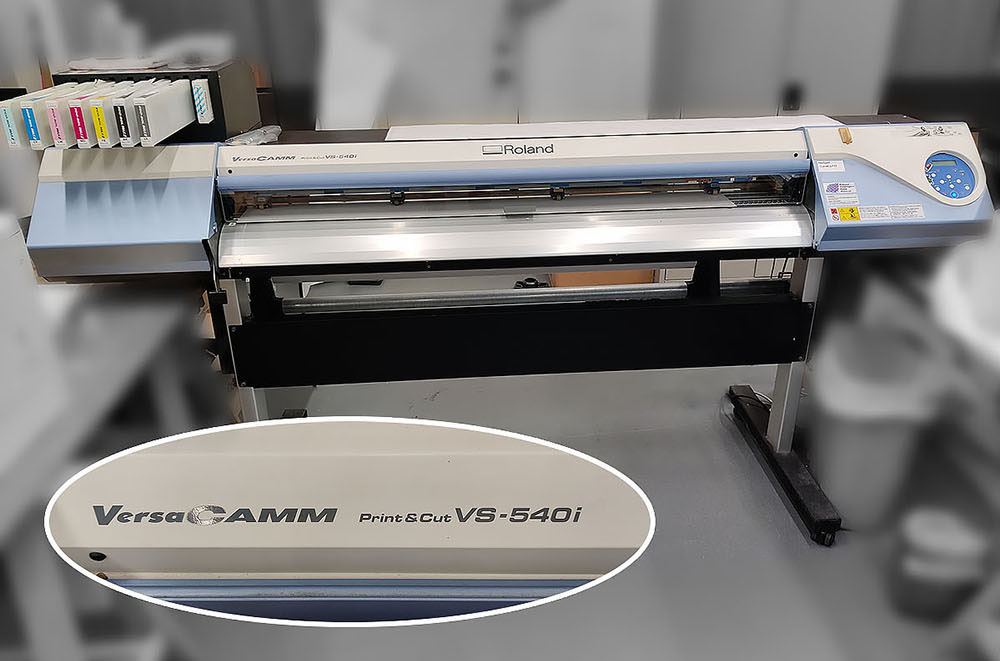
5. Roland VersaCamm (Print & Cut: VS-540i)
We have a 7-color printer (and cutter) at Building T1442. We use two applications to operate the print and cut machine: CorelDRAW 2021 (64bit) and Roland VersaWorks (printer driver).
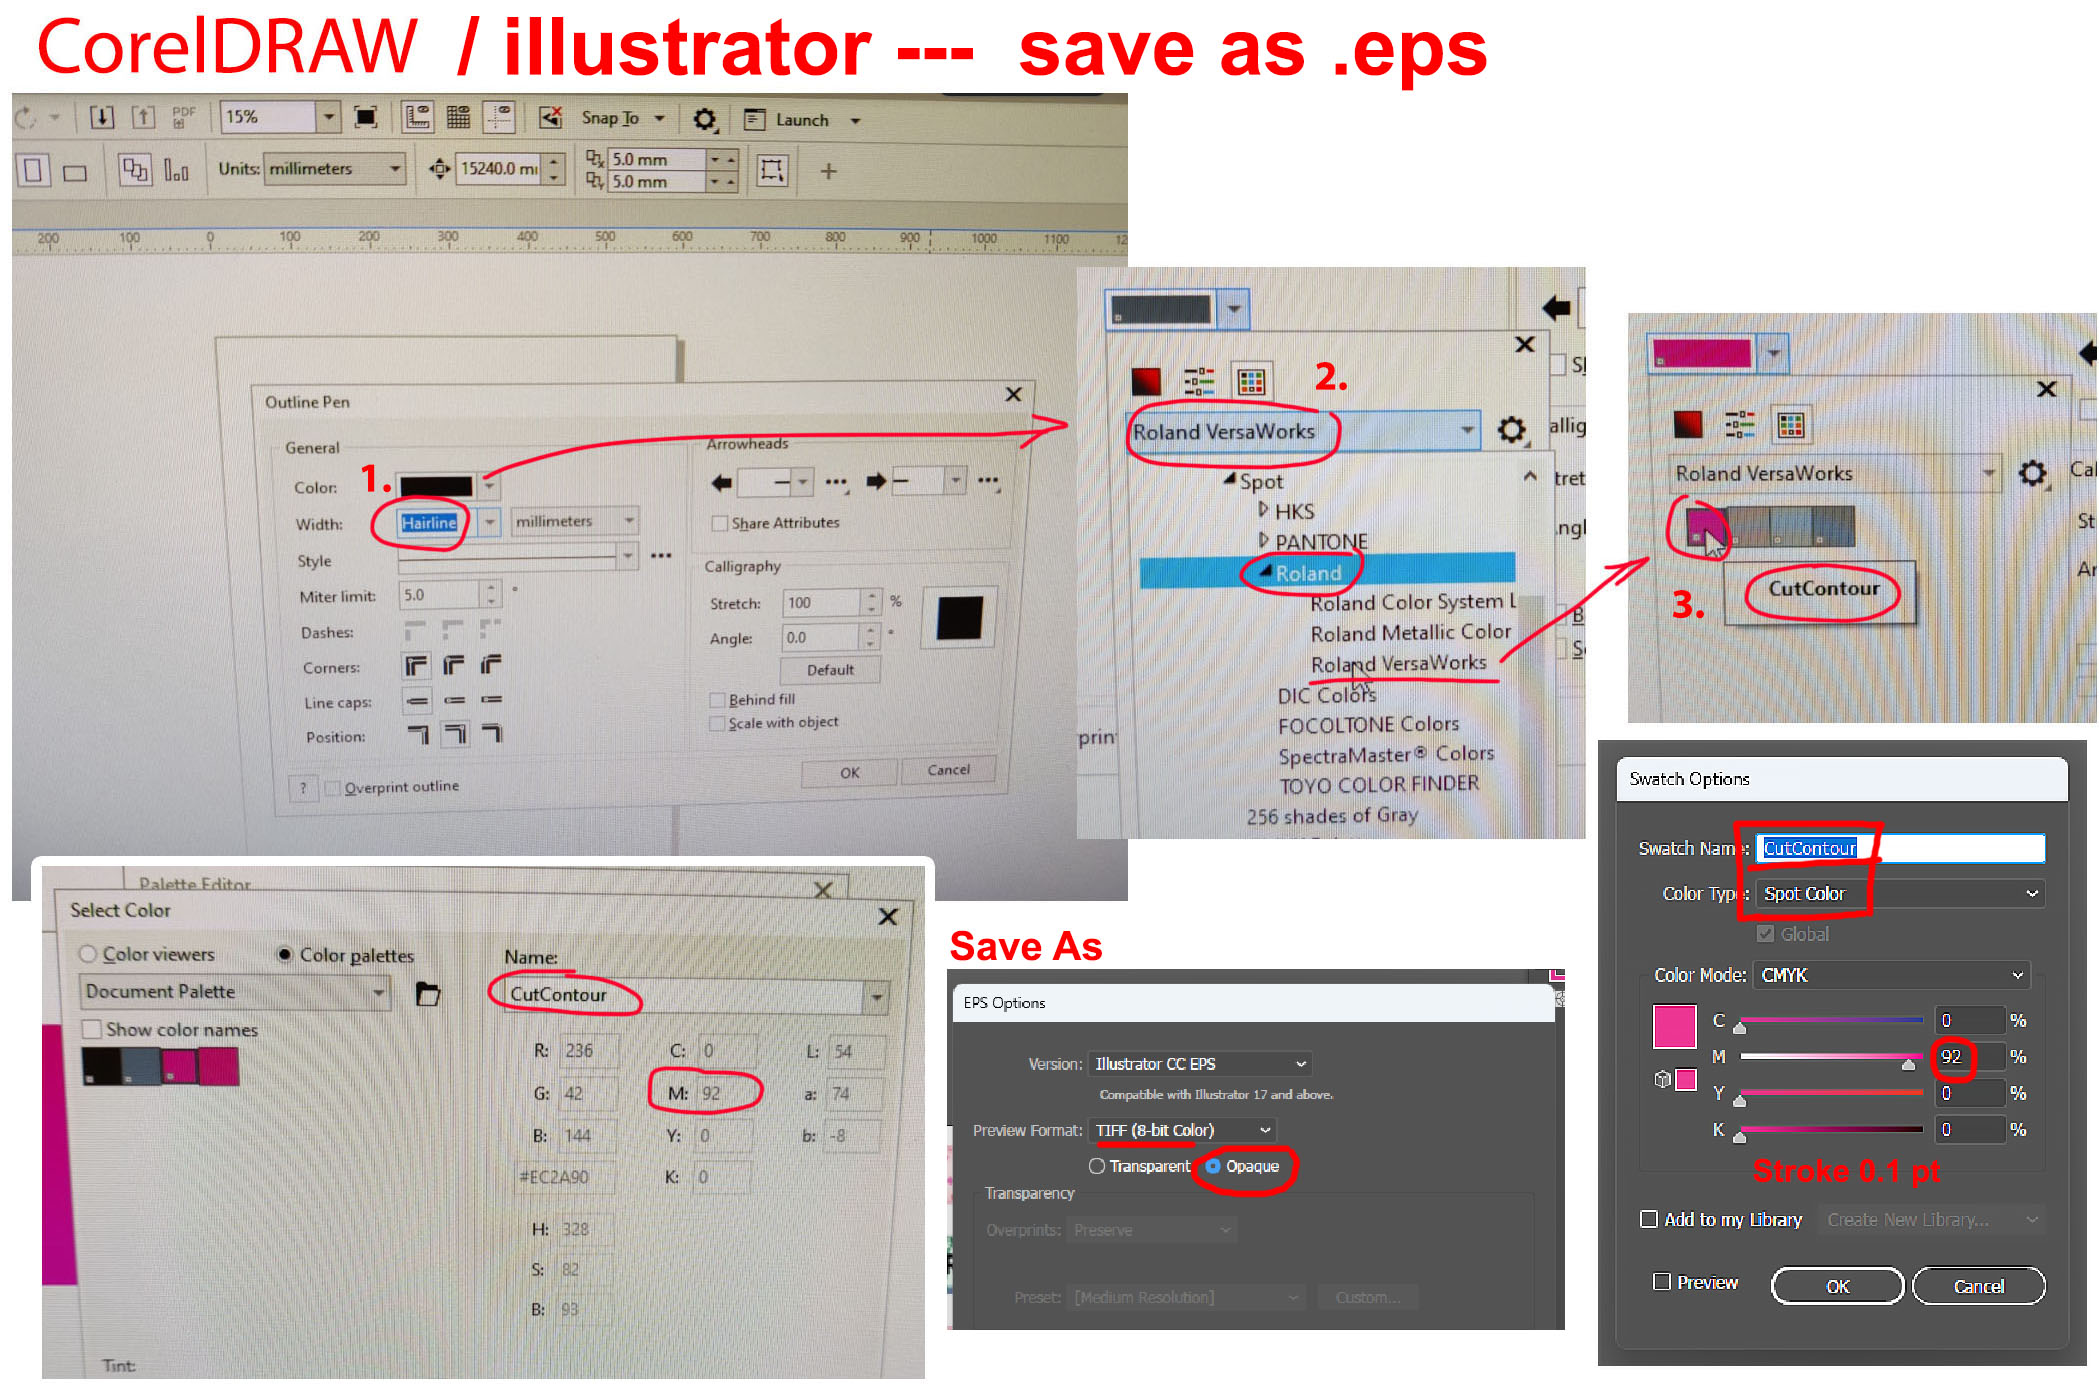
- Adobe Illustrator: save your file as pdf and import into CorelDRAW.
- First import pdf artwork into CorelDRAW. Set the cutting line to hairline (Roland VersaWorks color profile Magenta- CMYK- Magenta 92%). Group the Artworks and export (check "selected only") as EPS format (CMYK color mode). VersaWorks recognized all Magenta color as "CutContour" profile.
- Open the app
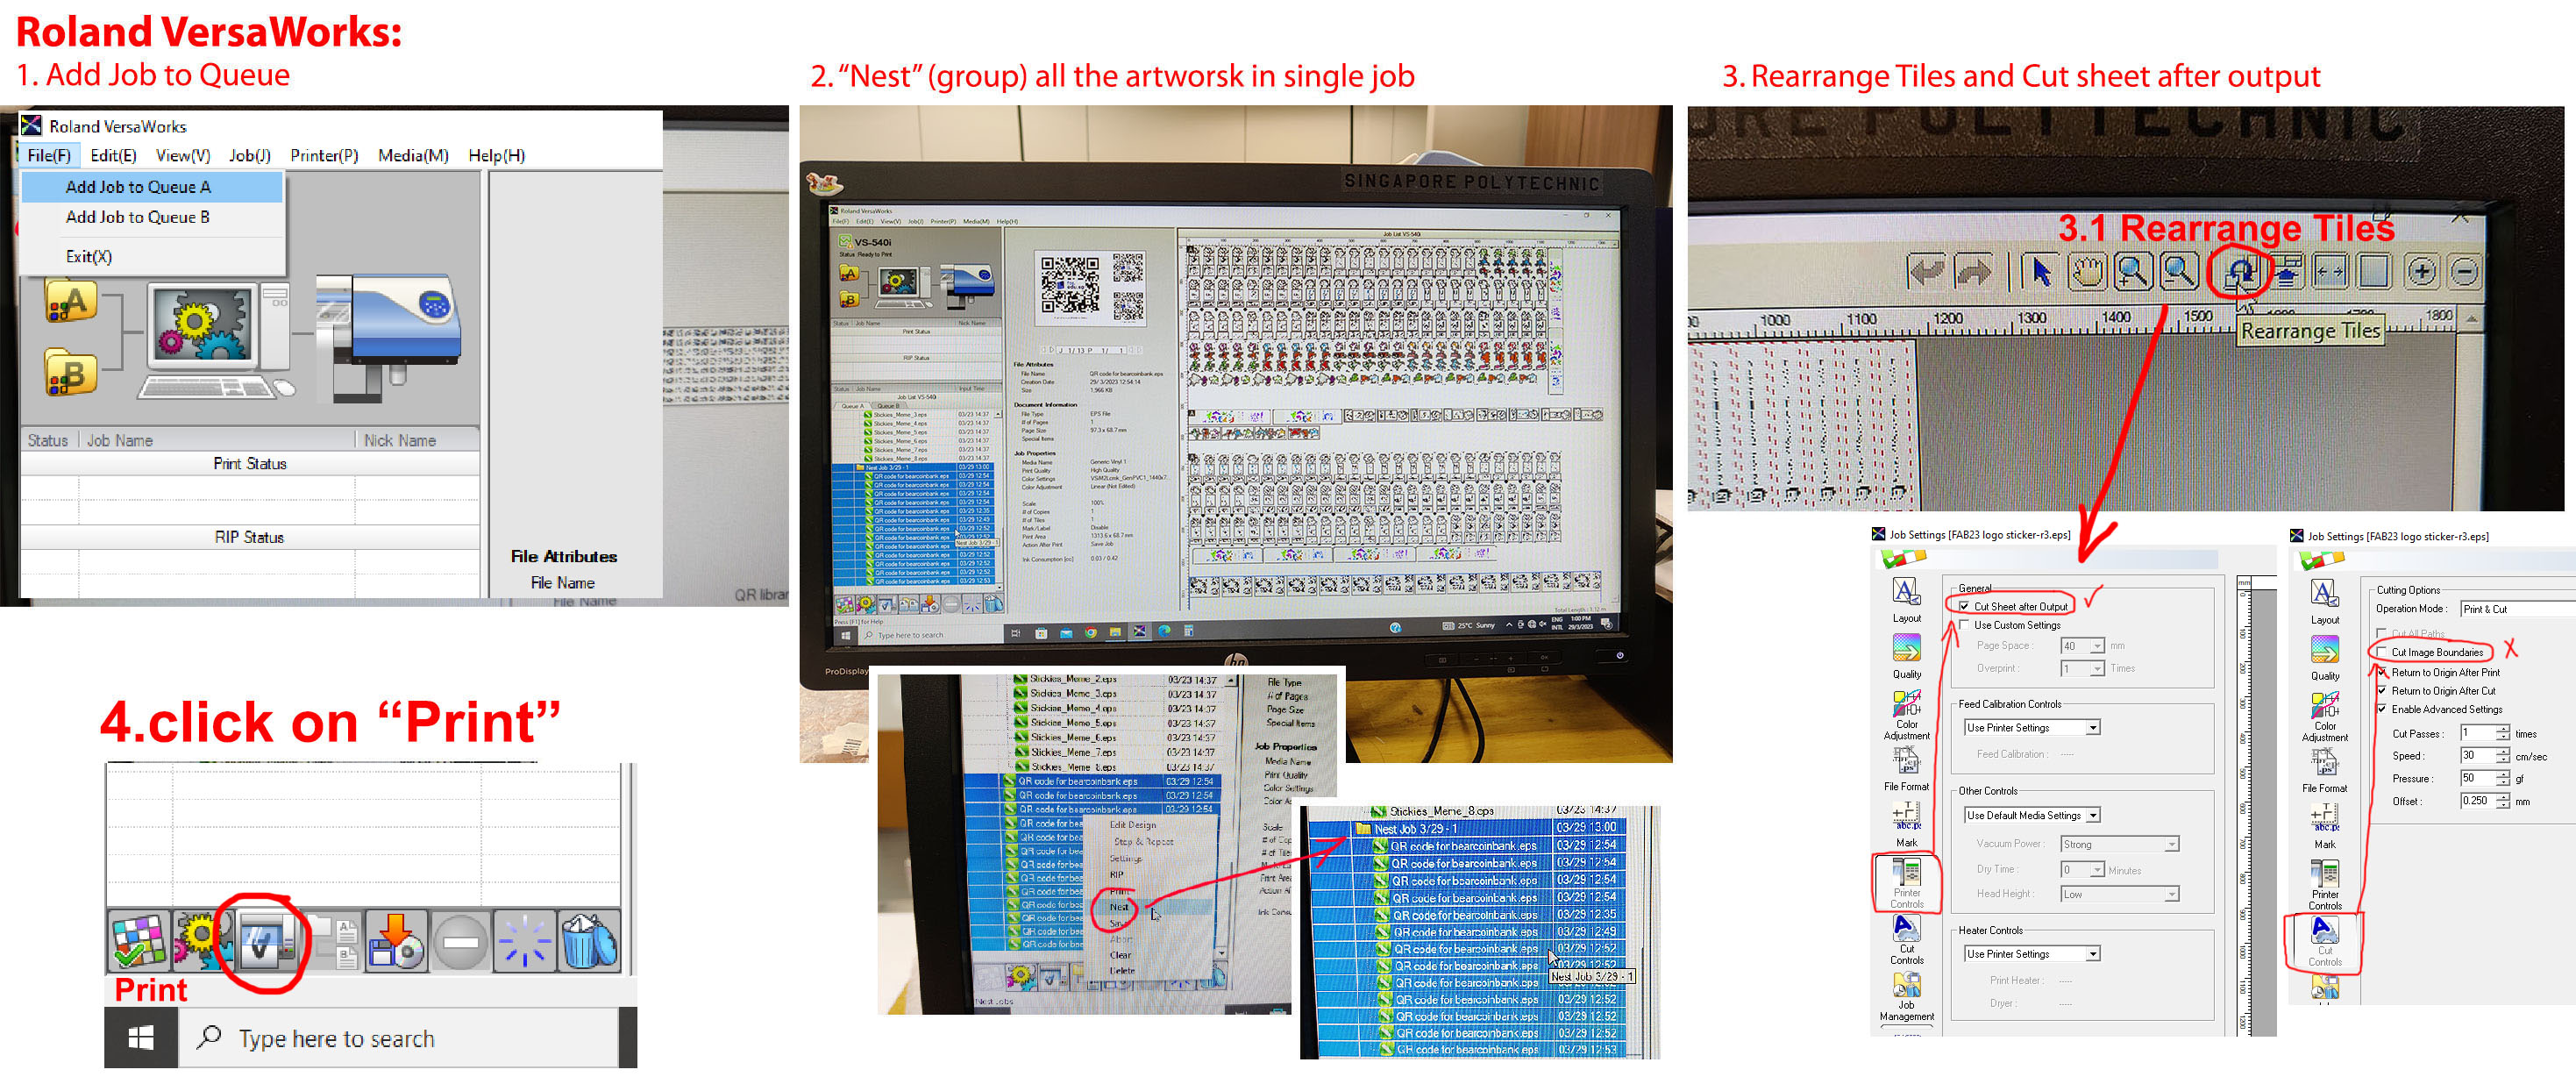
Roland VersaWorks. Go to "File", then "Add Job to Queue A". Add the EPS file into VersaWorks (multiple times if needed). Use the "Nest" Job for single print with multiple jobs. Double click on the Nest job to go into setting. - In the setting panel, use the tool "Rearrange Tiles" to maximize the print/cut area (photo below). Important: set the paper width correctly.
- Click on the "Printer Controls" and check on "Cut Sheet after Output". Click Ok to confirm the setting.
- Maximum cutting width is approximate 1183mm (Machine read 1201mm). Printing length is unlimited. But the cutting tolerance for length is approximately 50cm only (longer cutting profile may need to check on alignment issue)
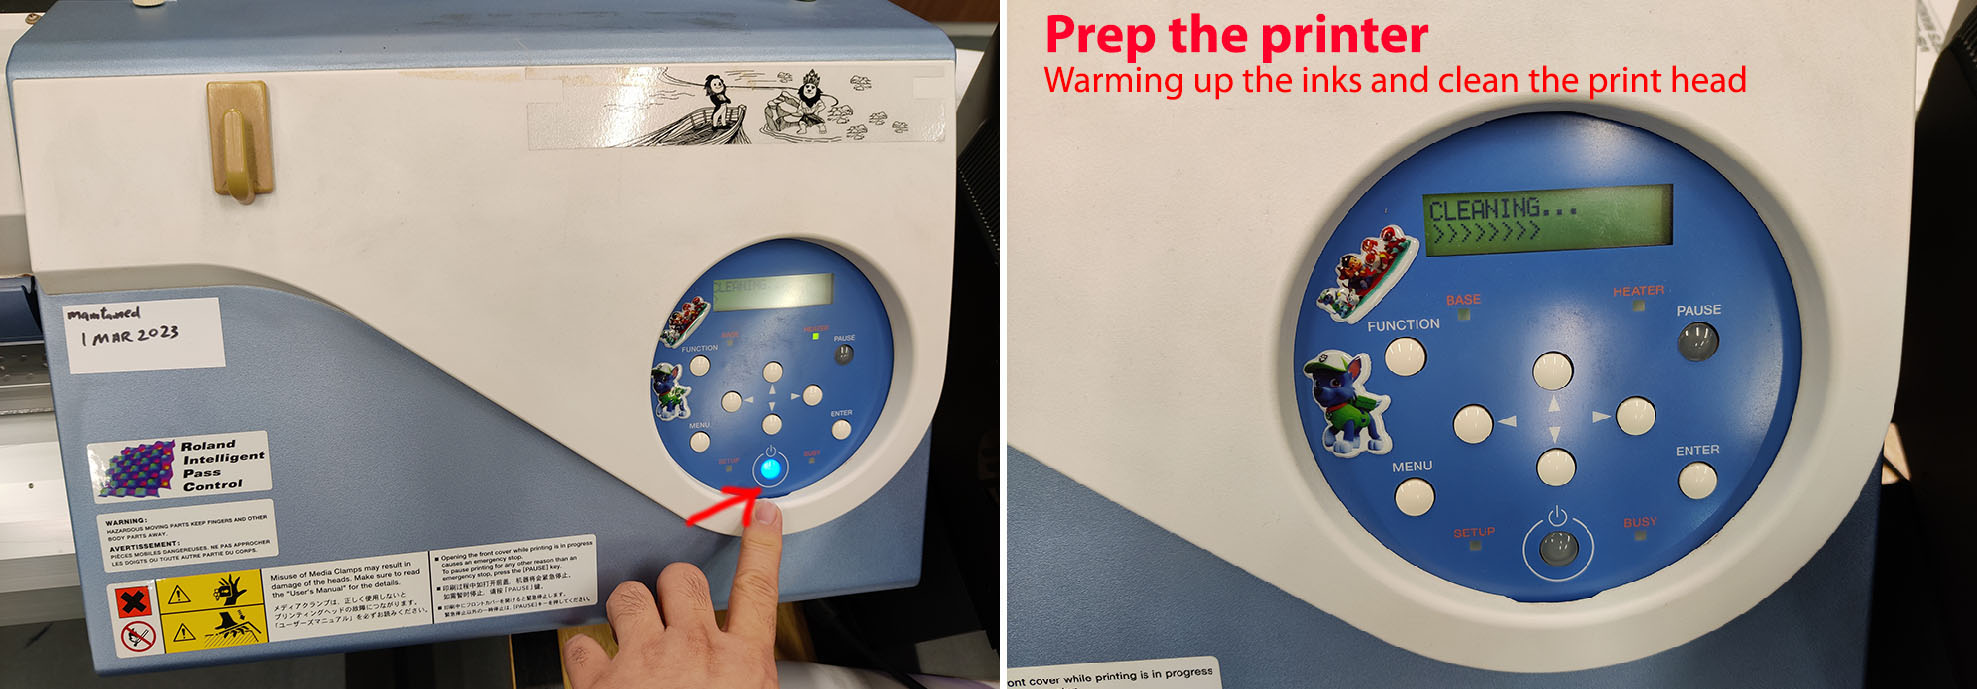
- Click "PRINT" to send the job to Roland printer. Go over to the printer control panel and press the power button to warm up the flow of the inks.
- Printing resolution 300 dpi is advisable.
1. CorelDRAW: export as EPS
2. Roland VersaWorks
Links to working files