Final Project: Shikumen Time Machine
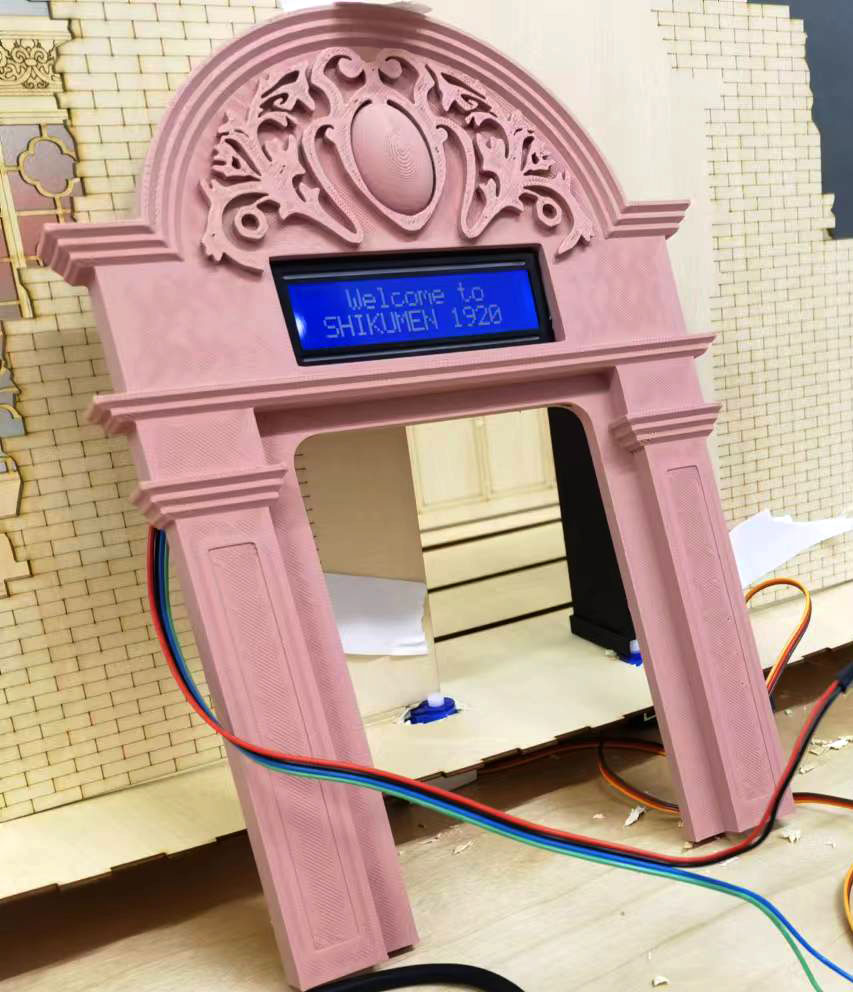
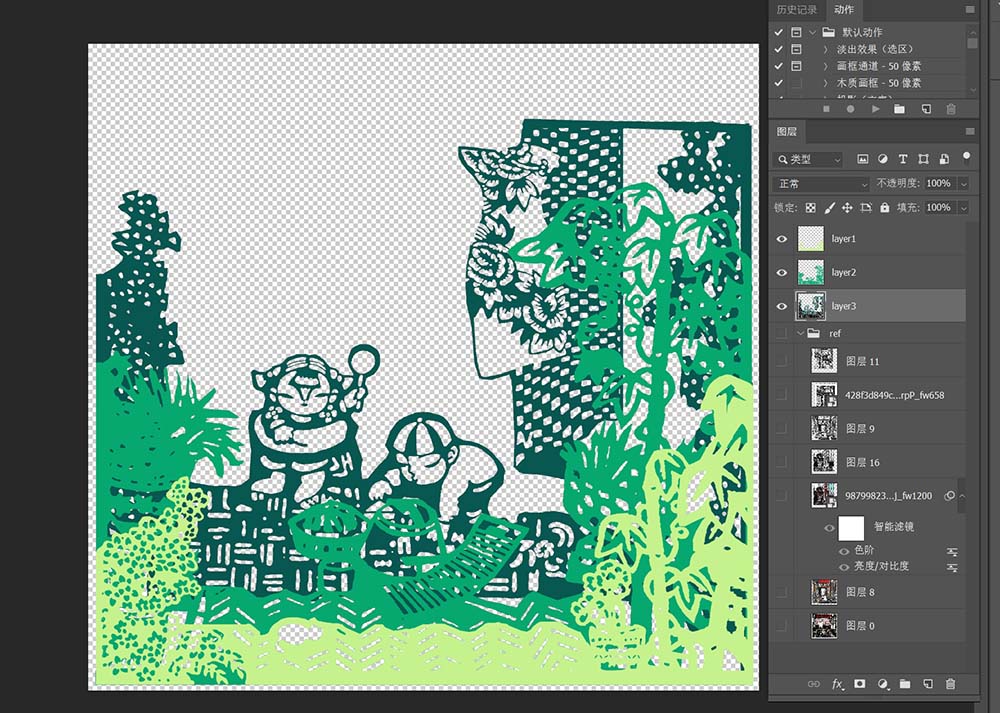
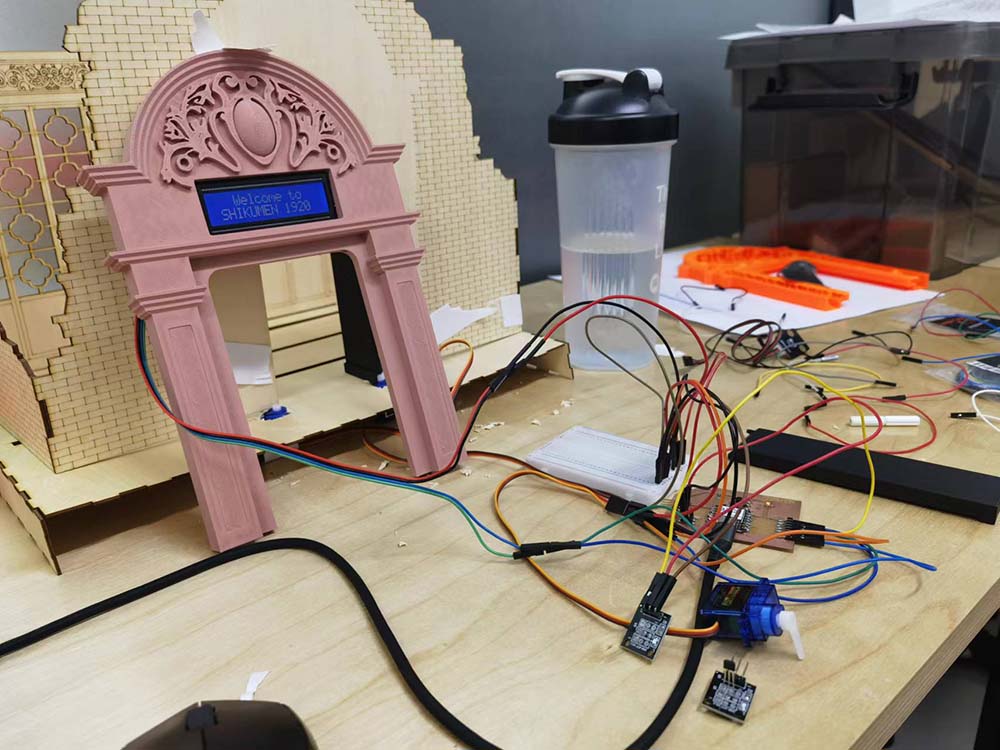
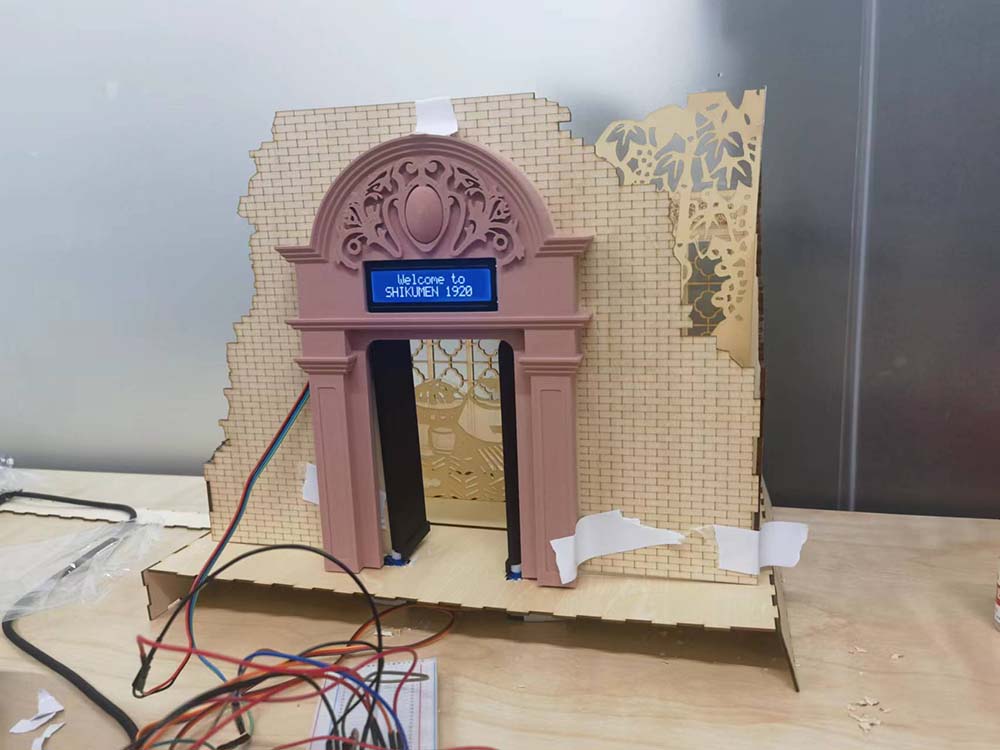
Final Result
This is a cultural and creative installation dedicated to preserving the traditional culture of Shikumen in Shanghai.
Shikumen carries the warm memories of many older generations of Shanghainese. It is also one of the symbols of Shanghai's modern urban civilization. I want this installation to be a captivating toy for kids. The idea is to spark children's interest with its visual appeal, motion, and lights.

Hero Shots
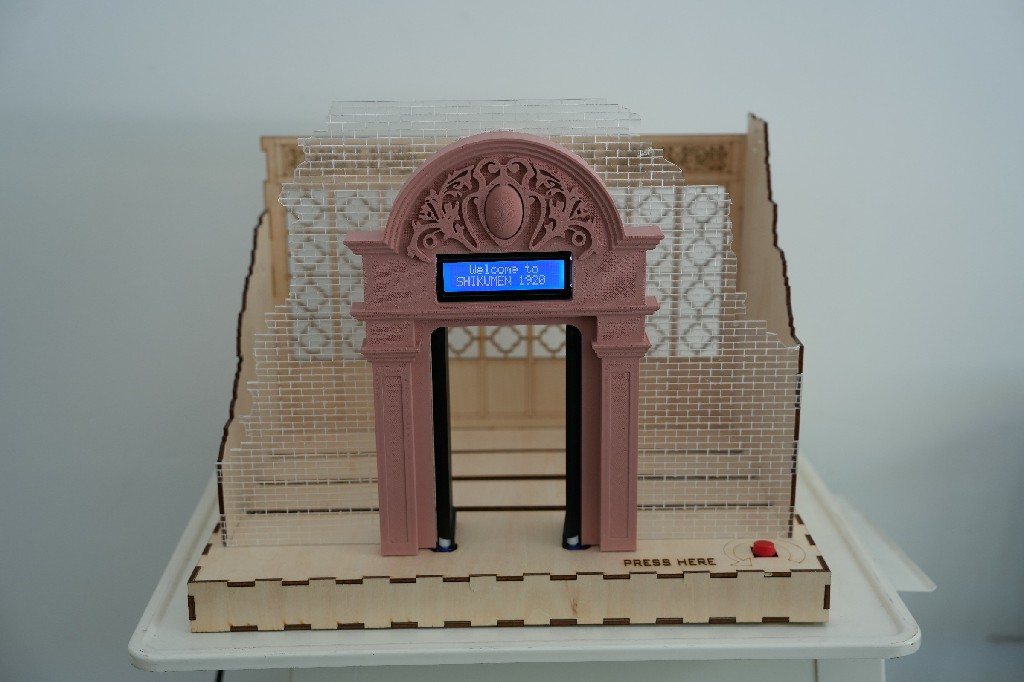
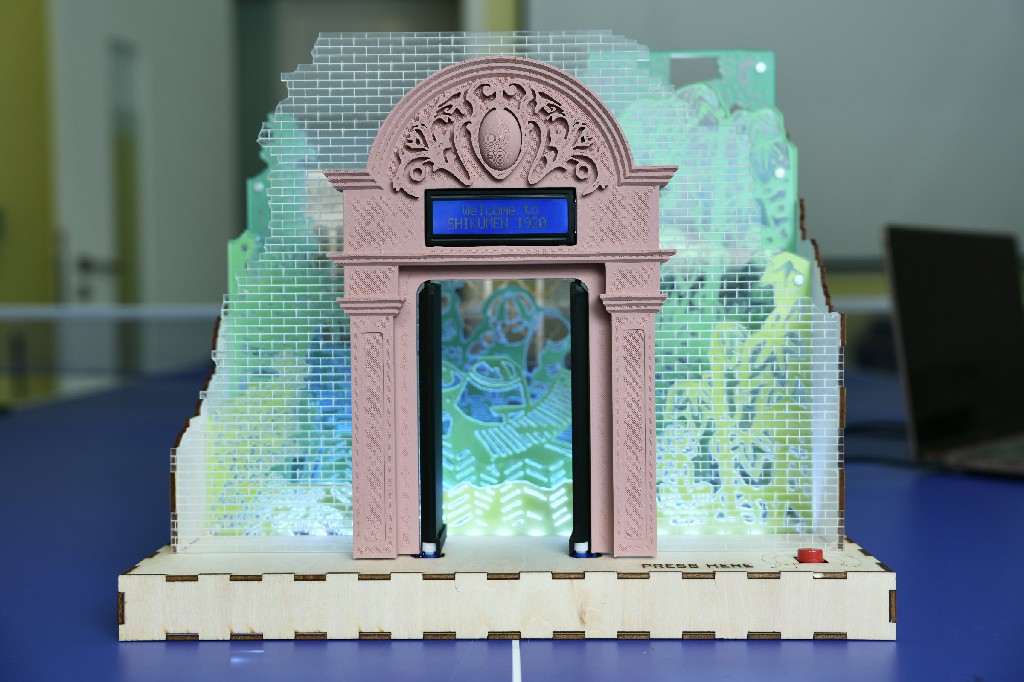
The exterior is designed to resemble the ruins of a Shikumen from the year 1920. By inserting life scene cards into the courtyard, colorful lights can be activated, bringing new life to the past Shikumen.
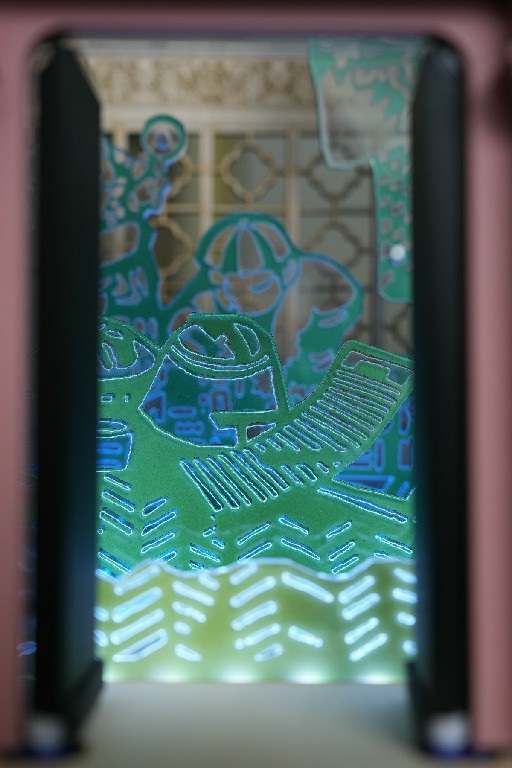
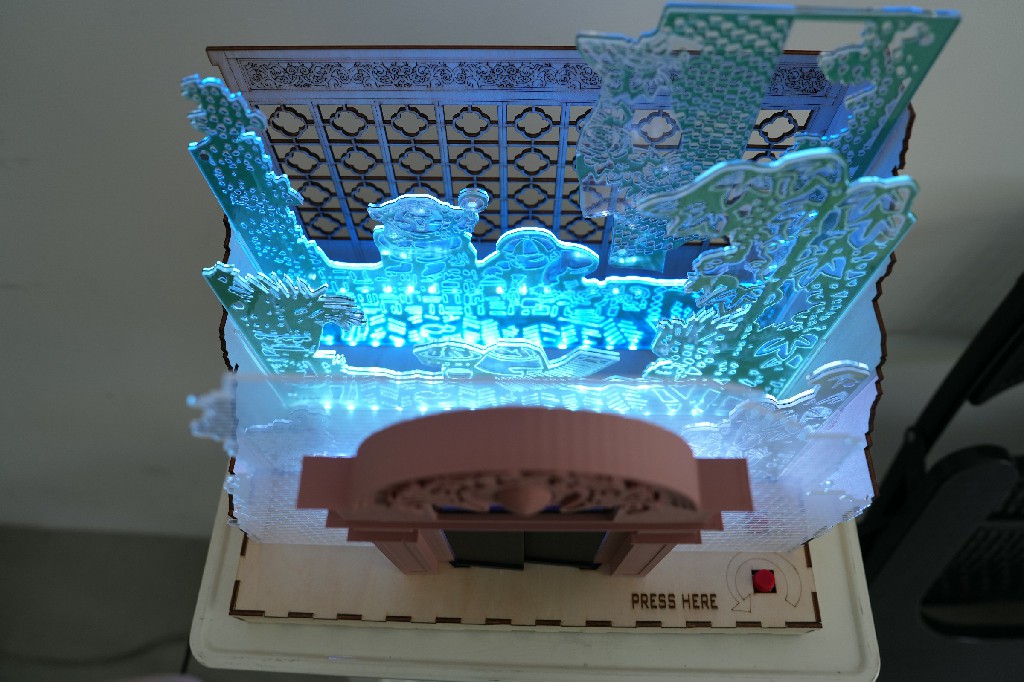
Scene Cards Look Inside the Door Top View
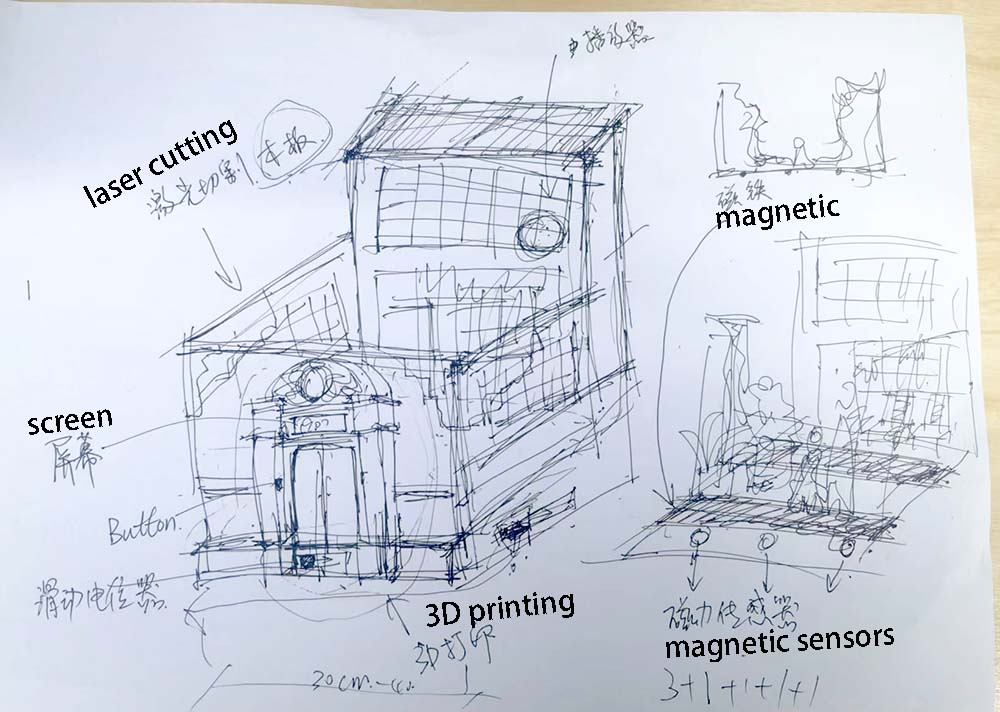
Idea and Sketch
I have launched an outdoor experiential learning course, taking children to explore traditional residential architecture in Shanghai - Shikumen. In the course, I introduce how people used to live in Shikumen buildings, as well as how Shikumen has been transformed and repurposed in contemporary times. Since they cannot see the authentic Shikumen courtyards during the visits, I aim to create an installation to help them understand this space better and learn how the people in the past utilized the courtyards in Shikumen houses.
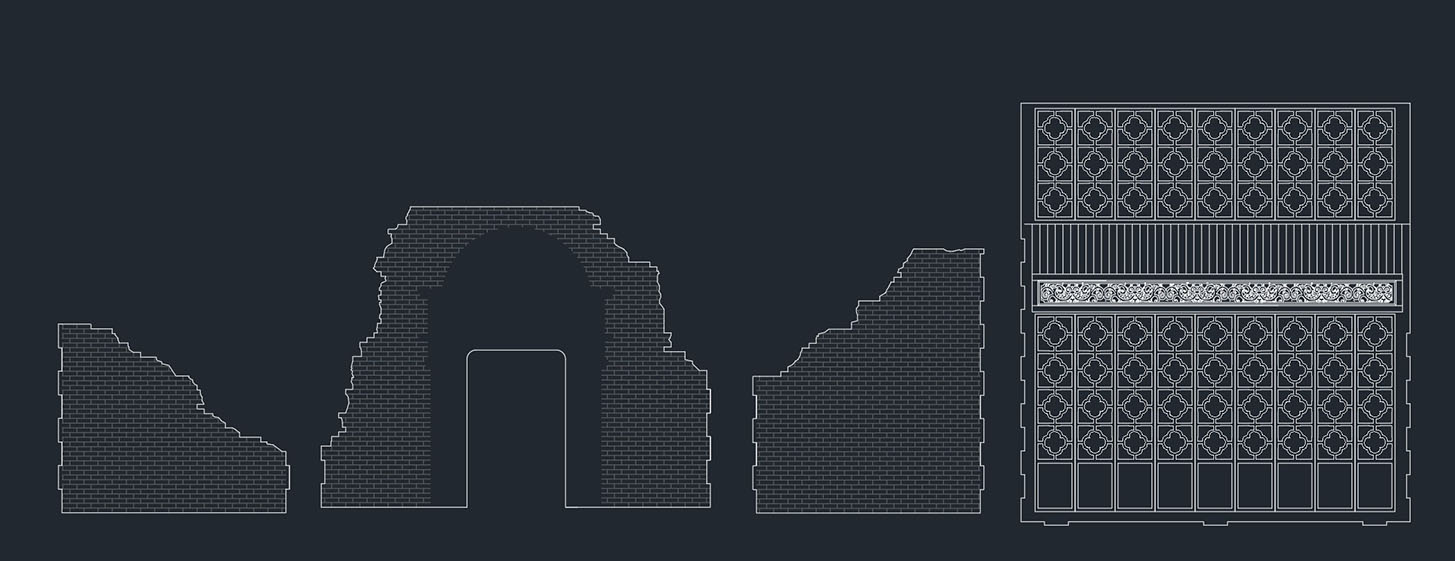
The reason why the Shikumen building in Shanghai is called "Shikumen" is because of its beautiful entrance gate. The gate is adorned with beautiful stone carvings on the lintel, leaving a profound impression on people. Therefore, the building is referred to by the name of its grand entrance gate - "Shikumen." So, the first thing this installation needs to showcase is the beautiful gate. I've decided to use 3D printing technology to create this model. The space below the lintel is suitable for placing an LCD screen, resembling a nameplate and providing a perfect combination.
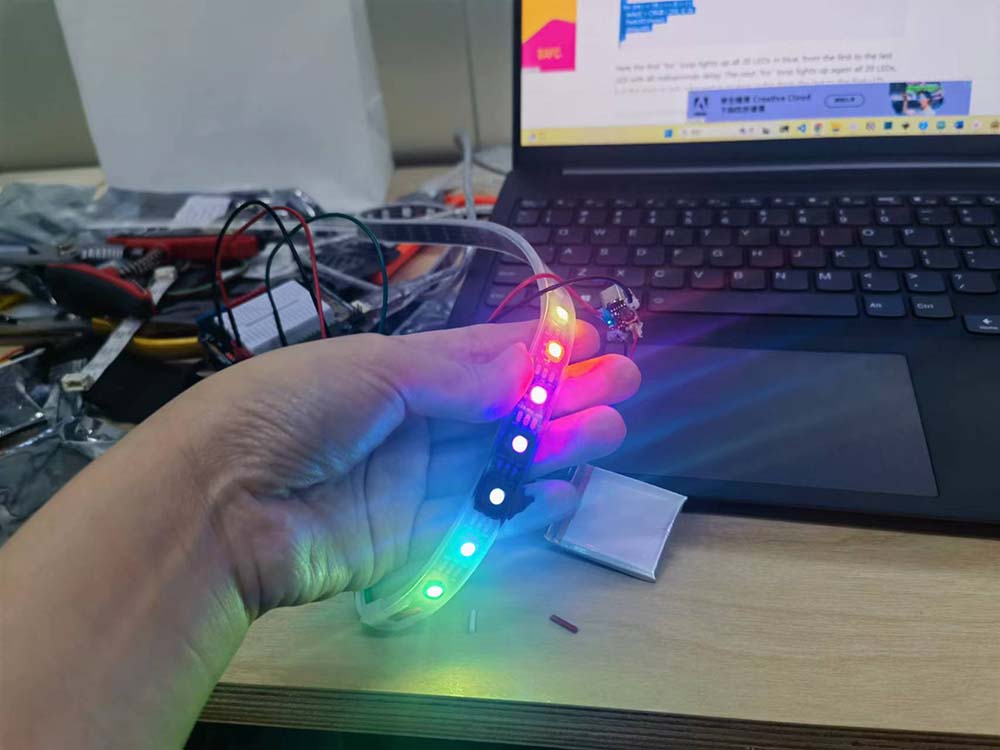
As for the surrounding walls, I've decided to use laser cutting to showcase the texture of bricks and beautiful Chinese-style lattice windows. The historical life scene cards inside are designed in a paper-cut style, and laser cutting can effectively achieve this effect. On the base, I will design three slots, each containing an LED strip and a magnetic sensor. Children will need to insert the cards into the correct slot according to my description. If inserted correctly, the magnetic sensor will detect the magnet and illuminate the LED strip. Once all the LED strips are lit, their task is complete.
 Rough Sketches
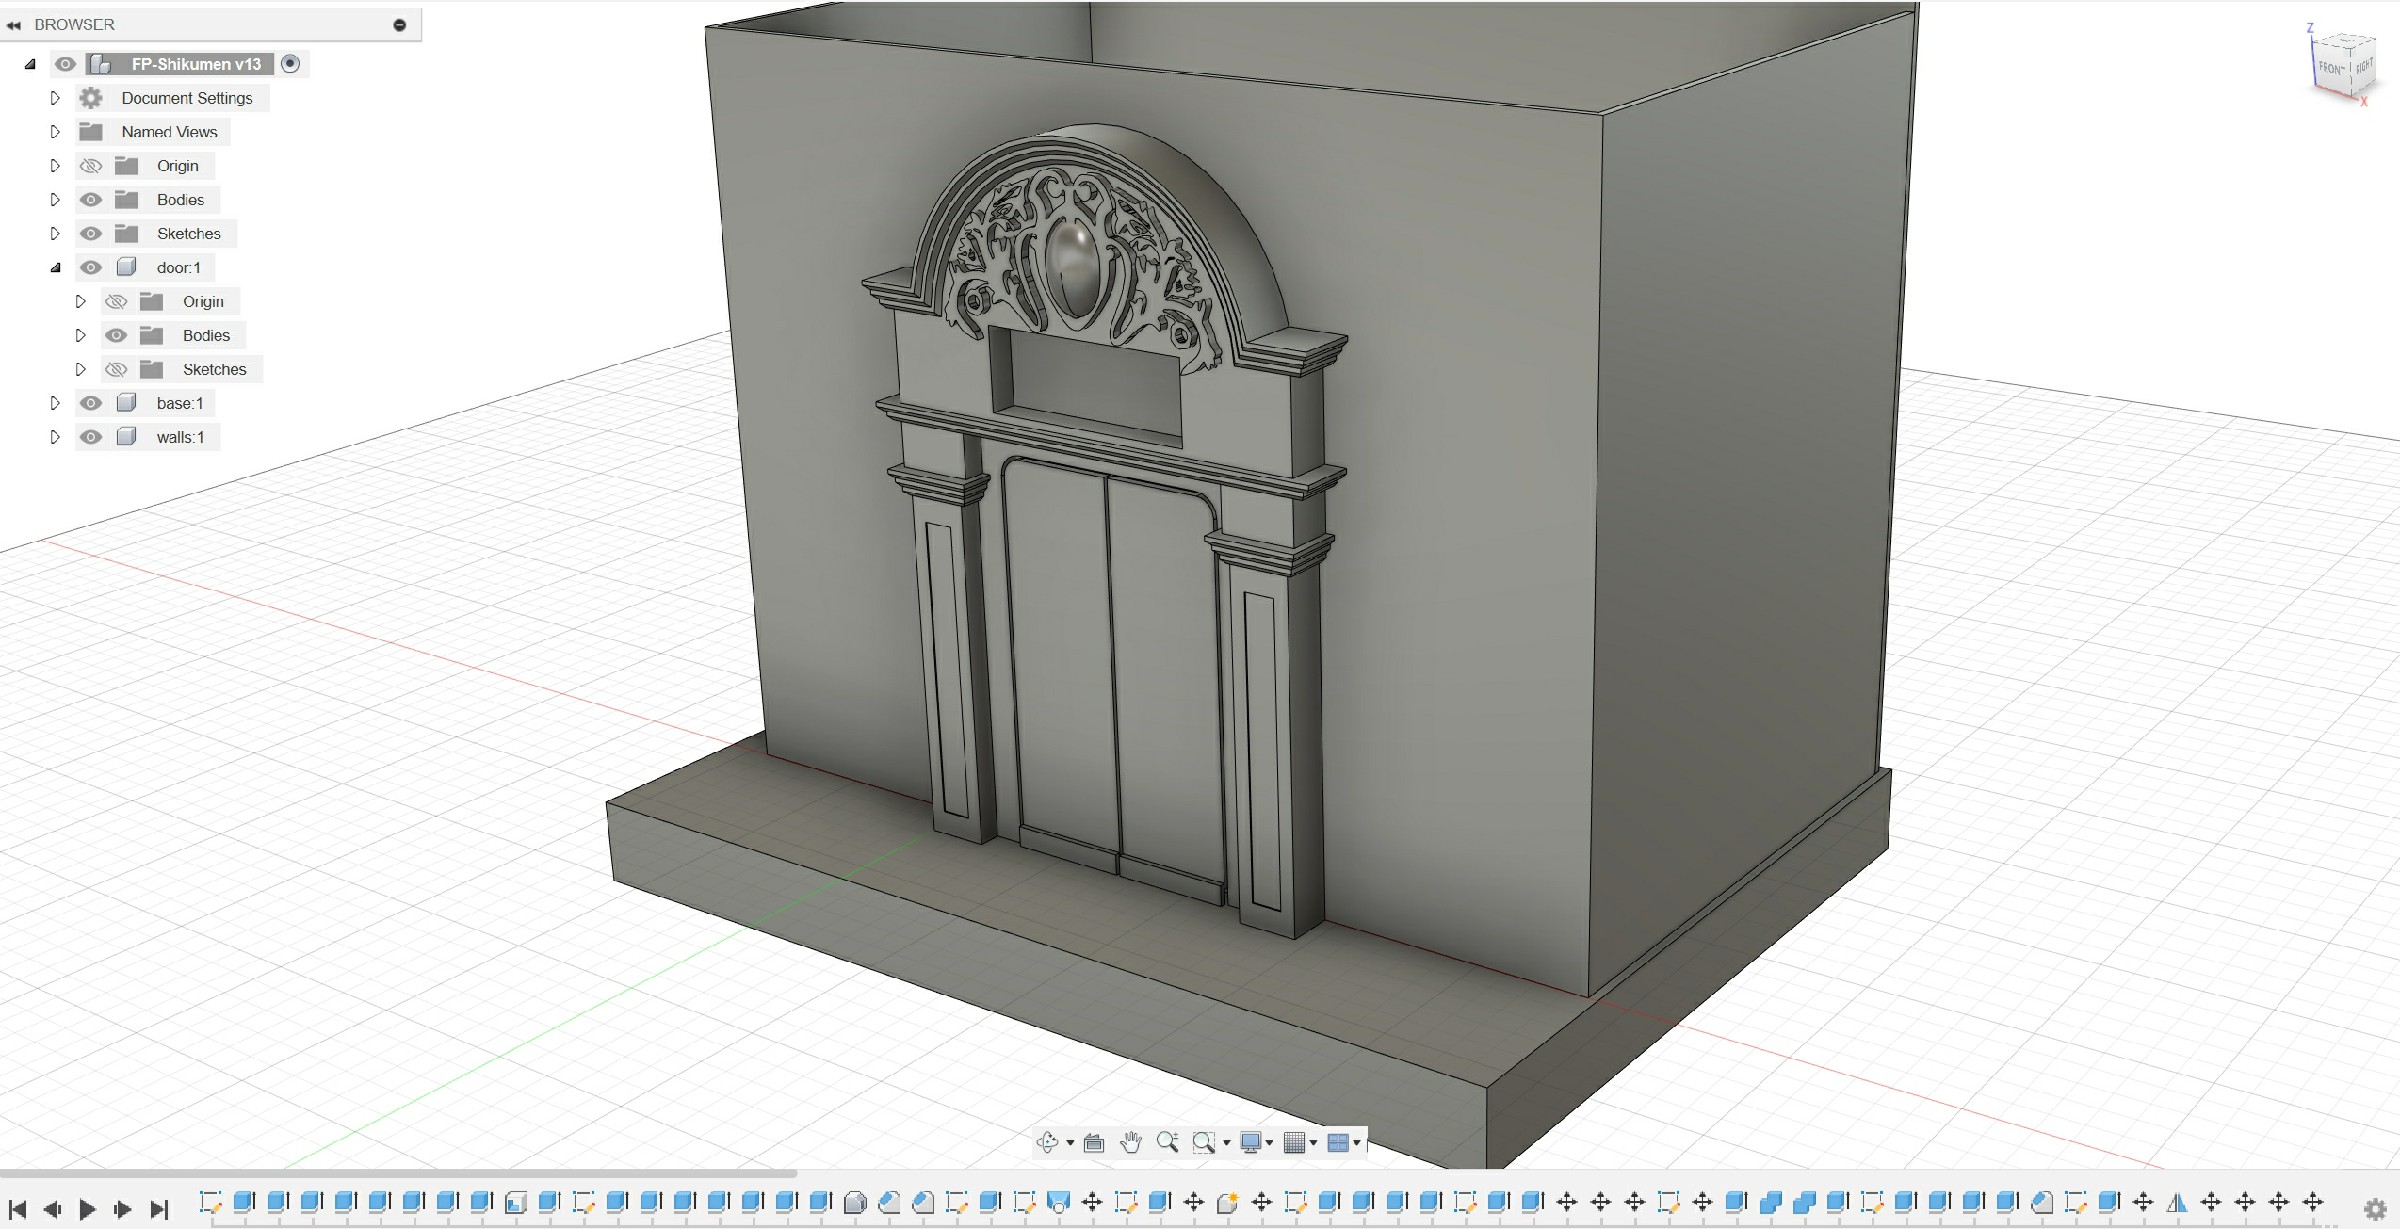
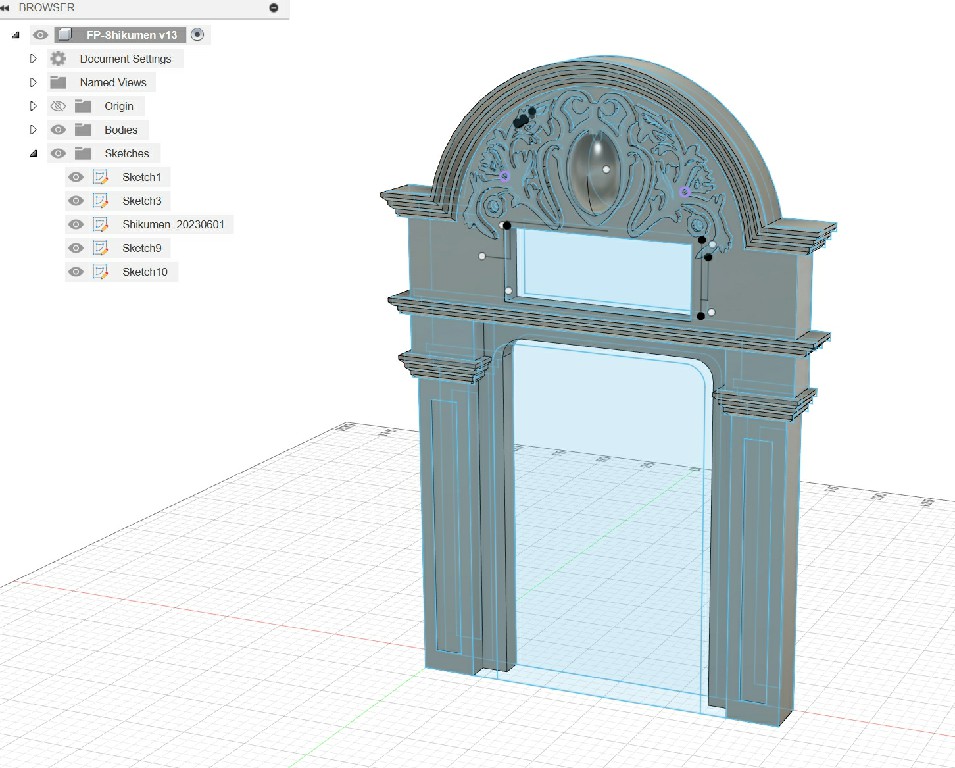
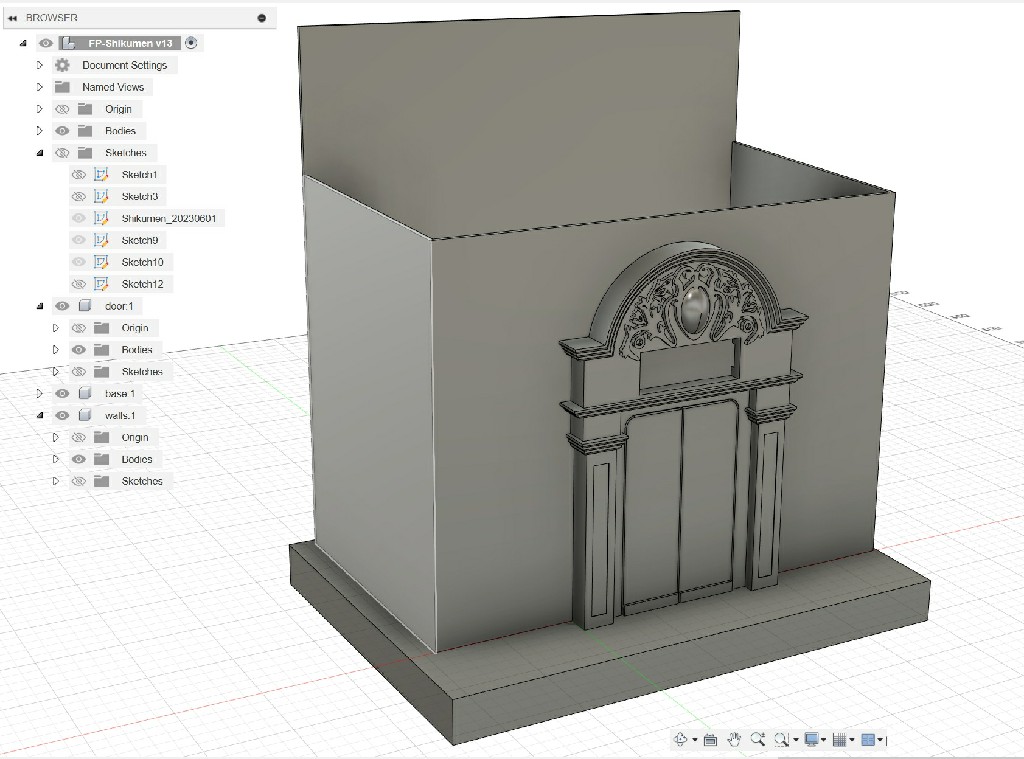
3D Model
Below you can see the 3D model of my idea. In the model, the primary focus is on determining the form and structure of the door, and it is directly imported into slicing software for 3D printing. For the walls and the base, the main consideration is to determine the dimensions, making it convenient to draw 2D graphics for laser cutting.
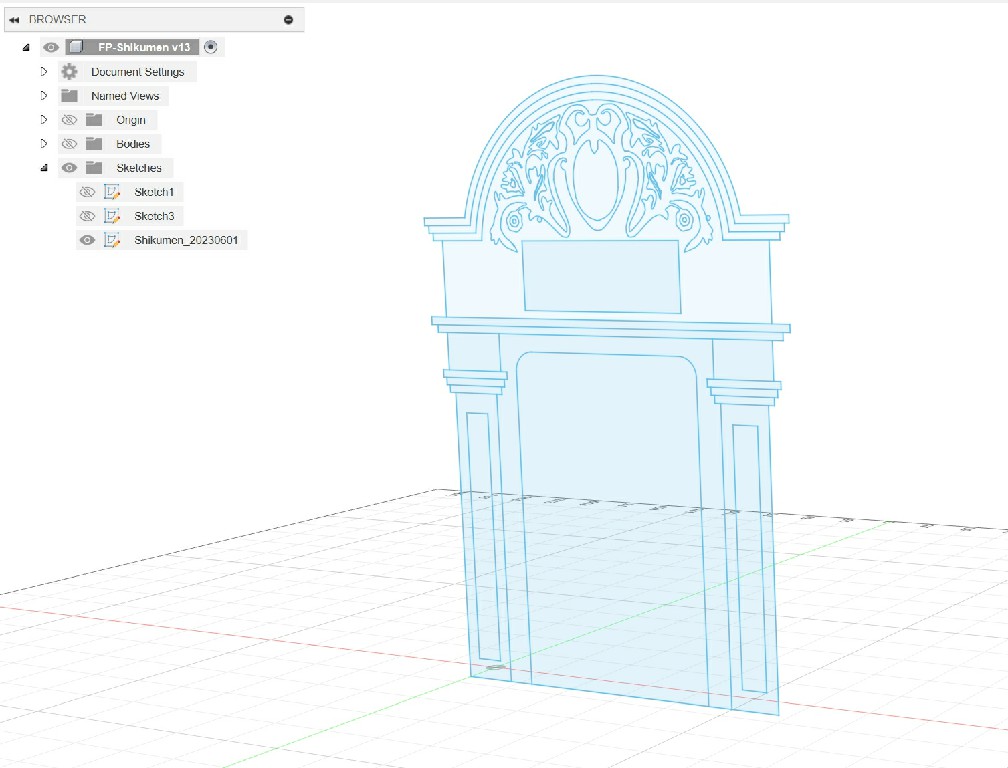
 Modeling in Fusion 360
The modeling process is mainly divided into the following steps:
- Sketch the design in AutoCAD, then import the DXF file into Fusion 360.
- Use the "extrude" command to create the main form.
- Refine the position of the door axis and the structure in coordination with the electronics.
- Modeling to determine the dimensions of the outer walls.

[Files]
Sketch - dxf file 3D model - f3d file
Shikumen 3D Printing
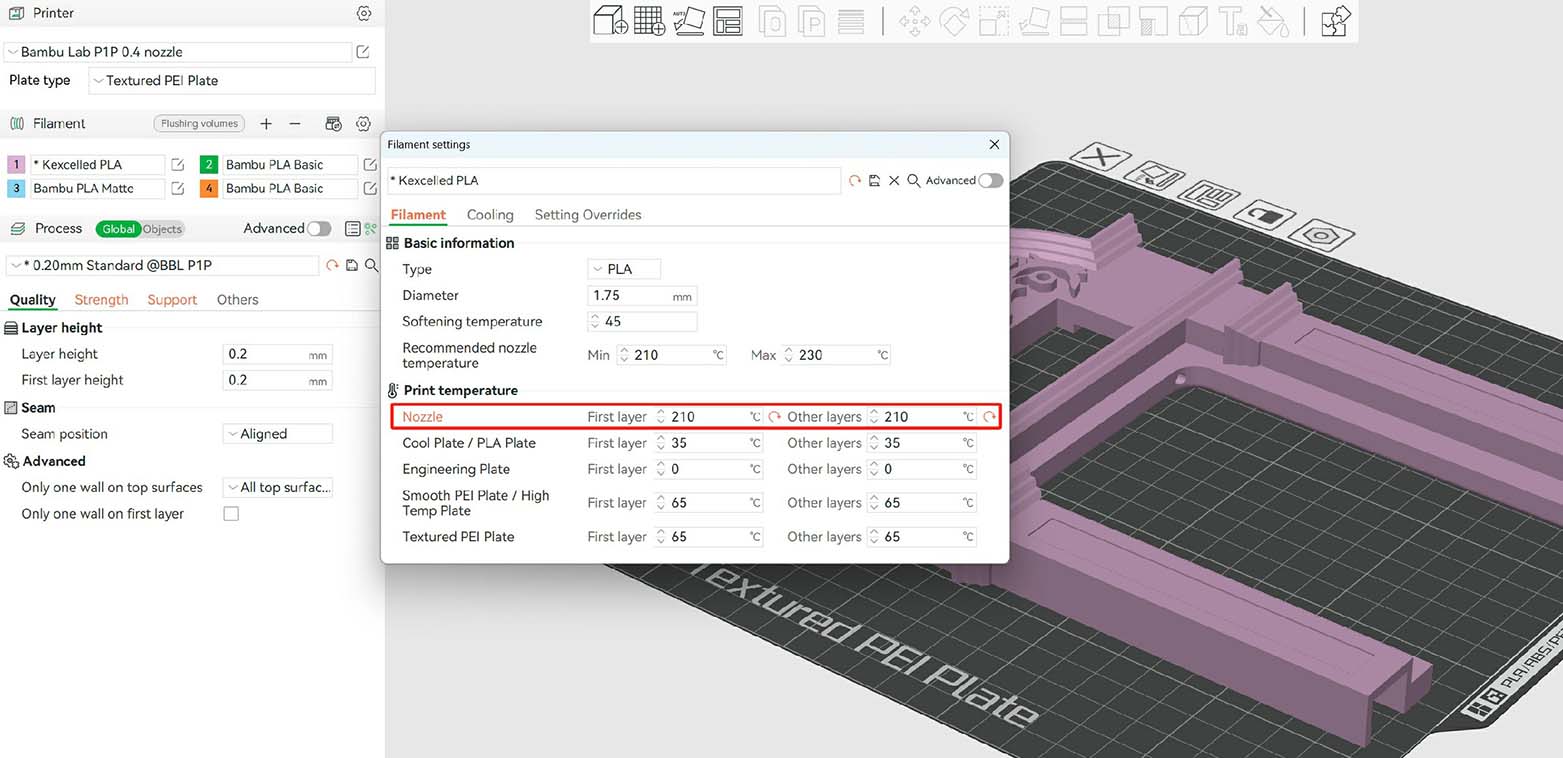
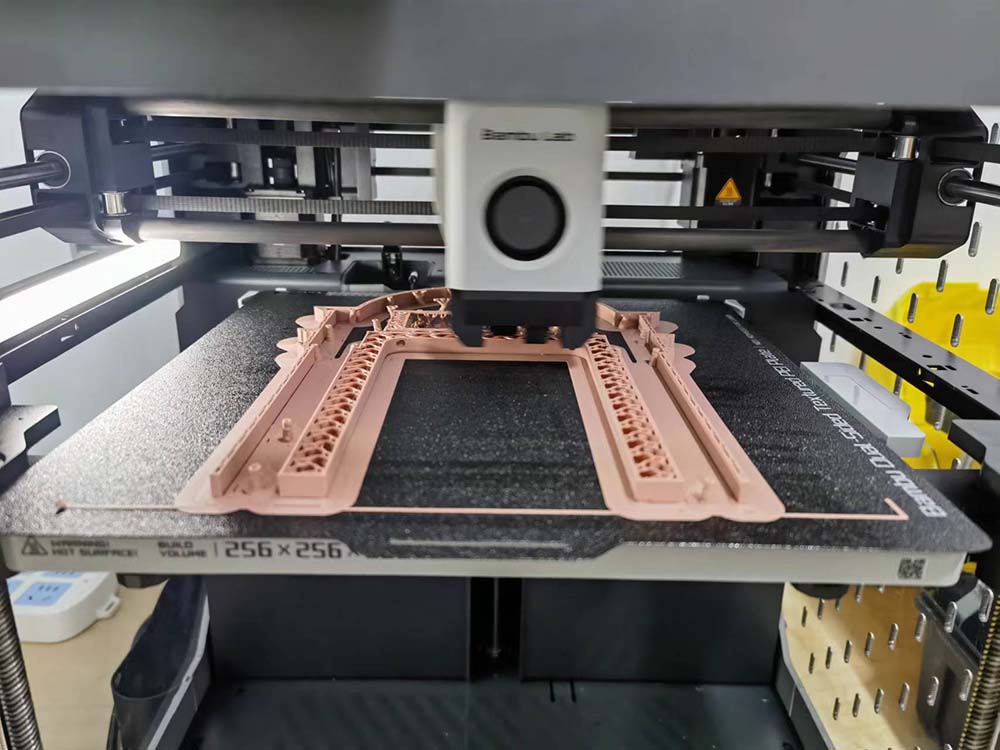
I chose a matte finish PLA filament for the 3D printing of the gate, aiming for a texture closer to stone. The printing parameters are as follows:
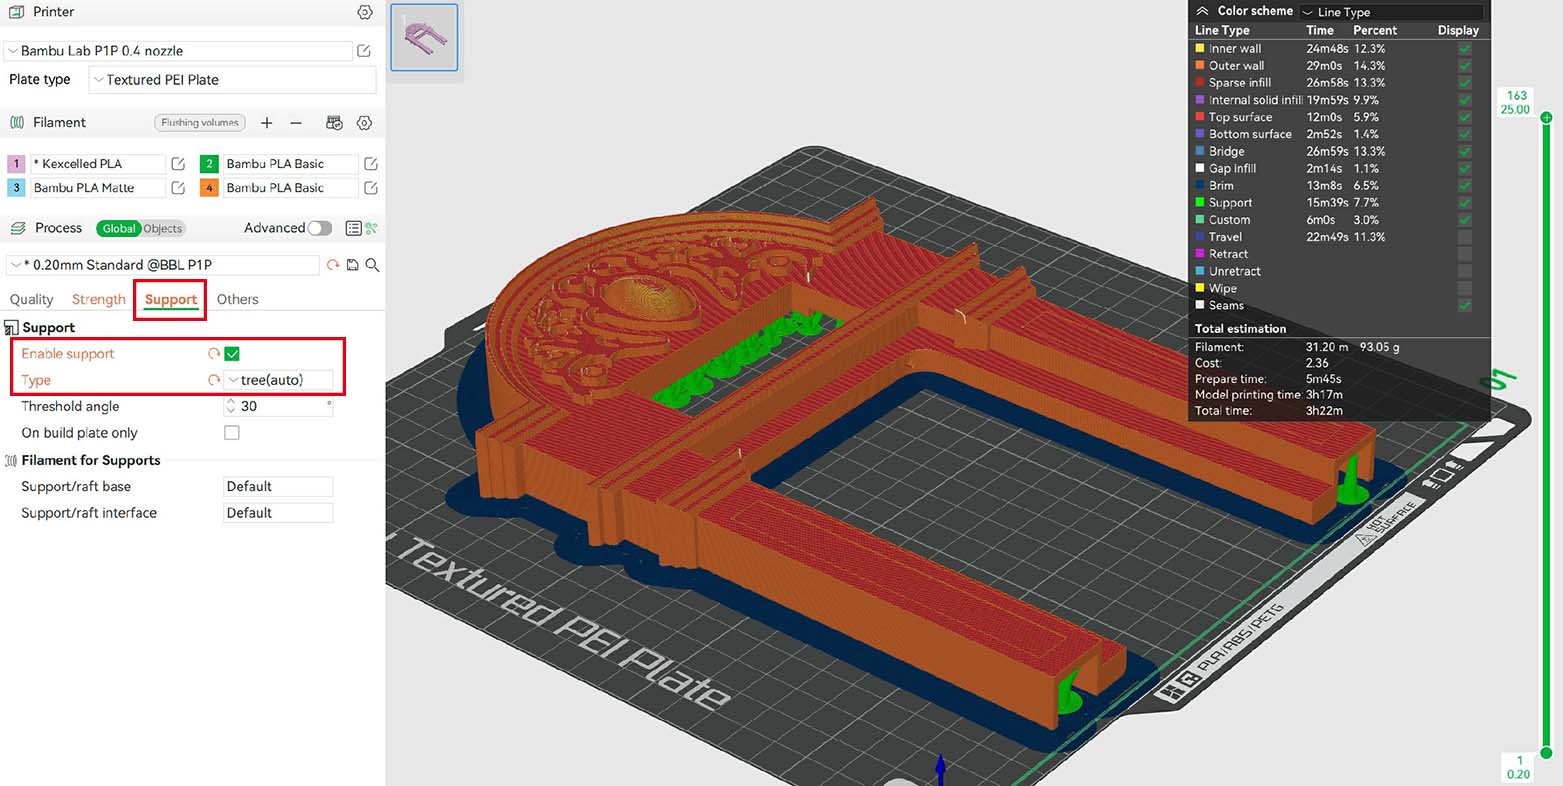
Since the automatically generated tree supports are very thin, it's crucial to apply some glue to the print bed. Without this, the supports may loosen and shift during the printing process, leading to a failed print.
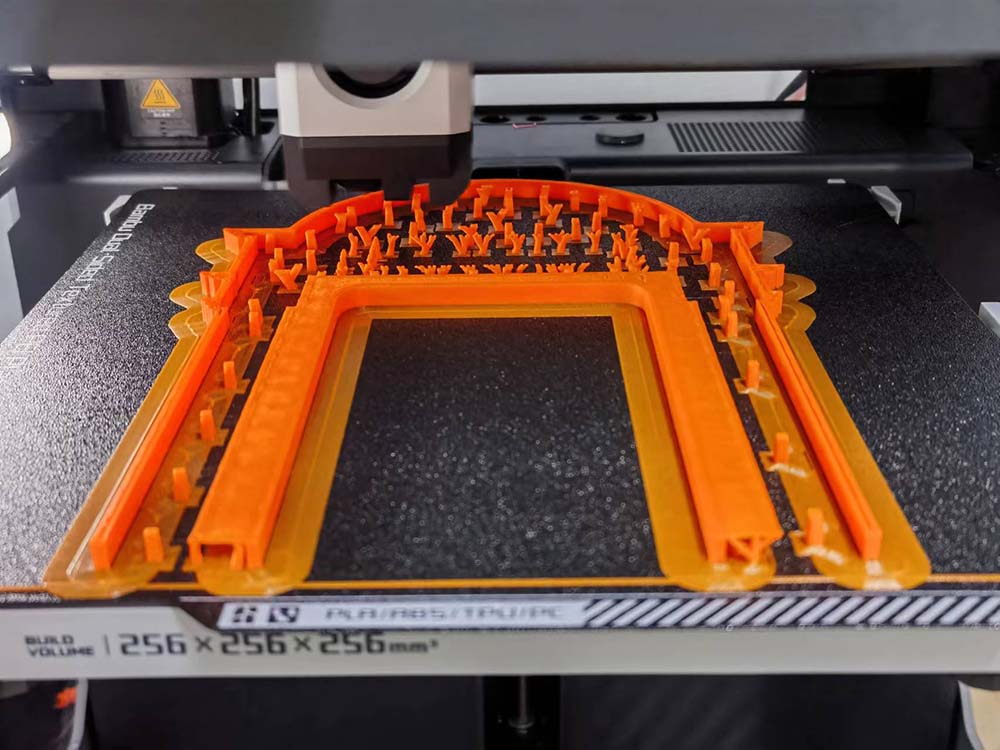
During testing, the lack of glue caused the supports to loosen, resulting in failure.
After completing the print, I noticed that the nozzle temperature of 210°C was not quite sufficient. There were some signs of under-extrusion on the surface. The 3D printer I used, the Bambu P1P, has a fast printing speed, requiring a higher temperature to ensure smooth extrusion of the filament from the nozzle. For a more perfect surface finish, increasing the nozzle temperature to 230°C is more suitable. However, the slightly under-extruded effect on the surface happened to create a mottled texture, coincidentally achieving the effect I desired. A pleasant surprise.
[Files]
2D Design
The Walls
During the modeling process in Fusion 360, I noticed that creating complete walls would result in a very enclosed internal space, making it difficult to see the interior scenes from the front. Therefore, during the 2D design phase in AutoCAD, I modified the front and two sides of the walls to appear as broken and crumbling. This not only allows for a more complete display of the internal scenes but also aligns with the theme of a time machine, creating a story of traveling to the past within the ruins of an old Shikumen.
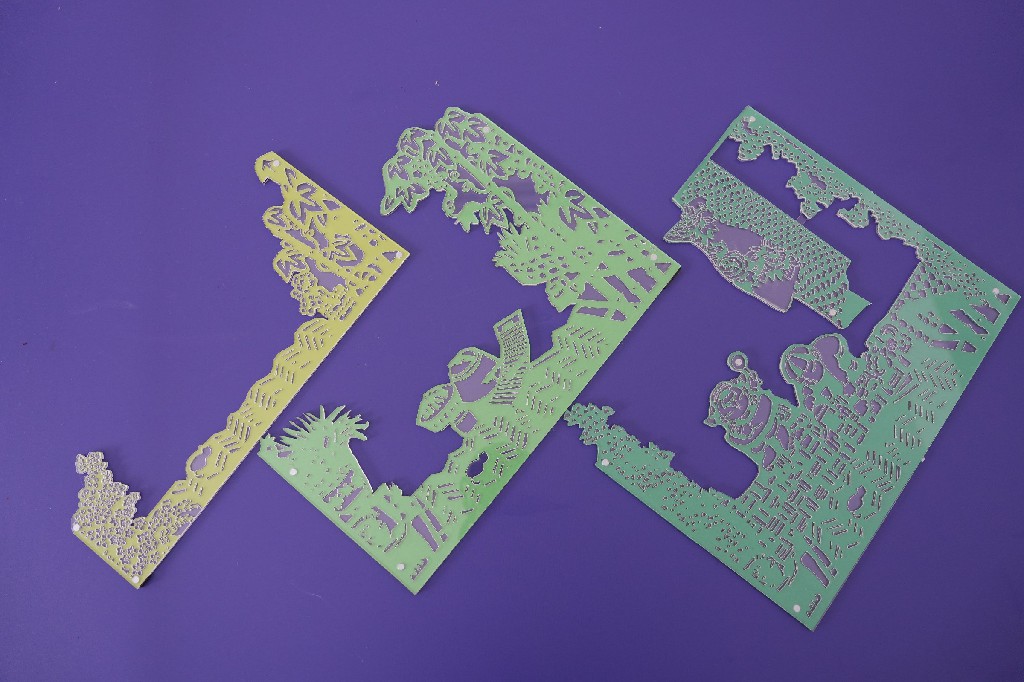
The Scene Cards
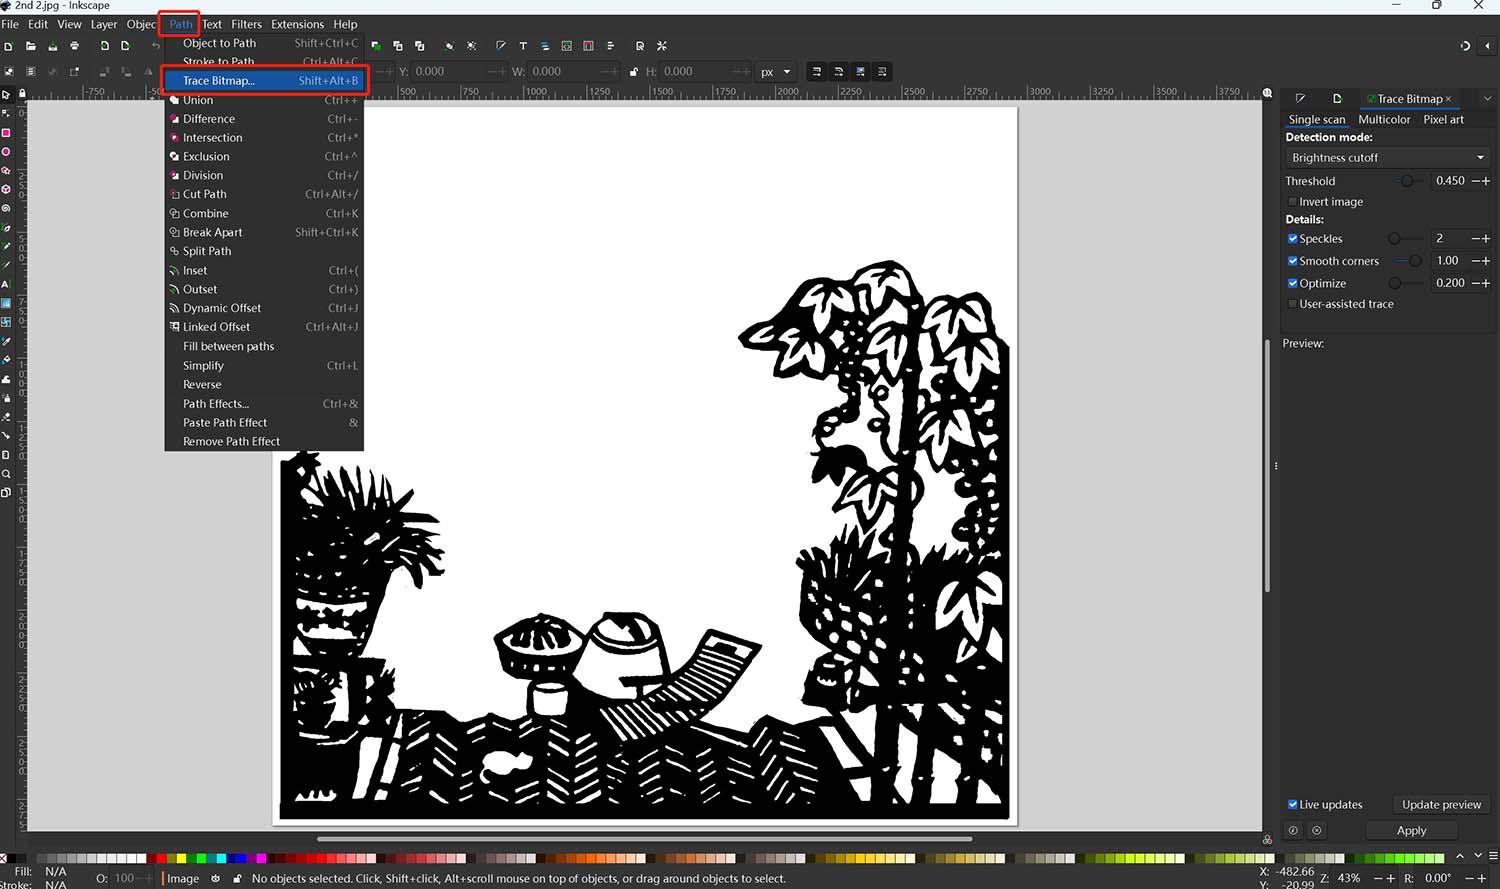
The design of the scene cards drew inspiration from the paper-cut works of the artist Li Shoubai . I extracted characters and scenes from his Shikumen series, collaging and reconstructing them in Photoshop. Using three cards, the scenes depict children playing in the Shikumen courtyard, taking a break in the afternoon, hanging laundry, and cultivating flowers and plants, capturing various aspects of life in the Shikumen courtyard.
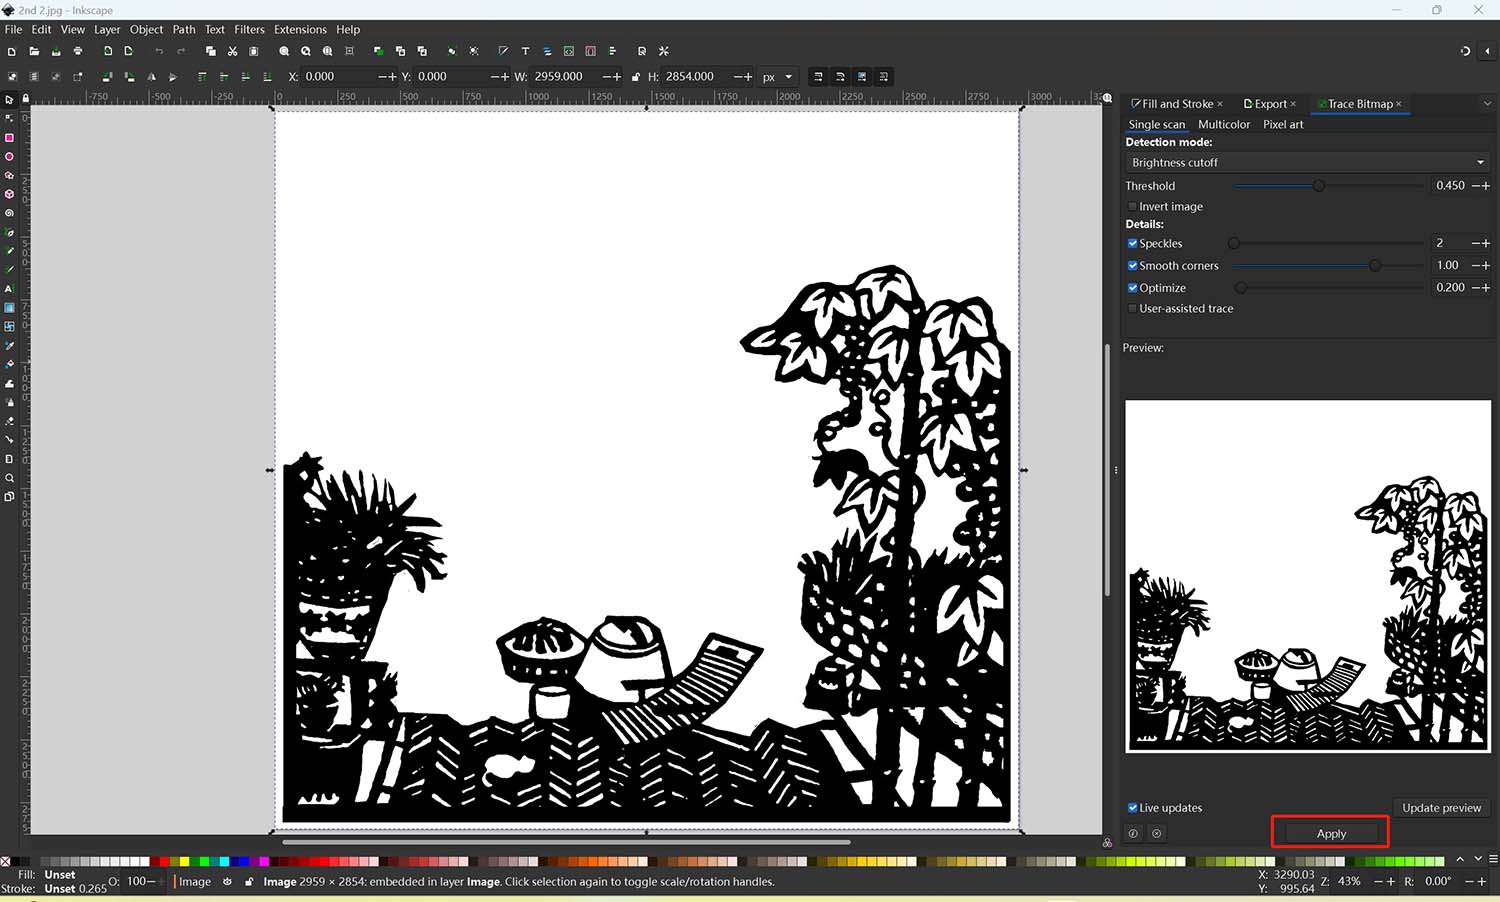
After exporting the three images from Photoshop, importing them into Inkscape for image tracing, and adjusting them to the correct dimensions, you will obtain vector files suitable for laser cutting.
[Files]
Walls - dxf file Scene Card 1 - dxf file Scene Card 2 - dxf file Scene Card 3 - dxf file
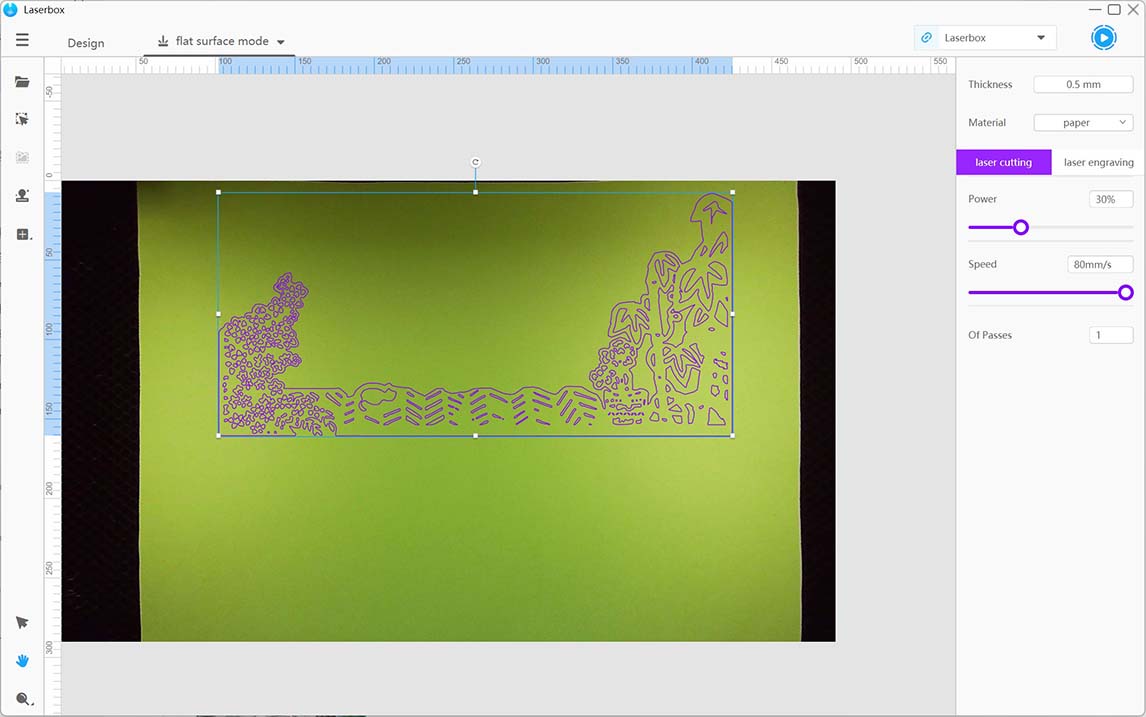
Laser Cutting
3mm Plywood
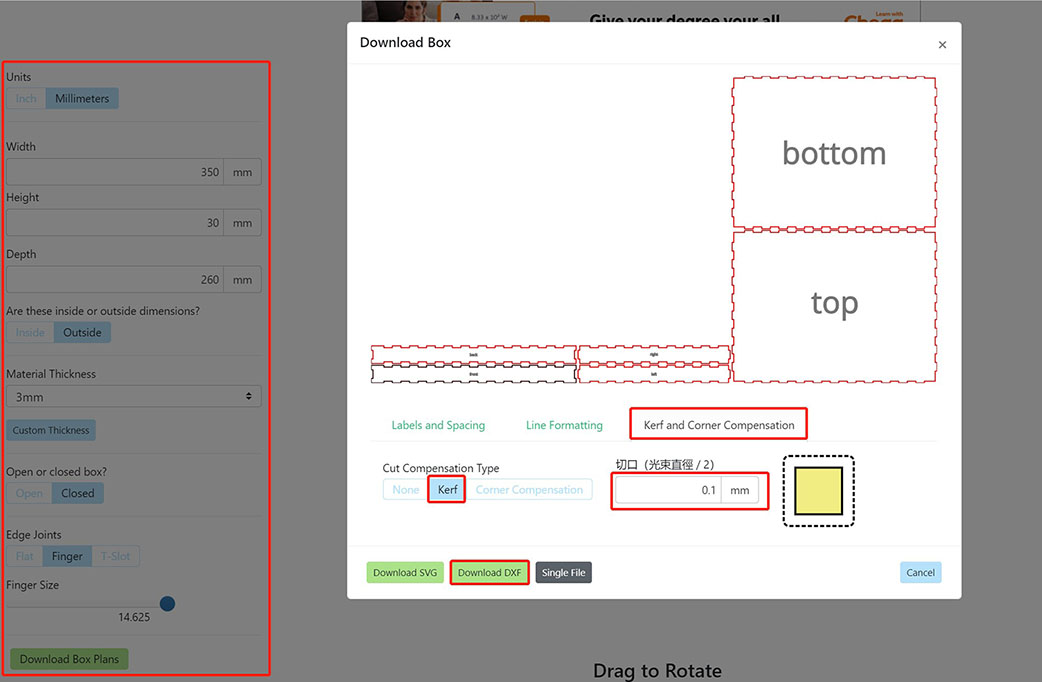
I generated a basic box on the MakerCase website and set a kerf of 0.1mm based on previous tests. I imported the generated DXF file into AutoCAD to draw the openings for the light slot and button. Afterward, I configured the cutting parameters in Laserbox.
For 3mm wooden board
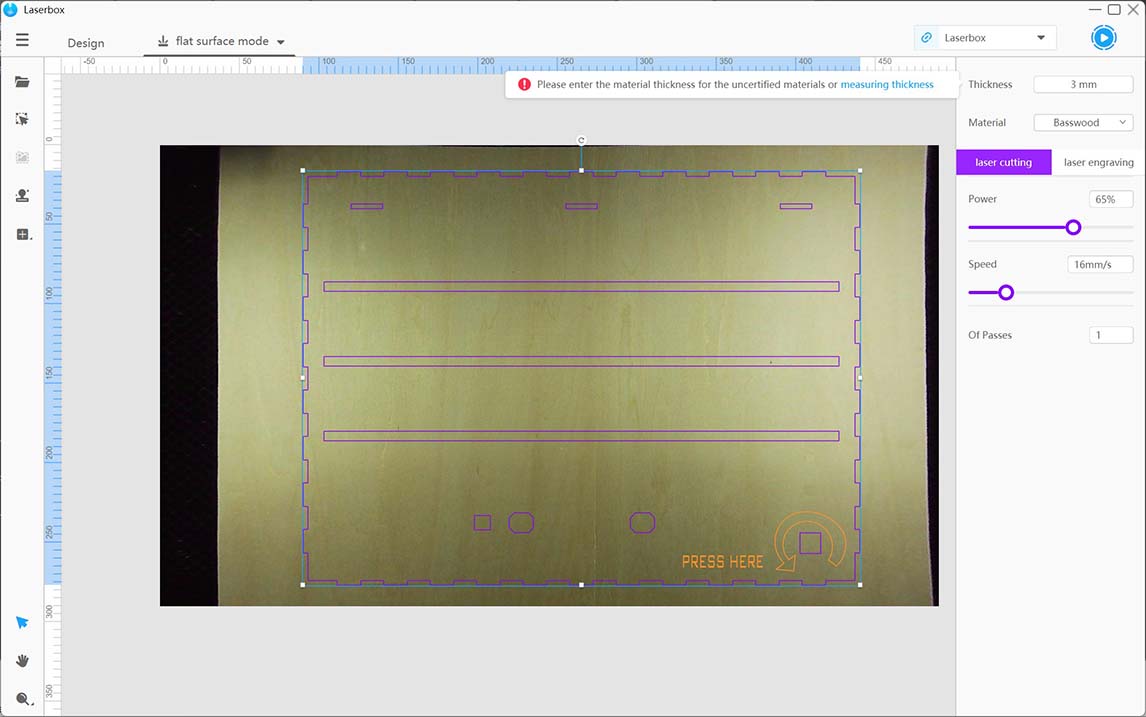
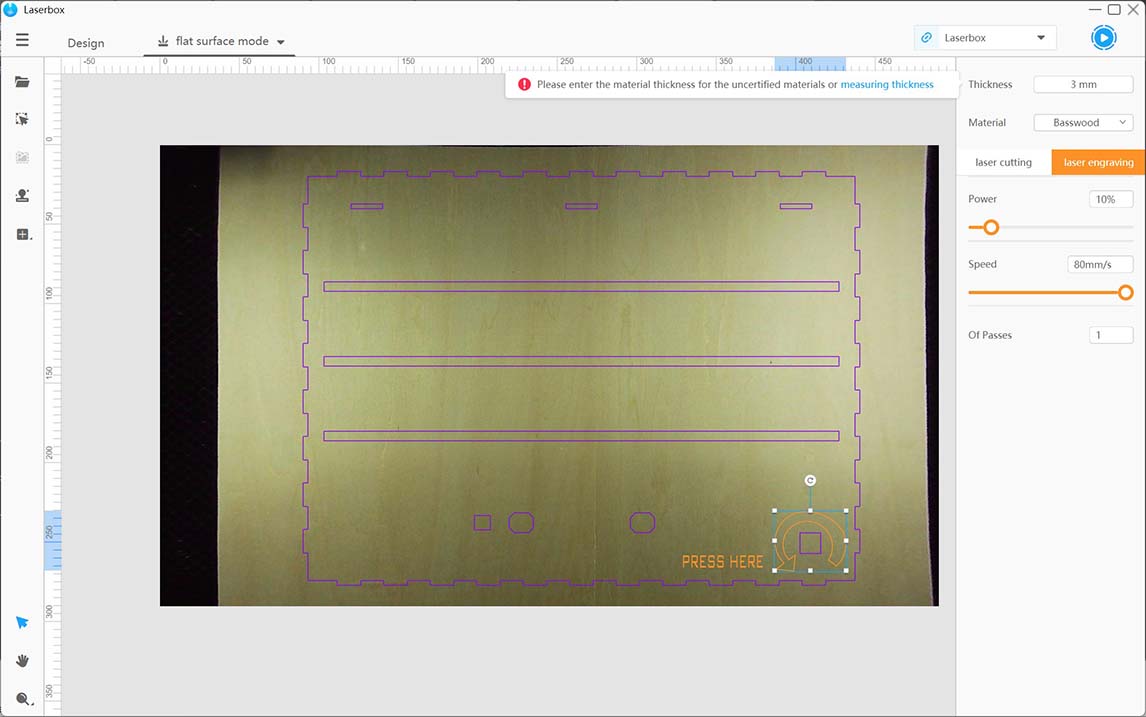
MakerCase Laser Cutting Laser Engraving
2mm Acrylic
The scene cards are sandwiched between two acrylic boards and a cardboard sheet, so each scene card needs to be cut three times. Subsequently, magnets are installed on the two acrylic boards to securely hold the cardboard sheet in the middle.The following are the cutting parameters for a 2mm acrylic board:
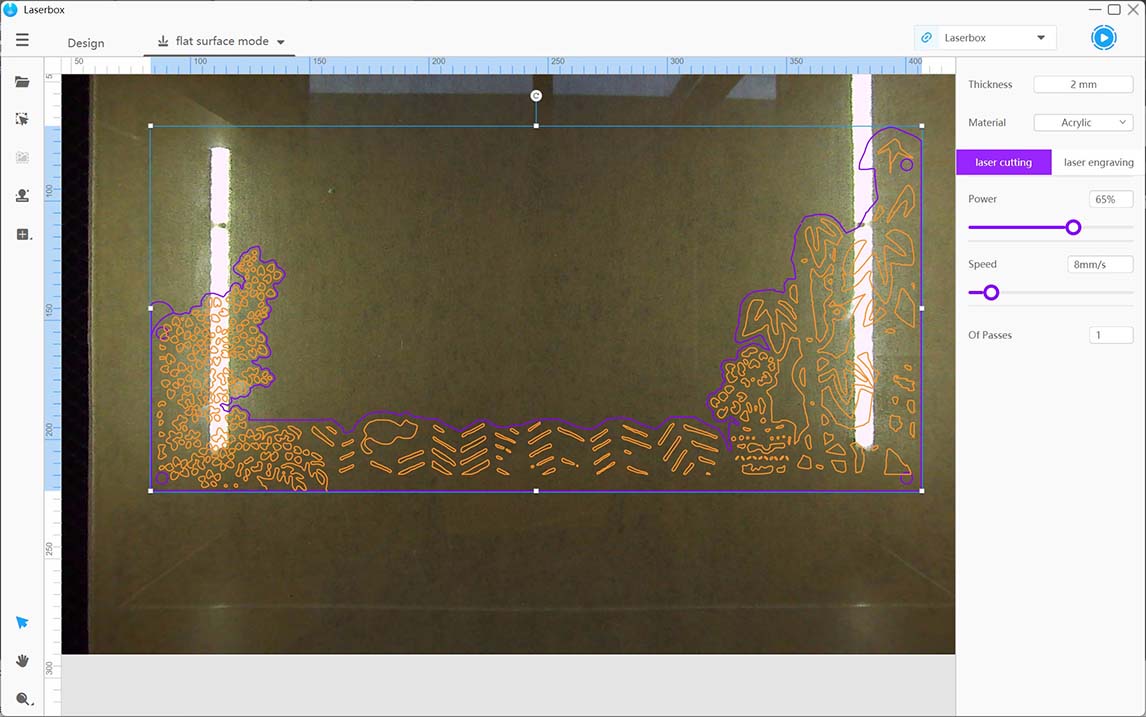
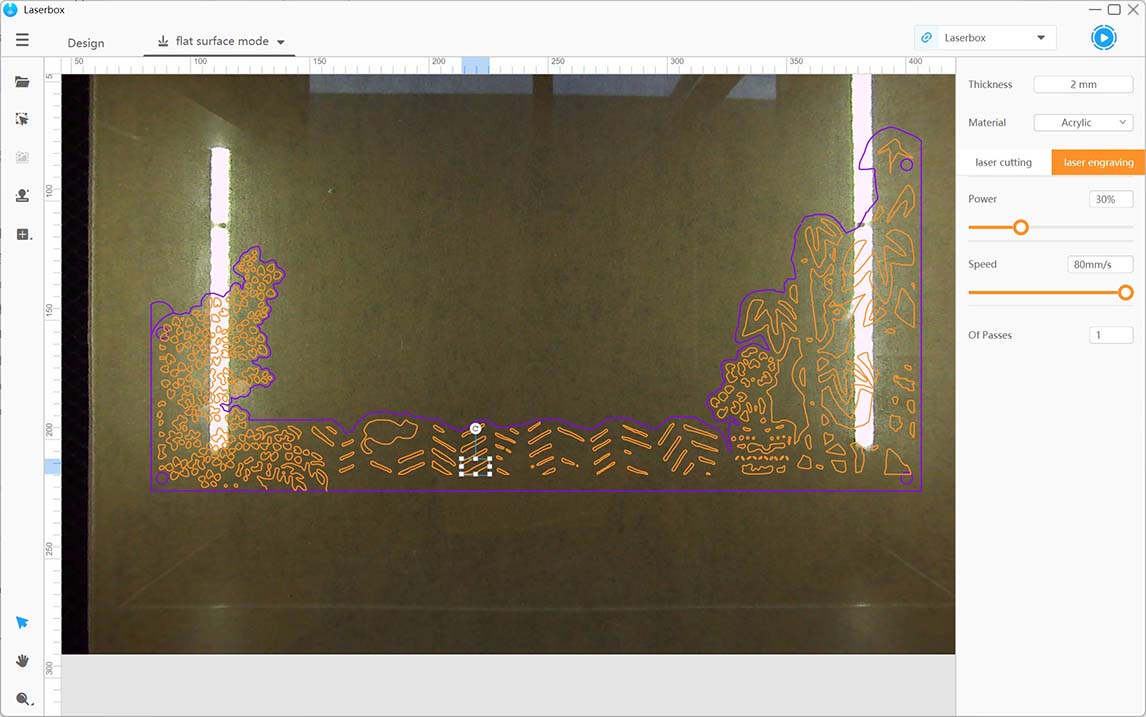
Laser Cutting Laser Engraving
0.5mm Cardboard
The following are the cutting parameters for a Cardboard:
Laser Cutting Video of Laser Cutting
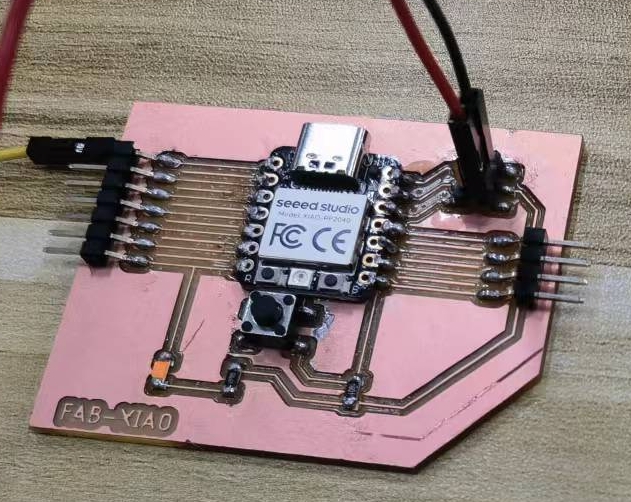
PCB Design and Production
PCB design is documented in Week06 and production in Week08.
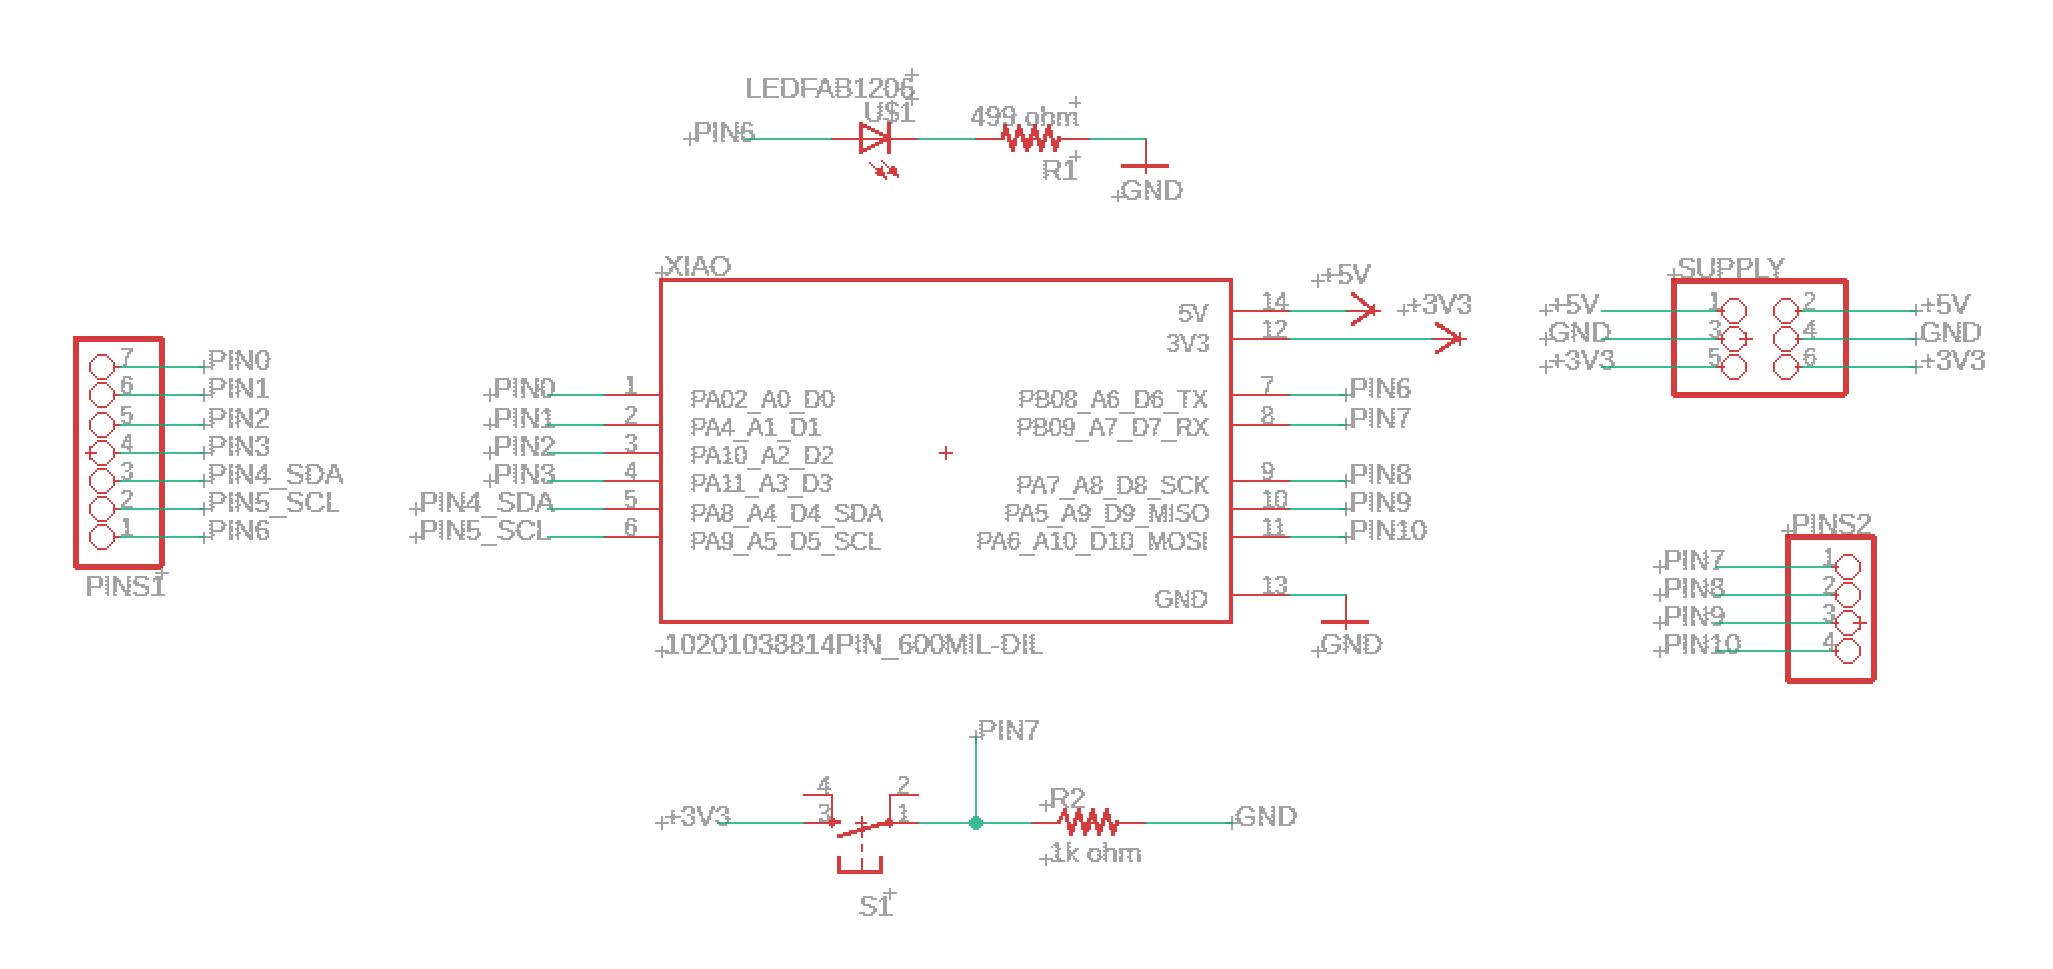
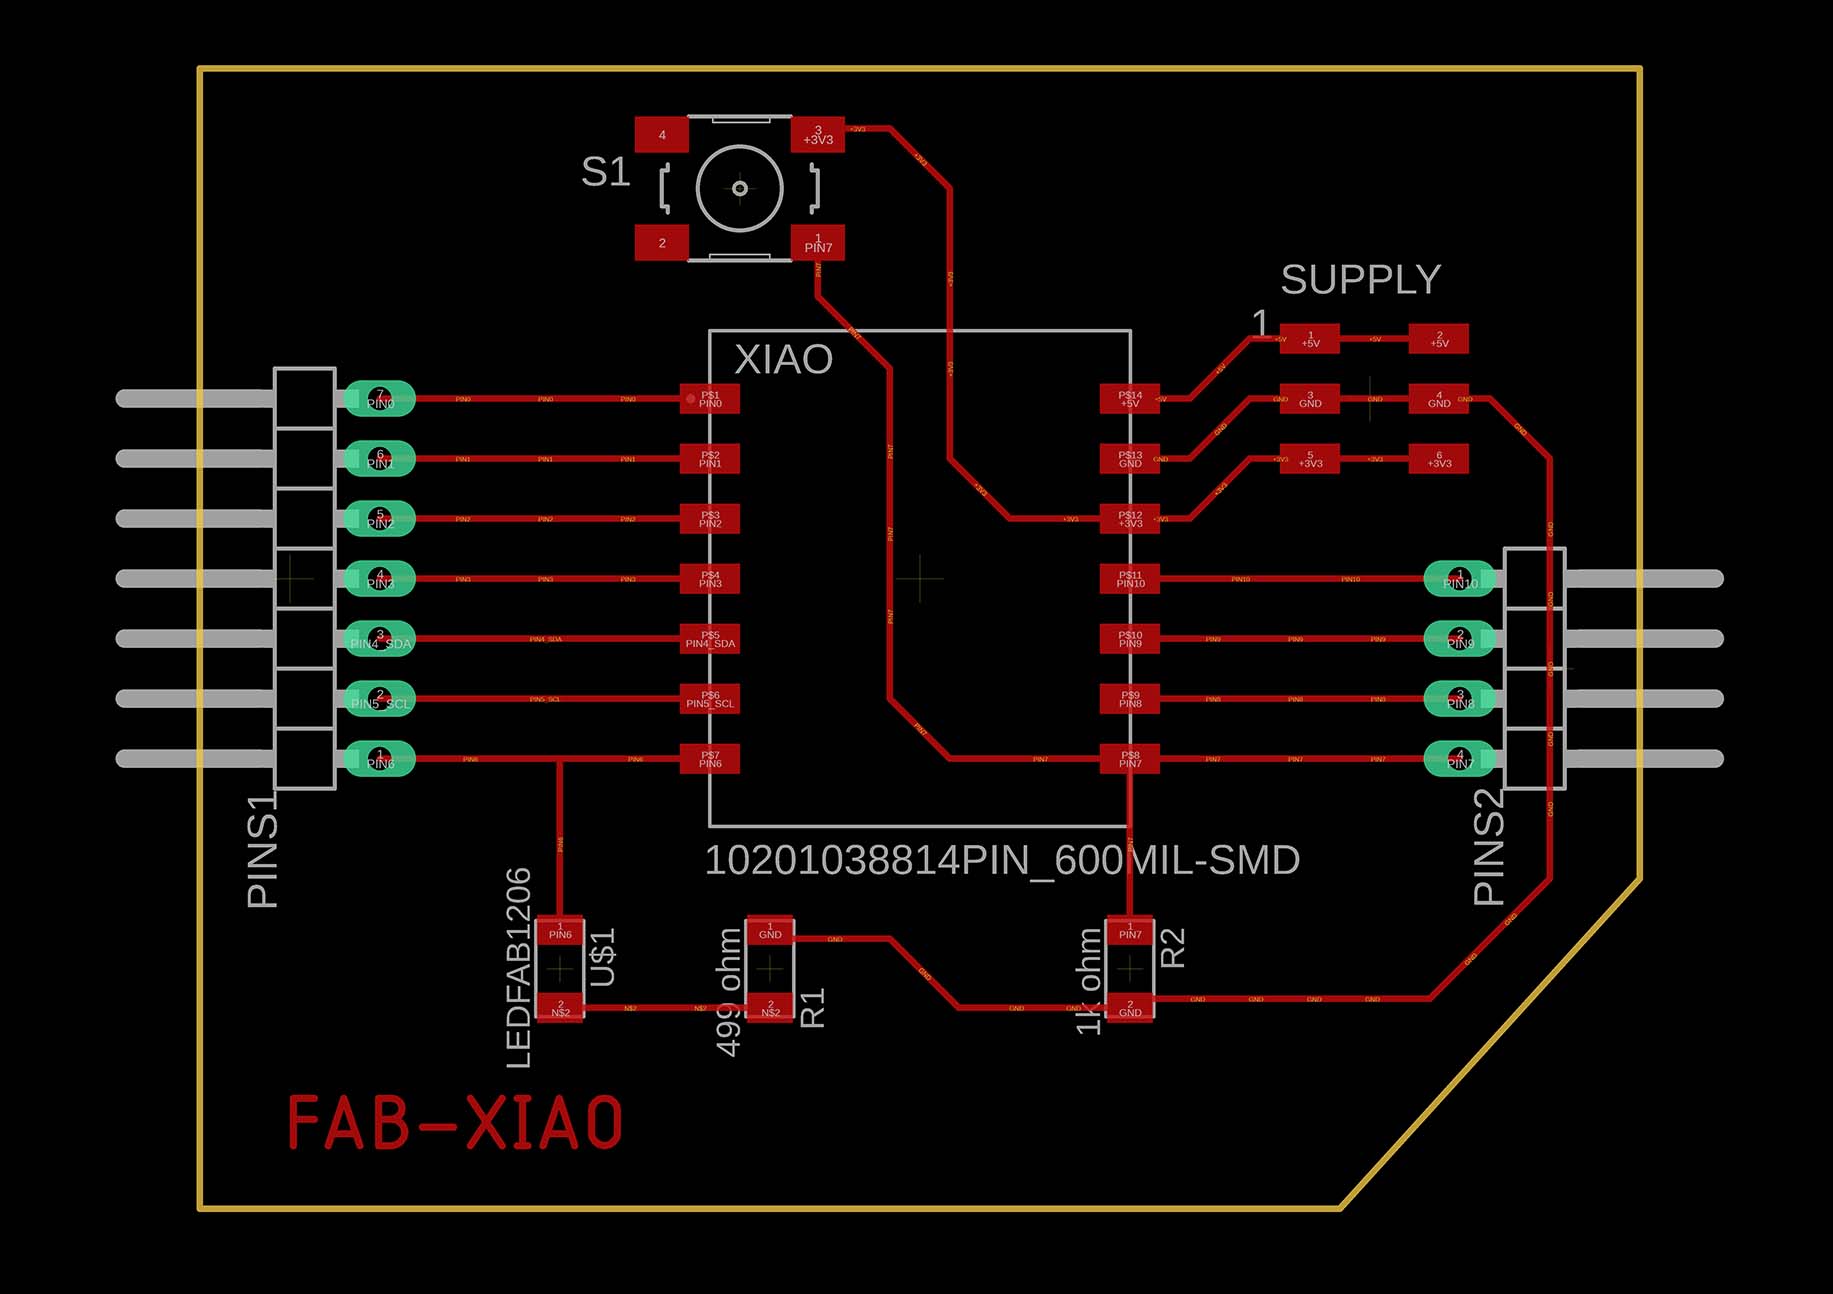
Below is a table with the components used:
| Part | Value | Device | Package | Description |
| XIAO | 10201038814PIN_600MIL-SMD | 10201038814PIN_600MIL-SMD | 14PIN_SMD-600MIL | |
| PINS1 | PINHD-1X7/90 | 1X07/90 | PIN HEADER | |
| PINS2 | PINHD-1X4/90 | 1X04/90 | PIN HEADER | |
| R1 | 499 ohm | RES-US1206FAB | R1206FAB | Resistor (US Symbol) |
| R2 | 1k ohm | RES-US1206FAB | R1206FAB | Resistor (US Symbol) |
| S1 | 6MM_SWITCH6MM_SWITCH | 6MM_SWITCH | OMRON SWITCH | |
| SUPPLY | PINHD-2X3-SMD | 2X03SMD | PIN HEADER | |
| U$1 | LEDFAB1206 | LEDFAB1206 | LED1206FAB | LED |
Programming
First, I tested each function separately.
1. LCD Screen: Pressing the button, the LCD screen displays "Welcome to SHIKUMEN 1920."
        #include "DFRobot_RGBLCD1602.h"

        DFRobot_RGBLCD1602 lcd(/*RGBAddr*/ 0x60, /*lcdCols*/ 16, /*lcdRows*/ 2);  //16 characters and 2 lines of show

        //Button
        int buttonPin = D7;
        int buttonState;
        int lastButtonState = LOW;
        long lastDebounceTime = 0;
        long debounceDelay = 50;

        void breath(unsigned char color) {
          for (int i = 30; i < 255; i++) {
            lcd.setPWM(color, i);
            delay(1);
          }

          delay(500);
          for (int i = 254; i >= 30; i--) {
            lcd.setPWM(color, i);
            delay(1);
          }

          delay(500);
        }

        void setup() {
          // initialize
          lcd.init();
          pinMode(buttonPin, OUTPUT);
        }

        void loop() {
          // Print a message to the LCD.
          int reading = digitalRead(buttonPin);
          if (reading != lastButtonState) {
            lastDebounceTime = millis();
          }

          if ((millis() - lastDebounceTime) > debounceDelay) {
            if (reading != buttonState) {
              buttonState = reading;
              if (buttonState == HIGH) {
                lcd.clear();
                lcd.setCursor(3, 0);
                lcd.print("Welcome to");
                lcd.setCursor(1, 1);
                lcd.print("SHIKUMEN 1920");
              }
            }
          }
          lastButtonState = reading;
          breath(lcd.REG_ONLY);
        }
2. Servos: Pressing the button, the servo motor opens the two doors.
        #include
          Servo leftdoor;
          Servo rightdoor;
          int pos = 0;
          int doorState = 0;

          //button
          int buttonPin = D7;
          int buttonState ;
          int lastButtonState = LOW;
          long lastDebounceTime = 0;
          long debounceDelay = 50;

          void setup() {
            //servo
            leftdoor.attach(D1, 544, 2400);
            rightdoor.attach(D0, 544, 2400);
            leftdoor.write(0);
            rightdoor.write(180);

            //button
            pinMode(buttonPin, INPUT);
          }

          void loop() {

            int reading = digitalRead(buttonPin);

            if (reading != lastButtonState) {
              lastDebounceTime = millis();
            }

            if ((millis() - lastDebounceTime) > debounceDelay) {
              if (reading != buttonState) {
                buttonState = reading;

                if (buttonState == HIGH) {

                  if (doorState == 0) {
                    for (pos = 0; pos <= 100; pos += 1) {  //open
                      leftdoor.write(pos);
                      rightdoor.write(180 - pos);
                      delay(15);
                    }
                    doorState = 1;
                  } else {

                    for (pos = 100; pos >= 0; pos -= 1) {  //close
                      leftdoor.write(pos);
                      rightdoor.write(180 - pos);
                      delay(15);
                    }
                    doorState = 0;
                  }
                }
              }
            }
            lastButtonState = reading;
          }
3. LED Strip: When the magnetic sensor detects the magnet, the corresponding LED lights up.
        //magnetic sensor
          int magnetic_1 = D8;
          int val_1 = 0;

          int magnetic_2 = D9;
          int val_2 = 0;

          int magnetic_3 = D10;
          int val_3 = 0;

          //LED strip
          #include
          #define LED_PIN D3
          #define NUM_LEDS 60
          CRGB leds[NUM_LEDS];

          void setup() {
            //meganetic sensor
            pinMode(magnetic_1, INPUT);

            //led
            FastLED.addLeds(leds, NUM_LEDS);
          }

          void loop() {
            val_1 = digitalRead(magnetic_1);
            if (val_1 == LOW) {
              for (int i = 0; i < 20; i++) {  // turn LED ON
                leds[i] = CRGB(150, 150, 255);
              }
              FastLED.show();
              Serial.println("Magnetic Sensor is Attracted.");
            } else {
              for (int i = 0; i < 20; i++) {  // turn LED off
                leds[i] = CRGB::Black;
              }
              FastLED.show();
              Serial.println("No Magnetic");
            }

            val_2 = digitalRead(magnetic_2);
            if (val_2 == LOW) {
              for (int i = 20; i < 40; i++) {  // turn LED ON
                leds[i] = CRGB(50, 150, 200);
              }
              FastLED.show();
            } else {
              for (int i = 20; i < 40; i++) {  // turn LED off
                leds[i] = CRGB::Black;
              }
              FastLED.show();
            }

            val_3 = digitalRead(magnetic_3);
            if (val_3 == LOW) {
              for (int i = 40; i < 60; i++) {
                leds[i] = CRGB(0, 50, 255);
              }
              FastLED.show();
            } else {
              for (int i = 40; i < 60; i++) {
                leds[i] = CRGB::Black;
              }
              FastLED.show();
            }
          }
Finally, merge all the code and debug.
        //LCD Screen
        #include "DFRobot_RGBLCD1602.h"
        DFRobot_RGBLCD1602 lcd(/*RGBAddr*/ 0x60, /*lcdCols*/ 16, /*lcdRows*/ 2);  //16 characters and 2 lines of show

        //Servo
        #include
        Servo leftdoor;
        Servo rightdoor;
        int pos = 0;
        int doorState = 0;

        //button
        int buttonPin = D7;
        int buttonState ;
        int lastButtonState = LOW;
        long lastDebounceTime = 0;
        long debounceDelay = 50;

        //meganetic sensor
        int magnetic_1 = D8;
        int val_1 = 0;

        int magnetic_2 = D9;
        int val_2 = 0;

        int magnetic_3 = D10;
        int val_3 = 0;

        //LED strip
        #include
        #define LED_PIN D3
        #define NUM_LEDS 60
        CRGB leds[NUM_LEDS];

        void setup() {
          //lcd screen
          lcd.init();
          lcd.clear();

          //servo
          leftdoor.attach(D1, 544, 2400);
          rightdoor.attach(D0, 544, 2400);
          leftdoor.write(0);
          rightdoor.write(180);

          //button
          pinMode(buttonPin, INPUT);

          //meganetic sensor
          pinMode(magnetic_1, INPUT);

          //led
          FastLED.addLeds(leds, NUM_LEDS);

        }


        void loop() {

          int reading = digitalRead(buttonPin);

          if (reading != lastButtonState) {
            lastDebounceTime = millis();
          }

          if ((millis() - lastDebounceTime) > debounceDelay) {
            if (reading != buttonState) {
              buttonState = reading;

              if (buttonState == HIGH) {

                if (doorState == 0) {
                  lcd.init();  //screen showcase
                  lcd.setCursor(3, 0);
                  lcd.print("Welcome to");
                  lcd.setCursor(1, 1);
                  lcd.print("SHIKUMEN 1920");
                  for (pos = 0; pos <= 100; pos += 1) {  //open the door
                    leftdoor.write(pos);
                    rightdoor.write(180 - pos);
                    delay(15);
                  }
                  doorState = 1;
                } else {
                  lcd.init();  //screen showcase
                  lcd.setCursor(5, 0);
                  lcd.print("Thanks");
                  lcd.setCursor(1, 1);
                  lcd.print("for visiting");

                  for (pos = 100; pos >= 0; pos -= 1) {  //close the door
                    leftdoor.write(pos);
                    rightdoor.write(180 - pos);
                    delay(15);
                  }
                  doorState = 0;
                }
              }
            }
          }
          lastButtonState = reading;

          //megnetic sensors
          val_1 = digitalRead(magnetic_1);
          if (val_1 == LOW) {
            for (int i = 0; i < 20; i++) {  // turn LED ON
              leds[i] = CRGB(150, 150, 255);
            }
            FastLED.show();
            Serial.println("Magnetic Sensor is Attracted.");
          } else {
            for (int i = 0; i < 20; i++) {  // turn LED off
              leds[i] = CRGB::Black;
            }
            FastLED.show();
            Serial.println("No Magnetic");
          }

          val_2 = digitalRead(magnetic_2);
          if (val_2 == LOW) {
            for (int i = 20; i < 40; i++) {  // turn LED ON
              leds[i] = CRGB(50, 150, 200);
            }
            FastLED.show();
          } else {
            for (int i = 20; i < 40; i++) {  // turn LED off
              leds[i] = CRGB::Black;
            }
            FastLED.show();
          }

          val_3 = digitalRead(magnetic_3);
          if (val_3 == LOW) {
            for (int i = 40; i < 60; i++) {
              leds[i] = CRGB(0, 50, 255);
            }
            FastLED.show();
          } else {
            for (int i = 40; i < 60; i++) {
              leds[i] = CRGB::Black;
            }
            FastLED.show();
          }
        }
Bill of Materials
| Components | Quantilty | Price P.P. | Shop | Notes |
| PLA Filament | 93g | 7 rmb | Taobao | 75 rmb per kg |
| 3mm plywood board | 30*45mm*6 | 48 rmb | Taobao | |
| 2mm Acrylic | 30*45mm*5 | 150 rmb | Shop in Tongji University | |
| Cardboard | A3*3 | 6 rmb | Taobao | |
| Seeed XIAO | 1 | -- | -- | Provided by FabLab Formshop |
| Button | 1 | -- | -- | Provided by FabLab Formshop |
| Magnetic Sensor | 3 | -- | -- | Provided by FabLab Formshop |
| LED Strip | 1 meter with 60 leds | 12.5 rmb | Taobao | |
| Servo | 2 | -- | -- | Provided by FabLab Formshop |
| LCD | 1 | -- | -- | Provided by FabLab Formshop |
| Magnetic | 27 | -- | -- | Provided by FabLab Formshop |