10. Mechanical/Machine Design
Assignments
group assignment
- actuate and automate your machine
- document the group project and your individual contribution
Research
Stepper motor and l298n driver contoller tutorial
Throughout The Week
Group Site
Group Site Link
Here is the link to my group site that covers everyone's work and files so that you can follow along with the whole process and not just my individual contribution.
Planning
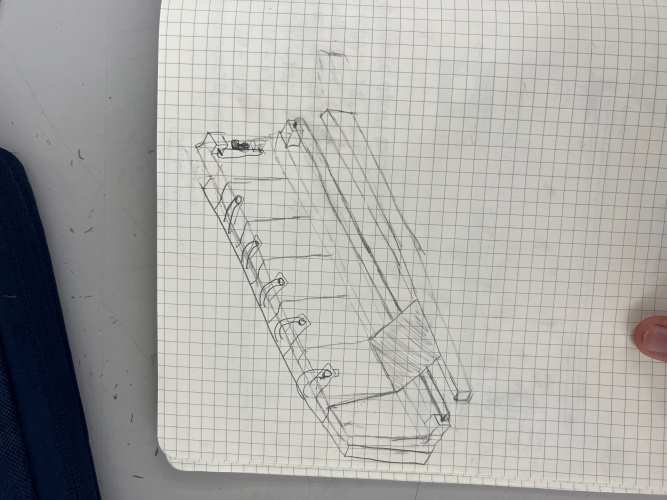
To start everything off we had to come up with an idea of what to make for this week. We had many ideas such as a drink gimble a drone, a table Roomba, a safety glass cleaner, and more but after a lot of research we came up with the idea of an epoxy resin mixer. After lots of talking with each other and writing on a Whiteboard we came up with the basics of how it will work as seen here.
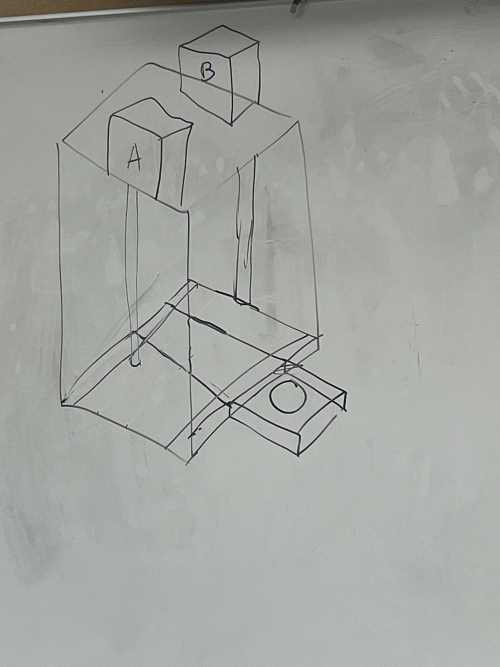
What you see here is the very basic drawing of our final project. It is a machine that mixes part A and part B of epoxy resin which when mixed together starts hardening. We have a plate that can move on both the X and Y axis. We also have a mixer that can move in the z-axis while spinning to move it. Furthermore, we have it move X and Y for the resin parts which we have on the side which we will have something control them to only let 250 ml of both part A & B when it moves under the tubes its in. Once I got home I felt that we needed a more detailed plan/drawing of the project, so I made this with what I knew then.
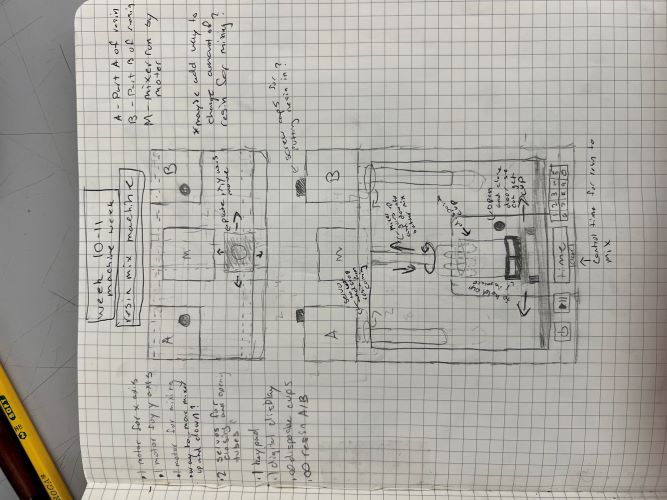
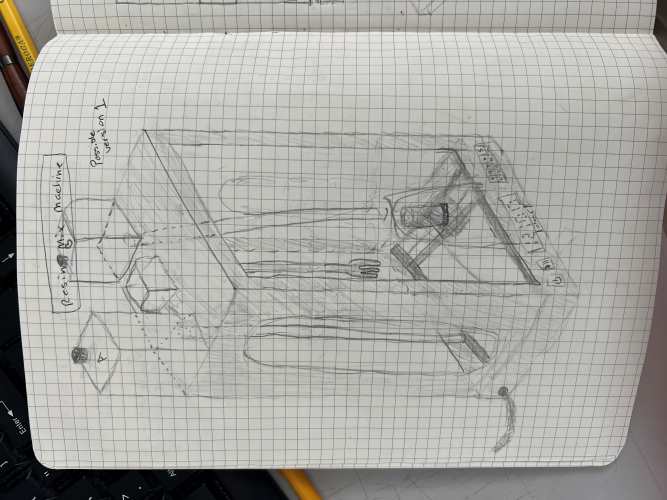

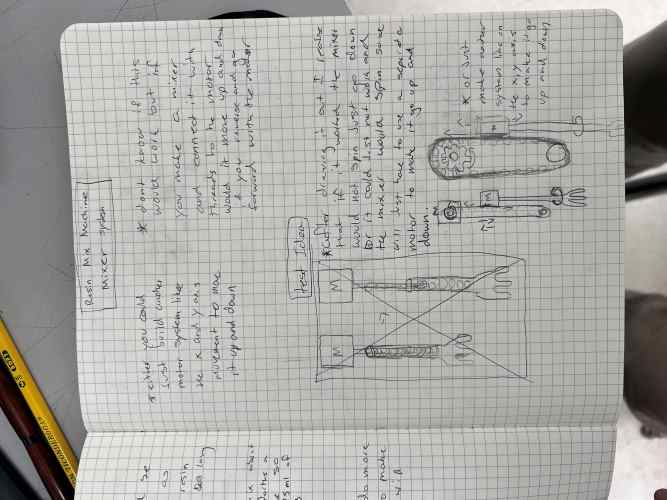
I put notes about was I was pretty sure about and what I knew that we would need to actually research more and look into. But after doing this I had to find out how the stepper motors work for our project.
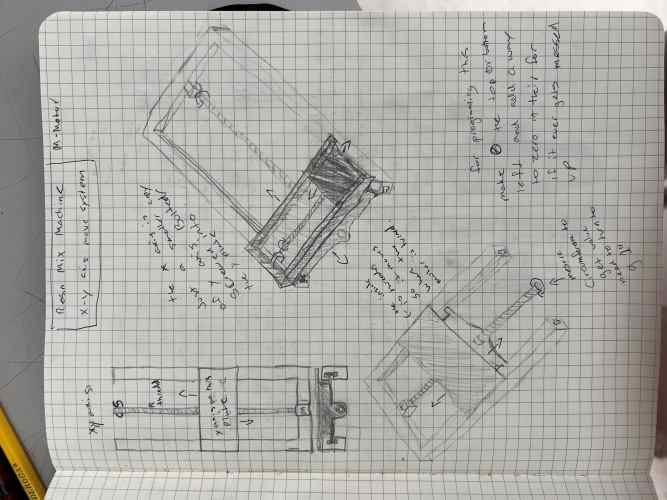
But in the middle of all of this we realized that resin would not be able to go down the tubes unless we got expensive pumps, and that we would not be able to get accurate amounts without it, so we switched our project to a soda machine and I redrew the whole thing.
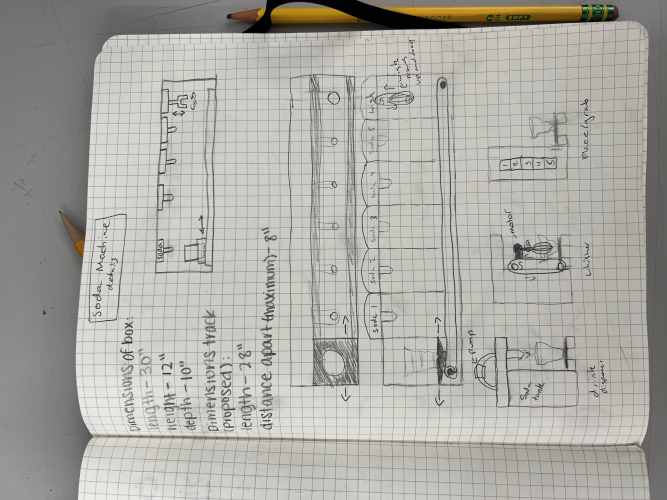
Here is the new design, its alot like the old project but now its one long x axis and not y axis. the whisker still moves up and down the z axis bu tnow we have multible liquids.
Ater getting the new design I still had to learn how to program the stepper Motor and finally got it after 30 mins.
Once I figure out how to make the motor turned I wanted to take a break from coding, So I designed a 3d model of what our group project might turn out like.
It will have 5 drink selections so we each get to chose one, and it will stir it at the end so that you can mix together more than one drink.
Electronics
The work I then had to do was figure out how to code a snap action switch and how to make it turn off the servo, so I can zero the whole carriage. To do this I started by looking through Teddy Warners machine week project from 2021, where he used a snap action switch to zero his machine. After looking through and wiring it I ended up with how I should wire it and just had to upload code to it.
#define LEVER_SWITCH_PIN 2
int pressSwitch = 0;
void setup()
{
Serial.begin(9600);
}

void loop()
{
pinMode(LEVER_SWITCH_PIN,INPUT);
pressSwitch = digitalRead(LEVER_SWITCH_PIN);
if(pressSwitch == HIGH)
{
Serial.println("Switch Pressed!");
delay(1000);
}
}
This is the code I used and here is it working.
After I got it working I added the code to the stepper motor code saying if button pressed turn stepper, and here is that working.
Lastly after making sure that the switch worked with the Stepper Motor I set it to the complete opposite saying it always runs unless the switch is pressed down to see if the plate would move and stop as soon as it touched the switch. Here is a video of it working and my code for it.
// Include the Stepper library:
#include <Stepper.h>

// Define number of steps per revolution:
int stepsPerRevolution = 50;
const int speed = 200;
#define LEVER_SWITCH_PIN 2
int pressSwitch = 0;
// Initialize the stepper library on pins 8 through 11:
Stepper myStepper = Stepper(stepsPerRevolution, 8, 9, 10, 11);
int buttonClick = 0;

void setup() {
  // Set the motor speed (RPMs):
  myStepper.setSpeed(speed);
  Serial.begin(9600);
  pinMode(7, INPUT);


}

void loop() {
pinMode(LEVER_SWITCH_PIN,INPUT);
pressSwitch = digitalRead(LEVER_SWITCH_PIN);
if(pressSwitch == HIGH)
{
if(buttonClick == 0){
  buttonClick = 1;

}
else if(buttonClick == 1){
  buttonClick = 0;
}
delay(1000);
}

if(buttonClick == 1){
  myStepper.step(stepsPerRevolution);
}

if(digitalRead(7) == HIGH){

  Serial.print("safhuahgufdna");
}
}
Pumps
For the pumps I had to figure out how to wire them and code them. Dylan Ferro helped me in learning how to wire them even if it is just a straight connection to power and ground for it to work. We connected it to the digital pin and ground of an arduino to turn it on and off. In this video listen to the sound to hear it turn on and off.
The next step was to learn how to actually program them. To do this we connected it to a MOSFET so that the Arduino could let the power go through and stop it here is a picture of the circuit.
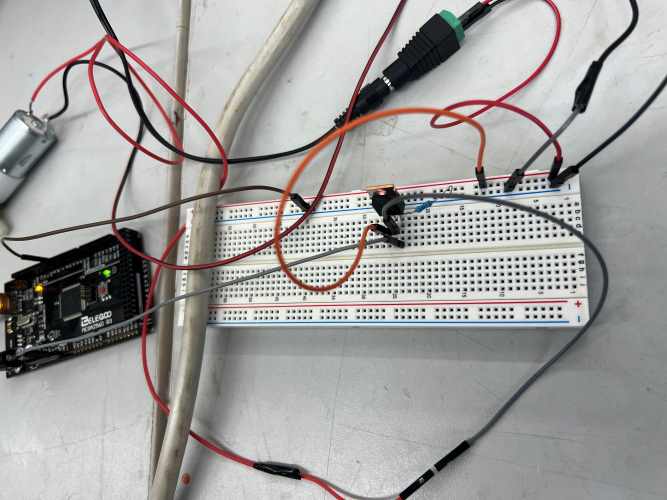
Then we hooked up 2 more pumps, so we could work multiple together and taking inspiration from a game called Minecraft made an infinite water source. By making them take and spit out water from one to another. Then I just had to put this code in for it to work. Here is my code a video of it working.
#define pump_one 7
#define pump_two 8
#define pump_three 9

int turn;
void setup() {
 pinMode(pump_one, OUTPUT);
 pinMode(pump_two, OUTPUT);
 pinMode(pump_three, OUTPUT);
 turn = 0;

}

void loop() {
digitalWrite(pump_one, HIGH);
digitalWrite(pump_two, LOW);
digitalWrite(pump_three, LOW);
delay(1000);
digitalWrite(pump_one, LOW);
digitalWrite(pump_two, HIGH);
digitalWrite(pump_three, LOW);
delay(1000);
digitalWrite(pump_one, LOW);
digitalWrite(pump_two, LOW);
digitalWrite(pump_three, HIGH);
delay(1000);
}
Carriage
While I was testing the pumps my group members had put together the skeleton of the carriage for me to program. I started hooking it all together by connecting the H Bridge to the stepper motor and arduino mega 2560. I also connected a limit action switch so that I would be able to tell where the plate is so I can zero the whole machine.
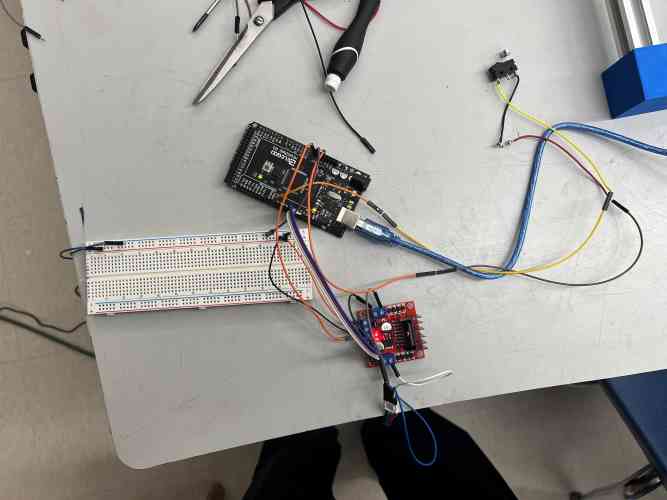
Then I uploaded this code to the arduino so that I could see it in action.
#include <Stepper.h> // stepper motor library

#define LEVER_SWITCH_PIN 2 // switch digital pin to pin 0
#define BUTTON_ONE_PIN 1 // button is set to digital pin 1
#define BUTTON_TWO_PIN 7 // button is set to digital pin 2
#define BUTTON_THREE_PIN 3 // button is set to digital pin 3
#define BUTTON_FOUR_PIN 4 // button is set to digital pin 4
#define BUTTON_FIVE_PIN 5 // button is set to digital pin 5
#define START_BUTTON_PIN 6 // button is set to digital pin 6

int stepsPerRevolution = 200;// how many steps it takes to go 360 degrees
int speed = 25;// steps per second of stepper motor
Stepper X = Stepper(stepsPerRevolution, 8, 9, 10, 11);// stepper motor object with its digital pins
int StepsXFromZero;// keeps track of distance form zero

int action;//shows what step the machine is on
int drinks;
int totalPumpTime = 10;// time for one pump to pump a full red solo cup

int button1 = 0;
int button2 = 0;
int button3 = 0;
int button4 = 0;
int button5 = 0;


void setup() {
  Serial.begin(9600);
  pinMode(LEVER_SWITCH_PIN,INPUT);// sets end-action-switch to pin and as inputput
  pinMode(BUTTON_ONE_PIN, INPUT);//sets button to pin and as input
  pinMode(BUTTON_TWO_PIN, INPUT);//sets button to pin and as input
  pinMode(BUTTON_THREE_PIN, INPUT);//sets button to pin and as input
  pinMode(BUTTON_FOUR_PIN, INPUT);//sets button to pin and as input
  pinMode(BUTTON_FIVE_PIN, INPUT);//sets button to pin and as input
  pinMode(START_BUTTON_PIN, INPUT);//sets button to pin and as input

  X.setSpeed(speed);// actually makes the speed of stepper motor the speed we set earlier
  action = 0;// sets action to 0 mode
}

void loop() {
  if(action == 0){//if action is still on step 0
    zero(digitalRead(LEVER_SWITCH_PIN));//starts using action 0 to zero out the x-axis
  }
  if(action == 1){
    int r = random(200,1000);
    X.step(r);
    StepsXFromZero = StepsXFromZero + r;
    delay(5000);
    X.step(-StepsXFromZero);
    StepsXFromZero = StepsXFromZero - StepsXFromZero;

  }
}

void zero(int switchState) { // for when aciton is 0 to zero out plate
  if(switchState == HIGH){//if the action switch is pressed
    X.step(-1);//go back 1
  }
  else{//if the action switcn is not flipped
    StepsXFromZero = 0;// sets the origin or zero spot were it just ended up
    action = 1;//turn to step or action 1
    X.setSpeed(100);

  }
}
This code is the final code Im making for the whole machine so thats why there is some extra info like all the buttons. This code starts by defining everything and then slowly moving the plate back to the front until it hits the limit action switch. Here is a video of that working.
Then after making sure it would stop when it hit the switch I tested a code in action 1 that makes it go out a random distance then go back to zero to see if it would remember zero. Here is a video of that working.
Mixer
Once I was done testing the carriage while I waited for my group mates to finish making the final version of the cariage and putting all the electronics together, I tested out the mixer that David Tian designed
Final
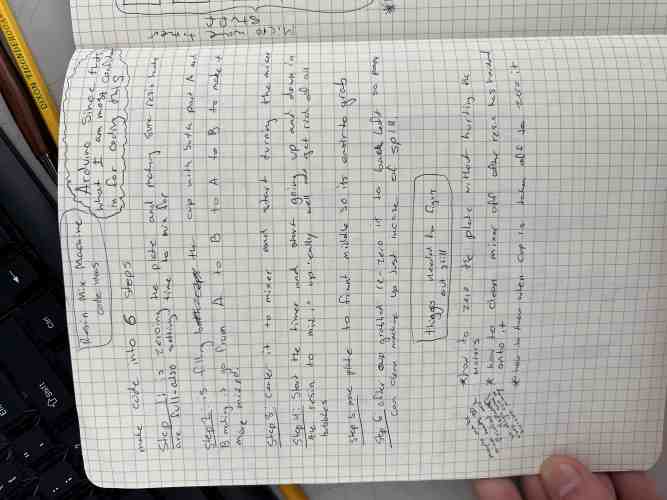
Once I was done with the basic carriage I just had to wait for my group members to put the whole machine together while I put all the seperate codes together to see if the whole thing worked. To do this I kept the steps to keep my code organised and just added a pump turning on during the delays after moving. this way the pumps would turn on once the plate stoped infront of it. Here is my final code with comments explaining it.
#include <Stepper.h> // stepper motor library

#define LEVER_SWITCH_PIN 49 // switch digital pin
#define BUTTON_ONE_PIN 53 // button is set to digital pi
#define BUTTON_TWO_PIN 52 // button is set to di
#define BUTTON_THREE_PIN 51 // button is set
#define START_BUTTON_PIN 50 // butto
#define PUMP_ONE 22
#define PUMP_TWO 24
#define PUMP_THREE 26
#define MIXER 12

int stepsPerRevolution = 200;// how many steps it takes to go 360 degrees
int speed = 50;// steps per second of stepper motor
Stepper X = Stepper(stepsPerRevolution, 8, 9, 10, 11);// stepper motor object with its digital pins
Stepper Z = Stepper(stepsPerRevolution, 4, 5, 6, 7);// stepper motor object with its digital pins
int StepsXFromZero;// keeps track of distance form zero

int action;//shows what step the machine is on

int totalPumpTime = 10;// time for one pump to pump a full red solo cup

int button1 = 0;
int button2 = 0;
int button3 = 0;

void setup() {
  Serial.begin(9600);
  pinMode(LEVER_SWITCH_PIN,INPUT);// sets end-action-switch to pin and as inputput
  pinMode(BUTTON_ONE_PIN, INPUT);//sets button to pin and as input
  pinMode(BUTTON_TWO_PIN, INPUT);//sets button to pin and as input
  pinMode(BUTTON_THREE_PIN, INPUT);//sets button to pin and as input
  pinMode(START_BUTTON_PIN, INPUT);//sets button to pin and as input
  pinMode(PUMP_ONE, OUTPUT);
  pinMode(PUMP_TWO, OUTPUT);
  pinMode(PUMP_THREE, OUTPUT);
  pinMode(MIXER, OUTPUT);

  X.setSpeed(speed);// actually makes the speed of stepper motor the speed we set earlier
  Z.setSpeed(200);
  action = 0;// sets action to 0 mode
}

void loop() {


  if(action == 0){//if action is still on step 0
    int switchState = digitalRead(LEVER_SWITCH_PIN);//starts using action 0 to zero out the x-axis
    if(switchState == HIGH){//if the action switch is pressed
    X.step(-1);//go back 1
  }
  else{//if the action switcn is not flipped
    StepsXFromZero = 0;// sets the origin or zero spot were it just ended up
    action = 1;//turn to step or action 1
    X.setSpeed(100);
    X.step(0);
  }
  }


if(action == 1){
   if(digitalRead(BUTTON_ONE_PIN) == HIGH){
    if(button1 == 0){
      button1 = 1;
      Serial.println("1");
      delay(500);
    }
    else if(button1 == 1){
      button1 = 0;
      delay(500);
    }
}
if(digitalRead(BUTTON_TWO_PIN) == HIGH){
    if(button2 == 0){
      button2 = 1;
      Serial.println("2");
      delay(500);
    }
    else if(button2 == 1){
      button2 = 0;
      delay(500);
    }
}
if(digitalRead(BUTTON_THREE_PIN) == HIGH){
    if(button3 == 0){
      button3 = 1;
      Serial.println("3");
      delay(500);
    }
    else if(button3 == 1){
      button3 = 0;
      delay(500);
    }
}
if(digitalRead(START_BUTTON_PIN) == HIGH){
   action = 2;
}
}


if(action == 2){
  Z.step(1000);
  delay(1000);
  X.step(500);
  StepsXFromZero = StepsXFromZero + 500;
  if(button1 == 1){
    digitalWrite(PUMP_ONE, HIGH);
    delay(10000);
    digitalWrite(PUMP_ONE, LOW);
  }
  X.step(500);
  StepsXFromZero = StepsXFromZero + 500;
  if(button2 == 1){
    digitalWrite(PUMP_TWO, HIGH);
    delay(10000);
   digitalWrite(PUMP_TWO, LOW);
  }
  X.step(500);
   StepsXFromZero = StepsXFromZero + 500;
  if(button3 == 1){
    digitalWrite(PUMP_THREE, HIGH);
    delay(10000);
    digitalWrite(PUMP_THREE, LOW);
  }
  X.step(750);
  StepsXFromZero = StepsXFromZero + 750;
  action = 3;
  }


  if(action == 3){
    Z.step(-1000);
    digitalWrite(MIXER,HIGH);
    delay(5000);
    digitalWrite(MIXER,LOW);
    Z.step(1000);
    action = 4;
  }

  if(action == 4){
    delay(1000);
    X.step(-StepsXFromZero + 50);
    delay(5000);
    action = 0;
  }

}
Summary
This week I discovered what I truly want to do for my final project and that is upgrading this unil it is really refined and works really well. This week I learned all the basics of what I need to refine and improve it more. Things like how to code steppers and pumps. That I need to think about how im going to put something together before designing it. How to design a carriage that works. And how to communicate with others becuase it was really stressful. I plan to build apon these for the final version by adding sensors to control where the plate stops and so the liquid goes right into the cup, and design so I can hide the electronics so you cant see them. I will need custom boards for this and design the holder to fit with the machine. I will also need to account for the rectangle of the skeleton not being perfectly square so I have to leave it some give maybe put a spring in the endcaps so if it needs give it will take it. But that is the basics of what I learned and plan to build apon from this week.