8 - Embedded Programming
This week we have learned about embedded programming. I have made an additive game... discover it!
Summary
This week we have learned about embedded programming and discovered new microcontrollers. For my final project I think I’ll use the SAMD21E.
Assigments
- individual assignment:
- read the data sheet for your microcontroller
- use your programmer to program your board to do something
- extra credit: try other programming languages and development environments
- read the data sheet for your microcontroller
- group assignment:
- compare the performance and development workflows for other architectures
- compare the performance and development workflows for other architectures
Individual Assigment
This week i will use to program the ATtiny412, but i need other microcontroller for my final project.
Read datasheet
I have read three data sheets: the one for the ATtiny412 that is on my own board and for my final project I will decide if I will use an ATmega328 or a SAMD21E, in principle surely the SAMD21E but it depends on if I get it and there is stock, if not the ATmega328 that I will get from some Arduino Nano.
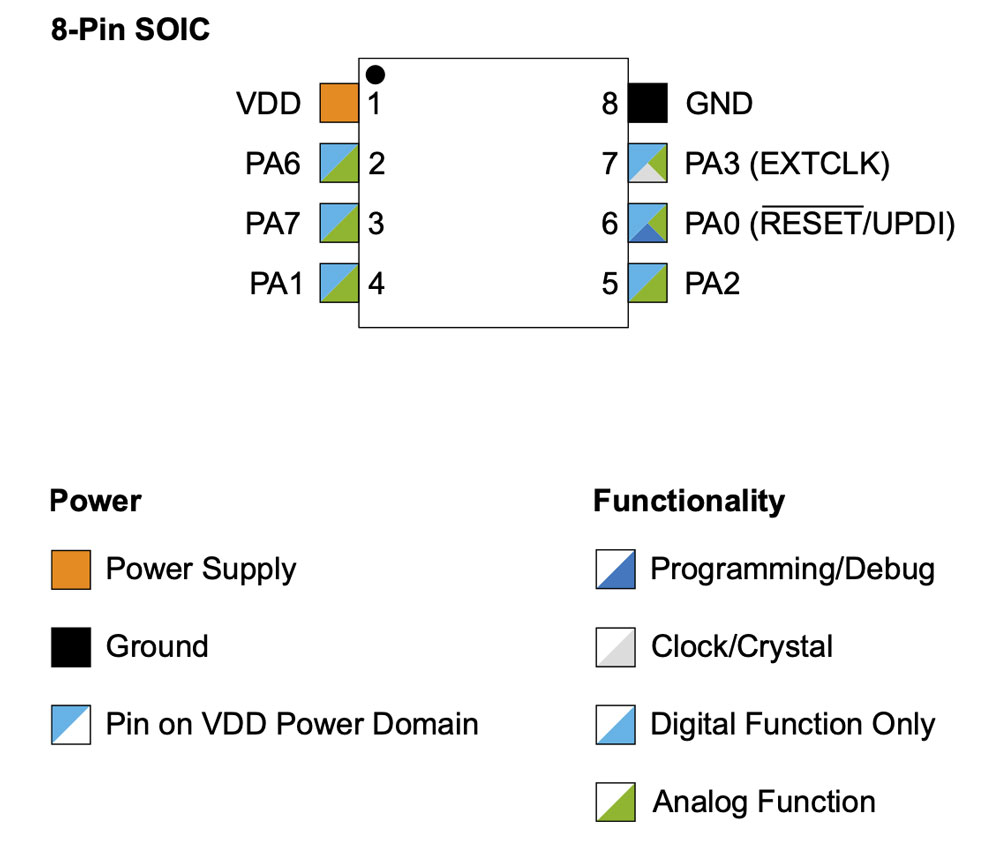
ATtiny412
The last version of ATtiny412 datasheet can be found in Microchip website.
The ATtiny212/214/412/414/416 are members of the tinyAVR®1-series of microcontrollers, using the AVR® processor with hardware multiplier, running at up to 20 MHz, with 2/4 KB Flash, 128/256 bytes of SRAM, and 64/128 bytes of EEPROM in a 8-, 14-, and 20-pin package. The tinyAVR®1-series uses the latest technologies with a flexible, low-power architecture, including Event System, accurate analog features, and Core Independent Peripherals (CIPs).
On page 14 of the datasheet can found the pinout.
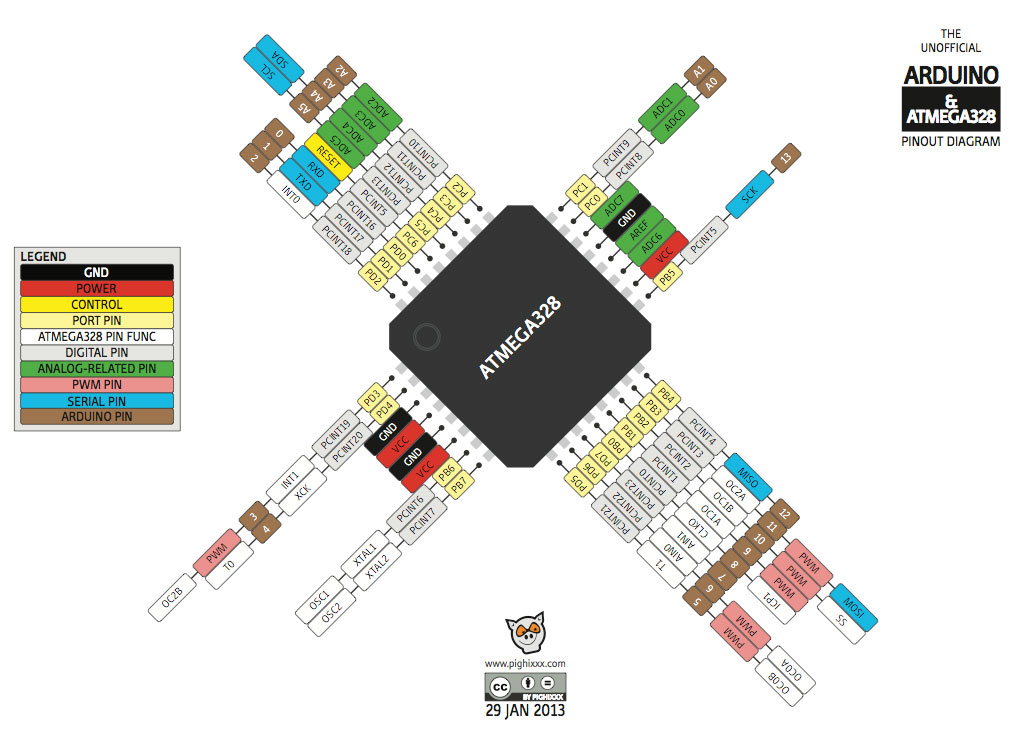
ATmega328
The last version of ATmega328 datasheet can be found in Microchip website.
The ATmega48A/PA/88A/PA/168A/PA/328/P is a low power, CMOS 8-bit microcontrollers based on the AVR® enhanced RISC architecture. By executing instructions in a single clock cycle, the devices achieve CPU throughput approaching one million instructions per second (MIPS) per megahertz, allowing the sys- tem designer to optimize power consumption versus processing speed.
The pinout of ATmega328 TQFP32 is this:
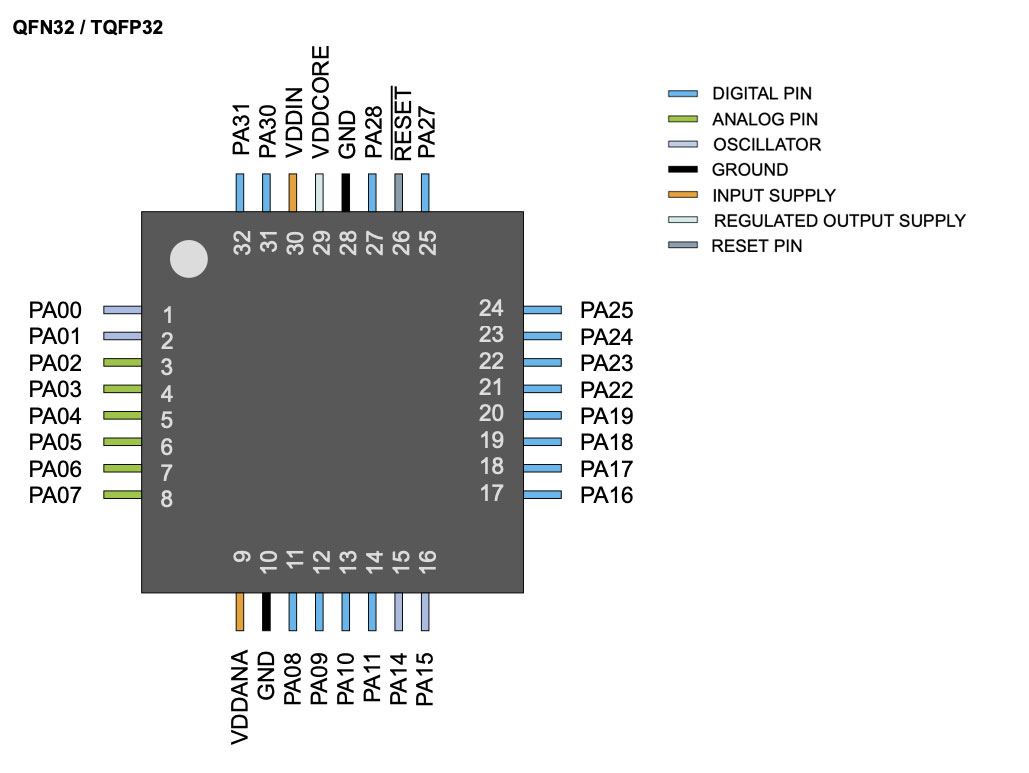
SAMD21E
The last version of SAMD21E datasheet can be found in Microchip website.
The SAM D21 is a series of low-power microcontrollers using the 32-bit ARM® Cortex®-M0+ processor, and ranging from 32- to 64-pins with up to 256KB Flash and 32KB of SRAM. The SAM D21 operate at a maximum frequency of 48MHz and reach 2.46 CoreMark®/MHz. They are designed for simple and intuitive migration with identical peripheral modules, hex compatible code, identical linear address map and pin compatible migration paths between all devices in the product series. All devices include intelligent and flexible peripherals, Event System for inter-peripheral signaling, and support for capacitive touch button, slider and wheel user interfaces.
The pinout of SAMD21E QFN32/TQFP32 is this:
Program your board
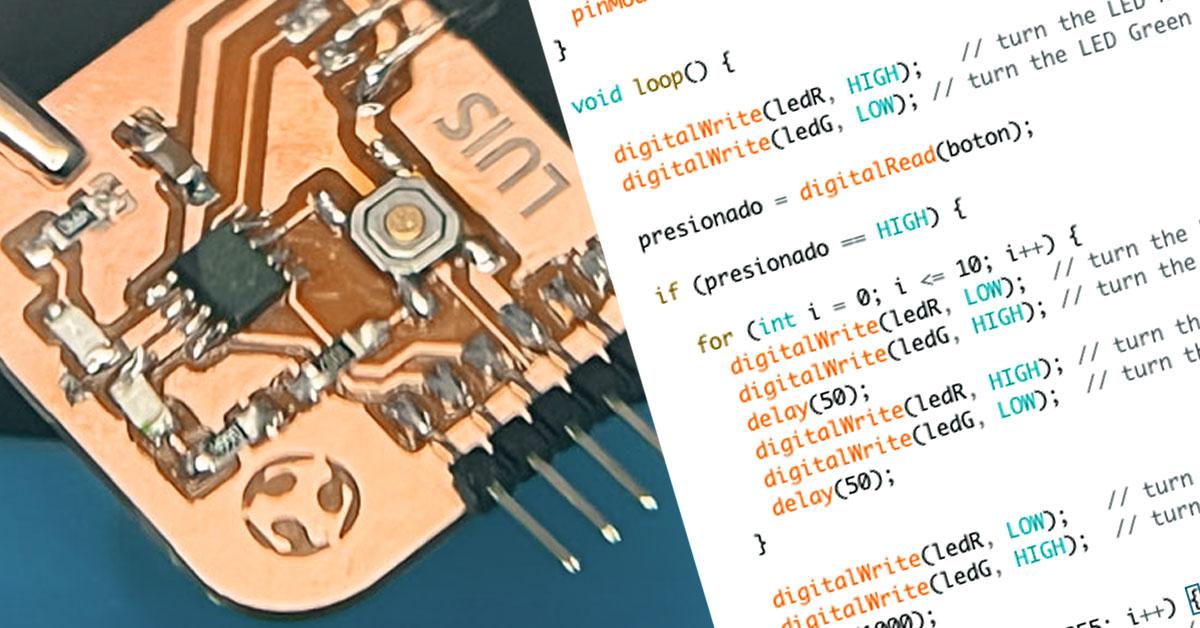
In electronic design week I had already programmed the board, but this time I wanted to make it a bit more complicated.
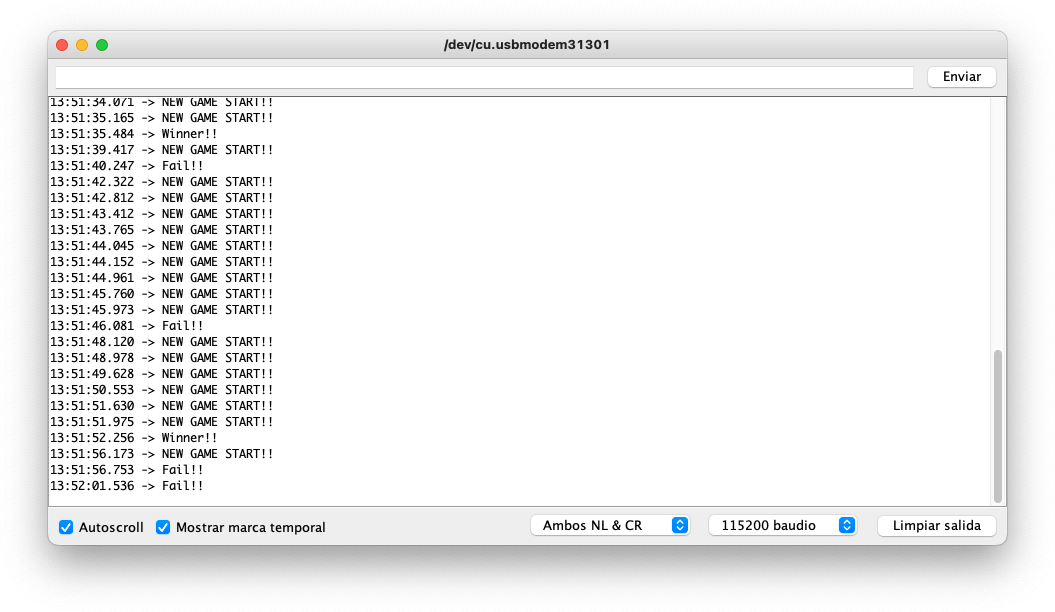
I have made a small game, where the player must press the button when the green led is on.
If you press with the red LED on, the 2 LEDs blink for a few seconds and it would be an error.
If the player presses the button with the green LED on, it begins to fade off and fade on, indicating that we have won.
In addition we show by series the success or failure.
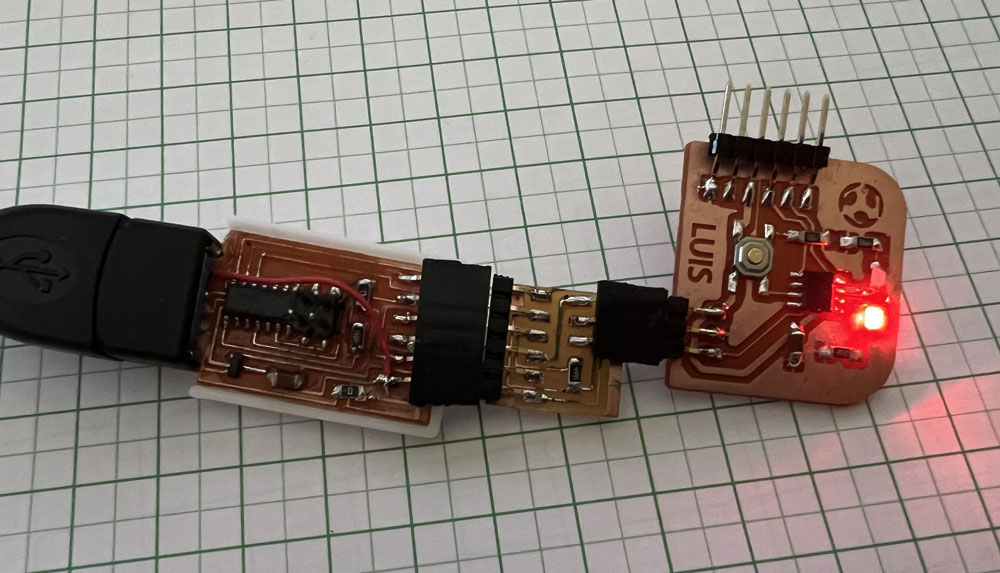
To program the board I must connect the FTDI as indicated in the image
The code of the game is the following, you can download it and try it on your board from the following link. I hope you enjoy playing it and especially modifying it!
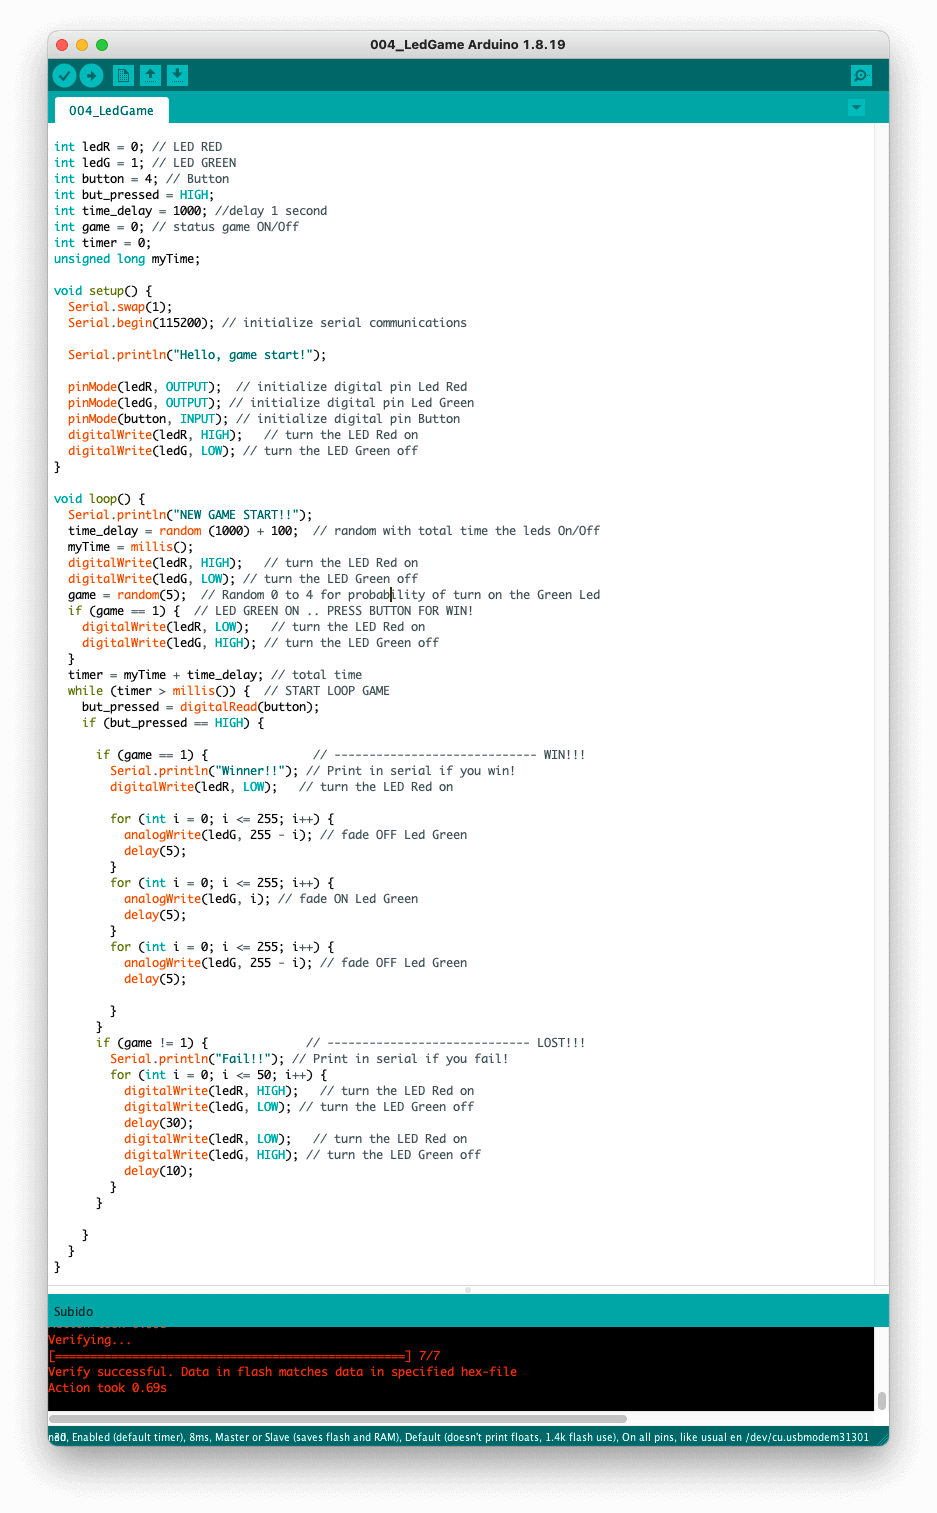
To use the serial I had to make a Serial.swap(1);
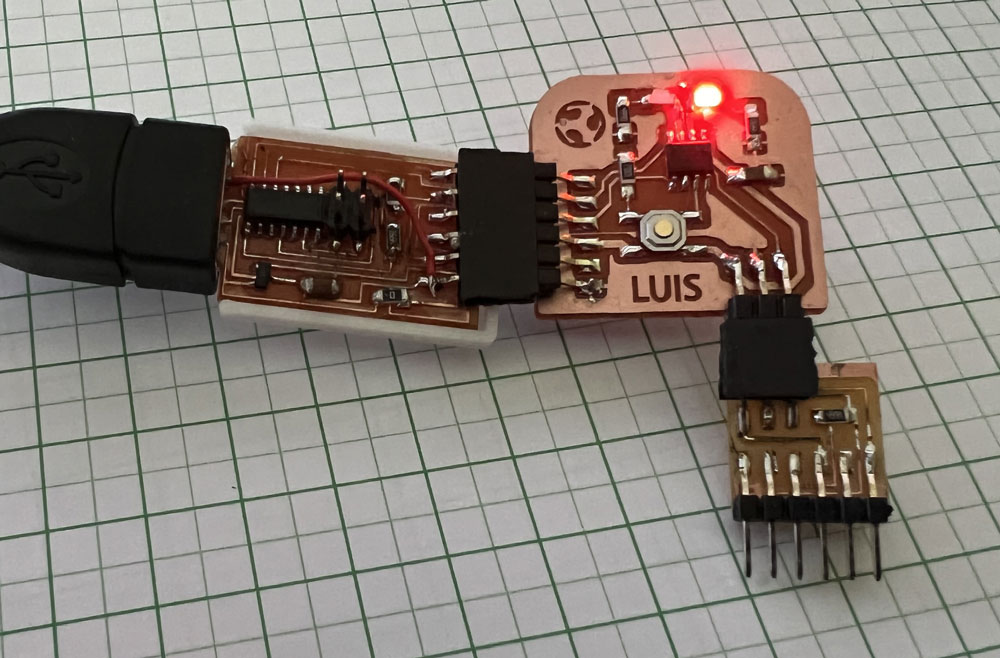
And connect the programmer as follows, in order to read the RX/TX messages
These would be the messages you would receive while playing ;)
Group assignment
The link to Group Assignments of Fab Lab León is this
I have this boards: Arduino UNO, Arduino Nano 33 IoT, Arduino Due, NodeMCU, Micro:bit, M5Stick-C, M5Stack FIRE and a FPGA Alhambra II.
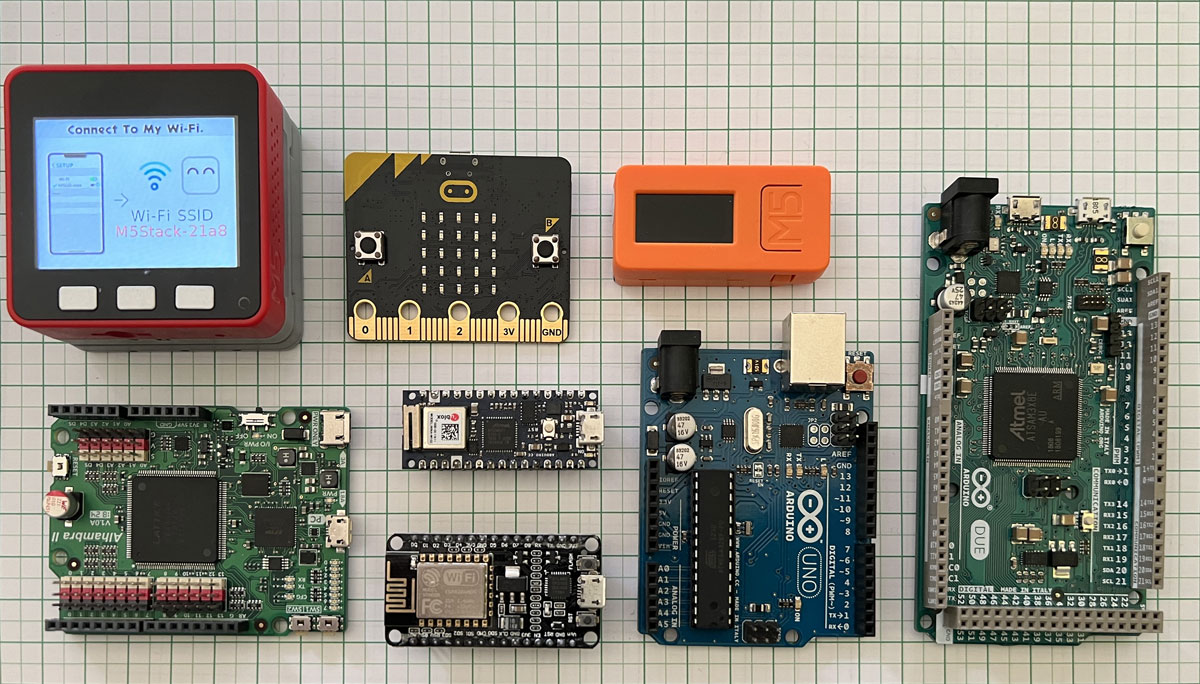
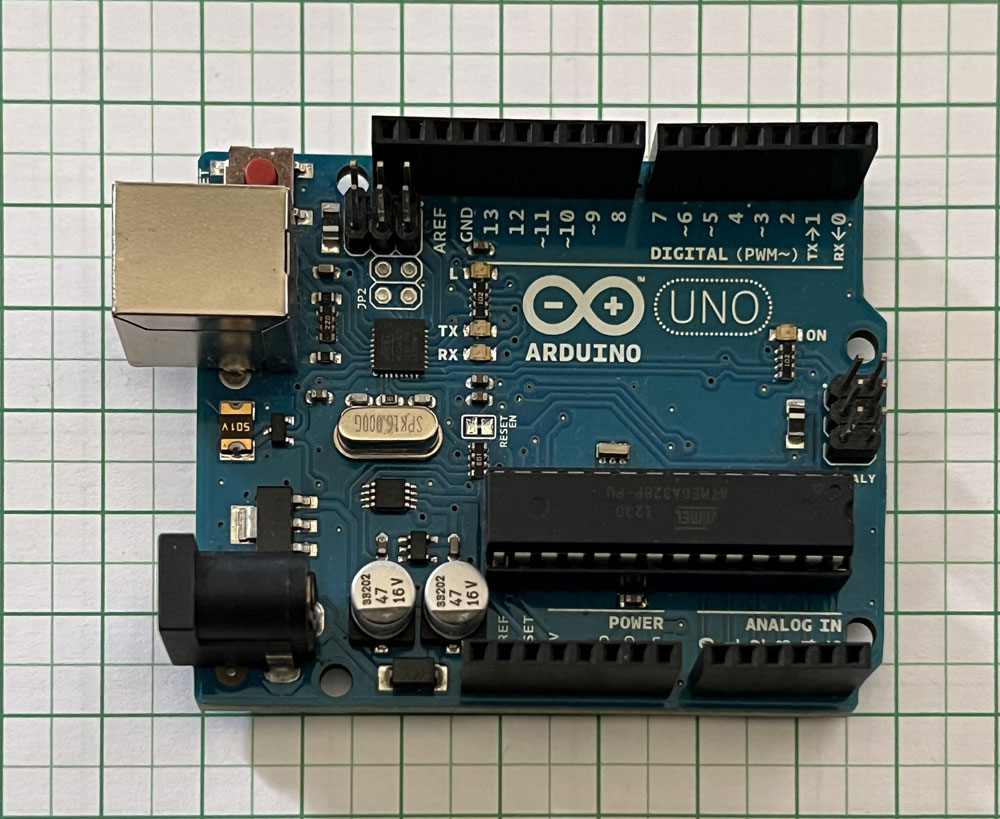
Arduino UNO
Arduino Uno is a microcontroller board based on the ATmega328P. It has 14 digital input/output pins (of which 6 can be used as PWM outputs), 6 analog inputs, a 16 MHz ceramic resonator (CSTCE16M0V53-R0), a USB connection, a power jack, an ICSP header and a reset button. It contains everything needed to support the microcontroller; simply connect it to a computer with a USB cable or power it with a AC-to-DC adapter or battery to get started.
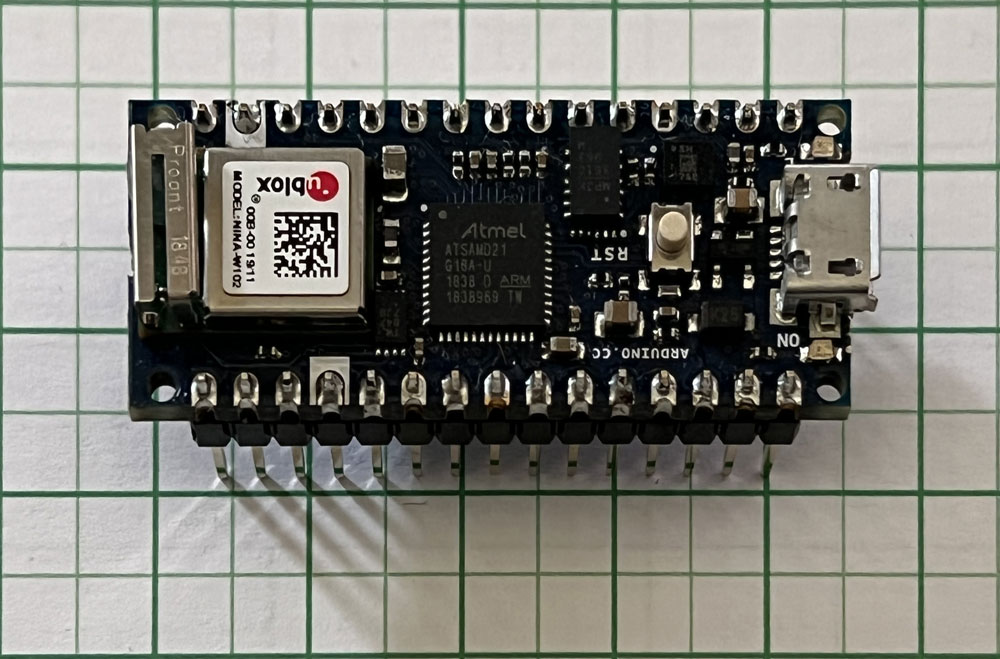
Arduino Nano 33 IoT
The board’s main processor is a low power Arm® Cortex®-M0 32-bit SAMD21. The WiFi and Bluetooth® connectivity is performed with a module from u-blox, the NINA-W10, a low power chipset operating in the 2.4GHz range. On top of those, secure communication is ensured through the Microchip® ECC608 crypto chip. Besides that, you can find a 6 axis IMU, what makes this board perfect for simple vibration alarm systems, pedometers, relative positioning of robots, etc.
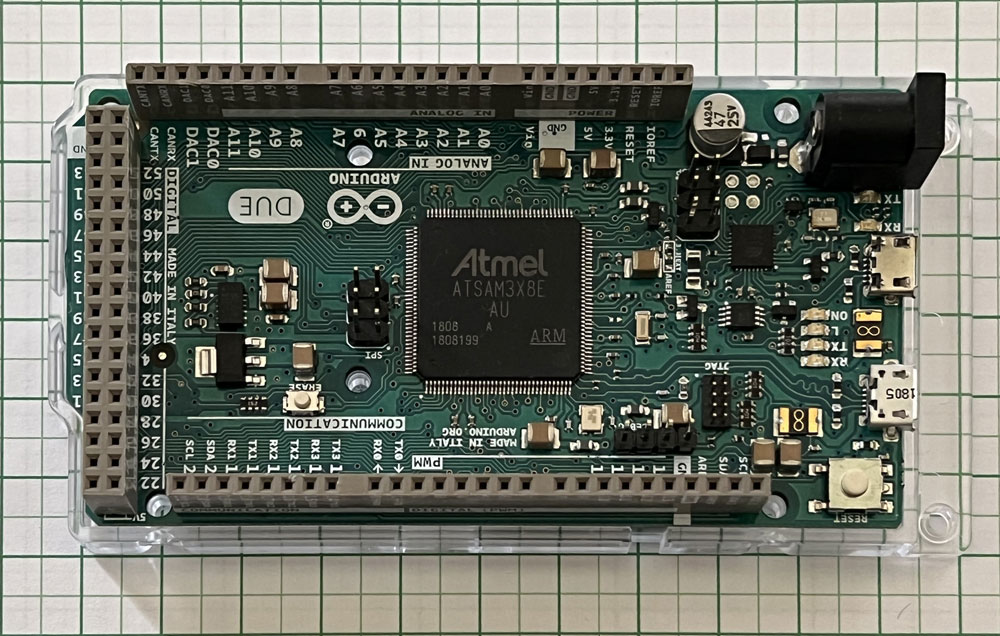
Arduino Due
The Arduino Due is a microcontroller board based on the Atmel SAM3X8E ARM Cortex-M3 CPU. It is the first Arduino board based on a 32-bit ARM core microcontroller. It has 54 digital input/output pins (of which 12 can be used as PWM outputs), 12 analog inputs, 4 UARTs (hardware serial ports), a 84 MHz clock, an USB OTG capable connection, 2 DAC (digital to analog), 2 TWI, a power jack, an SPI header, a JTAG header, a reset button and an erase button.
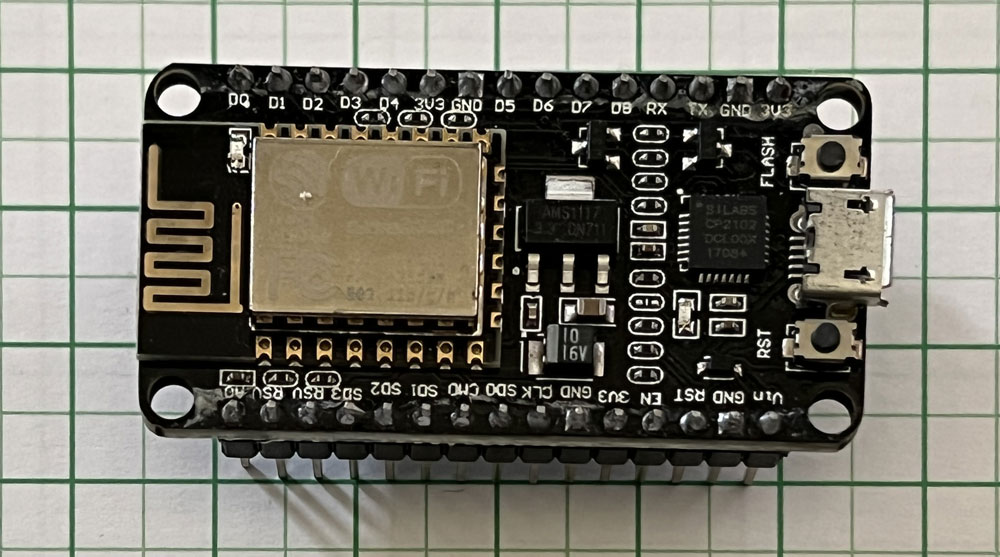
NodeMCU
The NodeMCU development board is an open source board based on ESP8266EX microcontroller with integrated Wi-Fi transceiver. Uploading programs to NodeMCU from any computer via microUSB port is very easy as it supports several programing languages. This makes NodeMCU a smart choice to play with the IoT.
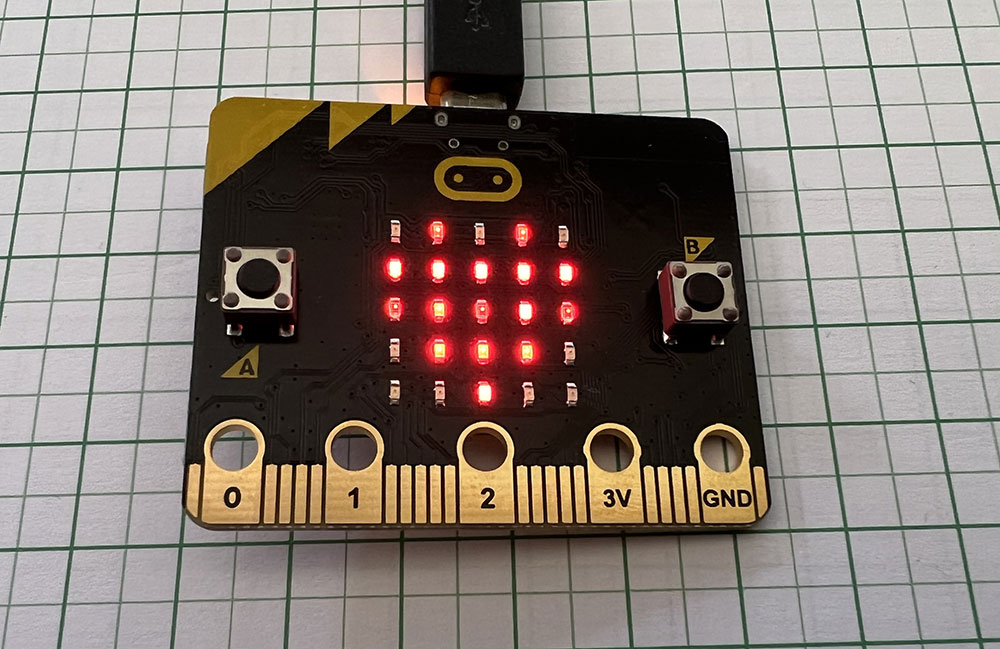
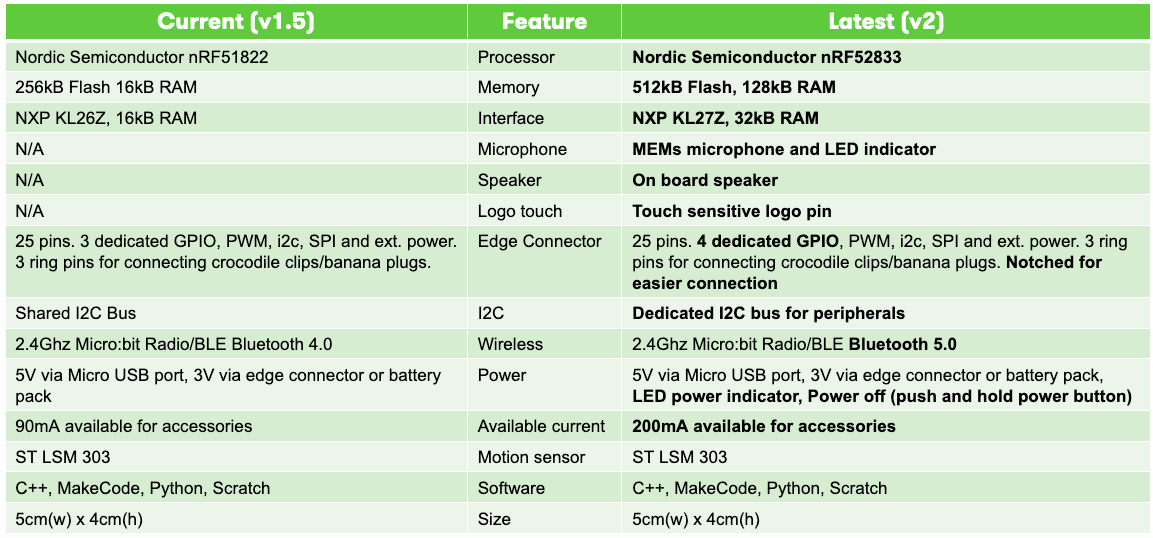
Micro:bit v1
The BBC micro:bit is a pocket-sized computer that introduces you to how software and hardware work together. It has an LED light display, buttons, sensors and many input/output features that, when programmed, let it interact with you and your world.
Can program from a computer, phone or tablet with internet access to load the Microsoft MakeCode or Python code editors.
MakeCode programs can be authored in Blocks, Static TypeScript or Static Python.
Blocks snap into each other to define the program that your micro:bit will run. Blocks can be event (buttons, shake, …) or need to be snapped into an event to run. The on-start event runs first.
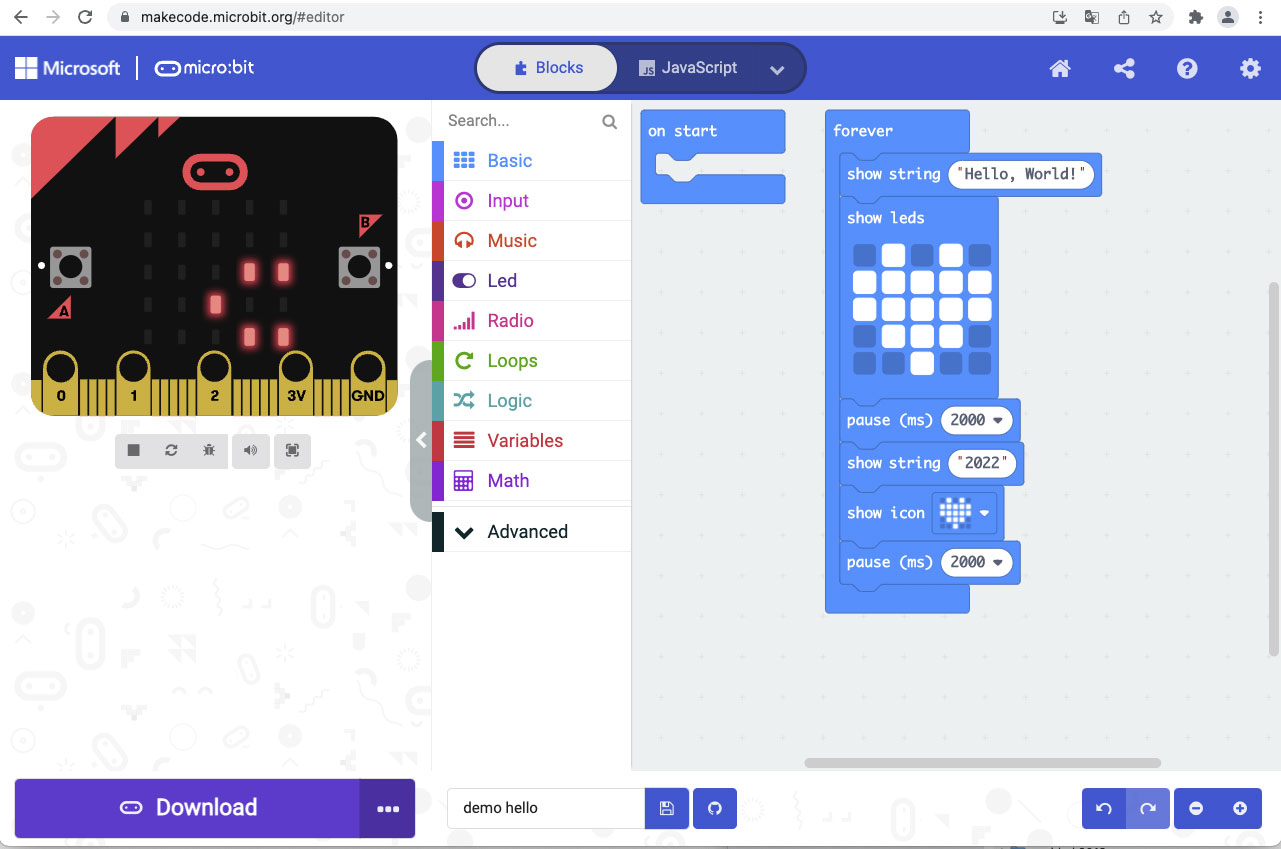
The Microsoft MakeCode programming environment uses JavaScript along with the Static TypeScript language.

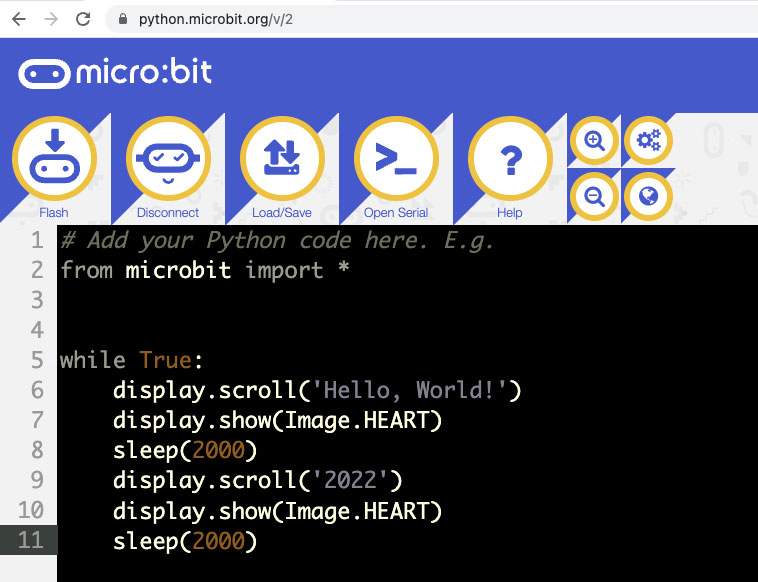
The new micro:bit has a built-in microphone and speaker to allow sound-sensing and sound-making without the need to attach another device. It also introduces capacitive touch sensing, a power-saving mode and more computing power.
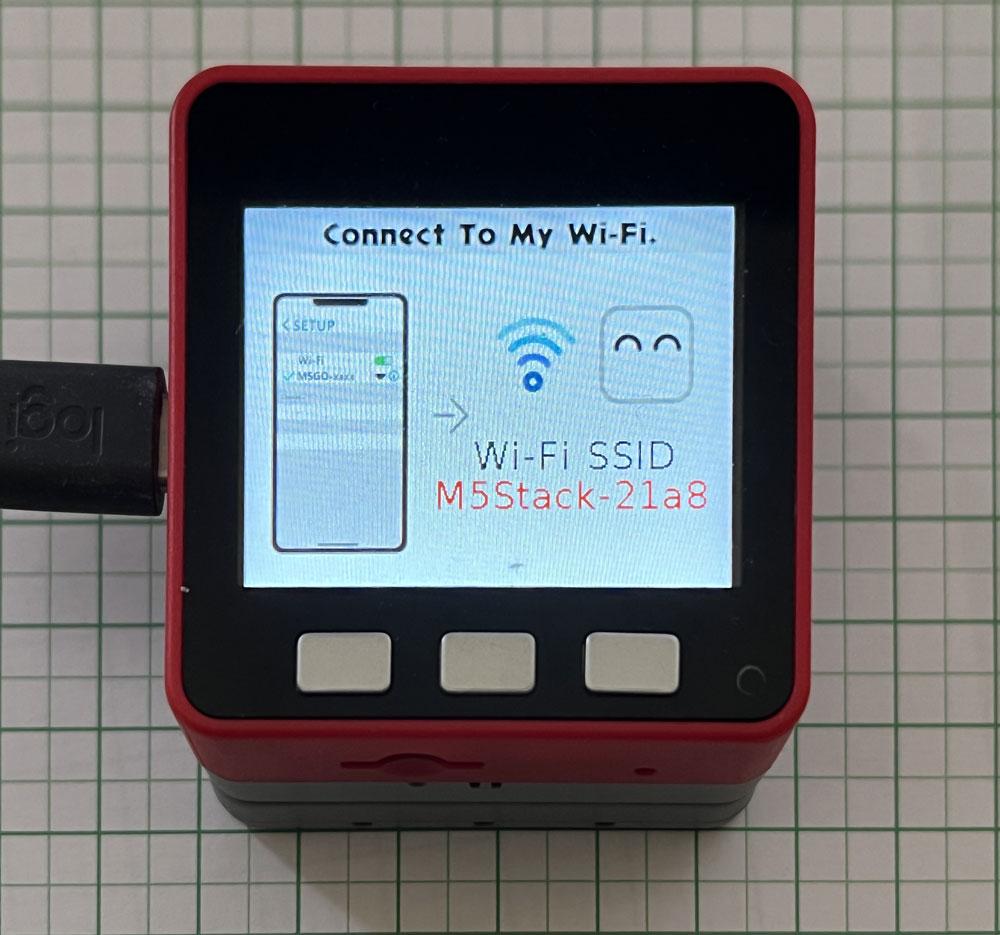
M5Stick-C
M5StickC is powered by ESP32 with LCD color. It is a portable, easy-to-use, open source, IoT development board.
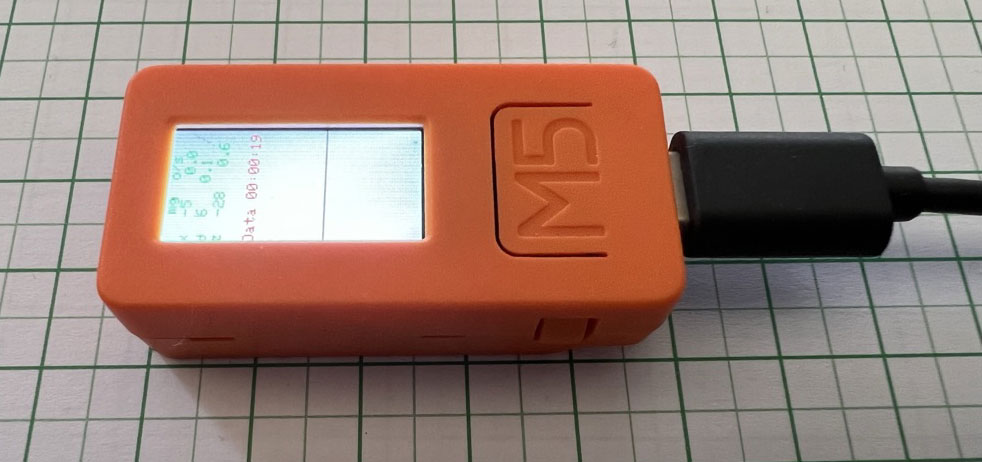
ESP32: 240MHz dual core, 600 DMIPS, 520KB SRAM, Wi-Fi
Flash Memory: 4MB
LCD screen: 0.96 inch, 80160 Colorful TFT LCD, ST7735S
Size: 48.225.5*13.7mm
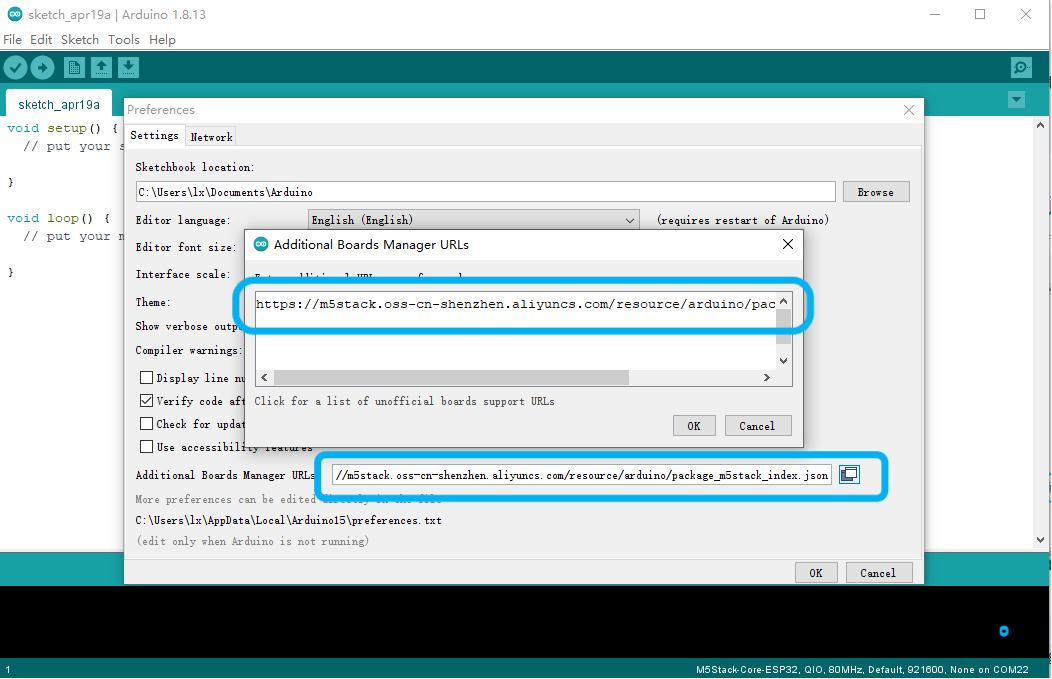
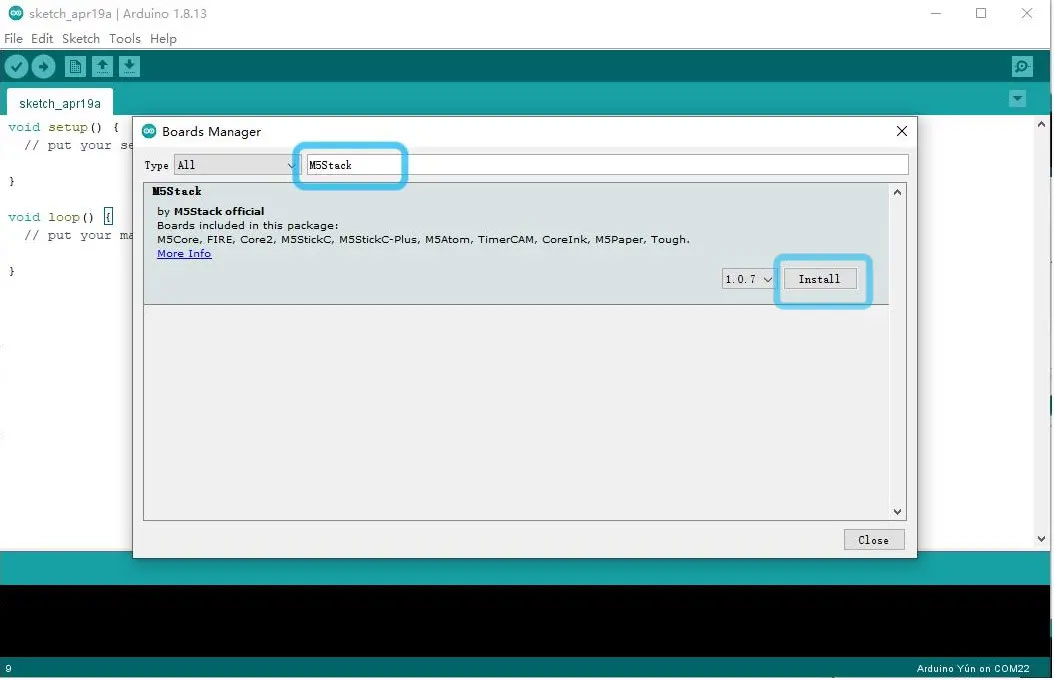
I use with Arduino IDE, same other boards, need import the boards in the app (for M5Stick and M5Stack):
https://m5stack.oss-cn-shenzhen.aliyuncs.com/resource/arduino/package_m5stack_index.json

M5Stack FIRE
M5Stack FIRE It‘ a cost-effective Wi-Fi IoT controller adopts Espressif ESP32 main control chip, equipped with two low-power Xtensa® 32-bit LX6 microprocessors, with main frequency up to 240MHz. With 8M PSRAM + 16M FLASH memory, 2.0-inch full-color HD IPS display panel, IMU, LED, microphone, speaker, TFCard slot and other peripherals. The full-coverage case ensures circuit stability even in complex industrial applications.
ESP32-D0WDQ6-V3: 240MHz dual core, 600 DMIPS, 520KB SRAM, Wi-Fi
Flash: 16MB
IMU: 6-axis MPU6886
LCD screen: 2.0”@320*240 ILI9342C IPS panel, maximum brightness 853nit
Size: 54mm x 54mm x 30.5mm
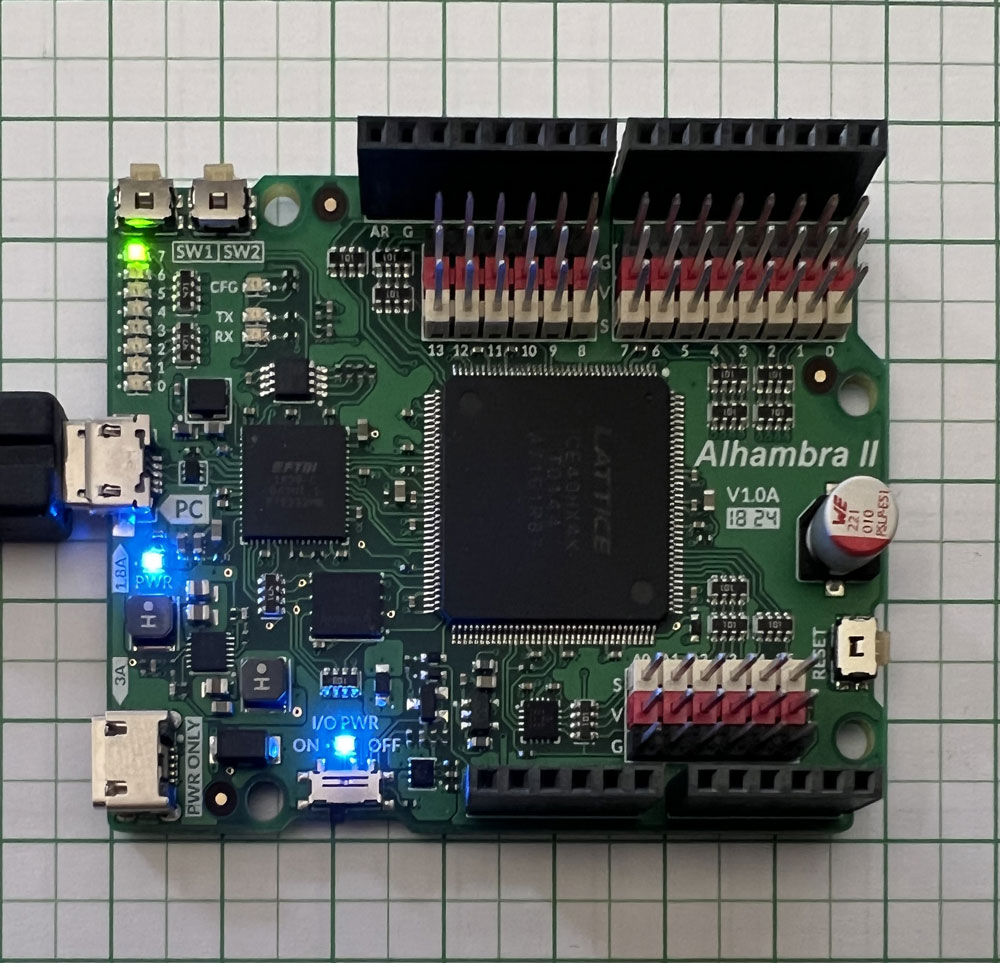
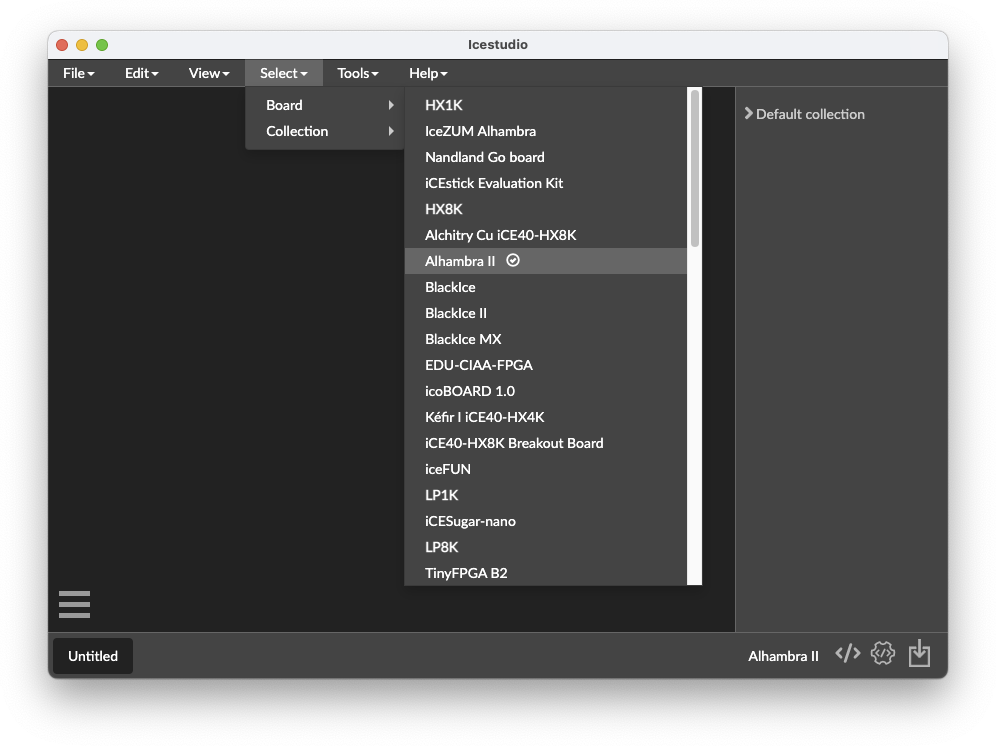
FPGA Alhambra II
Arduino/zum compatible Open FPGA electronic board. Synthesize hardware easily, using open source tools.
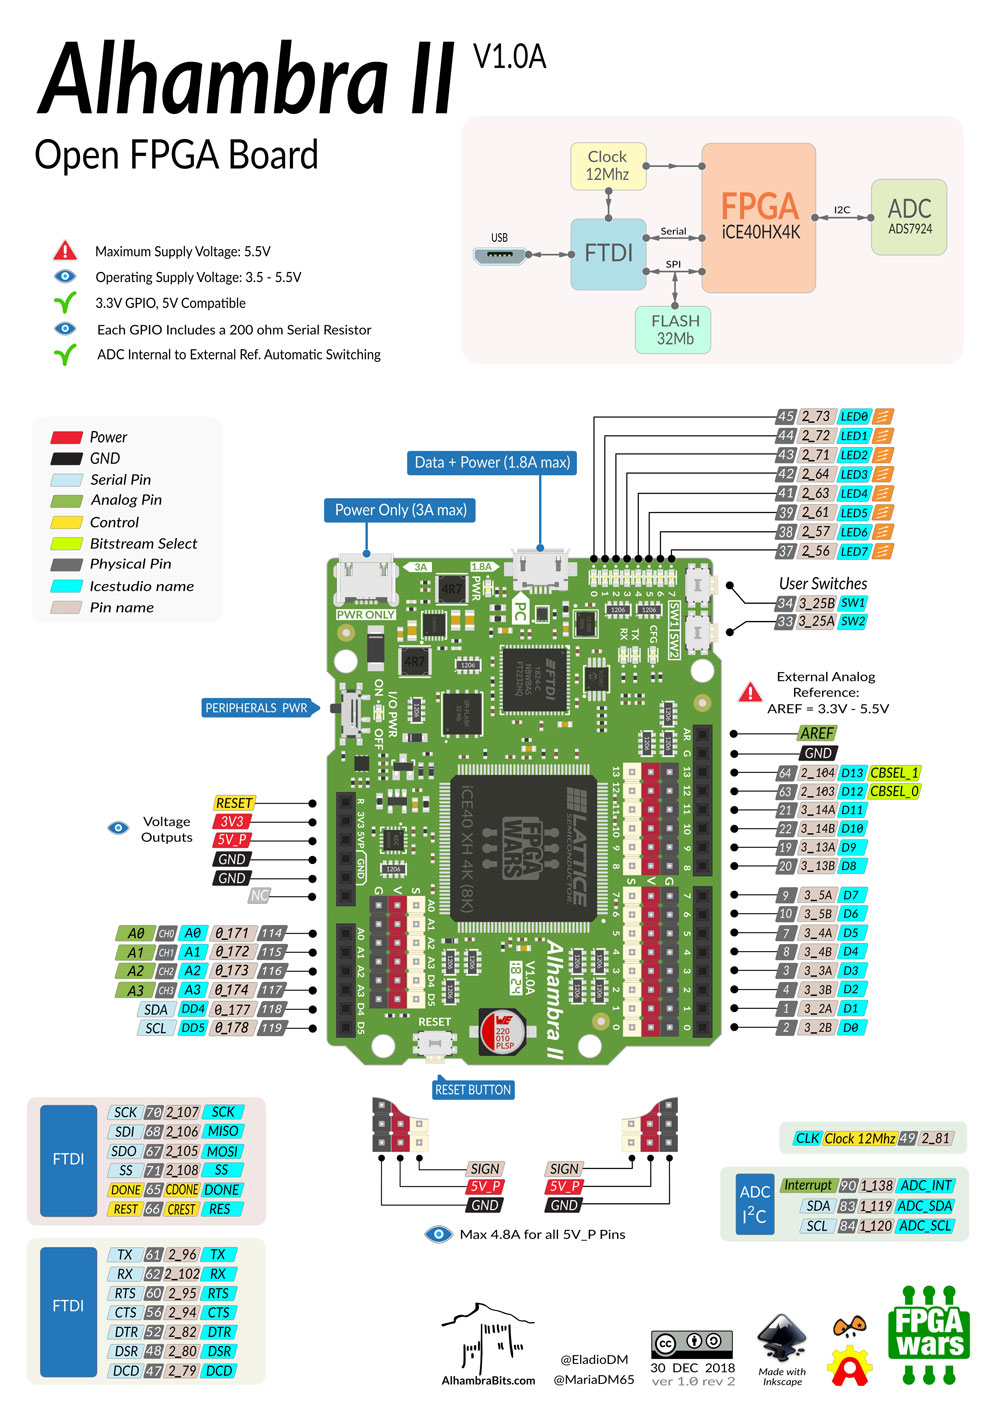
To program it we need the Icestudio, we can get for free in link. Once installed, we have to choose the board, in this case the Alhambra II. Then we must install the Toolchain, in the Tools menu.
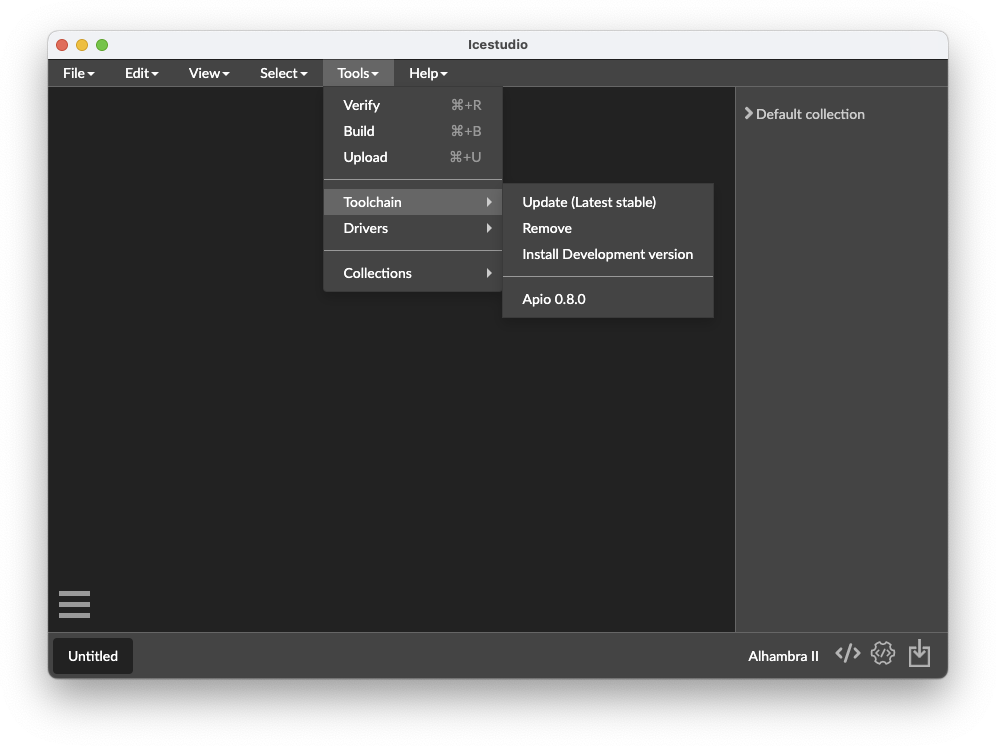
Thanks to Obijuan, He create a Jedi Academy, using GitHub and video tutorials to learn this programmable electronics. They have too a Google Group very active.
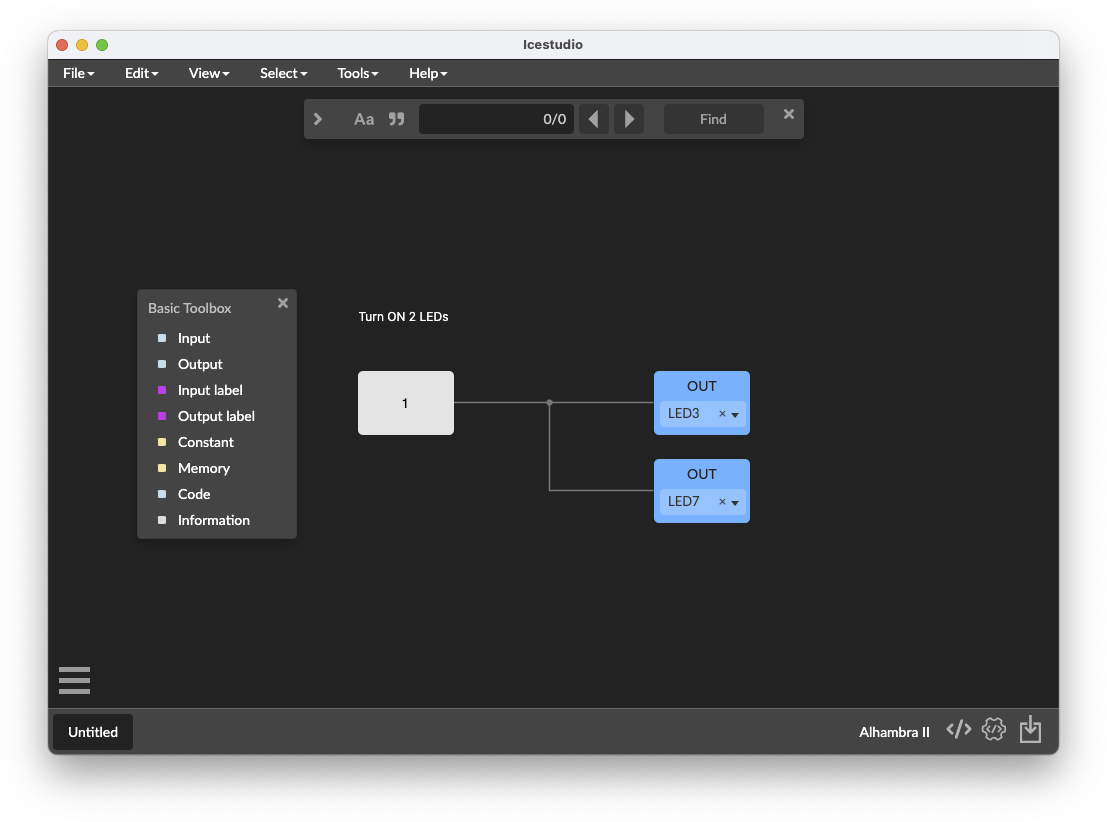
Once the toolchain is installed, the first thing the tutorials recommend is to open a simple program. They are small blocks of inputs / outputs, logic gates, signal generators … In this sample I turn on 2 leds.
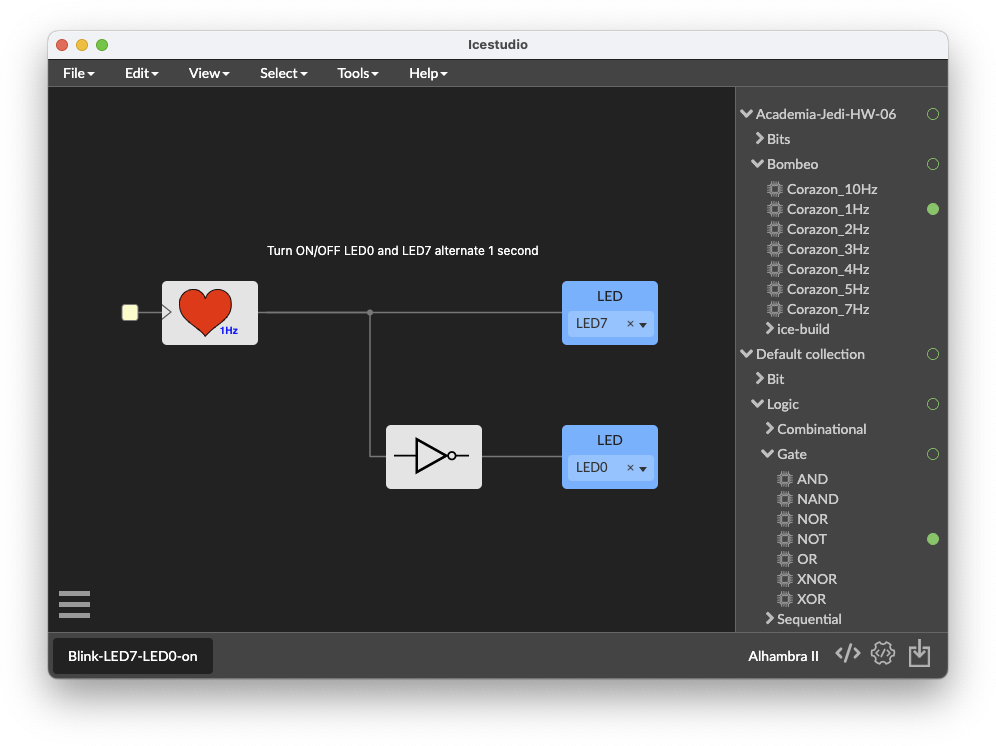
I install too a collection of the Jedi Academy, and made a alternate blink 2 LEDs with a pause of a second.
Downloads
ARDUINO WEEK 2022
During this week from March 21 to 26, Arduino week is celebrated worldwide.
From Amigus Labs (As Pontes, A Coruña, Spain), we have reissued, updated content and launched the Spanish and English version of our “Building Prototypes with Arduino” manual, which we have used over the past years in numerous workshops we have held.
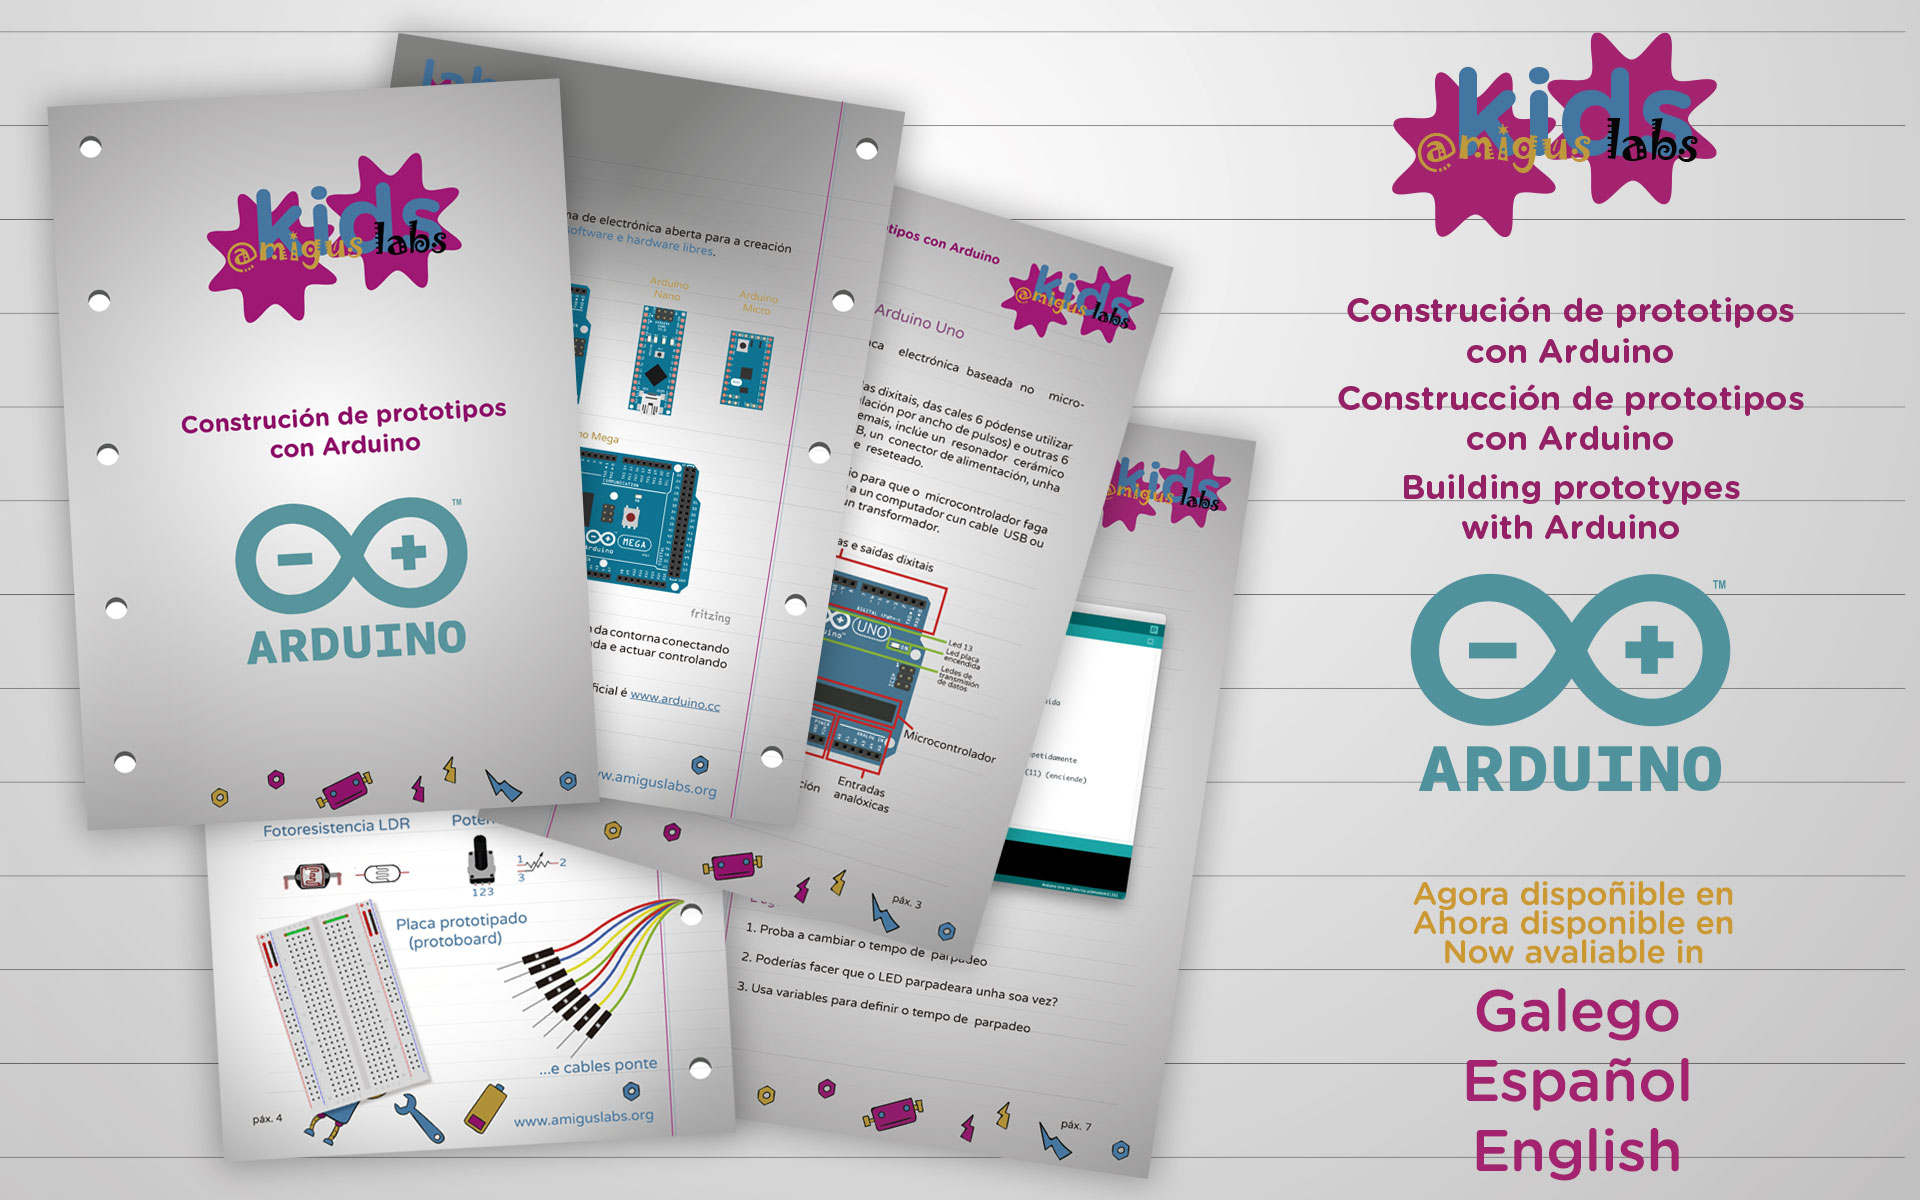
Learn in a simple way to program with Arduino and create small functional prototypes, as well as exercises that will take you into the exciting world of Arduino.
The book is aimed at all kinds of audiences from children, families, teachers… for use in class, at home or in labs.
Printable version and sketchs and other languajes in https://github.com/AmigusLabs/AmigusLabs-ArduinoBook_2022
Explore more like this
17 - Invention, Intellectual Property, and Income
This is the last week before I present the final project, I already have a slide and video proposal of my project.
16 - Applications and Implications
Propose a final project masterpiece that integrates the range of units covered, answering: