#Challenges 1
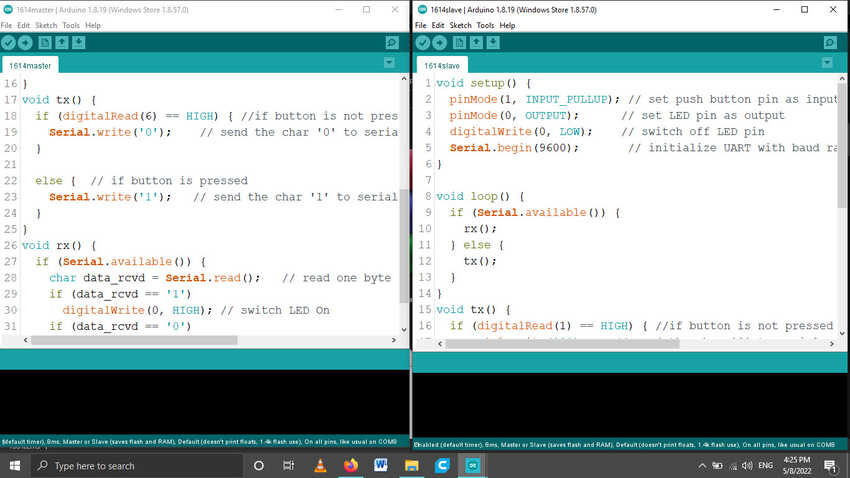
I wanted to try 2 way communication UART protocol but only worked one way. The image of the code is given below.
#Solution 1
it might be faulty wiring but still will try again.
Group assignment:
Individual assignment:
Group Assignmnet
For our group assignment we tried both UART and I2C protocols. We used 2 attiny 1614 boards for connections and for UART serial communication TX and RX pins were used and for I2C SDA and SCL pins were used. both were identified from 1614 datasheet, and burned on it simple LED on/off code by Arduino IDE.
Above video displays UART protocol communication, below displays I2C protocol.
Individual Assignmnet
As for my individual assignment I used 2 attiny 1614 boards (fabricated in week8 with GPIOs ) for UART serial communication bus.
So I started with writing the code which I had got help from my colleagues (thanks to them) I finally made the correct corrections and the code started working fine.
As mentioned below in challenges section I wanted to connect both of them and start UART communication protocol 2 ways but still could not manage to make it work properly.
So that is why I satisfied with the assignment helped by others to meet the deadline.
It is very similar to UART code between the 2 boards but the difference here is they are both slaves waiting for the data I write in the Serial Monitor, if the data sent is the ID number of a board it turns the led on and send data to Serial monitor then turns the led off. It was mainly 1 code but changing the ID number from each board.
Note To be able to use 2 boards as slaves in the UART communication technique we had to make the TX pin as input when it wasn't sending data to make sure that no noise is happening or 2 boards are sending data in the same time. Plus, that was the exact same reason there are no else in the code, as both boards will send data at the same time if they weren't chosen.
Here is the code
Voila its done
#Challenges 1
I wanted to try 2 way communication UART protocol but only worked one way. The image of the code is given below.
#Solution 1
it might be faulty wiring but still will try again.