

Interfacing and Applications:
In this Fourteenth week of Fab Academy, we had to explore Interfacing and Applications.
Objective:
1. Group assignment:
Details could be found here.2. Individual assignment:
Learning Outcomes:
Checklist:
Opening Quotes:
- A picture is worth a thousand words. An interface is worth a thousand pictures. "Ben Shneiderman"
- UI vs UX:
UI design is more concerned with the surface and overall feel of a design. UI design is a craft where you the designer build an essential part of the user experience. UX design covers the entire spectrum of the user experience. One analogy is to picture UX design as a car with UI design as the driving console. We may simply say that UI is a Subset of UX. - UI is the saddle, the stirrups, and the reins. UX is the feeling you get being able to ride the horse. "Dain Miller, Web Developer"
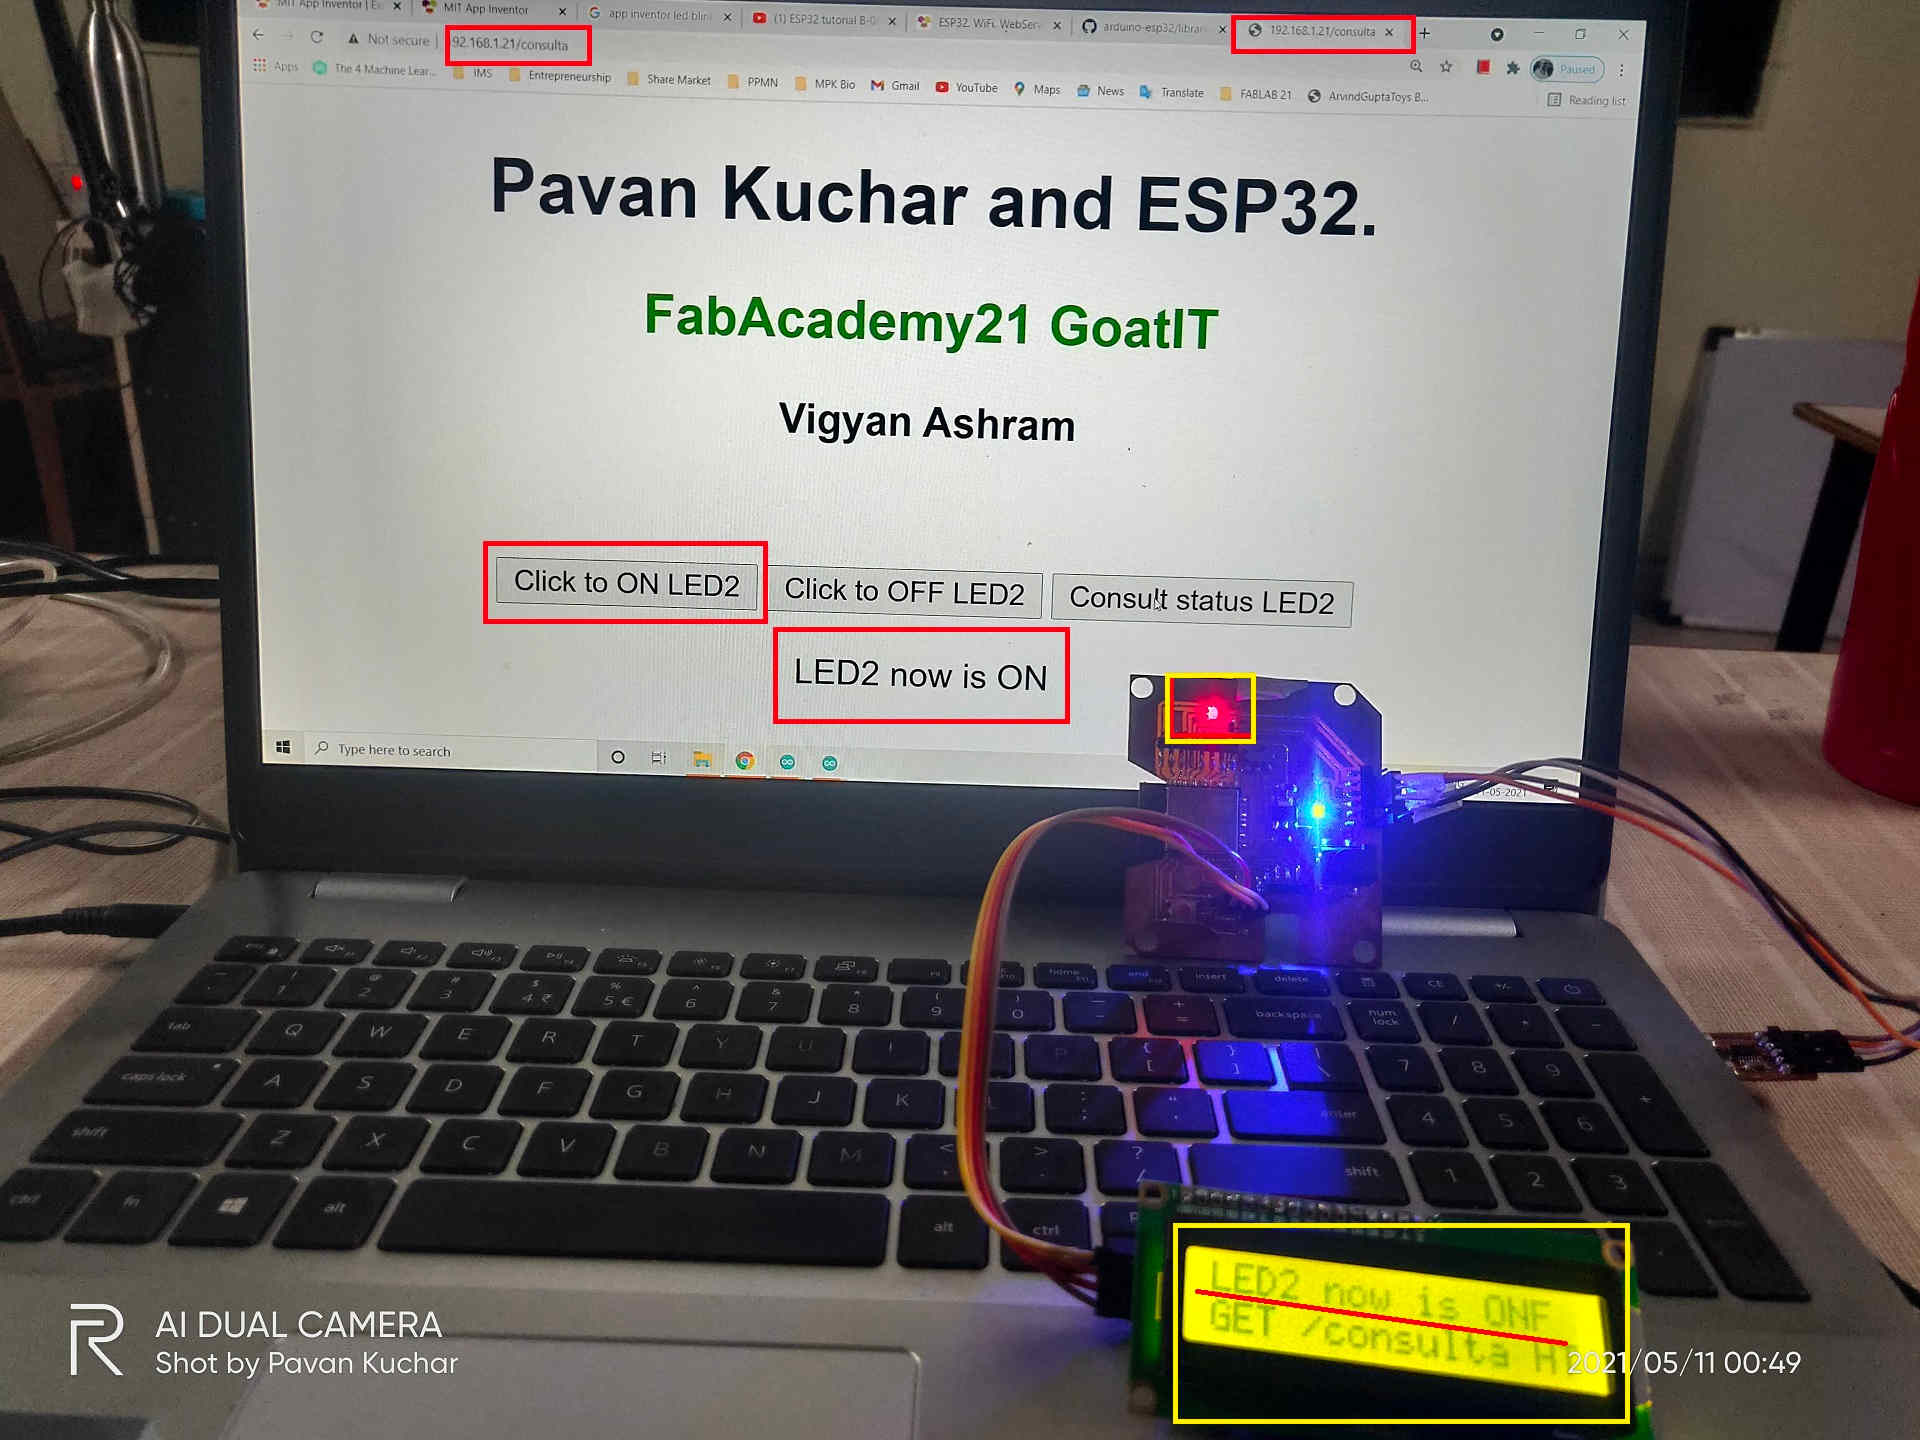
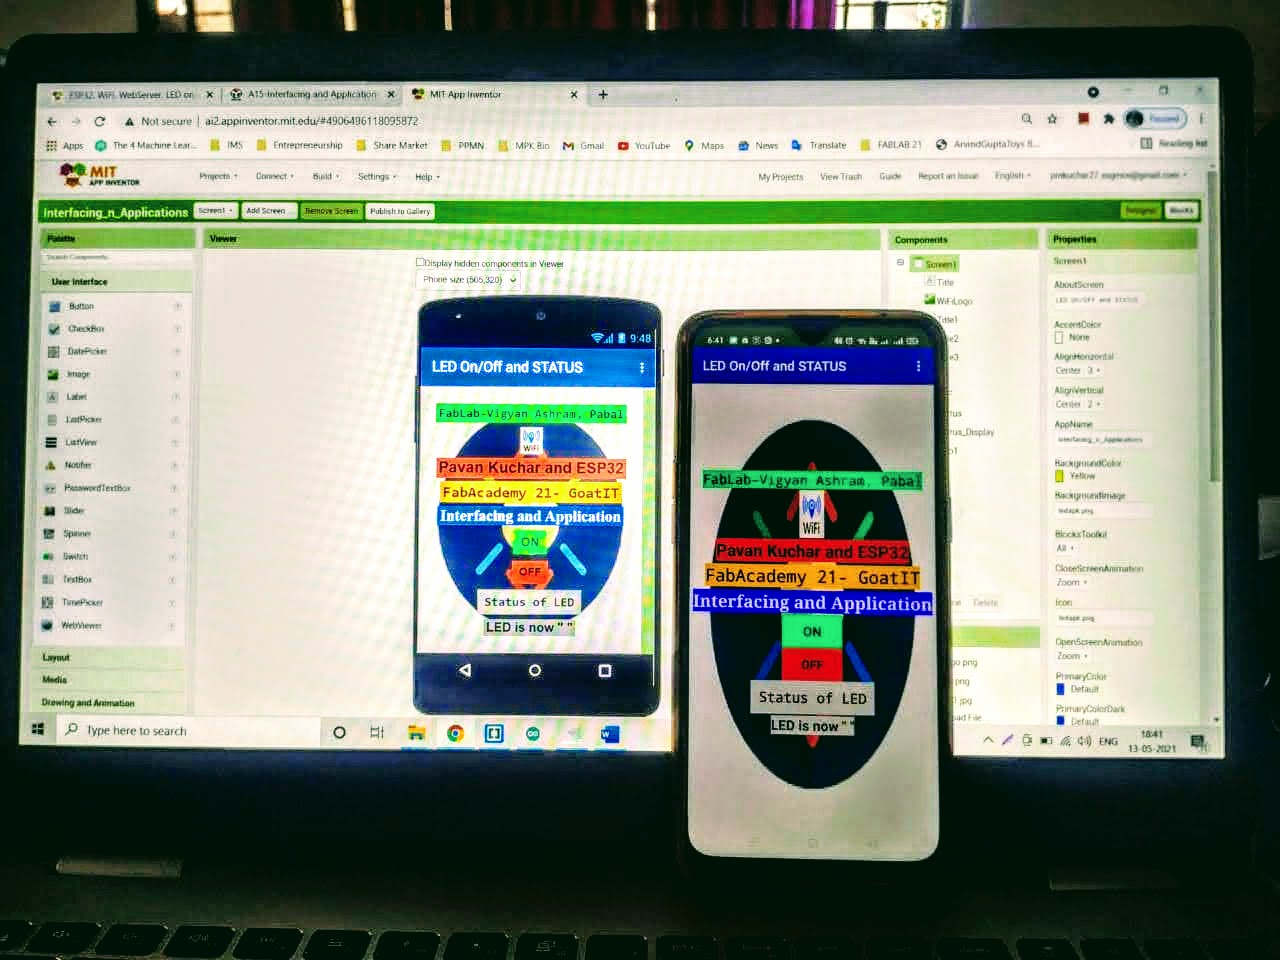
Web User Interface showing Status on Web and Output on LCD
1. Group assignment: Details here.
Details of Group Assignment could be found here.2. Individual assignment:
In this week, I have understood about Interfacing the Input and/or Output device with the application.I have made a Web User Interface to Switch ON and/or OFF the LED connected on my ESP32 board at GPIO17 and displayed its status on 16*2 LCD Display whether the LED is ON or OFF. Because I will not be using any Actuator like Motor, Fan in my Final Project. I have used Processing, MIT App Inventor for this week's assignment for interfacing and applications. I have shown the readings of Load cell in Meter by using Processing and created an App in MIT App Inventor. I also created a Web User Interface for Switching ON and OFF the LED attached on my ESP32 Project Board. I also wanted to send the data of Load Cell and RFID Reader to my Channel on Thingspeak but couldn't do it.
What is user interface?
The user interface (UI) is the point at which human users interact with a computer, website or application. The goal of effective UI is to make the user's experience easy and intuitive, requiring minimum effort on the user's part to receive maximum desired outcome.
UI is created in layers of interaction that appeal to the human senses (sight, touch, auditory and more). They include both input devices like keyboard, mouse, trackpad, microphone, touch screen, fingerprint scanner, e-pen and camera and output devices like monitors, speakers and printers.
In our Case, the Input Devices are the various Sensors used to get the readings from the environment like the BME280 or BH1750 or Load Cell etc and the Output Devices like LCD, OLED, Speakers / Sirens and Actuators like the Exhaust Fans, Motors, LED etc.
Devices that interact with multiple senses are called "multimedia user interfaces". For example, everyday UI uses a combination of tactile input (keyboard and mouse) and a visual and auditory output (monitor and speakers). (Source)
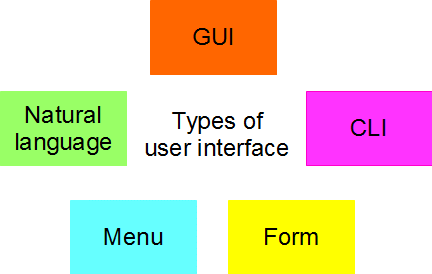
Types of User Interfaces:
A user interface, also sometimes called a human-computer interface, comprises both hardware and software components. It handles the interaction between the user and the system.
There are different ways of interacting with computer systems which have evolved over the years. There are five main types of user interface:
Gestural UI refers to using specific gestures, like scrolling, pinching, and tapping to operate an interface. It also refers to gesture recognition, including tipping, tilting, eye motion, and shaking. Mostly used today in various Mobiles to start music by or Flashlight by shaking, 3 finger screenshot, Waving to take selfies, etc. and also in the Mouse pads of Laptops.
(Images below - Source)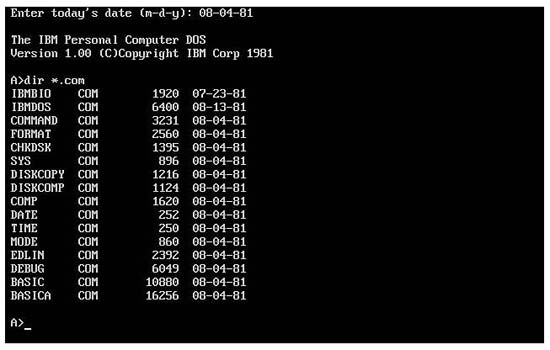 Command Line UI | 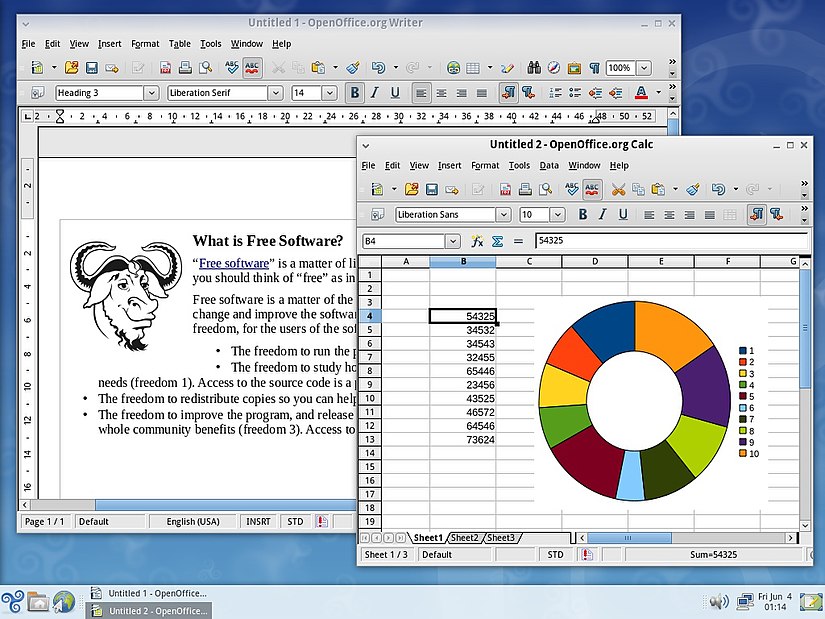 Graphical UI |
|---|
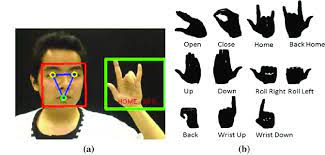 Gesture Driven UI | 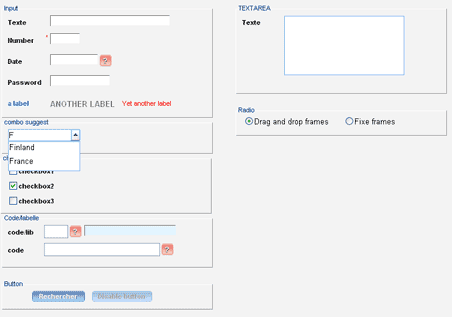 Form Based UI |
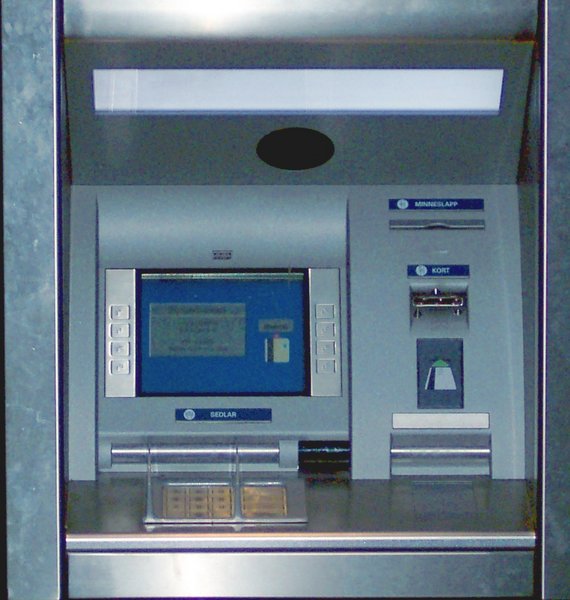 Menu Driven UI (ATM/Kiosk) | 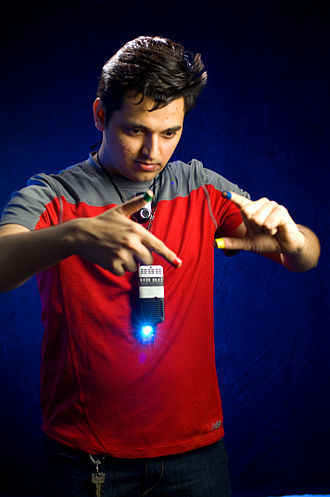 Pranav Mistry at TED for Gesture Driven UI |
What is a Graphical User Interface (GUI)?
The Graphical User Interface is the graphical content through which the equipment information is made visible on a screen.
Websites interfaces also tend to be designed so that any visitor may use it without the need of prior specific knowledge.
Web UI:refers to all the graphics, information and tools displayed on the screen when a web page is opened.
Web User Interface
I have used MIT App Inventor for this week's assignment for interfacing and applications. I created an App in MIT App Inventor. I also created a Web User Interface for Switching ON and OFF the LED attached on my ESP32 Project Board.
About Processing:
Processing is a free graphical library and integrated development environment (IDE) built for the electronic arts, new media art, and visual design communities with the purpose of teaching non-programmers the fundamentals of computer programming in a visual context.
Processing uses the Java language, with additional simplifications such as additional classes and aliased mathematical functions and operations. It also provides a graphical user interface for simplifying the compilation and execution stage.
The Processing language and IDE have been the precursor to other projects including Arduino, Wiring and p5.js.Source: Wikipedia
About MIT App Inventor:
MIT App Inventor is an intuitive, visual programming environment that allows everyone even children to build fully functional apps for smartphones and tablets.
Its blocks-based tool facilitates the creation of complex, high-impact apps in significantly less time than traditional programming environments. The MIT App Inventor project seeks to democratize software development by empowering all people, especially young people, to move from technology consumption to technology creation.
A small team of CSAIL staff and students, led by Professor Hal Abelson, forms the nucleus of an international movement of inventors.
App Inventor lets you develop applications for Android phones using a web browser and either a connected phone or emulator. The App Inventor servers store your work and help you keep track of your projects.
You build apps by working with:
The App Inventor Designer, where you select the components for your app.
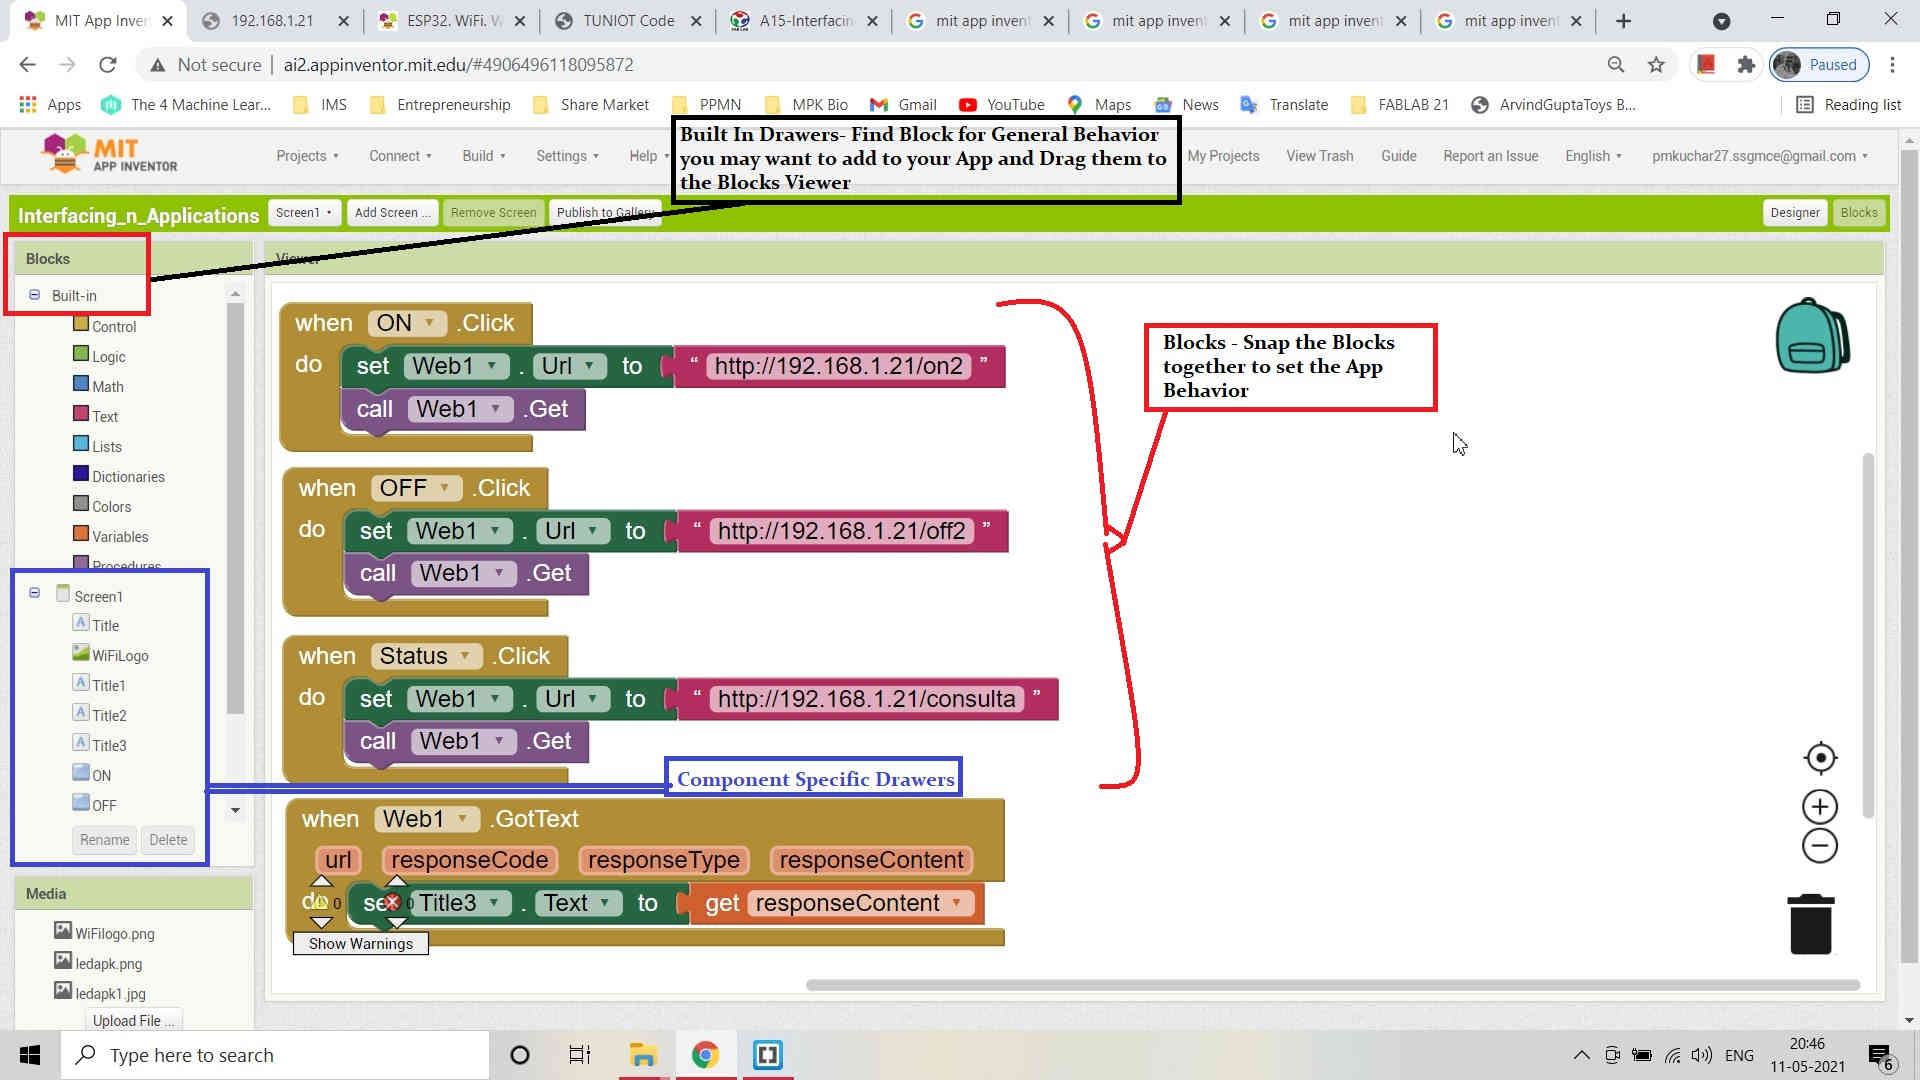
The App Inventor Blocks Editor, where you assemble program blocks that specify how the components should behave. You assemble programs visually, fitting pieces together like pieces of a puzzle.
Your app appears on the phone step-by-step as you add pieces to it, so you can test your work as you build. When you're done, you can package your app and produce a stand-alone application to install.
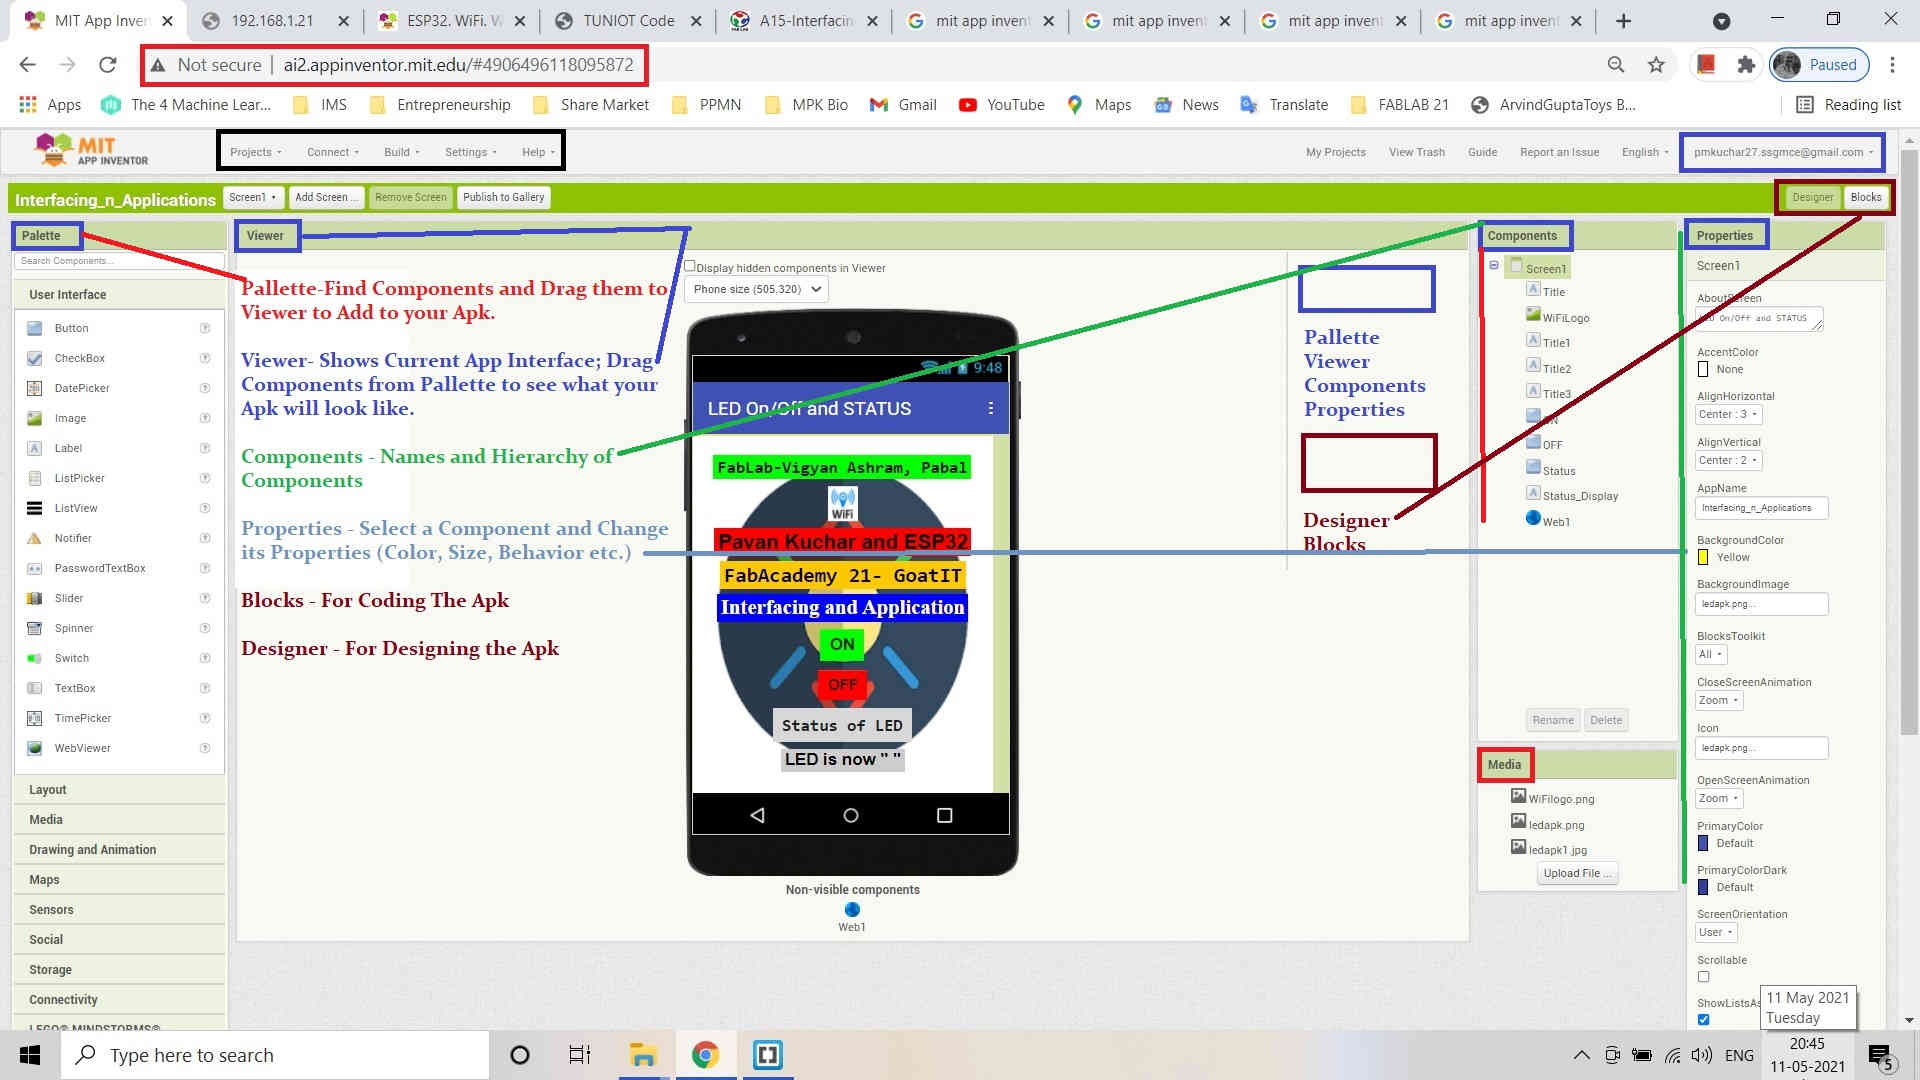
MIT App Inventor Window and its Designer Window
MIT App Inventor Window and its Blocks Window
How I built my App for Interfacing?
I was aware of the MIT App Inventor as I have used it earlier to design and made a Converter App from Kgs. to Liters for weighing the Milk in Vigyan Ashram. The details could be found at the end of this page.
- After creating an account with MIT App Inventor, I opened the MIT app Inventor designer window, went to the Projects section and selected new project and named it "Interfacing_n_Applications"
- For changing the back ground, I went to the properties => Background image => Choose file. Uploaded the image I wanted by clicking OK.
- Various Components used from the User Interface Pallette by me for my App are -
- After the App with the Logic is ready, Go to AI Companion in the Connect Tab and select it. It will prepare the App for downloading and opening in the Mobile. For that you need to have the MIT AI Companion.

MIT App Inventor Window at the StartUp

MIT App Inventor Window after Naming Project
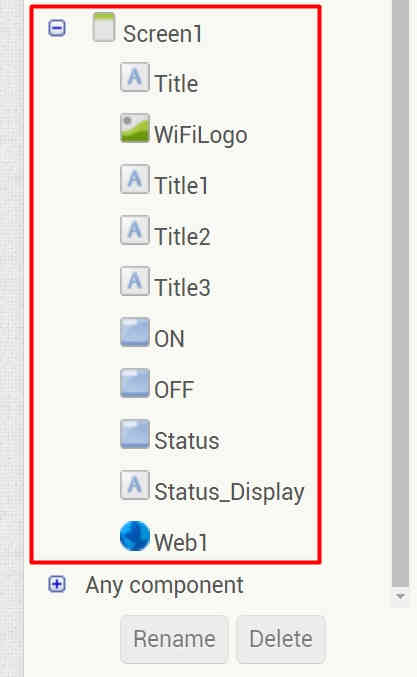
Components used in MIT Inventor App from User Interface Pallette like Labels, Buttons, Image, Web
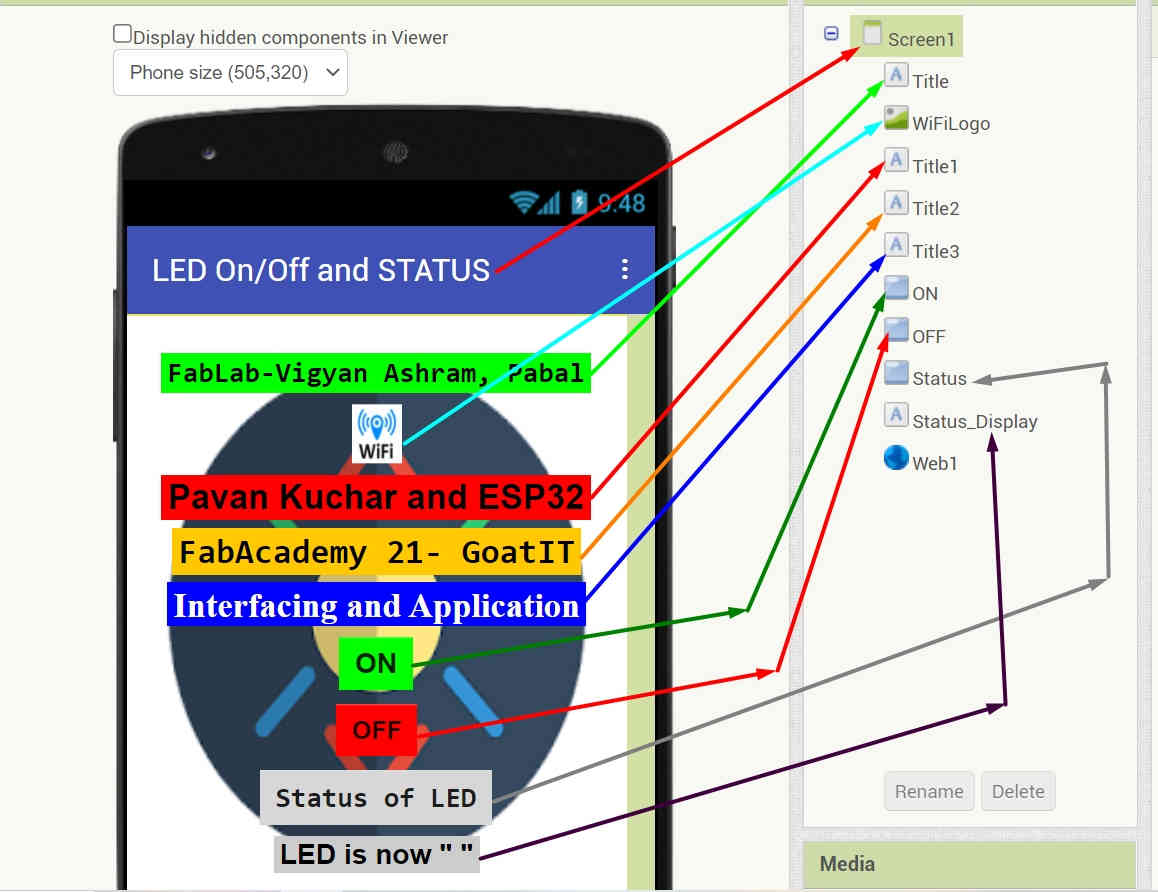
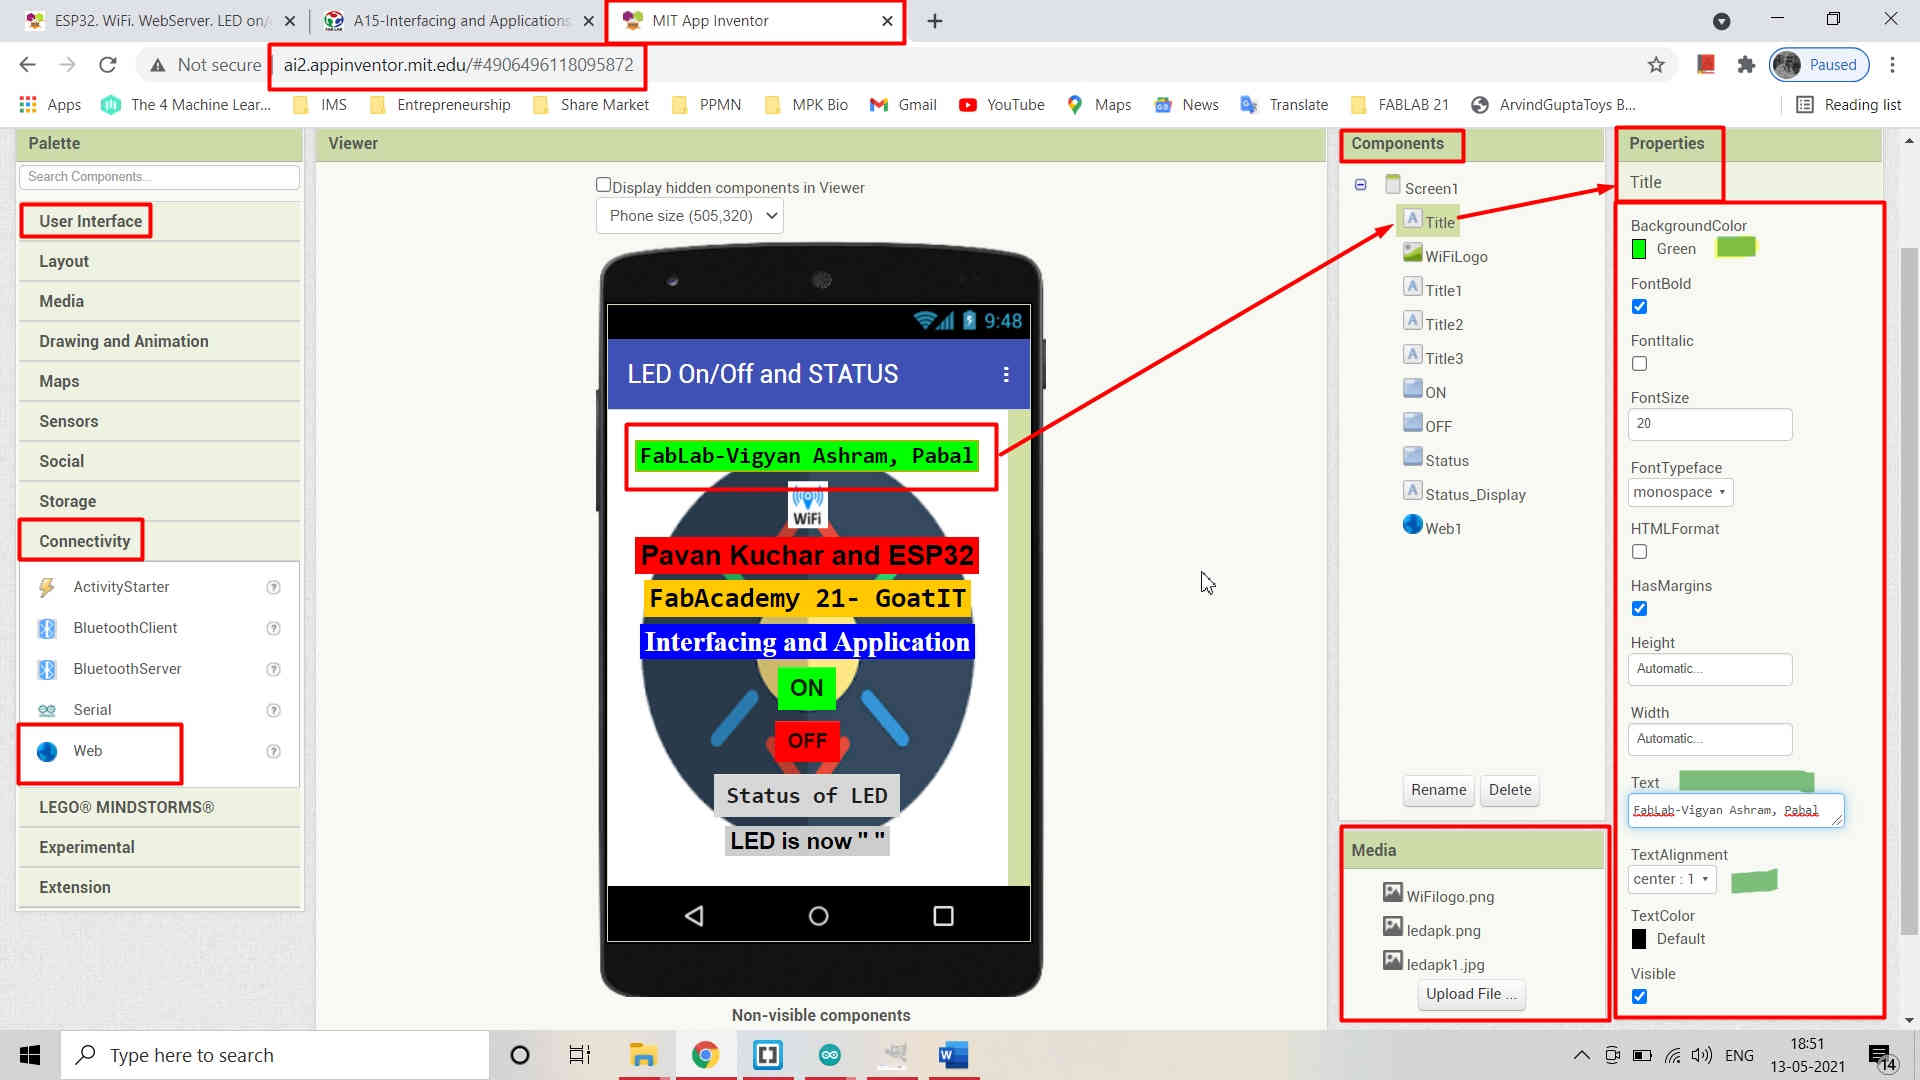
Components in the App and their Behavior can be changed in Properties by changing the Color, Font Size, Alignment, Background color, Text etc.
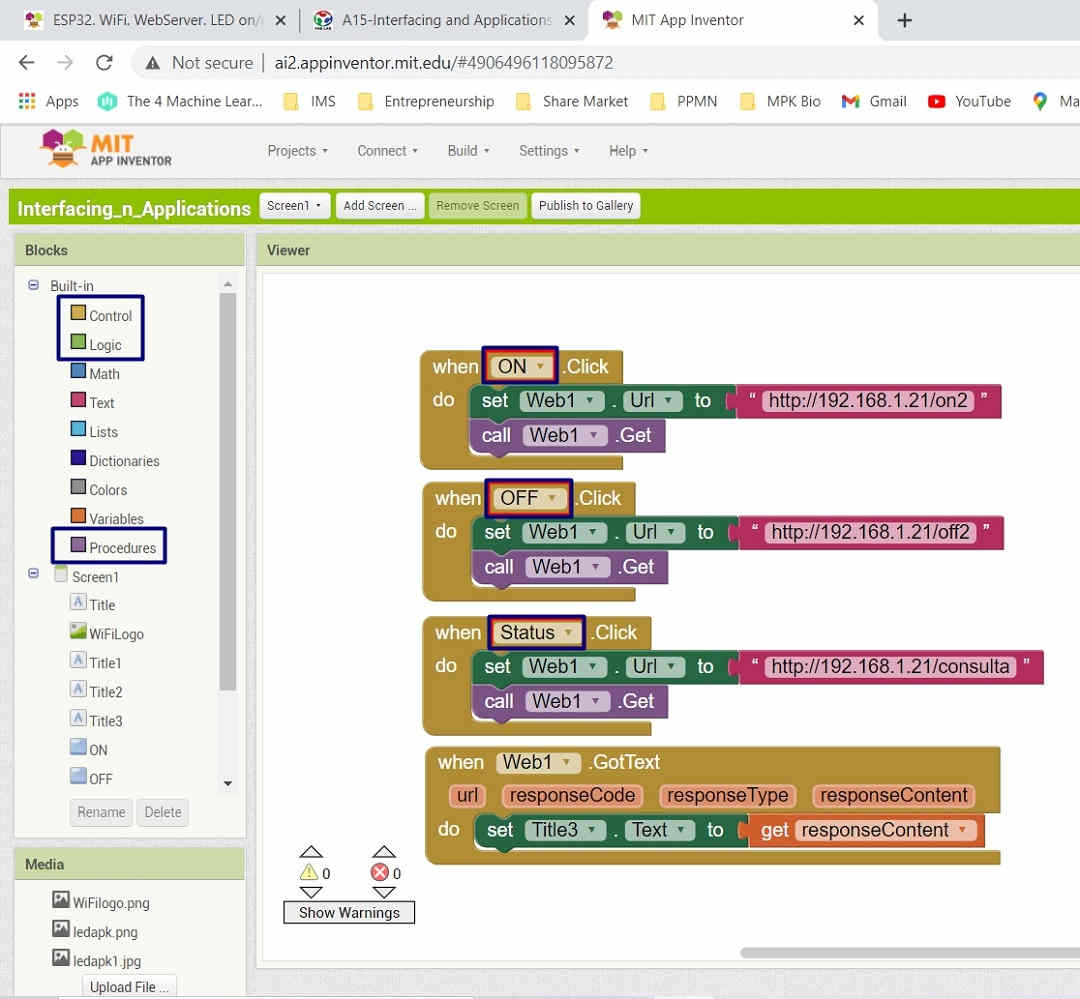
Logic Used in the App which can be manipulated in the Blocks section
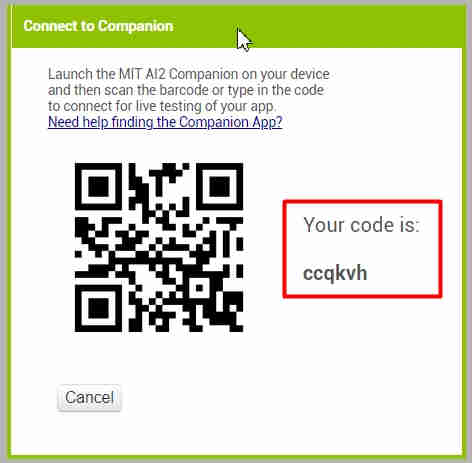
MIT App QR Code for Scanning and opening in the Mobile.
MIT App in my Mobile

MIT App in my Mobile
How I built my Web Interface?
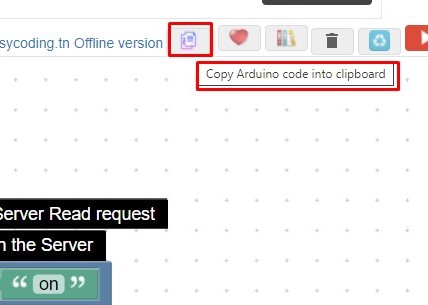
I referred the TUNIOT tutorial by Adel Kassah and copied the code for ESP 32 to act as a WiFi Sever. I made changes to it by changing the GPIO 17 of LED. The web link for the Tutorial is -
"https://easycoding.tn/esp32/demos/code/"
The You Tube video link is "https://www.youtube.com/watch?v=_0eHPrRC8oc&list=PLfPtpZzK2Z_QO8snrdnRTTNtQvLw35Zfc"
I followed the steps and could get the Sketch for knowing the IP address of my ESP32 board to act like a Server.
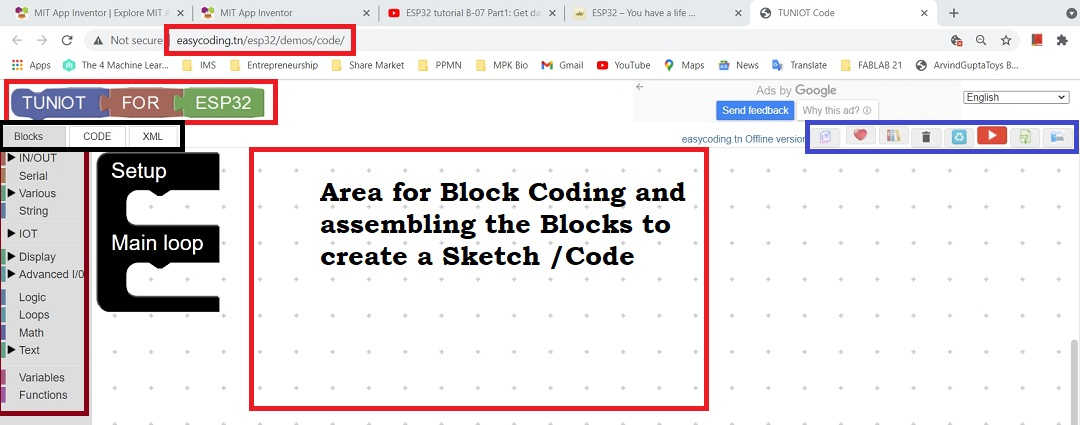
The Opening Window of TUNIOT

Click on the Template in Top Right Corner for selecting the template for ESP32
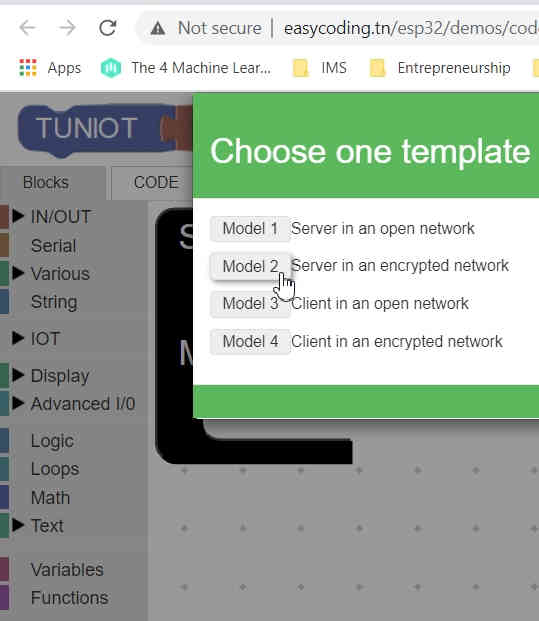 Select Model 2 in an Encrypted Network | 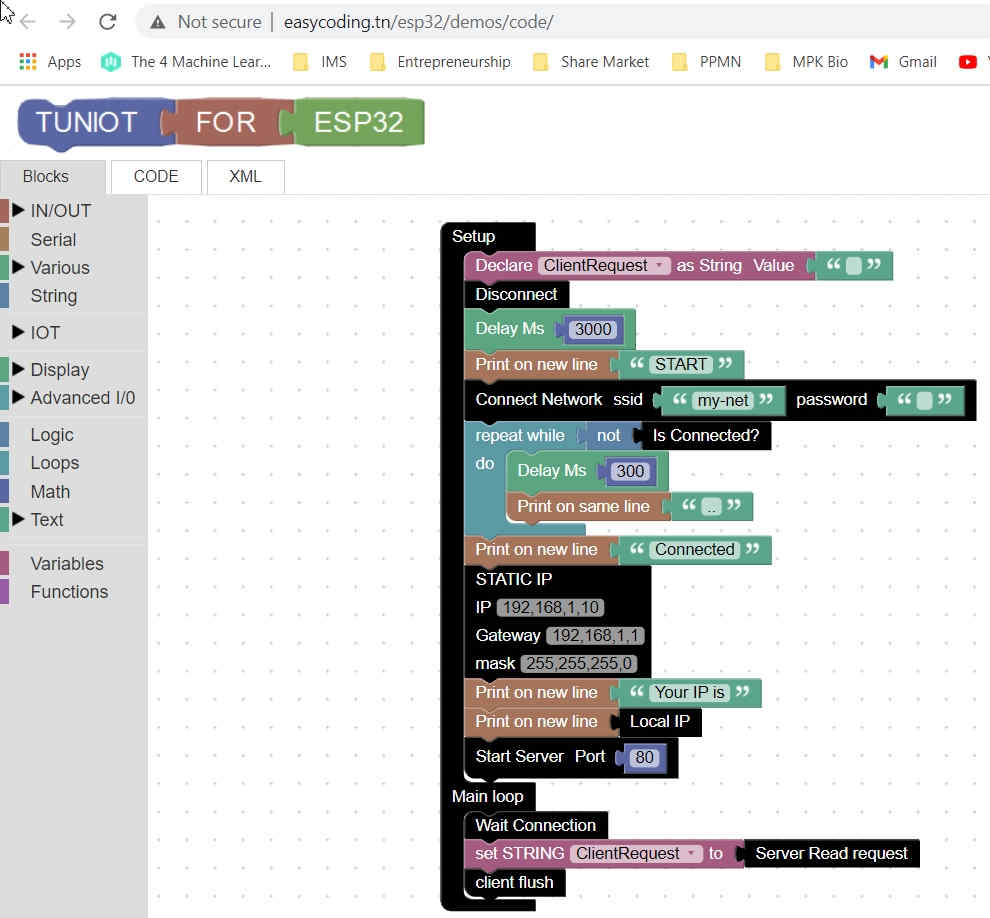 A Sketch will open for us to make changes as per our need |
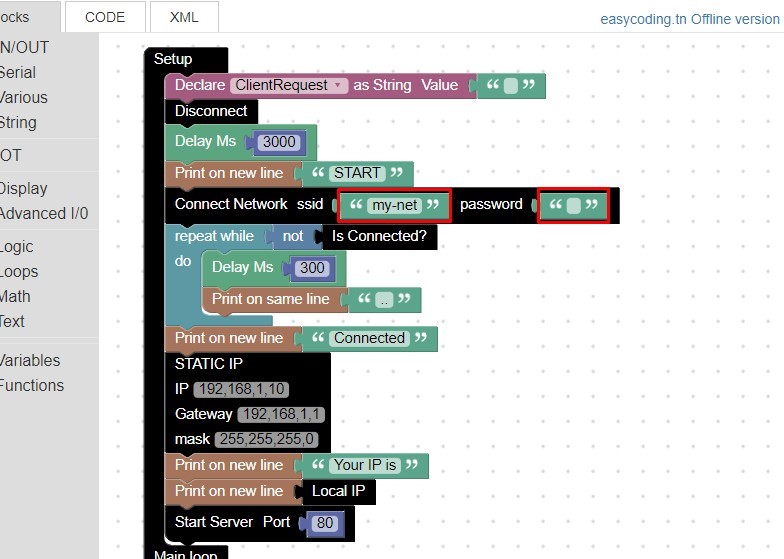 Write your ssid in place of "mynet" and password in next dialogue box. I have used the ssid and Password of Vigyan Ashram Workshop | 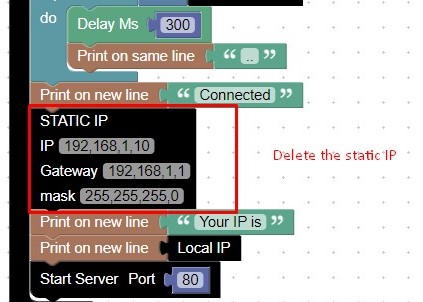 Delete the part of Static IP from the Sketch (unless you need it) |
|---|
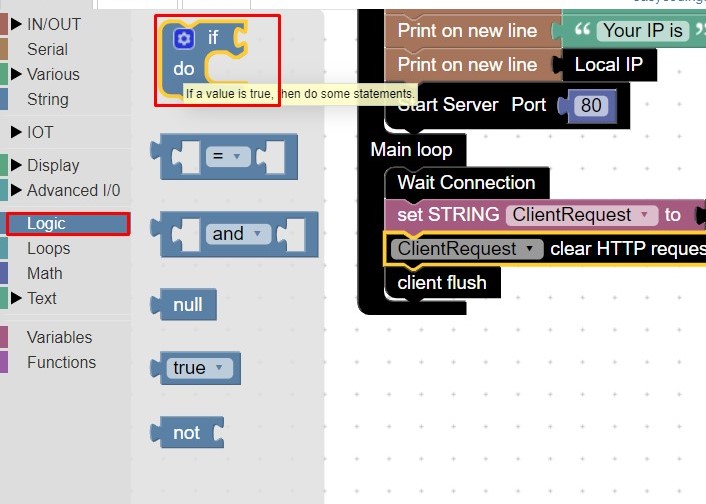 Go to string and select the "Client request block" for clearing HTTP request in server. | 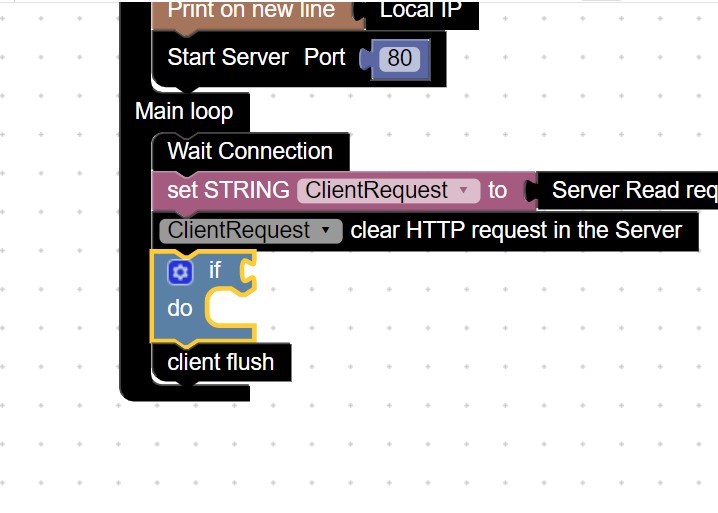 Add the client request block. Go to Logic; select If and do block. Also select return true value block |
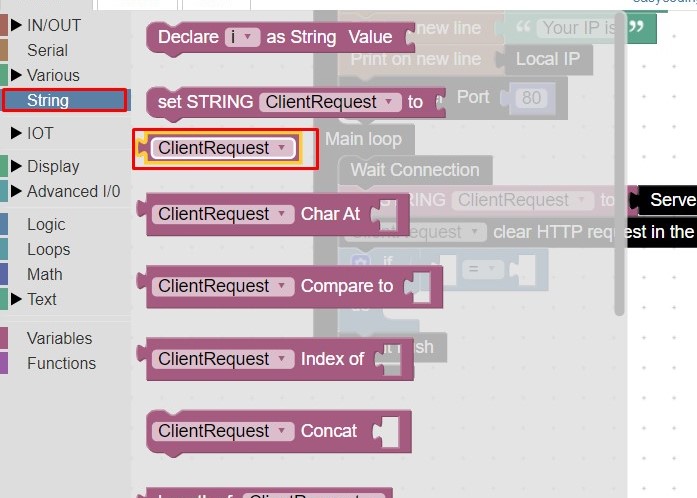 Adding logic block in the programming | 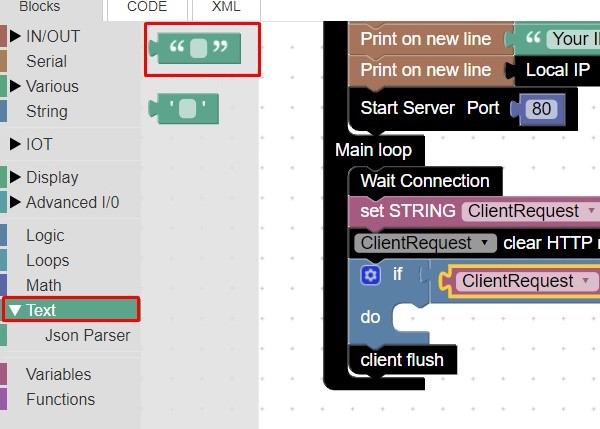 Go to string and select the "Client request" block |
|---|
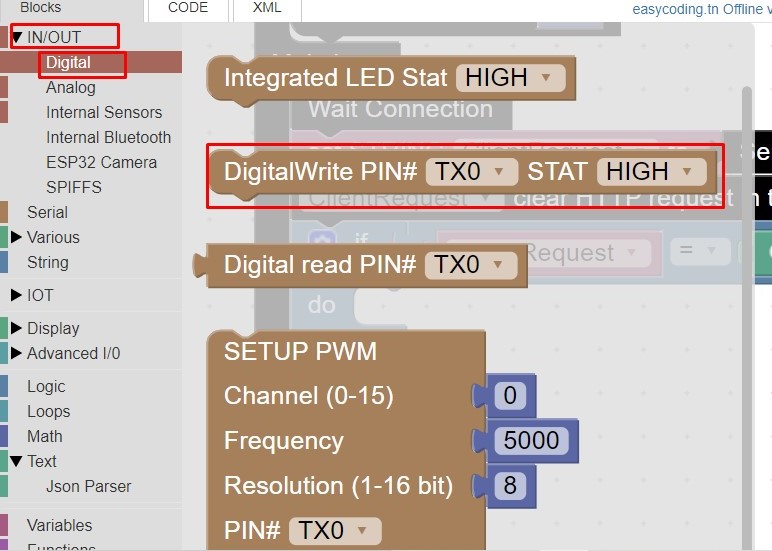 Adding "Client request" and "Text" block in the "If" side of block and update text as "on". | 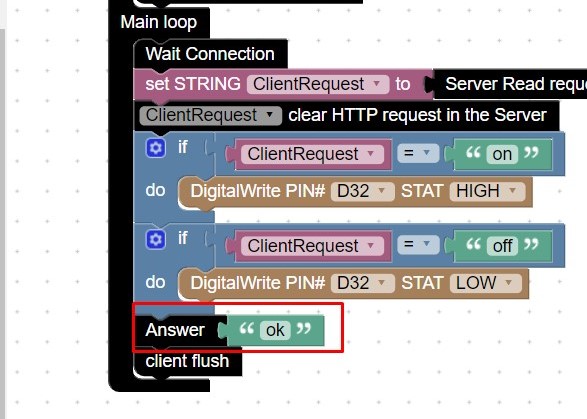 Go to Input digital, select the Digital write pin block |
Test Code:
for knowing the IP Address of ESP32 Board made in TUNIOT and copied to Arduino IDE Clipboard
/////////////////////////////////
// Generated with a lot of love//
// with TUNIOT FOR ESP32 //
// Website: Easycoding.tn //
/////////////////////////////////
//Modified by Pavan Kuchar
//09/05/2021
//GoatIT - IP Address of my ESP32 and
//LED Switch ON and OFF on ESP32Board
#include <WiFi.h>
String ClientRequest;
WiFiServer server(80);
WiFiClient client;
String myresultat;
String ReadIncomingRequest(){
while(client.available()) {
ClientRequest = (client.readStringUntil('\r'));
if ((ClientRequest.indexOf("HTTP/1.1")>0)&&(ClientRequest.indexOf("/favicon.ico")<0)){
myresultat = ClientRequest;
}
}
return myresultat;
}
void setup()
{
ClientRequest = "";
Serial.begin(9600);
pinMode(17, OUTPUT); //32
WiFi.disconnect();
delay(3000);
Serial.println("START");
WiFi.begin("Vigyan office 2","vigyan@ashram1"); //AndroidAP245A","rgtj2169"
while ((!(WiFi.status() == WL_CONNECTED))){
delay(300);
Serial.print("..");
}
Serial.println("Connected");
Serial.println("Your IP is");
Serial.println((WiFi.localIP()));
server.begin();
}
void loop()
{
client = server.available();
if (!client) { return; }
while(!client.available()){ delay(1); }
ClientRequest = (ReadIncomingRequest());
ClientRequest.remove(0, 5);
ClientRequest.remove(ClientRequest.length()-9,9);
if (ClientRequest == "on") {
digitalWrite(17,HIGH); //32
}
if (ClientRequest == "off") {
digitalWrite(17,LOW); //32
}
client.println("HTTP/1.1 200 OK");
client.println("Content-Type: text/html");
client.println("");
client.println("");
client.println("");
client.println("ok");
client.println("");
client.stop();
delay(1);
client.flush();
}
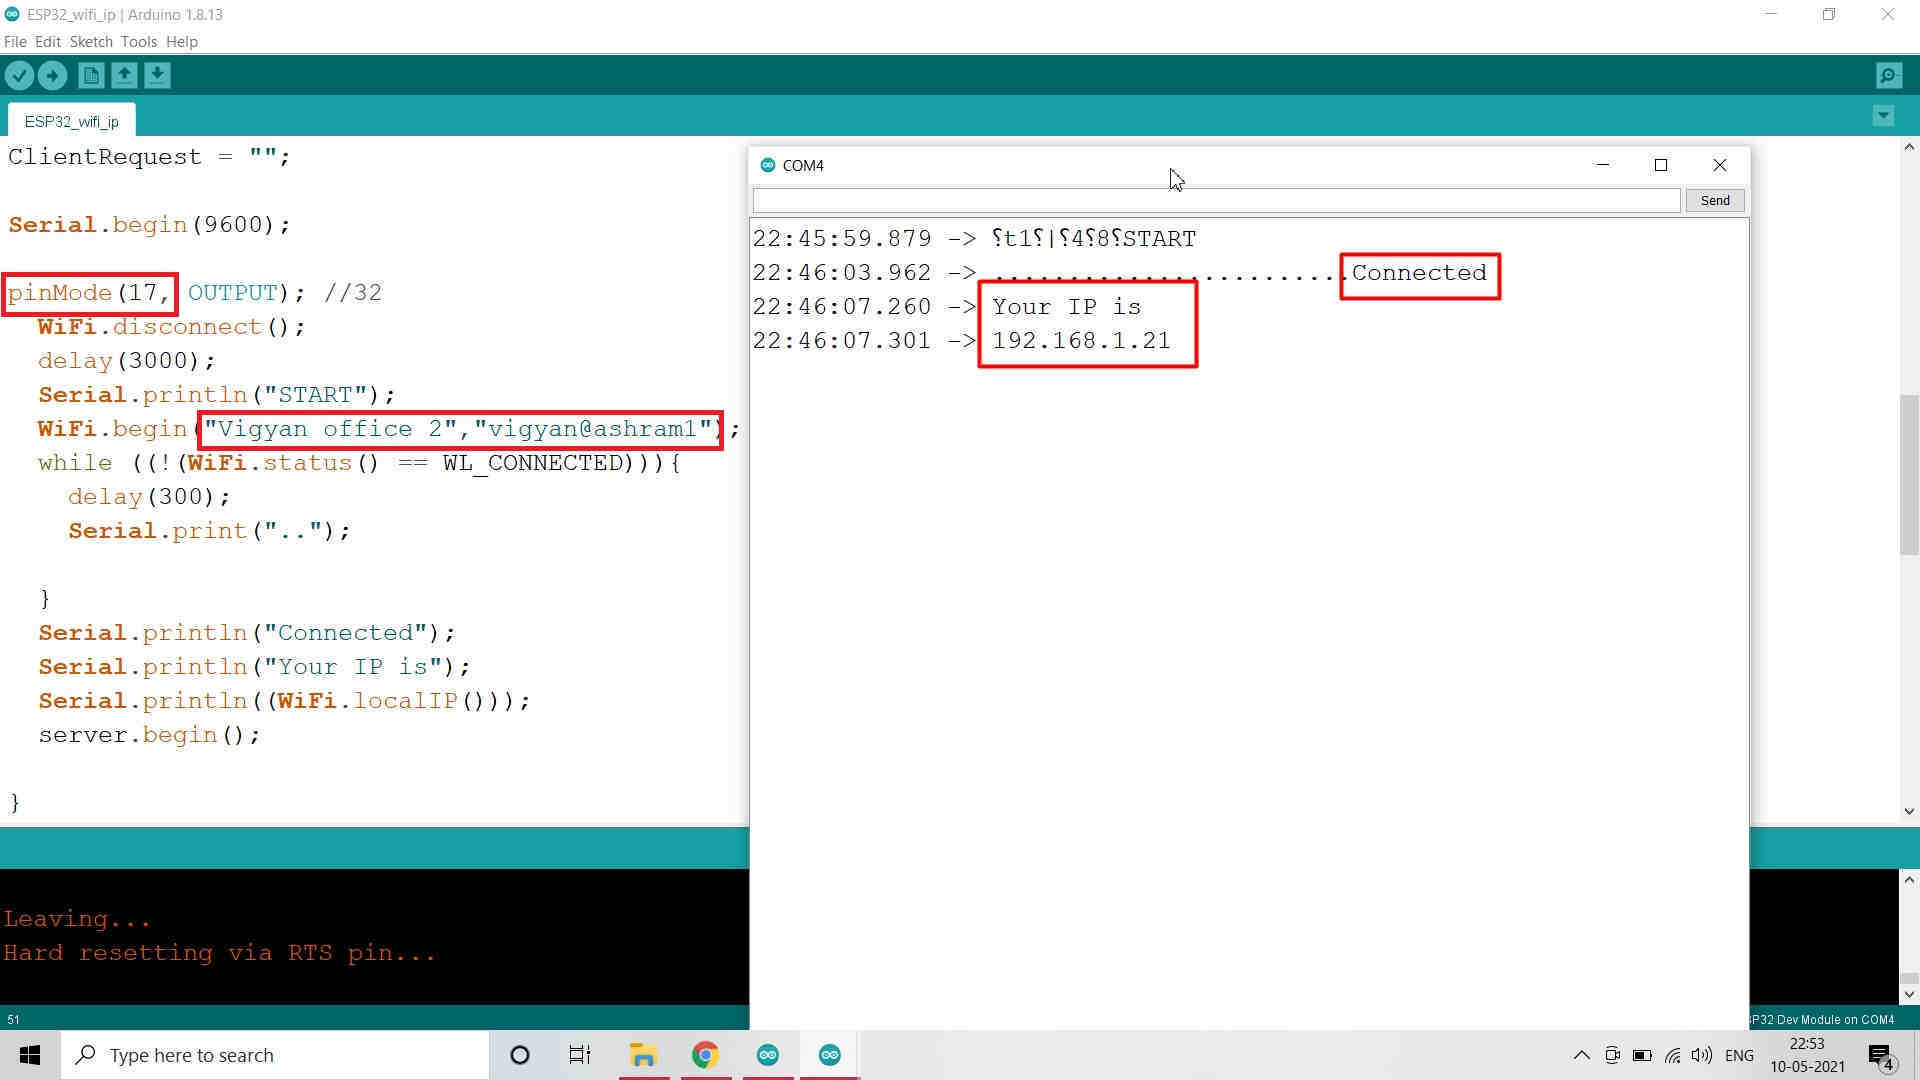
After Copying the Code in Arduino IDE, I uploaded it on my ESP32 board.
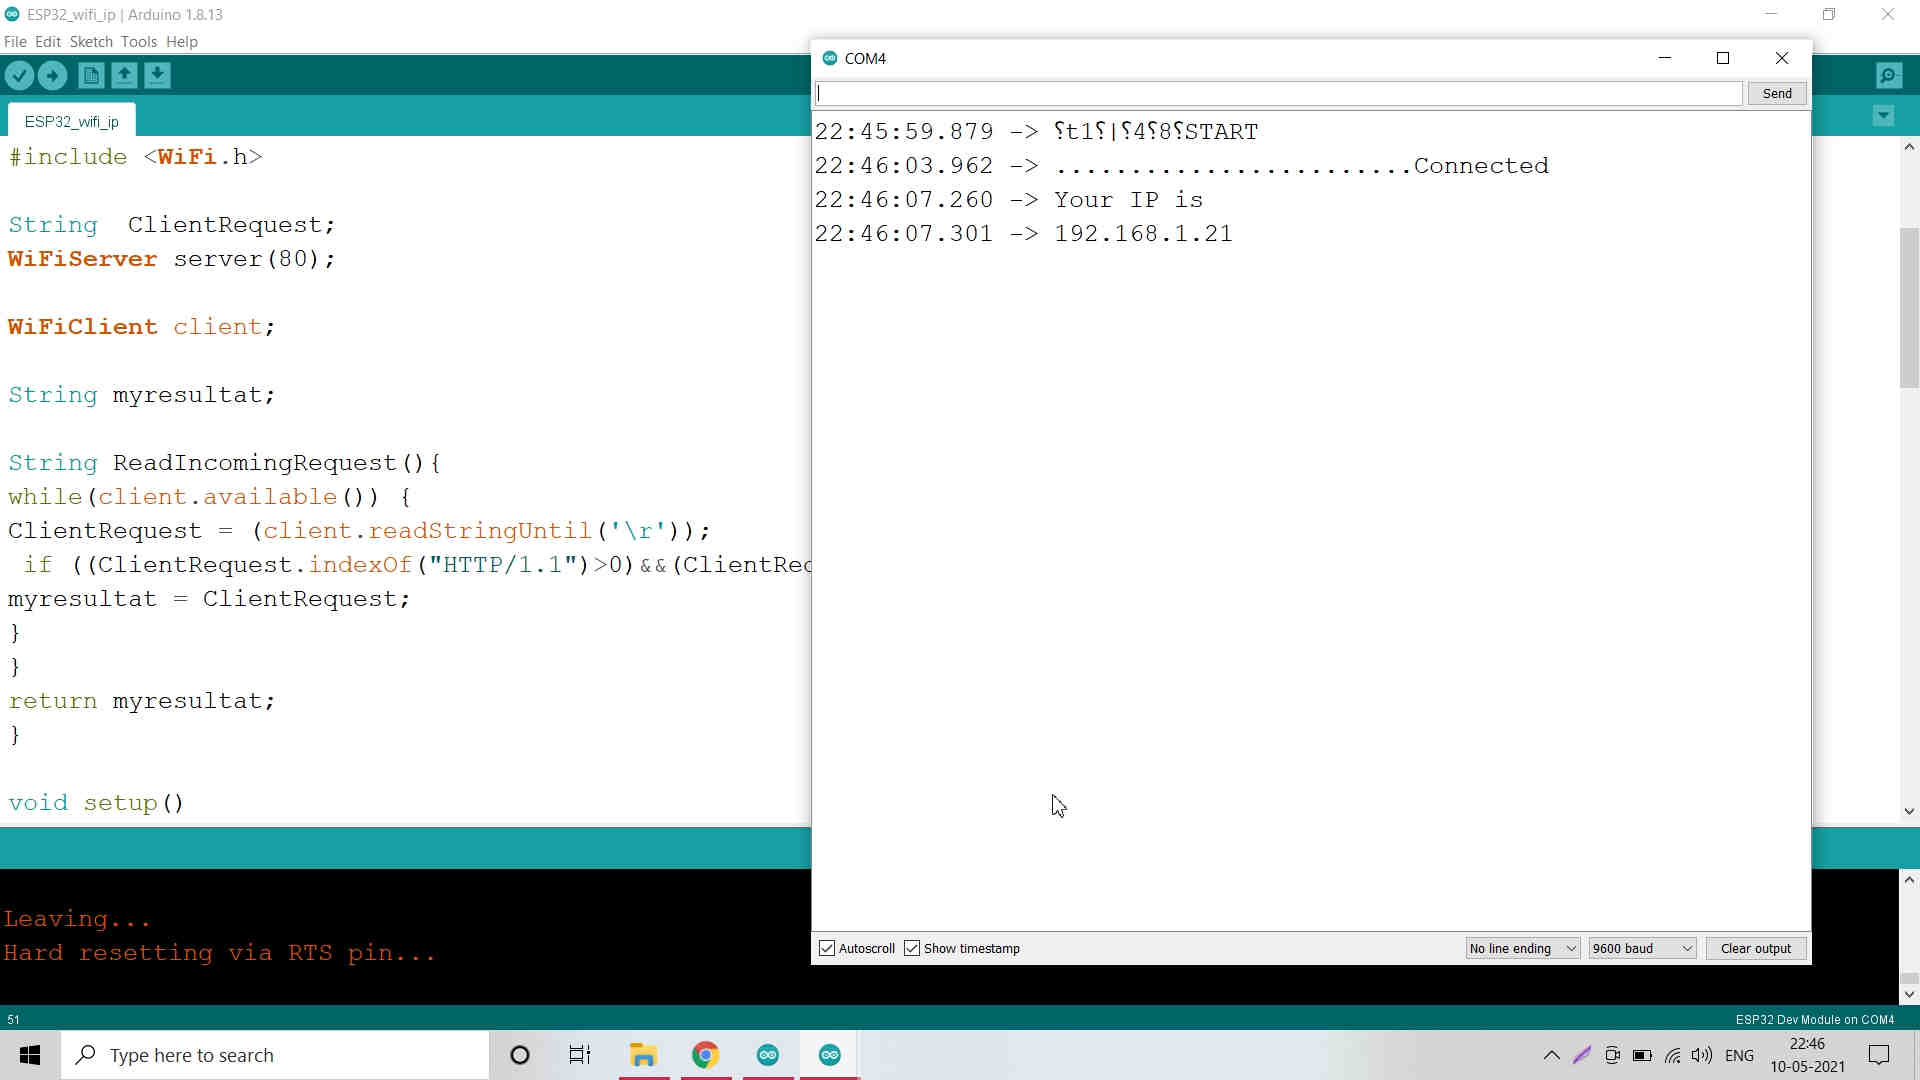
After Burning the Code on ESP32 Board, the Serial Monitor shows the IP Address of my Board.

Copied the IP address and pasted in browser and added "/on". The LED2 on board was Switched ON.

Copied the IP address and pasted in browser and added "/off". The LED2 on board was Switched OFF.
Shows the Changes made in Code LED2 is attached on GPIO 17 and SSID of Vigyan Ashram
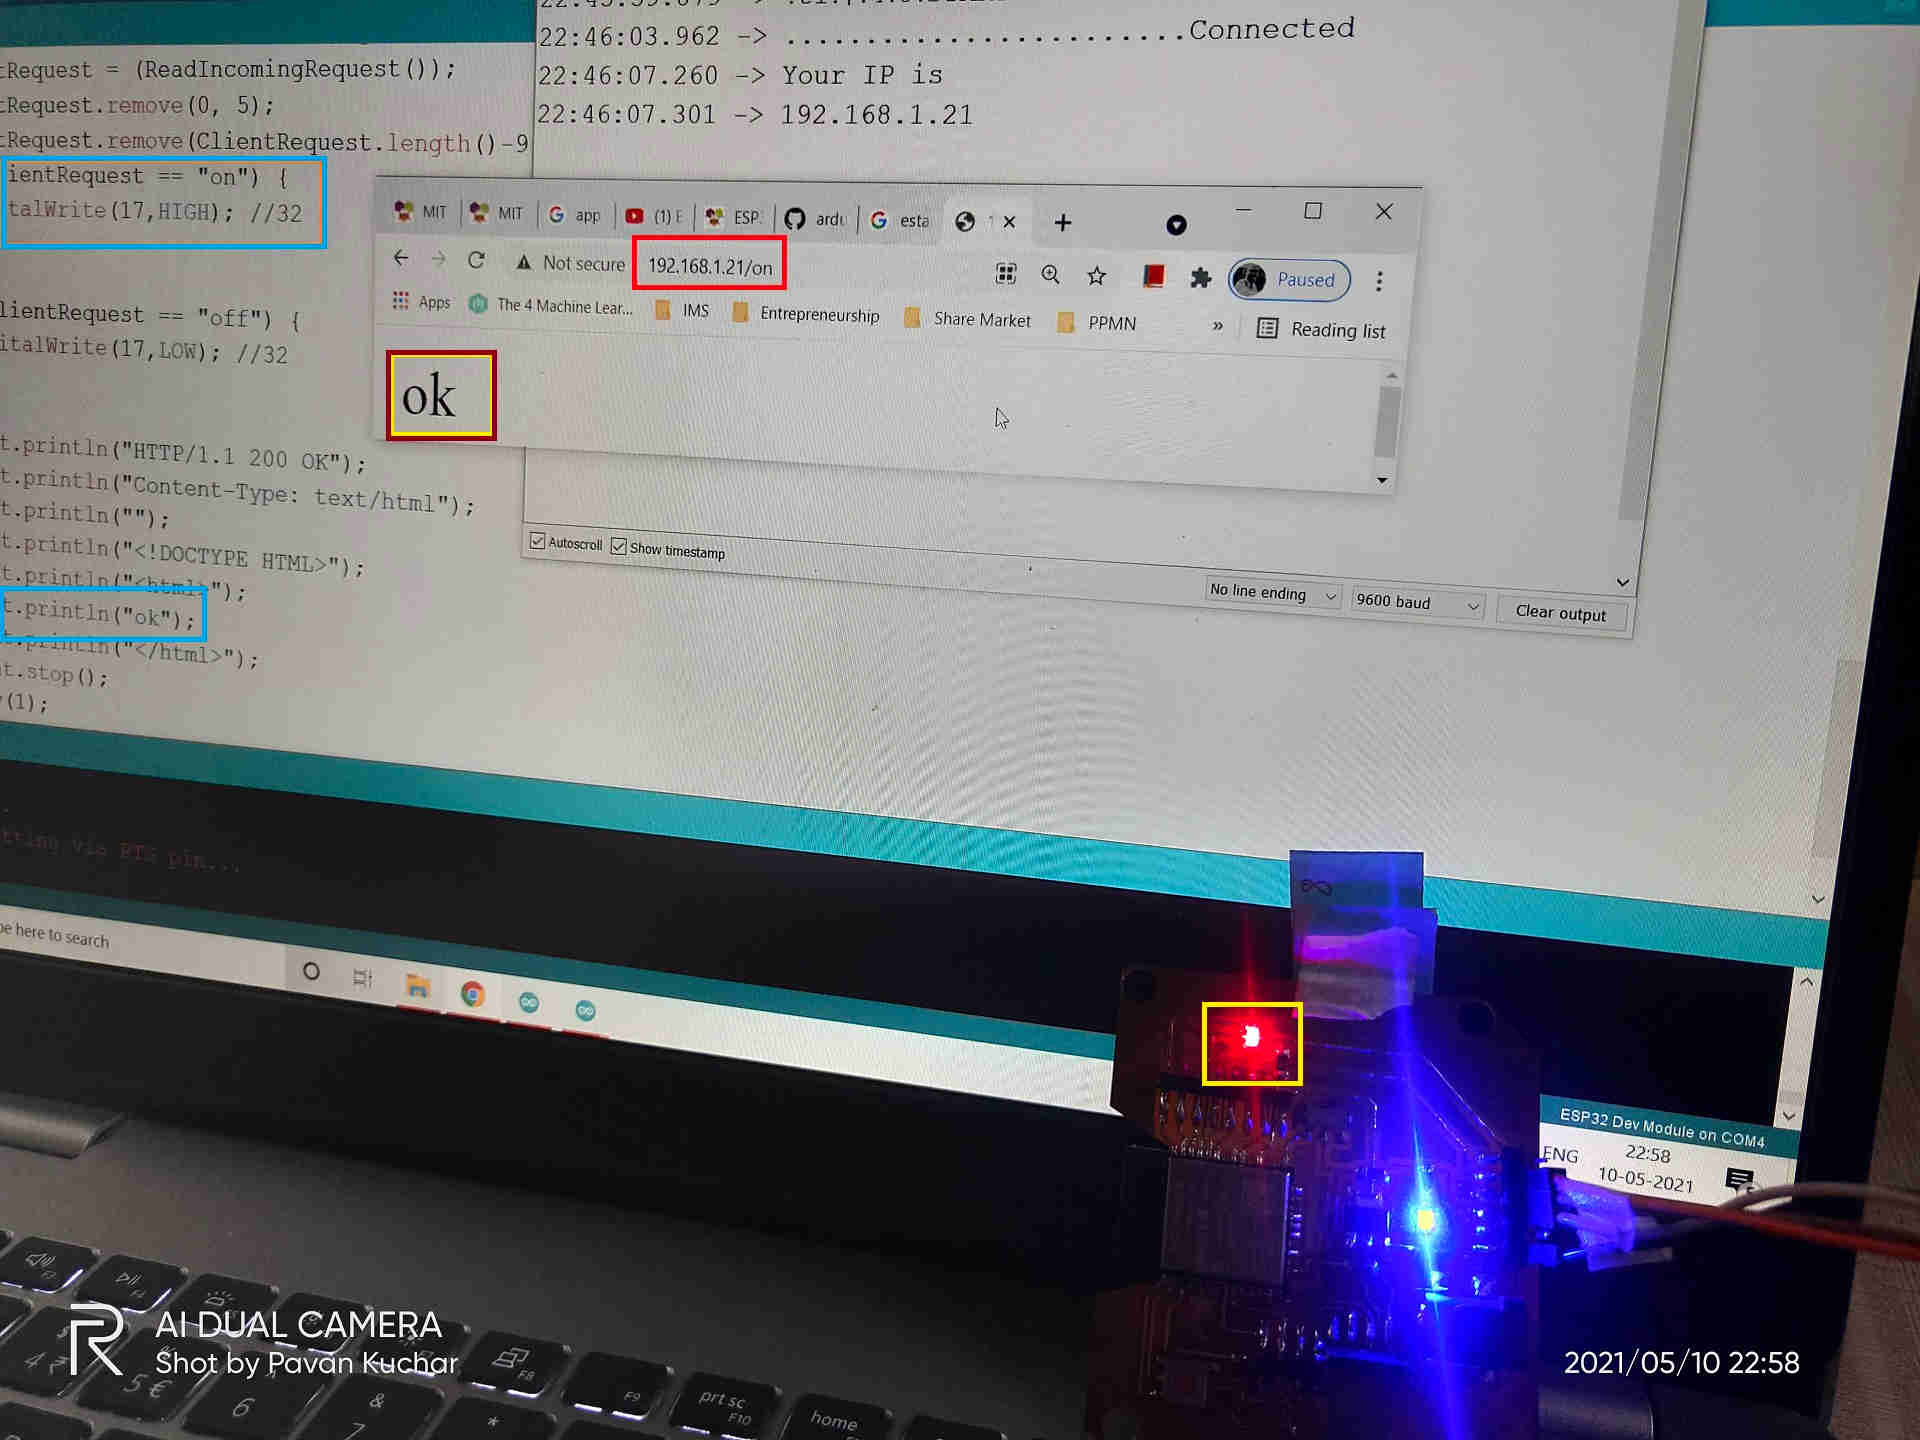
Windows of Arduino IDE, Browser and ESP32 Board showing LED2 is ON
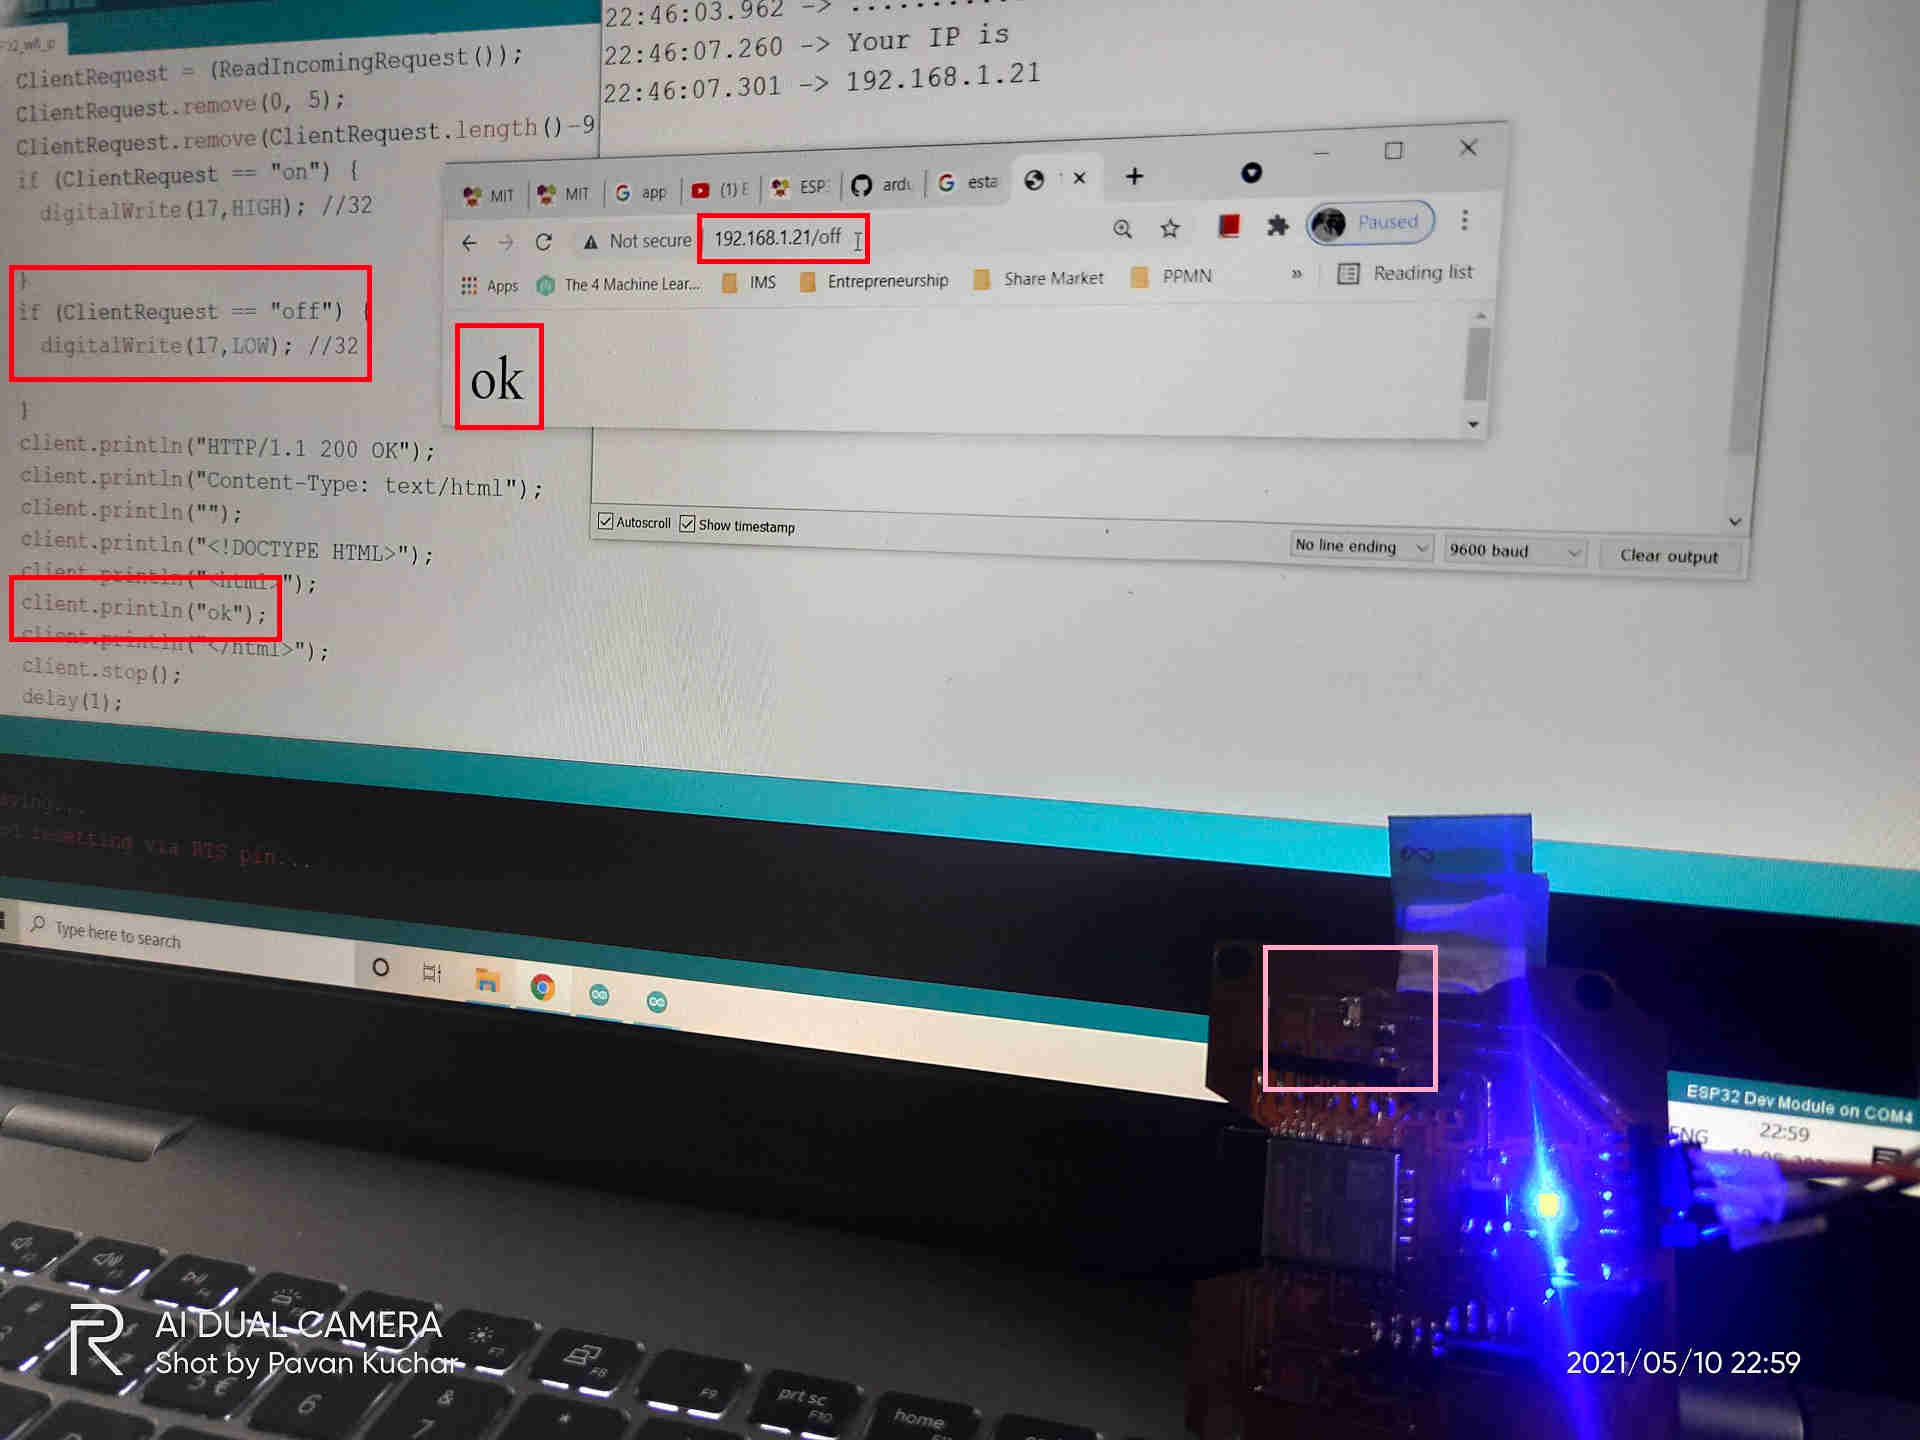
Windows of Arduino IDE, Browser and ESP32 Board showing LED2 is OFF
I decided to build a good Web Interface for my ESP32 Board. I googled out and found the answer in Community of MIT App Inventor. I referred the Article by Juan Antonio which shows step by step interfacing and creating the Web Server in ESP32, creating STatic IP, Knowing the Status of the LED, integrating it with the App etc. The link for this article is -
"https://community.appinventor.mit.edu/t/esp32-wifi-webserver-led-on-off-static-ip-soft-access-point/9323"
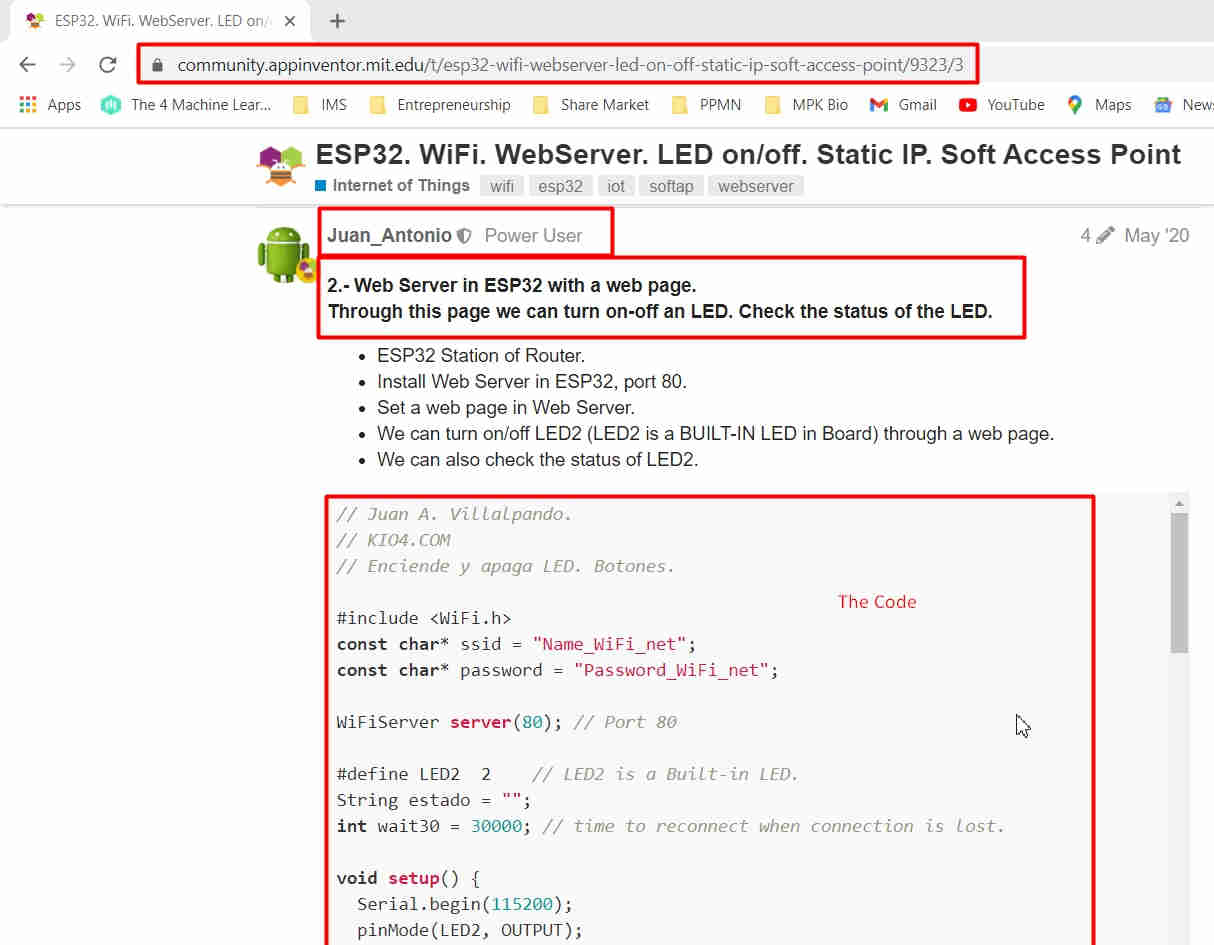
Juan Antonio's Article on MIT App Inventor Community which I referred
I copied the Code from here and pasted it in the Arduino IDE. Then I made certain changes in the Code.
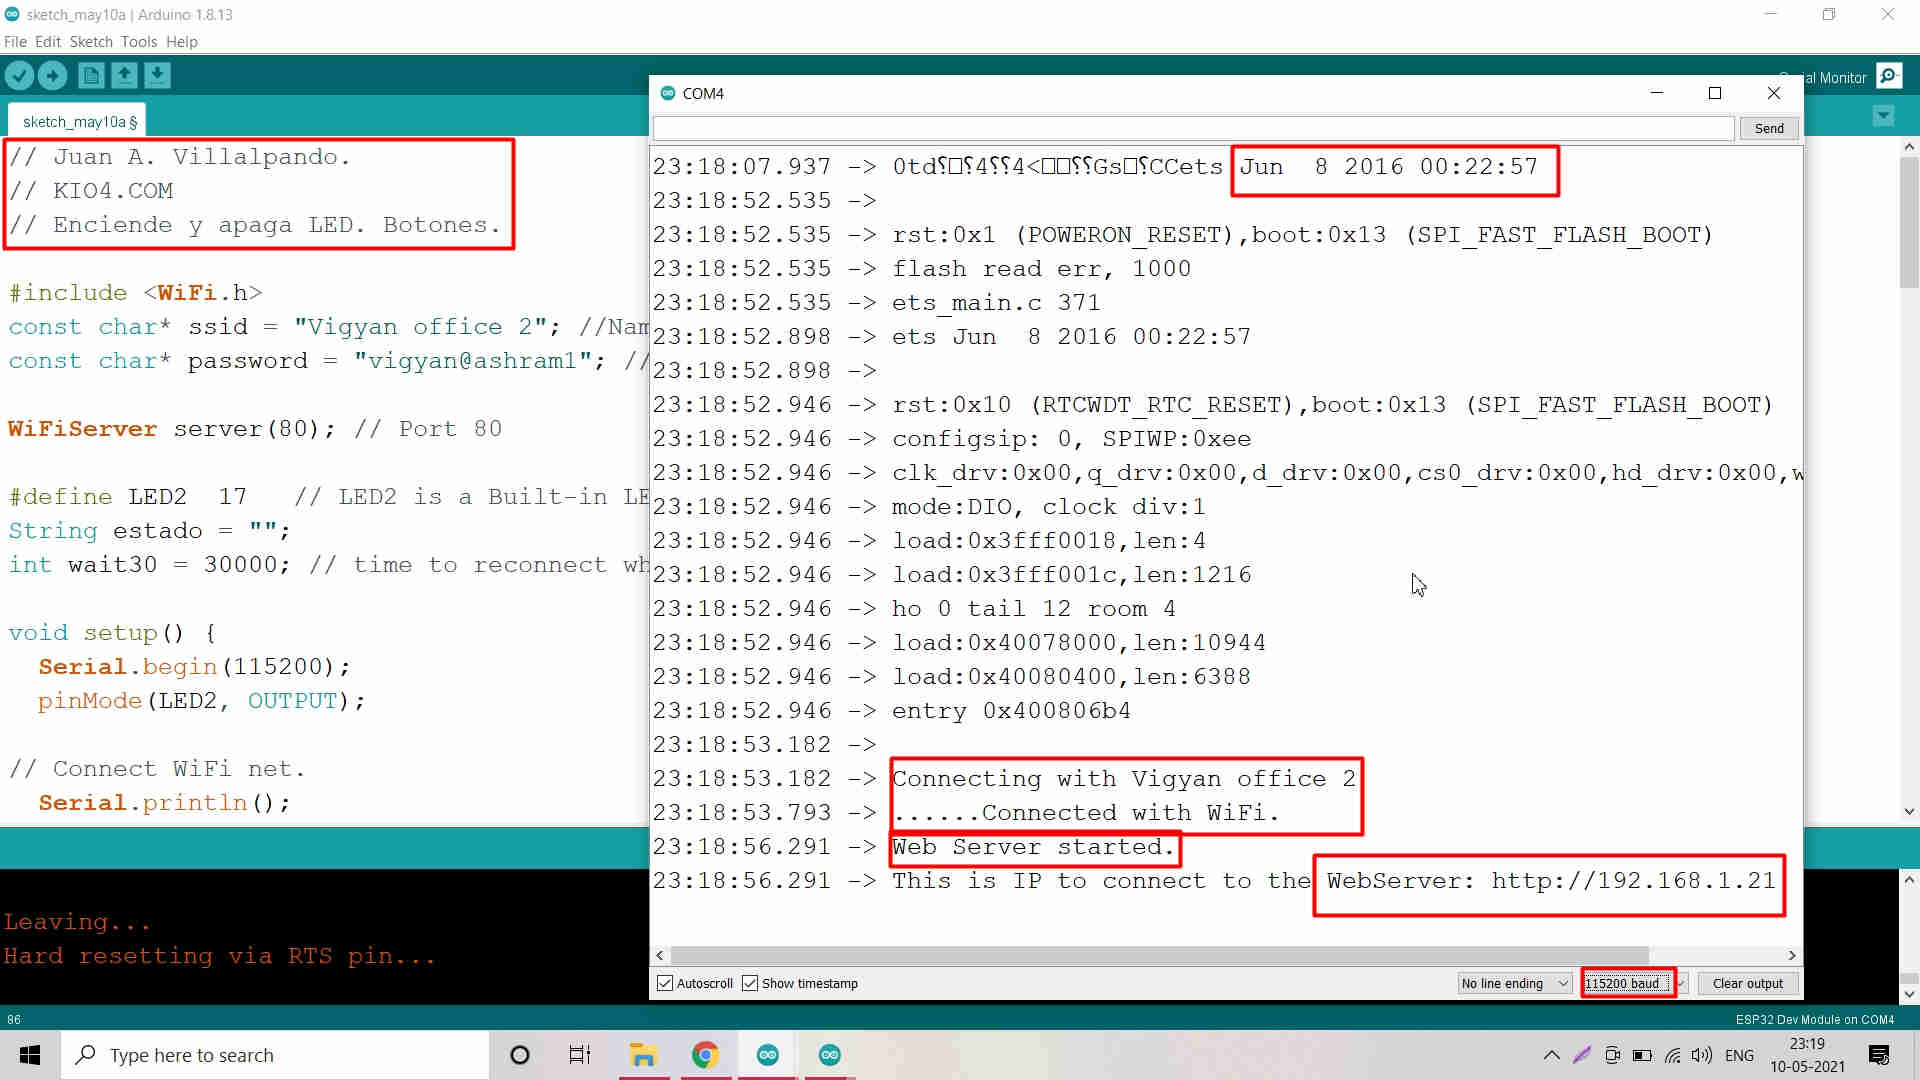
Copied, Pasted and tried burning the Sketch/Code and Voila! it worked. It displayed IP Address of my ESP32 board
Part of the Code where the Pins and ssid password are Set
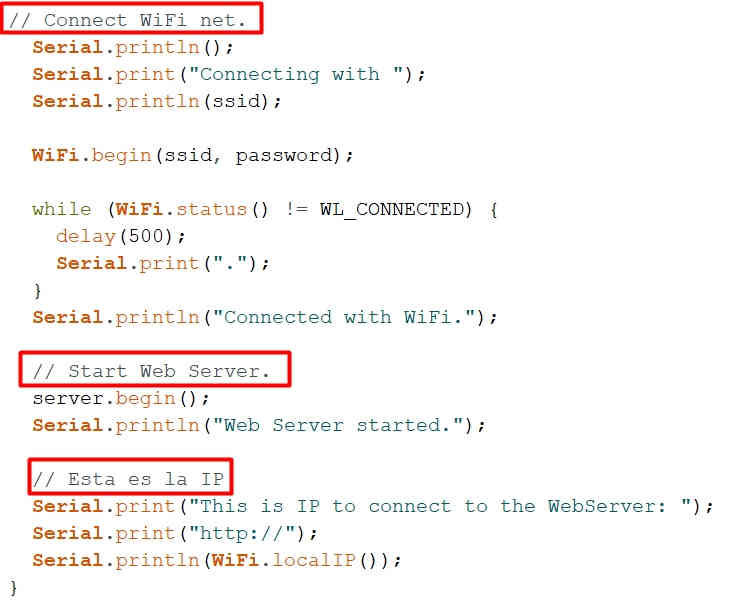
Part of the Code which begins the Serial and WiFi
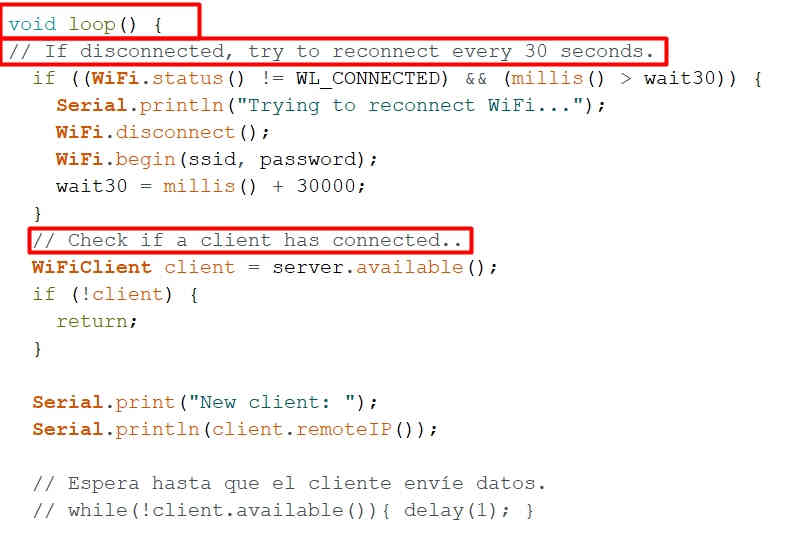
Part of Sketch/Code which defines to check the Connectivity
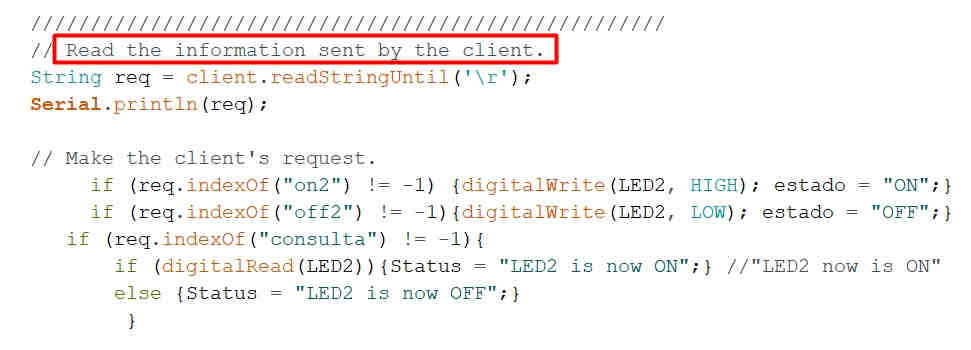
Code for reading Information sent by the Client to define what happens after clicking a particular option of switching LED2 ON or OFF
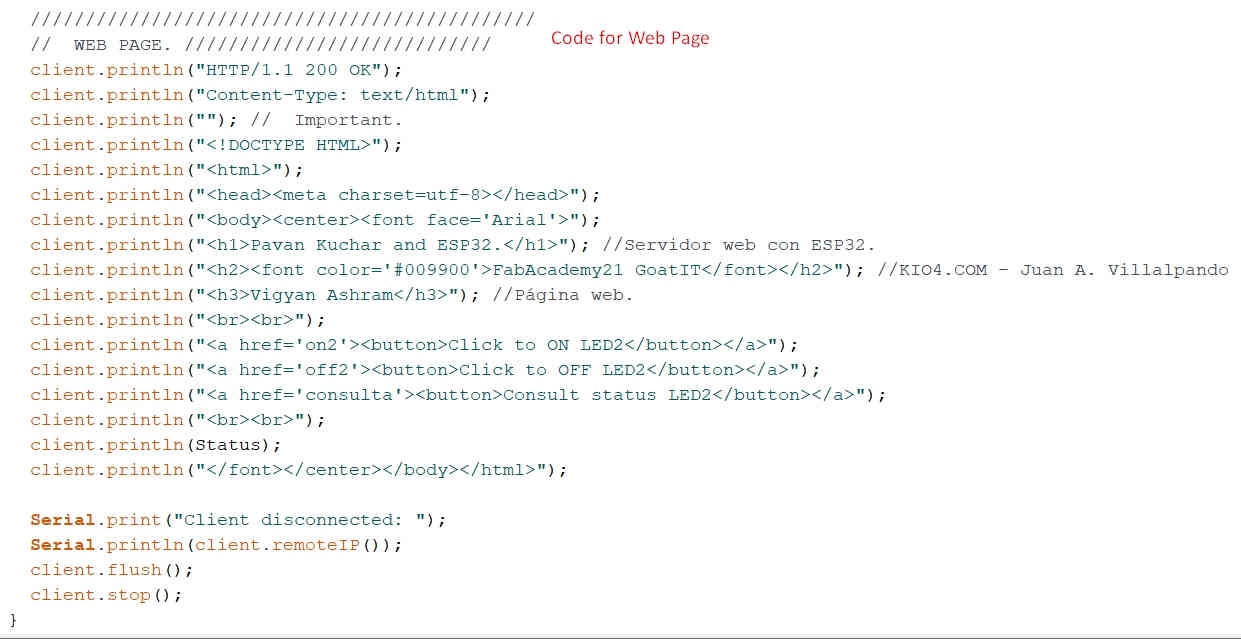
Code in Arduino IDE itself for the Web Page (User Interface)
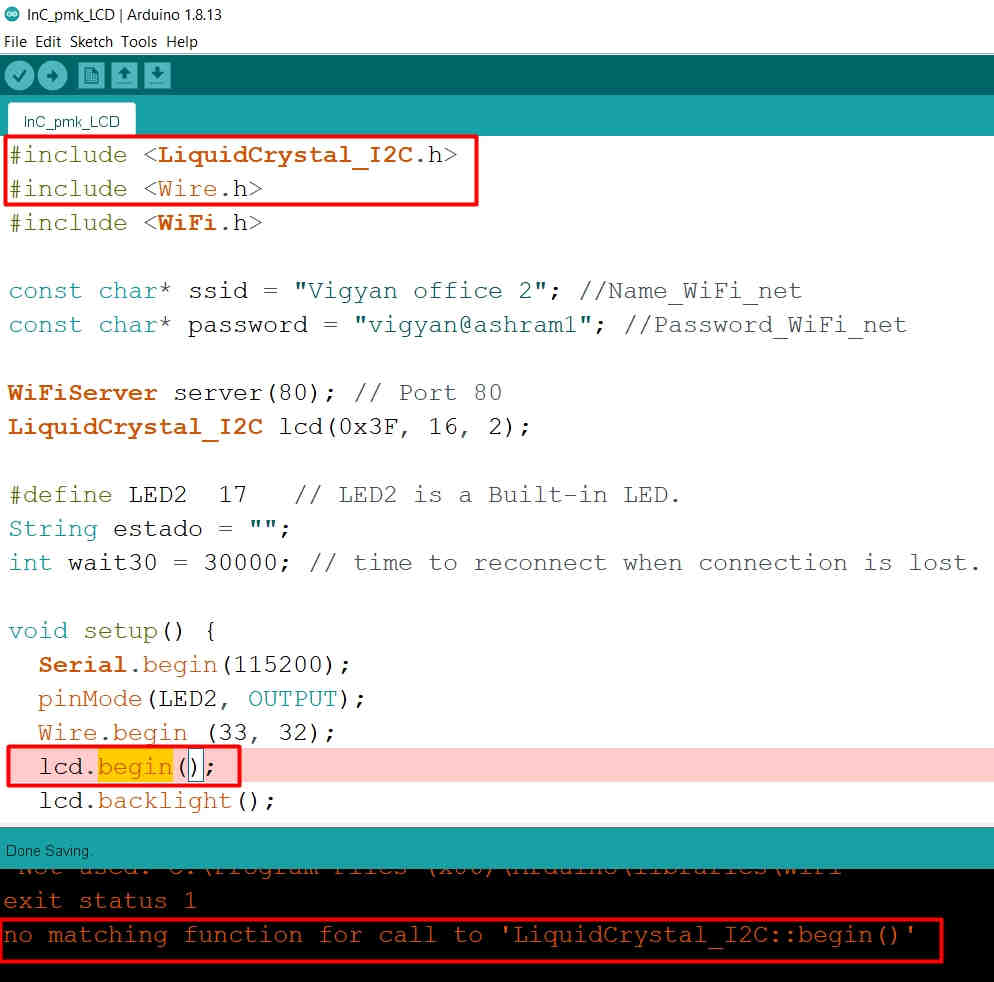
Tried to integrate this code with the LCD to show the status of LED switched ON or OFF. Included the required libraries of LiquidCrystal I2C in the Sketch
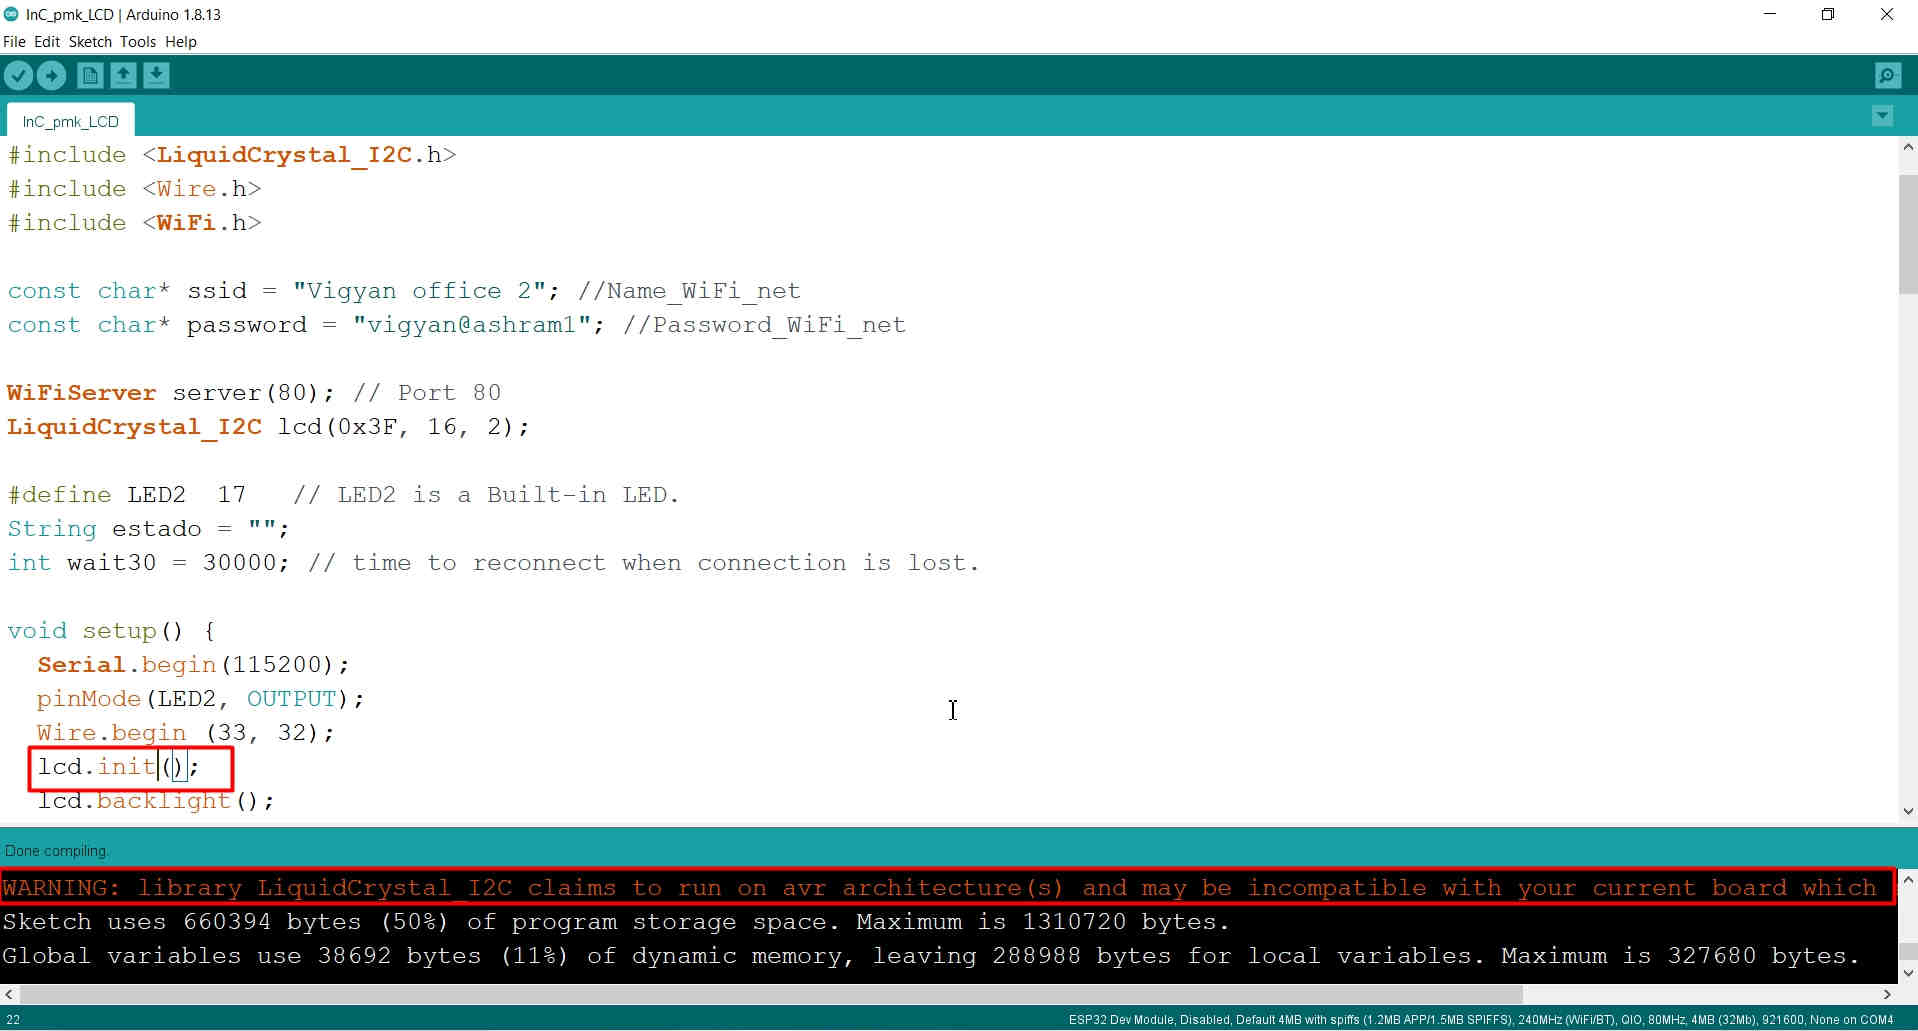
"lcd.begin" is not matching function as per the included Library, so changed it to "lcd.init"
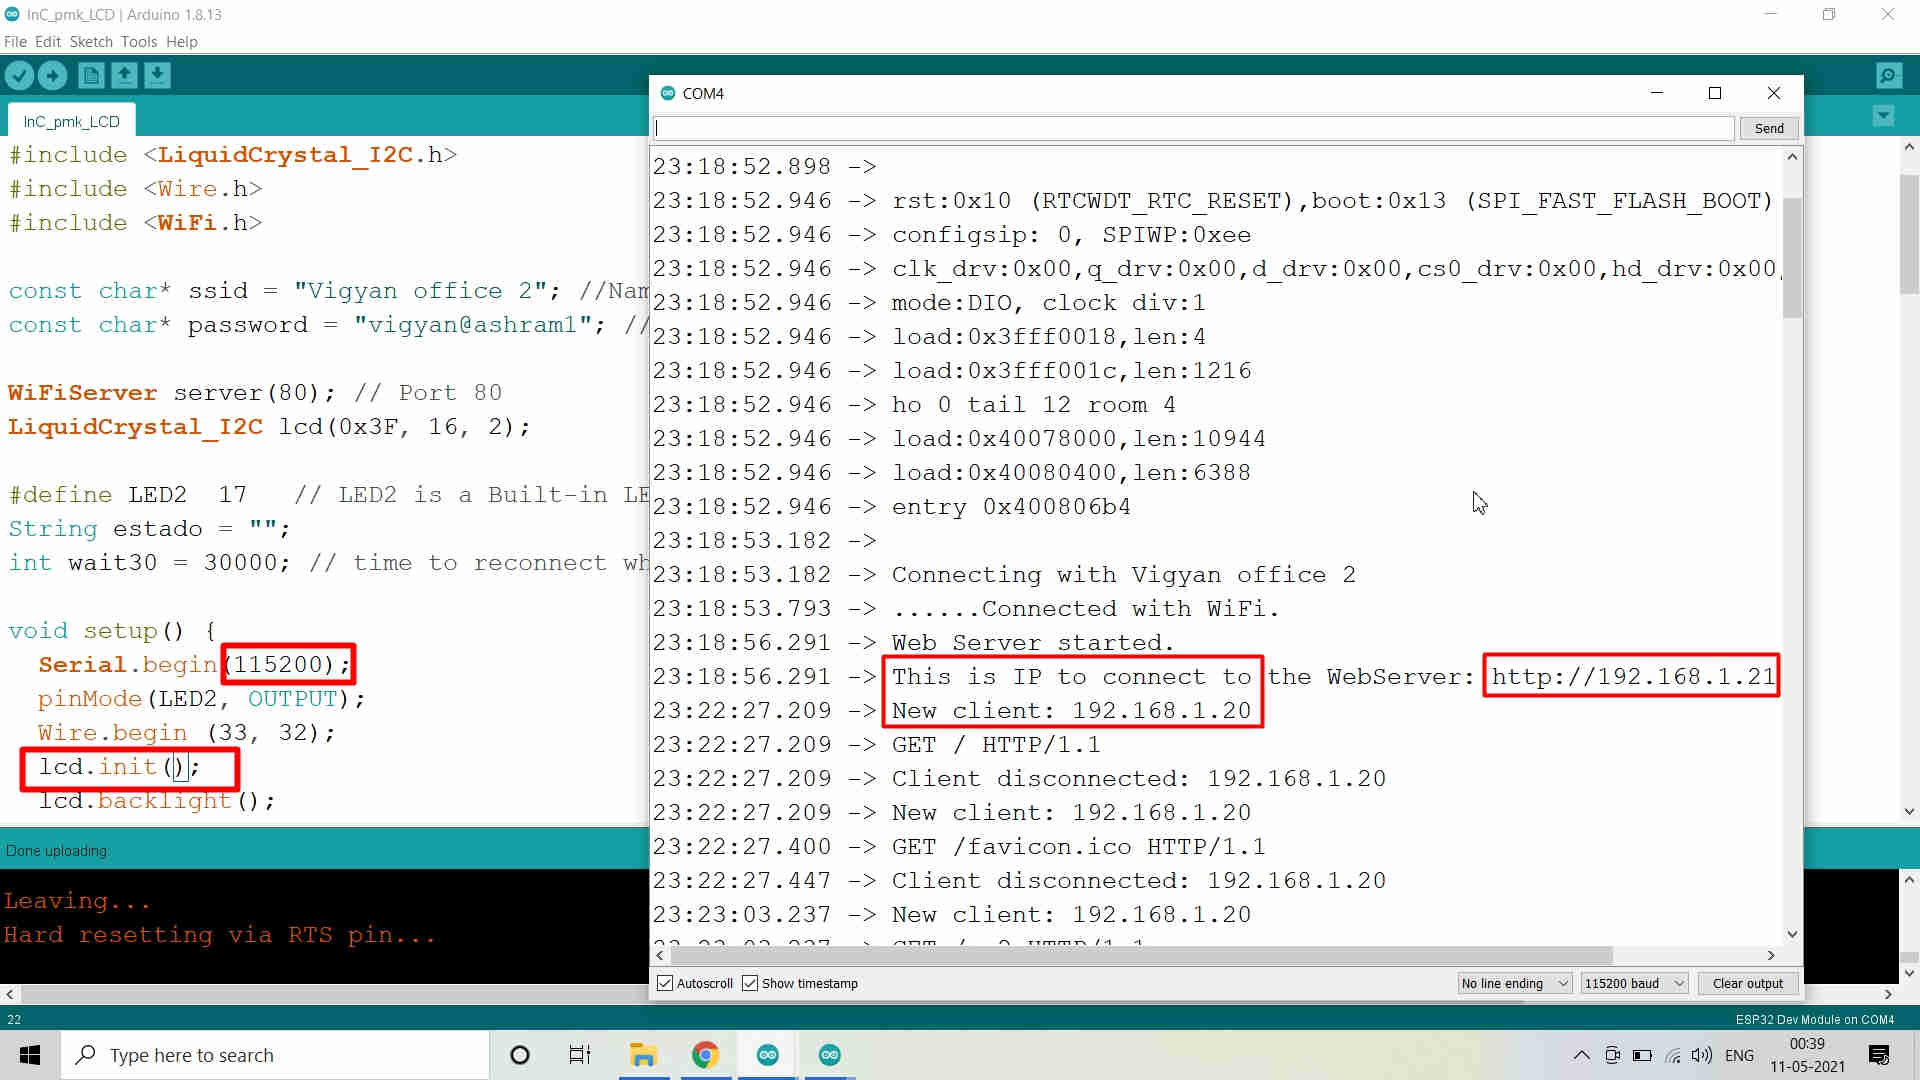
The Sketch/Code ran smoothly and was burn on the ESP32 board
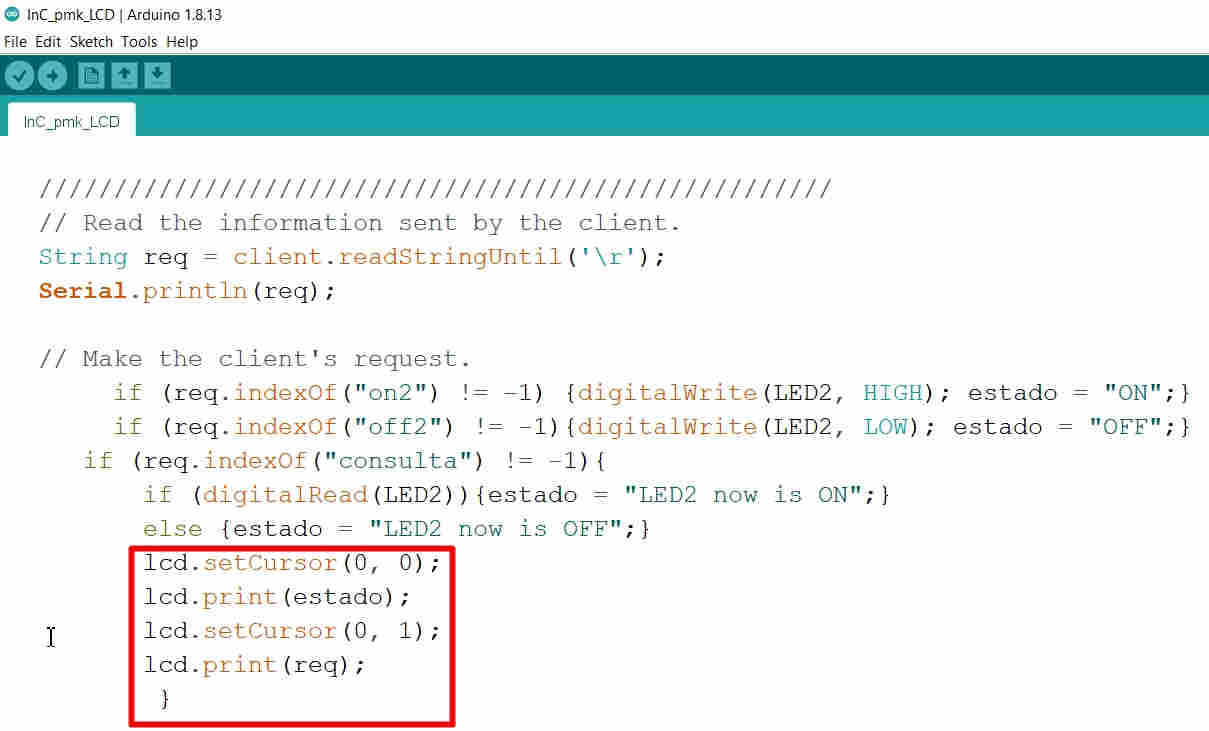
Included the Code for displaying Result on the LCD in the Sketch at right place
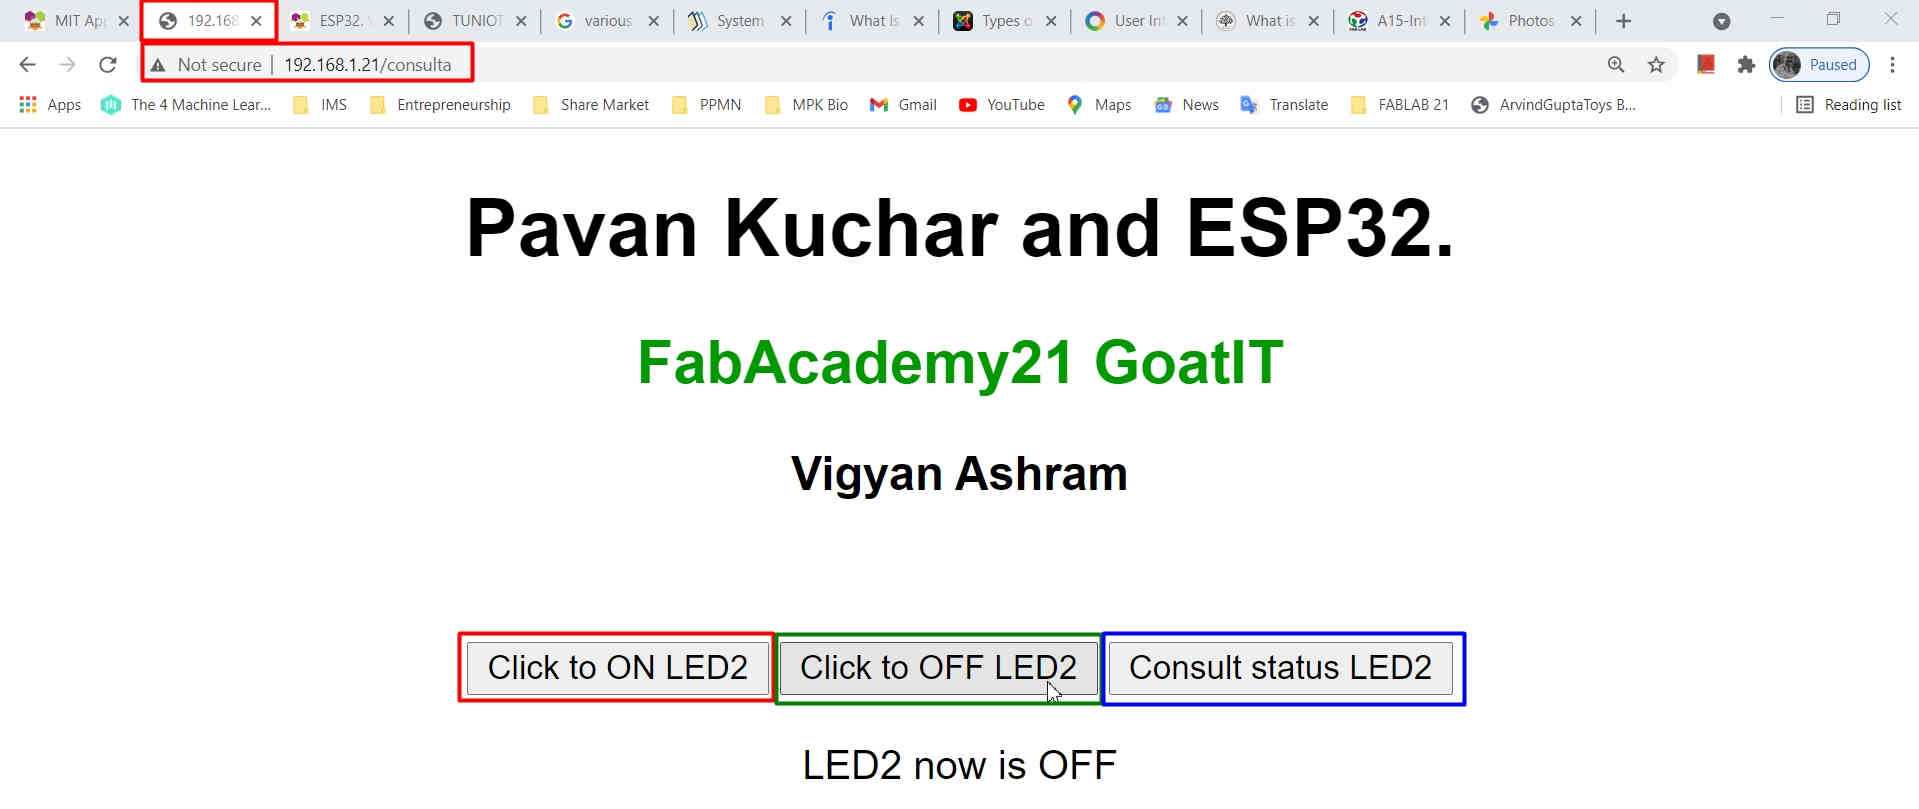
This is how the Sketch/Code was interfaced on the Web. This is the Screenshot of the Webpage User Interface
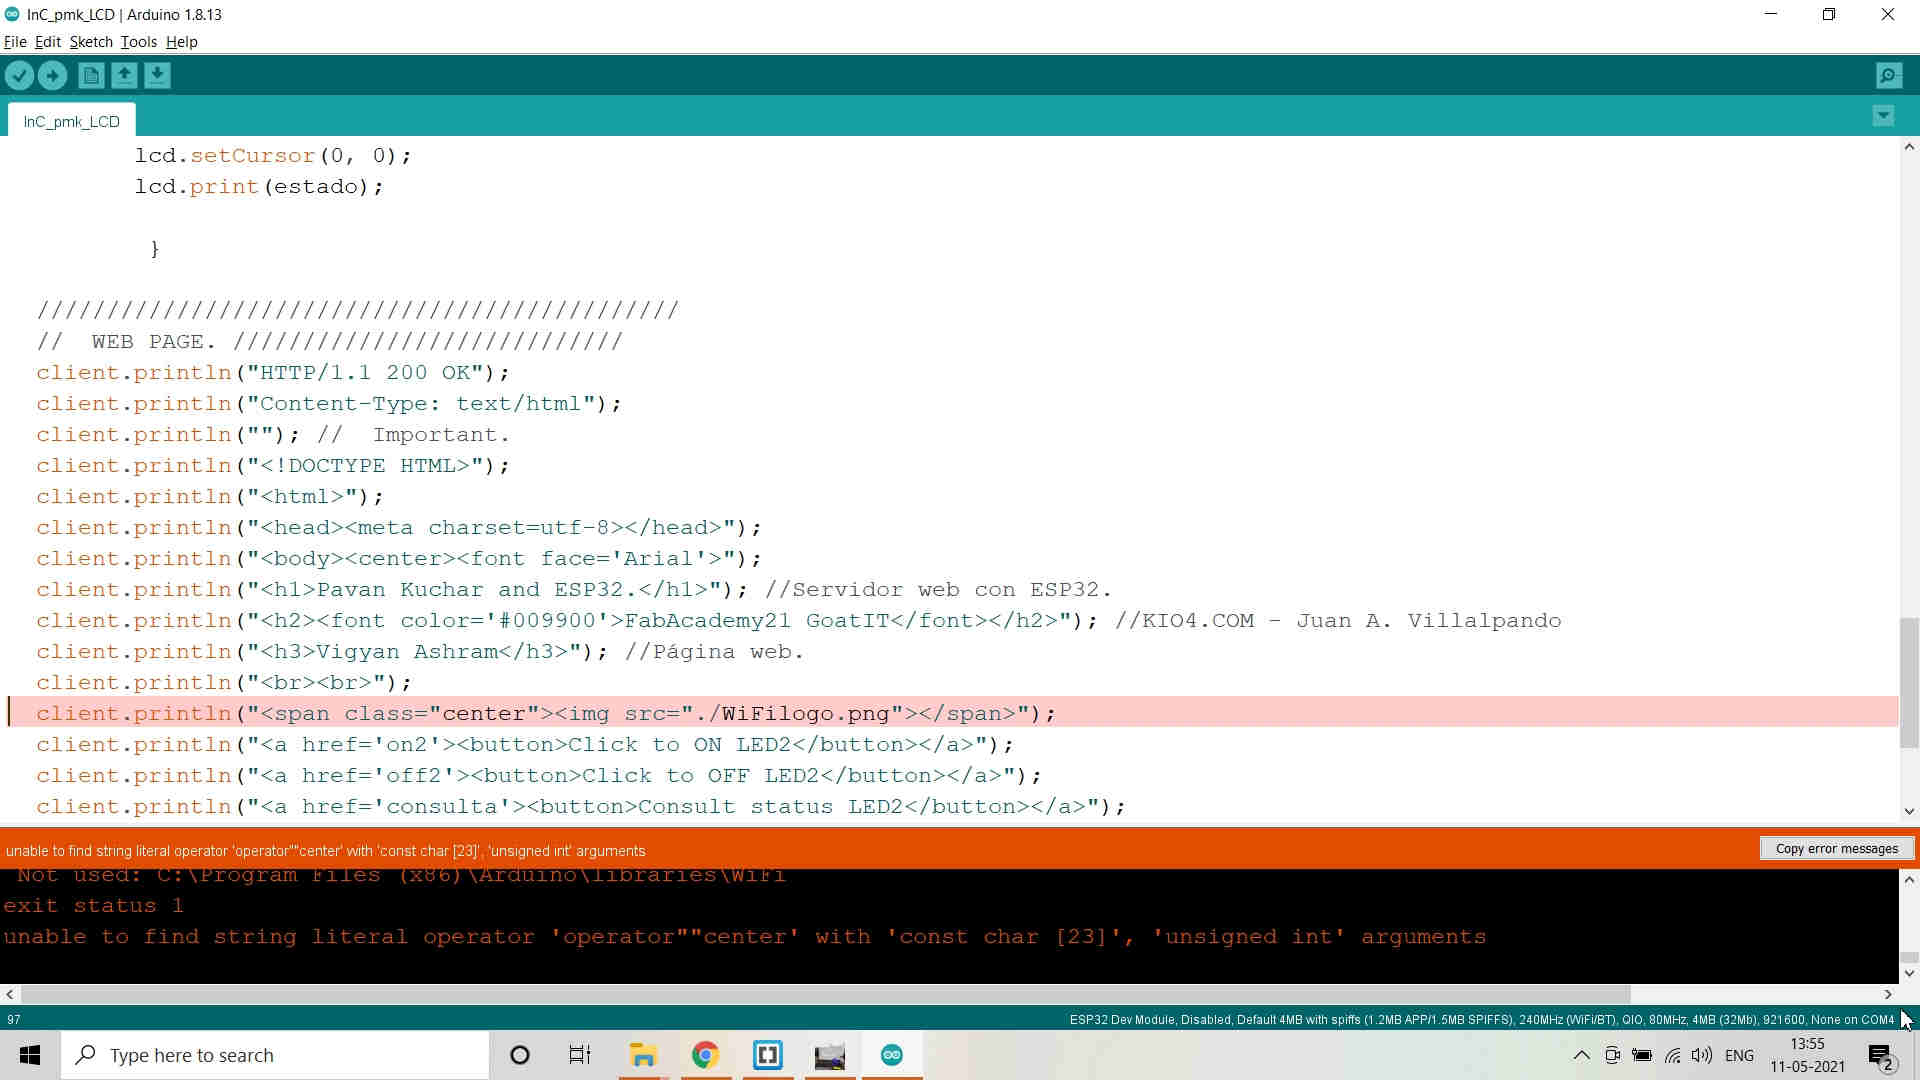
I then tried ti include the Logo of WiFi on the Webpage but was not able to do it. So, I left and contented my self with the usual display.
Test Code:
There are two Codes/Sketch for creating Web User Interface to Switch the LED2 attached to GPIO 17 on my ESP32 Board ON or OFF and knowing the Status of the LED2.
Sketch for Web UI without LCD
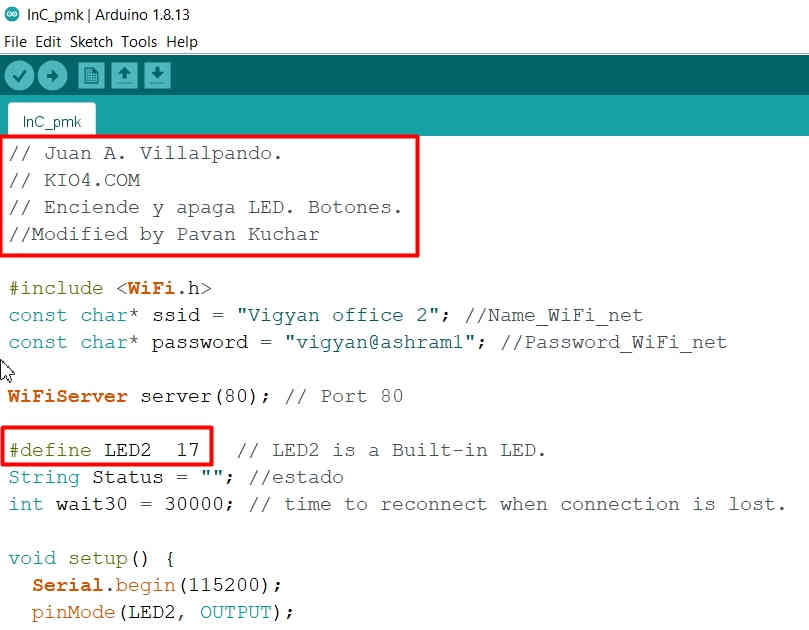
// Juan A. Villalpando.
// KIO4.COM
// Enciende y apaga LED. Botones.
//Modified by Pavan Kuchar
//LED2 ON and OFF and Status on WEB UI
#include <WiFi.h>
const char* ssid = "Vigyan office 2"; //Name_WiFi_net
const char* password = "vigyan@ashram1"; //Password_WiFi_net
WiFiServer server(80); // Port 80
#define LED2 17 // LED2 is a Built-in LED.
String Status = ""; //estado
int wait30 = 30000; // time to reconnect when connection is lost.
void setup() {
Serial.begin(115200);
pinMode(LED2, OUTPUT);
// Connect WiFi net.
Serial.println();
Serial.print("Connecting with ");
Serial.println(ssid);
WiFi.begin(ssid, password);
while (WiFi.status() != WL_CONNECTED) {
delay(500);
Serial.print(".");
}
Serial.println("Connected with WiFi.");
// Start Web Server.
server.begin();
Serial.println("Web Server started.");
// Esta es la IP
Serial.print("This is IP to connect to the WebServer: ");
Serial.print("http://");
Serial.println(WiFi.localIP());
}
void loop() {
// If disconnected, try to reconnect every 30 seconds.
if ((WiFi.status() != WL_CONNECTED) && (millis() > wait30)) {
Serial.println("Trying to reconnect WiFi...");
WiFi.disconnect();
WiFi.begin(ssid, password);
wait30 = millis() + 30000;
}
// Check if a client has connected..
WiFiClient client = server.available();
if (!client) {
return;
}
Serial.print("New client: ");
Serial.println(client.remoteIP());
// Espera hasta que el cliente envíe datos.
// while(!client.available()){ delay(1); }
/////////////////////////////////////////////////////
// Read the information sent by the client.
String req = client.readStringUntil('\r');
Serial.println(req);
// Make the client's request.
if (req.indexOf("on2") != -1) {digitalWrite(LED2, HIGH); Status = "ON";}
if (req.indexOf("off2") != -1){digitalWrite(LED2, LOW); Status = "OFF";}
if (req.indexOf("consulta") != -1){
if (digitalRead(LED2)){Status = "LED2 is now ON";} //"LED2 now is ON"
else {Status = "LED2 is now OFF";}
}
//////////////////////////////////////////////
// WEB PAGE. ////////////////////////////
client.println("HTTP/1.1 200 OK");
client.println("Content-Type: text/html");
client.println(""); // Important.
client.println("");
client.println("");
client.println("
client.println("
client.println("
Pavan Kuchar and ESP32.
"); //Servidor web con ESP32.client.println("
FabAcademy21 GoatIT
"); //KIO4.COM - Juan A. Villalpandoclient.println("
Vigyan Ashram
"); //Página web.client.println("
");
client.println("");
client.println("");
client.println("");
client.println("
");
client.println(Status);
client.println("
Serial.print("Client disconnected: ");
Serial.println(client.remoteIP());
client.flush();
client.stop();
}
Sketch for Web UI with LCD
// Juan A. Villalpando.
// KIO4.COM
// Enciende y apaga LED. Botones.
//Modified by Pavan Kuchar
//LED2 ON and OFF with Status Displayed on LCD
#include <LiquidCrystal_I2C.h>
#include <Wire.h>
#include <WiFi.h>
const char* ssid = "Vigyan office 2"; //Name_WiFi_net
const char* password = "vigyan@ashram1"; //Password_WiFi_net
WiFiServer server(80); // Port 80
LiquidCrystal_I2C lcd(0x3F, 16, 2);
#define LED2 17 // LED2 is a Built-in LED.
String Status = ""; //estado
int wait30 = 30000; // time to reconnect when connection is lost.
void setup() {
Serial.begin(115200);
pinMode(LED2, OUTPUT);
Wire.begin (33, 32);
lcd.init();
lcd.backlight();
// Connect WiFi net.
Serial.println();
Serial.print("Connecting with ");
Serial.println(ssid);
WiFi.begin(ssid, password);
while (WiFi.status() != WL_CONNECTED) {
delay(500);
Serial.print(".");
}
Serial.println("Connected with WiFi.");
// Start Web Server.
server.begin();
Serial.println("Web Server started.");
// Esta es la IP
Serial.print("This is IP to connect to the WebServer: ");
Serial.print("http://");
Serial.println(WiFi.localIP());
}
void loop() {
// If disconnected, try to reconnect every 30 seconds.
if ((WiFi.status() != WL_CONNECTED) && (millis() > wait30)) {
Serial.println("Trying to reconnect WiFi...");
WiFi.disconnect();
WiFi.begin(ssid, password);
wait30 = millis() + 30000;
}
// Check if a client has connected..
WiFiClient client = server.available();
if (!client) {
return;
}
Serial.print("New client: ");
Serial.println(client.remoteIP());
// Espera hasta que el cliente envíe datos.
// while(!client.available()){ delay(1); }
/////////////////////////////////////////////////////
// Read the information sent by the client.
String req = client.readStringUntil('\r');
Serial.println(req);
// Make the client's request.
if (req.indexOf("on2") != -1) {digitalWrite(LED2, HIGH); Status = "ON";}
if (req.indexOf("off2") != -1){digitalWrite(LED2, LOW); Status = "OFF";}
if (req.indexOf("consulta") != -1){
if (digitalRead(LED2)){Status = "LED2 is now ON";}
else {Status = "LED2 is now OFF";}
lcd.setCursor(0, 0);
lcd.print(Status);
}
//////////////////////////////////////////////
// WEB PAGE. ////////////////////////////
client.println("HTTP/1.1 200 OK");
client.println("Content-Type: text/html");
client.println(""); // Important.
client.println("");
client.println("");
client.println("
client.println("
client.println("
Pavan Kuchar and ESP32.
"); //Servidor web con ESP32.client.println("
FabAcademy21 GoatIT
"); //KIO4.COM - Juan A. Villalpandoclient.println("
Vigyan Ashram
"); //Página web.client.println("
");
client.println("");
client.println("");
client.println("");
client.println("
");
client.println(Status);
client.println("
Serial.print("Client disconnected: ");
Serial.println(client.remoteIP());
client.flush();
client.stop();
}
There are other examples on the Article of Juan Antonio as well. But, I limited myself to Web User Interface. The other examples include -
But, Static IP is used when you want to keep the same IP Address even if you want to connect by any device. But, it might cause difficulty in connection if other device is also having the same IP Address.
Now ESP32 is an Acces Point. ESP32 creates the network 192.168.4.X. It is independent of the Router.
What I did earlier in February out of Curiosity:
I have designed an Android Apk for the Dairy and Husbandary section of the Vigyan Ashram. It was Kg to Litres Coverter Apk. I made this Apk for making the process of measuring the amount of Milk easier by just weighing it on the Weighing Balance. The Tolerance or the Caliberation value was added to the weight and it would directly give us the value of Milk in Litres.
Draft about the Apk:
With this calculator (Kg to Litres Coverter Apk), you can convert Milk in Kgs. to Liters. The density of the Jersey Cow Milk is taken 1.0313kg/m3. Formula for calculating Volume is Mass divided by Density. This Apk is developed for Dairy and Husbandry Section of Vigyan Ashram, Pabal by Pavan M. Kuchar and Mohit Ahuja; students of Fab Academy 2021. The Idea was conceptualized by Pavan Kuchar and developed with the help of Mohit Ahuja.
This Apk is created to help the students of DBRT (Diploma in Basic Rural Technology) to quickly measure/quantify the amount of Milk in Kgs to Milk in Liters. There are 02 Jersey Cows and they had to measure the Milk of each cow seperately.
I wanted to pursue this project forward as a part of Fab Academy. I wanted to make a Digital Can which would have a QR Code which when scanned would display the details of the milk inside the container like the volume, pH, Fats and SNF. I also wanted the data to be sent on a server which would create a data log and could be retreived anytime anywhere by the dairy owners. But could not go ahead as it involves the measurement of Fats and SNF (Solid but Not Fat) content, the sensors of which are expensive.
The margin for error in the conversion depends on the density of the milk. The density of the milk varies in the range of 1.028 to 1.038. I have taken the density as 1.0313 as the standard. The margin for error is 50ml per 10 liters. This is a small attempt to ease of the pain of the volunteer student who milk the cow and had to measure the milk repeatedly.
Regards - Pavan M. Kuchar
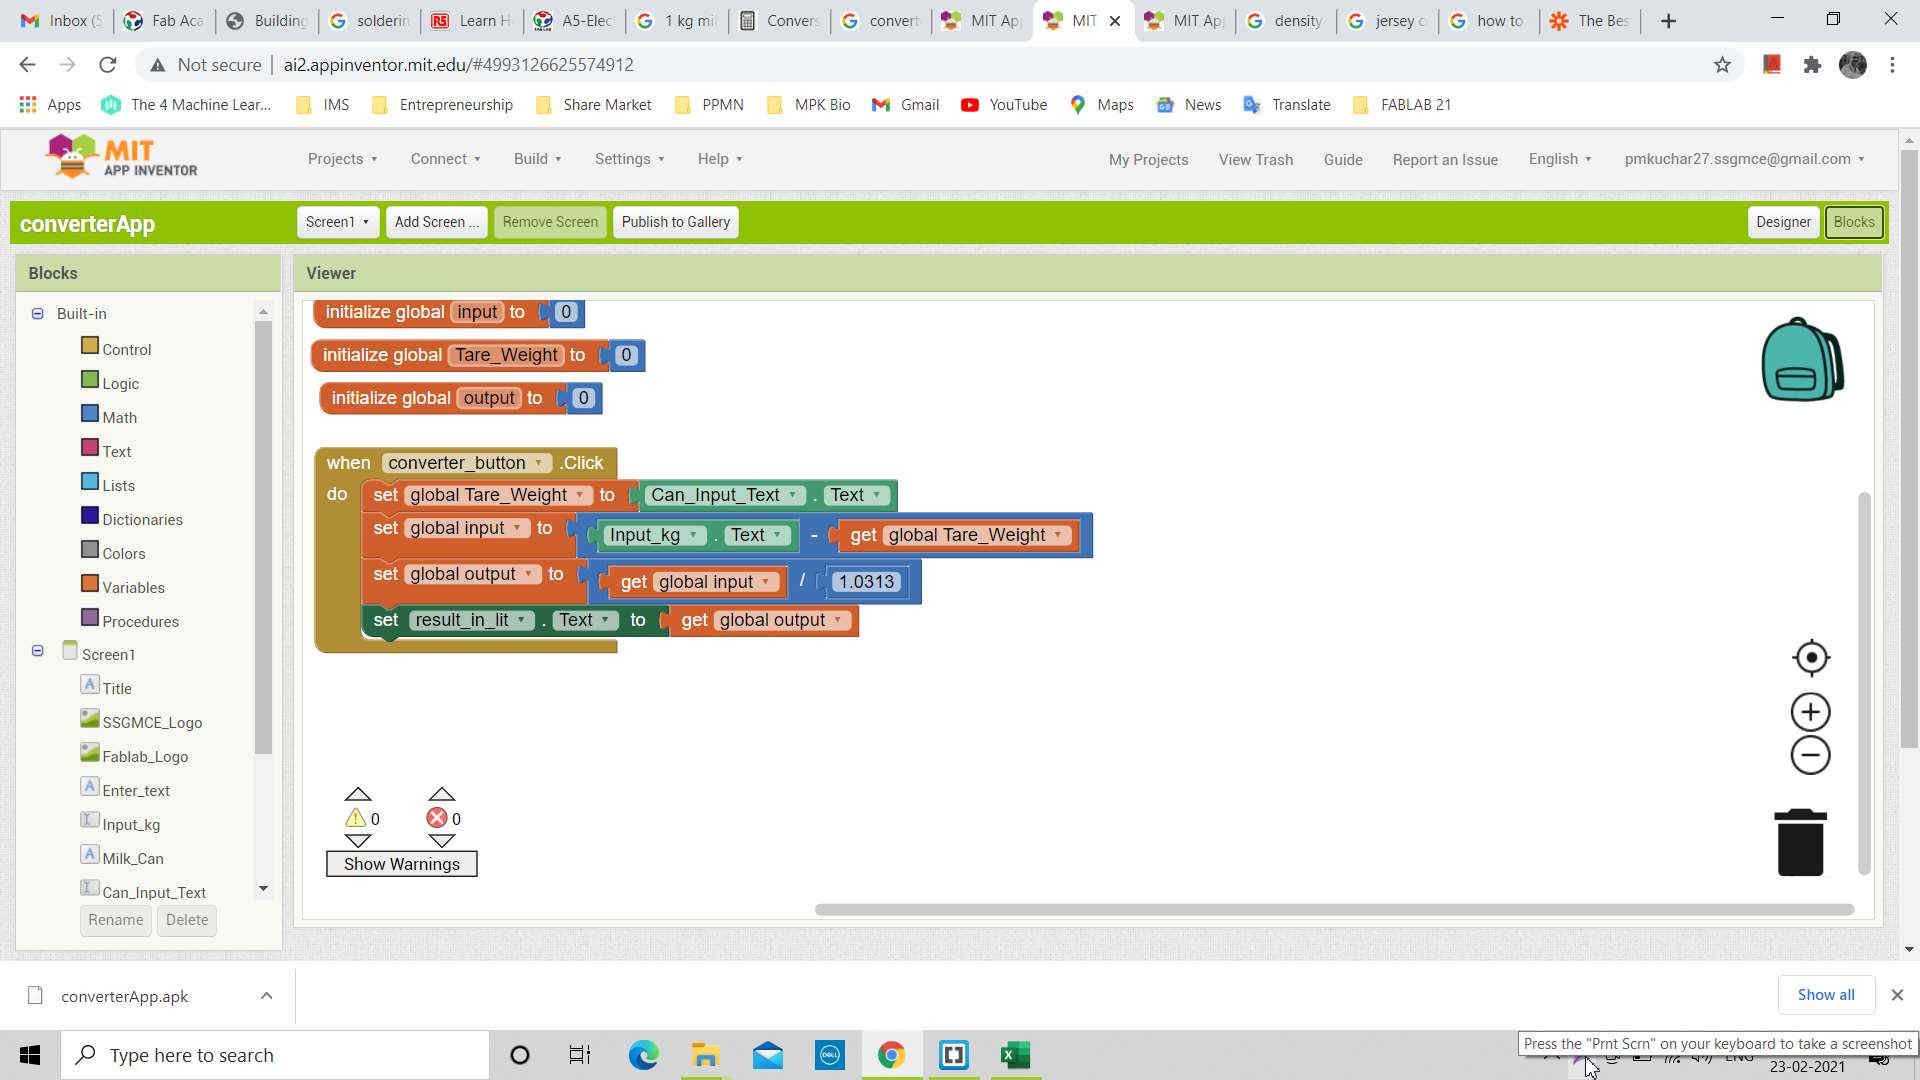
Logic Blocks in the Kg to Liter Coverter Apk
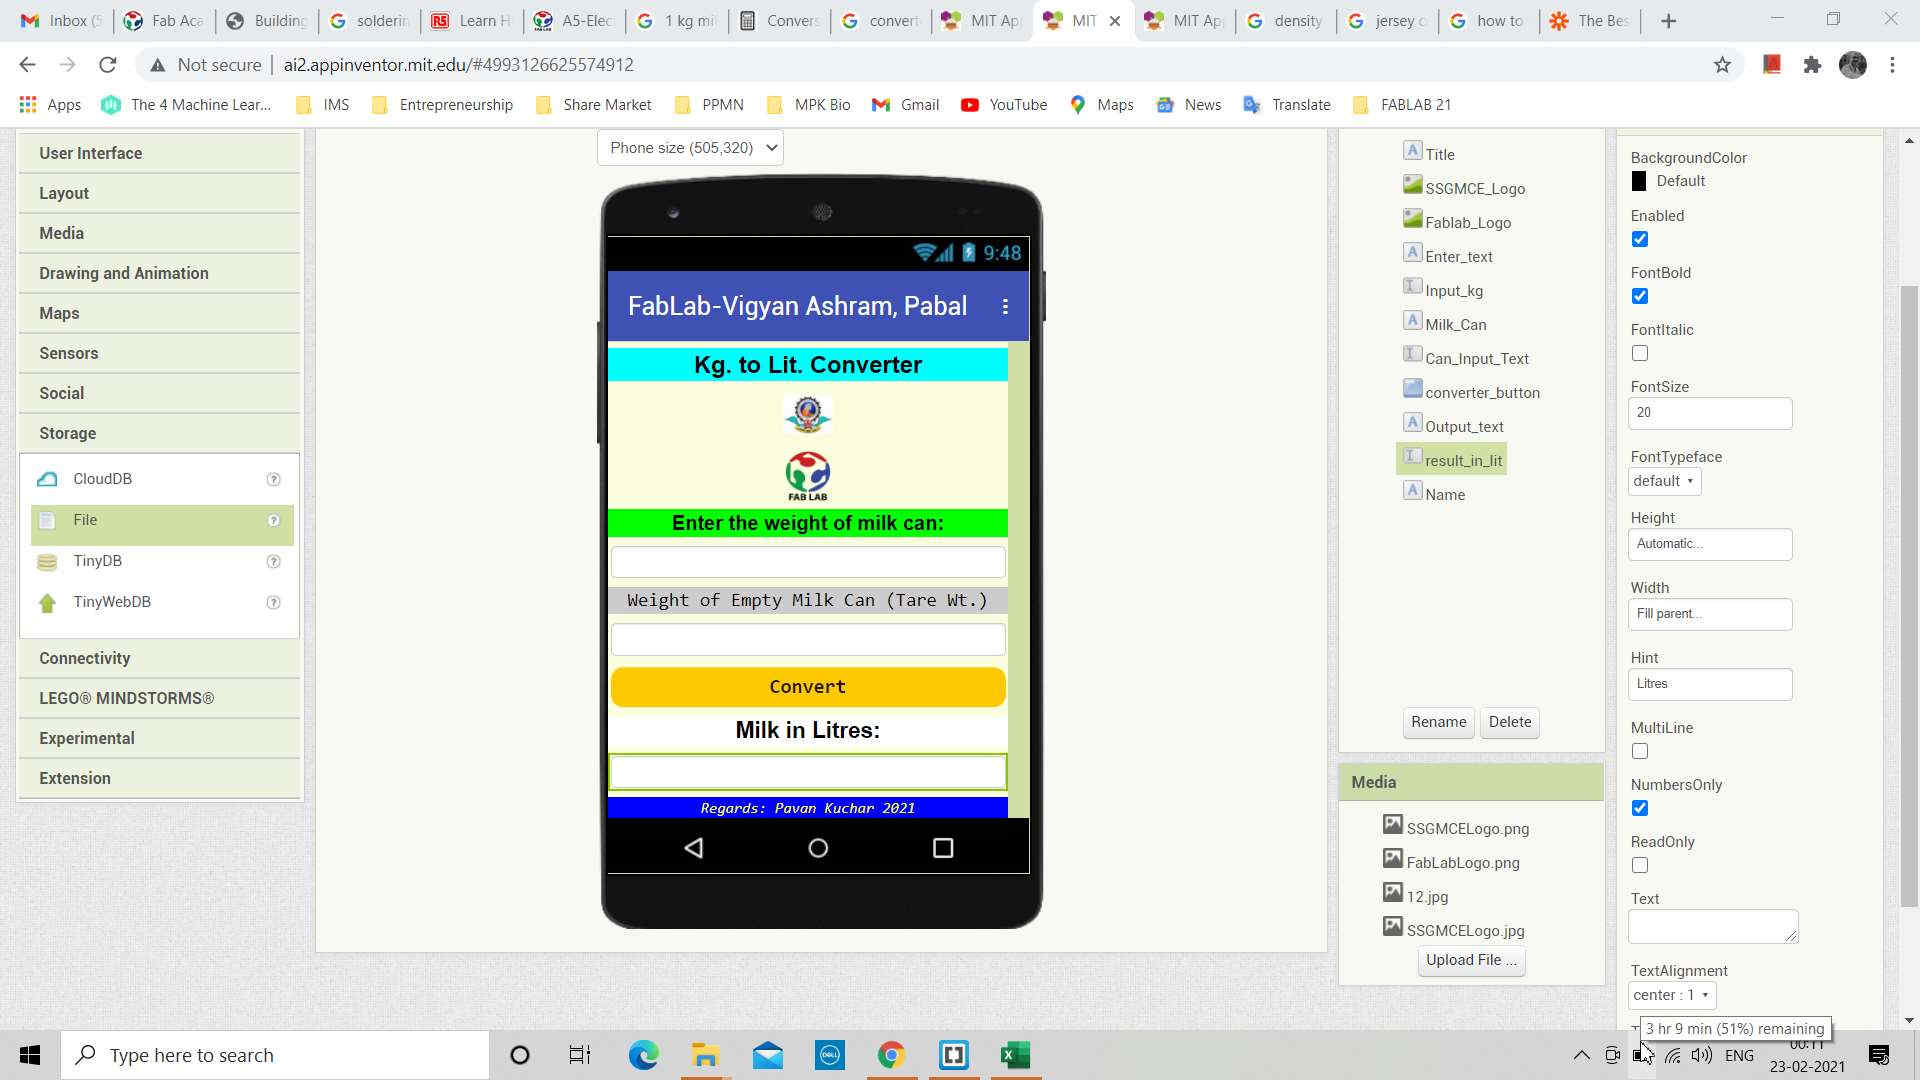
View of the Kg. to Liter Converter Apk
Summary:
In this week,
- I learned - about various User Interfaces like Command line, graphical, Natural language, form based, Gesture driven, Web etc.
- I explored the Processing Graphical user Interface to see the results serially transmitted by the COM Port of Arduino IDE. Only thing is that you have to clse the Serial Monitor in Arduino and make changes in the Sketch like "serial.write" instead of "serial.print"
- I made an Application in MIT App Inventor
- I designed and made a Web User Interface for my ESP 32 board and Switched the LED on GPIO17 ON and OFF. I was also able to see the Status whether it is ON or OFF.
- I was also able to show the Status of LCD on the LCD attached to the board as Output Device.
Video Stream of Interfacing and Application:
Downloads: Original Files
You may find here the three Codes/Sketches that I used in this Assignment. One for knowing the IP Address of my ESP32; Second for Web UI to Switch LED ON and OFF and the Third one for Web UI to Switch LED ON and OFF and displaying its Status on LCD.