3. Computer Aided design
THIS WEEK CHECKLIST
- [✓] Model (raster, vector, 2D, 3D, render, animate, simulate, …) a possible final project, compress your images and videos, and post it on your class page
- [✓] Shown how you did it with words/images/screenshots
- [✓] Included your original design files
2D Design Tool
Basiclly,I am using PowerPoint for design everything in my work, for example, report, lecture note, examp paper, worksheet and etc, so I think PowerPoint is very powerful. For my familiar software for making 2D Design, definitely should be PowerPoint. But, this time I try to use Procreate for creating my final project logo.
Procreate
Procreate is a raster graphics editor app for digital painting developed and published by Savage Interactive for iOS and iPadOS. Apple Pencil with iPad Pro is a precfect match for drawing in Procreate.
I think Procreate is very easy to use because of the simaple interface layout. Also, it includes most of the basic function for creating a logo. I show and list function Nd layput.
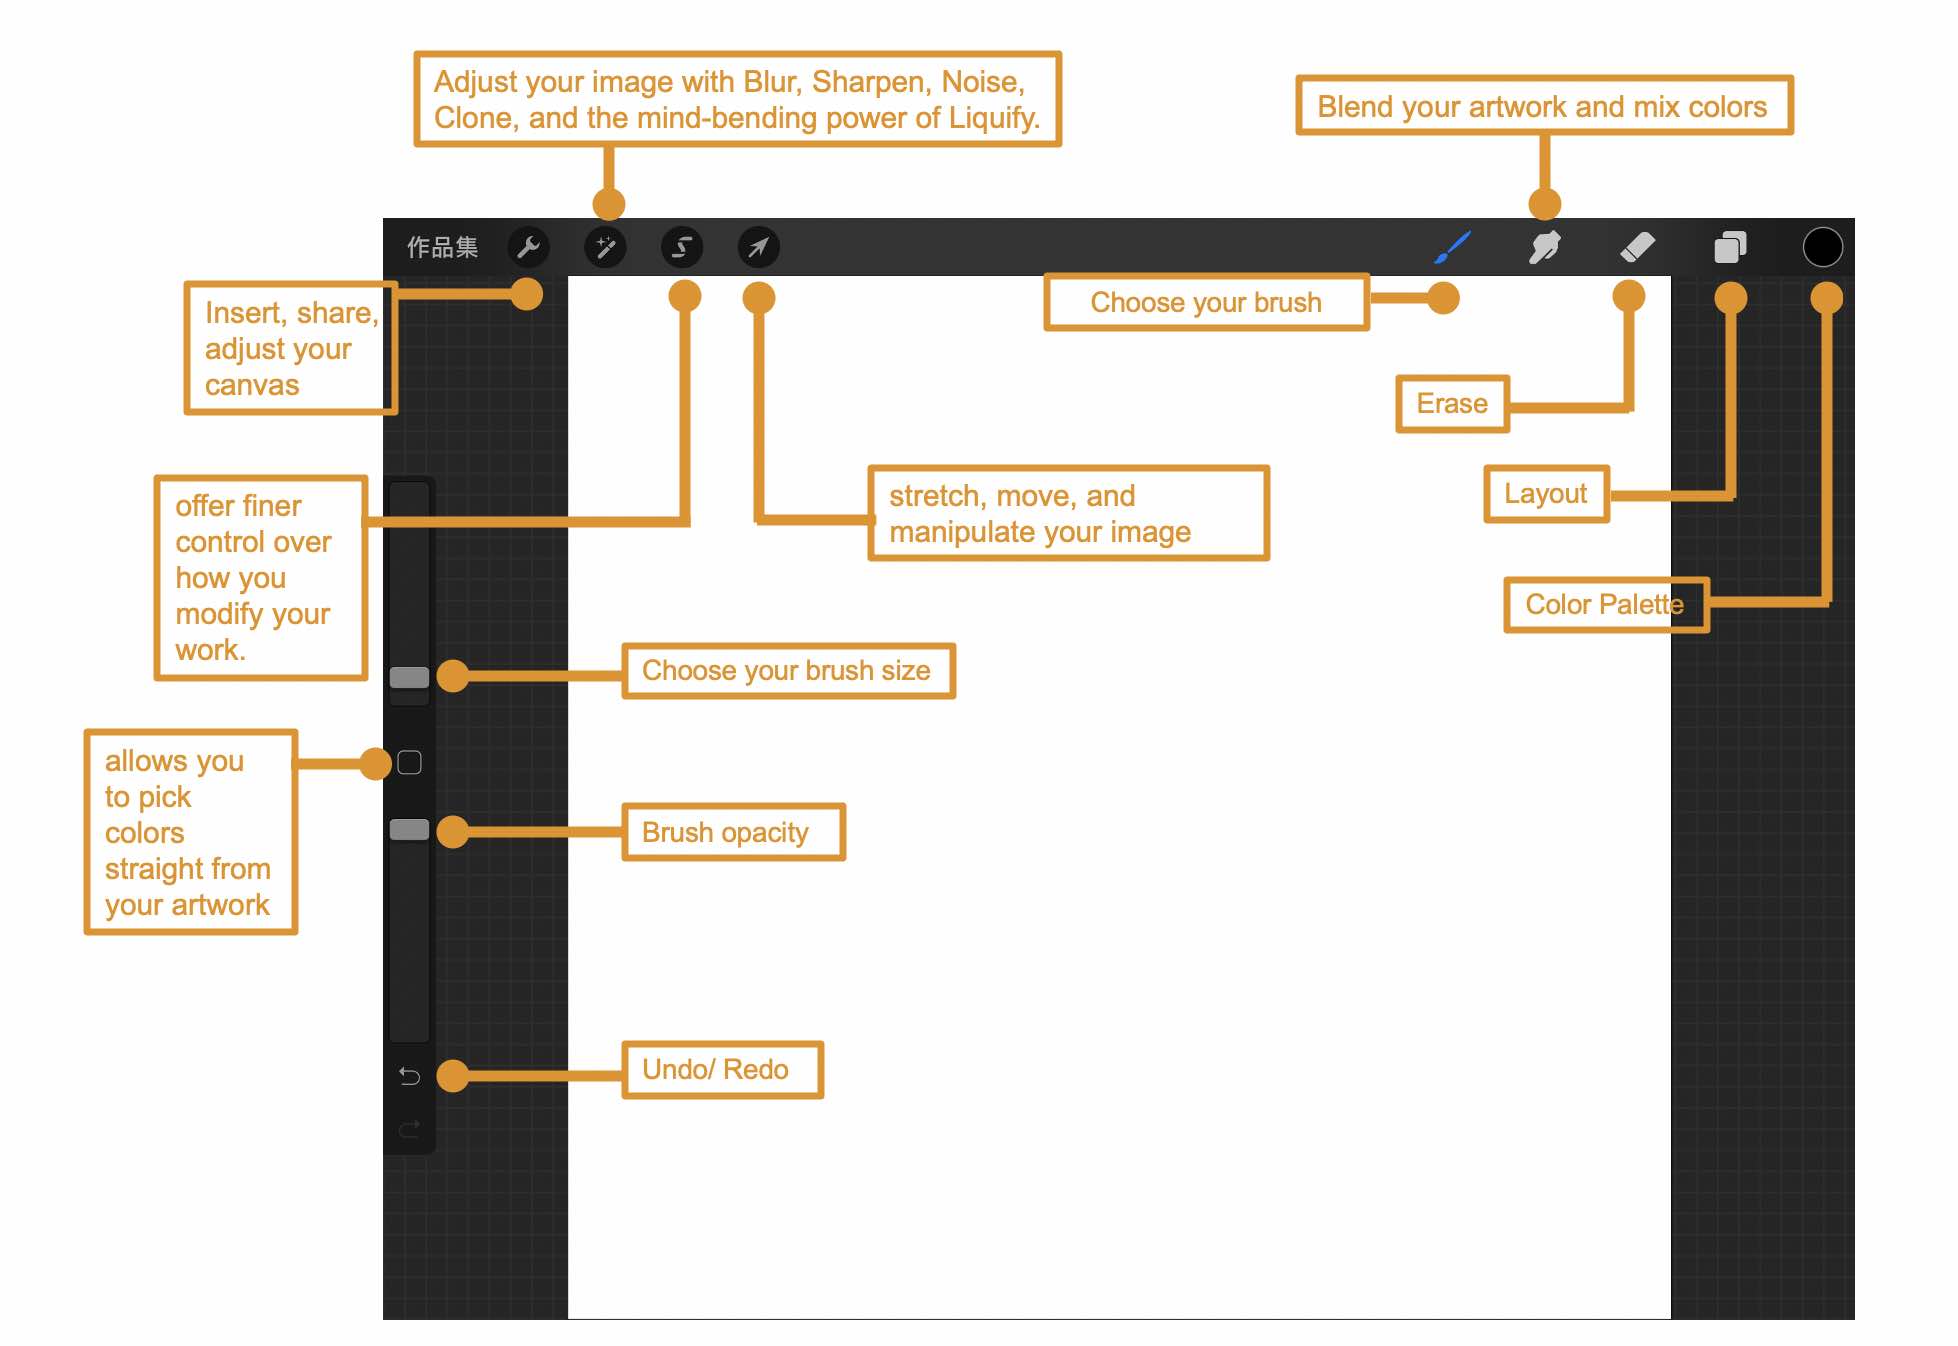
CLICK HERE have a detail handbook for using Procreate.
In my logo design, it includes at least 2 elements to fit my final Projetc (ALUMINIUM CAN RECYCLING BIN)
1. Crushed Can
2. Recycle Sign, like an arrow
Here is a process for designing my final project logo.
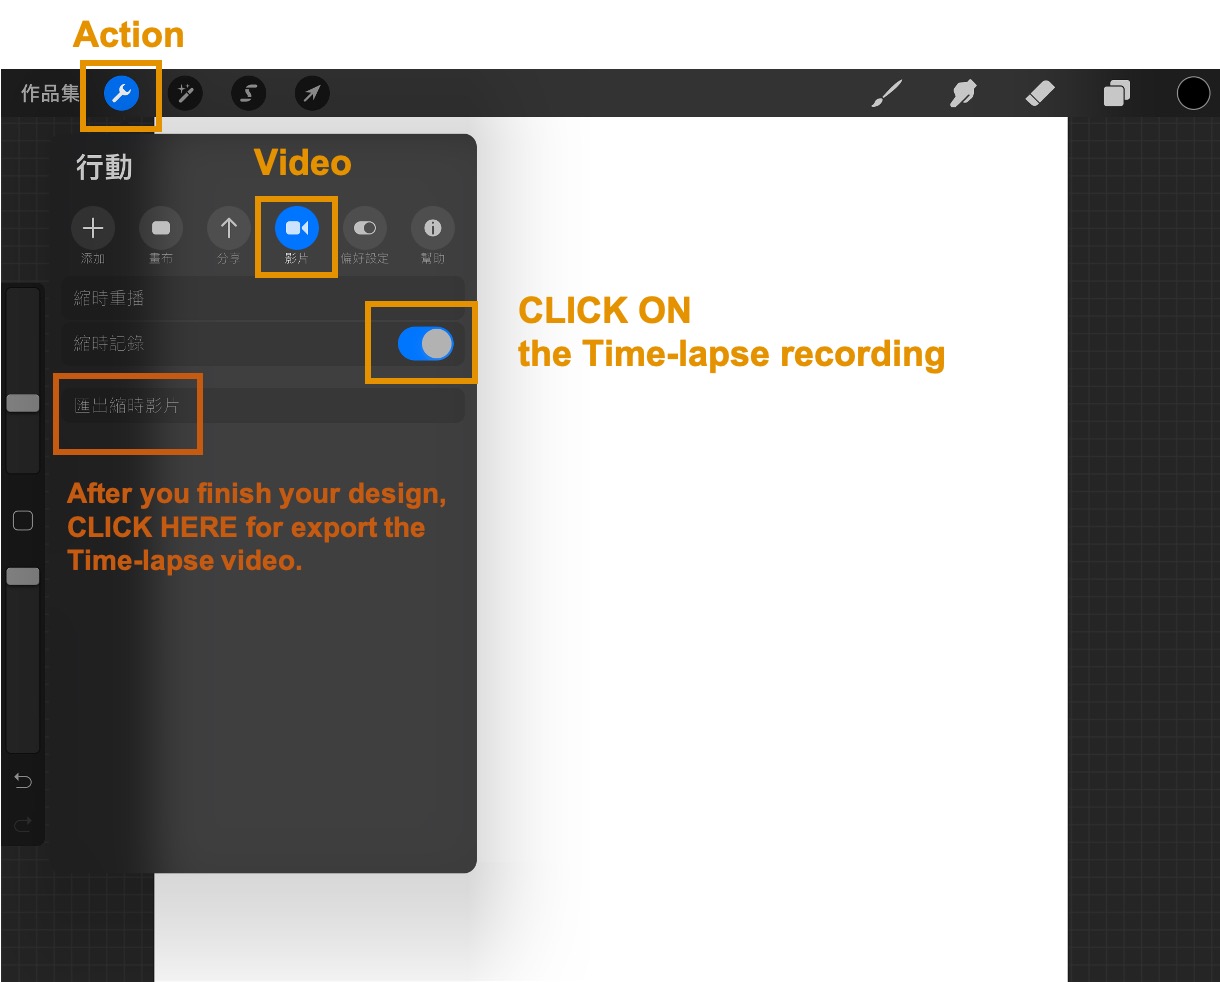
This video is a function of Procreate. It called Animation Assist Screen. It help you track your progress, instant playback, and versatile settings. It is a very good funcution for recording your deisgn process. As you can see the photo below how to trun on this function and export the time-lapse video.
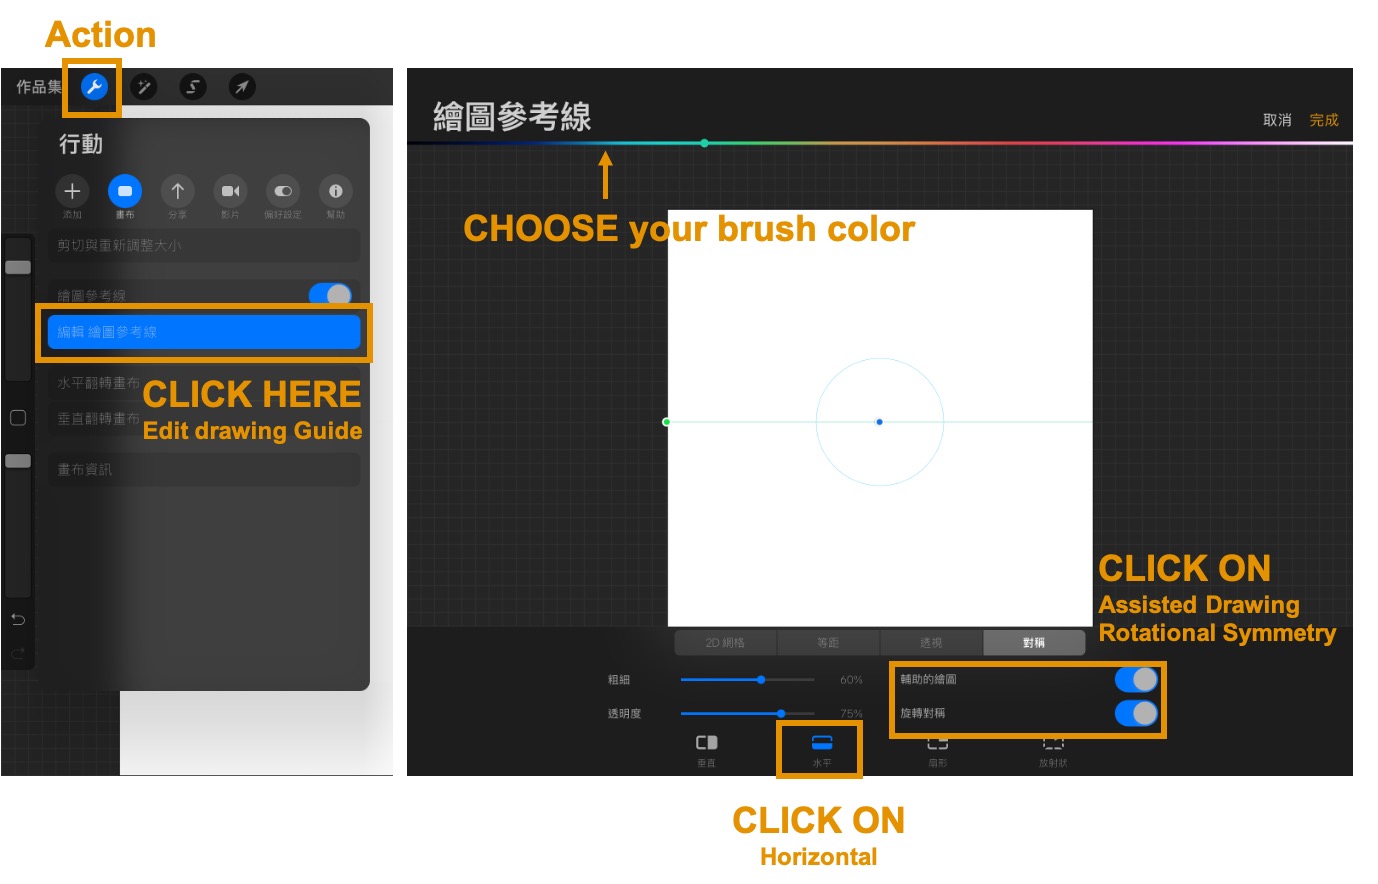
When I design the arrow with leaf, I only draw once, not two because I used Horizontal and Rotational Symmetry. Here is the function on.
For the crushed can, I just used simaple calligraphy brush to draw it.
Procreate is able to export PSD, PDF, JPEG, PNG and TIFF
Here is my final project logo in Procreate. I export JPEG file.
![]()
Adobe Illustrator
Adobe Illustrator is a vector graphics editor and design program developed and marketed by Adobe Inc.
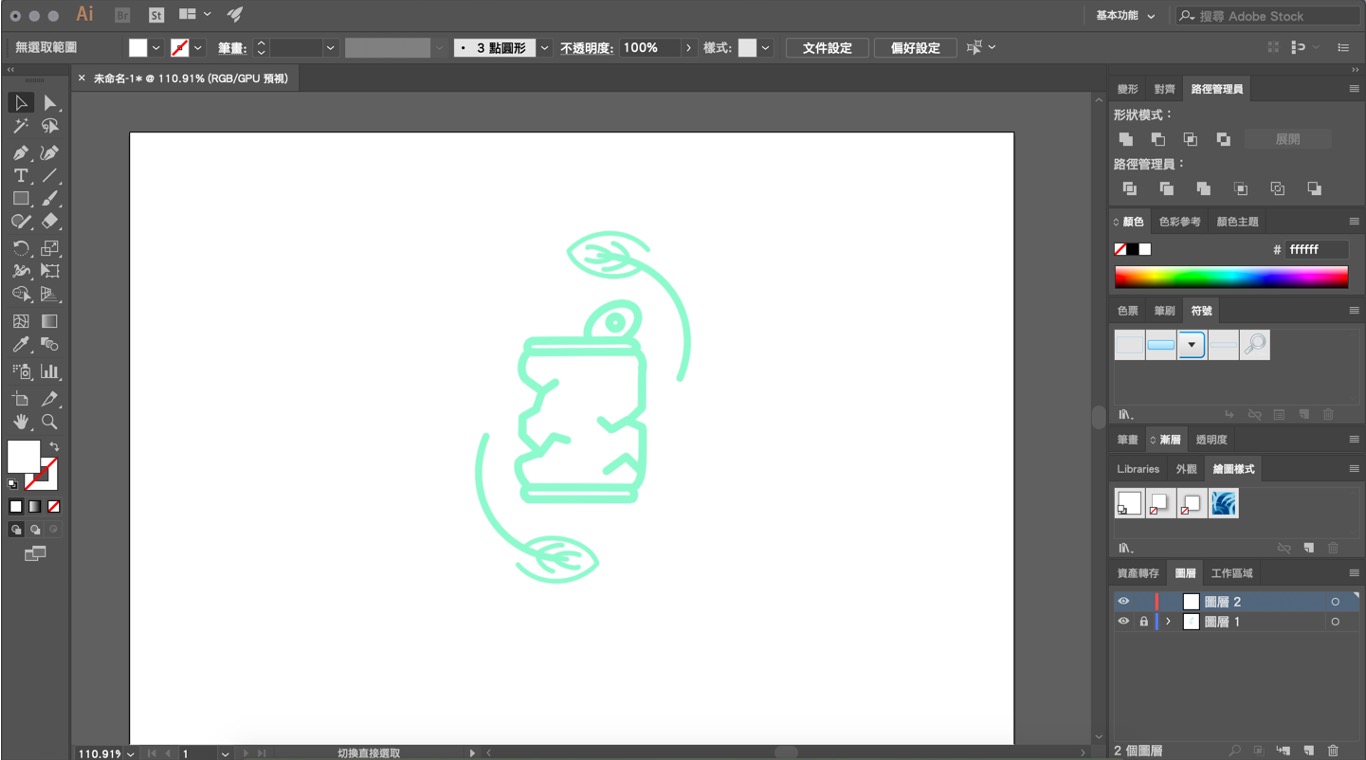
Basically, this is my first time to use AI. I ask my friend to teach me how to make my logo design in AI.
First, I draw 3 Rounded Rectangles and adjust the stroke more thicker. It finish my can deisgn. However, I am looking forward a crushed cans design, so I need to modifty the prefect can.
Second, I insert a JPEG that I created in Procreate as a draft.
Thrid, for making a crushed cans, I draw straight line segments with the Pen tool. (You can see the left photo in orange color.) Therefore, I cut the RED line to become a crush can. (Right photo)
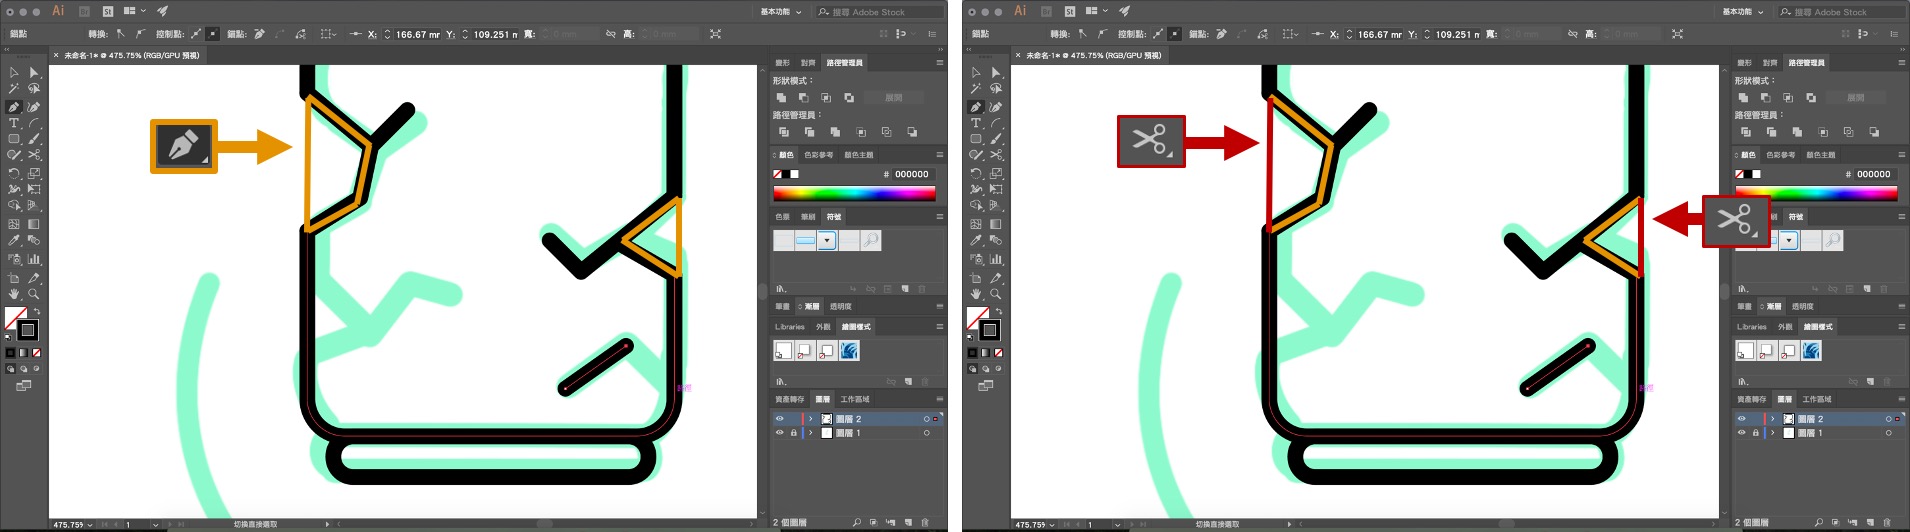
Fourth, using the same technique for making the tab.
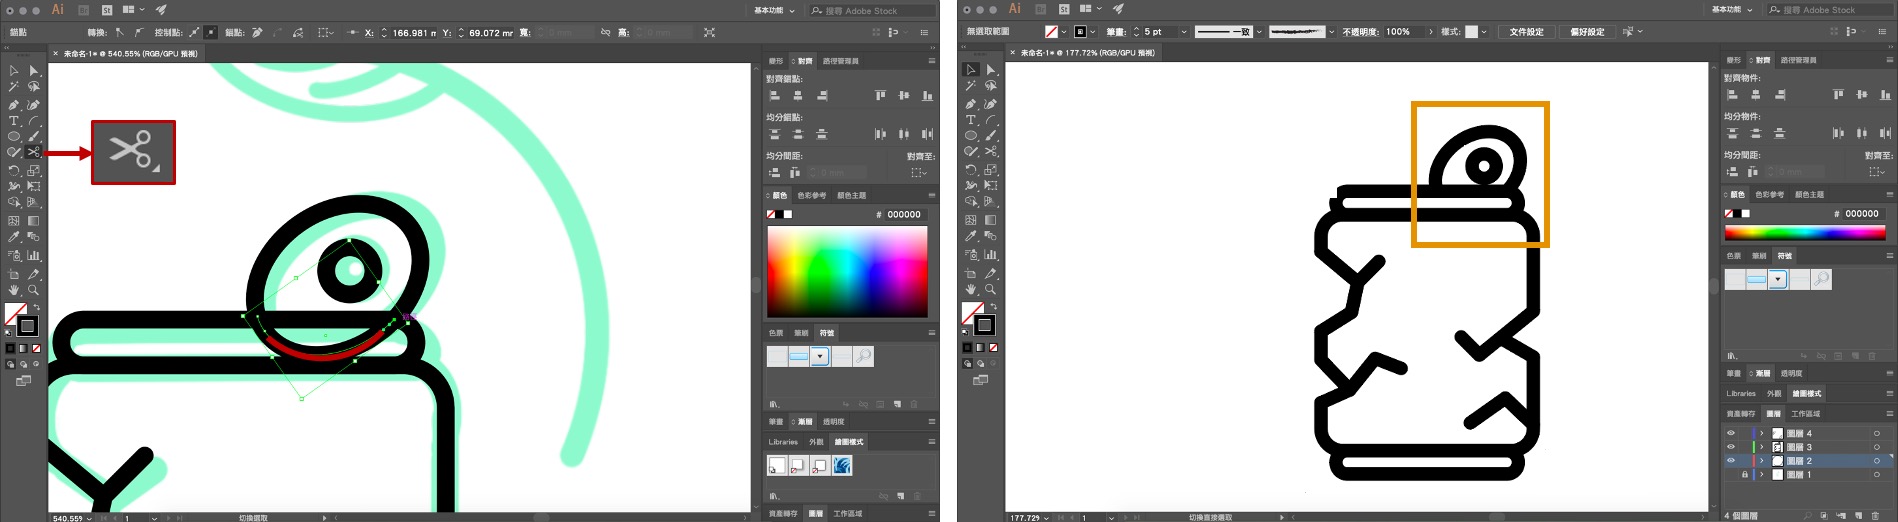
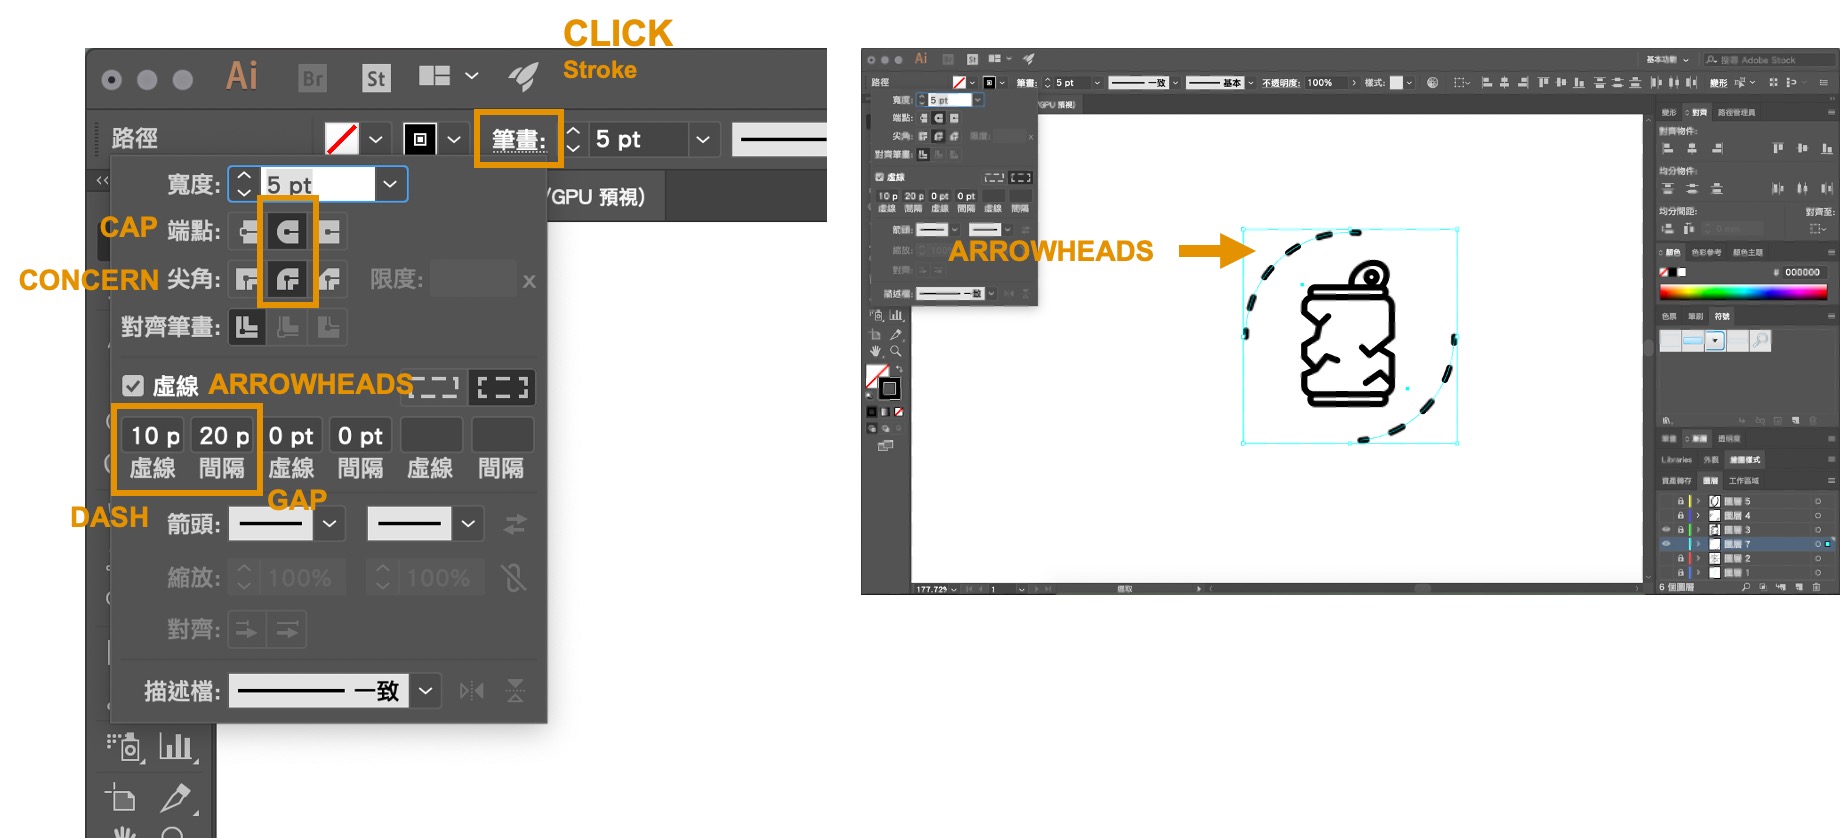
Fifth, for making a arrowhead, I need to click stroke for turning on arrowhead and choose dash and gap. Also, I choose ths stroke for round cap and concern to make lgoo design more good-looking.
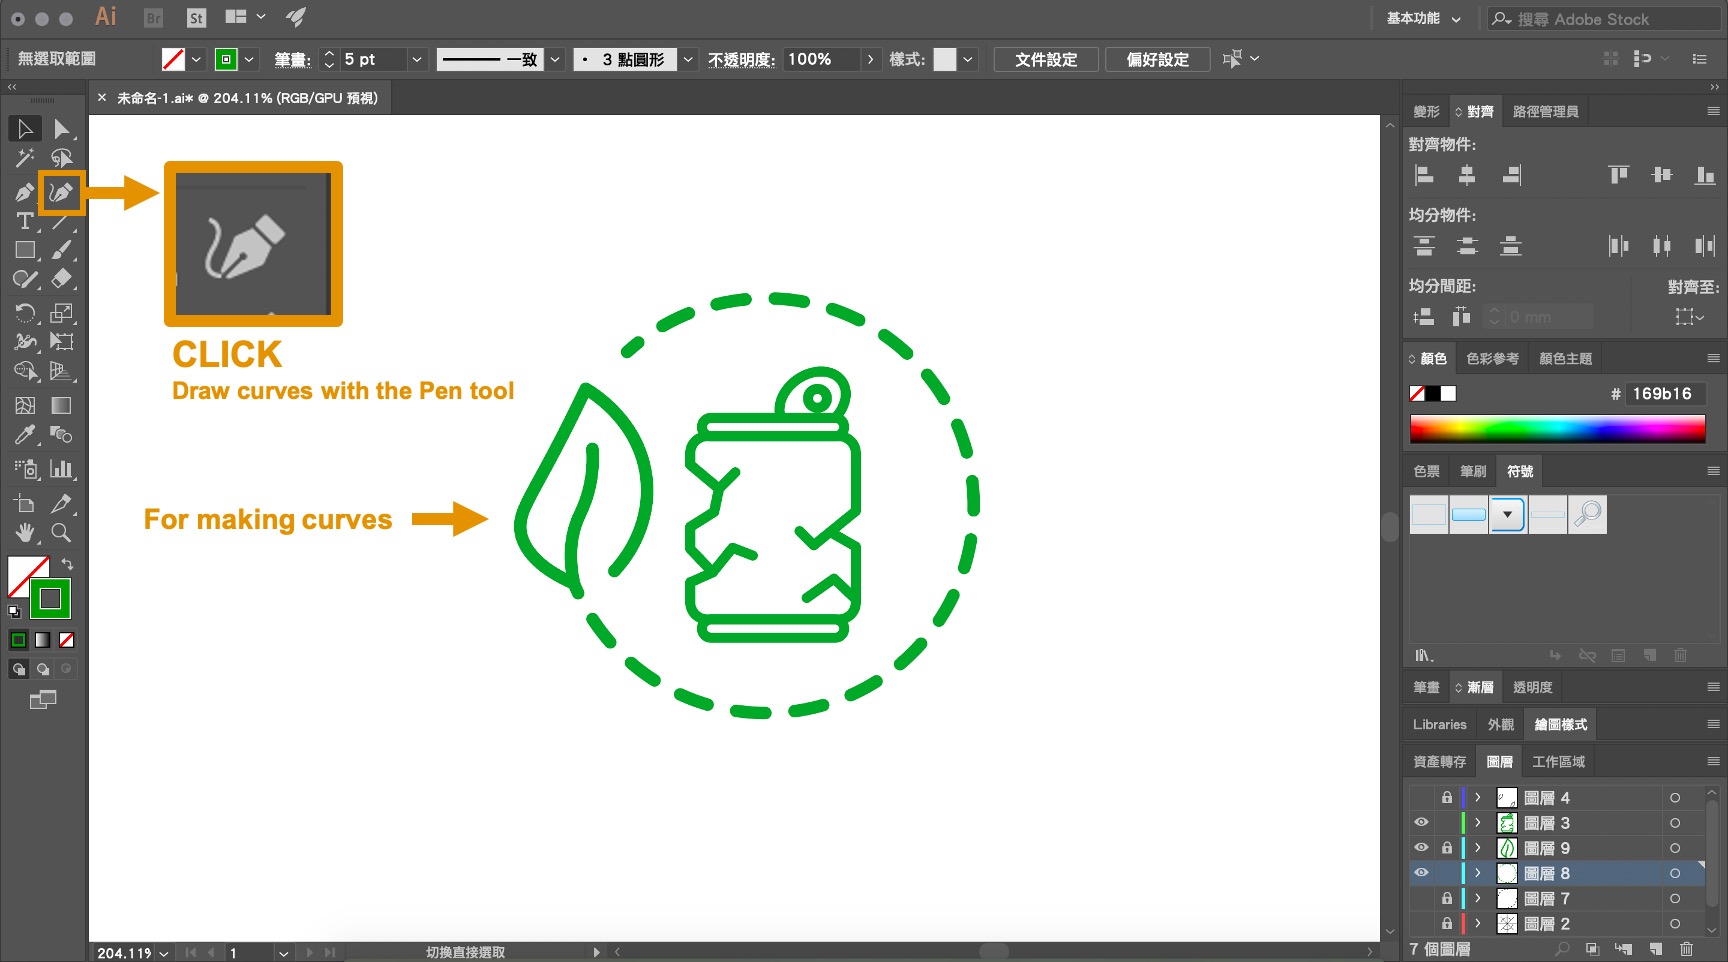
Sixth, for making a curves, I need to click Draw curves with the Pen tool. Position the Pen tool where you want the curve to begin, and hold down the mouse button. The first anchor point appears, and the Pen tool pointer changes to an arrowhead. Drag to set the slope of the curve segment you’re creating, and then release the mouse button.
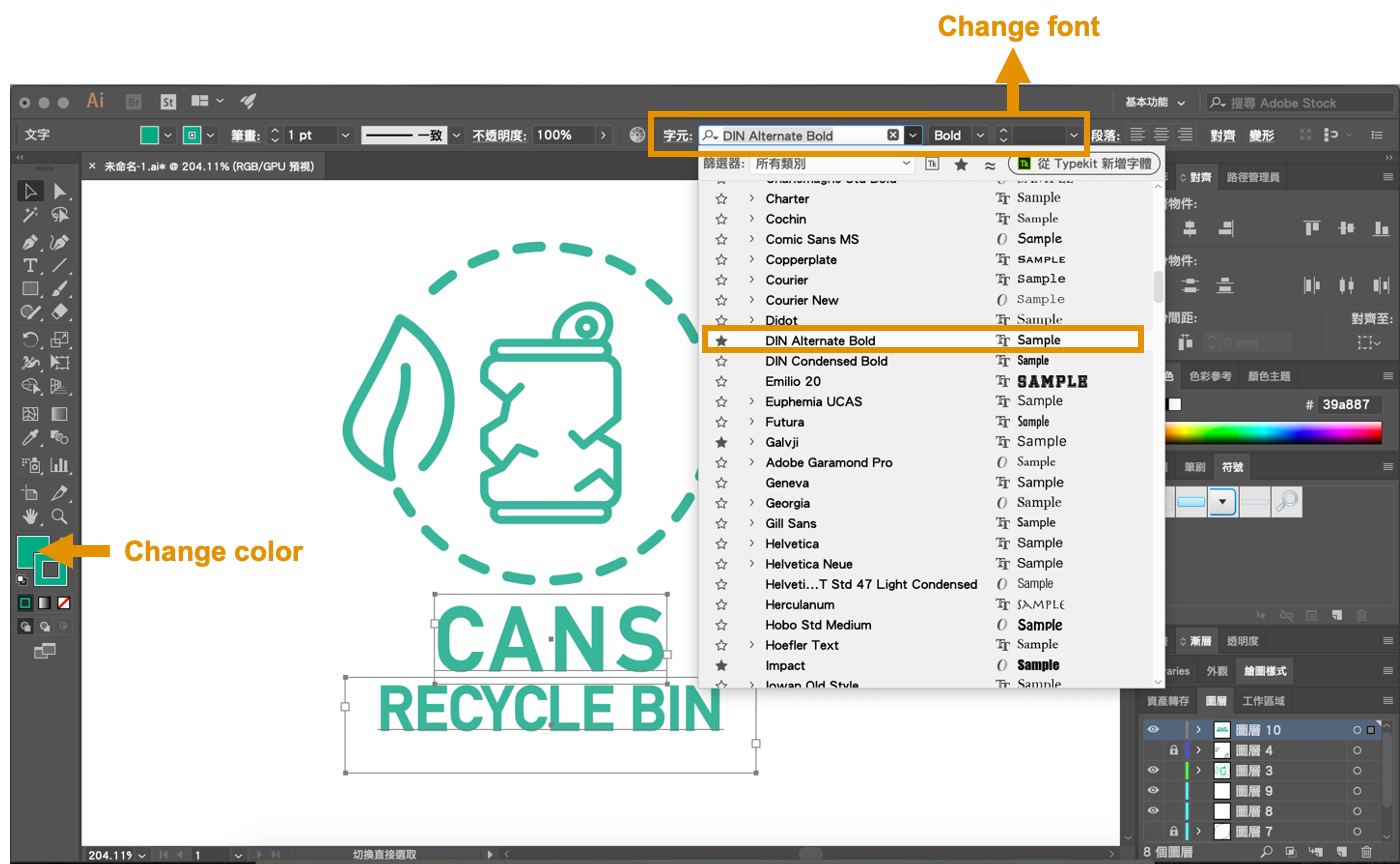
Seventh, adding text, change font and colour.
Eighth, I export AI file. Here is my final project log in Adobe Illustrator. Adobe Illustrator is able to export EPS, AIT, PDF, SVG.
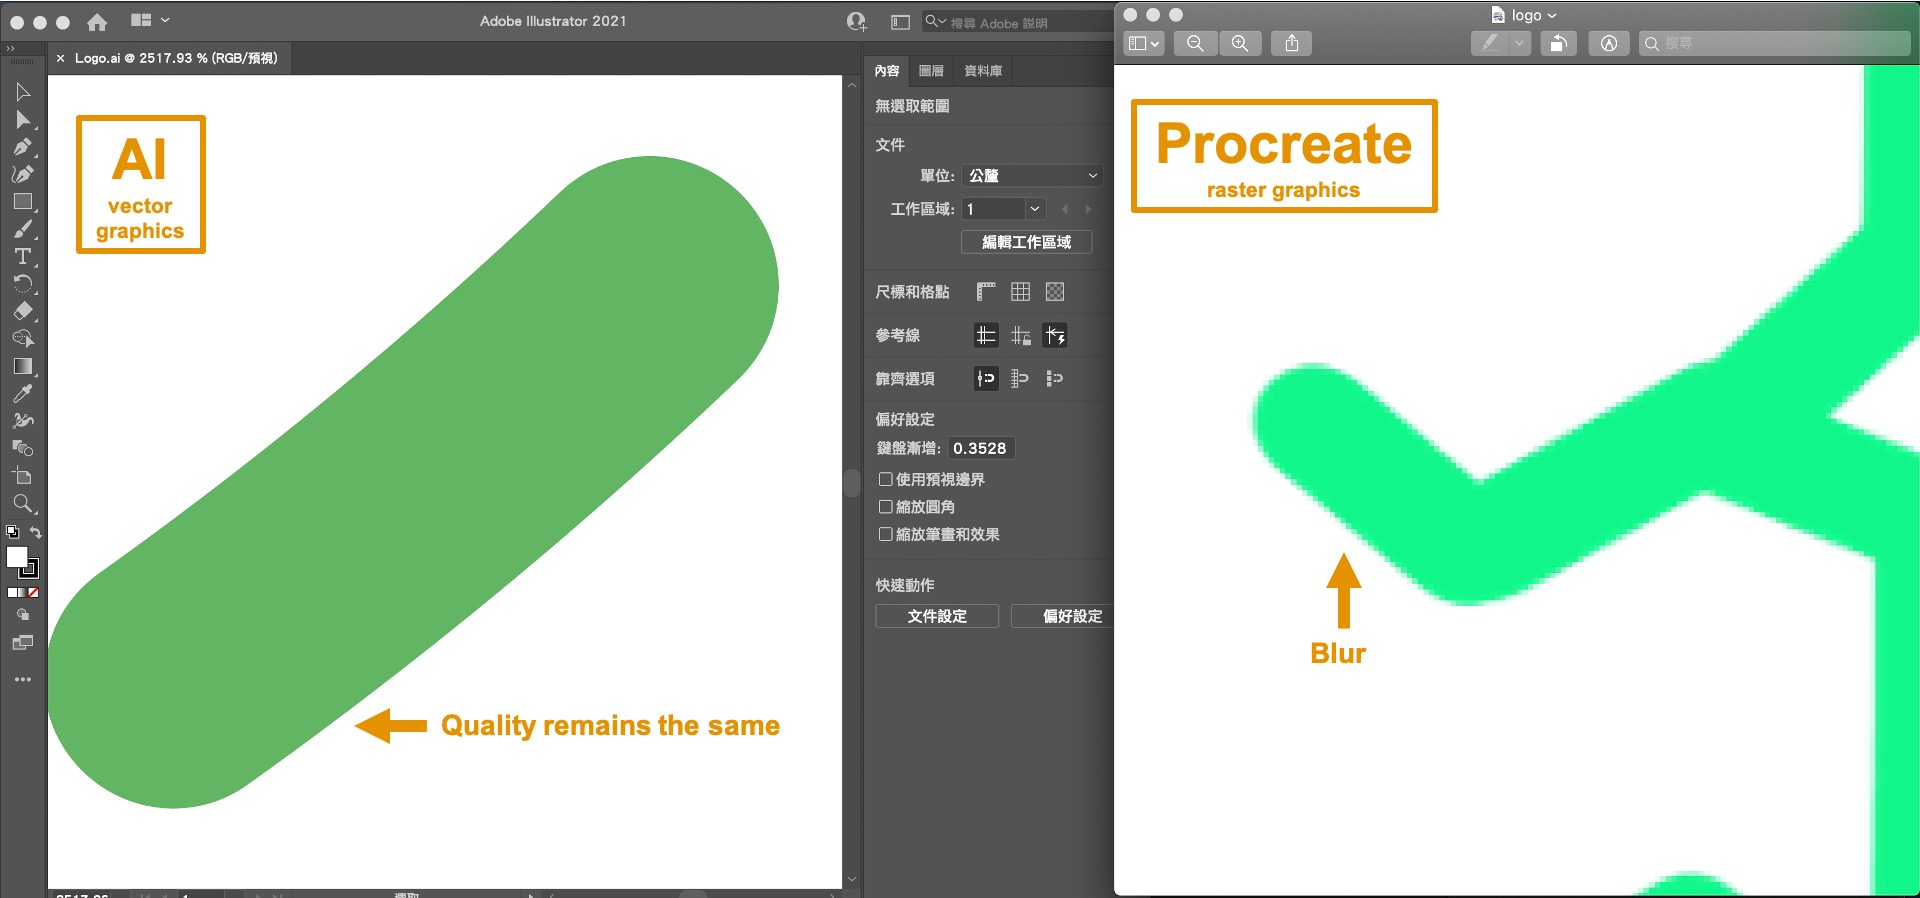
Here is a final project logo making at between AI (Left) and Procreate (Right).
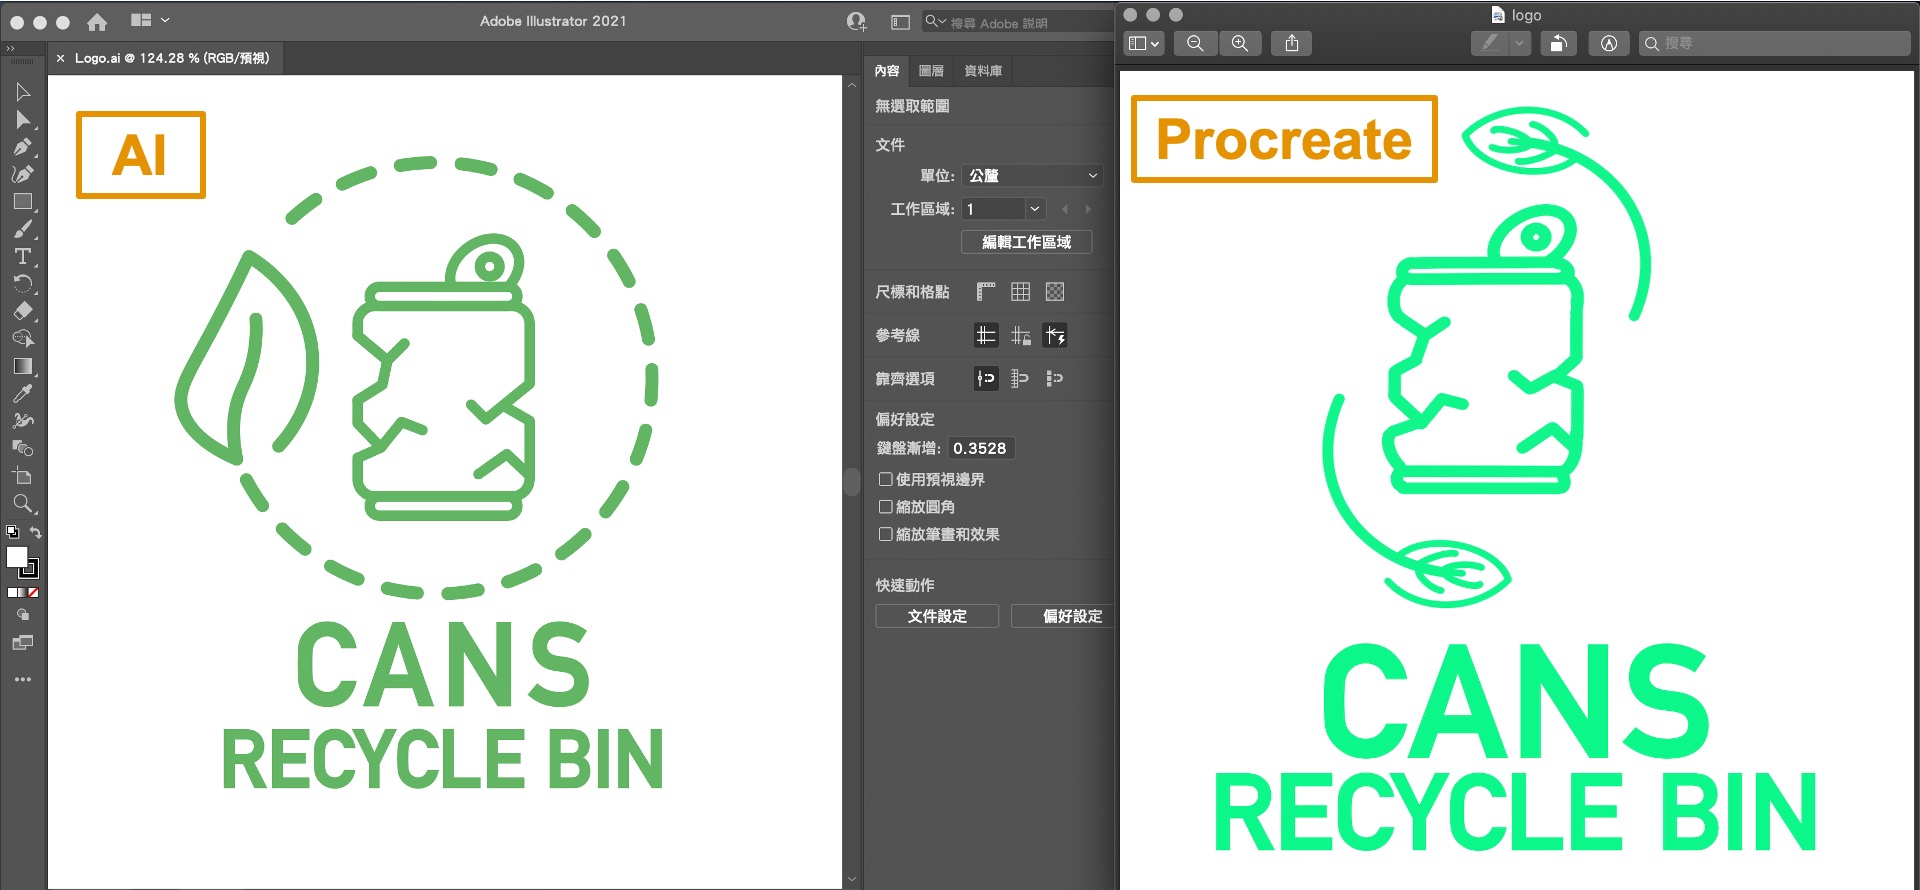
If you zoom in on a vector file (Left), the quality of the image remains the same. If you zoom i on a raster file (Righ), you will see that the image will start to blur. It is the different between vector and raster.
3D Design Tool
I don’t have any experience of using any 3D design tool before, so this time I try to use Fusion 360. Since it is very popular in Hong Kong education. There is a Youtube channel made by Hong Kong Teacher. Kiraemon 3D 教學- Kirk Leung Tutorial It include lots of useful tutorial and clear instruction for the beginner.
Fusion 360
Fusion 360 is a cloud-based 3D CAD, CAM & CAE design tool from Autodesk. It is available on a number of platforms including Windows, Mac & In-Browser.
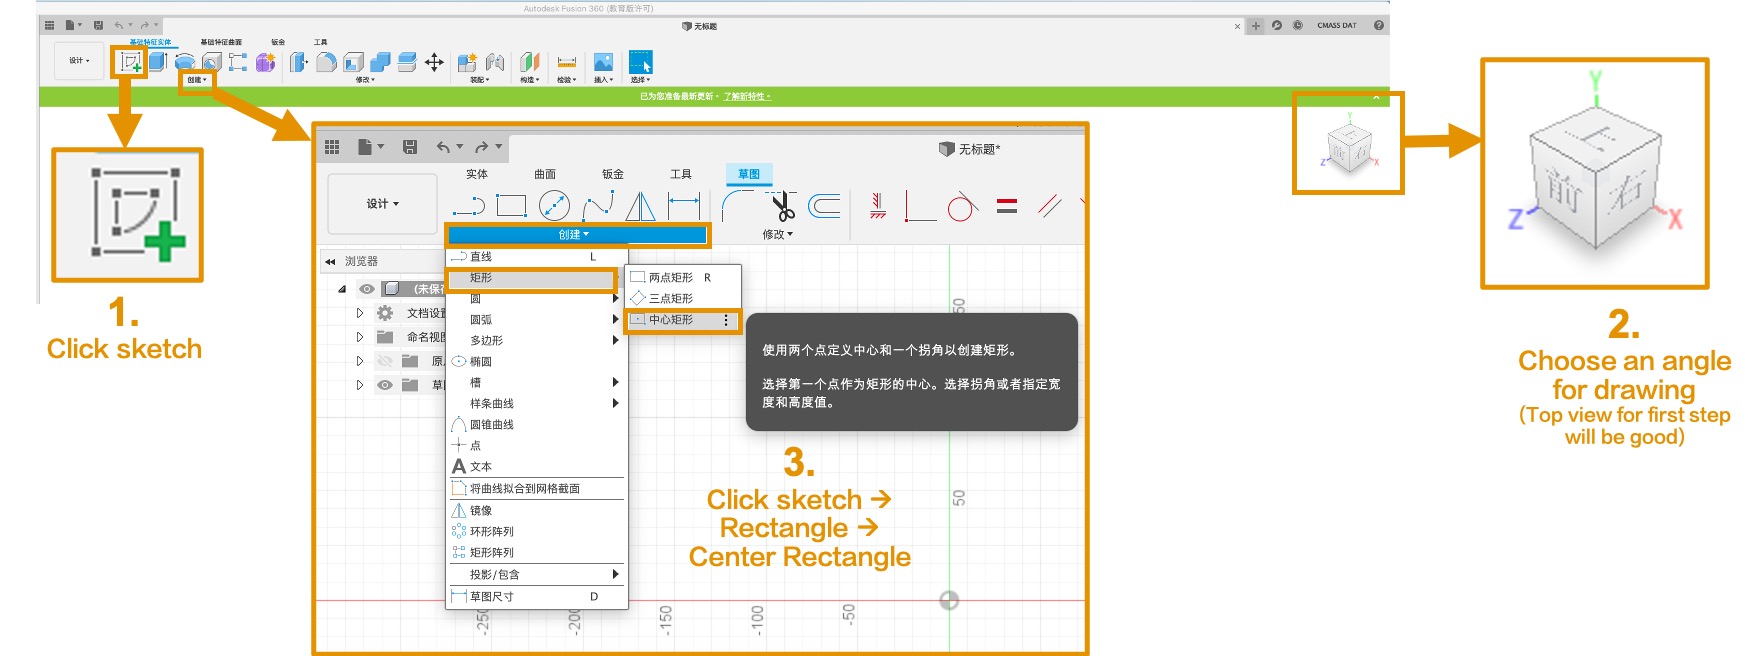
As a beginner, draw some basic prodcut for understanding the interface in Funsion 360 and basic function first. This time, I follow the instruction to draw a product in IKEA. It is a KUGGIS, an organisation box.
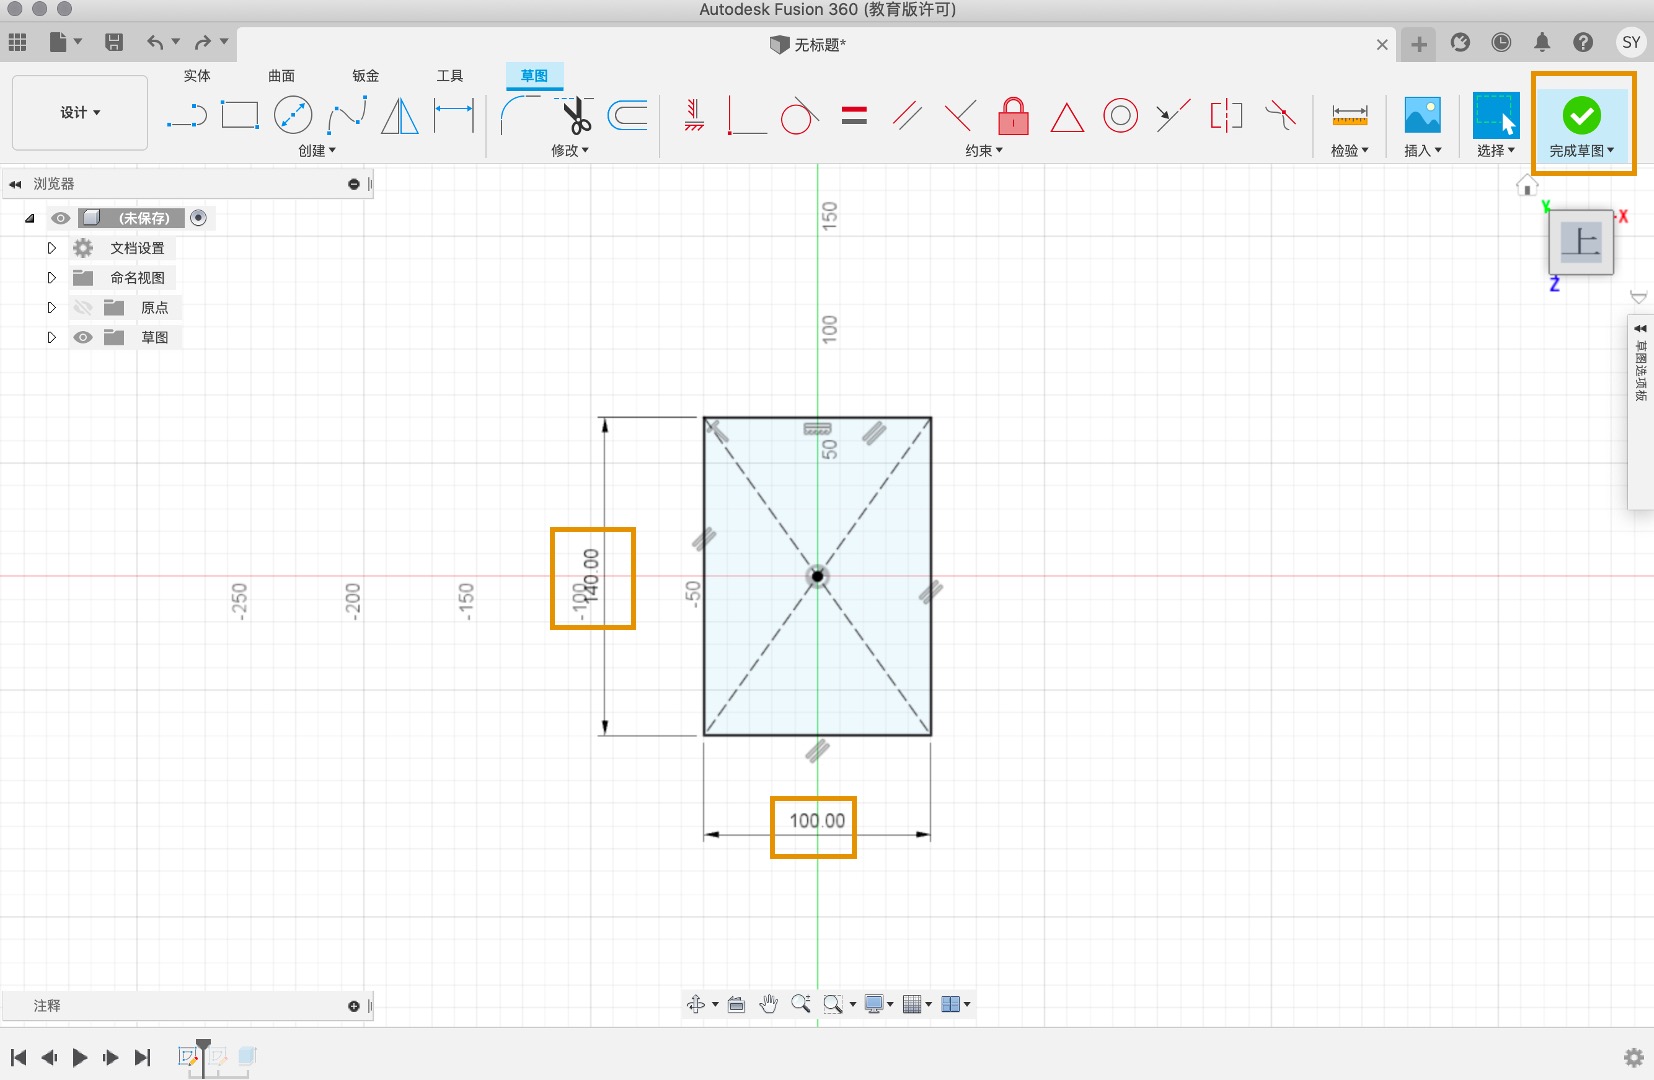
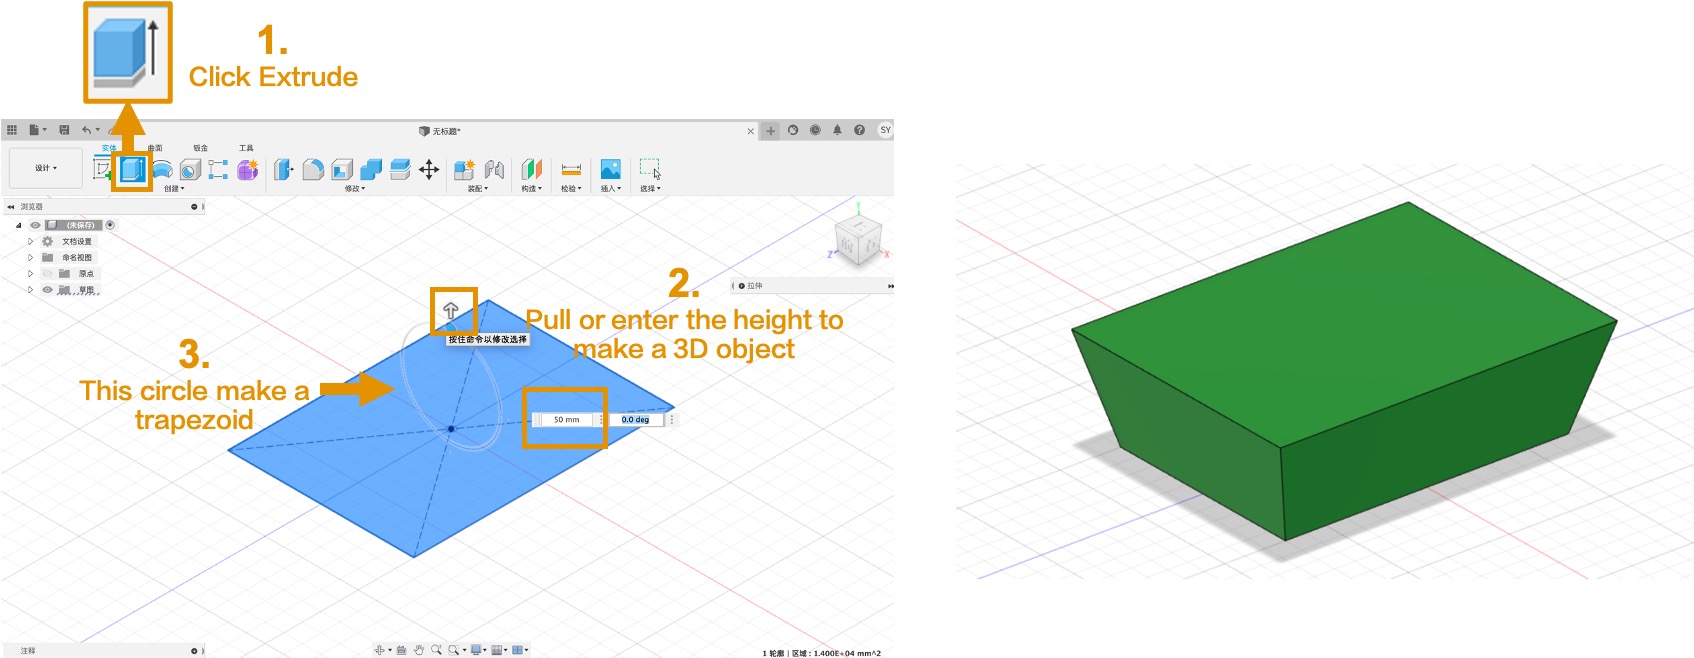
Since the box is trapezoid. First, I sketch a rectangle. Please be remember, using Center rectangle to sketch, you can always see the center point in your design. Foe me, I think choose top view for drawing the first step, you may have a clear mind.
You need to enter the Length and Width and click Finish Sketch to finish the sketch.
To making a 3D object, use Extrude. After that the height, you can adjust the circle to change the degree. It can make a trapezoid, a basic out-look of KUGGIS.
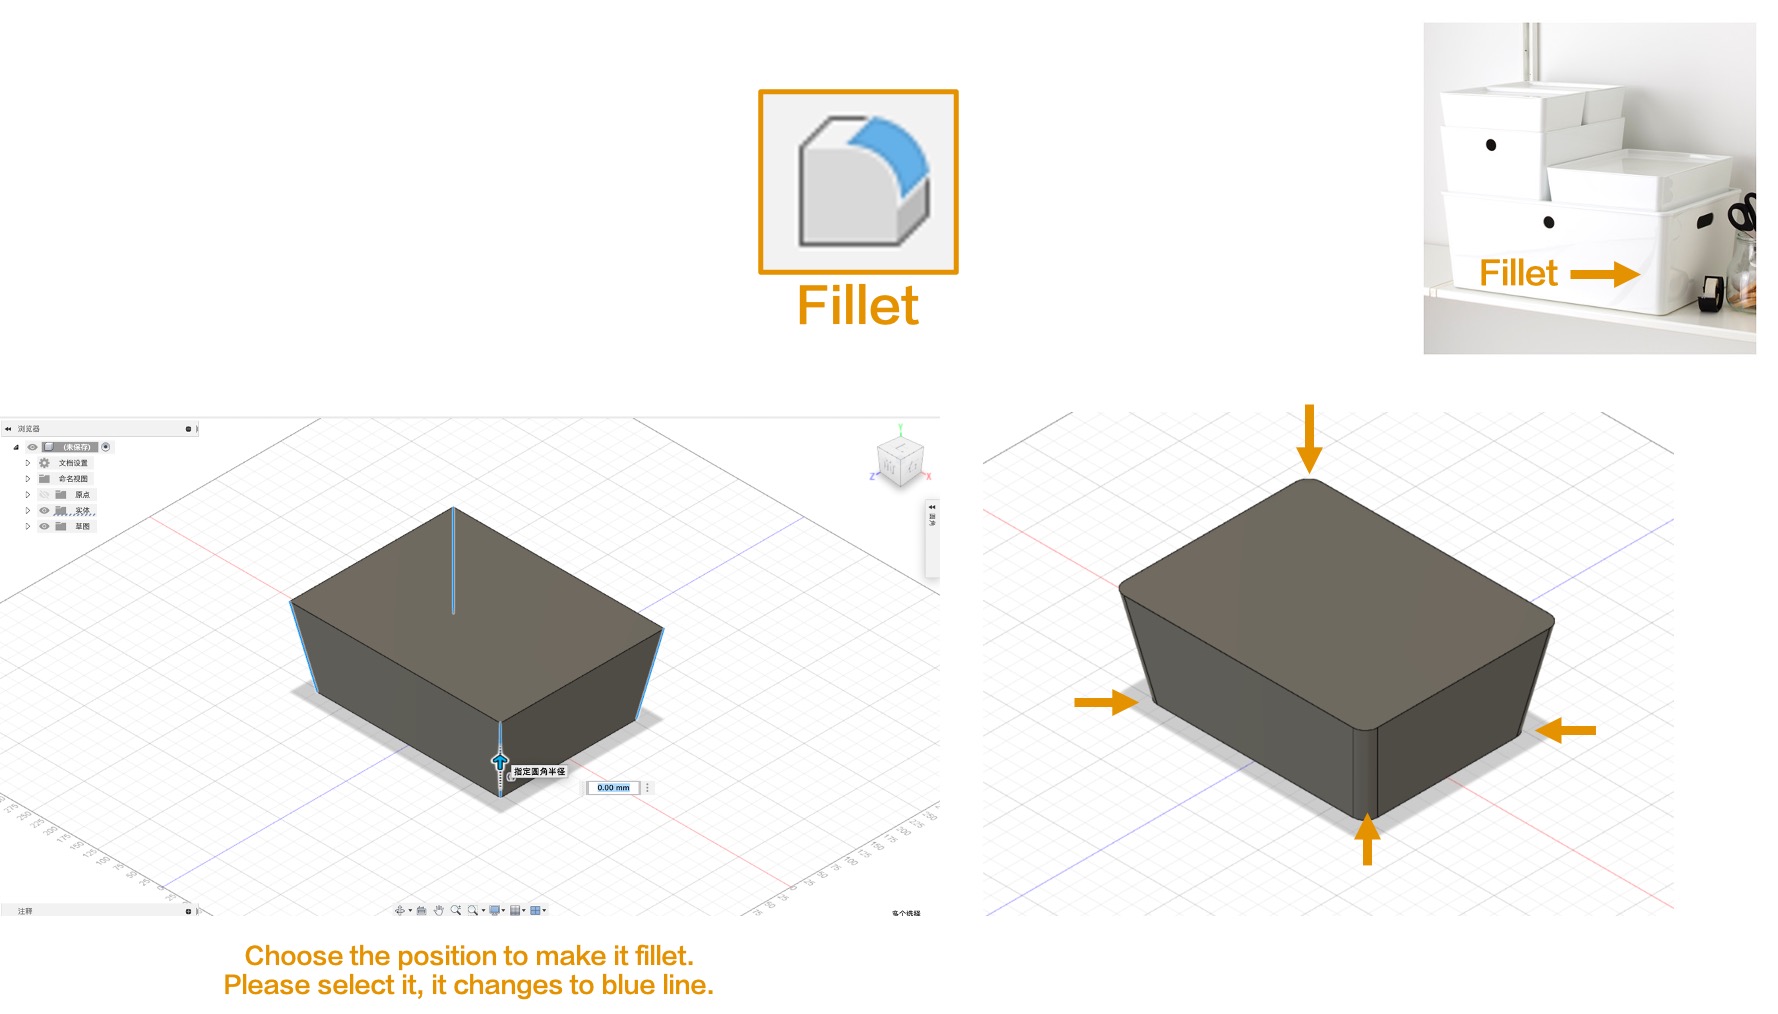
To avoide shape edge, most of the product used Fillet. Choose the position to make it fillet. Please select it, it changes to blue line (Left). Finished (Right)
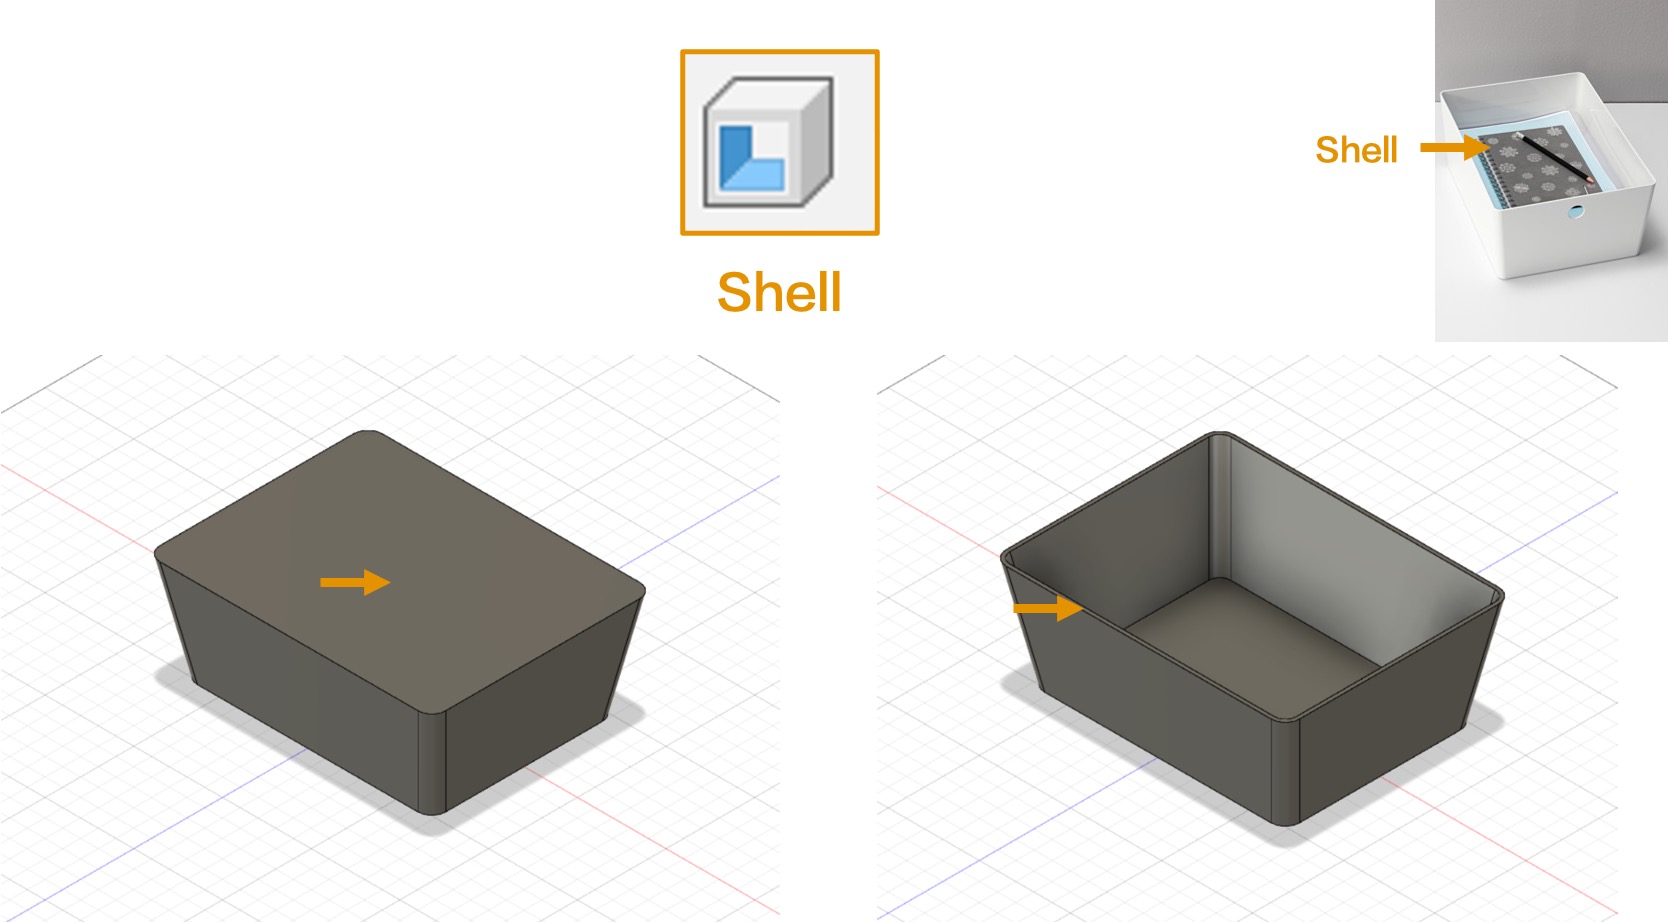
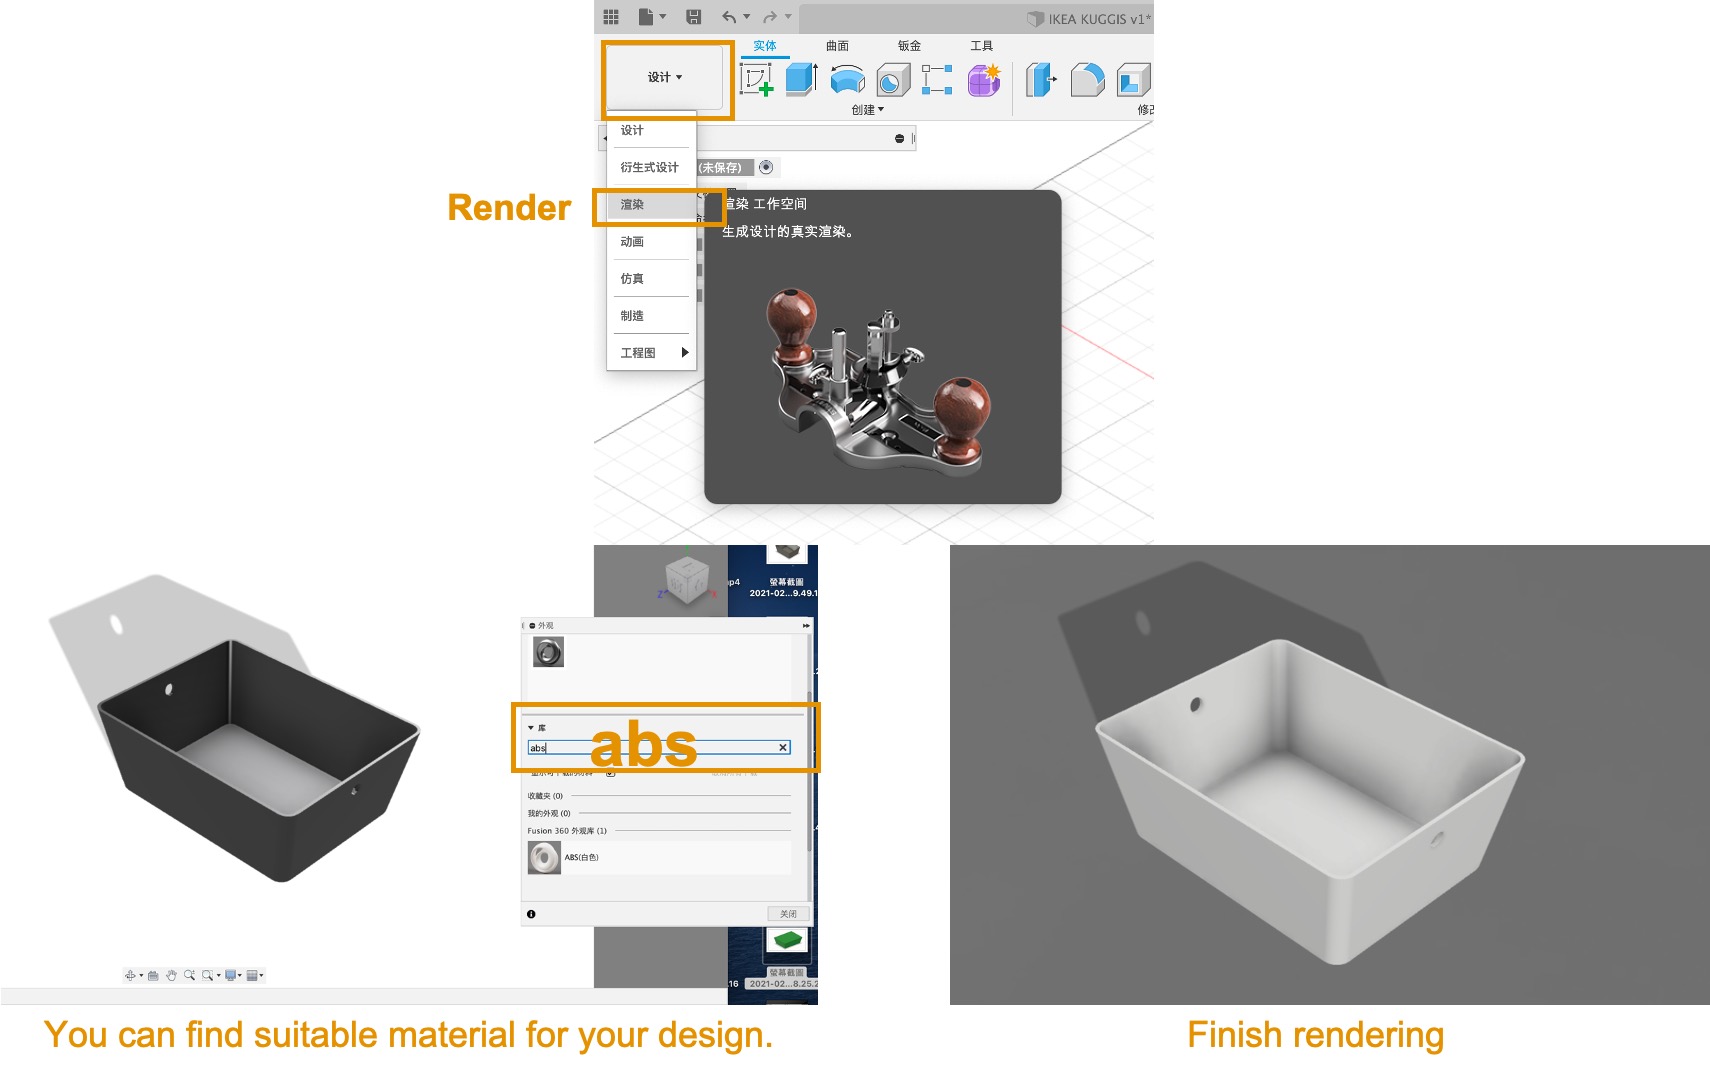
The most important part for the box is the storage. Use Shell for opening the top of the box.
For making a hole to the box, first, sketch a Center Dia. Circle. After that, use Extrude. Reminder, you need to change some setting:
Direction: Symmetic
Operation: Cut
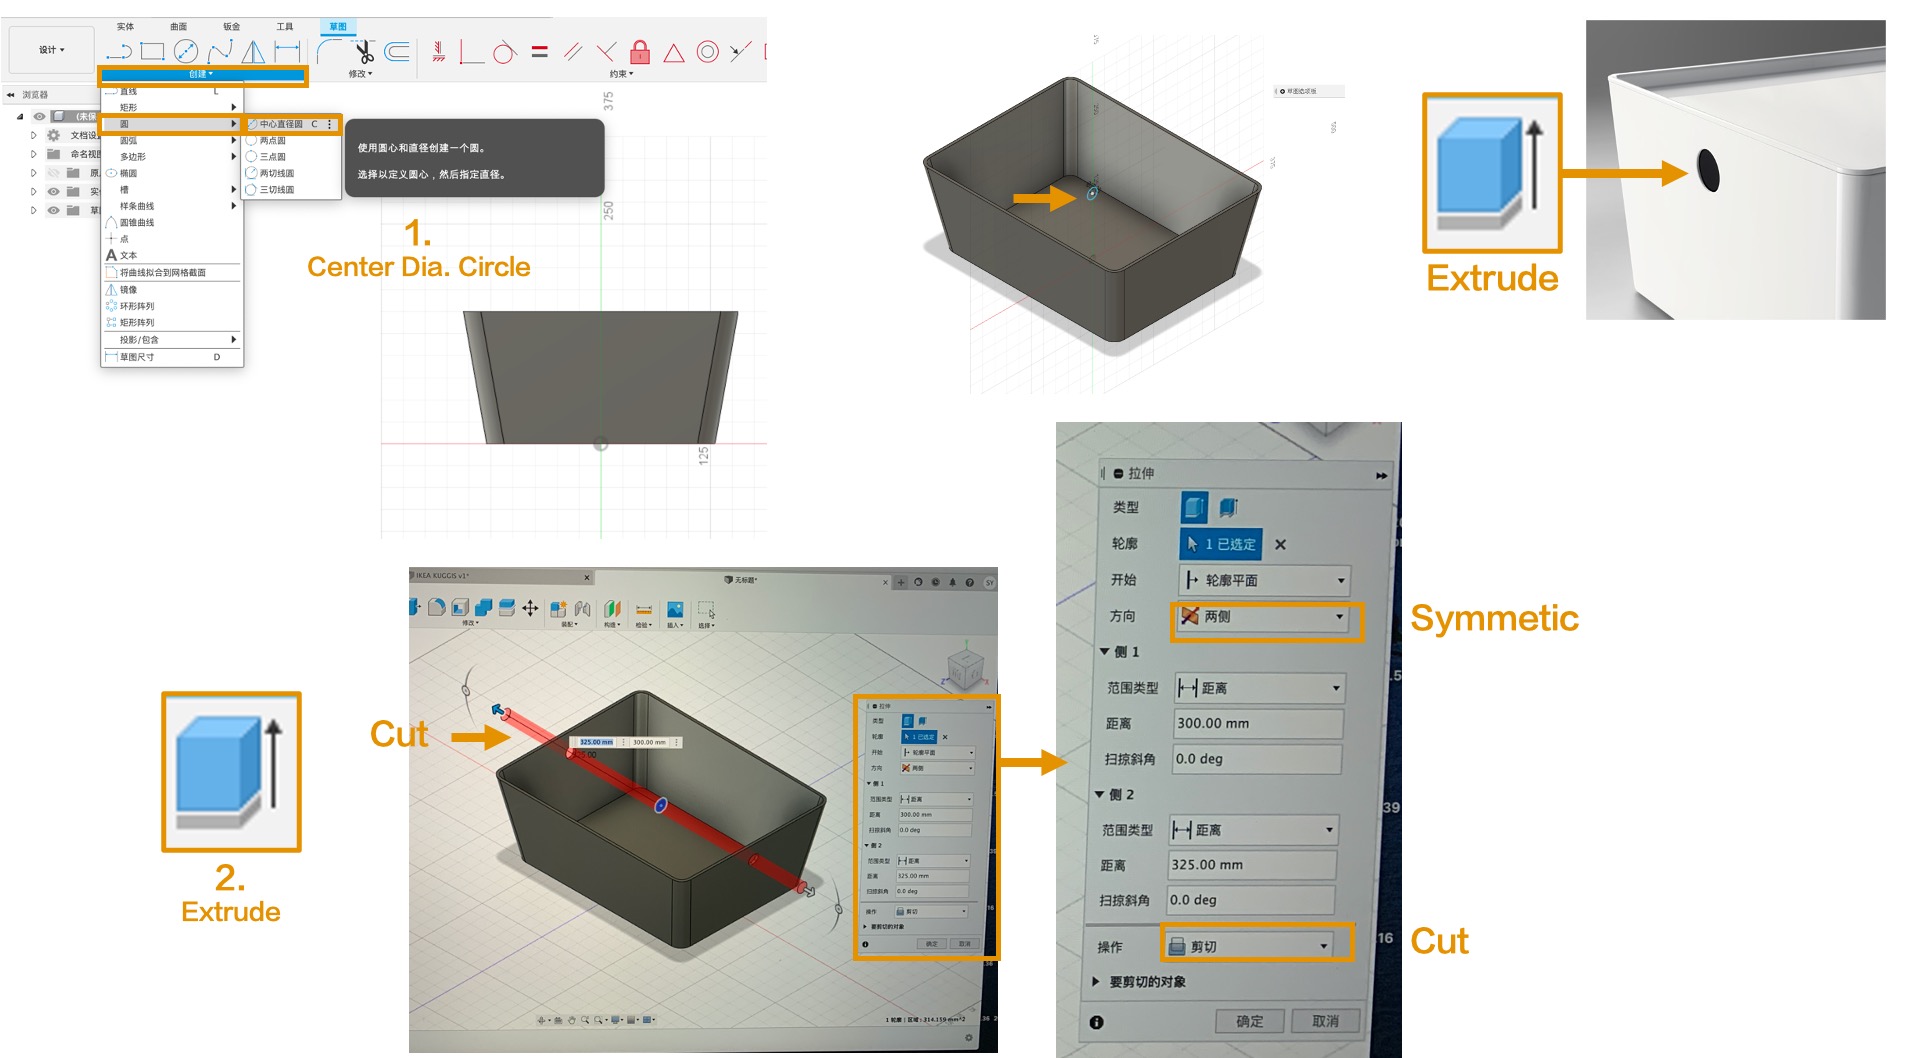
Finally, you finished KUGGIS, an organisation box.
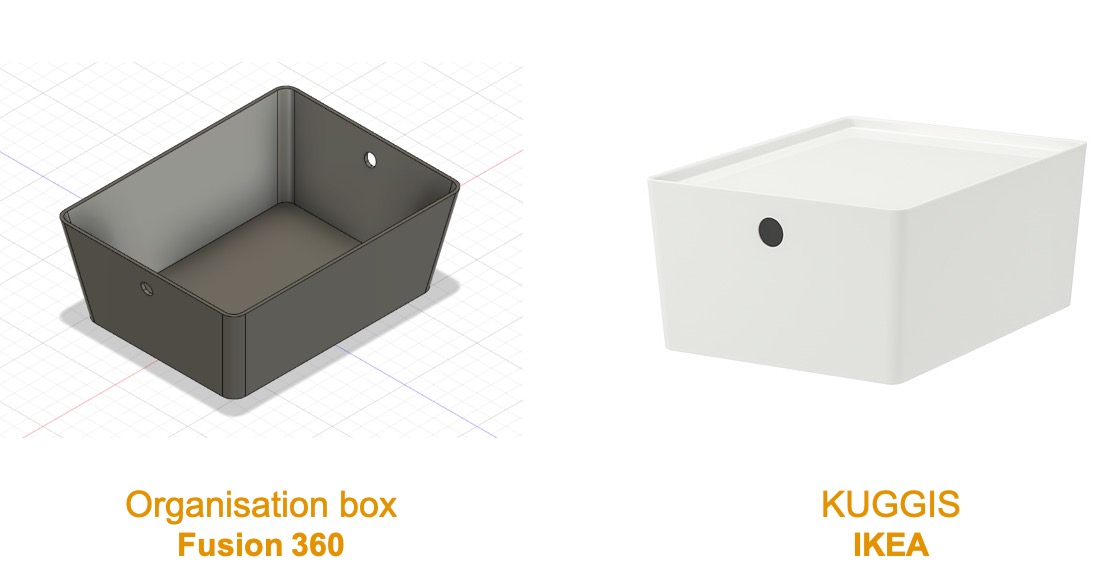
To make the box more realistic, you can Render in Fusion 360. KUGGIS is made by ABS, so I find the same texture for making an organisation box. Actually, there are many texture in Fusion 360. Don’y worried you cannot can the perfect one in your design.
In conclusion, I have learn about Fusion 360 in this exercise:
1. Understanding interface
2. Use Function: Extrude, Fillet and Shell
3. Use parametric design
3. Render Materials in product outlook
File Download
Procreate ALUMINIUM CAN RECYCLING BIN_Logo_JPG
Adobe Illustrator ALUMINIUM CAN RECYCLING BIN_Logo_AI
Fusion 360 IKEA KUGGIS_F3D