Networking & Communications
New boardnew machine
This week we were determined to finish the few remaining electronics assingments. We tried to find help, without much success, to mill a new board that could be used with the XIAO RP2040 and ESP32C3 XIAO microcontrollers. So, we decided to buy a board milling machine.👏👏 Now we are on our way to completion!. Now I will start with the individual task and then the group task.
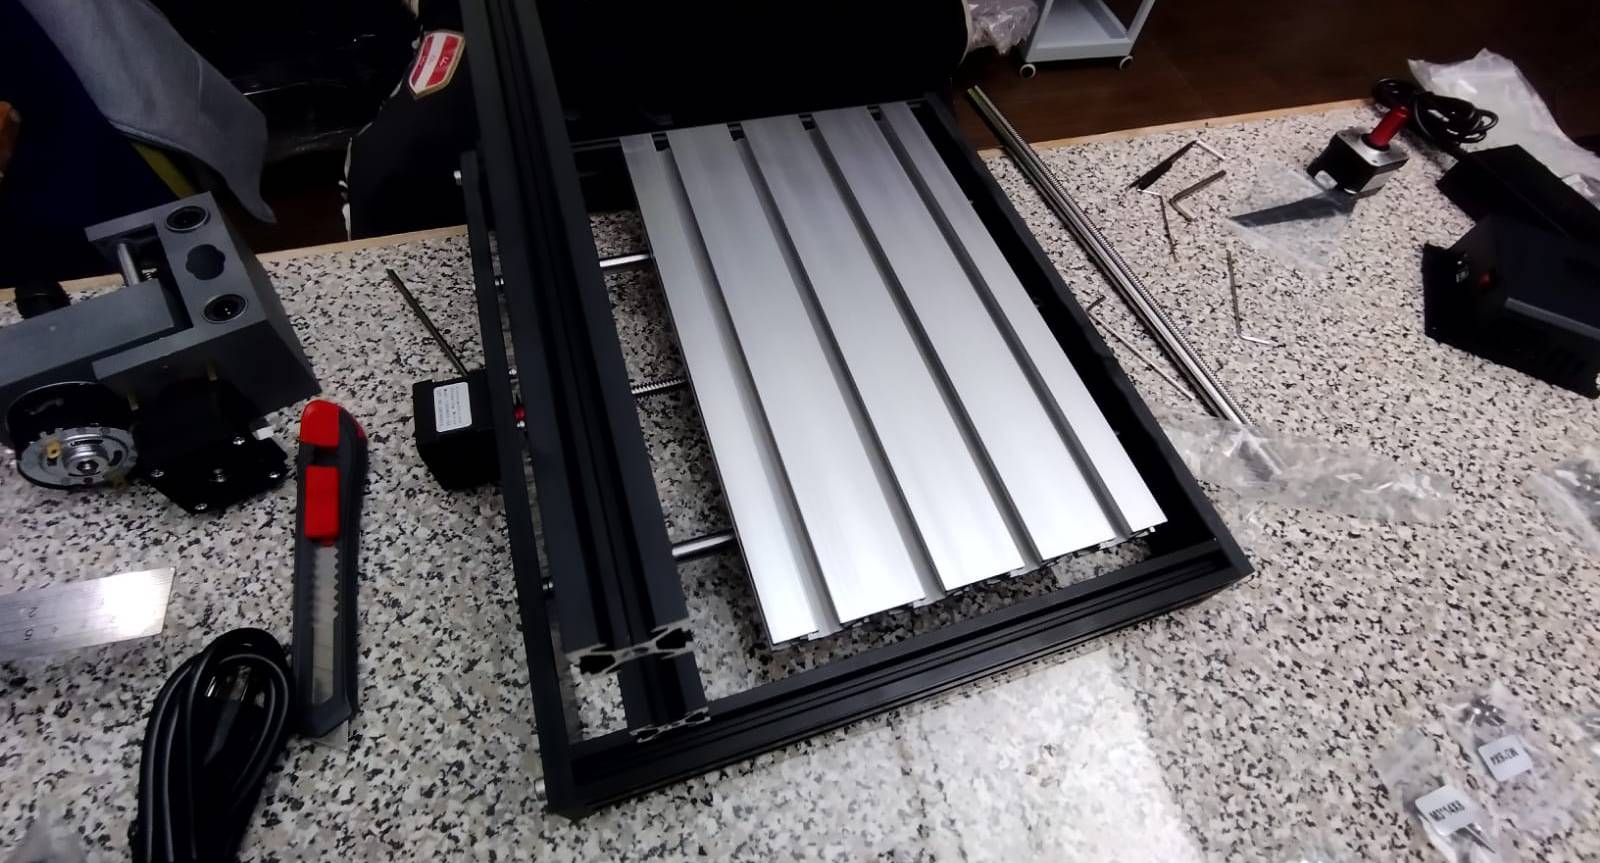
New machine!
Week 13 Assignment
IndividualTask
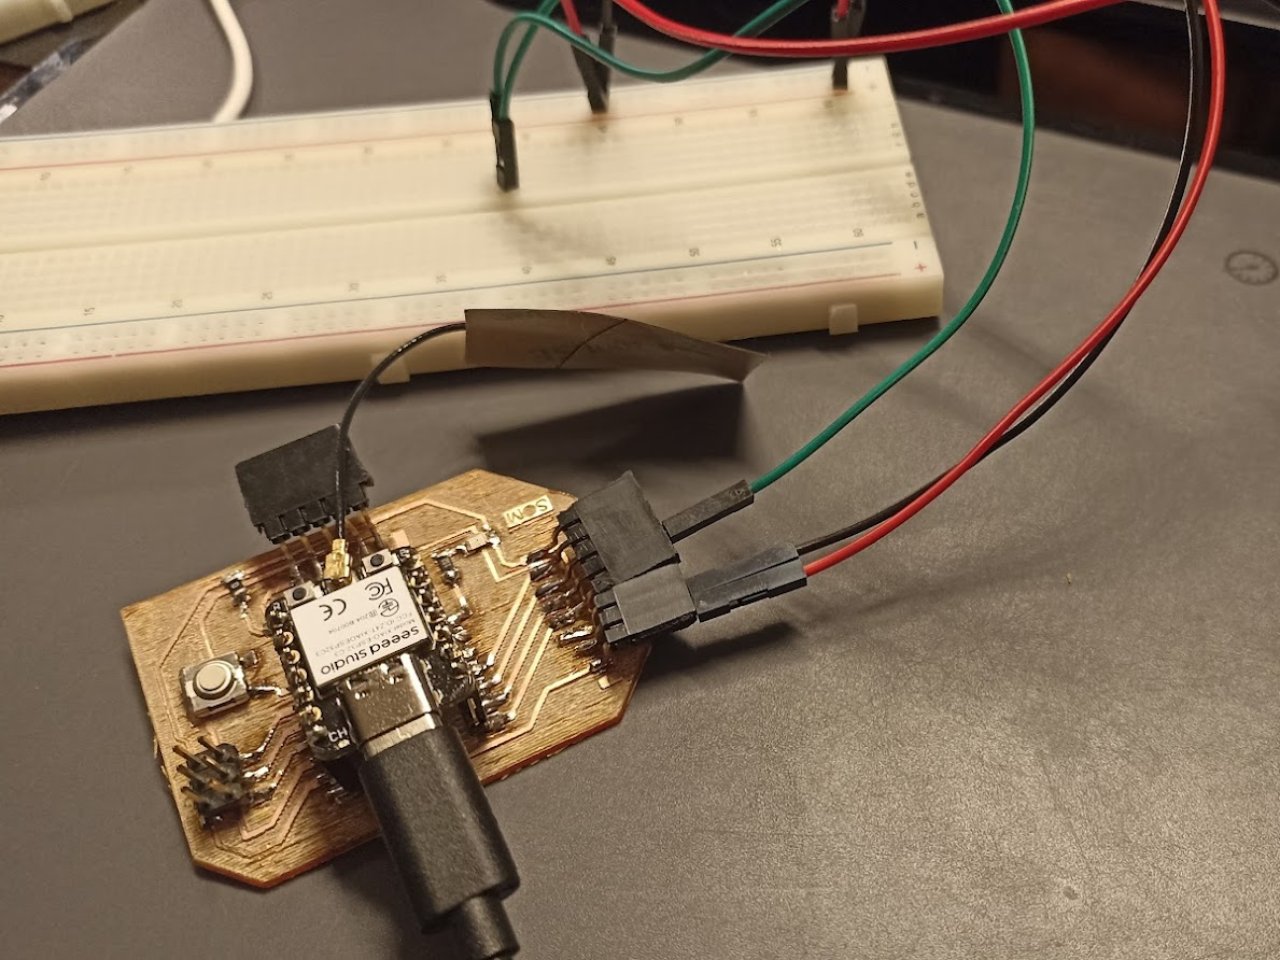
In this new stage I decided to use the XIAO ESP32C3 which is like a pocket superhero in the world of microcontrollers. It's tiny, but super-powerful because it has a RISC-V processor, built-in Wi-Fi and Bluetooth connectivity, and way more memory than most basic microcontrollers. Now, the ATtiny1614 is more like the minimalist cousin that does basic things but without a lot of show. It's ideal for simple projects.
Designing my PCB
The first thing is to design in Eagle, I have used this software before. As usual I designed the schematic first, then I arranged the components, I tried to use the autorouter, but it was not so efficient, then I designed the traces, and finally I customized the board with a name and that's it.
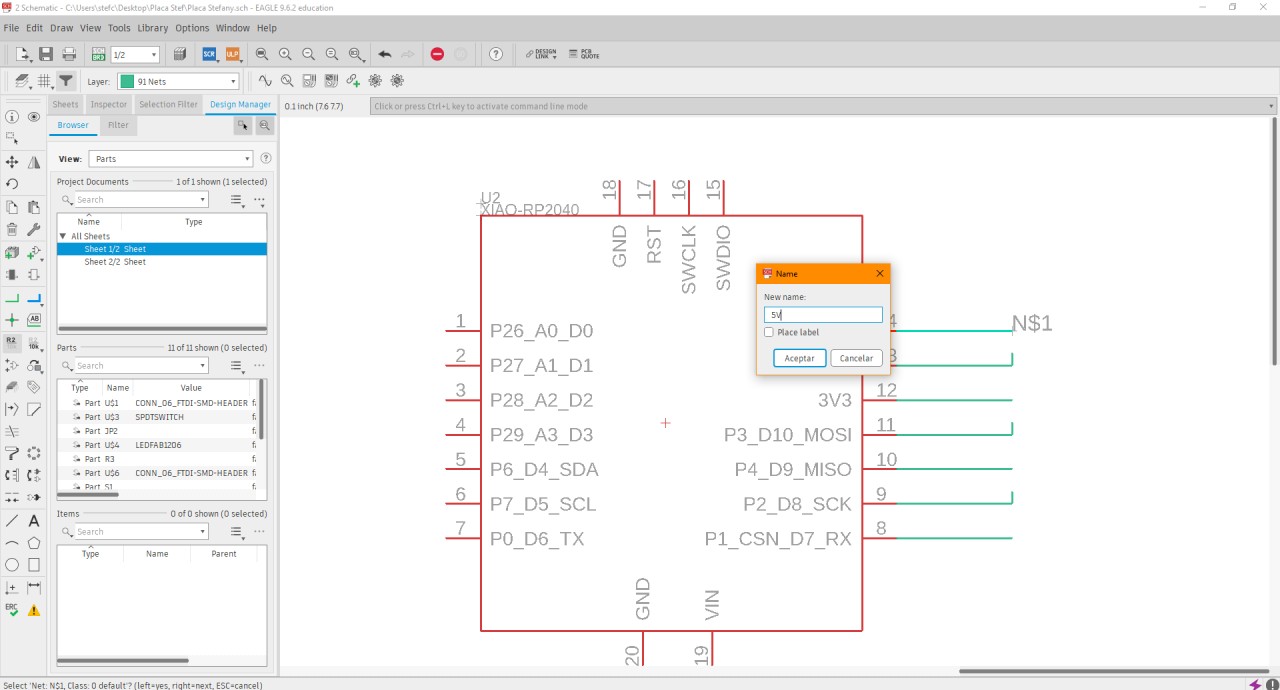
Schematic
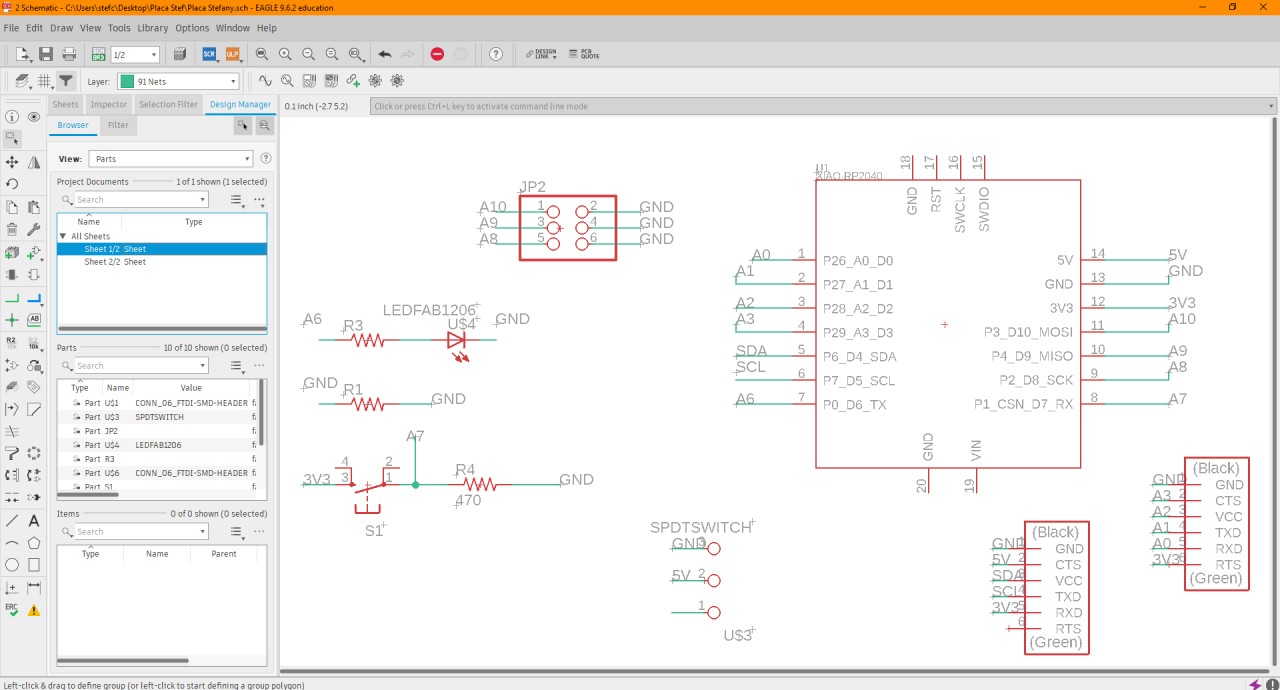
Schematic
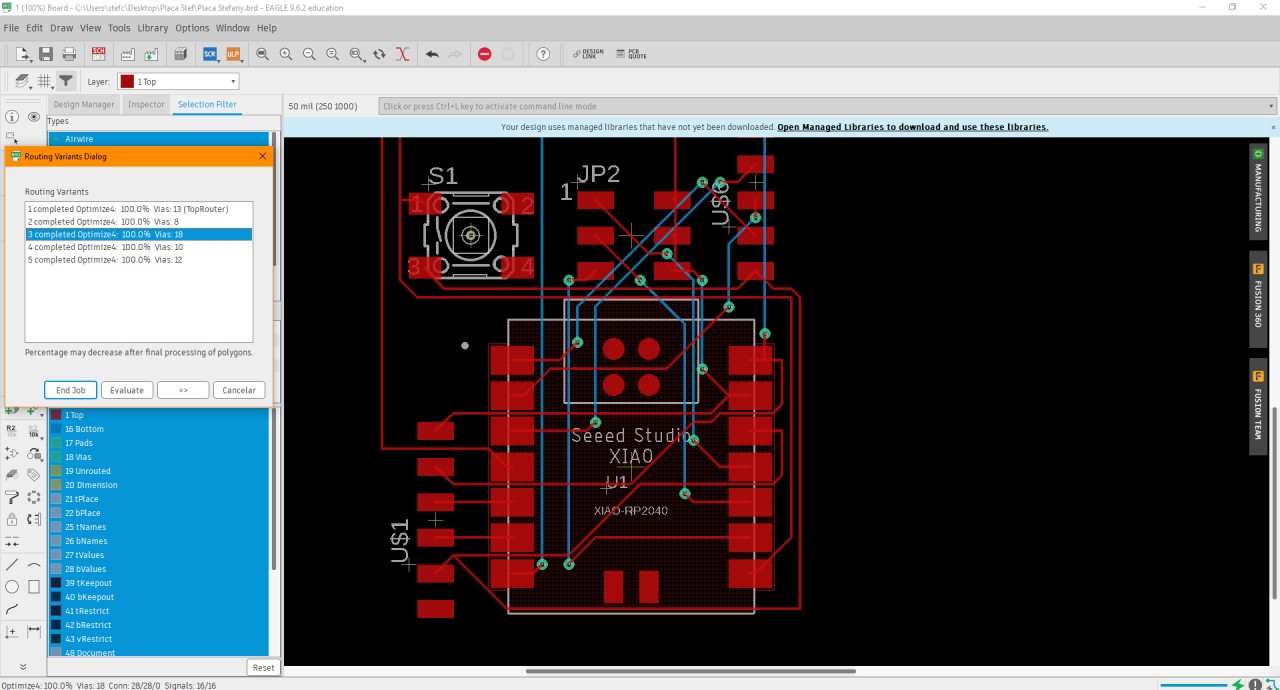
Design in Eagle
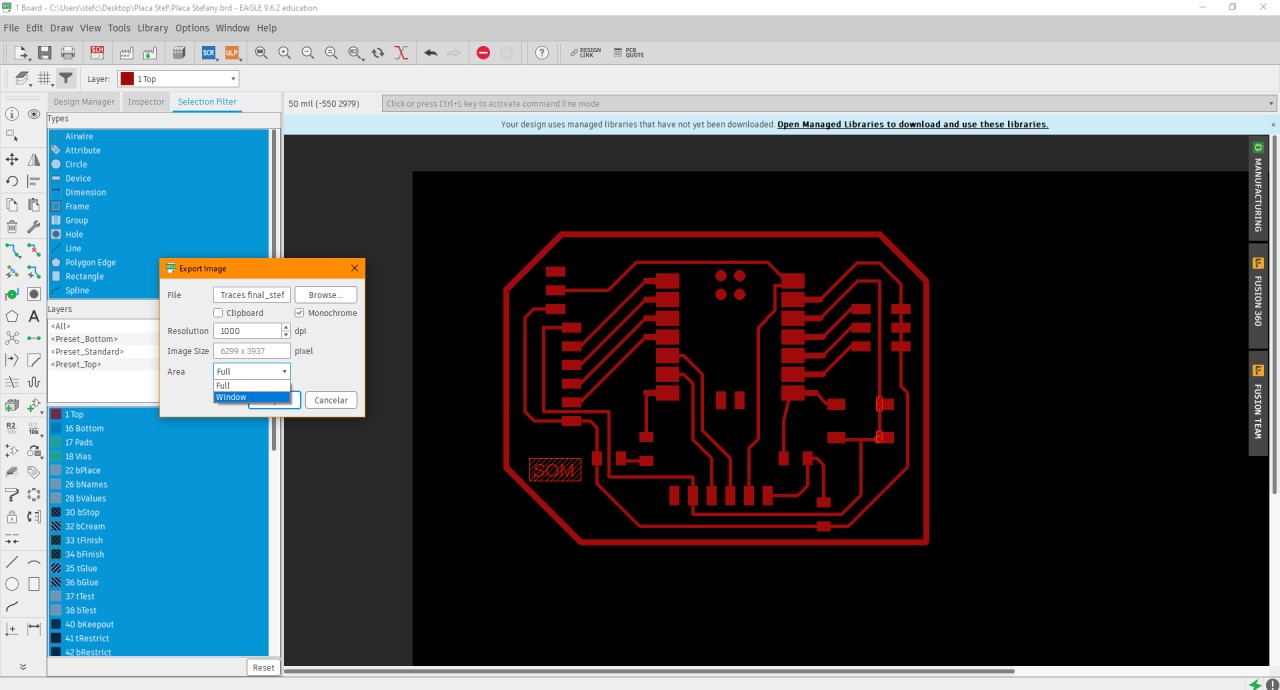
Exporting design in Eagle
Preparing G-code
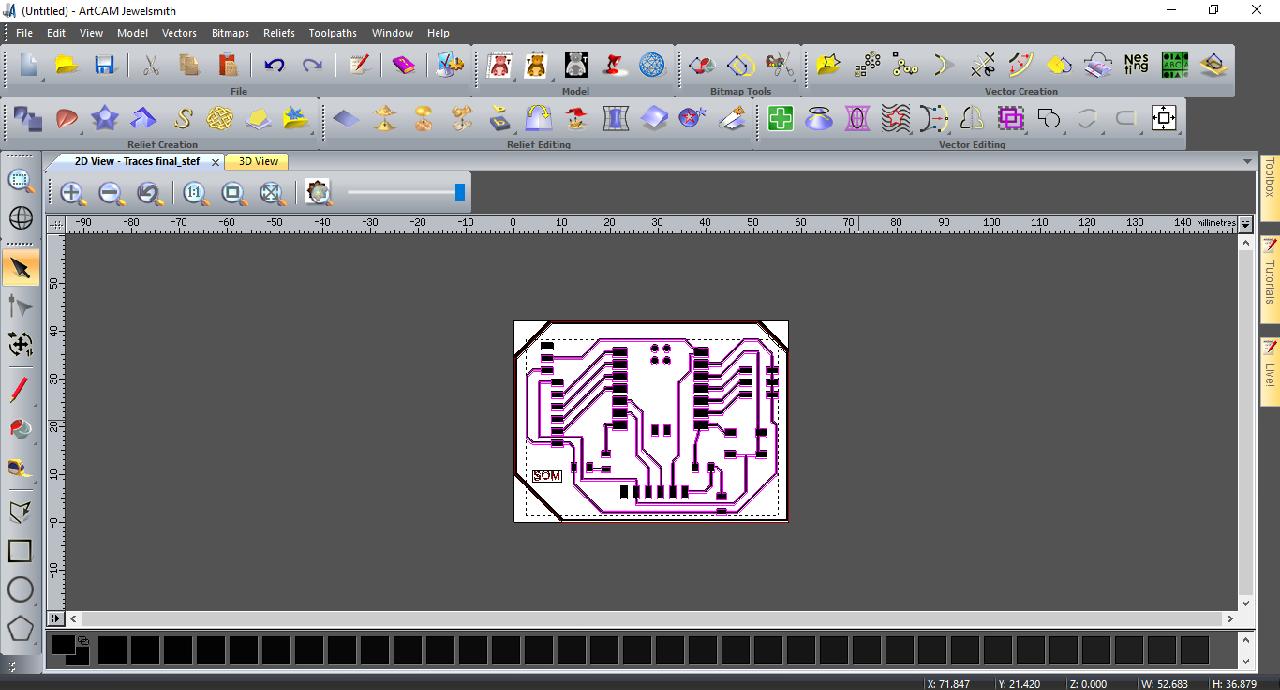
To develop the G-code, I used ArtCAM. I imported the necessary design in scaled black and white, making sure to adjust the dimensions. Then, I set up the machining tools, selecting the appropriate cutters and defining parameters such as cutting speed, depth and steps per layer. I initially tried just marking the traces, and then used the area clearence tool. Finally, I generated the G-code.

Image processing

Image processing

Image processing

Setting the dimensions

Import the traces

Import the traces

Import the traces

Design in ArtCam
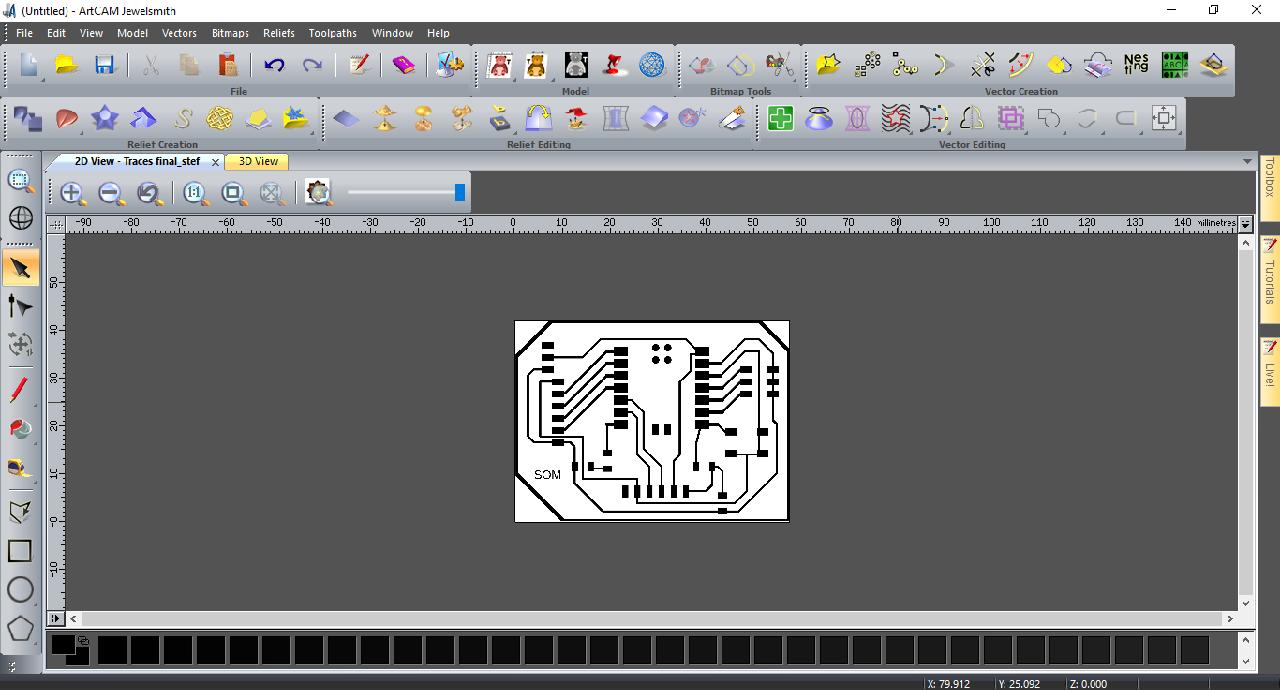
Design in ArtCam

Configuring area clearence
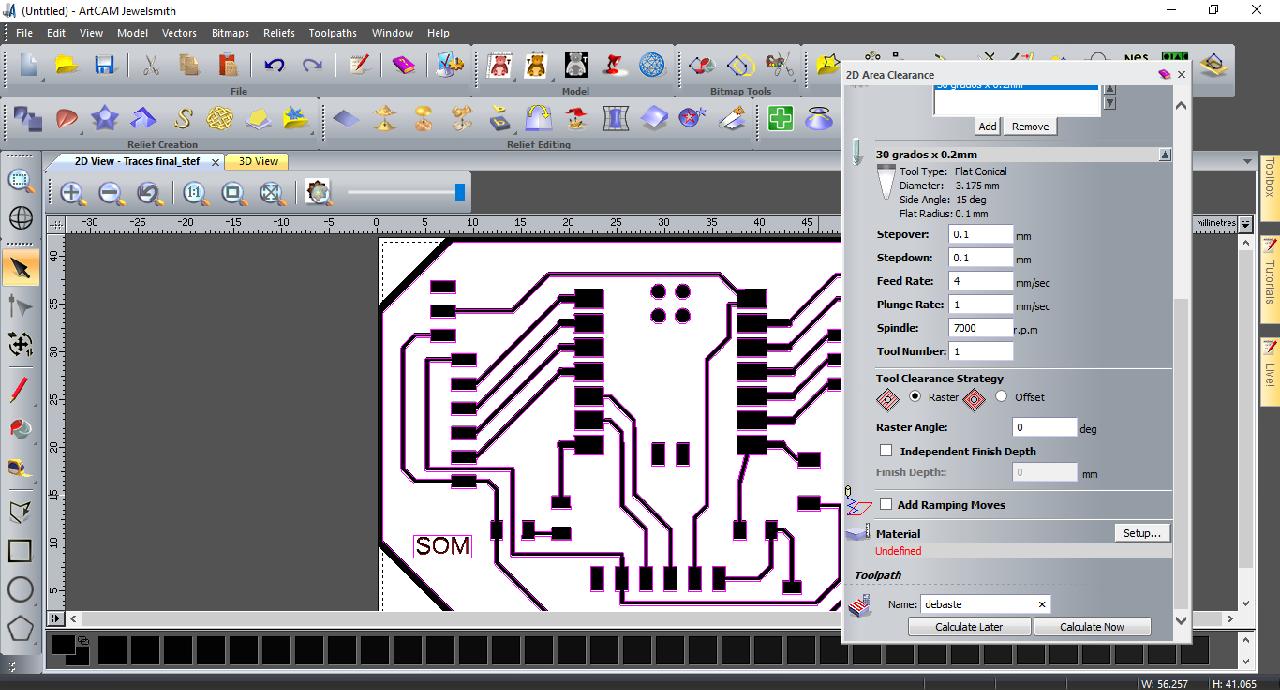
Configuring area clearence
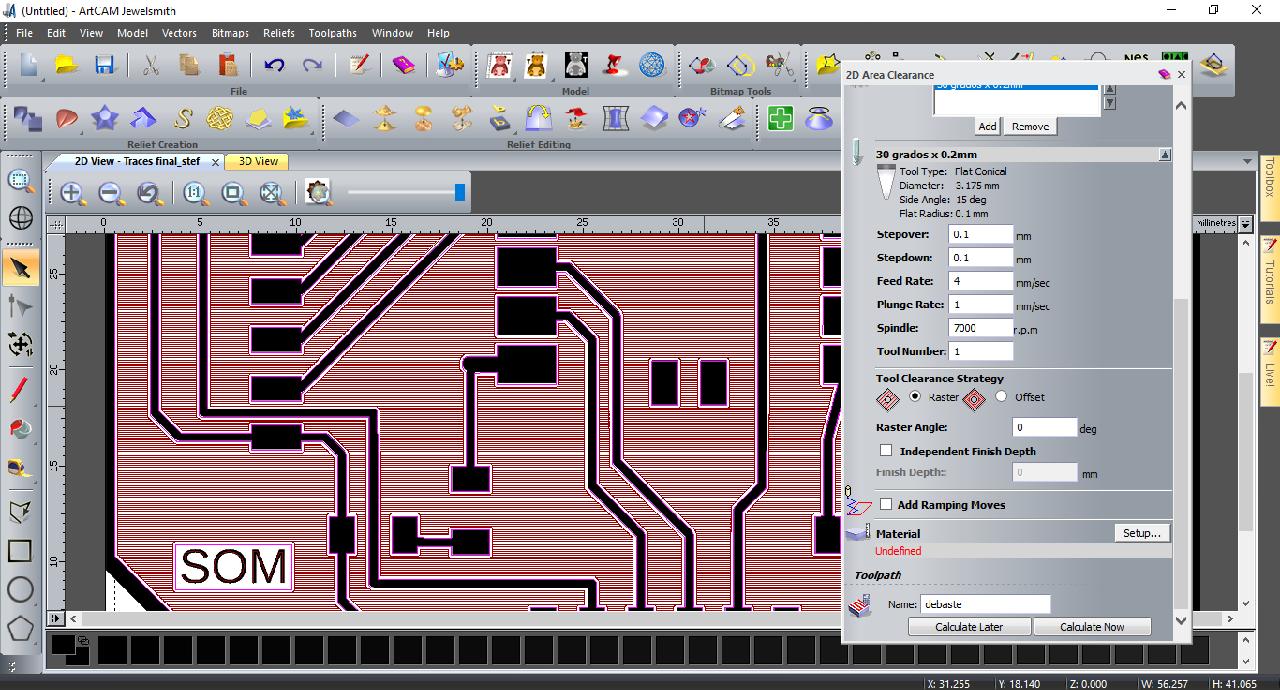
Select Raster option
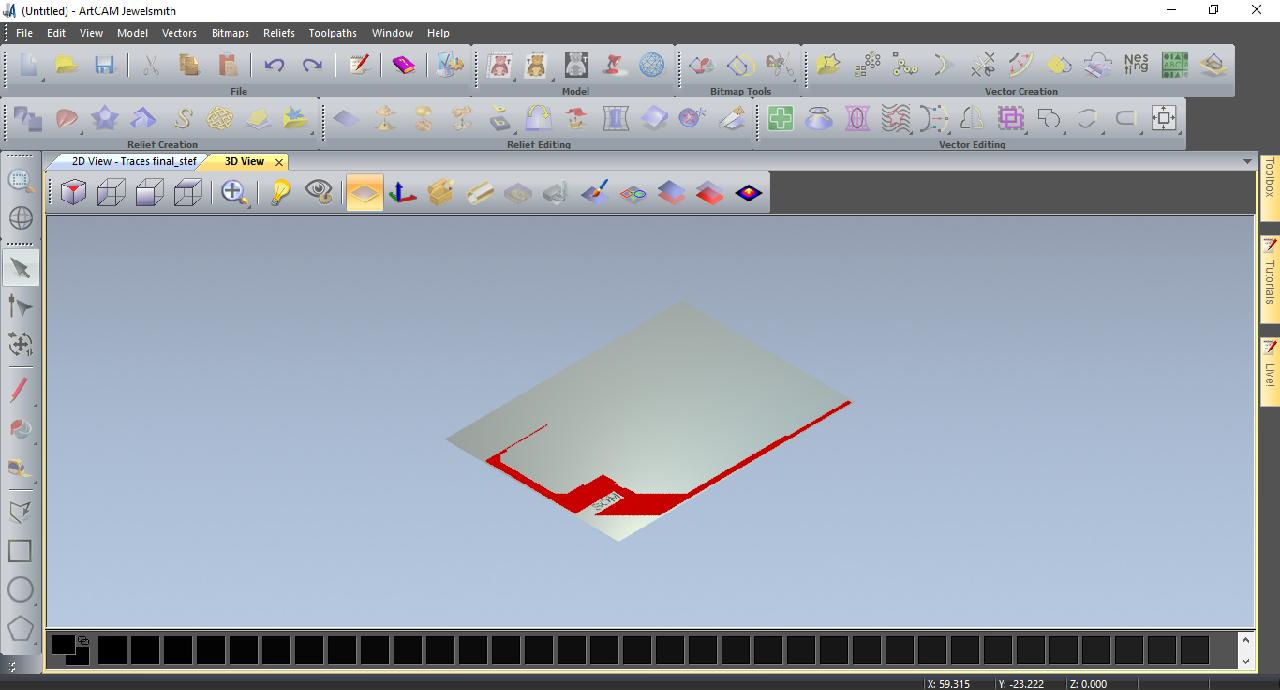
3D View
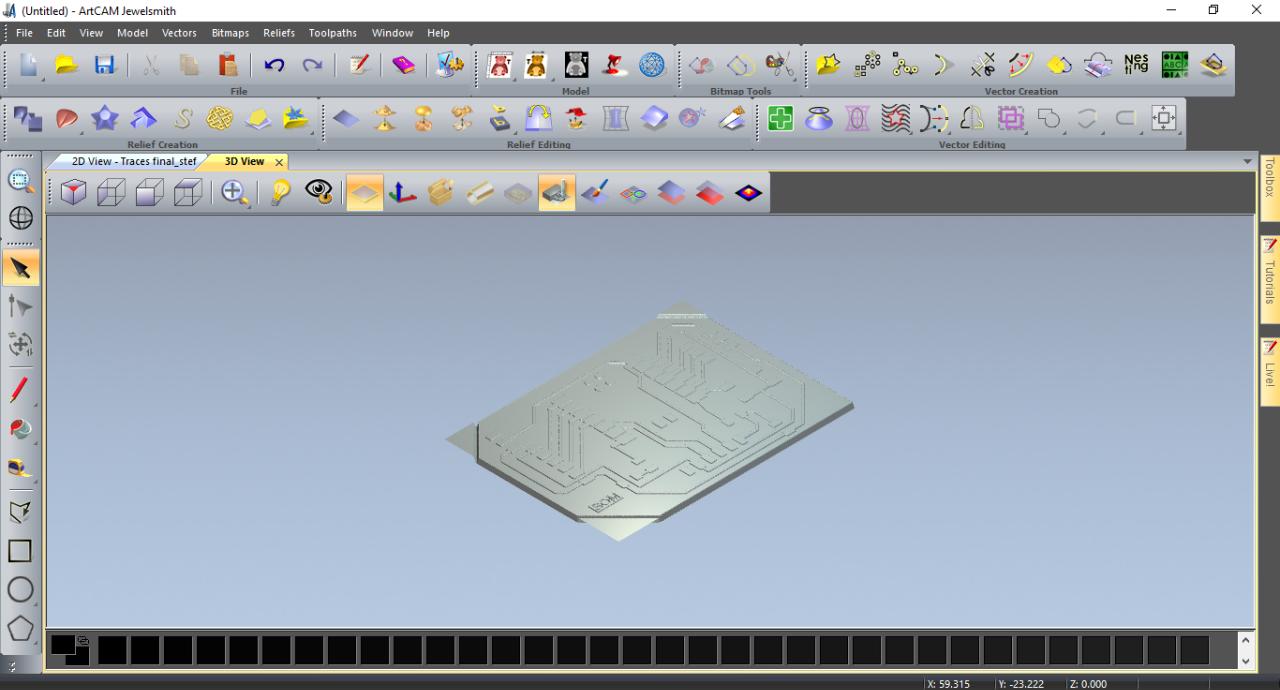
3D View
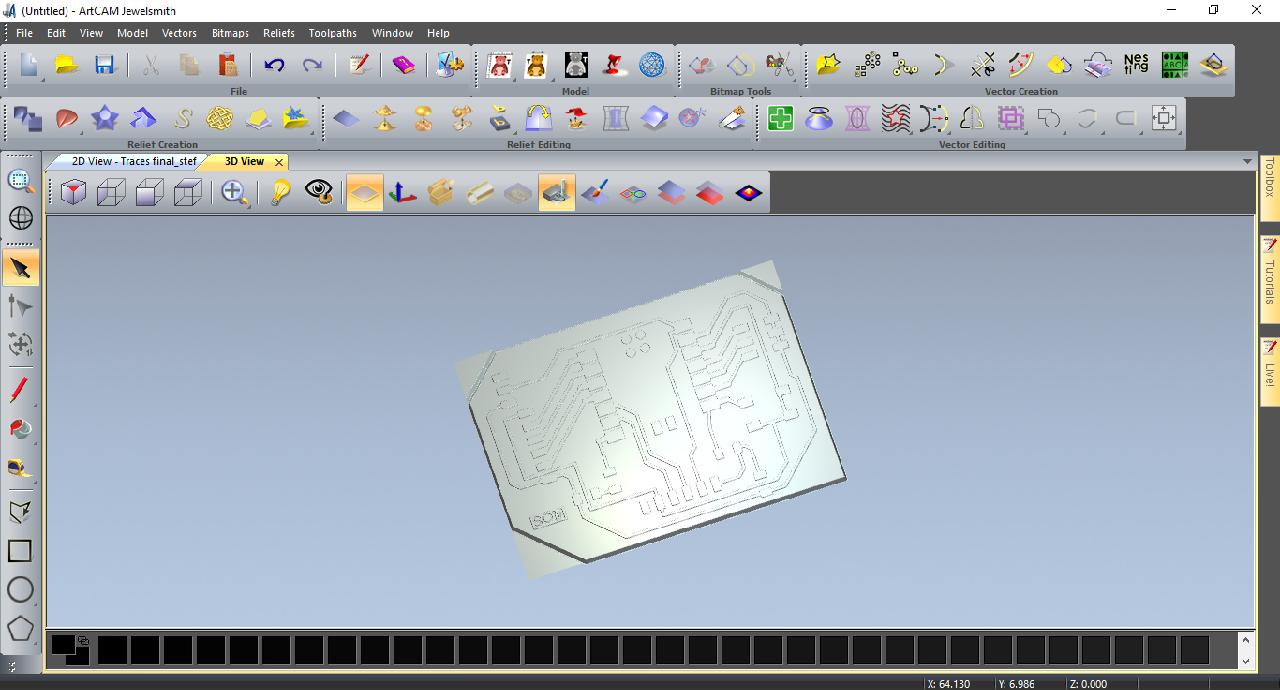
3D View
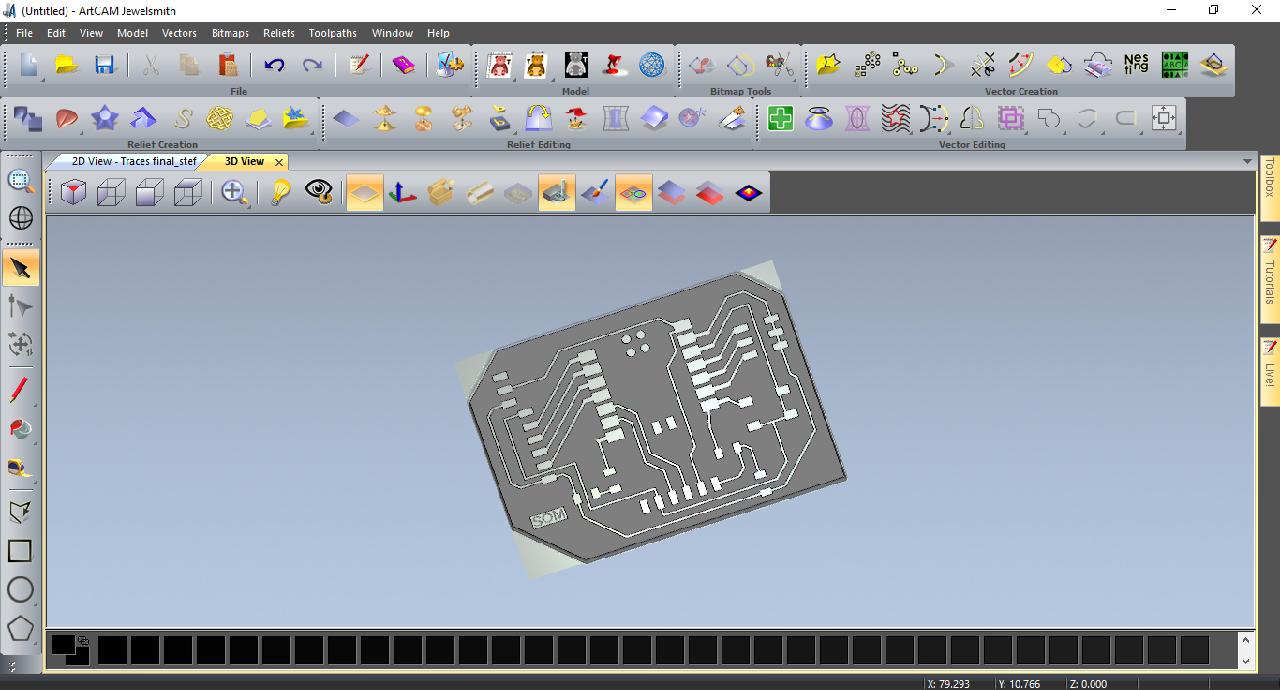
3D View
Profiling option
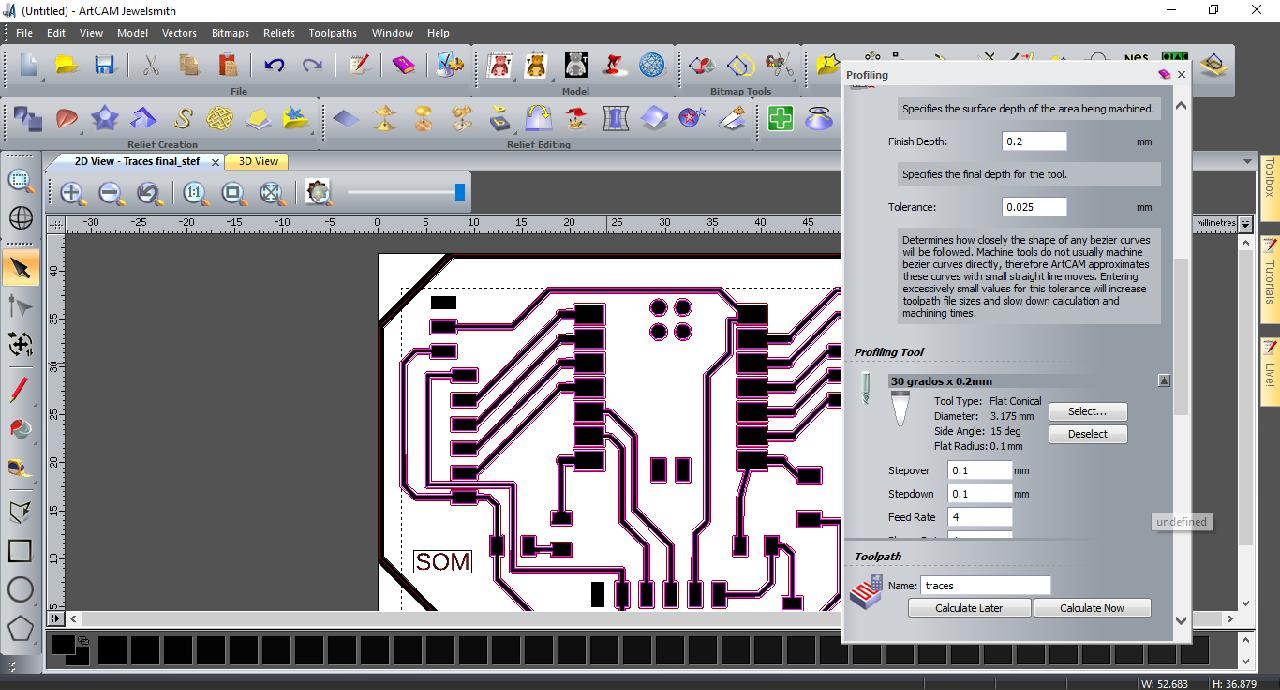
Profiling option
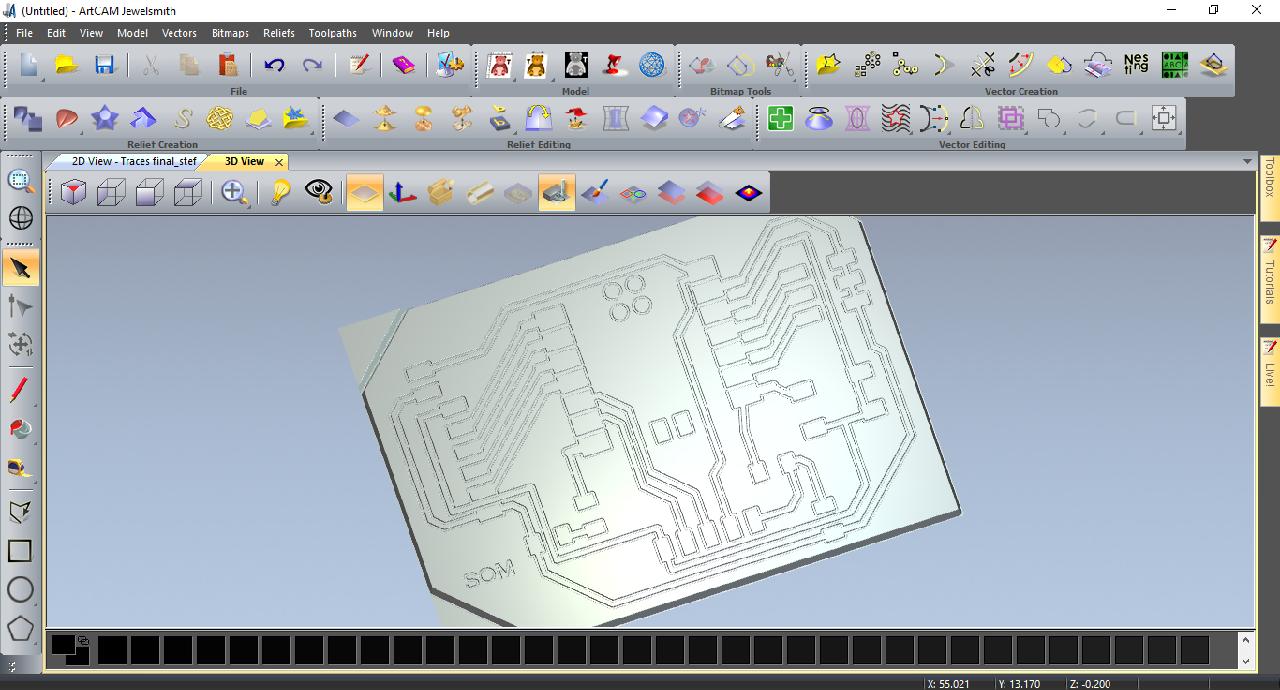
3D View - Profiling only
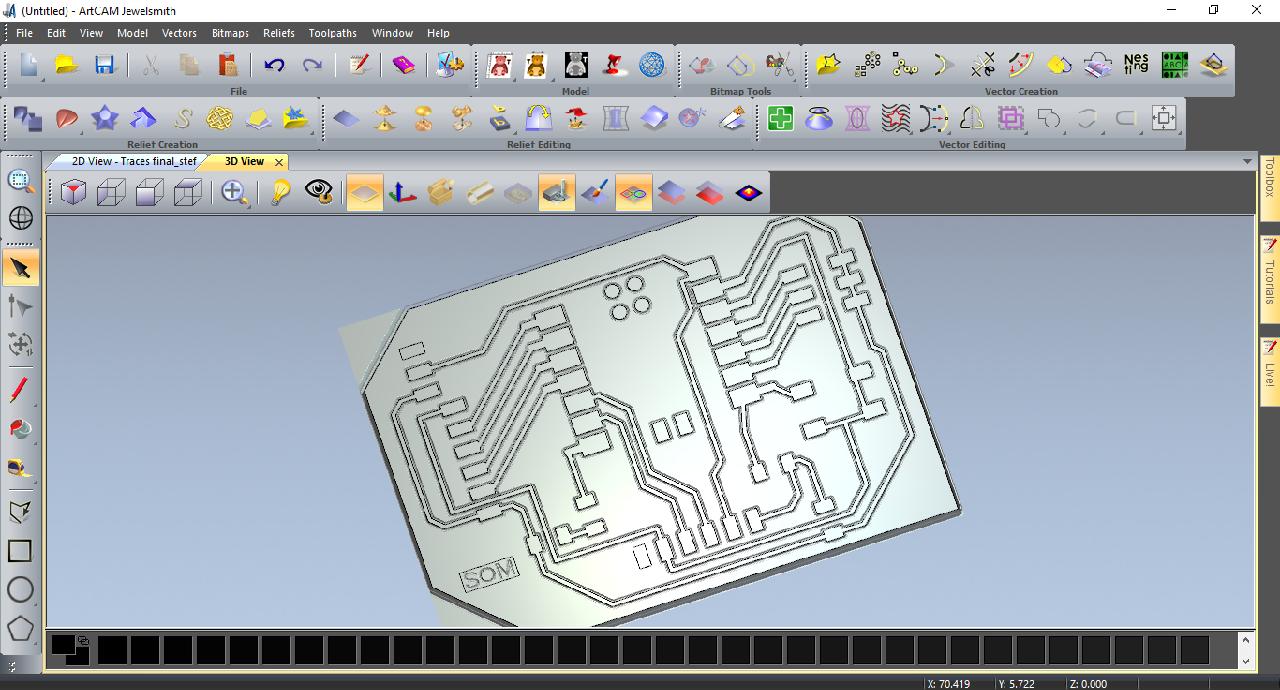
3D View - Profiling only
Manufacturing my PCB
As a first option I tried to manufacture the board without removing the copper that is outside the traces, it came out very well, but to ensure the correct operation of the board after several tests, the board to which I removed the excess copper was very well done. To manufacture the board with our new machine. We used the free program called Candle recommended by the brand of the CNC router which is a Twotrees TTC3018 CNC Router Machine.
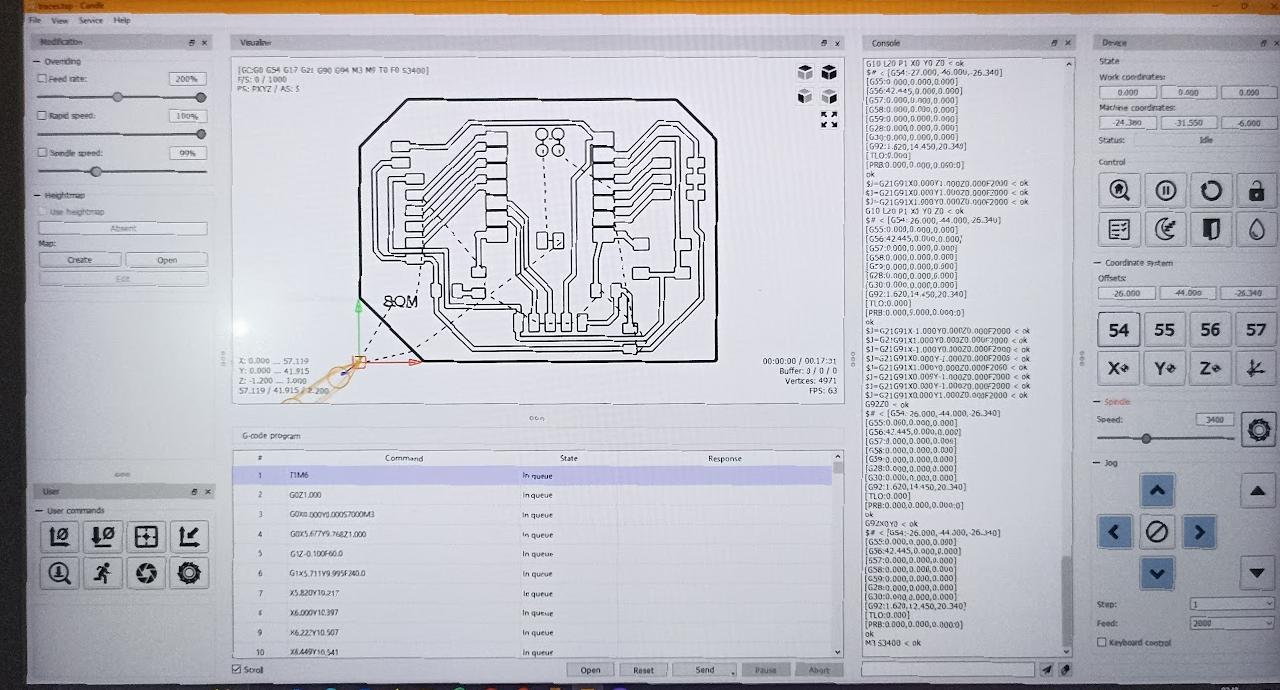
Software: Candle
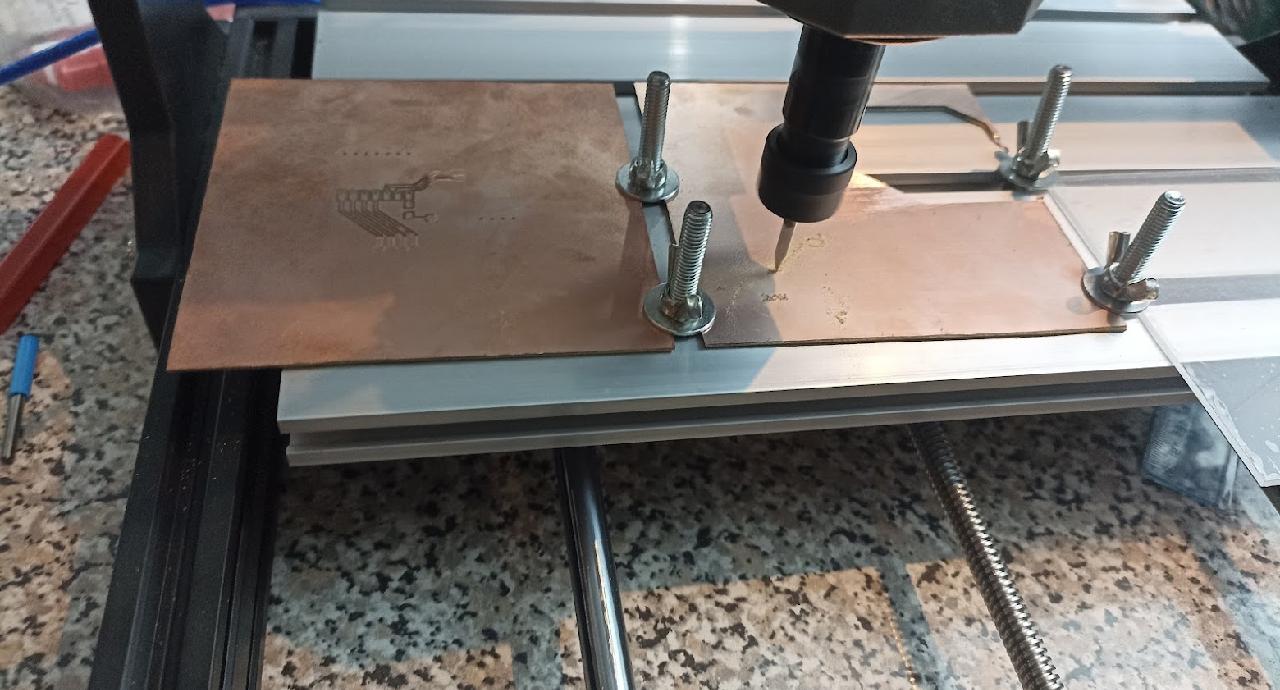
Cutting the board
Cutting the traces
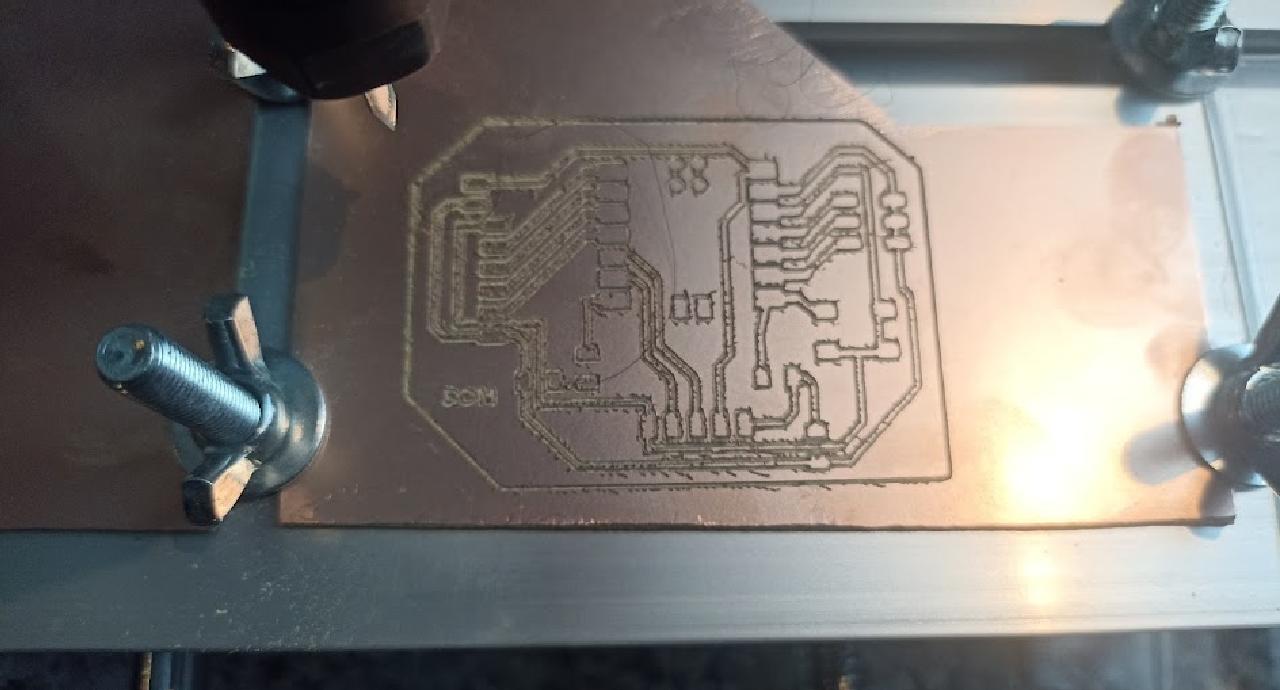
Work completed
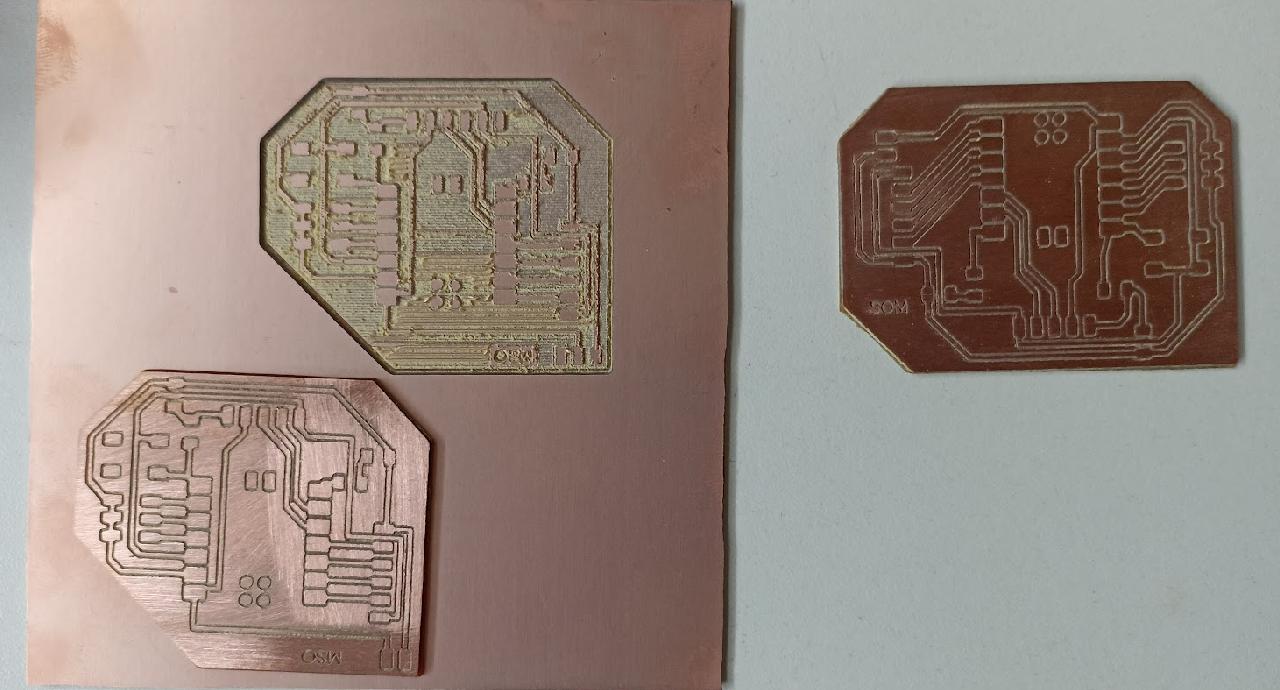
Three attempts
Area clearence
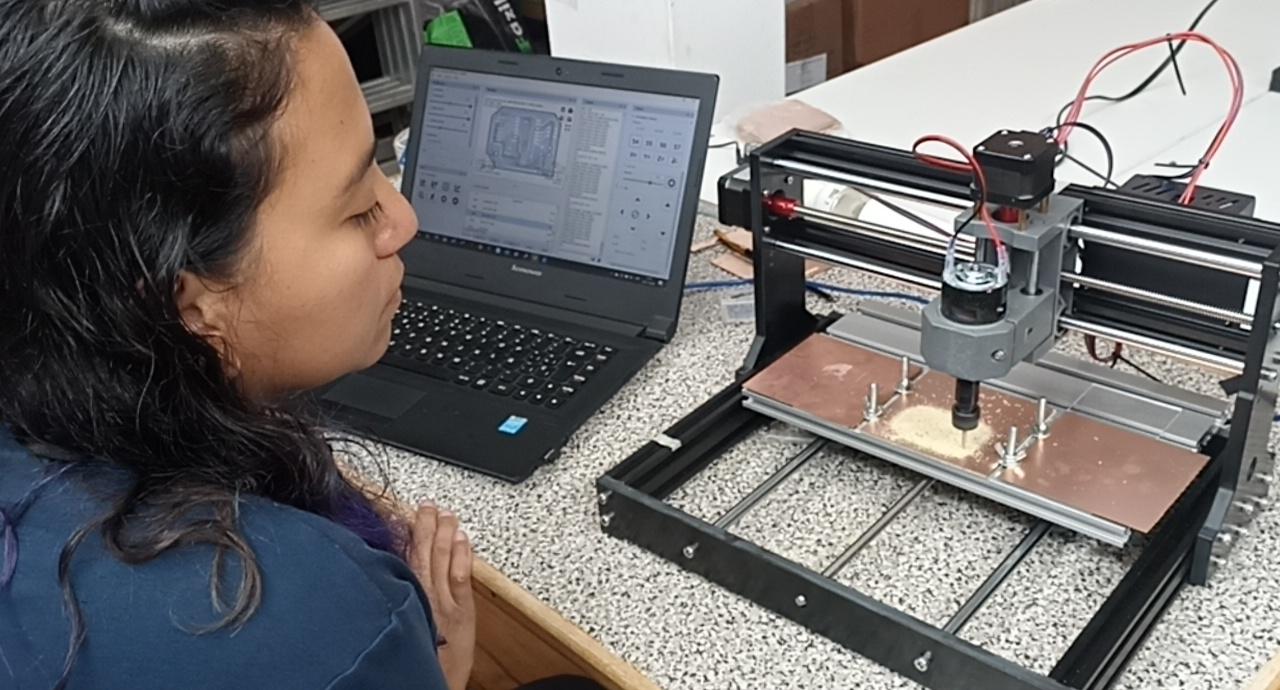
Area clearence
Area clearence
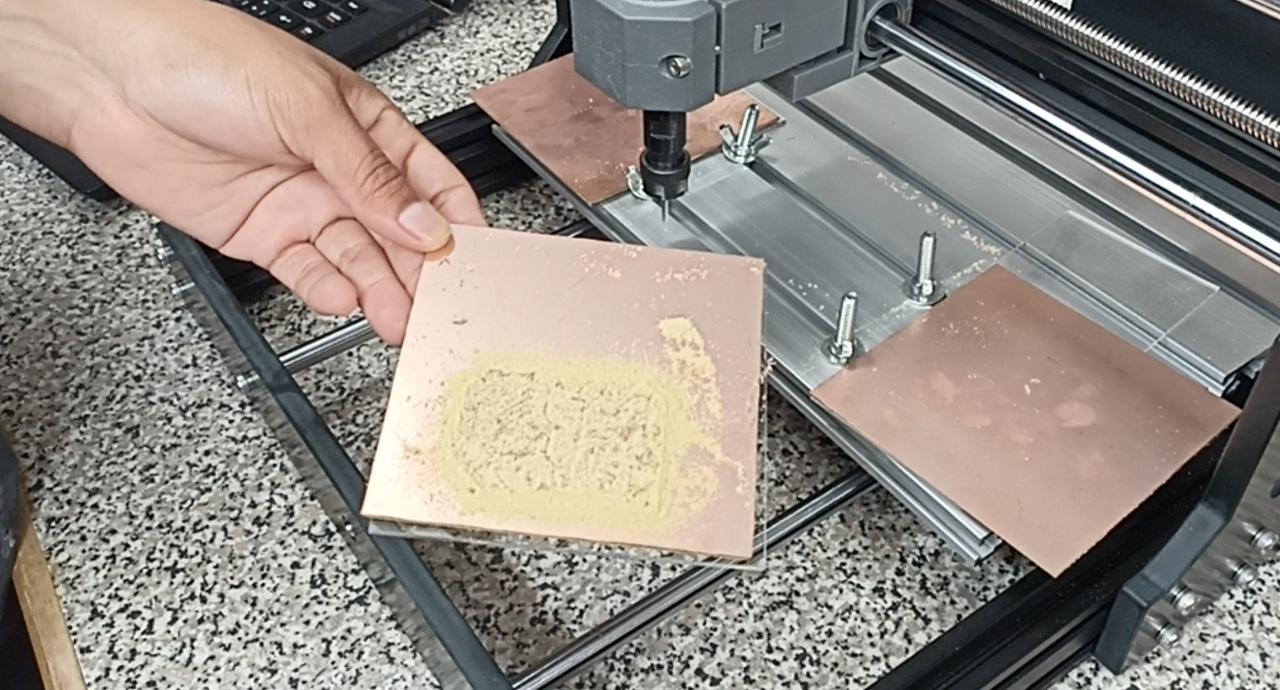
Work completed
Work completed
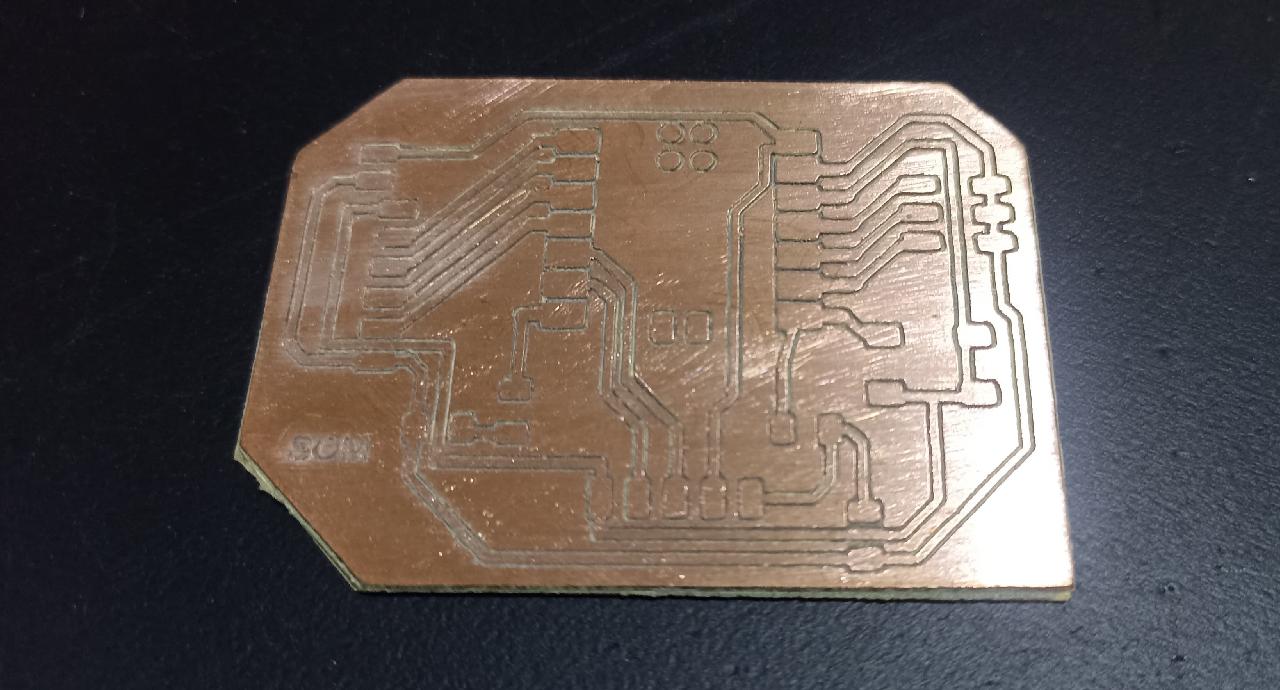
Milling only traces
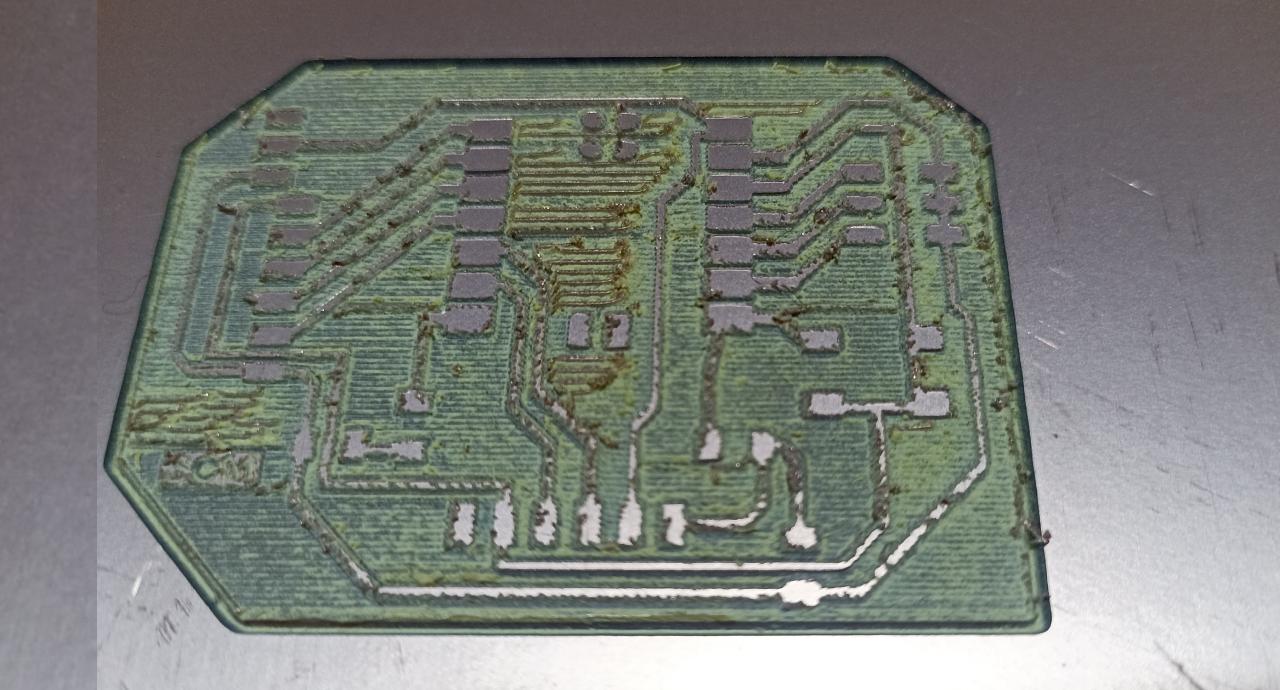
First attempt at milling with Area Clearance in Artcam
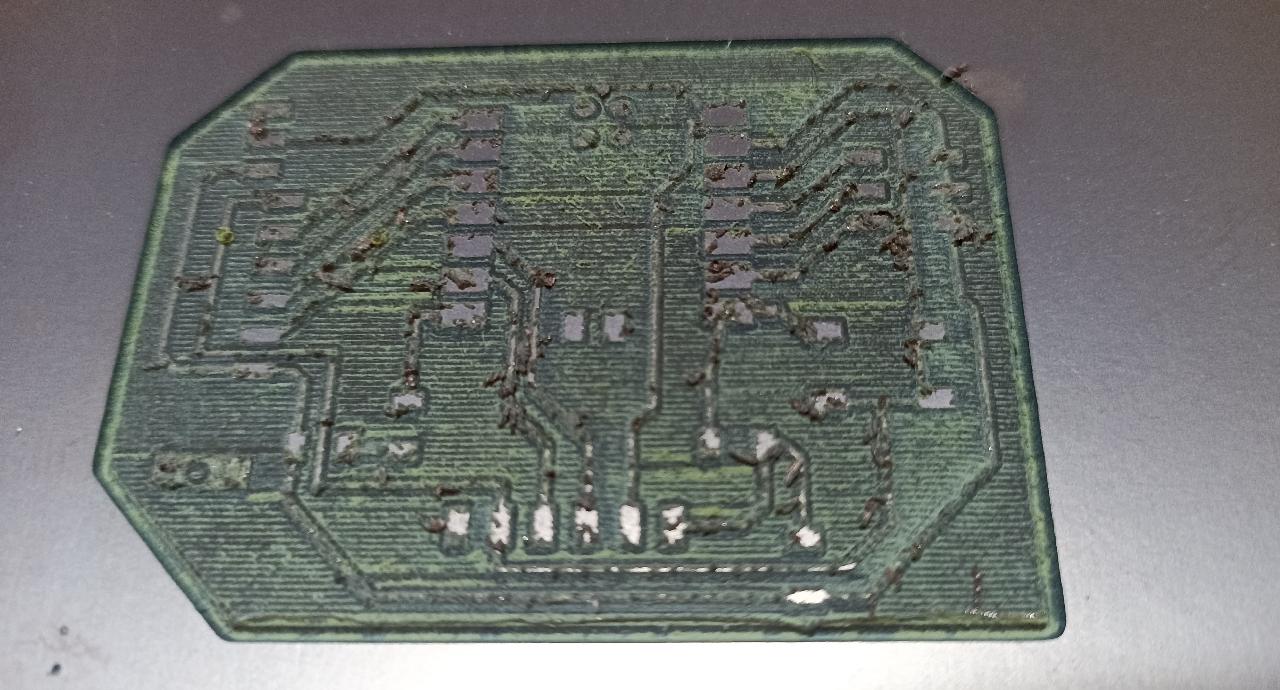
Second attempt at milling with Area Clearance in Artcam
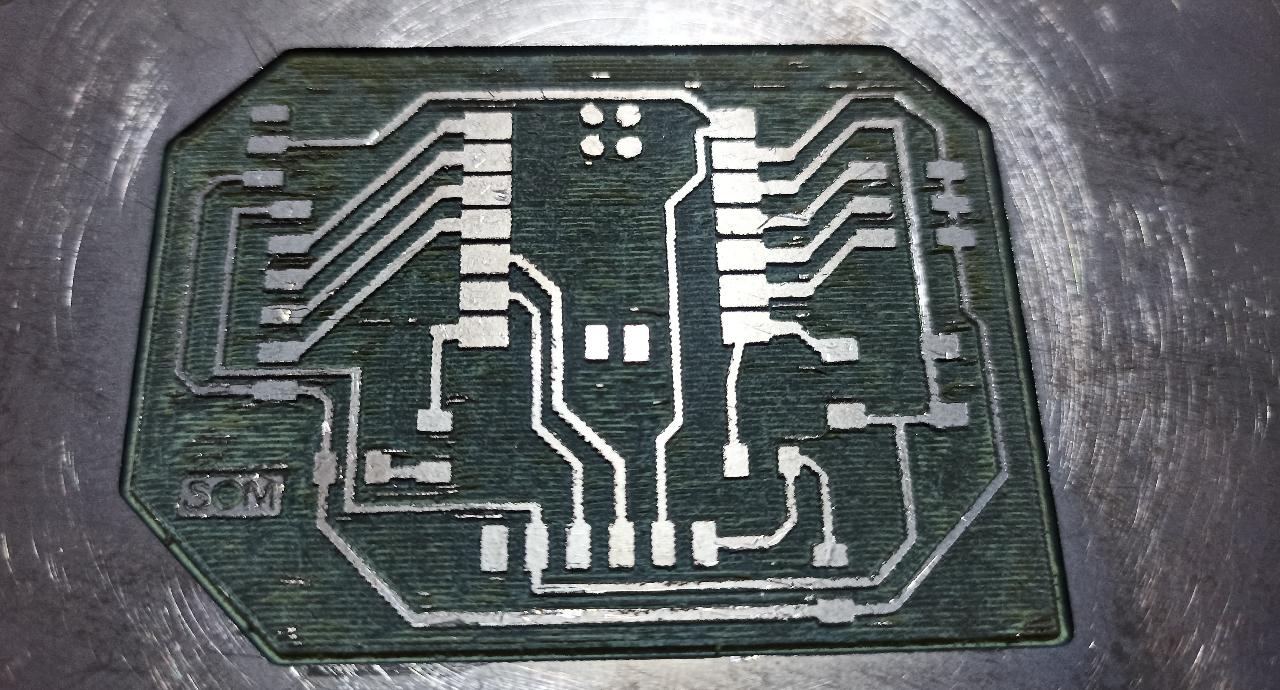
Third successful attempt!!! in Artcam
Soldering my PCB board
At first it was complicated to solder my PCB board but with effort and dedication I was able to do it.
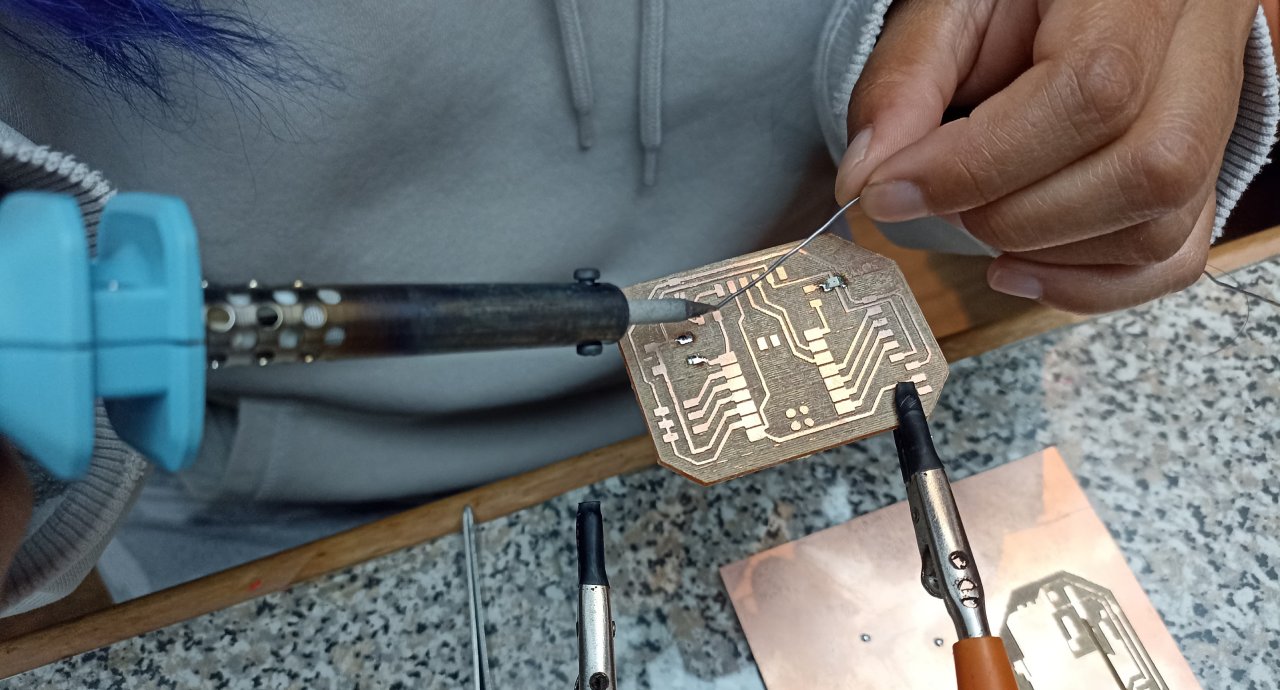
Starting to solder
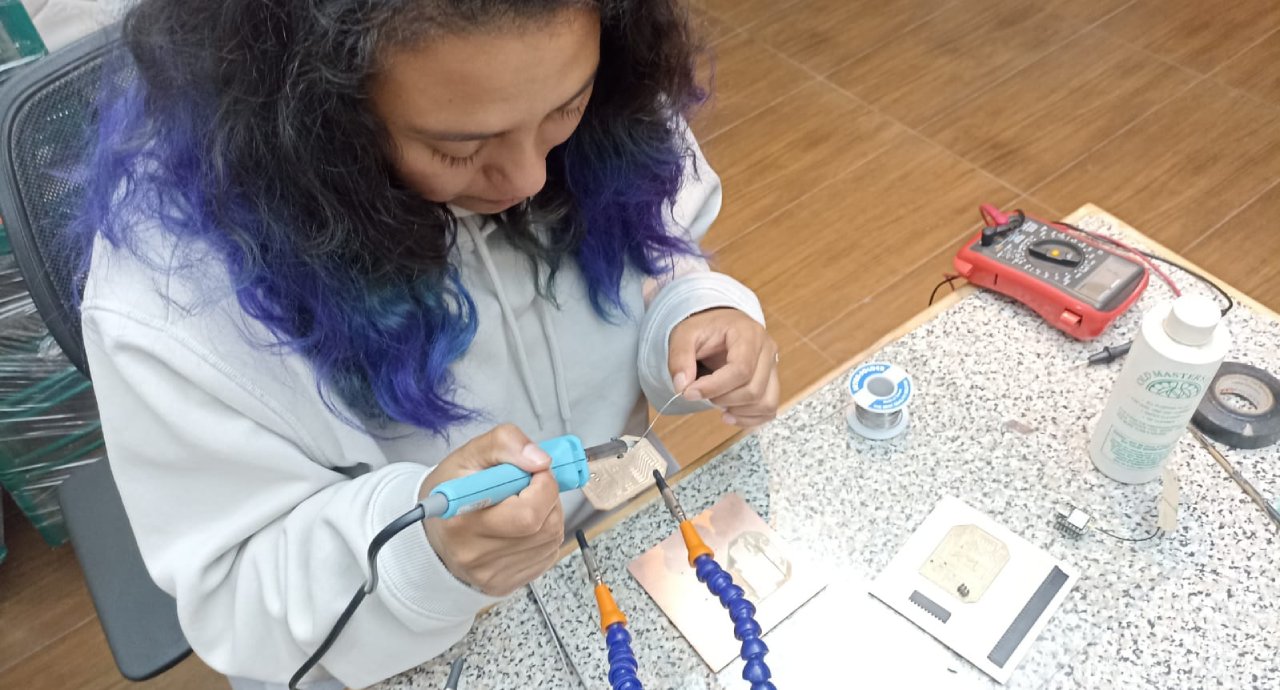
First soldered components
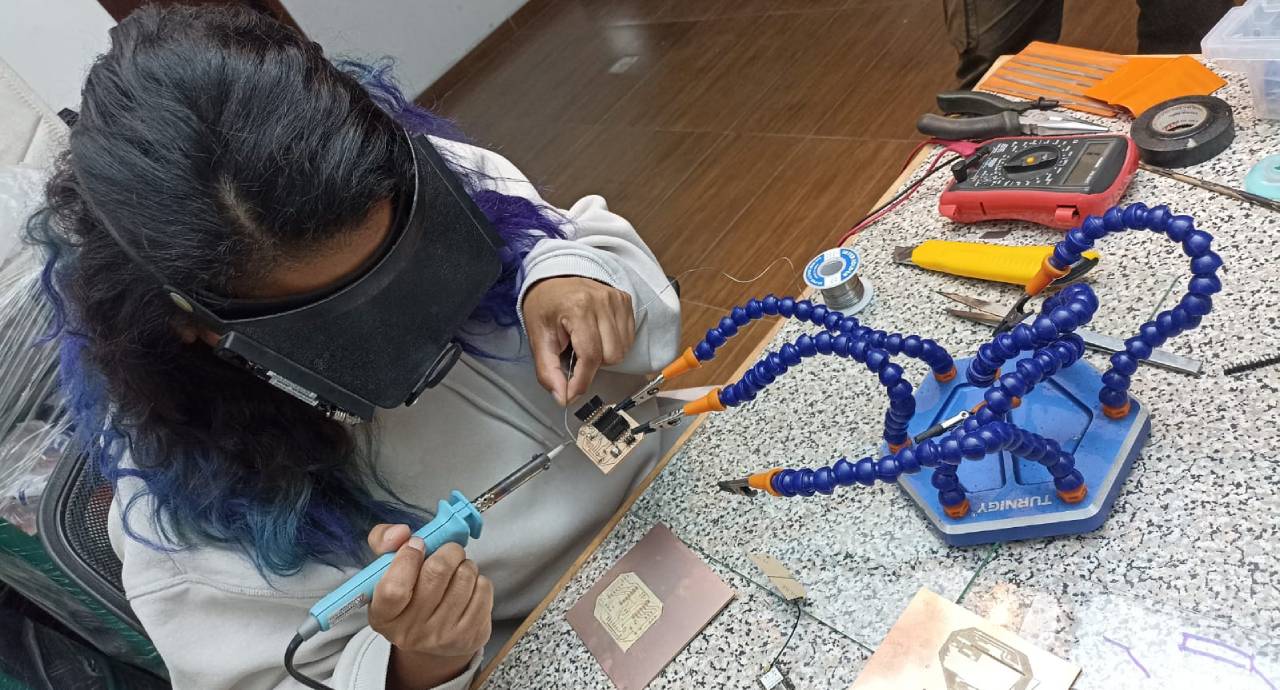
Soldering
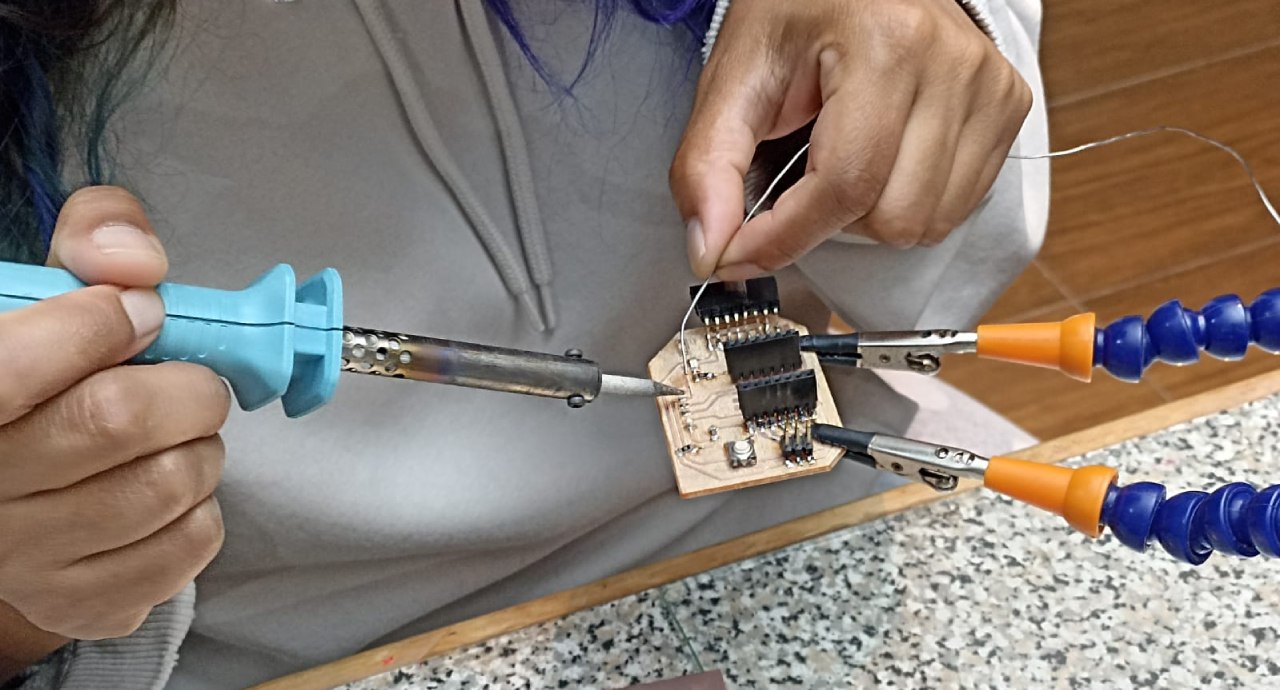
Last soldering points
Testing my XIAO ESP32C3 microcontroller
It is time to test my PCB board with the XIAO ESP32C3 microcontroller, for this test I will connect a LED and do a blink test. First I will install the microcontroller in the arduino IDE according to SEEED STUDIO instructions.
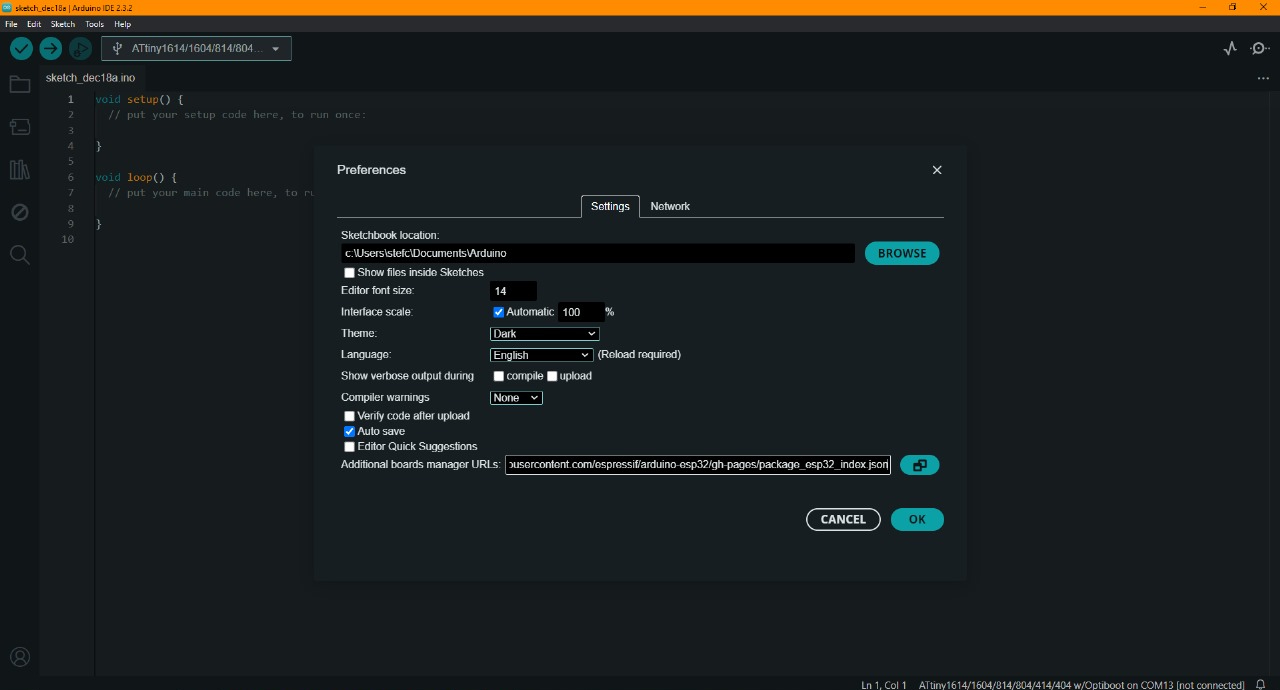
Additional Boards Manager URLs
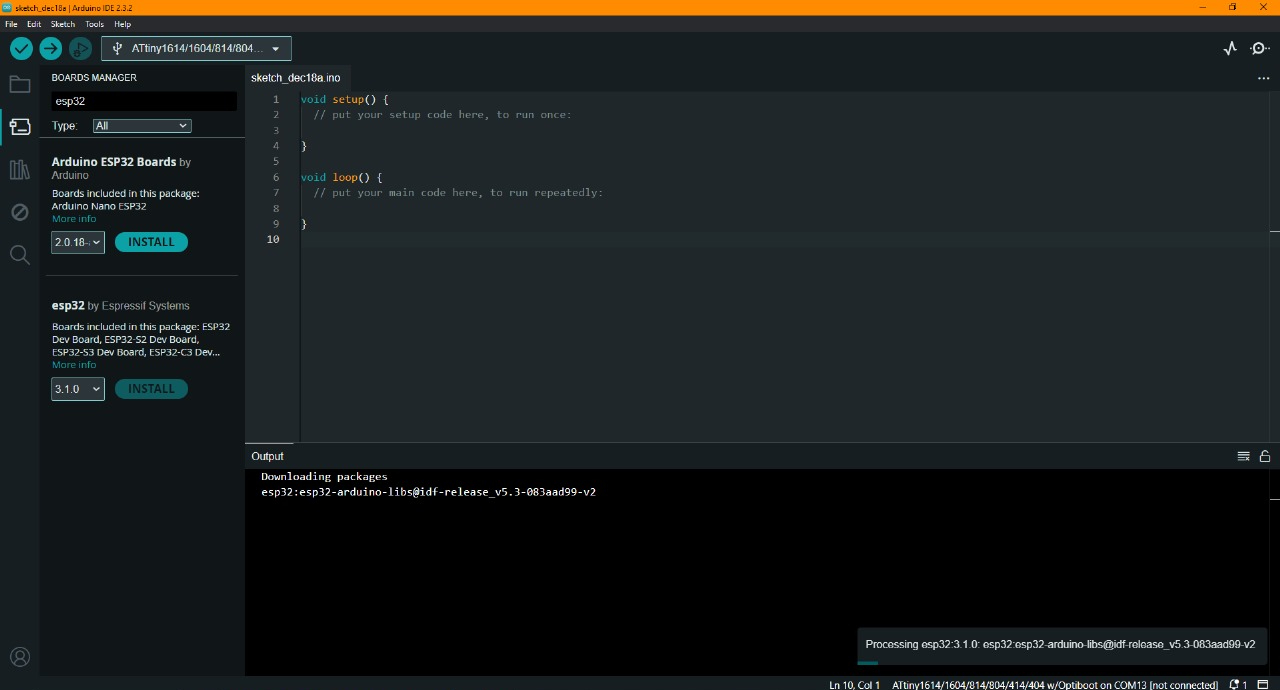
In the search box, select the latest version of esp32, install
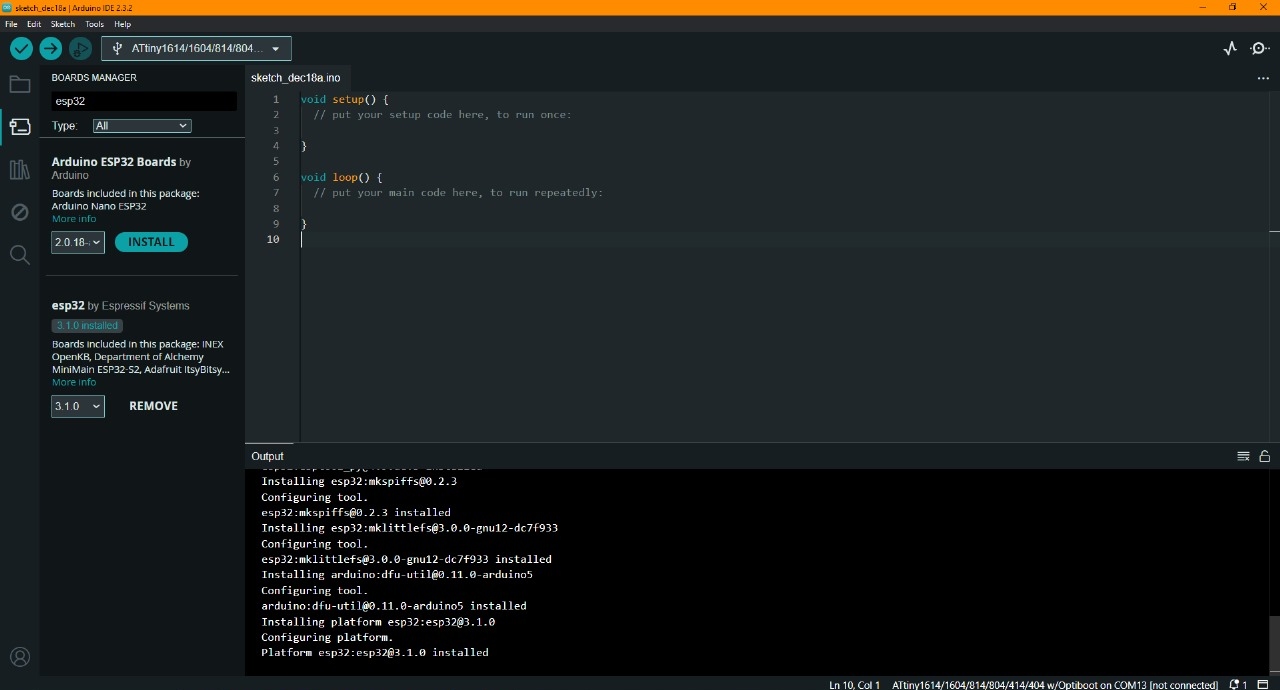
Installing
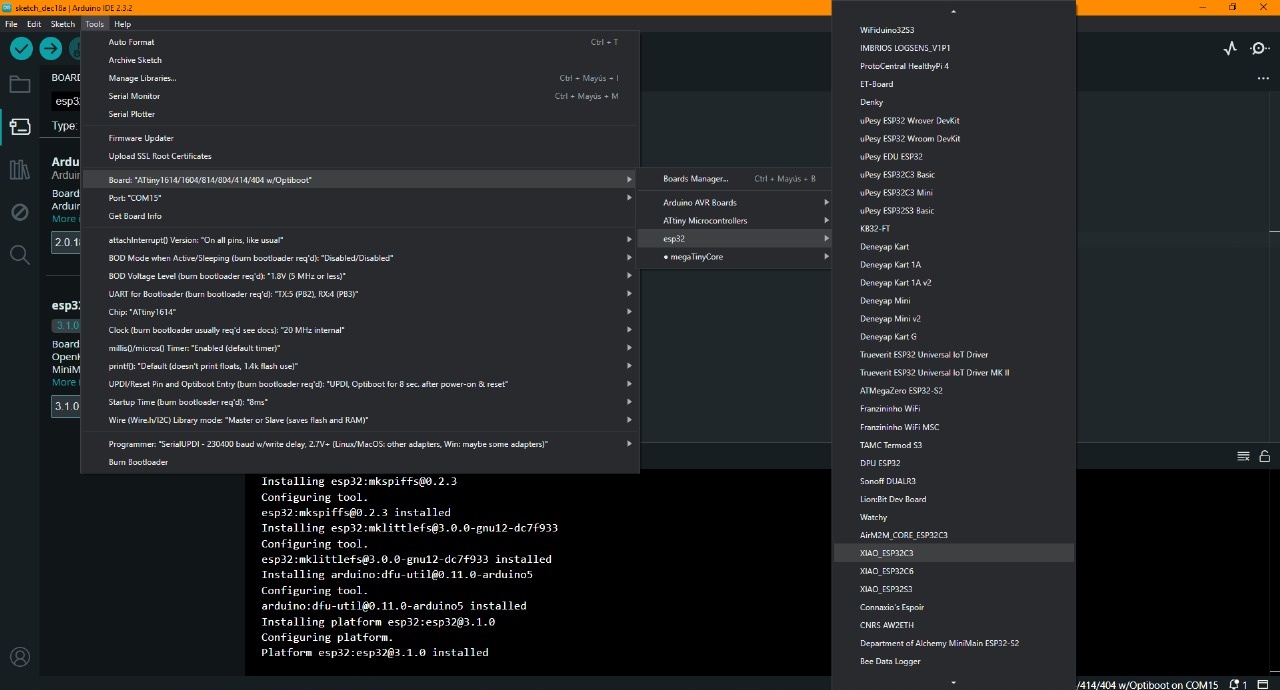
Selecting the port and the board XIAO ESP32C3
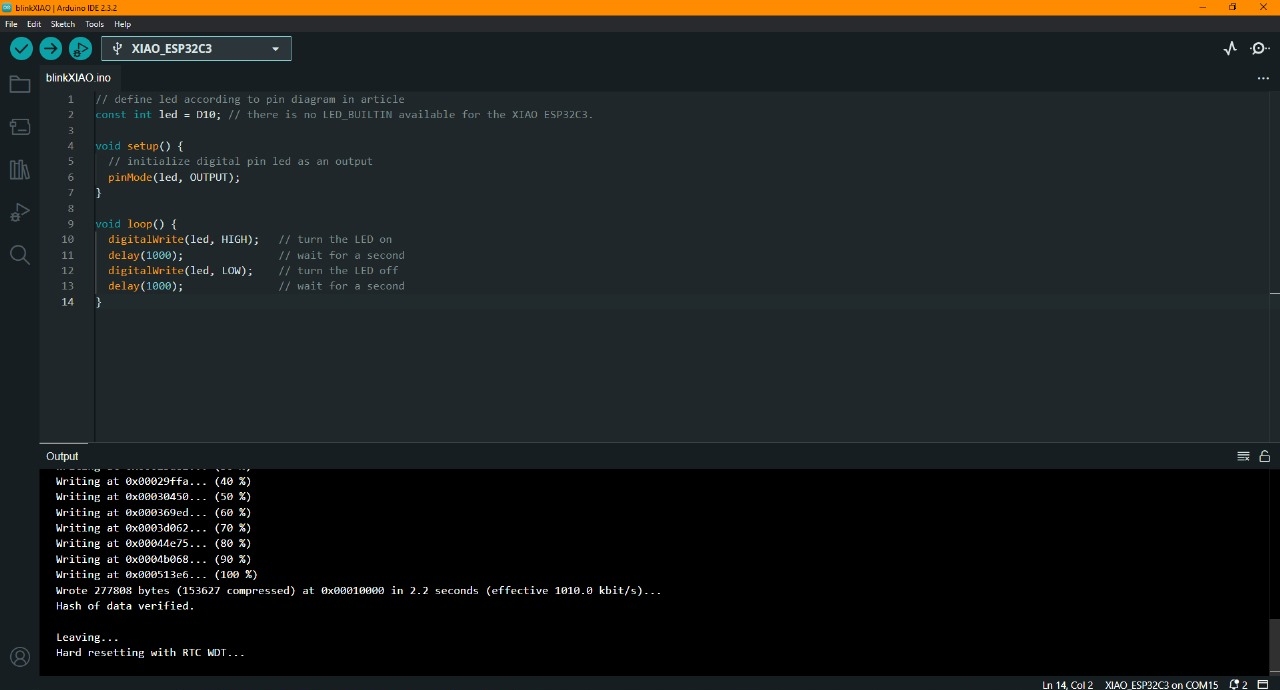
Loading the program
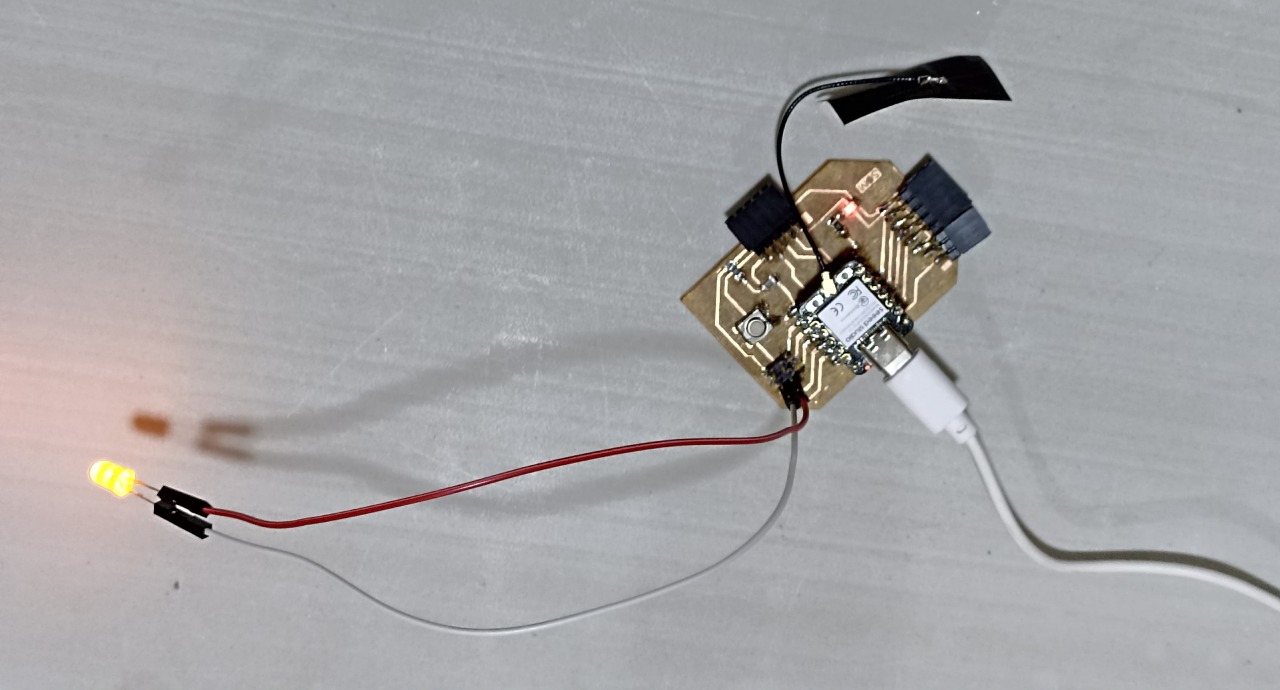
It works!!!
Blink test working!!!
Individual exercise
For this exercise, I used an infrared sensor TCRT5000 which is very accurate and was connected on the board that published the information on the web via WiFI and when this sensor detects the movement of my hand, it would turn on the LED that was connected on the other board.
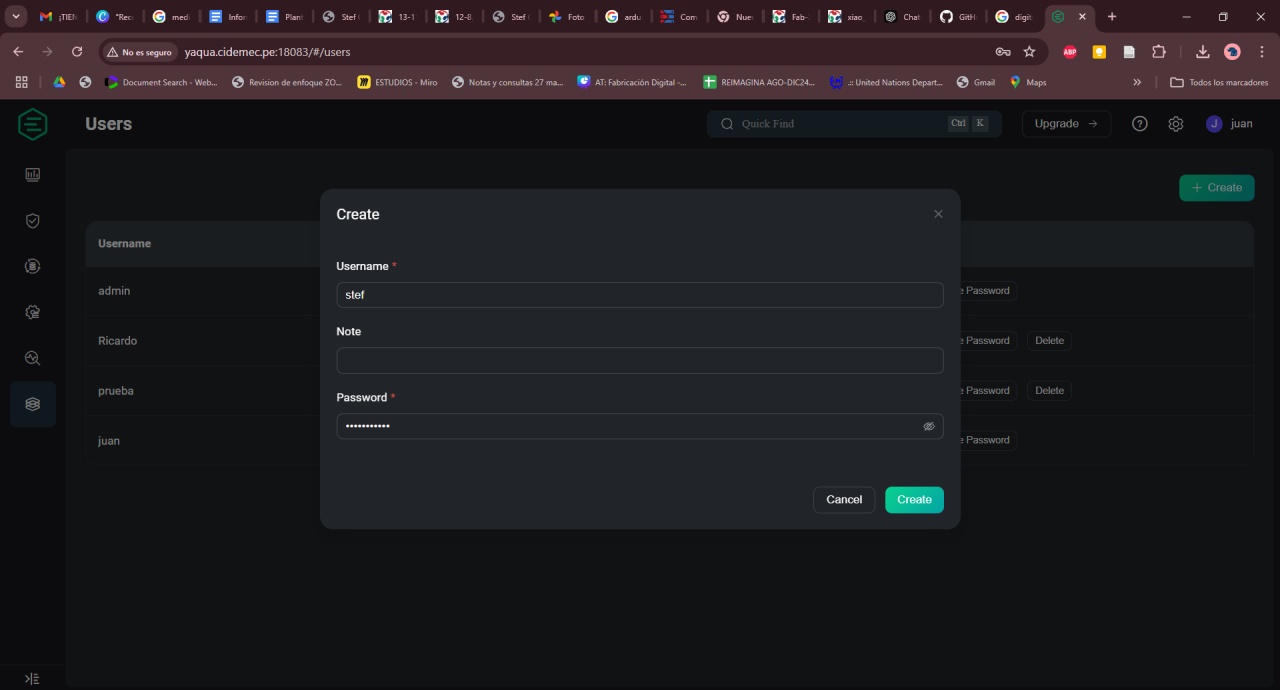
Creating a user in EMQX
First I had to create a user on the EMQX platform EMQX platform, which is a messaging platform based on the MQTT (Message Queuing Telemetry Transport) protocol designed to facilitate communication between devices in the context of the Internet of Things (IoT). Its main function is to act as an MQTT broker, i.e. as a mediator that allows devices to publish (send) and subscribe (receive) messages efficiently, securely and in real time.
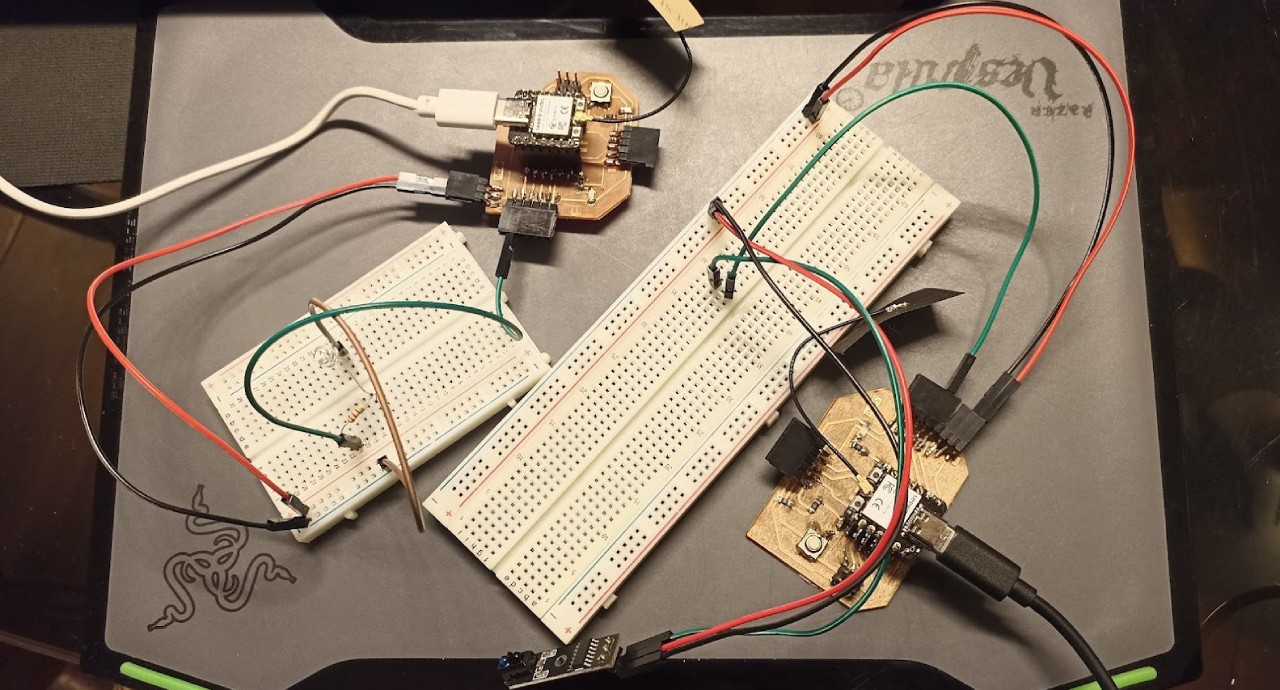
One board with an infrared sensor and the other board with an LED.
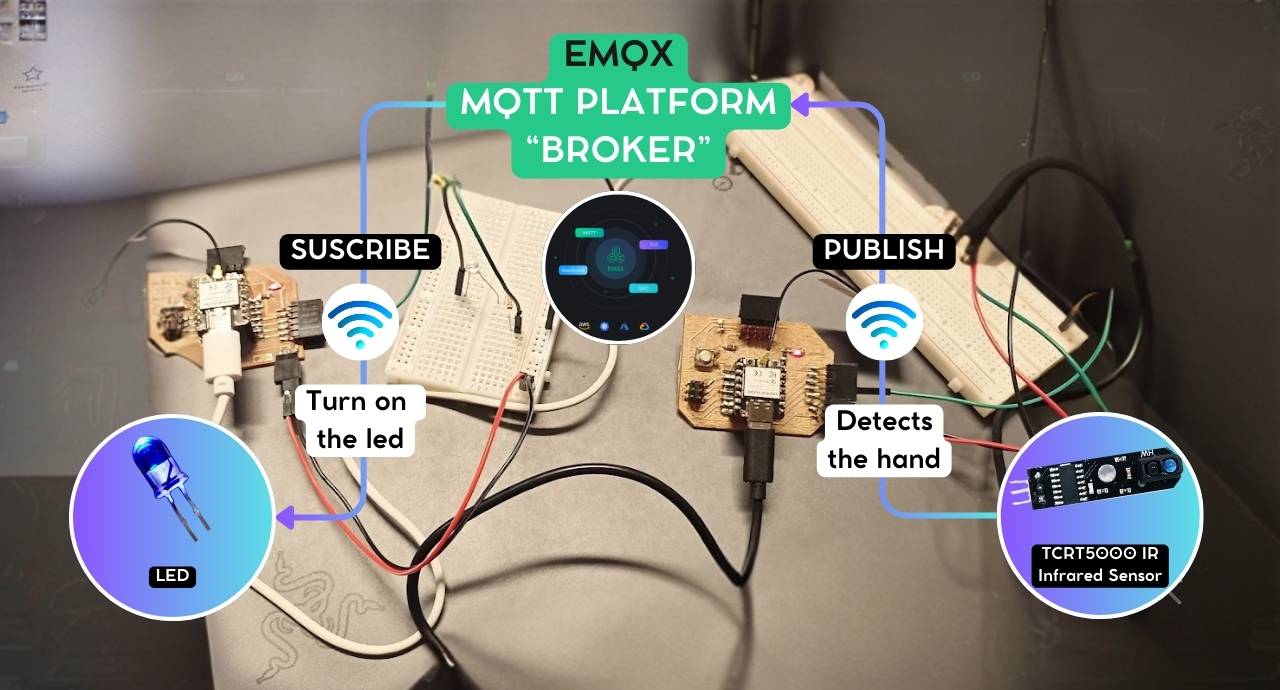
The exercise
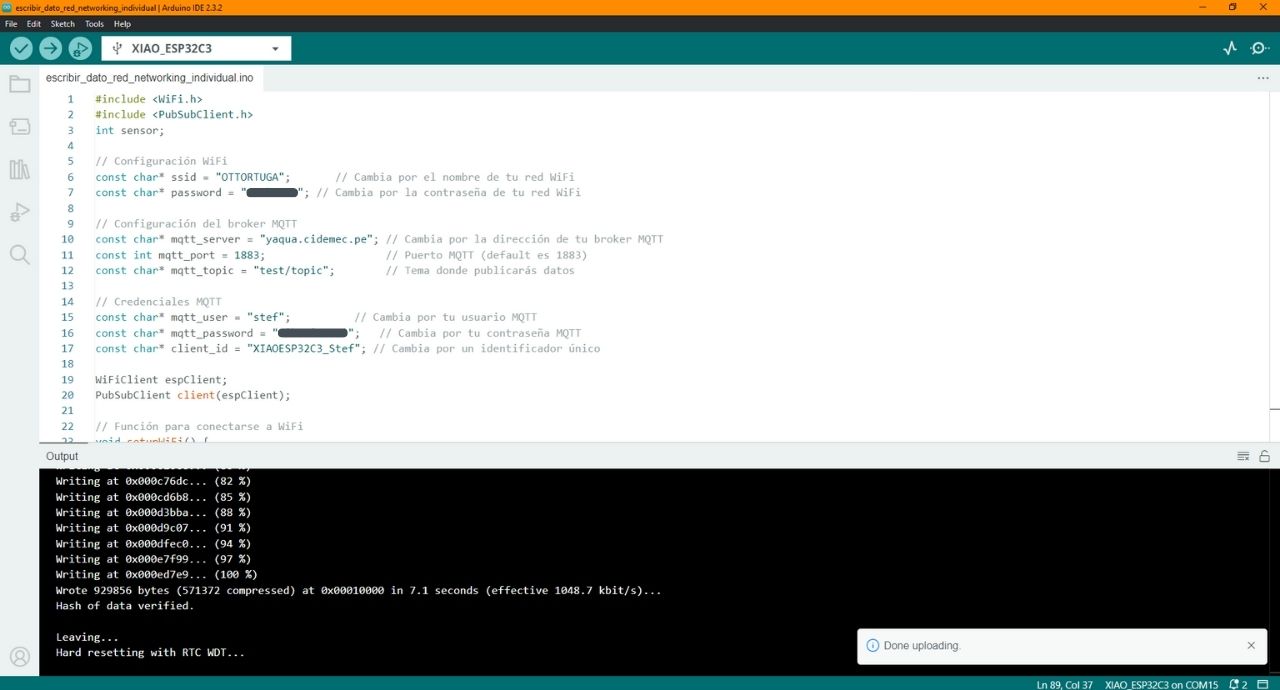
Arduino IDE Code for publish in MQTT platform by WIFI
        #include
        #include
        int sensor;

        // Configuración WiFi
        const char* ssid = "OTTORTUGA";       // Cambia por el nombre de tu red WiFi
        const char* password = "******"; // Cambia por la contraseña de tu red WiFi

        // Configuración del broker MQTT
        const char* mqtt_server = "yaqua.cidemec.pe"; // Cambia por la dirección de tu broker MQTT
        const int mqtt_port = 1883;                   // Puerto MQTT (default es 1883)
        const char* mqtt_topic = "test/topic";        // Tema donde publicarás datos

        // Credenciales MQTT
        const char* mqtt_user = "stef";          // Cambia por tu usuario MQTT
        const char* mqtt_password = "******";   // Cambia por tu contraseña MQTT
        const char* client_id = "XIAOESP32C3_Stef"; // Cambia por un identificador único

        WiFiClient espClient;
        PubSubClient client(espClient);

        // Función para conectarse a WiFi
        void setupWiFi() {
            delay(10);
            Serial.println();
            Serial.print("Conectando a ");
            Serial.println(ssid);

            WiFi.begin(ssid, password);

            while (WiFi.status() != WL_CONNECTED) {
            delay(500);
            Serial.print(".");
            }

            Serial.println("");
            Serial.println("WiFi conectado");
            Serial.print("Dirección IP: ");
            Serial.println(WiFi.localIP());
        }

        // Función para conectarse al broker MQTT
        void reconnect() {
            while (!client.connected()) {
            Serial.print("Intentando conexión MQTT...");
            // Intentamos conectar con usuario y contraseña
            if (client.connect(client_id, mqtt_user, mqtt_password)) {
                Serial.println("Conectado al broker MQTT");
            } else {
                Serial.print("Falló, rc=");
                Serial.print(client.state());
                Serial.println(" Intentando de nuevo en 5 segundos...");
                delay(5000);
            }
            }
        }

        void setup() {
            Serial.begin(115200);
            pinMode(3,INPUT);
            setupWiFi();
            client.setServer(mqtt_server, mqtt_port);

            // Intentamos conectar al broker
            reconnect();
        }

        void loop() {
            if (!client.connected()) {
            reconnect();
            }
            client.loop();
        /*
            // Subir un dato al broker
            String payload = "Hola desde XIAO ESP32-C3";
            Serial.print("Enviando mensaje: ");
            Serial.println(payload);
        */

        sensor=digitalRead(3);
        if (sensor==1)
        {
            if (client.publish(mqtt_topic, "1")) {
            Serial.println("Mensaje publicado correctamente");
            } else {
            Serial.println("Error al publicar el mensaje");
            }}
        else{
            if (client.publish(mqtt_topic, "0")) {
            Serial.println("Mensaje publicado correctamente");
            } else {
            Serial.println("Error al publicar el mensaje");
            }

        }
            delay(1000); // Espera 5 segundos antes de enviar el siguiente mensaje
        }
Arduino IDE Code PUBLISH - INDIVIDUAL
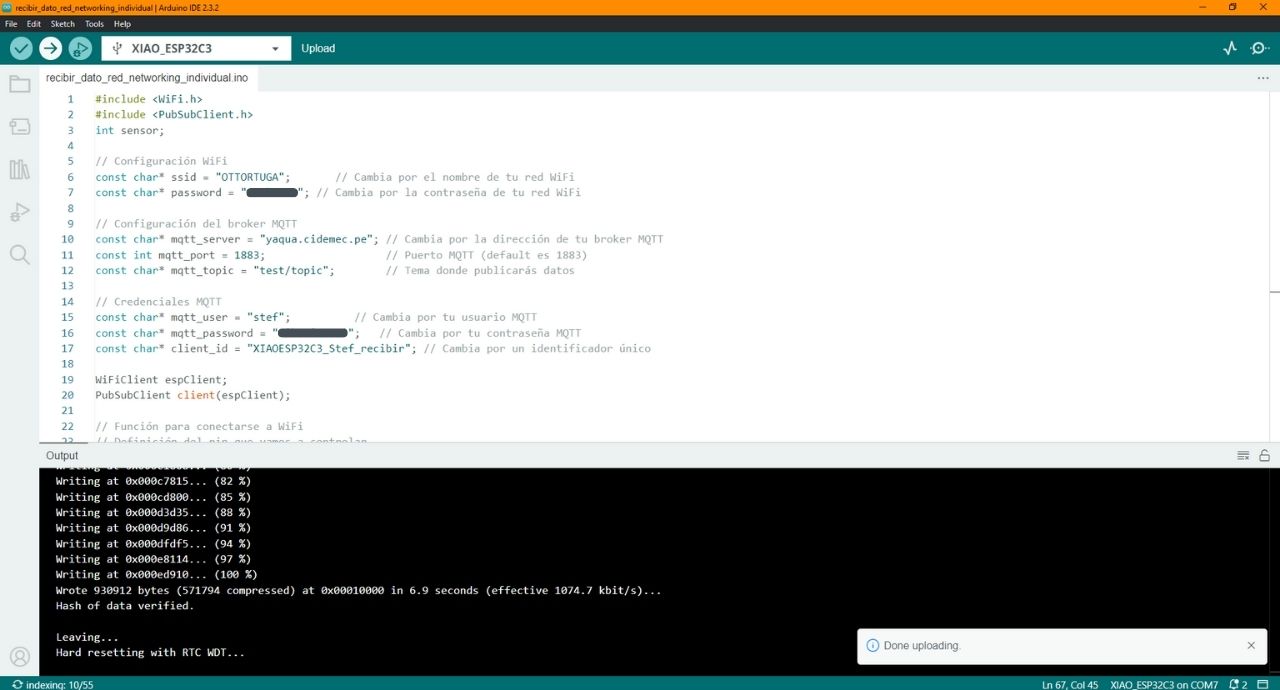
Arduino IDE Code for suscribe in MQTT platform by WIFI
        #include
        #include
        int sensor;

        // Configuración WiFi
        const char* ssid = "OTTORTUGA";       // Cambia por el nombre de tu red WiFi
        const char* password = "******"; // Cambia por la contraseña de tu red WiFi

        // Configuración del broker MQTT
        const char* mqtt_server = "yaqua.cidemec.pe"; // Cambia por la dirección de tu broker MQTT
        const int mqtt_port = 1883;                   // Puerto MQTT (default es 1883)
        const char* mqtt_topic = "test/topic";        // Tema donde publicarás datos

        // Credenciales MQTT
        const char* mqtt_user = "stef";          // Cambia por tu usuario MQTT
        const char* mqtt_password = "******";   // Cambia por tu contraseña MQTT
        const char* client_id = "XIAOESP32C3_Stef_recibir"; // Cambia por un identificador único

        WiFiClient espClient;
        PubSubClient client(espClient);

        // Función para conectarse a WiFi
        // Definición del pin que vamos a controlar
        const int controlPin = 2;

        // Función para conectarse a WiFi
        void setupWiFi() {
            delay(10);
            Serial.println();
            Serial.print("Conectando a ");
            Serial.println(ssid);

            WiFi.begin(ssid, password);

            while (WiFi.status() != WL_CONNECTED) {
            delay(500);
            Serial.print(".");
            }

            Serial.println("");
            Serial.println("WiFi conectado");
            Serial.print("Dirección IP: ");
            Serial.println(WiFi.localIP());
        }

        // Callback que se ejecuta cuando llega un mensaje al tema suscrito
        void callback(char* topic, byte* payload, unsigned int length) {
            Serial.print("Mensaje recibido en el tema: ");
            Serial.println(topic);
            Serial.print("Mensaje: ");

            // Convertir el payload en un String
            String message;
            for (unsigned int i = 0; i < length; i++) {
            message += (char)payload[i];
            }
            Serial.println(message);

            // Controlar el pin en función del mensaje recibido
            if (message == "1") {
            digitalWrite(controlPin, HIGH);
            Serial.println("Pin 2 en HIGH");
            } else if (message == "0") {
            digitalWrite(controlPin, LOW);
            Serial.println("Pin 2 en LOW");
            } else {
            Serial.println("Comando no reconocido");
            }
        }

        // Función para conectarse al broker MQTT
        void reconnect() {
            while (!client.connected()) {
            Serial.print("Intentando conexión MQTT...");
            if (client.connect(client_id, mqtt_user, mqtt_password)) {
                Serial.println("Conectado al broker MQTT");

                // Suscribirse al tema
                if (client.subscribe(mqtt_topic)) {
                Serial.println("Suscripción exitosa al tema: ");
                Serial.println(mqtt_topic);
                } else {
                Serial.println("Error al suscribirse al tema");
                }
            } else {
                Serial.print("Falló, rc=");
                Serial.print(client.state());
                Serial.println(" Intentando de nuevo en 5 segundos...");
                delay(5000);
            }
            }
        }

        void setup() {
            Serial.begin(115200);

            // Configurar el pin como salida
            pinMode(controlPin, OUTPUT);
            digitalWrite(controlPin, LOW); // Inicialmente en LOW

            setupWiFi();
            client.setServer(mqtt_server, mqtt_port);
            client.setCallback(callback);

            // Intentamos conectar al broker
            reconnect();
        }

        void loop() {
            if (!client.connected()) {
            reconnect();
            }

            client.loop();
        }
Arduino IDE Code SUSCRIBE - INDIVIDUAL
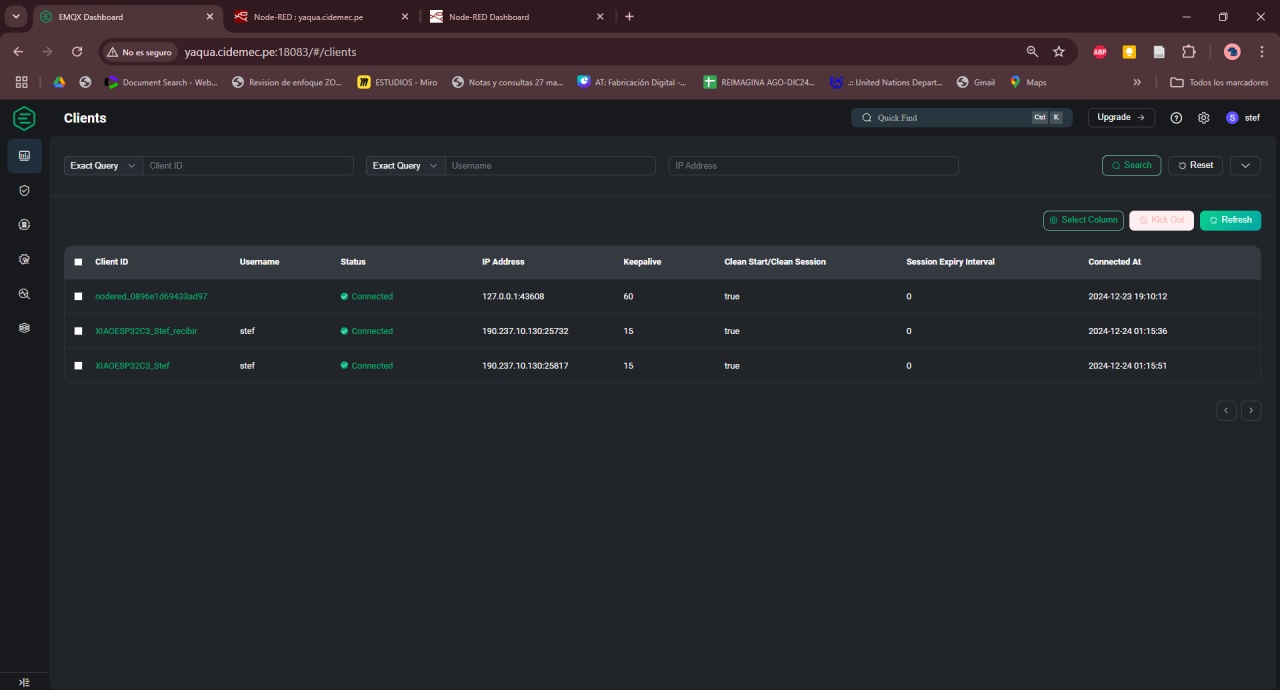
The two boards connected to the broker by WiFi, each with its Client ID.
Publish to the broker and suscribe
GroupTask
For this group exercise I did it with Mayra Ascencio, each one had her board with the XIAO ESP32C3 microcontroller connected to the MQTT platform, we used again the platform called “EMQX” that Juan lent us to perform this exercise.
WiFi interaction
In this exercise we made a communication system based on the MQTT protocol using infrared sensors and buzzers. There are two configurations, one from Stefany and the other from Mayra, which interact with each other through an MQTT platform, using a “broker” (mediator) called EMQX.
Process:
We both log in to our users in the broker. We also configure a “Topic” to be able to visualize when we receive the signal from the boards. We also upload the schedules to our boards and check the connectivity.
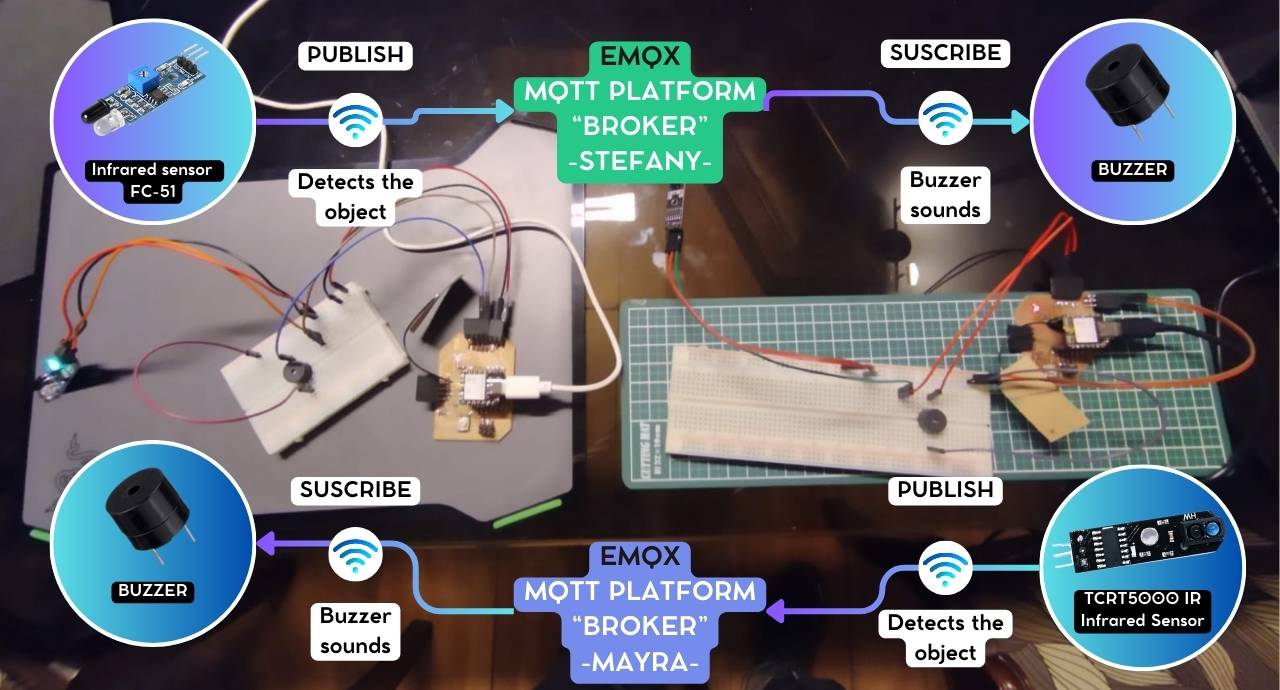
Group exercise
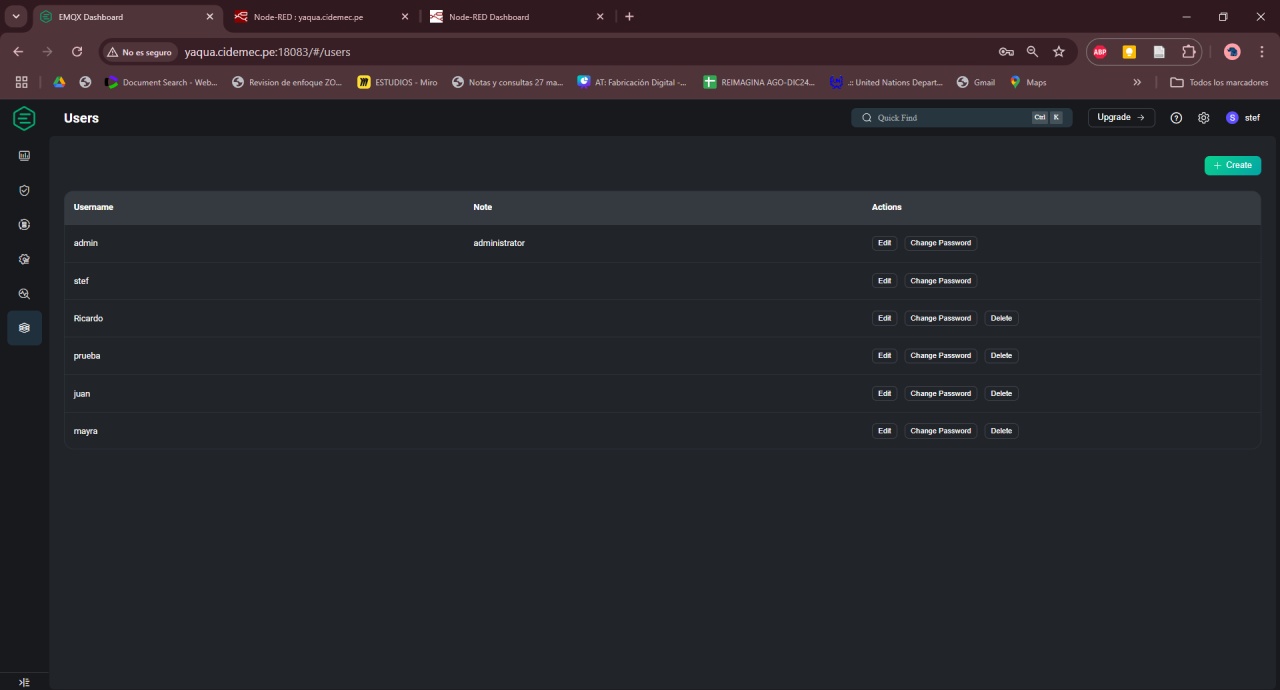
Users from Mayra y Stef
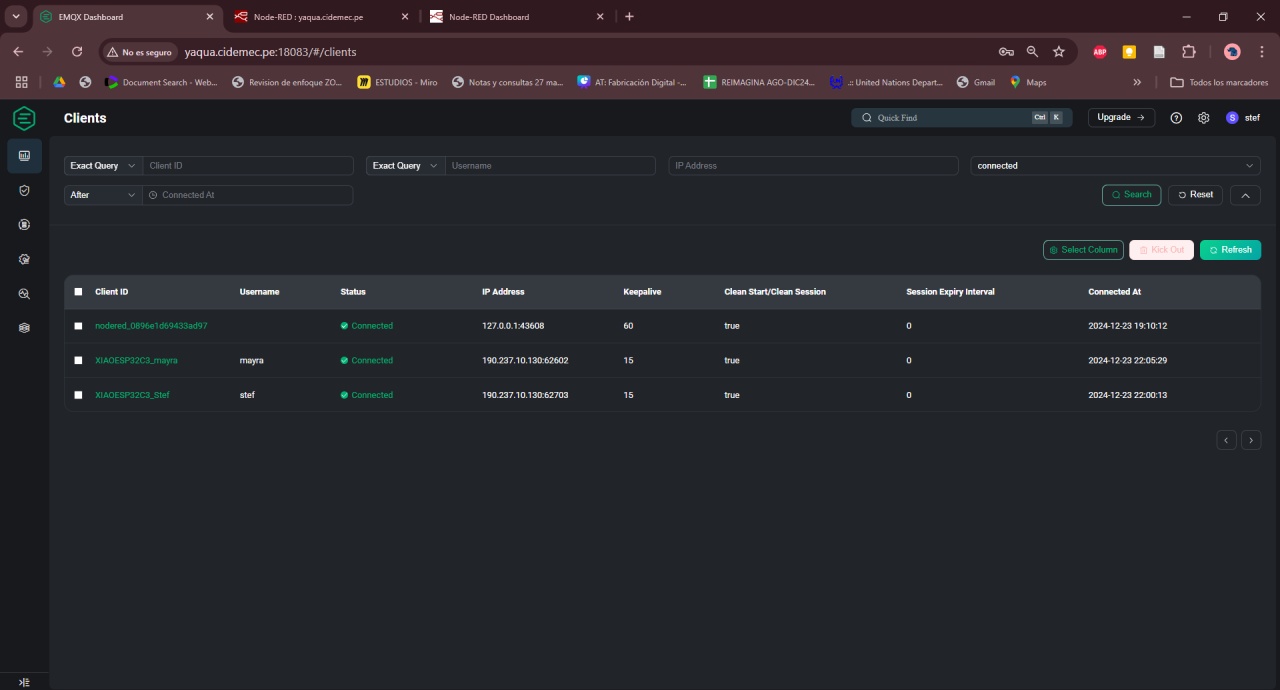
Connected to the broker
Stefany publishes >> Mayra suscribes
First configuration where Stefany publishes:- An FC-51 infrared sensor detects the presence of an object.
- This information is published to the MQTT broker.
- Another device, which is subscribed to the same topic in the broker, receives the information and activates a buzzer, emitting a sound in response.
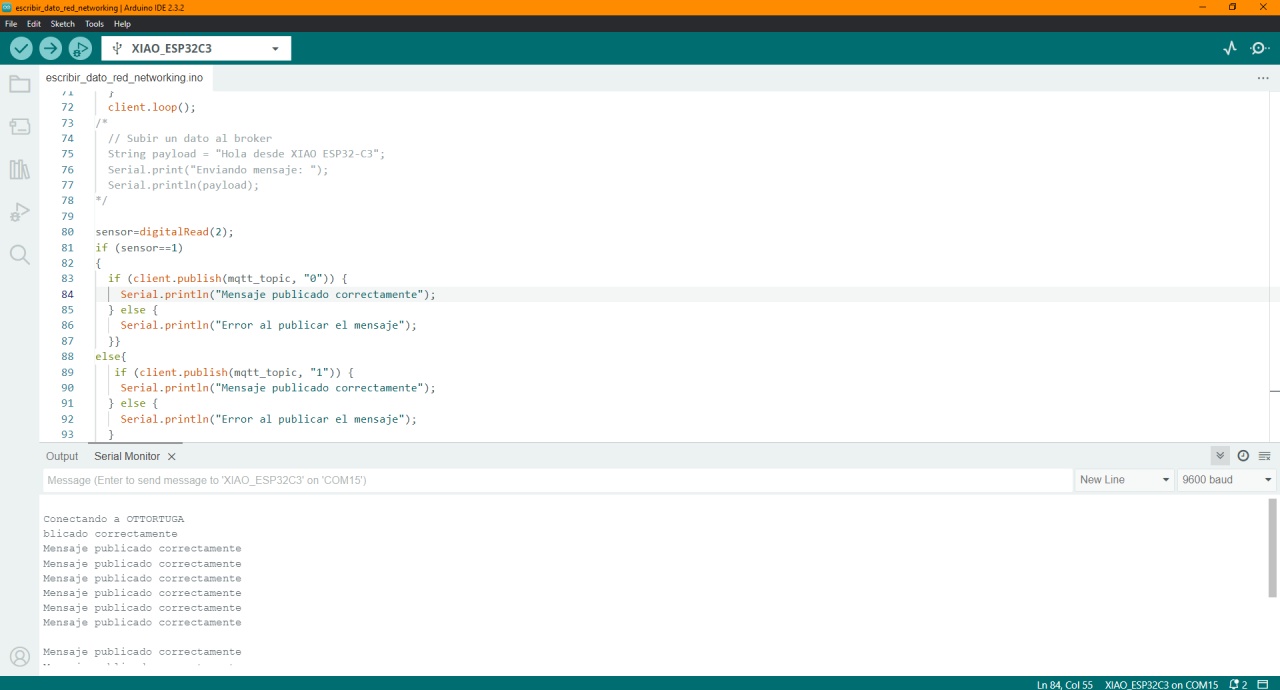
Arduino Code for PUBLISH - Board of Stefany
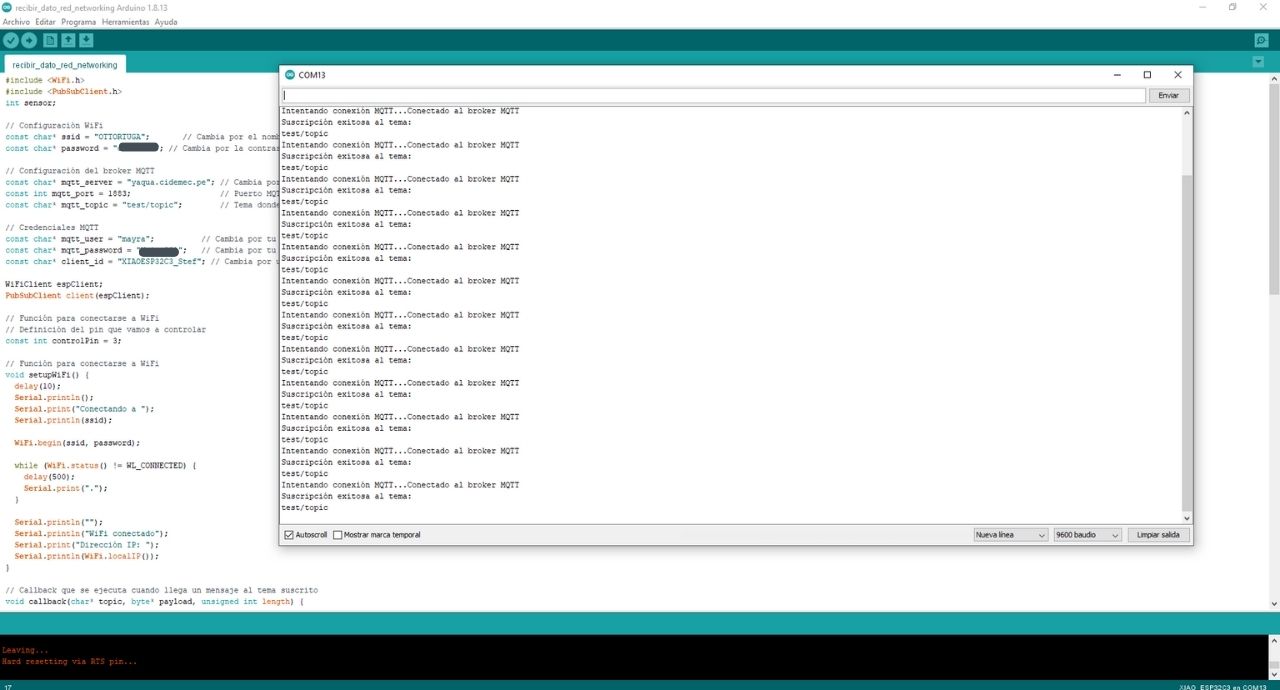
Arduino Code Connecting - Board of Mayra
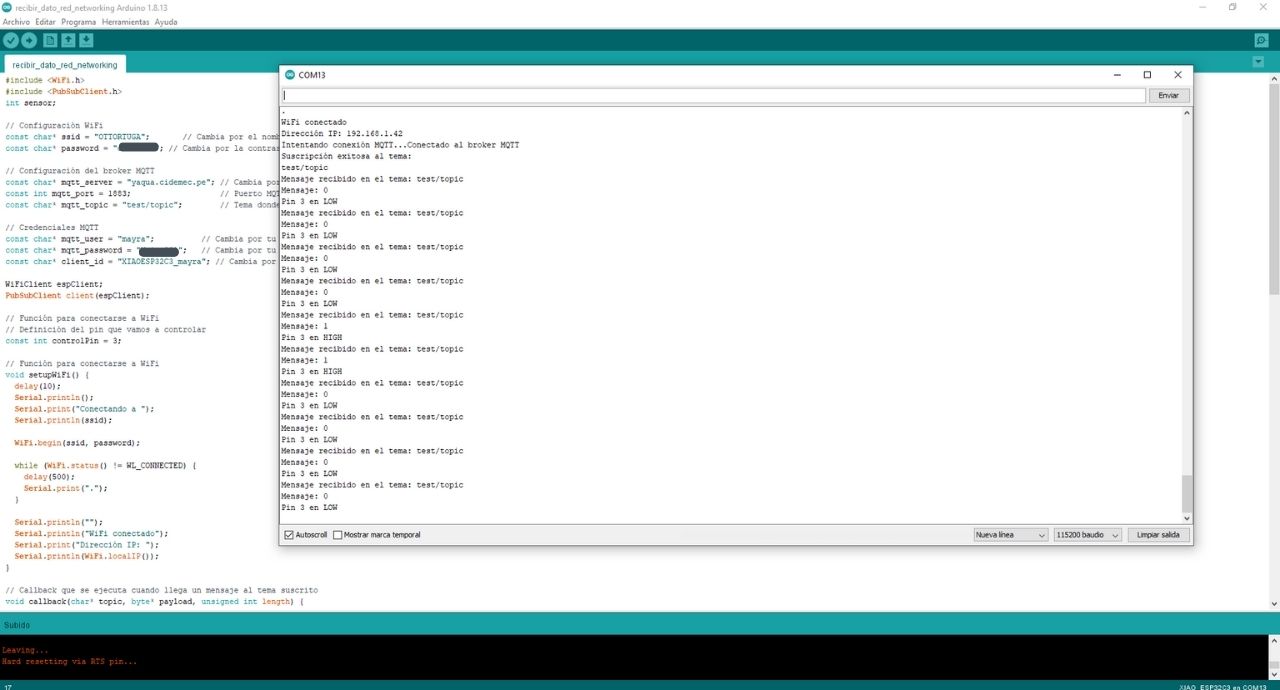
Arduino Code for SUSCRIBE - Board of Mayra
// PUBLISH CODE stefany board
#include
#include
int sensor;

// Configuración WiFi
const char* ssid = "OTTORTUGA";       // Cambia por el nombre de tu red WiFi
const char* password = "*****"; // Cambia por la contraseña de tu red WiFi

// Configuración del broker MQTT
const char* mqtt_server = "yaqua.cidemec.pe"; // Cambia por la dirección de tu broker MQTT
const int mqtt_port = 1883;                   // Puerto MQTT (default es 1883)
const char* mqtt_topic = "test/topic";        // Tema donde publicarás datos

// Credenciales MQTT
const char* mqtt_user = "stef";          // Cambia por tu usuario MQTT
const char* mqtt_password = "*****";   // Cambia por tu contraseña MQTT
const char* client_id = "XIAOESP32C3_Stef"; // Cambia por un identificador único

WiFiClient espClient;
PubSubClient client(espClient);

// Función para conectarse a WiFi
void setupWiFi() {
    delay(10);
    Serial.println();
    Serial.print("Conectando a ");
    Serial.println(ssid);

    WiFi.begin(ssid, password);

    while (WiFi.status() != WL_CONNECTED) {
    delay(500);
    Serial.print(".");
    }

    Serial.println("");
    Serial.println("WiFi conectado");
    Serial.print("Dirección IP: ");
    Serial.println(WiFi.localIP());
}

// Función para conectarse al broker MQTT
void reconnect() {
    while (!client.connected()) {
    Serial.print("Intentando conexión MQTT...");
    // Intentamos conectar con usuario y contraseña
    if (client.connect(client_id, mqtt_user, mqtt_password)) {
        Serial.println("Conectado al broker MQTT");
    } else {
        Serial.print("Falló, rc=");
        Serial.print(client.state());
        Serial.println(" Intentando de nuevo en 5 segundos...");
        delay(5000);
    }
    }
}

void setup() {
    Serial.begin(115200);
    pinMode(3,INPUT);
    setupWiFi();
    client.setServer(mqtt_server, mqtt_port);

    // Intentamos conectar al broker
    reconnect();
}

void loop() {
    if (!client.connected()) {
    reconnect();
    }
    client.loop();
/*
    // Subir un dato al broker
    String payload = "Hola desde XIAO ESP32-C3";
    Serial.print("Enviando mensaje: ");
    Serial.println(payload);
*/

sensor=digitalRead(3);
if (sensor==1)
{
    if (client.publish(mqtt_topic, "0")) {
    Serial.println("Mensaje publicado correctamente");
    } else {
    Serial.println("Error al publicar el mensaje");
    }}
else{
    if (client.publish(mqtt_topic, "1")) {
    Serial.println("Mensaje publicado correctamente");
    } else {
    Serial.println("Error al publicar el mensaje");
    }

}
    delay(1000); // Espera 5 segundos antes de enviar el siguiente mensaje
}
Arduino IDE Code PUBLISH - UPLOAD IN STEFANY'S BOARD
// SUSCRIBE MAYRA BOARD
#include
#include
int sensor;

// Configuración WiFi
const char* ssid = "OTTORTUGA";       // Cambia por el nombre de tu red WiFi
const char* password = "*****"; // Cambia por la contraseña de tu red WiFi

// Configuración del broker MQTT
const char* mqtt_server = "yaqua.cidemec.pe"; // Cambia por la dirección de tu broker MQTT
const int mqtt_port = 1883;                   // Puerto MQTT (default es 1883)
const char* mqtt_topic = "test/topic";        // Tema donde publicarás datos

// Credenciales MQTT
const char* mqtt_user = "mayra";          // Cambia por tu usuario MQTT
const char* mqtt_password = "*****";   // Cambia por tu contraseña MQTT
const char* client_id = "XIAOESP32C3_mayra"; // Cambia por un identificador único

WiFiClient espClient;
PubSubClient client(espClient);

// Función para conectarse a WiFi
// Definición del pin que vamos a controlar
const int controlPin = 3;

// Función para conectarse a WiFi
void setupWiFi() {
    delay(10);
    Serial.println();
    Serial.print("Conectando a ");
    Serial.println(ssid);

    WiFi.begin(ssid, password);

    while (WiFi.status() != WL_CONNECTED) {
    delay(500);
    Serial.print(".");
    }

    Serial.println("");
    Serial.println("WiFi conectado");
    Serial.print("Dirección IP: ");
    Serial.println(WiFi.localIP());
}

// Callback que se ejecuta cuando llega un mensaje al tema suscrito
void callback(char* topic, byte* payload, unsigned int length) {
    Serial.print("Mensaje recibido en el tema: ");
    Serial.println(topic);
    Serial.print("Mensaje: ");

    // Convertir el payload en un String
    String message;
    for (unsigned int i = 0; i < length; i++) {
    message += (char)payload[i];
    }
    Serial.println(message);

    // Controlar el pin en función del mensaje recibido
    if (message == "1") {
    digitalWrite(controlPin, HIGH);
    Serial.println("Pin 3 en HIGH");
    } else if (message == "0") {
    digitalWrite(controlPin, LOW);
    Serial.println("Pin 3 en LOW");
    } else {
    Serial.println("Comando no reconocido");
    }
}

// Función para conectarse al broker MQTT
void reconnect() {
    while (!client.connected()) {
    Serial.print("Intentando conexión MQTT...");
    if (client.connect(client_id, mqtt_user, mqtt_password)) {
        Serial.println("Conectado al broker MQTT");

        // Suscribirse al tema
        if (client.subscribe(mqtt_topic)) {
        Serial.println("Suscripción exitosa al tema: ");
        Serial.println(mqtt_topic);
        } else {
        Serial.println("Error al suscribirse al tema");
        }
    } else {
        Serial.print("Falló, rc=");
        Serial.print(client.state());
        Serial.println(" Intentando de nuevo en 5 segundos...");
        delay(5000);
    }
    }
}

void setup() {
    Serial.begin(115200);

    // Configurar el pin como salida
    pinMode(controlPin, OUTPUT);
    digitalWrite(controlPin, LOW); // Inicialmente en LOW

    setupWiFi();
    client.setServer(mqtt_server, mqtt_port);
    client.setCallback(callback);

    // Intentamos conectar al broker
    reconnect();
}

void loop() {
    if (!client.connected()) {
    reconnect();
    }

    client.loop();
}
Arduino IDE Code SUSCRIBE - UPLOAD IN MAYRA'S BOARD
Final result: Stef Publish - Mayra Suscribe
Mayra publishes >> Stefany suscribes
Second configuration where Mayra publishes:- A TCRT5000 infrared sensor detects an object and publishes the information in the MQTT broker.
- The device that is subscribed to this topic activates its buzzer to emit a sound when it receives the signal.

Arduino Code for PUBLISH - Board of Mayra

Arduino Code for PUBLISH - Board of Mayra
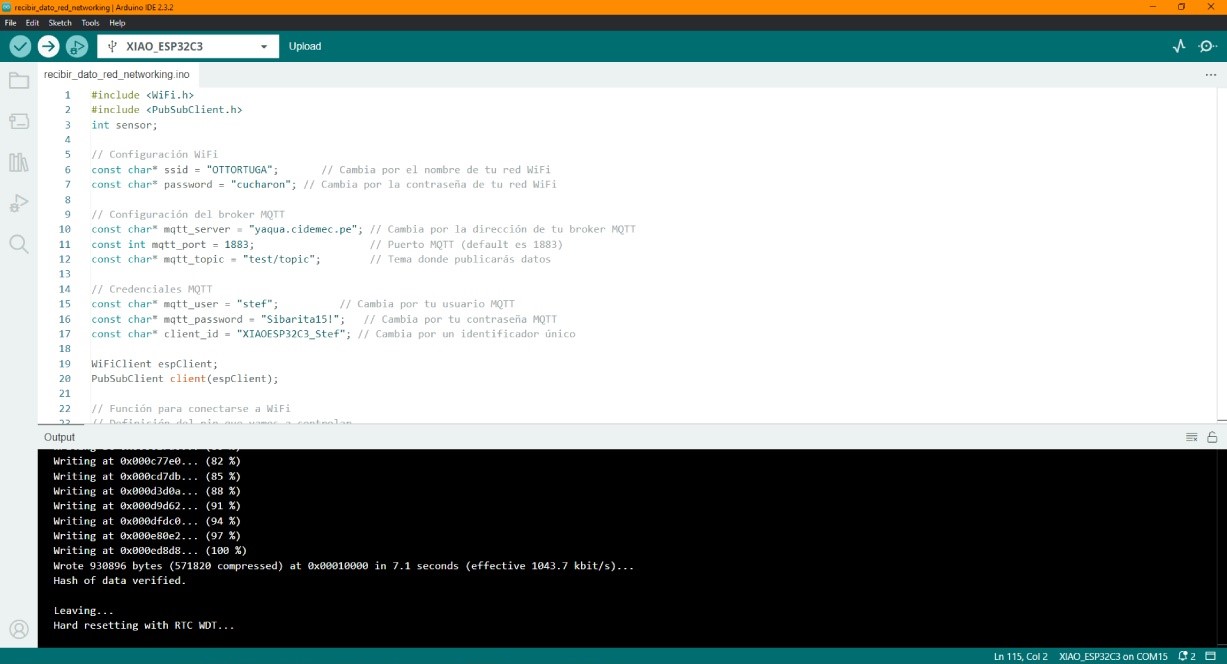
Arduino Code for SUSCRIBE - Board of Stefany
// PUBLISH Mayra Board
#include
#include
int sensor;

// Configuración WiFi
const char* ssid = "OTTORTUGA";       // Cambia por el nombre de tu red WiFi
const char* password = "*****"; // Cambia por la contraseña de tu red WiFi

// Configuración del broker MQTT
const char* mqtt_server = "yaqua.cidemec.pe"; // Cambia por la dirección de tu broker MQTT
const int mqtt_port = 1883;                   // Puerto MQTT (default es 1883)
const char* mqtt_topic = "test/topic";        // Tema donde publicarás datos

// Credenciales MQTT
const char* mqtt_user = "mayra";          // Cambia por tu usuario MQTT
const char* mqtt_password = "*****";   // Cambia por tu contraseña MQTT
const char* client_id = "XIAOESP32C3_mayra"; // Cambia por un identificador único

WiFiClient espClient;
PubSubClient client(espClient);

// Función para conectarse a WiFi
void setupWiFi() {
    delay(10);
    Serial.println();
    Serial.print("Conectando a ");
    Serial.println(ssid);

    WiFi.begin(ssid, password);

    while (WiFi.status() != WL_CONNECTED) {
    delay(500);
    Serial.print(".");
    }

    Serial.println("");
    Serial.println("WiFi conectado");
    Serial.print("Dirección IP: ");
    Serial.println(WiFi.localIP());
}

// Función para conectarse al broker MQTT
void reconnect() {
    while (!client.connected()) {
    Serial.print("Intentando conexión MQTT...");
    // Intentamos conectar con usuario y contraseña
    if (client.connect(client_id, mqtt_user, mqtt_password)) {
        Serial.println("Conectado al broker MQTT");
    } else {
        Serial.print("Falló, rc=");
        Serial.print(client.state());
        Serial.println(" Intentando de nuevo en 5 segundos...");
        delay(5000);
    }
    }
}

void setup() {
    Serial.begin(115200);
    pinMode(2,INPUT);
    setupWiFi();
    client.setServer(mqtt_server, mqtt_port);

    // Intentamos conectar al broker
    reconnect();
}

void loop() {
    if (!client.connected()) {
    reconnect();
    }
    client.loop();
/*
    // Subir un dato al broker
    String payload = "Hola desde XIAO ESP32-C3";
    Serial.print("Enviando mensaje: ");
    Serial.println(payload);
*/

sensor=digitalRead(2);
if (sensor==1)
{
    if (client.publish(mqtt_topic, "1")) {
    Serial.println("Mensaje publicado correctamente");
    } else {
    Serial.println("Error al publicar el mensaje");
    }}
else{
    if (client.publish(mqtt_topic, "0")) {
    Serial.println("Mensaje publicado correctamente");
    } else {
    Serial.println("Error al publicar el mensaje");
    }

}
    delay(1000); // Espera 5 segundos antes de enviar el siguiente mensaje
}
Arduino IDE Code PUBLISH - UPLOAD IN MAYRA'S BOARD
// SUSCRIBE STEFANY BOARD
#include
#include
int sensor;

// Configuración WiFi
const char* ssid = "OTTORTUGA";       // Cambia por el nombre de tu red WiFi
const char* password = "*****"; // Cambia por la contraseña de tu red WiFi

// Configuración del broker MQTT
const char* mqtt_server = "yaqua.cidemec.pe"; // Cambia por la dirección de tu broker MQTT
const int mqtt_port = 1883;                   // Puerto MQTT (default es 1883)
const char* mqtt_topic = "test/topic";        // Tema donde publicarás datos

// Credenciales MQTT
const char* mqtt_user = "stef";          // Cambia por tu usuario MQTT
const char* mqtt_password = "*****";   // Cambia por tu contraseña MQTT
const char* client_id = "XIAOESP32C3_Stef_recibir"; // Cambia por un identificador único

WiFiClient espClient;
PubSubClient client(espClient);

// Función para conectarse a WiFi
// Definición del pin que vamos a controlar
const int controlPin = 3;

// Función para conectarse a WiFi
void setupWiFi() {
delay(10);
Serial.println();
Serial.print("Conectando a ");
Serial.println(ssid);

WiFi.begin(ssid, password);

while (WiFi.status() != WL_CONNECTED) {
delay(500);
Serial.print(".");
}

Serial.println("");
Serial.println("WiFi conectado");
Serial.print("Dirección IP: ");
Serial.println(WiFi.localIP());
}

// Callback que se ejecuta cuando llega un mensaje al tema suscrito
void callback(char* topic, byte* payload, unsigned int length) {
Serial.print("Mensaje recibido en el tema: ");
Serial.println(topic);
Serial.print("Mensaje: ");

// Convertir el payload en un String
String message;
for (unsigned int i = 0; i < length; i++) {
message += (char)payload[i];
}
Serial.println(message);

// Controlar el pin en función del mensaje recibido
if (message == "1") {
digitalWrite(controlPin, HIGH);
Serial.println("Pin 2 en HIGH");
} else if (message == "0") {
digitalWrite(controlPin, LOW);
Serial.println("Pin 2 en LOW");
} else {
Serial.println("Comando no reconocido");
}
}

// Función para conectarse al broker MQTT
void reconnect() {
while (!client.connected()) {
Serial.print("Intentando conexión MQTT...");
if (client.connect(client_id, mqtt_user, mqtt_password)) {
    Serial.println("Conectado al broker MQTT");

    // Suscribirse al tema
    if (client.subscribe(mqtt_topic)) {
    Serial.println("Suscripción exitosa al tema: ");
    Serial.println(mqtt_topic);
    } else {
    Serial.println("Error al suscribirse al tema");
    }
} else {
    Serial.print("Falló, rc=");
    Serial.print(client.state());
    Serial.println(" Intentando de nuevo en 5 segundos...");
    delay(5000);
}
}
}

void setup() {
Serial.begin(115200);

// Configurar el pin como salida
pinMode(controlPin, OUTPUT);
digitalWrite(controlPin, LOW); // Inicialmente en LOW

setupWiFi();
client.setServer(mqtt_server, mqtt_port);
client.setCallback(callback);

// Intentamos conectar al broker
reconnect();
}

void loop() {
if (!client.connected()) {
reconnect();
}

client.loop();
}
Arduino IDE Code SUSCRIBE - UPLOAD IN MAYRA'S BOARD
Final result: Mayra publish - Stef suscribe
AboutLearning
- Using EMQX as an MQTT broker: I learned that EMQX is an essential tool for managing communication between IoT devices, enabling real-time data exchange through a lightweight protocol such as MQTT. This is key to develop scalable and efficient solutions in digital manufacturing or automation projects.
- Interaction between sensors and actuators: I understood how infrared sensors, when detecting objects, can publish information in an MQTT broker, and how other devices, such as buzzers, can act accordingly by subscribing to those messages, showing a practical IoT application.
My Veredictfrom what I learned
- The implementation of EMQX demonstrates that MQTT-based systems are highly efficient and reliable for real-time communication between devices, making them an ideal solution for automation and monitoring projects.
- The use of platforms such as EMQX together with basic components such as sensors and actuators shows that it is possible to develop functional IoT systems without complex hardware, which favors accessibility and expansion to larger projects.