Interface & Application Programing
UsingProcessing
Processing is a development environment and programming language used to create digital art projects, interactive design, data visualizations, animations and creative prototypes. It was created with the goal of making programming more accessible to artists, designers, and creative people, even if they have no previous programming experience. write it colloquially

Processing
Week 14 Assignment
IndividualTask
👩💻This week was a very enriching experience, as I was able to deepen the interaction between hardware and software, combining sensors, microcontrollers and visual programming. I learned how to use the ATTiny 1614 with the Arduino IDE, integrating buttons and sensors like the TCRT5000 to control graphical elements in Processing. I also explored how data from the physical world can be translated into visual and interactive actions, better understanding the communication between devices through digital signals. This process helped me strengthen my skills in programming, electronics and interactive design, expanding the possibilities of my future creative projects.
First exercise
In this exercise, I started using my board with an ATTiny 1614 and took advantage of the built-in button to control something super basic but interesting: turning on and off a circle in Processing. The operation was simple, every time I pressed the button, the circle on the screen changed state, appearing or disappearing accordingly. It was a fun way to connect the physical world with the visual and understand how hardware and software interact.

Program uploaded to my attiny1614
First, I used the Arduino IDE to load the program on the board with the ATTiny 1614, correctly configuring the microcontroller model and the corresponding programmer. In the code, I defined the logic for the built-in button to send a digital signal to the microcontroller, which would then be interpreted as a state change (turn on or off). After compiling and loading the program, my board was ready to interface with Processing and control the circle on the screen based on the button inputs.

Program in processing
    //stef_first exercise

    const int sensor = 10;
    const int led1 = 8;
    int s1;

    const int pinservo1=1;

    void setup() {
        Serial.begin(9600);
        pinMode(sensor,INPUT);
        pinMode(led1,OUTPUT);

    }

    void loop() {

        s1= digitalRead(sensor);


        if (s1==1)
        {digitalWrite(led1,HIGH);
        Serial.print(1);
        }
        else
        {
        digitalWrite(led1,LOW);
        Serial.print(0);
        }


    delay(20);
    }
Arduino IDE Code: Interacting with processing by pressing the button on the board
First try: Interacting with processing by pressing the button on the board
Second exercise
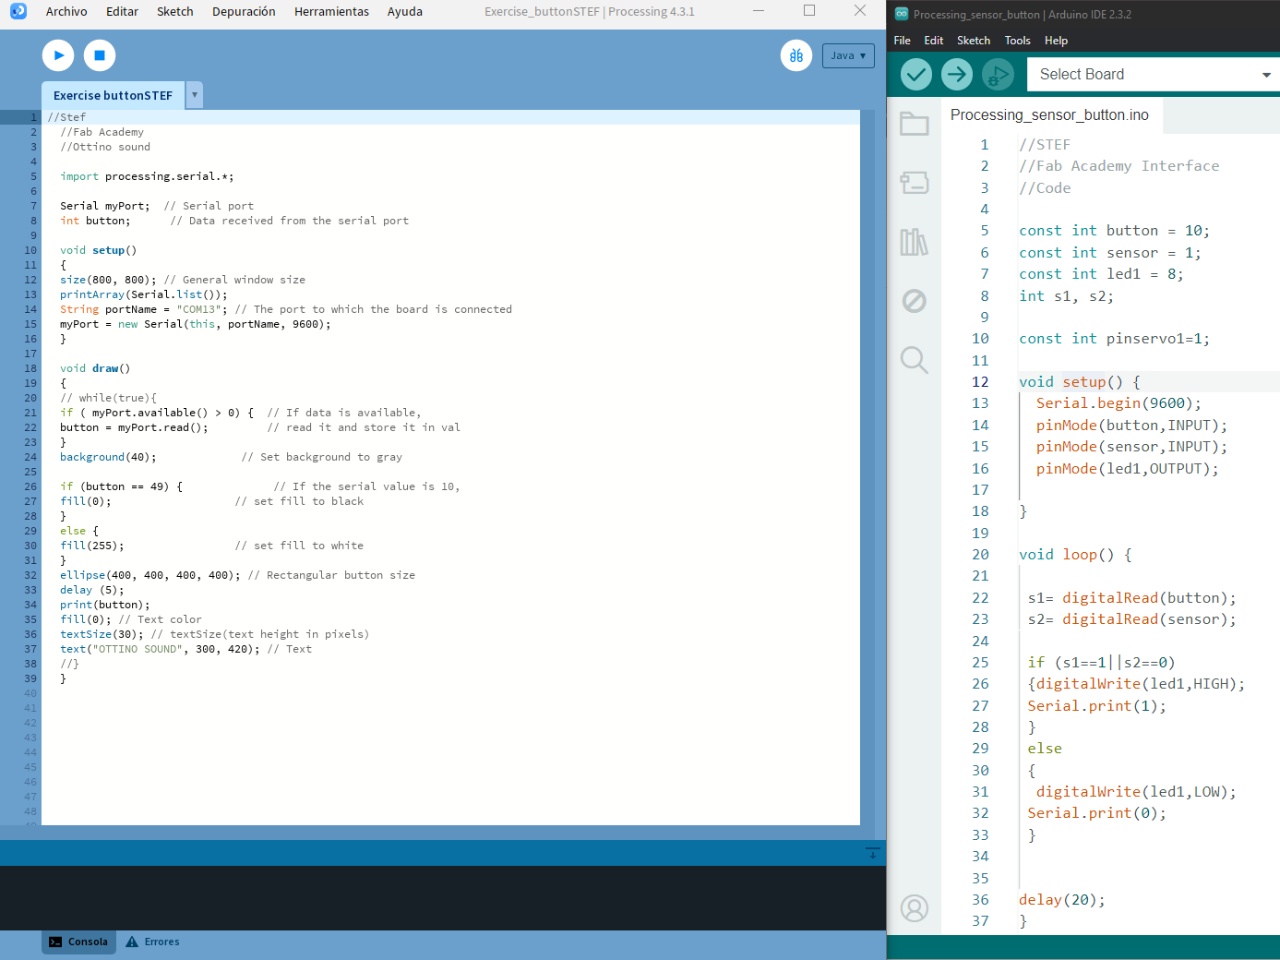
In the second exercise, I used the TCRT5000 infrared sensor to detect objects and combined its functionality with the board's built-in button. The sensor sent a signal to the microcontroller when it detected a nearby object💃💃, and this signal was used to turn a circle on or off in Processing, just as with the button. This allowed me to activate the circle in two ways: automatically when detecting an object with the sensor or manually when pressing the button. It was a good exercise to explore how to integrate multiple inputs into a single project.

Second program uploaded to my attiny1614
    //STEF
    //Fab Academy Interface
    //Code

    const int button = 10;
    const int sensor = 1;
    const int led1 = 8;
    int s1, s2;

    const int pinservo1=1;

    void setup() {
        Serial.begin(9600);
        pinMode(button,INPUT);
        pinMode(sensor,INPUT);
        pinMode(led1,OUTPUT);

    }

    void loop() {

        s1= digitalRead(button);
        s2= digitalRead(sensor);

        if (s1==1||s2==0)
        {digitalWrite(led1,HIGH);
        Serial.print(1);
        }
        else
        {
        digitalWrite(led1,LOW);
        Serial.print(0);
        }


    delay(20);
    }
Arduino IDE Code: Interacting with processing by pressing the button or with a infrared sensor
Second try: Interacting with processing by pressing the button or with a infrared sensor
Second try: Interacting with processing by pressing the button or with a infrared sensor
AboutLearning
- This week I learned how to connect the physical world with the digital world using microcontrollers such as the ATTiny 1614 and the TCRT5000 infrared sensor, as well as tools such as Processing.
- I also discovered how to handle multiple inputs (buttons and sensors) to control specific actions, improving my understanding of programming logic.
My Veredictfrom what I learned
- I used my board with the ATTiny 1614 and it worked very well with Processing. I think it turned out to be a light and efficient solution for basic projects, but with certain limitations when compared to more robust boards like an ESP32, especially in connectivity and memory issues.
- Processing is ideal for interactive visualization, it is perfect for fast and creative visual projects.