Interface and Application Programming
week 14 assignment is to write an application that interfaces a user with an input & or output device that I made
This week I like to transmit audio from my PC to the ESP32 walki-talki Project That I made during the Networking and Communications week.It has an I2S decoder to decode the audio to the speaker
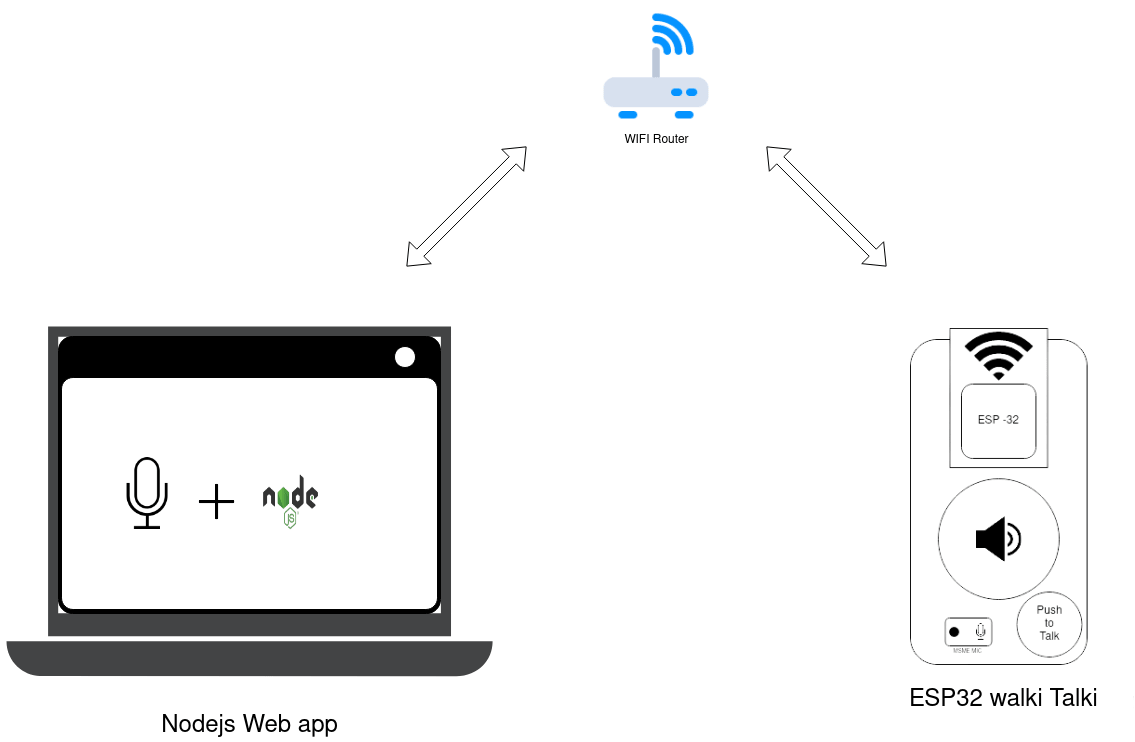
The above figure shows what exactly I wanted to do in this week assignment. I'm using the Nodejs server program with a web interface to do the job
So the walki-talki project is using the UDP protocol to send and receive data from server.I did able to broadcast the audio of my computer with to a ESP32 in my previous project 2 years ago.That time I used an Icecast server with But Application in a windows PC
Due to some time limitations I've to drop the plan for while and continue the assignment by creating a simple app using other languages and platforms and will continue the task later.So I've thought to try the Python GUI libraries as per my Instructor's suggestion
PyQt5
Qt is a set of C++ libraries which can implement high-level APIs for accessing many aspects od modern desktop and mobile systems. It's indeed a cross platform libraries.PyQt5 is a comprehensive set of Python bindings for Qt v5. see here for more. One of my friend suggests me this so we can create simple serial UI's like the Python tkinter.

So I'm gonna try out the PyQt5 in my windows. I already have the python installed my computer, now I need to install PyQt5 library using the python "pip install" command
pip install PyQt5Using the above command in my windows Powershell I installed the PyQt5 for python library in my windows PC. check here for the installation documentation
What should I build?
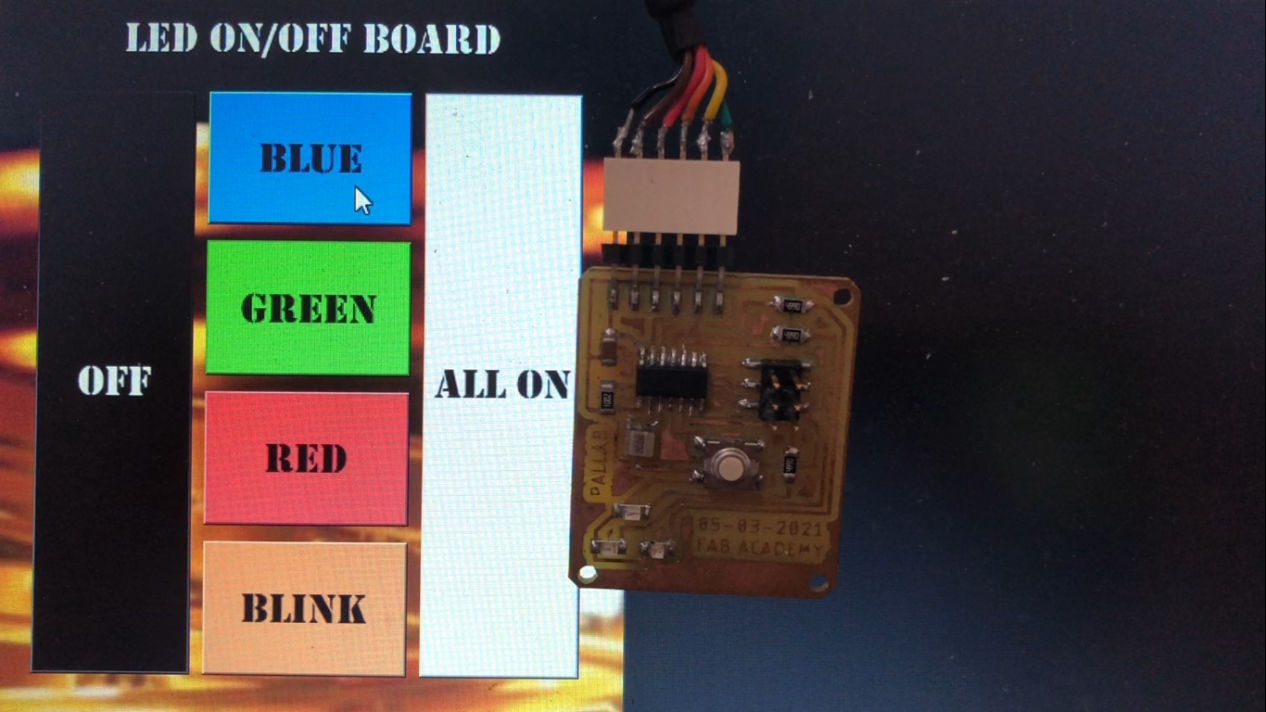
While I'm exploring the PyQt5 Tutorials it got me thinking, to make some Ui for interfacing my Communication week RGB LED I2C project .So I can control my Slave boards from the UI by sending some commands to the Master board through Serials to perform the I2C control tasks.
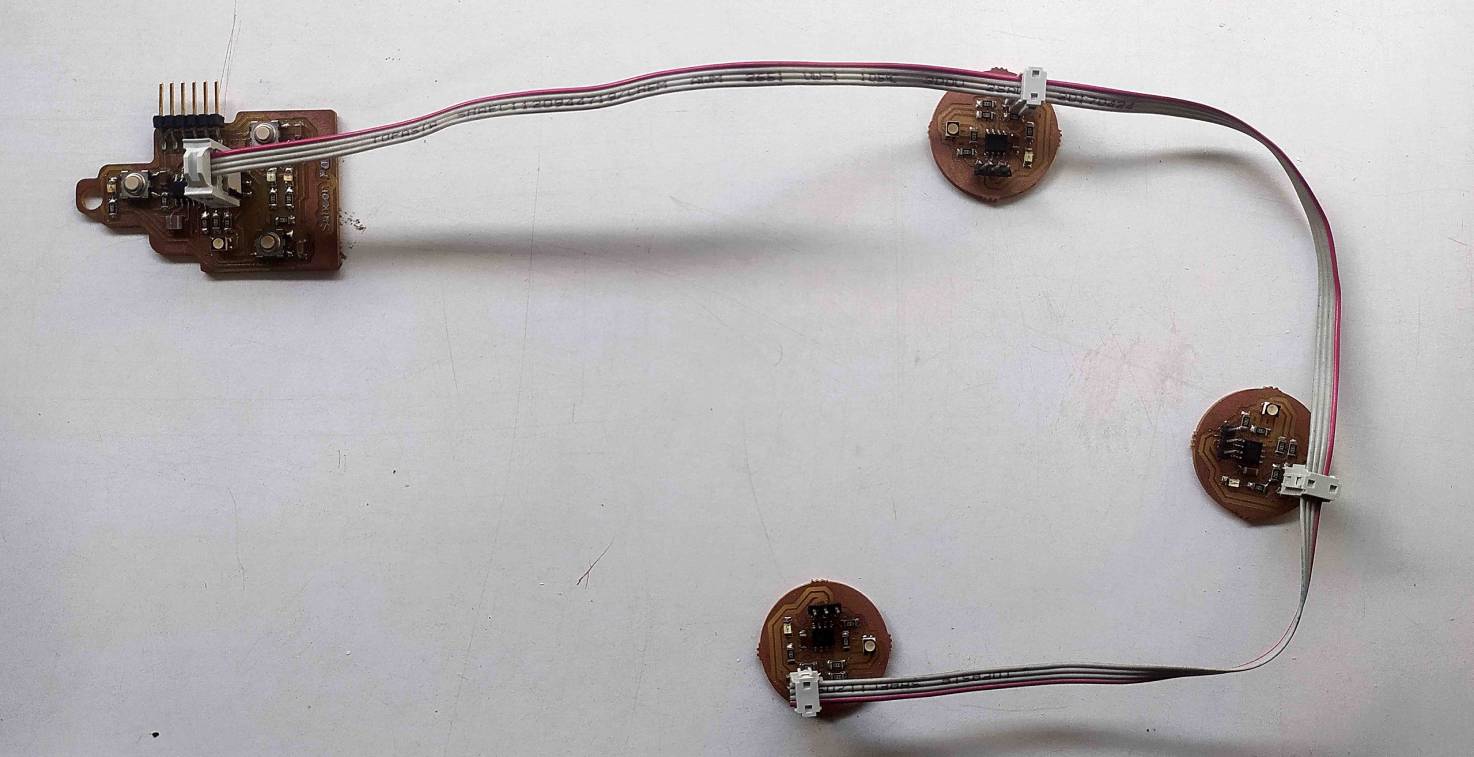
Here is my Hardware setup from my Communication week please check my Communication week for exploring the I2C project I did
Serial (USART) Communication Protocol
So in order to communicate with the board I made we have make protocol which sends an some commands through the serial to board and recognize the command perform accordingly. It's works kind of G-code in CNC I already learnt about it during our machine week.
- 6 digit char numerics will be used ranging from 000000 to 111111
- The command will group as two digits and will match slave1,slave2,slave3 to 00,00,00 respectively
- ';' using the semicolon as command ending sign
- Commands
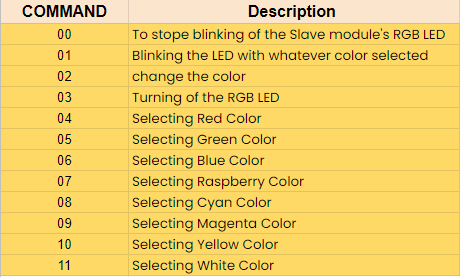
So I made up a communication protocol with above command and coded in to my board using this I can select color of each Slaves and I can turn off them and also individual blink options is there.
- The Command will be '04' + '04' + '04' + ';'
- -> 040404;
Let's say I need to make all Red color
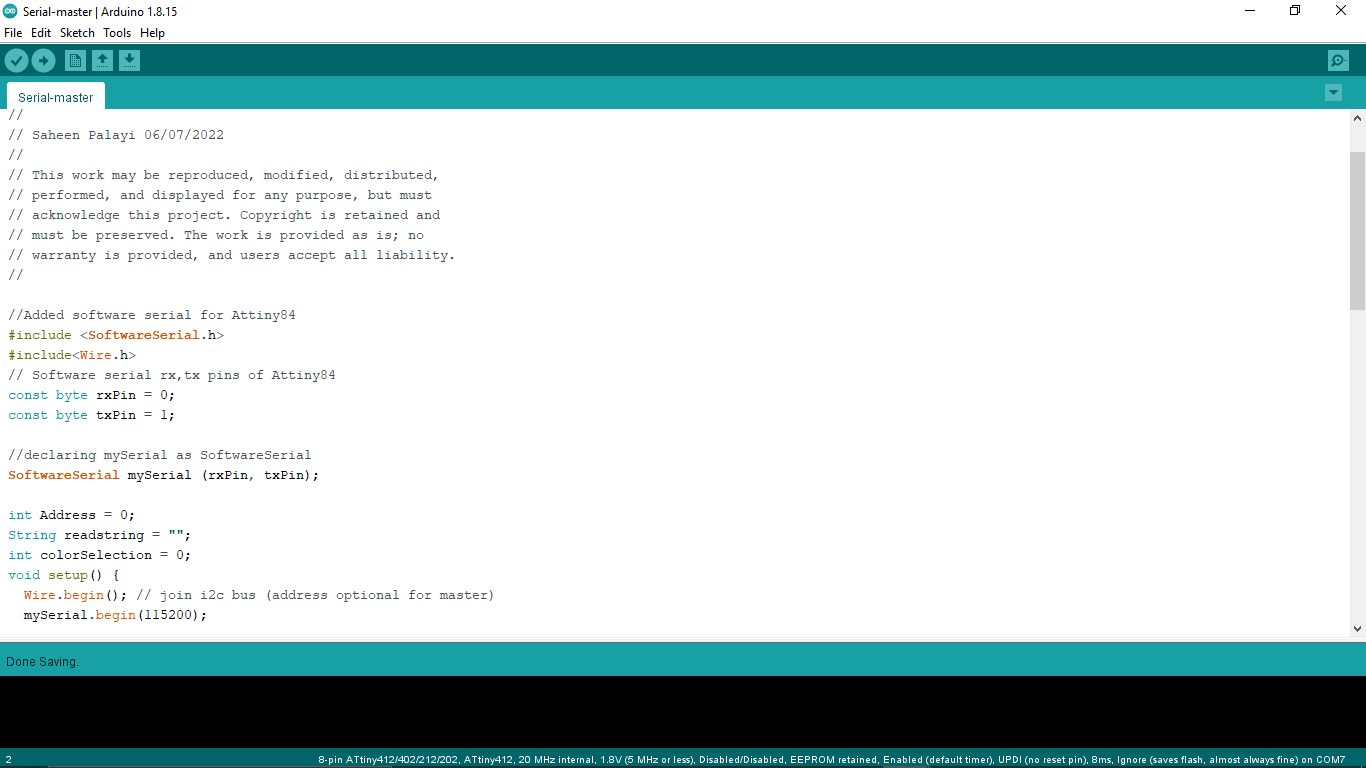
Here is the Serial-master code I've made.It just sending the commands which receives from the serial, to the I2C Slave modules.
Attiny84 Serial-master CODE :-
                    //
                    // Serial-master.ino
                    //
                    // I2C Master
                    //
                    // Saheen Palayi 06/07/2022
                    //
                    // This work may be reproduced, modified, distributed,
                    // performed, and displayed for any purpose, but must
                    // acknowledge this project. Copyright is retained and
                    // must be preserved. The work is provided as is; no
                    // warranty is provided, and users accept all liability.
                    //

                    //Added software serial for Attiny84
                    #include < SoftwareSerial.h >
                    #include< Wire.h >
                    // Software serial rx,tx pins of Attiny84
                    const byte rxPin = 0;
                    const byte txPin = 1;

                    //declaring mySerial as SoftwareSerial
                    SoftwareSerial mySerial (rxPin, txPin);

                    int Address = 0;
                    String readstring = "";
                    int colorSelection = 0;
                    void setup() {
                      Wire.begin(); // join i2c bus (address optional for master)
                      mySerial.begin(115200);

                    }

                    void loop() {
                      while (mySerial.available() > 0)
                      {
                        char c = mySerial.read();
                        mySerial.println(c);
                        if (c != ';')
                        {
                          readstring = readstring + c;
                          c = ' ';
                          delay(15);
                        }
                        else
                        {
                          mySerial.println(readstring);
                          parseCommand(readstring);
                          readstring = "";
                        }
                      }

                    }

                    void parseCommand(String data)
                    {


                      Address = 1;
                      colorSelection = (data[0] - 48) * 10 + data[1] - 48;
                      sendWire();
                      delay(10);
                      Address = 2;
                      colorSelection = (data[2] - 48) * 10 + data[3] - 48;
                      sendWire();
                      delay(10);
                      Address = 3;
                      colorSelection = (data[4] - 48) * 10 + data[5] - 48;
                      sendWire();
                      delay(10);

                    }
                    void sendWire()
                    {
                      mySerial.println(Address);
                      mySerial.println(colorSelection);


                      Wire.beginTransmission(Address); // transmit to device
                      Wire.write(colorSelection);        // sends five bytes
                      Wire.endTransmission();    // stop transmitting
                    }
After I made a new serial-master code for my attiny84 board from the Communication week I2C project also did some editing in the Slave codes too
Attiny412 coin Slave_2 CODE :-
                    //
                    // Slave_2.ino
                    //
                    // I2C Slave
                    //
                    // Saheen Palayi 06/07/2022
                    //
                    // This work may be reproduced, modified, distributed,
                    // performed, and displayed for any purpose, but must
                    // acknowledge this project. Copyright is retained and
                    // must be preserved. The work is provided as is; no
                    // warranty is provided, and users accept all liability.
                    //

                    #define RedLED 0 //PA3 0
                    #define GreenLED 1 //PA6  1
                    #define BlueLED 4 //PA7
                    long redValue, blueValue, greenValue;
                    unsigned long previousTime = 0;
                    int switchColor = 1;
                    boolean blinkFlag = false;
                    #include< Wire.h >

                    void setup() {
                      Wire.begin(3);
                      Wire.onReceive(receiveEvent);
                      pinMode(RedLED, OUTPUT);
                      pinMode(GreenLED, OUTPUT);
                      pinMode(BlueLED, OUTPUT);

                      digitalWrite(RedLED, HIGH);
                      digitalWrite(GreenLED, HIGH);
                      digitalWrite(BlueLED, HIGH);

                    }
                    void loop() {
                      unsigned long currentTime = millis();
                      if ((currentTime - previousTime) >= 100)
                      {
                        if (blinkFlag)
                        {
                          colorSelect(switchColor);
                        }
                      }
                      if ( (currentTime - previousTime) >= 200)
                      {
                        if (blinkFlag)
                        {
                          colorSelect(0);
                        }
                        previousTime = currentTime;
                      }


                      soft_analogWrite( redValue);

                      //  delay(100);
                    }
                    void soft_analogWrite(int Value) {

                      // On period
                      for (int x = 0; x < Value; x++) {
                        digitalWrite(RedLED, LOW);
                      }

                      // Off period
                      for (int x = 0; x < (255 - Value); x++) {
                        digitalWrite(RedLED, HIGH);
                      }

                    }
                    void RGB_color(int RedLED_value, int GreenLED_value, int BlueLED_value)
                    {

                      redValue = RedLED_value;
                      //
                      analogWrite(GreenLED, (255 - GreenLED_value));
                      analogWrite(BlueLED, (255 - BlueLED_value));
                      //  Serial.print(RedLED_value);
                      //    Serial.print(GreenLED_value);
                      //      Serial.println(BlueLED_value);


                    }
                    void colorSelect(int colorOption) {
                      switch (colorOption)
                      {
                        case 0:
                          RGB_color(0, 0, 0); // off
                          break;
                        case 1:
                          RGB_color(255, 0, 0); // Red
                          break;
                        case 2:
                          RGB_color(0, 255, 0); // Green

                          break;
                        case 3:
                          RGB_color(0, 0, 255); // Blue

                          break;
                        case 4:
                          RGB_color(227, 11, 92); // Raspberry
                          break;
                        case 5:
                          RGB_color(0, 255, 255); // Cyan
                          break;
                        case 6:
                          RGB_color(255, 0, 255); // Magenta
                          break;
                        case 7:
                          RGB_color(255, 255, 0); // Yellow
                          break;
                        case 8:
                          RGB_color(255, 255, 255); // White
                          break;
                      }
                    }
                    void receiveEvent(int howMany) {
                      int reciveData = Wire.read();
                      if (reciveData == 1)
                      {
                        blinkFlag = true;

                      }
                      if (reciveData == 0)
                      {
                        blinkFlag = false;
                      }
                        if (reciveData == 2)
                        {
                          switchColor ++;
                          if (switchColor >= 9)
                          {
                            switchColor = 1;
                          }
                        }
                      colorSelect(switchColor);
                      if (reciveData > 2)
                      {
                        switchColor = reciveData - 3;
                        colorSelect(switchColor);
                      }
                    }
Then I uploaded the master slave codes to each boards like I did in the Communication week gave the address 1,2,3 for the Attiny412 coin boards.
Here is the video of the testing of the Protocol I've made You can see with the Commands I can turn off,blink,stop blink ad change color as well.
UI Wireframing
After I went through the tutorials and basic understanding of the PyQt5 Ui design using python I've made a plan to build an simple UI to control my Communication week I2C Project
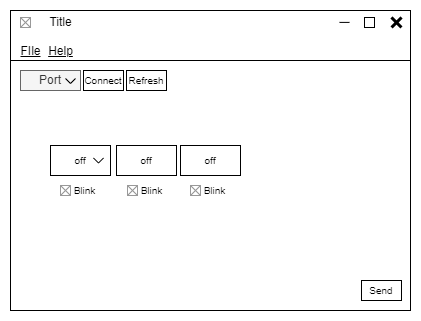
Here is the simple wireframe I drew using the draw.io tool .From this diagram I can get an understanding about placing the buttons and elements while coding the application
Let's Build the UI
I wrote the Python code in VS code IDE for the UI according to the wireframe plan I've made. It takes a lots of test runs to get the final UI .Which is still easy to do in Python lot of Documentations and examples available on the Internet.
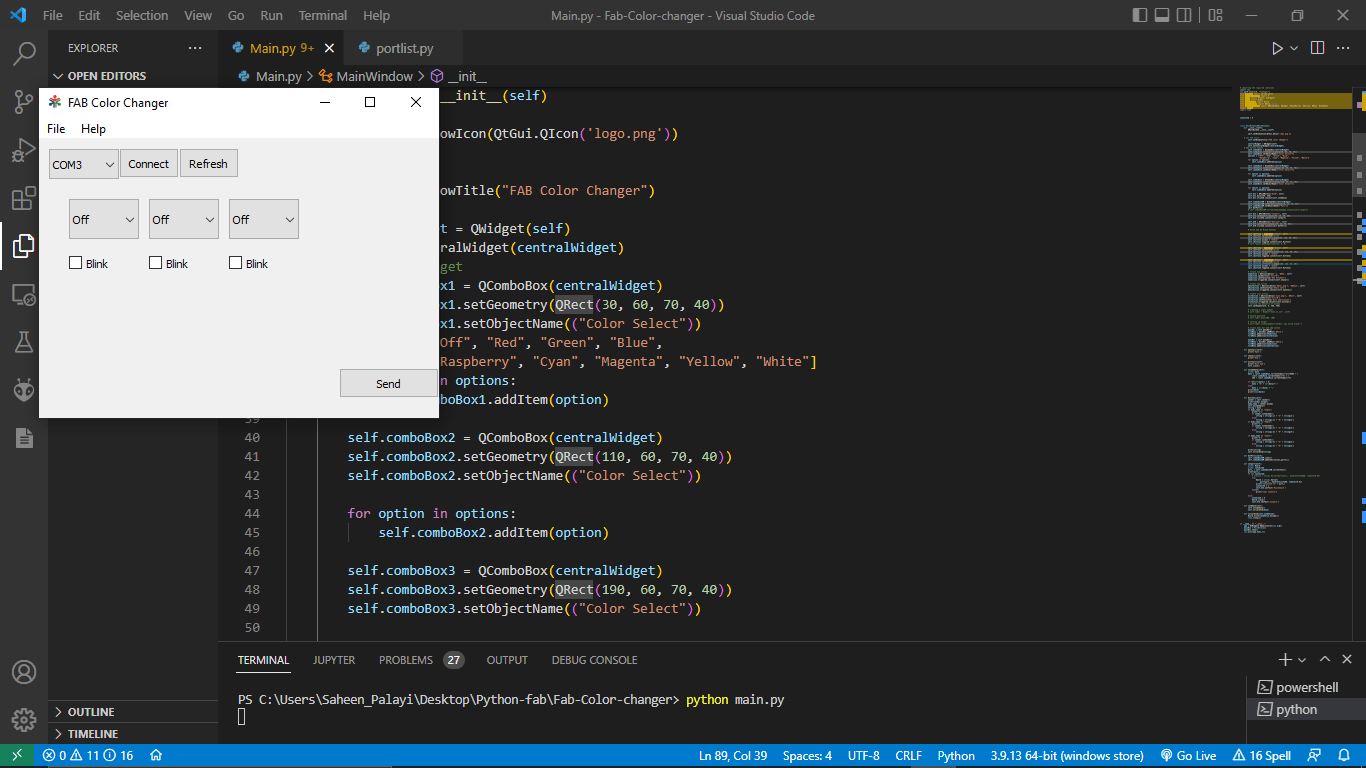
By running 'python mai.py' in the VS Code terminal I can run the UI alive like a Windows application
FAB Color Changer main.py CODE :-
#
# main.py
#
# FAB Color Changer
#
# Saheen Palayi 10/07/2022
#
# This work may be reproduced, modified, distributed,
# performed, and displayed for any purpose, but must
# acknowledge this project. Copyright is retained and
# must be preserved. The work is provided as is; no
# warranty is provided, and users accept all liability.
# importing the required libraries
import sys
sys.path.insert(0, "configs/")
from portlist import serial_ports
from PyQt5.QtWidgets import *
from PyQt5 import QtCore, QtWidgets
from PyQt5 import QtGui
from PyQt5.QtGui import QIcon
from PyQt5.QtCore import QSize, QRect
from PyQt5.QtWidgets import QMainWindow, QWidget, QPushButton, QAction, QMenu, QComboBox
import serial
import time
connected = 0
class MainWindow(QMainWindow):
def __init__(self):
QMainWindow.__init__(self)
self.setWindowIcon(QtGui.QIcon('logo.png'))
# set the title
self.setWindowTitle("FAB Color Changer")
centralWidget = QWidget(self)
self.setCentralWidget(centralWidget)
# Add button widget
self.comboBox1 = QComboBox(centralWidget)
self.comboBox1.setGeometry(QRect(30, 60, 70, 40))
self.comboBox1.setObjectName(("Color Select"))
options = ["Off", "Red", "Green", "Blue",
"Raspberry", "Cyan", "Magenta", "Yellow", "White"]
for option in options:
self.comboBox1.addItem(option)
self.comboBox2 = QComboBox(centralWidget)
self.comboBox2.setGeometry(QRect(110, 60, 70, 40))
self.comboBox2.setObjectName(("Color Select"))
for option in options:
self.comboBox2.addItem(option)
self.comboBox3 = QComboBox(centralWidget)
self.comboBox3.setGeometry(QRect(190, 60, 70, 40))
self.comboBox3.setObjectName(("Color Select"))
for option in options:
self.comboBox3.addItem(option)
self.bt1 = QPushButton("Send", self)
self.bt1.move(300, 250)
self.bt1.clicked.connect(self.sendData)
self.comboBoxCOM = QComboBox(centralWidget)
self.comboBoxCOM.setGeometry(QRect(10, 10, 70, 30))
self.comboBoxCOM.setObjectName(("Port"))
self.GetPorts()
# self.comboBoxCOM.currentIndexChanged.connect(self.setport)
self.bt2 = QPushButton("Connect", self)
self.bt2.setGeometry(QRect(80, 30, 60, 30))
self.bt2.clicked.connect(self.setport)
self.bt9 = QPushButton("Refresh", self)
self.bt9.setGeometry(QRect(140, 30, 60, 30))
self.bt9.clicked.connect(self.GetPorts)
# Blink and No Blink buttons
self.cbutton1 = QCheckBox("Blink", self)
self.cbutton1.setChecked(False)
self.cbutton1.setGeometry(QRect(30, 130, 60, 30))
self.cbutton1.animal = "modu1"
self.cbutton1.toggled.connect(self.Button1)
# self.layout.addWidget(cbutton, 0, 0)
self.cbutton2 = QCheckBox("Blink", self)
self.cbutton2.setChecked(False)
self.cbutton2.setGeometry(QRect(110, 130, 60, 30))
self.cbutton2.animal = "modu2"
self.cbutton2.toggled.connect(self.Button1)
self.cbutton3 = QCheckBox("Blink", self)
self.cbutton3.setChecked(False)
self.cbutton3.setGeometry(QRect(190, 130, 60, 30))
self.cbutton3.animal = "modu3"
self.cbutton3.toggled.connect(self.Button1)
# Create new action
newAction = QAction(QIcon(''), '&New', self)
newAction.setShortcut('Ctrl+N')
newAction.setStatusTip('New document')
newAction.triggered.connect(self.newCall)
# Create new action
aboutAction = QAction(QIcon('About.png'), '&About', self)
aboutAction.setStatusTip('About Info')
aboutAction.triggered.connect(self.openCall)
# Create exit action
exitAction = QAction(QIcon('exit.png'), '&Exit', self)
exitAction.setShortcut('Ctrl+Q')
exitAction.setStatusTip('Exit application')
exitAction.triggered.connect(self.exitCall)
# setting the geometry of window
self.setGeometry(0, 0, 400, 300)
# creating a label widget
# self.label = QLabel("Icon is set", self)
# moving position
# self.label.move(100, 100)
# setting up border
# self.label.setStyleSheet("border: 1px solid black;")
# Create menu bar and add action
menuBar = self.menuBar()
fileMenu = menuBar.addMenu('&File')
fileMenu.addAction(newAction)
fileMenu.addAction(exitAction)
menuBar = self.menuBar()
fileMenu = menuBar.addMenu('&Help')
fileMenu.addAction(newAction)
fileMenu.addAction(aboutAction)
def openCall(self):
print('Open')
def newCall(self):
print('New')
def exitCall(self):
print('Exit app')
self.close()
def encodeData(self):
global data
data = (self.comboBox1.currentIndex()+3)*10000 + \
(self.comboBox2.currentIndex()+3) * \
100 + (self.comboBox3.currentIndex()+3)
if len(str(data)) < 6:
data = "0" + str(data)+";"
else:
data = str(data) + ";"
print(data)
print(type(data))
def Button1(self):
sender = self.sender()
print(sender.animal)
modu_name = sender.animal
self.encodeData()
string = data
if modu_name == "modu1":
print("1")
if sender.isChecked():
string = string[:1] + "1" + string[2:]
else:
string = string[:1] + "0" + string[2:]
if modu_name == "modu2":
print("2")
if sender.isChecked():
string = string[:3] + "1" + string[4:]
else:
string = string[:3] + "0" + string[4:]
if modu_name == "modu3":
print("3")
if sender.isChecked():
string = string[:5] + "1" + string[6:]
else:
string = string[:5] + "0" + string[6:]
print(string)
self.serialSend(string)
def GetPorts(self):
self.comboBoxCOM.clear()
self.comboBoxCOM.addItems(serial_ports())
def setport(self):
global Board
global connected
port_ = self.comboBoxCOM.currentText()
print(port_)
if not connected:
# arduino = serial.Serial(port=port_, baudrate=115200, timeout=0.01)
try:
Board = serial.Serial(
port=port_, baudrate=115200, timeout=0.01)
print("Connected to" + port_)
connected = 1
self.bt2.setText('Disconnect')
except:
print("Cant connect")
else:
connected = 0
Board.close()
self.bt2.setText('Connect')
def sendData(self):
self.encodeData()
self.serialSend(data)
def serialSend(self,sendValue):
Board.write(sendValue.encode())
time.sleep(1)
if __name__ == "__main__":
app = QtWidgets.QApplication(sys.argv)
mainWin = MainWindow()
mainWin.show()
sys.exit(app.exec_())
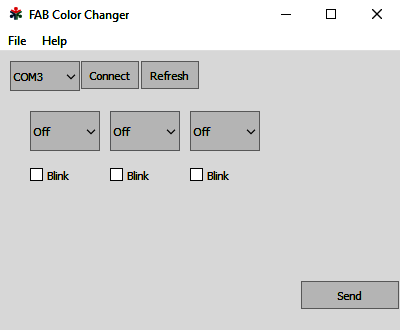
Here is the picture of the UI I've made with Python+Qt5 awesome!. I can add later many functions and Layouts to make more like a professional application
FAB Color Changer 'Serial' portlist.py CODE :-
                        import sys
                        import glob
                        import serial


                        def serial_ports():
                            """ Lists serial port names

                                :raises EnvironmentError:
                                    On unsupported or unknown platforms
                                :returns:
                                    A list of the serial ports available on the system
                            """
                            if sys.platform.startswith('win'):
                                ports = ['COM%s' % (i + 1) for i in range(256)]
                            elif sys.platform.startswith('linux') or sys.platform.startswith('cygwin'):
                                # this excludes your current terminal "/dev/tty"
                                ports = glob.glob('/dev/tty[A-Za-z]*')
                            else:
                                raise EnvironmentError('Unsupported platform')

                            result = []
                            for port in ports:
                                try:
                                    s = serial.Serial(port)
                                    s.close()
                                    result.append(port)
                                except (OSError, serial.SerialException):
                                    pass
                            return result


                        if __name__ == '__main__':
                            print(serial_ports())
The Serial python code is a separate python code which imported to the main file in this project.
Then I attached the I2C communication project to my computer using the Serial FTDI Cable I've and Tested the PyQt5 UI FAB color Changer like in the video.It's actually very feel good to see the app working finally!!
week 14 Group assignment is to compare as many tool options as possible
Group assignment
For the group assignment of this week , most of didn't present at the lab because of the pandemic and other reasons.So, some of us did the assignment alone and few of decided to compare others assignments and also decided to tryout something more if time left.
- Python
- Processing
- MIT App Inventor
- Firebase
- Blynk IoT
- Nodejs
- FAB MODS
- WebGl
List of explored tools by all:-
Processing
During the machine week We had used an user interface for our machine for test which is built using the Processing application development platform. while we exploring we understood that processing one of the open source Application development tool which also supports cross platforms.
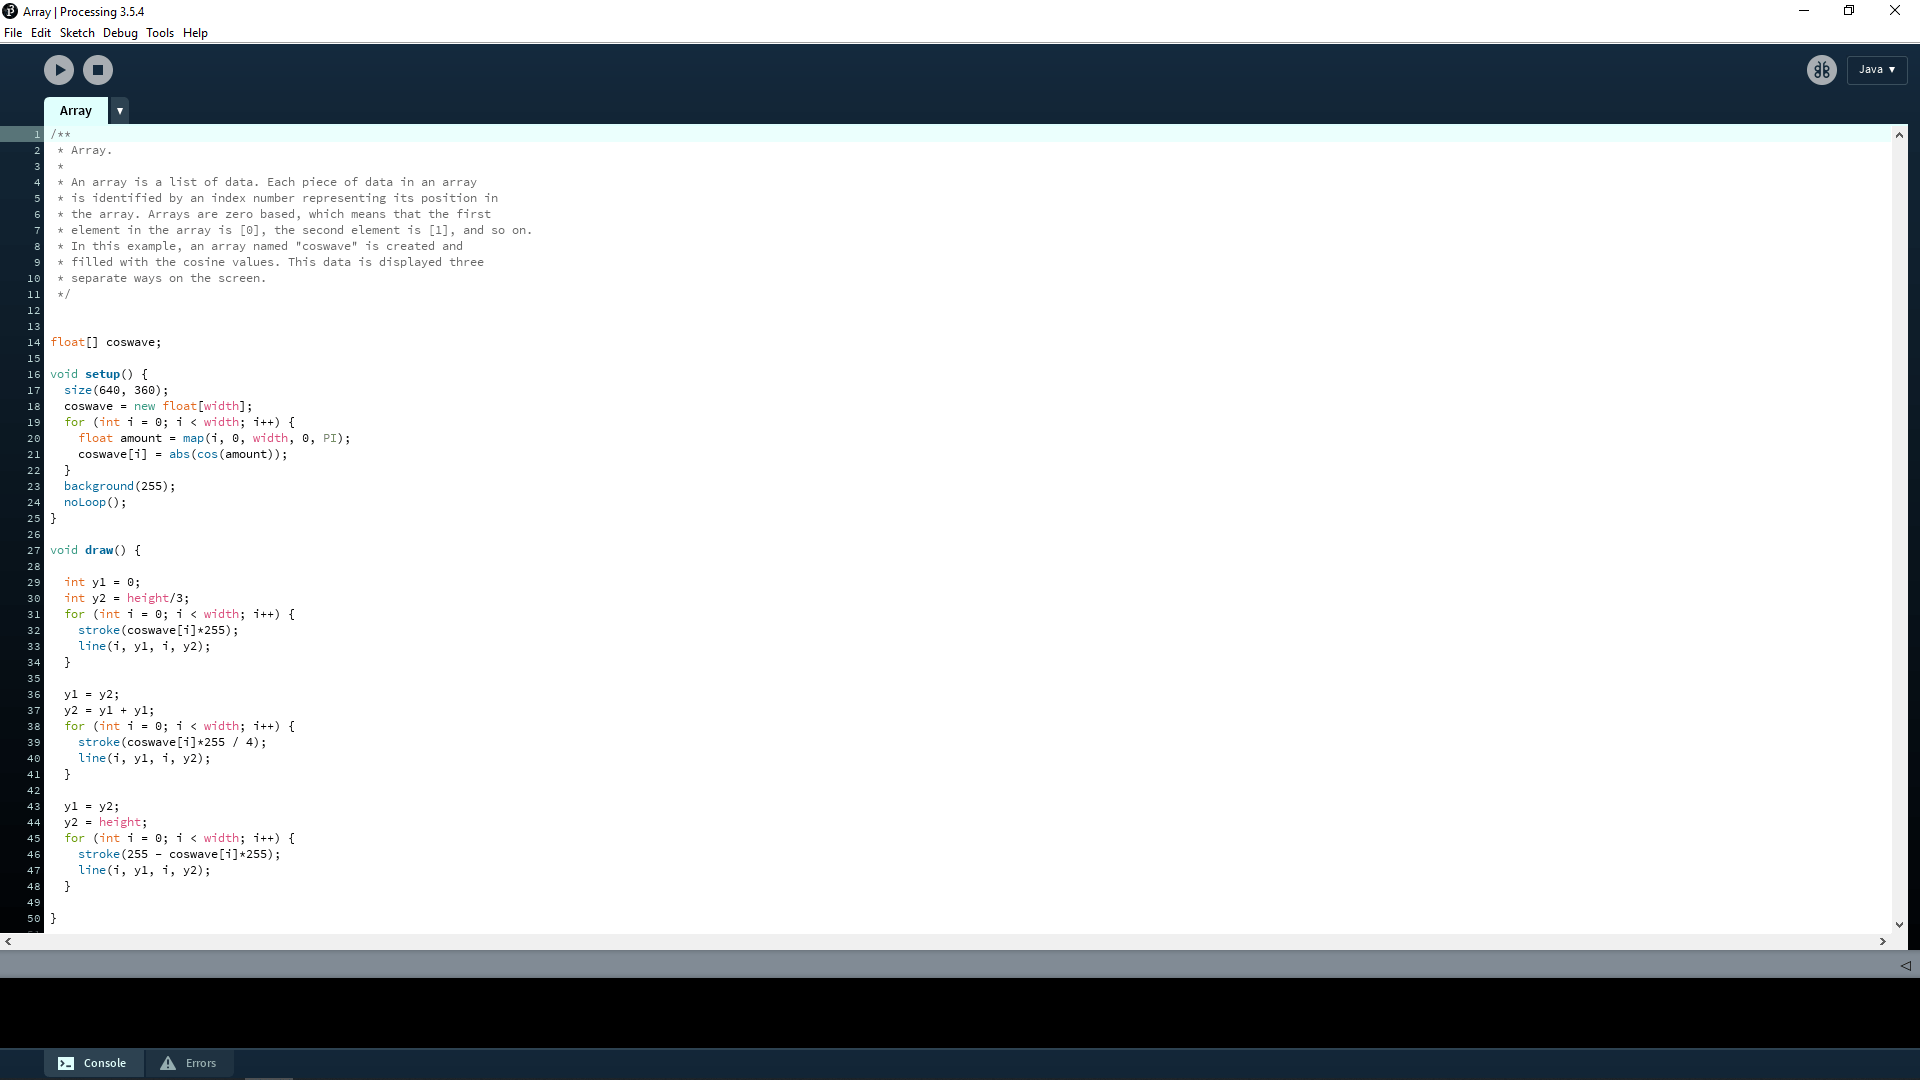
Here is the Screen shot of the Processing 3 IDE .Looks very familiar to the Arduino IDE because the Arduino IDE actually Inspired from the Processing IDE UI. In processing we write the code in C and C++ like in the arduino then we can play and debug to check the application's working during it's development.
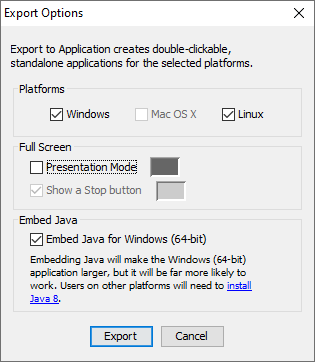
here is the exporting option of the Processing IDE that we can create executable files of our own application. The Mac OS X is unselectable because I'm using a windows PC.
Check out Alfia's Week 14 to see how she used the processing IDE to create an application to control one of her own Micro controller board.
Python
There are multiple ways to build an application using python nowadays the python language is most powerful and simple to learn during the we explored 2 different methods to create an application in python
- Tkinter
- PyQt5
To build the application we just simply need to install the one of the libraries from above mentioned and we can do it in a simple TEXT IDE like VS Code. just running the '.py' file can show the output in our Computer perfectly.
Tkinter
Tikinder is the one we mostly found in Neil's classes and in fab documentation because the tutorials of tkinder is very much available in the Internet and Youtube crash course as well and most of the fabacademy examples in the input devices class is made using tkinter and python.
check out Pallab's Interfacing week. He build an application using python and tkinter for his board awesome!.
PyQt5
This is the another library which used to build awesome UI application which is very suitable for large scale project than the Tkinter.
Check this Tutorial for knowing more about the comparison of the Tkinter vs PyQt5
Check out Shaeen Palayi's Interfacing week to know more about PyQt5
MIT App Inventor
Building smartphone applications are needed little bit engineering and special skills are need. but,with MIT app Inventor It's very easy to build an android application with limited features and resources.
References
- Fab Academy Interface and Application Programming classes
- Visual Studio Code
- python
- Python PyQt5
- processing
- Python tkinter
- Python PyQt5 tutorial
Downloads
- PyQt5 GUI Python Code files
- Arduino Code Files