2. Computer aided design
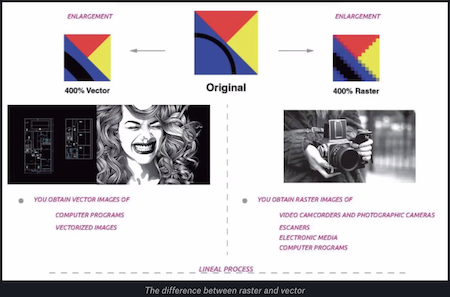
This week is all about designing using a computer. If we’re modelling, we want to achieve the biggest outcome, but preferably with not too big files. Information takes up a lot of space on your hard drive, so it’s a given that we have to keep it small. In modelling, we talk about raster and vector files. There is a big difference between a raster and a vector file. As a photographer and graphic designer I use both almost every day. So a lot of this class is a repetition of information.
But I never had Mythbusters as an example in class before!
But of course designing graphics is a totally different thing than designing for machines.
Simply put: you can upscale a vector to any size, while a raster file will get pixelated super fast. So choose wisely which of the two is needed for your design. When working with machines, you will most likely go for vector based files like eps or svg.
Mesh vs Nurbs

A quick comparison between the two:
Mesh
- Easier to modify
- Smaller file size
- Compatible with the STL format; no need to convert
- Full render, no seams from patching pieces together
- Uses points in space, based on triangles
- Not as smooth
NURBS
- More accurate, less pixels in your model
- Better for engineering and mechanical uses
- Renders smoothly
- Uses patches based on mathematical points in space
Conclusion: for 3D printing, it’s better to use a mesh file. A NURBS file needs to be converted into mesh before being able to print it. But if you like your curves, go for NURBS.
Parametric Design

Parametric design is part of next week’s assignment so I taught I would already start exploring the possibilities. I’m still looking for good software that I can use on my mac and iPad, but so far I haven’t yet found it.
The whole goal of parametric design is abstracting your design to a set of rules, which allows you to make complex designs. It’s pretty cool and it allows you not only to make cool shapes and forms, but to simply adjust your whole design to say another boult as it automatically recalculated the whole thing. Super handy!

Software examples
It’s always good to have extra ideas concerning software and what to use for which type of designing. I followed the workshops on Rhino and Blender. Rhino is an expensive software package which I won’t be using, so I haven’t explored it further. In the past I already explored Blender, but it’s never been my cup of tea.
2D design and 3D modelling
Drawing in vectors is a well known thing for me. I prefer Illustrator for most graphic work, but this is a personal choice and is based on the training I had 15 years ago in school. Since then I’ve been experimenting with Inkscape and Gravit designer, both have their advantages and both have their flaws. But I guess there’s not one software that’ll do everything. Therefor I decided to focus on the 3D modelling software for this week.
Fusion 360
During the Thursday session from BCN we explored with Fusion 360. A new and interesting programme but I don’t think I’ll be using it very much. I’m not much a 3D modeller, but the software is impressive.
I did manage to make something. It’s not worth saving though, but at least I tried 🙂

I rendered the file as well.
Tinkercad
I have been experimenting with Tinkercad before as it’s a software we use to give workshops at Fyxxi as well. But it’s been a while. For this test I drew a logo for Rites on paper, I traced it in ProCreate on iPad. ProCreate exports to PNG, which is perfect for making a simple trace in Illustrator. The SVG was imported in Tinkercad and converted into a stamp, hence the mirroring. I added a base plate to the logo to make sure we didn’t loose the middle piece of the letter ‘R’ and went on to printing and testing the stamp.

The PLA is actually too smooth when stamping it straight from the printer, you need to sand it a little with a rough sandpaper to make sure it stamps okay. Let’s get stamping!

Download your own Rites stamp!
Shapr3D
Because I enjoy drawing on a screen (whether it’s a drawing pad like Wacom or my iPad) I looked a bit further to discover that Shapr3D is actually a pretty cool iPad alternative for 3D modelling. In this software having the freedom of drawing with a pen is very appealing to me and works much smoother than any of the other 3D modelling softwares I’ve tested this week!

You can easily see the size of the drawing, select the face you wish to change, extrude, … everything is also explained in super short instruction videos if you were to need them. I’m very happy with discovering this app! Both for 2D as well as 3D modelling. I applied for a free student license and I’ll definitely continu using this software during the course.
Model your final project
The whole project was a bit too high of an aim for this week, but I did manage to model a small piece that we need for the paper to stay on the board. I made a frame clamp, like you would use when you glued something together and want it to stay put. We need this to keep the paper or cardboard in place when the robot is drawing.
Download and print your own clamp.
I already made a first 3D-printed version as well. It needs some adjustments, but it worked just fine to keep my laser cut tea pot holder in place while drying.
