Individual Assignment
In this week, our task is to use a digital fabrication method that has not been covered in previous assignments. I first wanted to use water jet cutter to accomplish this week's assignment, but the device is not accessible now. So I changed my plan and tried to use the blasting machine in our FabLab instead.
Design
My original idea was to make a multi-tool card with water jet cutter.
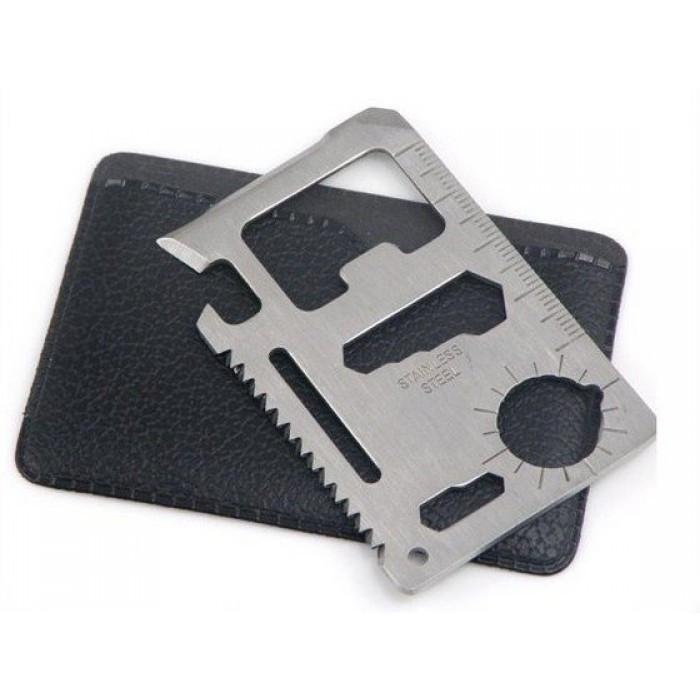
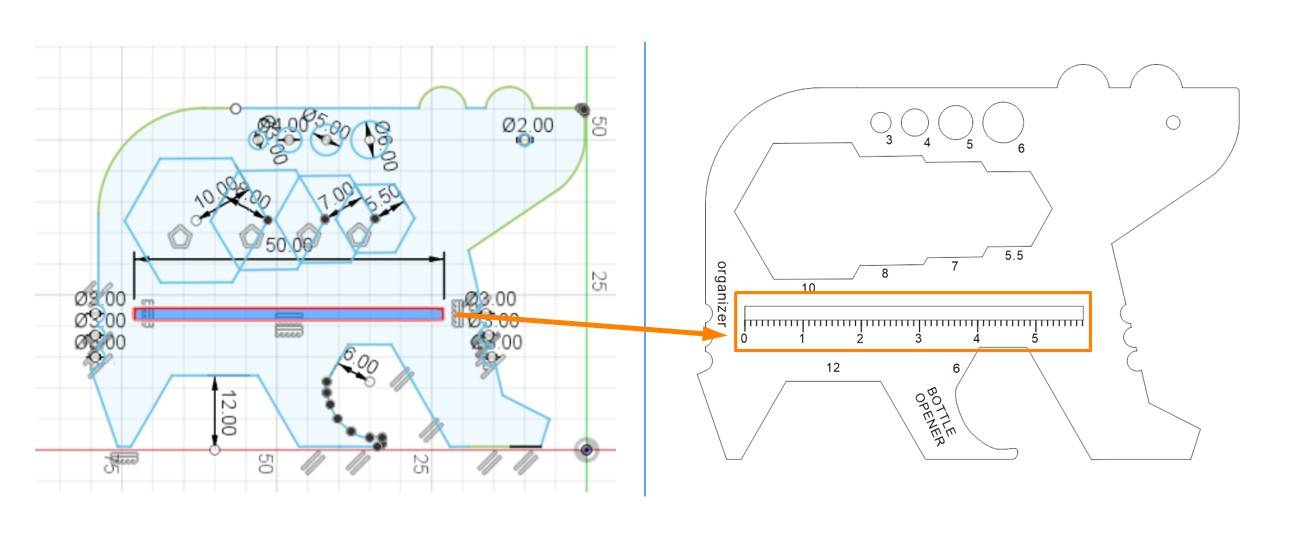
The first step is to determine the functions of the multi-tool card. These tools are expected to be integrated inside the bear:
● Wrench
● 5.5 mm
● 6 mm
● 7 mm
● 8 mm
● 10 mm
● 12 mm
● Wire Bender Hole
● 3 mm
● 4 mm
● 5 mm
● 6 mm
● Ruler (5 cm)
● Cable Organizer
● Bottle Opener
● Cross Screwdriver(Not applicable in Arcrylic version)
● Flat Screwdriver(Not applicable in Arcrylic version)
The next step is to design this tool. Because many of the tools require accurate parametric design, I used Fusion 360 to accomplish most of the design procedures.
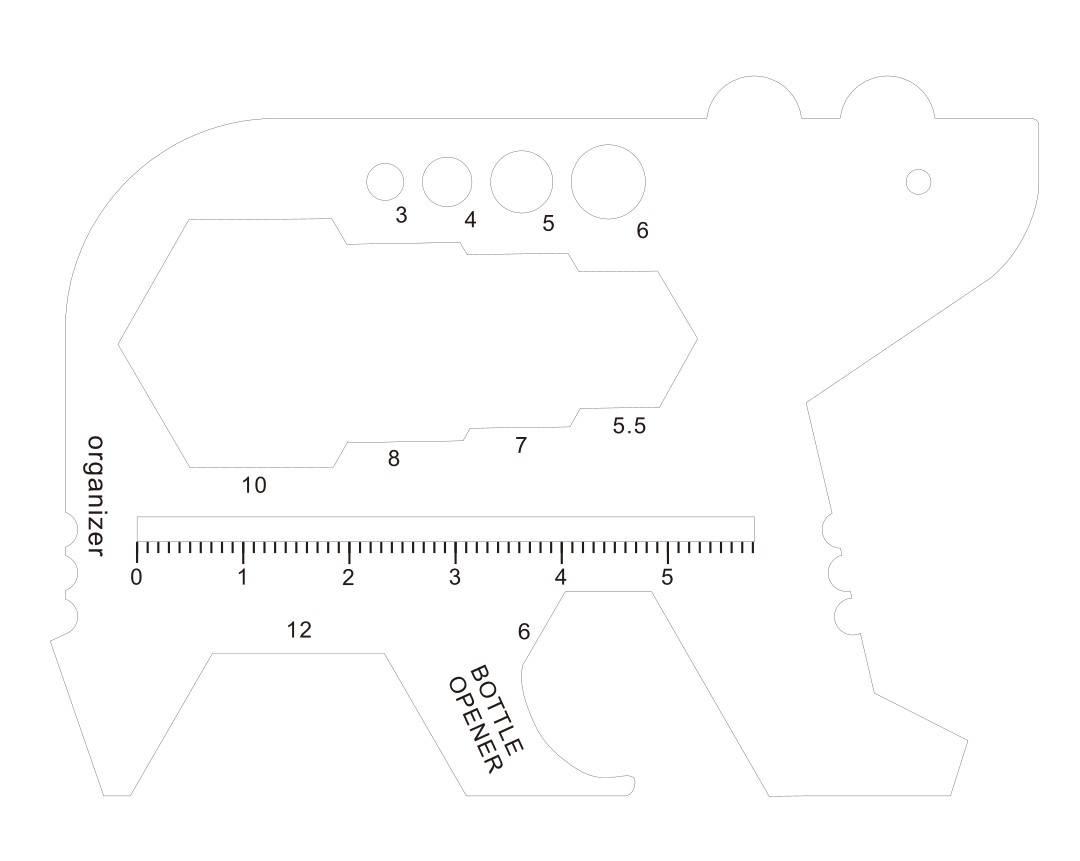
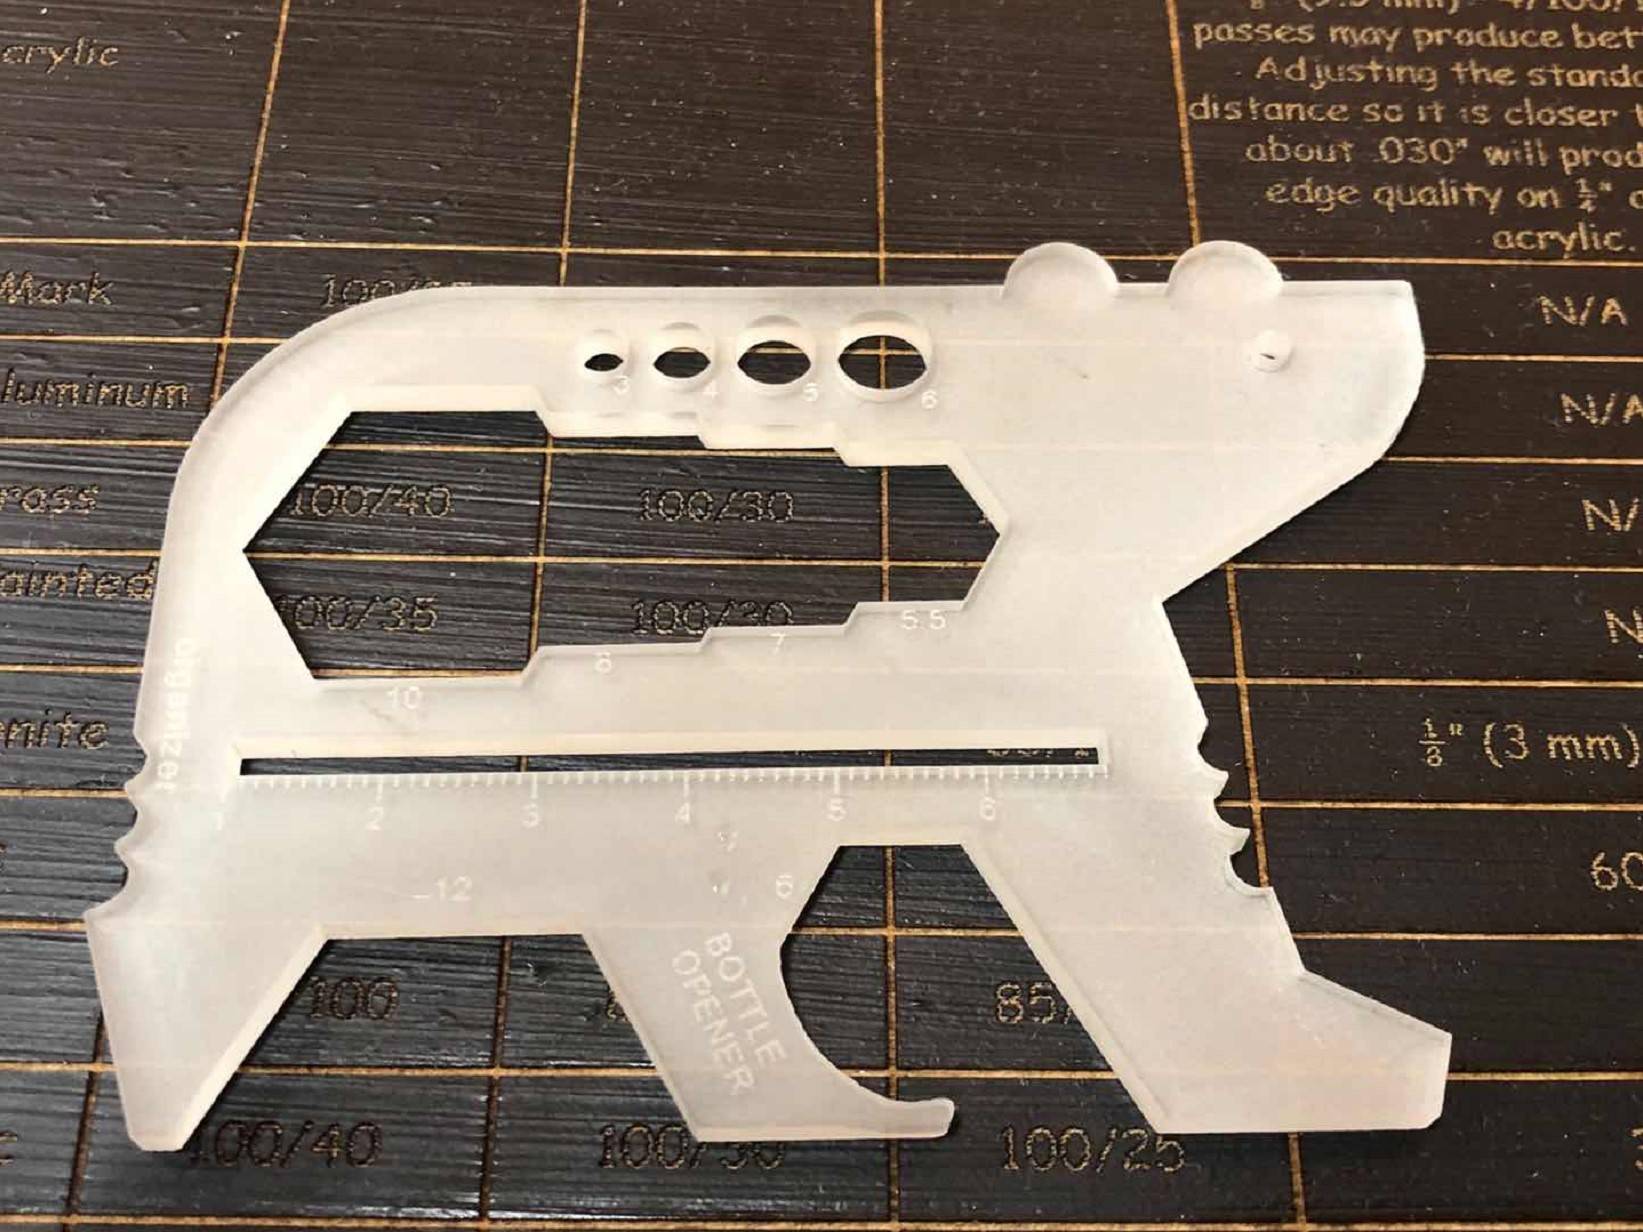
Instead of a rectangle, I decided to make an animal-shaped card. After testing several different shapes of animals, I found bear may be the ideal choice. Because it has a curvy shape that is suitable for holding while leaving adequate spaces for the hex wrench and gauges.

This bear SVG retrieved from SVG Repo has been used as the contour.
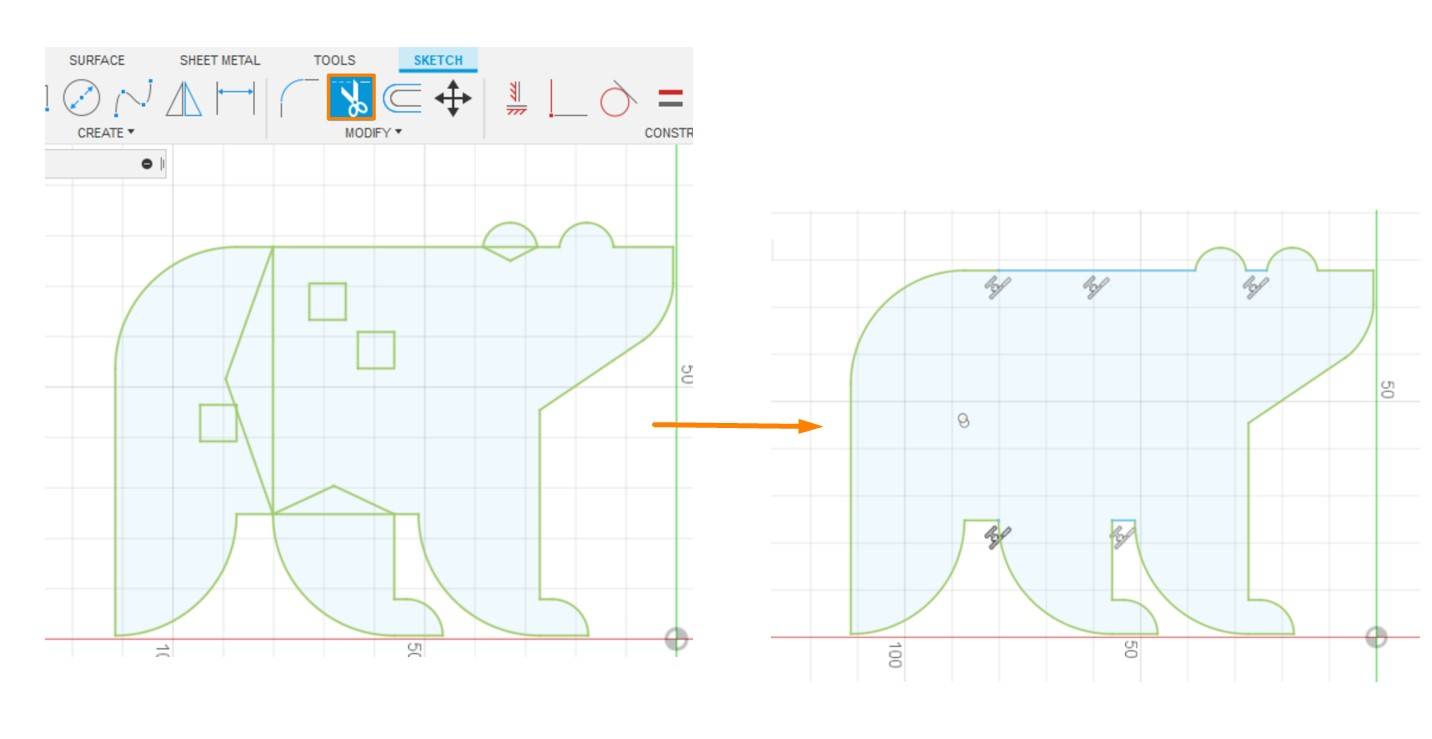
1. Clear the contour
First, after inserting the SVG file, the irrelevant lines should be trimmed from the contour.
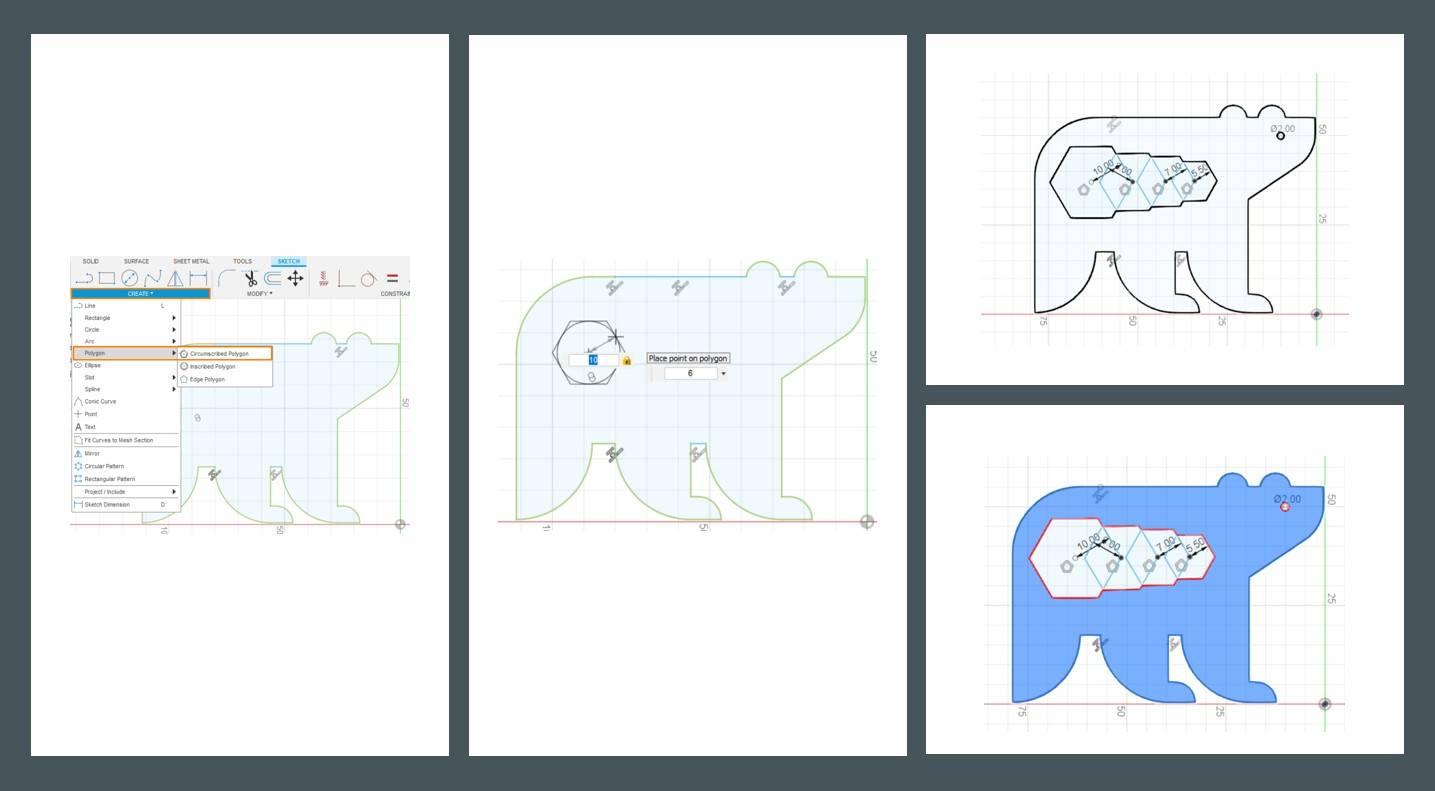
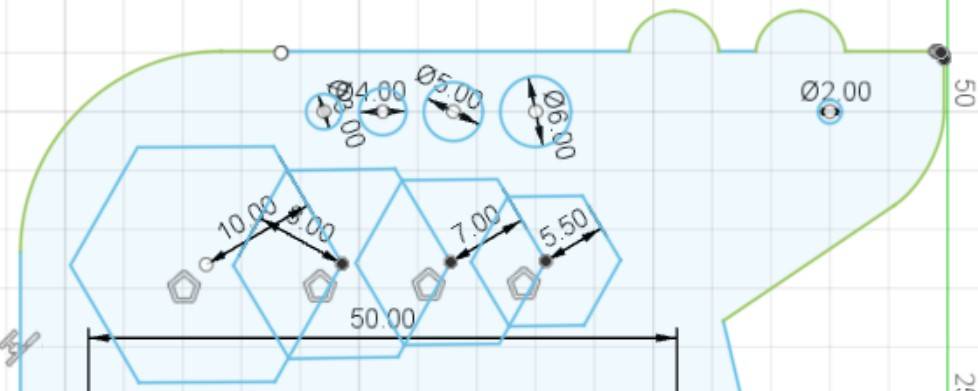
2. Design Hex Wrench Holes
The hex wrenches are designed with the Polygon function in sketch.
Create >> Polygon >> Circumscribed Polygon
-Dimension=10/8/7/5.5
-Edge Number = 6
* The dimensions are decided based on common hex wrench parameters
* The hex wrench holes will automatically connect and become a joint contour, so there is no need to manually combine the shapes.
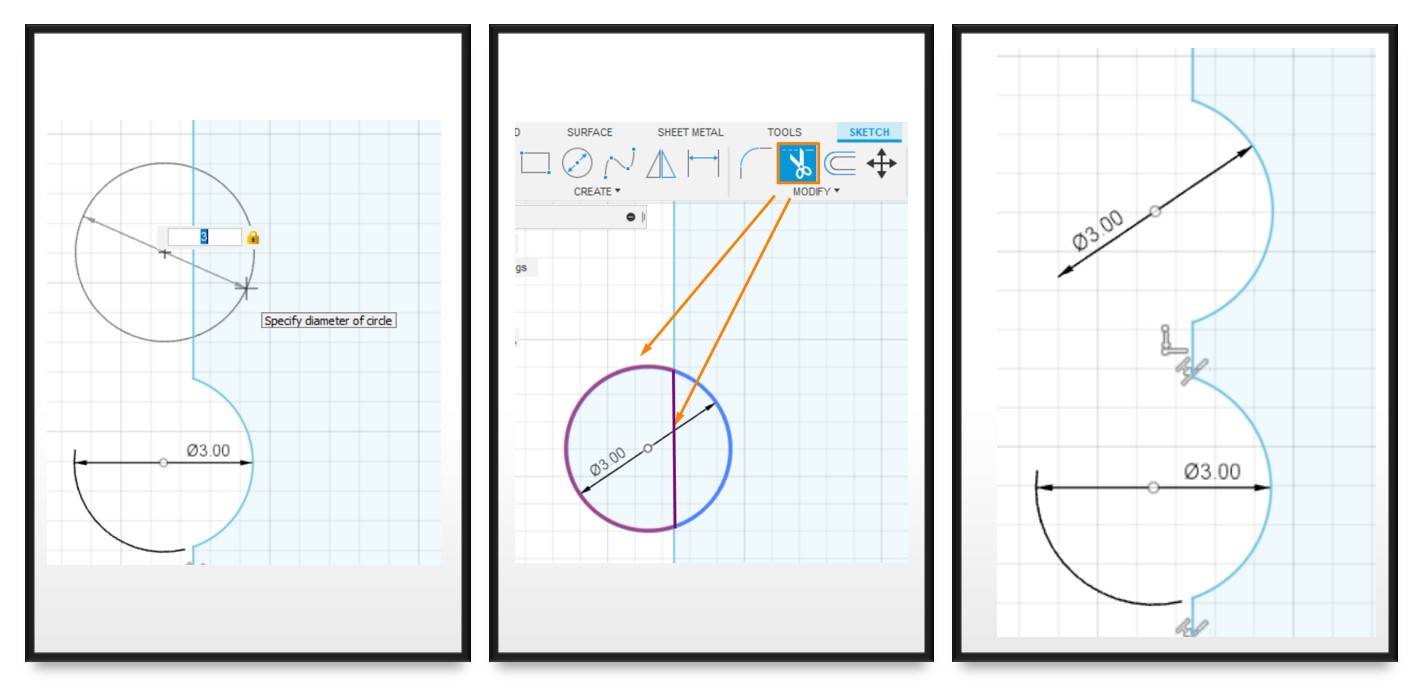
step 3: Design the Cable Organizer
The diameter of common USB cable is around 3 mm. Thus, the cable organizer can be made by creating 3mm circles at the edges of the bear.
Create >> Circle >> Dimension =3
-Dimension=3
Move >> Select the Circle >> check "Create Copy" >> Move to ideal position
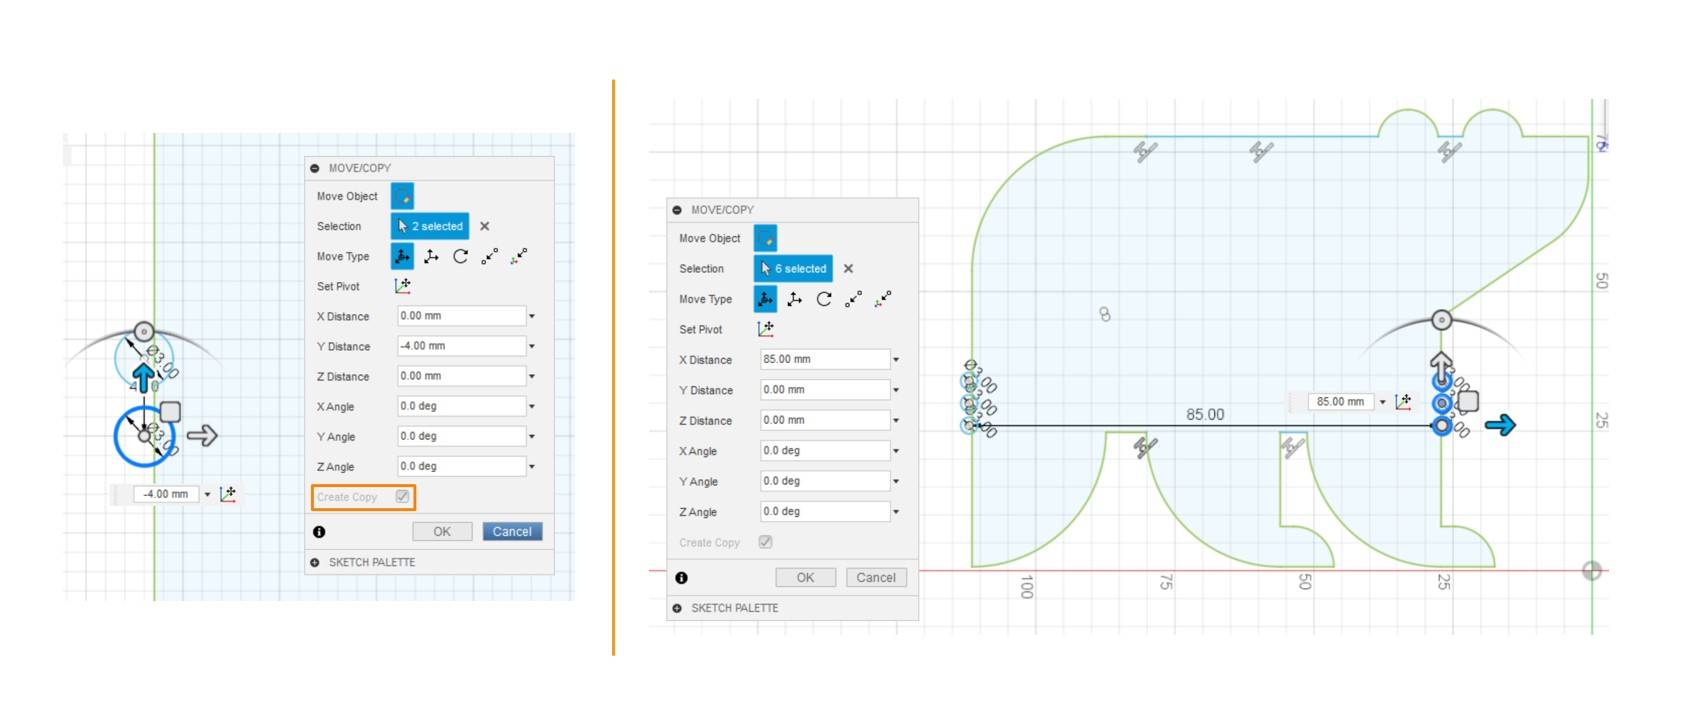
Then trim off the irrelevant curves.
4. Design the Legs of Bear
In the original design, these five tools, 12 mm wrench, 6 cm wrench, bottle opener, and 2 screwdrivers , are supposed to be integrated in the design of the bear's leg.
● The 12 mm wrench and 6 cm wrench are designed as the space among bear legs, while the two legs besides the 6 cm wrench hole are designed into the bottle opener shape.
The front and back legs of the bear were originally planned as screwdrivers, but this plan does not work on arcylic.

5. Ruler
A 50 mm rectangle slot is created on the lower part of the bear's body. The scale is added in CorelDraw in later steps.
6. Wire Bender Holes
Create >> Circle
-Dimension=6/5/4/3 mm
* The dimensions are decided based on common hex wrench parameters
* The bear's eyes can work as 2 mm wire bender holes
* All these holes can work as key chain holes as well
7. Engraving Features
The parameters and ruler scales will be designed in CorelDraw for convenience, which requires the drawing to be output from Fusion 360.
* The sketches cannot be directly export as drawing. Extrusion is necessary in this case.
After extruding the bear for a random thickness,by Design >> Drawing >> From Design, the output interface will be evoked. When the drawing is adjusted to ideal setting, click Output to export the PDF file.
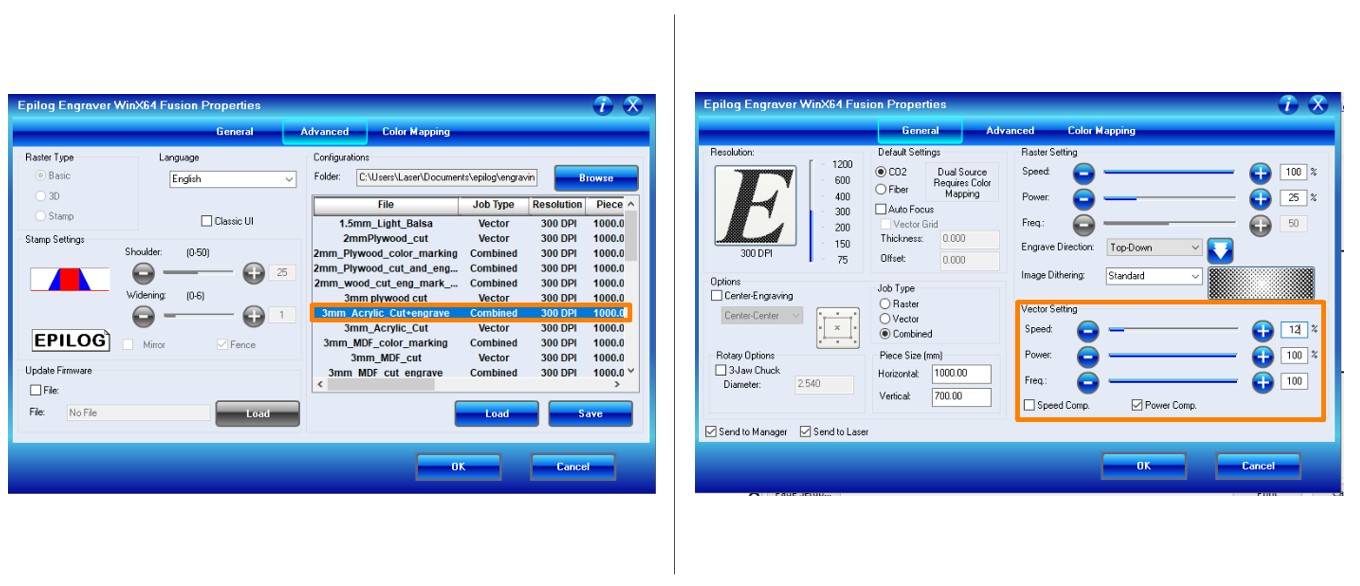
In CorelDraw, the two major tasks are to (1) add the ruler scale and other text on the bear and (2) set the line width of all the contours that be cut as 0.02 mm. After this step, the card is ready to cut.
Laser Cutting
I used the Epilog Laser Fusion machine to laser cut the Acrylic board. The uncovered side of the acrylic board should face up.
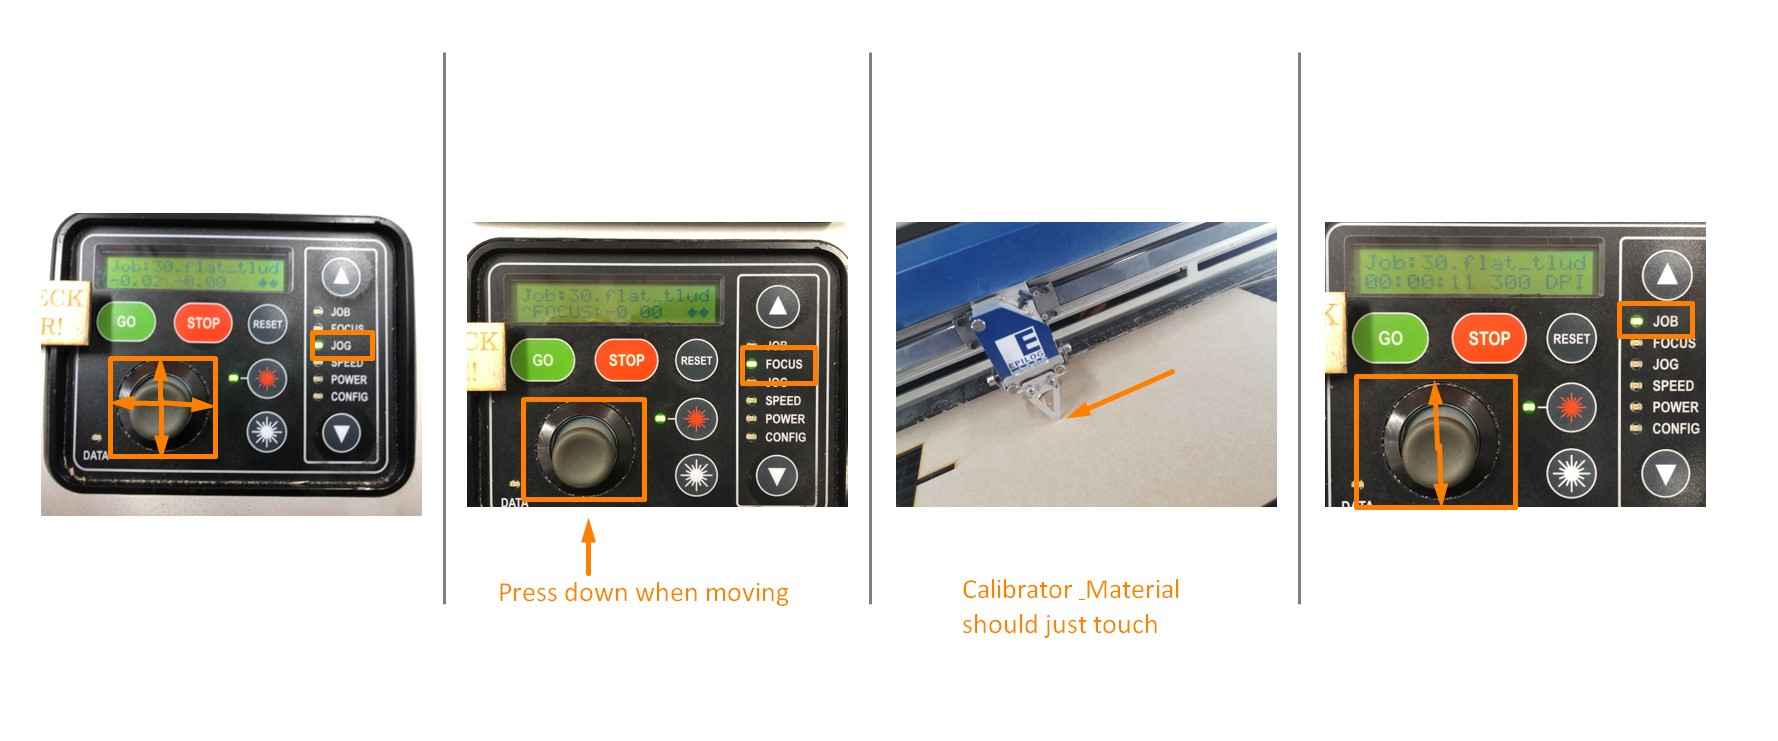
Step 1. Adjust the start point of the laser cutting path. Select the Jog option on the machine and use the joystick to adjust the position.
Step 2. Adjust the focus with the calibrator. Select the Focus option on the machine and adjust the position of the platform until the tip of calibrator just touches the material.
Step 3. Send the PDF file to the machine and use the Job option and select the right file.
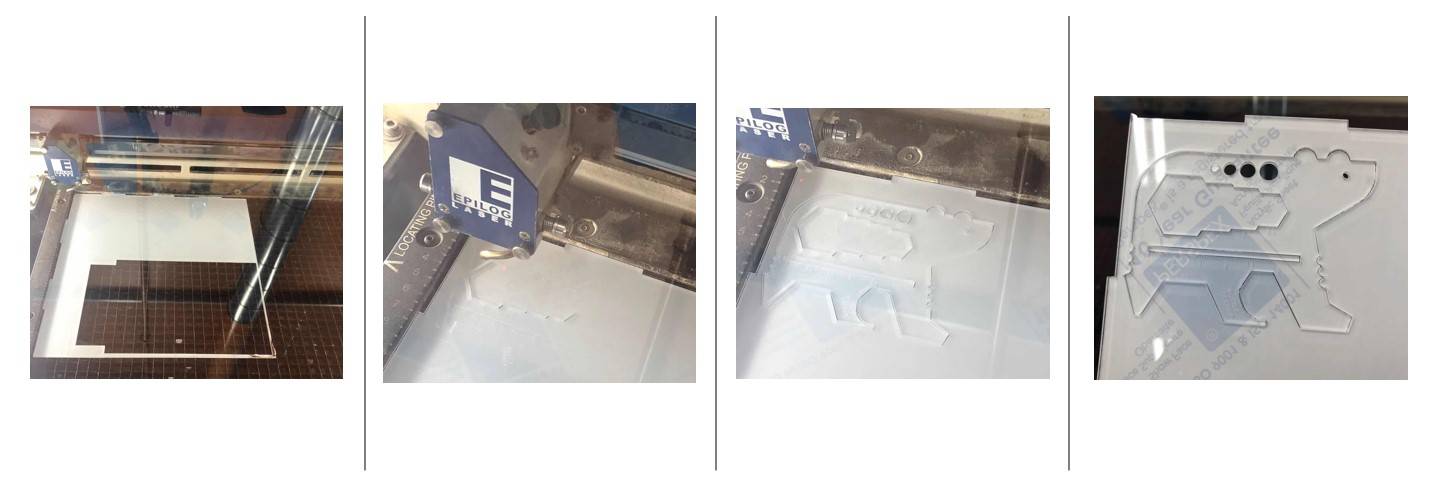
Step 4. Cut the bear and wait for 1 minute before opening the machine.
*For safety concern, please stay in front of the laser cutter and watch the progress when the machine is working.
More operational details can be found in Week 3 Assignment.
Blasting
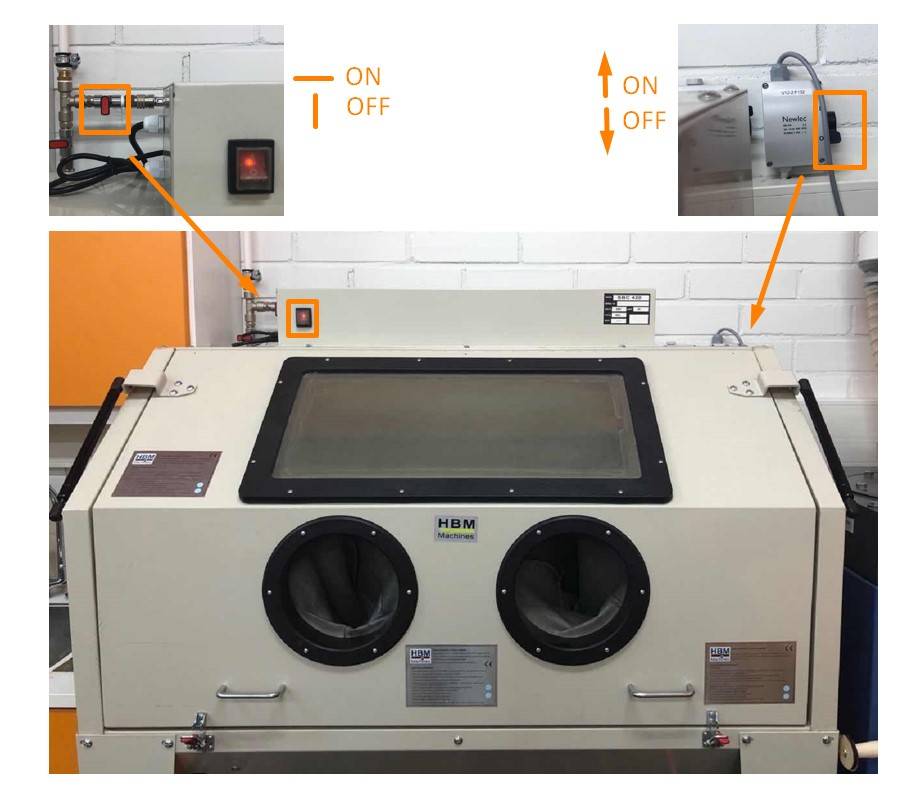
The last step is to process the bear. I used the HBM blasting machine in the lab. Because there are engraved texts and scales on the front side of the bear, I decided to only blast the backside of the bear.
The operation is not complex.
1. Put the Bear in the Machine
The object to blast should be put into the machine before turning on the machine. The front side of the machine can be opened after untackling the two red snaps. Put the object in a position that will be easy to reach is highly recommended. Because the following steps will be finished with those gloves on.
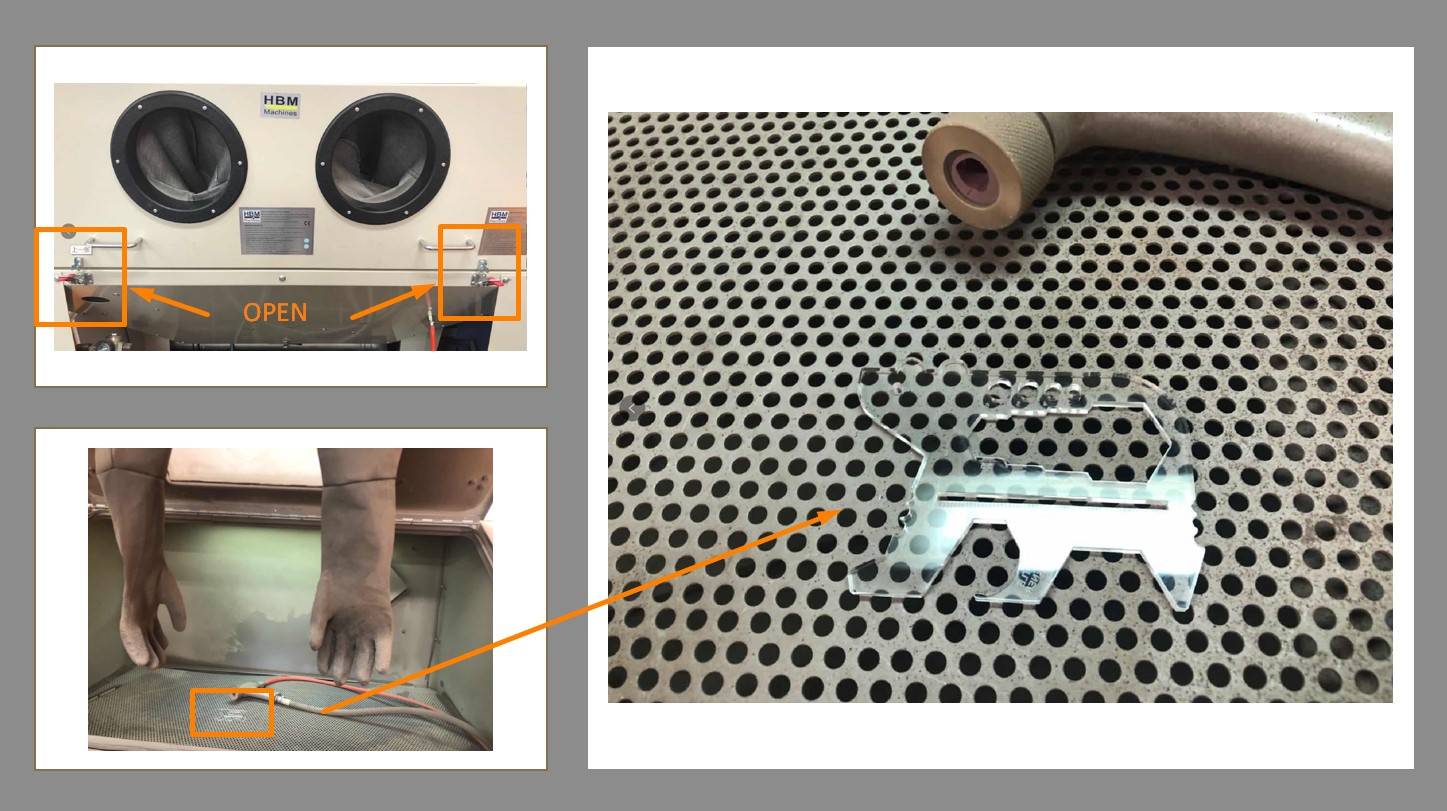
2. Start the Machine
There are 3 swicthes to be taken care of. After turning on these switches, the machine will start to work.
3. Blasting!
The last step is just to put the hands in the gloves and hold the object on the one hand and the blasting gun on the other hand. Carefully spray the sand particles on the surface of the object.
*It is highly recommended to flip the object upside-down in the middle of the process because the areas covered by the hand may not be evenly sprayed.
Ta-da! The back side of the bear has been well frosted and the engraved features on the front side are still clear.
However, it is will be possible, I would still try to use the water jet cutter to make a metal version of this card. Because Acrylics wrenches are too fragile to actually function.
Files
Bear Design:
● Bear.stl
● Bear.f3d
● Bear_laser_cut.PDF