Project Management
For this week we had to set up our personal websites, where we document our progress. Furthermore we had to create a public repository on GitLab to publish the website.
Creating the Website
Before you start creating a website you need to insall a proper code editor. I decided to use Brackets to create my HTML and CSS files, since Brackets comes with a Live Preview. Thereby I have the possibility to view the changes I make directly. I already have some experience wit HTML and CSS, but still the w3schools website had some very helpful tutorials.
HTML Basics
HTML stands for Hyper Text Markup Language. It describes the structure of web pages using markup. HTML consists of a series of short codes typed into a text-file surrounded by tags. The text is then saved as a HTML file, and viewed through a browser. The browser does not display the HTML tags, but uses them to render the content of the page.
HTML tags are element names surrounded by angle brackets. They normally have a start tag and an end tag. Below you can see the basic page structure of an HTML file.
<!DOCTYPE html>	 //defines this document to be HTML5

<html>	 // this is the root element of the page
<head>	// this element contains the meta information

<title> Project Management </title>
// here you declare the title of the page shown in the tab

</head>	 // head end tag

<body> 	// here you place the content of the page
</body>	// body end tag

</html> 	// html end tag
Inside the <body> tag you define headings <h1> tags and paragraph <p> tags to display the content of your documentation. To create a single line break you use the <br> tag, which has no end tag.
<body>
   <h1> About Me </h1>
        <p> My name is Alessandra Crotty. <br> I was born in Fiesole (Italy) and I can speak 5 languages.
	</p>
</body>
To insert a picture you use the <img> tag. This tag has two required attributes src and alt. The src attribute specifies the path (URL) of the image, so that it contains the location of the file to display it. The alt attribute is is necessary, if for any reason the picture cannot be displayed. In this case it shows the alternative text.
<body>
	<img class="aboutme" src="images/aboutme" alt="about me image"/>
</body>
To add a Link in your documentaion you use the <a> tag. The link's destination is specified in the herf attribute. Between the start and end tag you insert the text for the link you want to display on the page.
<body>
	<a href="https://git-scm.com/book/en/v2/Getting-Started-Installing-Git">Git</a>
</body>
To learn more about HTML and how to use it visit the w3schools website.
CSS Basics
To style your HTML elements you use CSS, which stands for Cascading Style Sheets. It specifies the style of your elements like for example: the color, font and position. The style definitions are normally saved in external CSS file. With an external stylesheet, you can change the look of an entire website by changing just one file.
The CSS syntax consists of a selector and a declaration block. Each declaration contains a property name and a value, separated by a colon. Moreover the declaration is surrounded by curly braces and ends with a semicolon.
In the following example all paragraph elements will be centered and use Trebuchet MS as font:
p {
	font-family: Trebuchet MS;
	text-align: center;
	}
Usually you use id's or classes to adress certain HTML elements. The id attribute of an HTML element is unique, so it's used to select only one element. To select the element in the CSS file write a hash(#) before the id attribute.
For example HTML code:
<body>
   <div class="text">
   	<a href="index.html"><img id="smallhome" src="images/icons/home.png"/></a>
</body>
CSS code:
#smallhome {
	width: 25%;
	position: absolute;
	top: 20px;
	right: 15px;
	}

The class attribute is used to address several HTML elements at the same time. To select the element in the CSS file write a dot(.) followed by the class attribute.
For example HTML code:
<body>
   <div class="text">
   	<p>To learn more about HTML and how to use it visit the <a class="links" href=" https://www.w3schools.com/ ">w3schools</a> website.</p>
</body>
CSS code:
.text {
    margin-left: 60px;
    font-size: 16px;
    margin-right: 250px;
    background-color: white;
    text-align: center;
  }
.links {
    font-weight: bold;
    color: indianred;
    text-decoration: none;
  }
To learn more about CSS and how to use it visit the w3schools website.
Page Structure
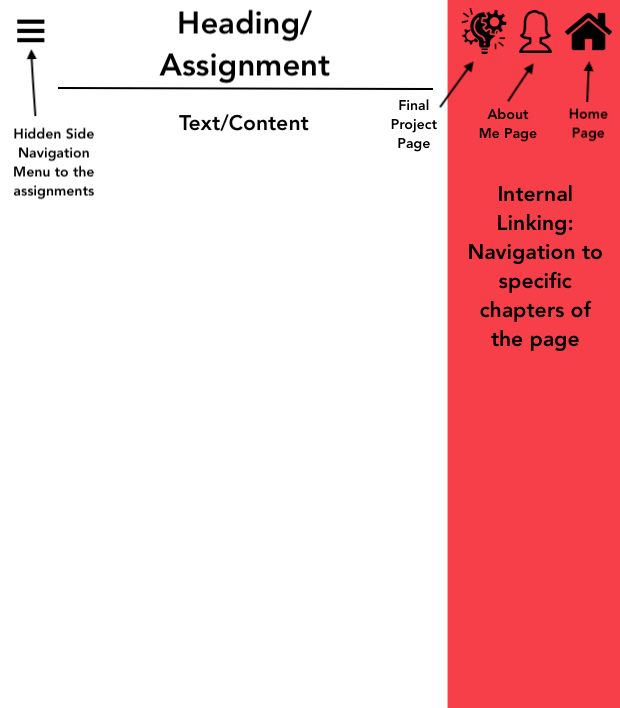
I intended to create a simple structure for the website. The aim was to make it easy for the user to use the website. I wanted to summarize all the important links on each page, so that the user doesn't need many clicks to get to his destination. To do this the idea was to create two navigation menus. A hidden one to switch easily between the assignments and a visible one next to the content of the page to jump through interesting sections of the current assignment. Moreover I wanted the user to always be able to switch to the home, about me and final project page, since these are the core pages of the website. Underneath you can see the sketch I made.
To create a solid layout a used a grid, which I reccomend to always use. With a grid you can easily arrange an element in certain a place.
.grid-container {
	display: grid;
	grid-template-columns: 60px auto auto 250px;	// defines the colums. 250px is the length of the navigation side menu on the right and 60px is the space declared for the hidden navigation menu.
	grid-template-rows: 50px 100px auto;	//defines the rows. You use auto so that each row or colum resizes itself automatically.
}
So now I basically just had to assign the content and the navigation menus to there positions. Like this:
.text {
	font-size: 16px;
	background-color: white;
	text-align: center;
	grid-column-start: 2;
	grid-column-end: 4;
 }
In addition the code underneath shows how I made the two navigation menus.
CSS Code:
.sidebar-right {
	top: 0;
	grid-column-start: 4;
	grid-column-end: 5;
	background-color: indianred;
	max-width: 250px;
	right: 0;
	right: 0;
	position: fixed;
	padding-top: 100px;
	margin: 0;
    z-index: 1; // Stay on top
	overflow-x: hidden; // Disable horizontal scroll
	height: 100%; // Full-height
}
// Styles the unordered list. The most importent style element here is the list-style-type, because it removes the bullets of the list intems.
.sidebar-right li{
	list-style-type: none;
}
.sidebar-right li a {
	display: block;
	padding: 8px 8px;
    text-decoration: none;
    font-size: 20px;
    color: white;
    text-align: center;

}
// Creates a special effect when you hover over the link
.sidebar-right li a:hover {
    background-color: lightcoral;
    color: white;
}
.sidemenu-left {
	height: 100%; // Full-height
  	width: 0;
	position: fixed; // Fixed Sidebar (stay in place on scroll)
	z-index: 1; // Stay on top
	top: 0;
	left: 0;
	background-color: slategrey;
	overflow-x: hidden;  // Disable horizontal scroll
	transition: 0.5s;
	padding-top: 40px;
	overflow: scroll;
}
// Styles the links in the sidemenu
.sidemenu-left a {
	display: block;
	padding: 6px 6px;
    text-decoration: none;
    font-size: 20px;
    color: white;
    text-align: center;
	transition: 0.3s;
}
// Styles the close button of the menu
.sidemenu-left .closebtn {
	position: absolute;
	top: 0;
	right: 5px;
	font-size: 36px;
	margin-left: 50px;
}
// Creates a special effect when you hover over the link*/
.sidemenu-left a:hover {
    color: lightcoral;
	font-weight: bold;
}
HTML Code:
<span onclick=" openNav() ">☰</span>
<div id="mySidenav" class="sidemenu-left">
	<a href="javascript:void(0)" class="closebtn" onclick="closeNav()">×</a>
	<a href="week1.html" >Project Management </a>
	<a href="week2.html" >Computer-Aided Design </a>
</div>
<div id="main" class="text">
<div class="sidebar-right">
	<a href="index.html"> <img id="smallhome" src="images/icons /home.png"/></a>
	<a href="index.html"> <img id="smallavatar" src="images/icons/ avatar.png"/></a>
	<a href="project.html"> <img id="smallproject" src="images/icons/ project-management.png"/></a>
	<li> <a href="#one"> Creating the Website</a></li>
	<li> <a href="#two"> HTML Basics</a></li>
	<li> <a href="#three"> CSS Basics</a></li>
	<li> <a href="#four"> Page Structure</a></li>
	<li> <a href="#five"> Working with GitLab</a></li>
</div>

<script>
function openNav() {
  document. getElementById("mySidenav") .style.width = "250px";
}
function closeNav() {
  document. getElementById("mySidenav") .style.width = "0";
}
</script>
Working with GitLab
Since I am already familiar with using Git. I didn't follow a tutorial, but I can recommend a good one for beginners from Corey Schafer. A repository is like a folder for your project. Your project's repository contains all of your project's files. Repositories can be public or private. Public repositories are visible to everyone. To create a repository on GitLab you need to create a personal account. Since we already have an account, we check if Git has already been installed on our computer.

Use the following command to check if Git is installed.
git --version
According to that you should receive a message that tells you, which Git version you have on your computer. If you don't receive a message, you need to download Git. Usually Git is already preinstalled on Mac and Linux. Moreover it is important to configure your Git username and email address, because every Git commit will use this information to identify you as the author. You only need to do this once since you are using the --global option. Use the following two commands to set up your Git username and email adress.
git config --global user.name "YOUR_USERNAME"
git config --global user.email "YOUR_EMAIL_ADRESS@EXAMPLE.COM"
Then you will have to create a folder on your computer to save your files locally and push them into the git repository.
cd /path/to/local/repository
In addition you need to generate your public SSH key for authentication. If you don't already have a SSH key by deafault you will need to generate one by using this command:
ssh-keygen -o -t rsa -C "your.email@example.com"
Note: if this command does not work just remove the -o option and try again. Then you will be asked to input a file path to save your SSH key pair and to input a password to secure your SSH key pair. The next step is to copy the public SSH key, because we later need to add the key to GitLab.
If you have MacOS use this command:
pbcopy <~/.ssh/id_rsa.pub
If you have Git Basch on Windows use this command:
cat <~/.ssh/id_rsa.pub | clip
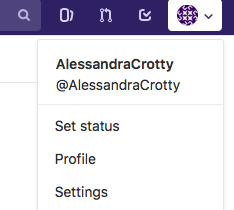
Open your Profile Settings by clicking on the last Icon of the navigation bar.
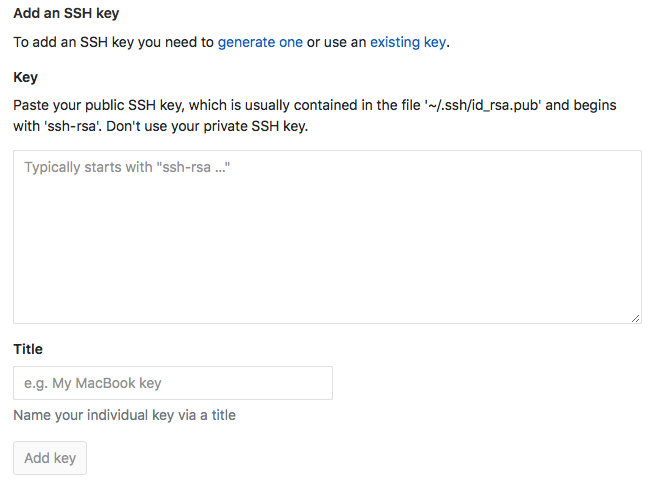
Next click on SSH Keys in the sidebar navigation.

Finally, add your public SSH key to GitLab and give it a relevant title.
The project we made has already been set up in a central repository, so we only need to get a copy of the existing Git respository by using the clone command.
git clone (the url of your Website)
To see the changes you made check your git status by using the following command:
git status
When you check your status be sure that you are in the file that was created when you generated your key. You can find your file by using the ls command and open it with the cd command. The local changes you made are shown in red. These changes may be new, modified, or deleted files/folders.
Now you can add and commit all local changes with these two commands.
git add FILE OR FOLDER OR ALL (*)
git commit -m "COMMENT TO DESCRIBE THE INTENTION OF THE COMMIT"
At last push your local changes to your online repository with the next command:
git push origin master
To be sure that you published everything, go to your GitLab project and click on CI/CD --> Jobs in the sidebar navigation.
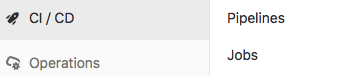
If there is a job, you can be sure that you pushed all your files. Wait untill the job's status is passed.

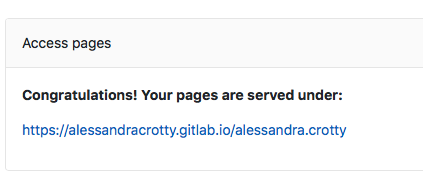
Now check if your website is online click on Settings --> Pages in the sidebar navigation.
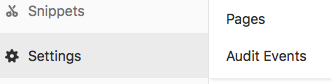
Here you can find your URL. Click on it and check if your website is online.