FAB ACADEMY 2014
Michael Hurtado
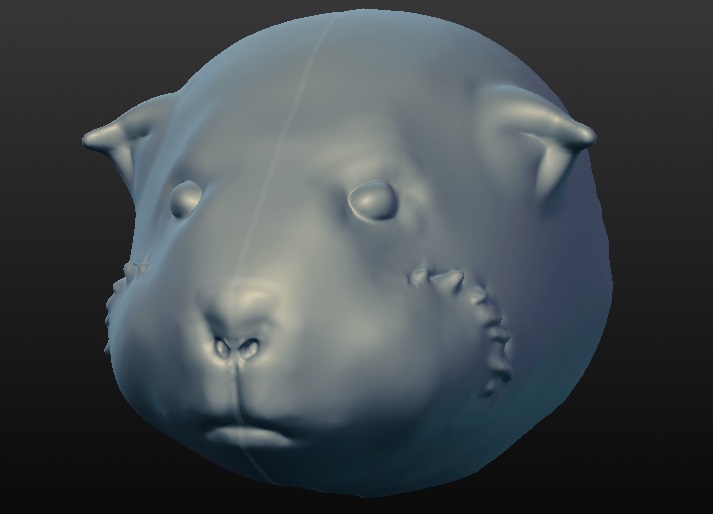
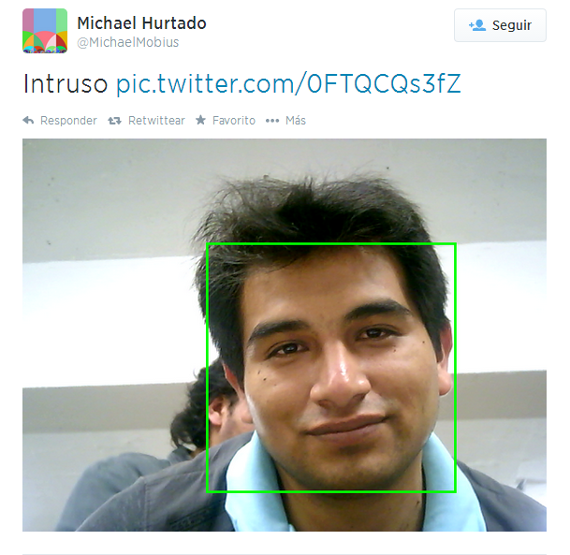
My final project is the development of the mobile platform of a bigger project that I have, I called Rural Tech. To see (the materials and costs are here): applications_implications.html And the distribution license invention.html This mobile platform has the form of a guinea pig, I explain about this in: project_management.html In the rural areas of my country exist an ancestral practice call "passing guinea pig", in that the native ones use to know what kind of illnesses they have. The first modeling of the prototype you can find in: computer_aided_design.html Which is not the definitive modeling because in the road I found that there are another inconveniences. For a modeling is only necessary look at: mechanical_design.html As you see in this last link, for the process of manufacture it was necessary to investigate on materials to make the gears and the whole mechanics. This took me to use extruded acrylic that is more expensive than the acrylic strained but the finish is better and also because it is uniform his thickness. For the mechanism I am using two servomotores, these they were controlled in the following link: output_devices.html The used controller that time was Attiny 44a, but for questions by heart and more ports, I opted to use Atmega328p and to build me my own Arduino. With this Arduino I could control servos using sensor Kinect like entrance device and Processing to establish the contact. interface_programming.html The final prototype and process My project is a robot Guinea pig that can be controlled wirelessly by Bluetooth and that also serves to monitor. Has a variation of Theo Jansen mechanism walker for 4 legs. It has a camera that lets you take photos to the strangers by face detection and send photos directly to Twitter. It also allows to make streaming video to see the places where the Guinea pig is moving. It can control his movement pressing the key "l" or control directly the forward speed using the hands by means of the Kinect sensor. The design of the head of the Guinea pig did in Sculptris, which is a software package for modeling using tools to sculpt.
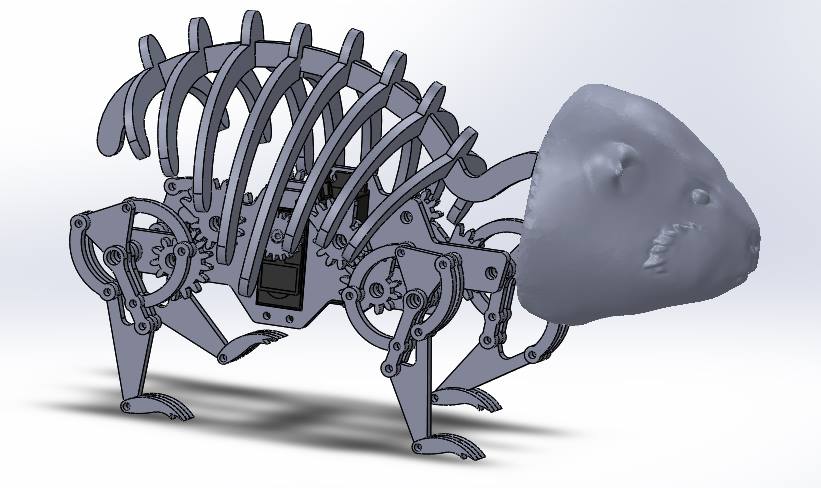
The body design was carried out in several stages with the SolidWorks software, it was necessary to use this tool because it also allows us to simulate the mechanism used.
With respect to the mechanism, I initially considered to use a DC motor with a mechanism like the Tamiya Gearbox, but the internal mechanics it was more complicated.
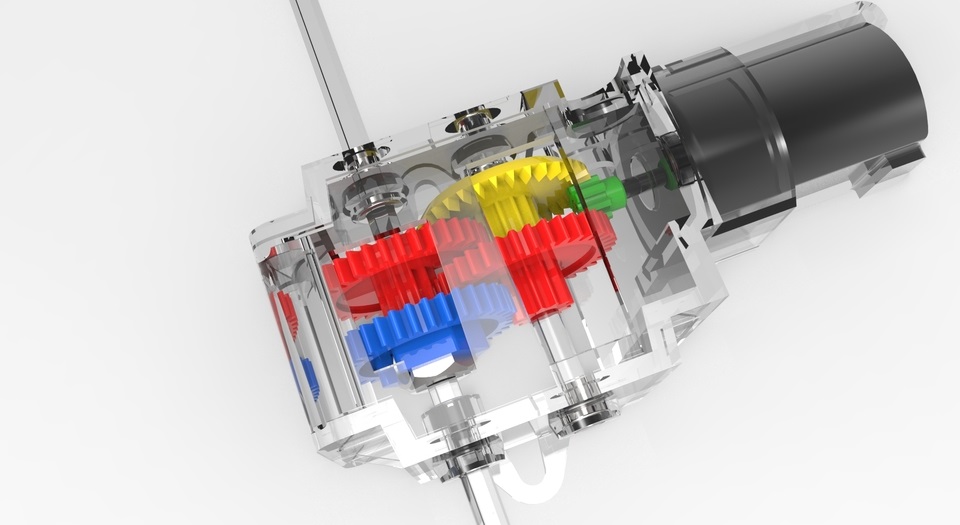
So, I decided to use continuous rotation servo-motors, but as I did not find that type of engine, I used normal servomotors MG995 having good torque and metal gears.

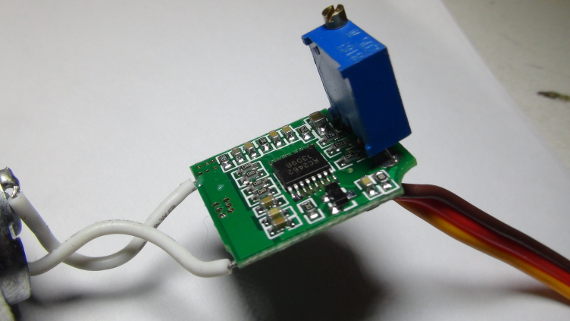
For continuous rotation, I had to hack the servos using two resistors 2.2 k ohms, but this did not work well.
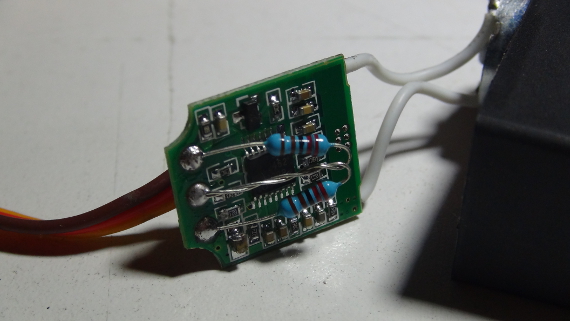
I had to replace the resistors with a trimpot which is a resistor with 5 k ohm variable resistor. Calibrating the resistor looking for zero, because when you hack a servomotor which previously corresponded to a 90-degree turn, is equivalent to zero speed. Which corresponds to 0 degrees is equivalent to turn counter-clockwise to maximum speed and 180 degrees clockwise to maximum speed.
The design of the mechanism uses gears of different radio, since these allow you to change the speed and obtain an acceleration in a given time, allowing you to stability for walking. It is very important that it always have three legs touching the floor, this describes a triangle, and to make it stable requires that the center of mass fall within that triangle.
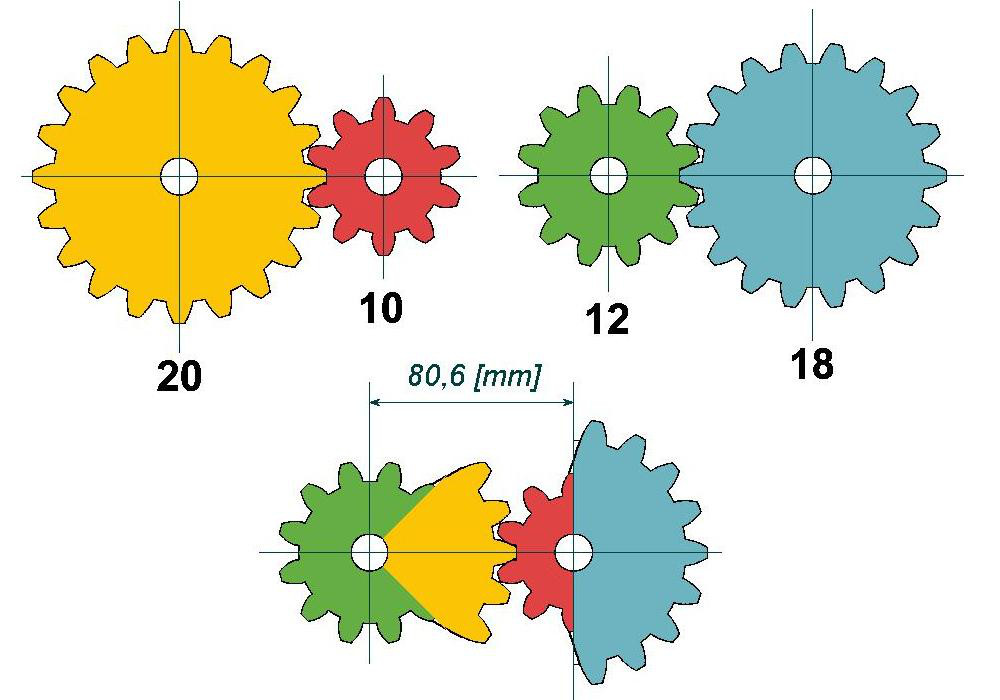
The arrangement of gears is the following:
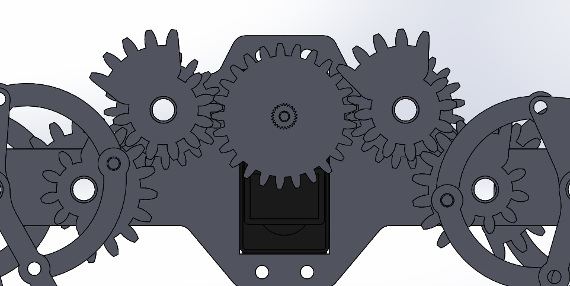
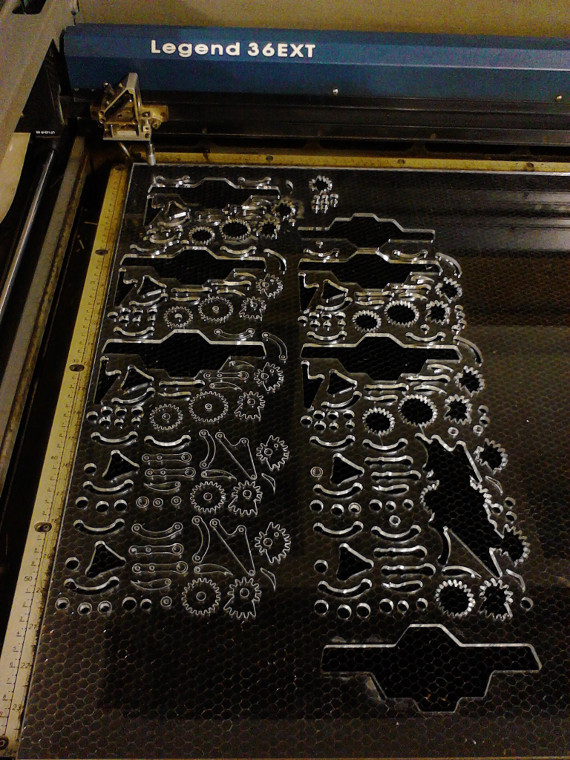
The main cogwheels of the two sides have a difference in angle of 180 degrees. If the proposed measures are not taken into account, it will not make the mechanism work and may not be possible to walk, therefore it is important to keep the proportions given. For the manufacture of the structure I used extruded acrylic of 4mm, because his thickness is uniform. And using laser cut I was able to get the parts using the following parameters: Speed 15 Potency 100% Frequency 5000 In this part I had a problem, because, as the lens of the laser cutter was dirty I could not cut well the first pieces that I sent to cut.
In the design was considered that the ribs come to Pressfit, to the same as the neck.

The head was printed in the Makerbot Replicator 2, without support. By which the piece is hollow, but it had a problem reaching the area of the nose.

About the result of manufacture, the laser cutter does not cut perpendicular the acrylic or better said the result is not a cut perpendicular to the surface of the material. The cutter has a tilt angle, which complicates the armed. For this reason I had to manufacture washers of thicknesses of 1.6mm, 2.9mm and 4mm. This also enabled us to avoid the friction between the pieces. The measure of the axes is M6, for the central axes I used threaded rods that were easy to get, to hold the pieces I used head bolts Allen and nuts with measure M3.
After the armed, when it comes to the design of the machine, I had problems with the control of the phase between the central gears that should be 180 degrees. This prevented her from walking to the robot, but using only a servomotor is able to control the phase and the robot was able to walk. GAP
PHASE
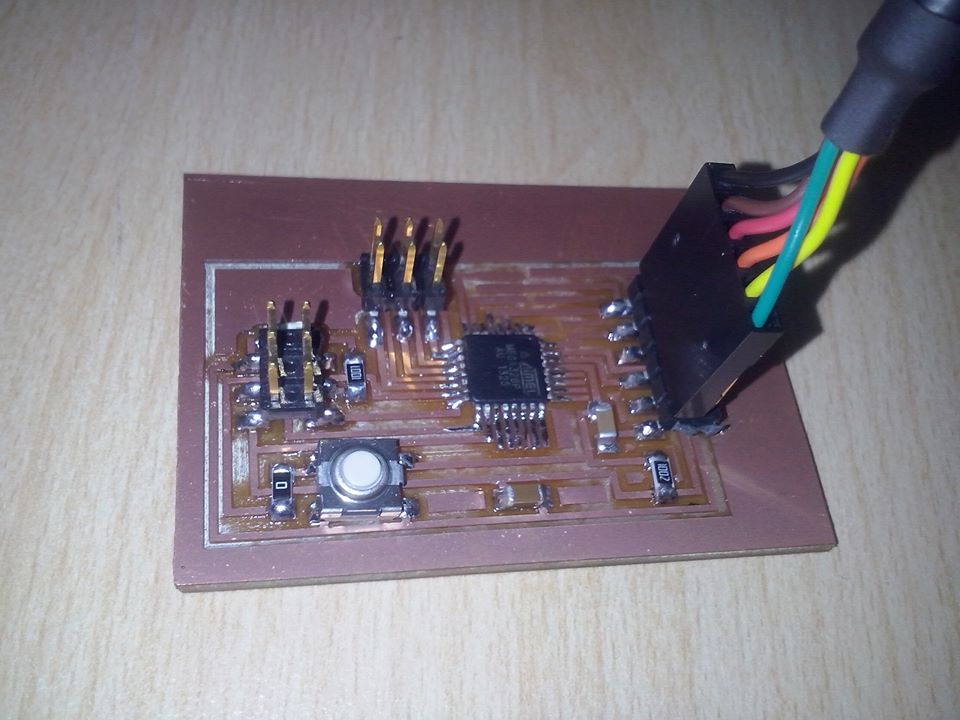
A problem in the design is that the gears do not make good contact and this makes the legs have a position in which flex too. This is corrected by changing the gears variable radius. About the electronics, I fabricate my own Arduino to control the servomotor. As I wanted wireless control, I also fabricate a board to feed the servos with a 9V battery. About the Arduino, I had problems with the manufacturing because initially I used the Atmega328 but I couldn't find a file board.txt, to burn it correctly. The that worked for me was the Atmega328p, I used it with the internal oscillator. For the manufacture of the card I used the Roland Modela MDX20. Arduino bug
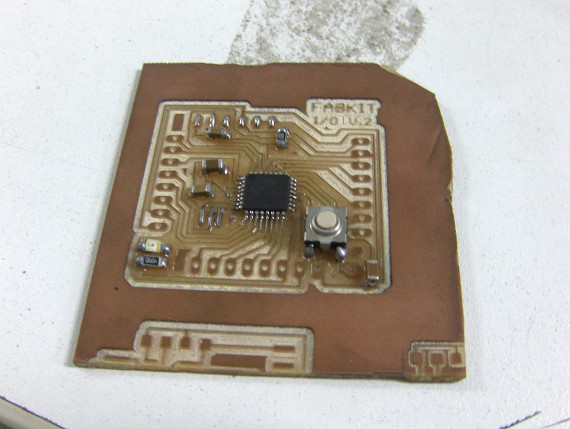
Fabduino final
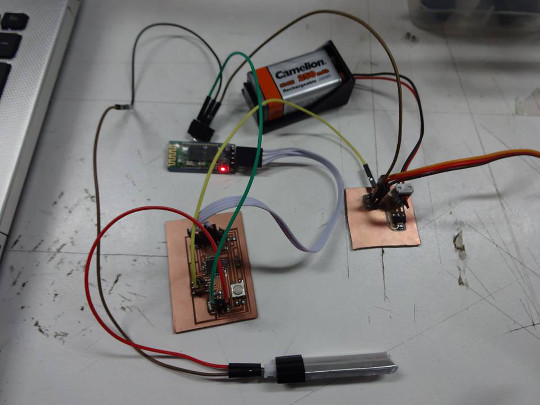
We downloaded the board.txt that we need from this link: boards.txt To record the bootloader must be connected to the FabISP and the FTDI cable to the Fabduino. We open the Arduino IDE, we select in Tools the card "hello.Arduino" and the USBtinyISP programmer. Finally we click to burn boot sequence. To record programs on the Fabduino is no longer necessary to use the FabISP, we will load the following program to test the movement of the servomotor: The module that we will use to supply it the energy to the servo using a 9v battery, basically uses a voltage regulator to 5v. As the control will be via Bluetooth, we have to record the next program in the bluetooth, this will allow us to define the baud rate and the access key to bluetooth.
// Opciones de configuración:
	char ssid[10]		= "Arduino1";	// Nombre para el modulo Bluetooth.
	char baudios		 = '4';		   // 1=>1200 baudios, 2=>2400, 3=>4800, 4=>9600 (por defecto), 5=>19200, 6=>38400, 7=>57600, 8=>115200
	char password[10]	= "0001";		// Contraseña para el emparejamiento del modulo.


void setup()
{
	Serial.begin(9600);

	// Tiempo de espera:
		pinMode(13,OUTPUT);
		digitalWrite(13,HIGH);
		delay(10000);
		digitalWrite(13,LOW);
                pinMode(0, INPUT);
                digitalWrite(0, HIGH);

	// Ahora se procede a la configuración del modulo:

		// Se inicia la configuración:
			Serial.print("AT"); delay(1000);

		// Se ajusta el nombre del Bluetooth:
			Serial.print("AT+NAME"); Serial.print(ssid); delay(1000);

		// Se ajustan los baudios:
			Serial.print("AT+BAUD"); Serial.print(baudios); delay(1000);

		// Se ajusta la contraseña:
			Serial.print("AT+PIN"); Serial.print(password); delay(1000);
}

void loop()
{
	// Al parpadear el led se habrá terminado la configuración:
	digitalWrite(13, !digitalRead(13));
	delay(500);
}
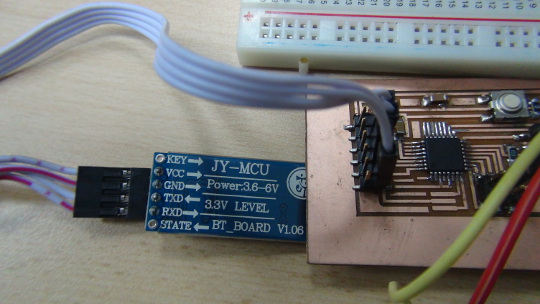
The connection that we need to do to record the program is as follows: Tx of the Bluetooth module with Rx of the Fabduino. Rx of the Bluetooth module with TX of the Fabduino. Vcc of the Bluetooth module with Vcc of the Fabduino. GND of the Bluetooth module with GND of the Fabduino.
Now, what we have to do is to record this program in our Fabduino using the FTDI cable. With this program, we will control the rotation of our servomotor by pressing the key 'l'.
#include <Servo.h>
Servo miservo1;

int counter = 0;
int val;
void setup() {
  Serial.begin(9600);
  miservo1.attach(10);
  pinMode(0, INPUT);
  digitalWrite(0, HIGH);
}
void loop(){
  val= Serial.read();// lee el valor del puerto serie
  if(val!= -1 && val==108 || val=='l') {
    counter++;
  }
  Serial.println(counter);
  delay(100);
  if(counter%2==0){
    miservo1.write(98);
  }
  else{
    miservo1.write(79);
  }
}
The connections to our bluetooth module with our Fabduino are the following:
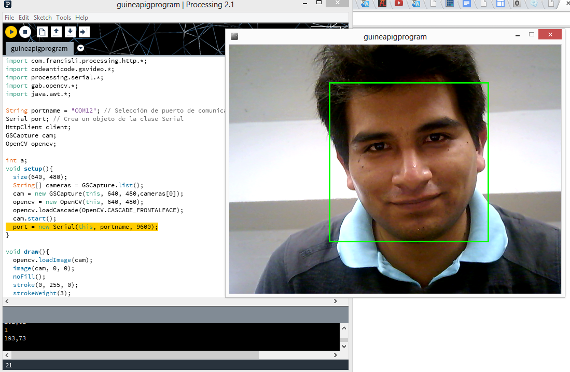
The interface was developed using Processing, and making use of libraries such as http to send images to Twitter, OpenCV to detect faces, GSvideo to use the external webcam. The download links of libraries are: Http OpenCV GSvideo Code:
import com.francisli.processing.http.*;
import codeanticode.gsvideo.*;
import processing.serial.*;
import gab.opencv.*;
import java.awt.*;

String portname = "COM12"; // Selection of communications port with Bluetooth
Serial port;
HttpClient client;
GSCapture cam;
OpenCV opencv;

int a;
void setup(){
  size(640, 480);
  String[] cameras = GSCapture.list();
  cam = new GSCapture(this, 640, 480,cameras[0]);
  opencv = new OpenCV(this, 640, 480);
  opencv.loadCascade(OpenCV.CASCADE_FRONTALFACE);
  cam.start();
  port = new Serial(this, portname, 9600);
}

void draw(){
  opencv.loadImage(cam);
  image(cam, 0, 0);
  noFill();
  stroke(0, 255, 0);
  strokeWeight(3);
  Rectangle[] faces = opencv.detect();
  println(faces.length);

  for (int i = 0; i < faces.length; i++) {
    println(faces[i].x + "," + faces[i].y);
    rect(faces[i].x, faces[i].y, faces[i].width, faces[i].height);
    a=a+1;
    if (a==50){
      saveFrame("sketch.png");
      client = new HttpClient(this, "api.twitter.com");
      //// using SSL is optional, but recommended
      client.useSSL = true;
      //// turn on OAuth request signing
      client.useOAuth = true;
      //// set up OAuth signing parameters
      client.oauthConsumerKey = "ConsumerKey"; //This was obtain making an account of developer in Twitter
      client.oauthConsumerSecret = "ConsumerSecret"; //This was obtain making an account of developer in Twitter
      client.oauthAccessToken = "AccessToken"; //This was obtain making an account of developer in Twitter
      client.oauthAccessTokenSecret = "AccessTokenSecret"; //This was obtain making an account of developer in Twitter
      //// set up POST params
      HashMap params = new HashMap();
      params.put("status", "Intruso"); //Message
      HashMap files = new HashMap();
      files.put("media[]", "sketch.png"); //Image file
      client.POST("/1.1/statuses/update_with_media.json", params, files);
      a=0;
    }
  }
}

void captureEvent(GSCapture c) {
  c.read();
}

void responseReceived(HttpRequest request, HttpResponse response) {
  println(response.statusCode + ": " + response.statusMessage);
  println(response.getContentAsString());
}

void keyReleased() { //Sending the key for port
  port.write(key);
  println(key);
}
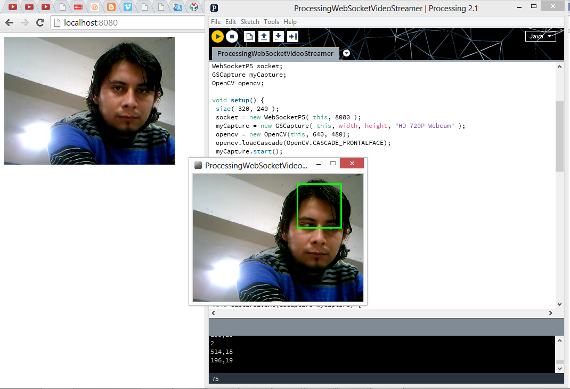
This other interface allows us to video streaming:
import codeanticode.gsvideo.*;
import java.awt.image.BufferedImage;
import java.io.ByteArrayOutputStream;
import javax.imageio.ImageIO;

import muthesius.net.*;
import org.webbitserver.*;
import jcifs.util.Base64;

WebSocketP5 socket;
GSCapture myCapture;

void setup() {
	size( 320, 240 );
	socket = new WebSocketP5( this, 8080 );
        String[] cameras = GSCapture.list();
        myCapture = new GSCapture(this, width, height,cameras[0]);
        myCapture.start();
}

byte[] int2byte(int[]src) {
	int srcLength = src.length;
	byte[]dst = new byte[srcLength << 2];

	for (int i=0; i<srcLength; i++) {
		int x = src[i];
		int j = i << 2;
		dst[j++] = (byte) (( x >>> 0 ) & 0xff);
		dst[j++] = (byte) (( x >>> 8 ) & 0xff);
		dst[j++] = (byte) (( x >>> 16 ) & 0xff);
		dst[j++] = (byte) (( x >>> 24 ) & 0xff);
	}
	return dst;
}

void captureEvent(GSCapture myCapture) {
	myCapture.read();

	BufferedImage buffimg = new BufferedImage( width, height, BufferedImage.TYPE_INT_RGB);
	buffimg.setRGB( 0, 0, width, height, myCapture.pixels, 0, width );

	ByteArrayOutputStream baos = new ByteArrayOutputStream();
	try {
    	ImageIO.write( buffimg, "jpg", baos );
  	} catch( IOException ioe ) {
	}

	String b64image = Base64.encode( baos.toByteArray() );
	socket.broadcast( b64image );
}

void draw() {
	image(myCapture, 0, 0);
}

void stop(){
	socket.stop();
}

void websocketOnMessage(WebSocketConnection con, String msg){
	println(msg);
}

void websocketOnOpen(WebSocketConnection con){
	println("A client joined");
}

void websocketOnClosed(WebSocketConnection con){
	println("A client left");
}
The download links of the library are the following: SocketP5 And finally for the control with the Kinect we have to record the following code in our Fabduino.
#include <Servo.h>

Servo myservo;

void setup()
{
  Serial.begin(9600);
  myservo.attach(10);
  pinMode(0, INPUT);
  digitalWrite(0, HIGH);
}

void loop()
{
  byte brightness;
  if (Serial.available()>0) {
    brightness = Serial.read();
    myservo.write(brightness);
    delay(15);
  }
}
And execute the following code in Processing:
import SimpleOpenNI.*;
import processing.serial.*;

Serial port;
/*---------------------------------------------------------------
Variables
----------------------------------------------------------------*/
// create kinect object
SimpleOpenNI  kinect;

// image storage from kinect
PImage kinectDepth;
// int of each user being  tracked
int[] userID;
// user colors
color[] userColor = new color[]{ color(255,0,0), color(0,255,0), color(0,0,255),
                                 color(255,255,0), color(255,0,255), color(0,255,255)};

// postion of head to draw circle
PVector headPosition = new PVector();
// turn headPosition into scalar form
float distanceScalar;
// diameter of head drawn in pixels
float headSize = 200;

// threshold of level of confidence
float confidenceLevel = 0.5;
// the current confidence level that the kinect is tracking
float confidence;
// vector of tracked head for confidence checking
PVector confidenceVector = new PVector();

float ellipseSize, ellipseSize1;

PVector rightHand = new PVector();
PVector leftHand = new PVector();

/*---------------------------------------------------------------
Starts new kinect object and enables skeleton tracking.
Draws window
----------------------------------------------------------------*/
void setup()
{

  println("Ports");
  println(Serial.list());

  // start a new kinect object
  kinect = new SimpleOpenNI(this);

  // enable depth sensor
  kinect.enableDepth();

  // enable skeleton generation for all joints
  kinect.enableUser();

  // draw thickness of drawer
  strokeWeight(3);
  // smooth out drawing
  smooth();

  // create a window the size of the depth information

  size(kinect.depthWidth(), kinect.depthHeight());

  port = new Serial(this, Serial.list()[0], 9600);
} // void setup()

/*---------------------------------------------------------------
Updates Kinect. Gets users tracking and draws skeleton and
head if confidence of tracking is above threshold
----------------------------------------------------------------*/
void draw(){
  // update the camera
  kinect.update();
  // get Kinect data
  kinectDepth = kinect.depthImage();
  // draw depth image at coordinates (0,0)
  image(kinectDepth,0,0);

   // get all user IDs of tracked users
  userID = kinect.getUsers();

  // loop through each user to see if tracking
  for(int i=0;i<userID.length;i++)
  {
    // if Kinect is tracking certain user then get joint vectors
    if(kinect.isTrackingSkeleton(userID[i]))
    {
      // get confidence level that Kinect is tracking head
      confidence = kinect.getJointPositionSkeleton(userID[i],
                          SimpleOpenNI.SKEL_HEAD,confidenceVector);

      // if confidence of tracking is beyond threshold, then track user
      if(confidence > confidenceLevel)
      {
        // change draw color based on hand id#
        stroke(userColor[(i)]);
        // fill the ellipse with the same color
        fill(userColor[(i)]);
        // draw the rest of the body
        drawSkeleton(userID[i]);
      } //if(confidence > confidenceLevel)
    } //if(kinect.isTrackingSkeleton(userID[i]))
  } //for(int i=0;i<userID.length;i++)

  //saveFrame("frames/####.tif");

} // void draw()

/*---------------------------------------------------------------
Draw the skeleton of a tracked user.  Input is userID
----------------------------------------------------------------*/
void drawSkeleton(int userId){

  kinect.getJointPositionSkeleton(userId, SimpleOpenNI.SKEL_RIGHT_HAND,rightHand);
  kinect.getJointPositionSkeleton(userId, SimpleOpenNI.SKEL_LEFT_HAND,leftHand);

  kinect.convertRealWorldToProjective(rightHand, rightHand);
  kinect.convertRealWorldToProjective(leftHand, leftHand);

  ellipseSize = map(rightHand.z, 700, 2500, 50, 1);
  ellipseSize1 = map(leftHand.z, 700, 2500, 50, 1);

  ellipse(rightHand.x, rightHand.y, ellipseSize, ellipseSize); //draw circle in right hand
  ellipse(leftHand.x, leftHand.y, ellipseSize1, ellipseSize1); //draw circle in left hand

  port.write((int)map(rightHand.x,100,700,0,179)); //sending data


} // void drawSkeleton(int userId)

/*---------------------------------------------------------------
When a new user is found, print new user detected along with
userID and start pose detection.  Input is userID
----------------------------------------------------------------*/
void onNewUser(SimpleOpenNI curContext, int userId){
  println("New User Detected - userId: " + userId);
  // start tracking of user id
  curContext.startTrackingSkeleton(userId);
} //void onNewUser(SimpleOpenNI curContext, int userId)

/*---------------------------------------------------------------
Print when user is lost. Input is int userId of user lost
----------------------------------------------------------------*/
void onLostUser(SimpleOpenNI curContext, int userId){
  // print user lost and user id
  println("User Lost - userId: " + userId);
} //void onLostUser(SimpleOpenNI curContext, int userId)

/*---------------------------------------------------------------
Called when a user is tracked.
----------------------------------------------------------------*/
void onVisibleUser(SimpleOpenNI curContext, int userId){
} //void onVisibleUser(SimpleOpenNI curContext, int userId)
Downloading link for my files: Head Body and Mechanism Eagle files Codes