
Week 4: Electronics Production
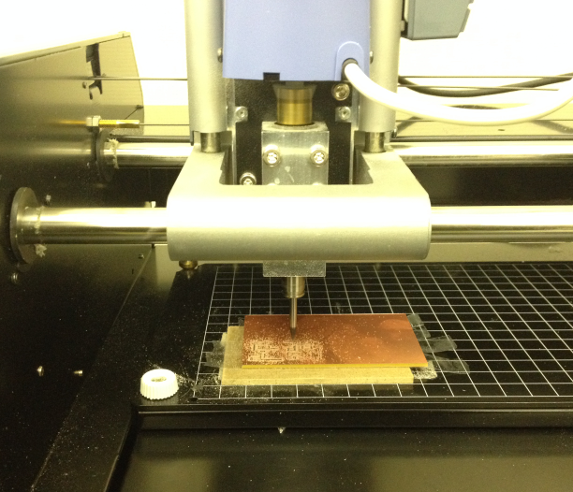
This week's assignment is to make the FabISP in-circuit programmer. Although FabLab Richmond is not yet setup, I do have access to a portable containing an electronics workbench that includes a Roland Modela CNC which is what I will use to mill and cut out the PCB.
FabLab Instructor Mercedes Mane was in town visiting from the Urbana Lab in Indiana to help us with the intial setup in Richmond and some much needed instruction for this weeks lesson.
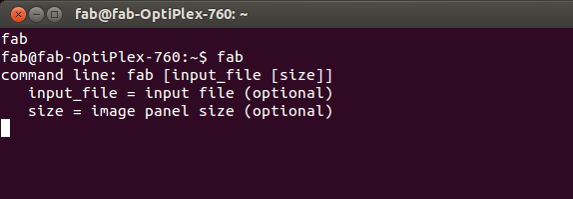
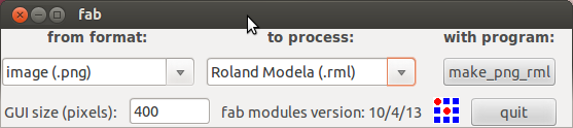
The computer that was connected to the Modela was running Ubuntu. First I opened up the fab modules by entering 'fab' into the terminal window and once the fabmodule popped up I selected the file format from .png to file format .rml (Roland Modela) and clicked make_png_rml
Next step is to click the load.png button and select the file containing the traces layout. After loading the image, you need to change the drop down menu at the top of the page to "mill traces 1/64th" which then loads a bunch of presets in various fields at the bottom of the page.
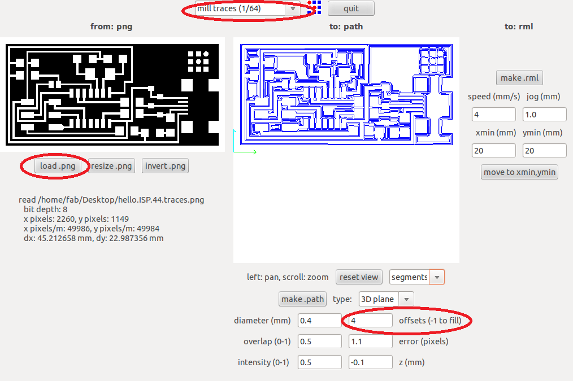
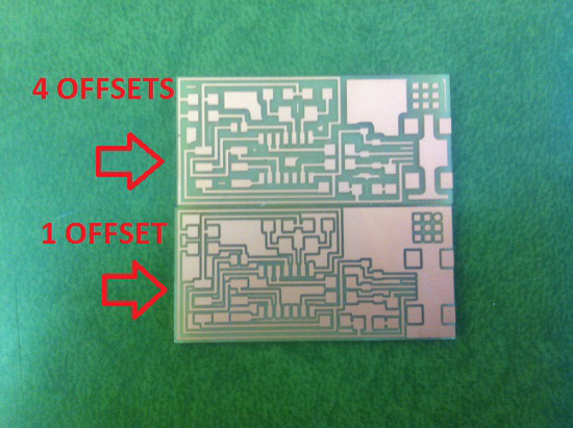
The preset values that appear in the fields at the bottom of the page after selecting from the drop down menu do not need to be adjusted in any way. However, the one field that can be changed is the number of offsets, which is number of passes the modela takes. Pictured below are two boards, one milled using 4 in the offset field and the other using 1 as the offset
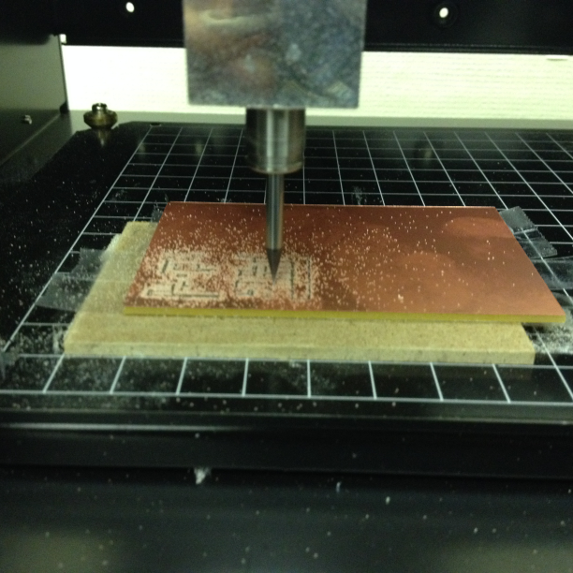
Next step is to put down a dunage piece with doubled sided tape on the stage for protection so that when then board is cut out I can make sure the bit goes deep enough to cut all the way through without damaging the surface. Next I placed my blank PCB slightly offset to make removing after completion easier. Inserted the 1/64th bit into the Modela.
Set the home (x,y) until the bit was over the bottom right corner of the board, then adjust the 1/64th bit so it sits flush on top of the material, and then tightened the set screws. Once the bit was in place, and the home was set, I sent the make rml file and it began milling.
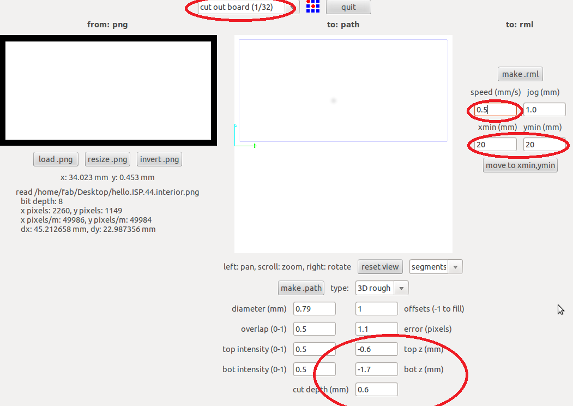
After the milling was completed, I repeated the same steps in order to cut out the PCB, just with a few minor adjustments. Loaded the exterior board png file, and selected 1/32nd from the drop down menu.
Now you need to adjust the following fields:
Since the board is 1.3mm thick, I set the
cut depth to 1.5
bottom z to 1.5,
top z to 0
I also changed the speed down to 0.5 for cutting in comparison to the 4 used for tracing. Also make sure you keep the same x,y home setting and do not remove the board inbetween milling traces and cutting the board out. The slightest adjustment of the board cut lead to an incorrect cut.
Once fields were adjusted, click make.path, then sent the make rml file and it cut out the board.
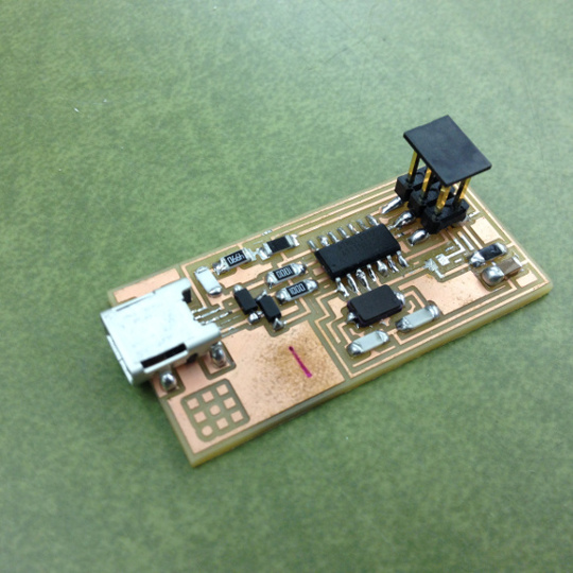
Once the board was cut out, I then pulled the various components to be soldered onto the board. I have had some previous experience soldering but this would be my first time putting components onto traces.
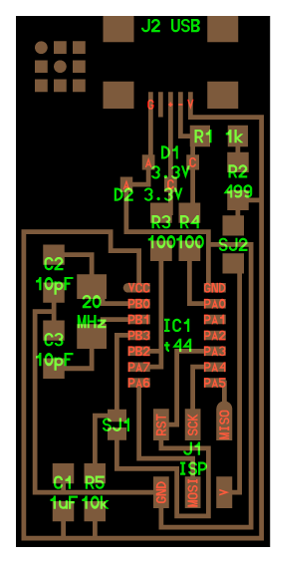
List Components
1 - RES 1K
2 - DIODE 3.3V
1 - RES 499
2 - RES 100
2 - CAP 10PF
1 - CAP 1UF
1- RES 10K
1 - 2X3 ISP CONNECTOR
1 - ATTINY44
1 - MINI USB CONNECTOR
Now that the board is milled, cut, and populated according to the board layout above, we need to program it. Download the FabISP Firmware, unzip the folder and save it to the desktop. Power the board using the mini USB cord and connect the AVRISP2 programmer to the ISP connector on the board, making sure the light on the AVR is green. Open up the terminal window and type the following commands:
cd
cd desktop
cd desktop firmware
next type:
make clean
if you are successful - you will see this response from the system:
Philips-iMac:firmware philipgonsalves$ make clean

    rm -f main.hex main.lst main.obj main.cof main.list main.map  main.eep.hex main.elf *.o usbdrv/*.o main.s usbdrv/oddebug.s usbdrv/usbdrv.s
next type:
make hex
if you are successful - you will see this response from the system:
Philips-iMac:firmware philipgonsalves$ make hex

      avr-gcc -Wall -Os -DF_CPU=20000000  -Iusbdrv -I. -DDEBUG_LEVEL=0 -mmcu=attiny44 -c usbdrv/usbdrv.c -o  usbdrv/usbdrv.o

      avr-gcc -Wall -Os -DF_CPU=20000000  -Iusbdrv -I. -DDEBUG_LEVEL=0 -mmcu=attiny44 -x assembler-with-cpp  -c usbdrv/usbdrvasm.S -o usbdrv/usbdrvasm.o

      avr-gcc -Wall -Os -DF_CPU=20000000  -Iusbdrv -I. -DDEBUG_LEVEL=0 -mmcu=attiny44 -c usbdrv/oddebug.c -o  usbdrv/oddebug.o

      avr-gcc -Wall -Os -DF_CPU=20000000  -Iusbdrv -I. -DDEBUG_LEVEL=0 -mmcu=attiny44 -c main.c -o main.o

      main.c:88:13: warning: always_inline function might not be  inlinable [-Wattributes]

      static void delay ( void  )

      ^

      avr-gcc -Wall -Os -DF_CPU=20000000  -Iusbdrv -I. -DDEBUG_LEVEL=0 -mmcu=attiny44 -o main.elf  usbdrv/usbdrv.o usbdrv/usbdrvasm.o usbdrv/oddebug.o main.o

      rm -f main.hex main.eep.hex

      avr-objcopy -j .text -j .data -O ihex main.elf main.hex

      avr-size main.hex

      text           data           bss           dec           hex       filename

    0           2002             0          2002           7d2       main.hex
next type:
make fuse
if you are successful - you will see this response from the system:
Philips-iMac:firmware philipgonsalves$ make fuse

avrdude -c avrisp2 -P usb -p attiny44  -U hfuse:w:0xDF:m -U lfuse:w:0xFF:m
avrdude: AVR device initialized and ready to accept instructions
Reading | ################################################## | 100% 0.00s
avrdude: Device signature = 0x1e9207

  avrdude: reading input file "0xDF"

  avrdude: writing hfuse (1 bytes):
Writing | ################################################## | 100% 0.00s
avrdude: 1 bytes of hfuse written

  avrdude: verifying hfuse memory against 0xDF:

  avrdude: load data hfuse data from input file 0xDF:

  avrdude: input file 0xDF contains 1 bytes

  avrdude: reading on-chip hfuse data:
Reading | ################################################## | 100% 0.00s
avrdude: verifying ...

  avrdude: 1 bytes of hfuse verified

  avrdude: reading input file "0xFF"

  avrdude: writing lfuse (1 bytes):
Writing | ################################################## | 100% 0.00s
avrdude: 1 bytes of lfuse written

  avrdude: verifying lfuse memory against 0xFF:

  avrdude: load data lfuse data from input file 0xFF:

  avrdude: input file 0xFF contains 1 bytes

  avrdude: reading on-chip lfuse data:
Reading | ################################################## | 100% 0.00s
avrdude: verifying ...

  avrdude: 1 bytes of lfuse verified
avrdude: safemode: Fuses OK (H:FF, E:DF, L:FF)
avrdude done. Thank you.
next type:
make program
if you are successful - you will see this response from the system:
Philips-iMac:firmware philipgonsalves$ make program

avrdude -c avrisp2 -P usb -p attiny44  -U flash:w:main.hex:i
avrdude: AVR device initialized and ready to accept instructions
Reading | ################################################## | 100% 0.00s
avrdude: Device signature = 0x1e9207

      avrdude: NOTE: "flash" memory has been specified, an  erase cycle will be performed

      To disable this  feature, specify the -D option.

      avrdude: erasing chip

      avrdude: reading input file "main.hex"

      avrdude: writing flash (2002 bytes):
Writing | ################################################## | 100% 0.70s
avrdude: 2002 bytes of flash written

      avrdude: verifying flash memory against main.hex:

      avrdude: load data flash data from input file main.hex:

      avrdude: input file main.hex contains 2002 bytes

      avrdude: reading on-chip flash data:
Reading | ################################################## | 100% 0.62s
avrdude: verifying ...

      avrdude: 2002 bytes of flash verified
avrdude: safemode: Fuses OK (H:FF, E:DF, L:FF)
avrdude done. Thank you.
avrdude -c avrisp2 -P usb -p attiny44 -U hfuse:w:0xDF:m -U lfuse:w:0xFF:m
avrdude: AVR device initialized and ready to accept instructions
Reading | ################################################## | 100% 0.00s
avrdude: Device signature = 0x1e9207

      avrdude: reading input file "0xDF"

      avrdude: writing hfuse (1 bytes):
Writing | ################################################## | 100% 0.00s
avrdude: 1 bytes of hfuse written

      avrdude: verifying hfuse memory against 0xDF:

      avrdude: load data hfuse data from input file 0xDF:

      avrdude: input file 0xDF contains 1 bytes

      avrdude: reading on-chip hfuse data:
Reading | ################################################## | 100% 0.00s
avrdude: verifying ...

      avrdude: 1 bytes of hfuse verified

      avrdude: reading input file "0xFF"

      avrdude: writing lfuse (1 bytes):
Writing | ################################################## | 100% 0.00s
avrdude: 1 bytes of lfuse written

      avrdude: verifying lfuse memory against 0xFF:

      avrdude: load data lfuse data from input file 0xFF:

      avrdude: input file 0xFF contains 1 bytes

      avrdude: reading on-chip lfuse data:
Reading | ################################################## | 100% 0.00s
avrdude: verifying ...

      avrdude: 1 bytes of lfuse verified
avrdude: safemode: Fuses OK (H:FF, E:DF, L:FF)
avrdude done. Thank you.
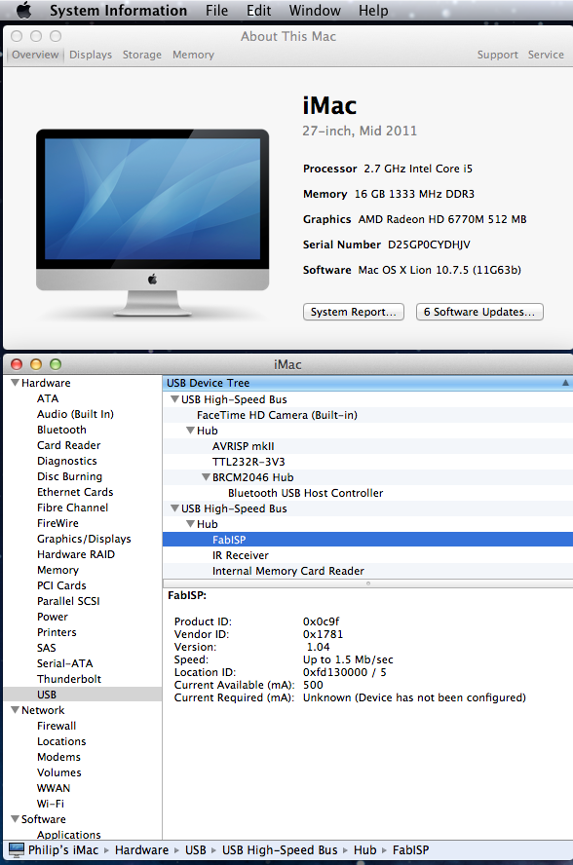
To verify the board has been programmed correctly:
Click the "apple" menu in your main toolbar
Select "about this mac"
Select "system report"
Under the "Contents" menu in the left hand navigation
Click "Hardware" to expand the hardware menu (if not already expanded)
Click "USB"
Under the "USB Device Tree"
Click "Hub" to expand the hub menu (if not already expanded)
"FabISP" should be listed in the hub menu
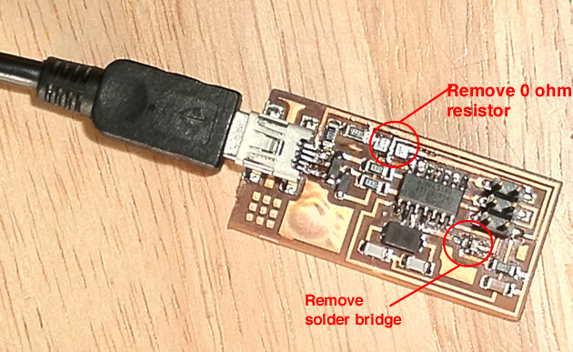
After checking that the board was successfully programmed, remove the 0 ohm resistor and solder jump to be able to use it as a programmer to program other boards. After removing the 0 ohm and solder jump, I followed the same steps of checking if the FabISP was still recognized under the usb device tree, and it was.
Files: