Design and produce something New with a digital fabrication process
(incorporating computer-aided design and manufacturing) not covered in another assignment, documenting the requirements that your assignment meets, and including everything necessary to reproduce it. Possibilities include but are not limited to wildcard week examples.
in this week we have the freedom to choose our own topic and create new assignment, and it should be something new
What is machine vision
Machine vision is the capability of a computer to perceive the environment. One or more video cameras are used with analog-to-digital conversion and digital signal processing. The image data is sent to a computer or robot controller.
Computer vision tools
computer vision tools have been advanced lately. Moreover, our century of detail in parts like the GPUs, plus machine learning tools and frameworks, make computer vision even more powerful nowadays. All major cloud service providers such as Google, Microsoft and AWS joined the race for developer selection. But what do you need to choose? I will help you and show top tools for you to use to do computer vision
Top tools/libraries
OpenCV
Most well-known library, multi-platform, and simple to utilize. It covers all the fundamental strategies and algorithms to play out a few image and video processing tasks, functions admirably with C++ and Python.
Tensorflow
This is the most well-known machine learning and deep learning library today. Its prominence quickly increased and outperformed existing libraries because of the simplicity of the API. TensorFlow is a free open-source library for data streams and differential programming. It is a symbolic math library that is additionally utilized for machine learning applications, for example, neural networks.
Matlab
Matlab is an extraordinary tool for making image processing applications and is generally utilized in research as it permits quick prototyping. Another fascinating perspective is that Matlab code is very concise when compared with C++, making it simpler to peruse and troubleshoot. It handles errors before execution by proposing a few different ways to make the code faster.
CUDA
NVIDIA’s foundation for parallel computing that is easy to program and very effective and quick. Utilizing the power of GPUs it delivers incredible performance. Its toolbox incorporates the NVIDIA Performance Primitives library contained with a set of image, signal, and video processing functions.
SimpleCV
its a framework for building computer vision applications. It gives you access to a multitude of computer vision tools on the likes of OpenCV, pygame, etc. If you don’t want to get into the depths of image processing and just want to get your work done, this is the tool to get your hands on. If you want to do some quick prototyping, SimpleCV will serve you best.
Keras
Keras is a deep learning Python library that combines the elements of different libraries, for example, Tensorflow, Theano, and CNTK. Keras has a favorable position over contenders, for example, Scikit-learn and PyTorch, as it runs on top of Tensorflow.
GPUImage
It is a framework based on OpenGL ES 2.0 that permits applying GPU-accelerated impacts and channels to live motion video, pictures, and films. Running custom channels on a GPU demands a lot of code to set up and keep up.
YOLO
“You just look once” or YOLO is an object detection system planned particularly for real-time processing. YOLO is an advanced real-time object detection system created by Joseph Redmon and Ali Farhadi from the University of Washington. Their algorithm applies a neural network to a whole picture and the neural network partitions the picture into a grid and imprints districts with detected items.
BoofCV
BoofCv is an open-source Java library for real-time robotics and computer vision applications which comes under an Apache 2.0 license for both scholastic and business use. Its functionality
Which device should you choose?
There are many popular devices that are commonly used for running computer vision algorithms by early adopters. However, when it comes to an industrial application, long-term viability becomes a very important factor.
Here is a list of a few devices that are being used for computer vision use-cases:
Nvidia Jetson TX1
Loaded with 64-bit quad-core ARM Cortex-A57 CPU with a 256-core Maxwell GPU, Nvidia Jetson TX1 is one of the most powerful devices in the market for embedded computer vision. What makes it more impressive is that it consumes just 10W of power to deliver 1 Teraflop 16FP performance. At $495, it is slightly pricey, but with Nvidia putting all its force behind it, you have a growing eco-system to make this the right choice for high-end computer vision applications.
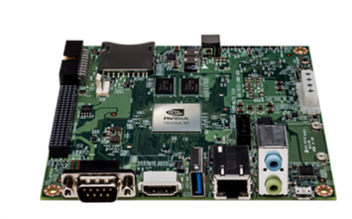
Nvidia Jetson TK1
Nvidia Jetson TK1 is the predecessor of Jetson TX1 and is available at $192. If you think the pricing is odd, think again. With 192-core Kepler GK20a GPU, it is priced at $1 per CUDA core and it delivers a performance of 300 GigaFlops. Tk1 doesn’t have onboard WiFi or Bluetooth. However, these can be added via USB or the mini-PCIe port.
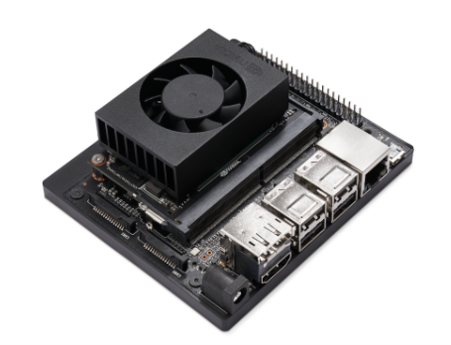
Jetson Nano Developer Kit
NVIDIA® Jetson Nano™ Developer Kit is a small, powerful computer that lets you run multiple neural networks in parallel for applications like image classification, object detection, segmentation, and speech processing. All in an easy-to-use platform that runs in as little as 5 watts. The power of modern AI is now available for makers, learners, and embedded developers
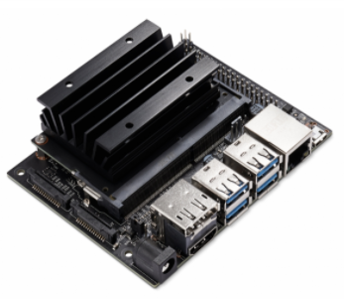
Jetson Xavier NX Developer Kit
The NVIDIA® Jetson Xavier NX™ Developer Kit brings supercomputer performance to the edge. It includes a Jetson Xavier NX module for developing multi-modal AI applications with the NVIDIA software stack in as little as 10 W. You can also now take advantage of cloud-native support to more easily develop and deploy AI software to edge devices.
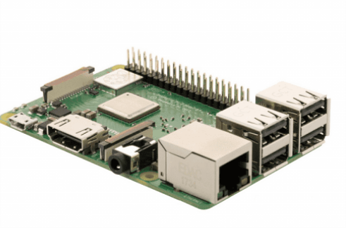
Raspberry Pi 3
Raspberry Pi 3 (RasPi3) has been a significant upgrade on Raspberry Pi 2. With 1.2 GHZ quad-core ARM Cortex A53, new RasPi3 is the go-to device for traditional computer vision on a budget applications (usually using OpenCV).and its available at $39.00
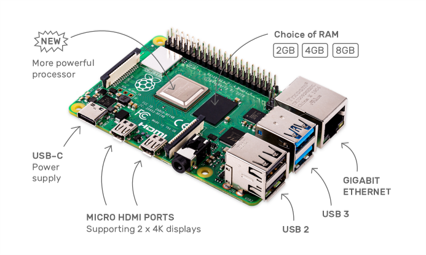
Raspberry Pi 4
The speed and performance of the new Raspberry Pi 4 is a step up from earlier models with 1.5GHz and ARM® Cortex®-A72.Raspberry Pi 4 comes with Gigabit Ethernet, along with onboard wireless networking and Bluetooth.it has Dual displays 4K output,depending on how much RAM you need — 2GB, 4GB, or 8GB.start from $39.84 for 2GB and $86.37 for 8GB
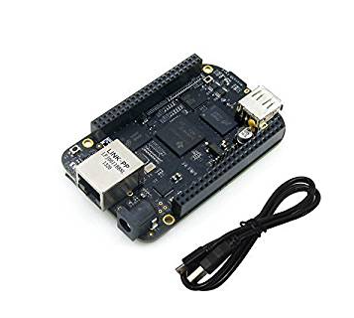
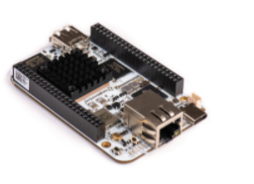
Beagleboard: BeagleBone Black
BeagleBone Black is popular for IoT applications. As compared to Raspberry Pi which has a single 26-pin header that can be used as 8 GPIO pins, or as a serial bus, the Beaglebone Black has two 48-socket headers that can be utilized for virtually limitless I/O hardware. It also includes a number of analog I/O pins that allow it to connect to a variety of sensor hardware that can’t be used with an out-of-the-box Raspberry Pi. With double the price and inferior performance, BeagleBone Black isn’t an excellent choice for computer vision as video decoding, 3D rendering, and general GUI performance is much better on Raspberry Pi 3.
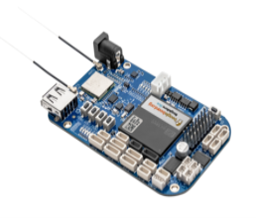
BeagleBone® Blue
BeagleBone® Blue is an all-in-one Linux-based computer for robotics, integrating onto a single small (3.5" x 2.15") board the Octavo OSD3358 microprocessor together with wifi/bluetooth, IMU/barometer, power regulation and state-of-charge LEDs for a 2-cell LiPo, H-Bridges, and discrete connectors for 4 DC motors+encoders, 8 servos, and all of the commonly-needed buses for additional peripherals in embedded applications.
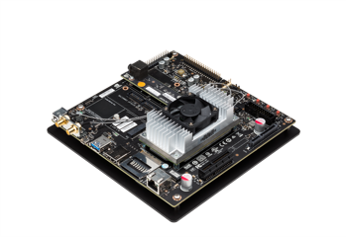
3- BeagleBone® AI
Built on the proven BeagleBoard.org® open source Linux approach, BeagleBone® AI fills the gap between small SBCs and more powerful industrial computers. Based on the Texas Instruments AM5729, developers have access to the powerful SoC with the ease of BeagleBone® Black header and mechanical compatibility. BeagleBone® AI makes it easy to explore how artificial intelligence (AI) can be used in everyday life via the TI C66x digital-signal-processor (DSP) cores and embedded-vision-engine (EVE) cores supported through an optimized TIDL machine learning OpenCL API with pre-installed tools.
Practical
after we introduced to you the software and hardware you can use for th
Understand Pixel
A pixel is the smallest unit of a digital image or graphic that can be displayed and represented on a digital display device.
A pixel is the basic logical unit in digital graphics. Pixels are combined to form a complete image, video, text, or any visible thing on a computer display.
A pixel is also known as a picture element (pix = picture, el = element)
to understand it even better lets write the number 3 in a screen of 10 X 10, first lets divide the picture into small boxes then fill the boxes with black and mark it as zeros to shape the number 3,
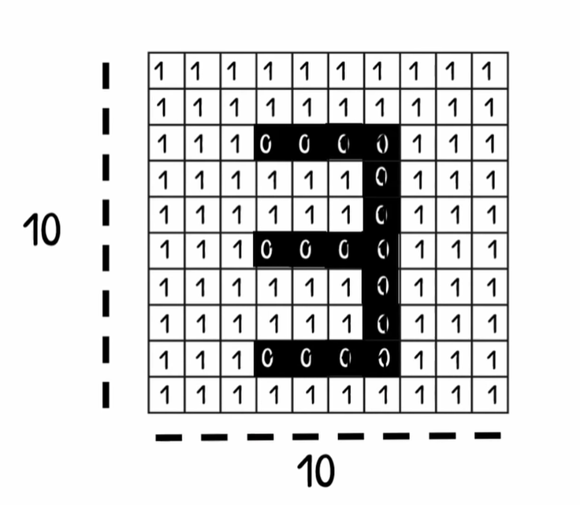
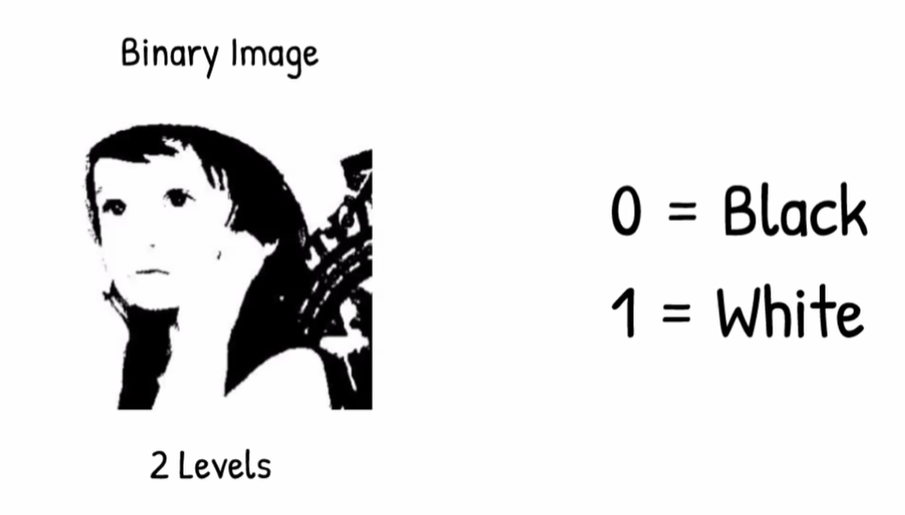
Image of black and white
this is We called a binary, image it has only values of 0 and one and with 2 layer, and like we did with number 3 here we did the same but with more pixels in the picture.
Gray scale image
To make the picture have more details we will add more layer and divide the colors for 255 values and make it 255 shades of grays and we call this image a gray scale image
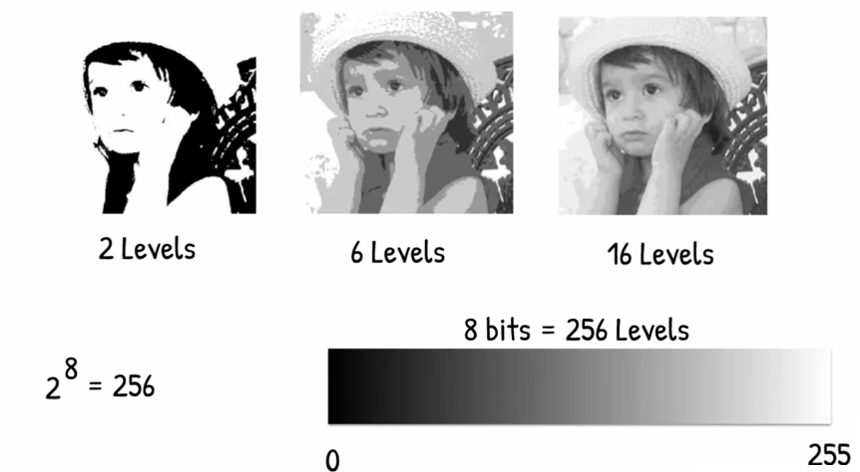
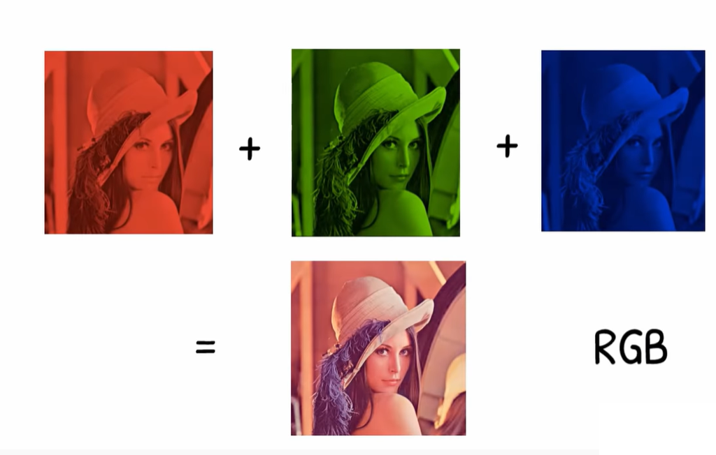
Colored image
By the same way we can have the colored image we divide it into 255 shade for each color Red , Green , Blue
screen resolution
Screen resolution refers to the clarity of the text and images displayed on your screen. At higher resolutions, such as 1600 x 1200 pixels, items appear sharper. They also appear smaller so more items can fit on the screen. The larger the monitor, usually the higher the resolution it supports.
Familiar With this
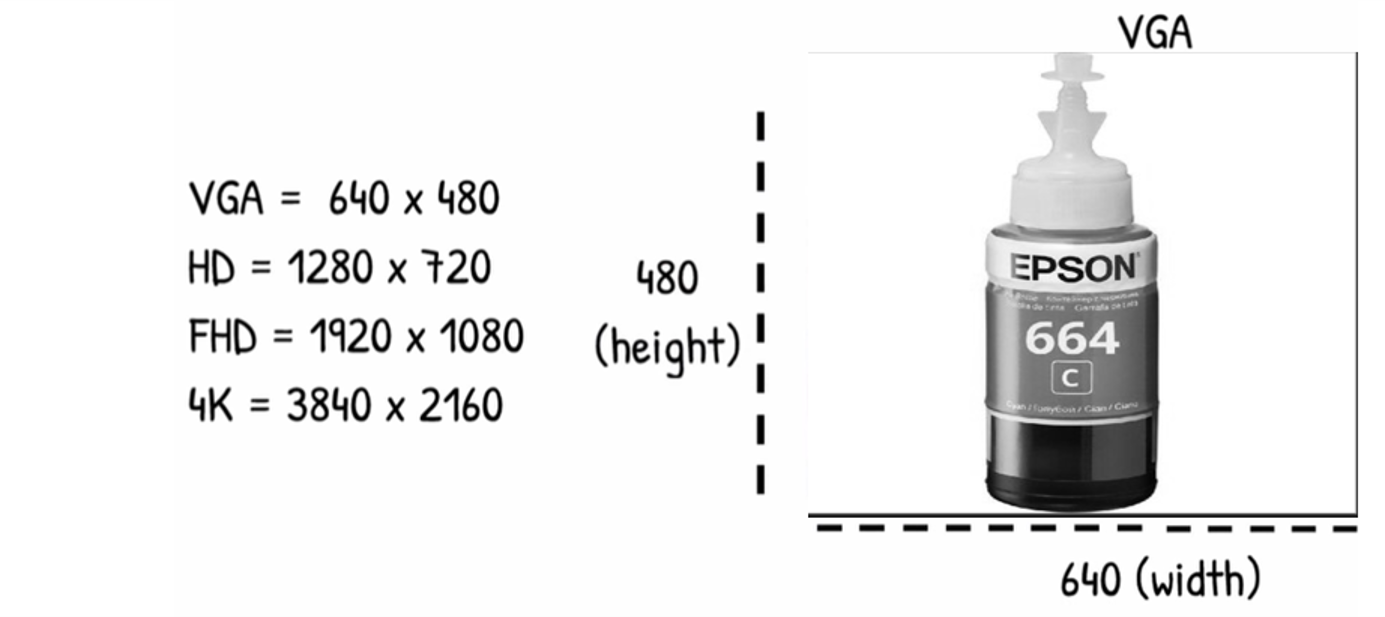
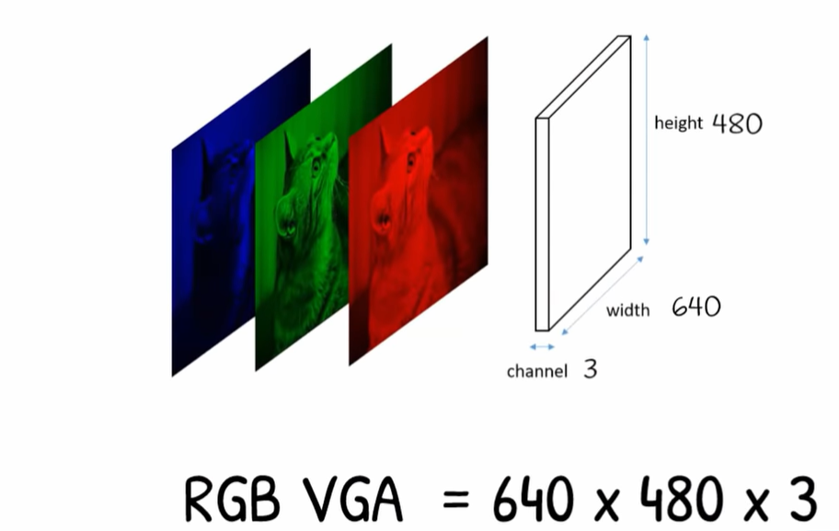
VGA have 640 pixel in width and 480 in Height
Colored VGA Image
Adding these layer in top of each other will represent the full colored images
OpenCV
for the practical part for this assignment i will use opencv as the program to do machine vision and i will use pycharm community version as the environment to use open cv on it, and will use python as programming language. later on will use raspberry pi 3 as its not available with me at the moment.
Download and install python
start first by downloading python from its website then click download from the top bar

then choose the version of python that ompatible with the opencv version you are using ( it depends on the year you are reading this post ). check OpenCV for recommendation.
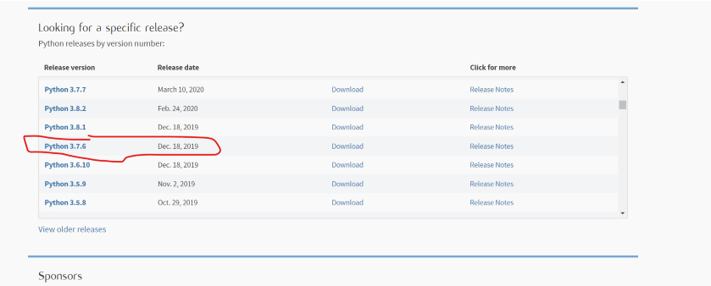
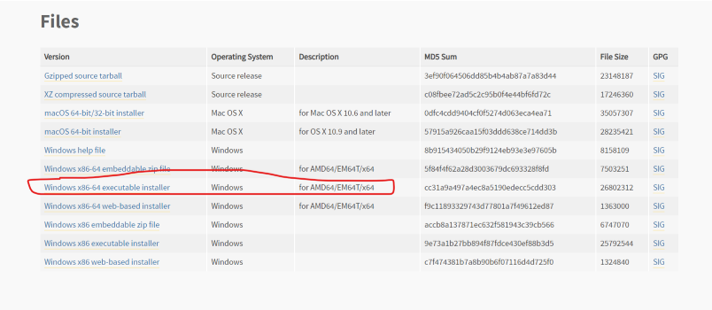
for me i am using python 3.7.6 , and using windows
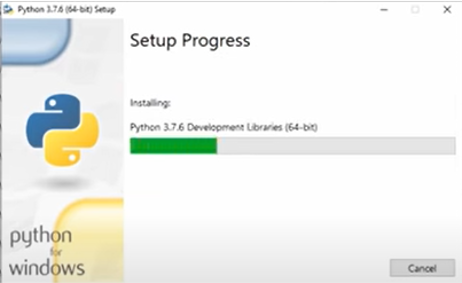
installing


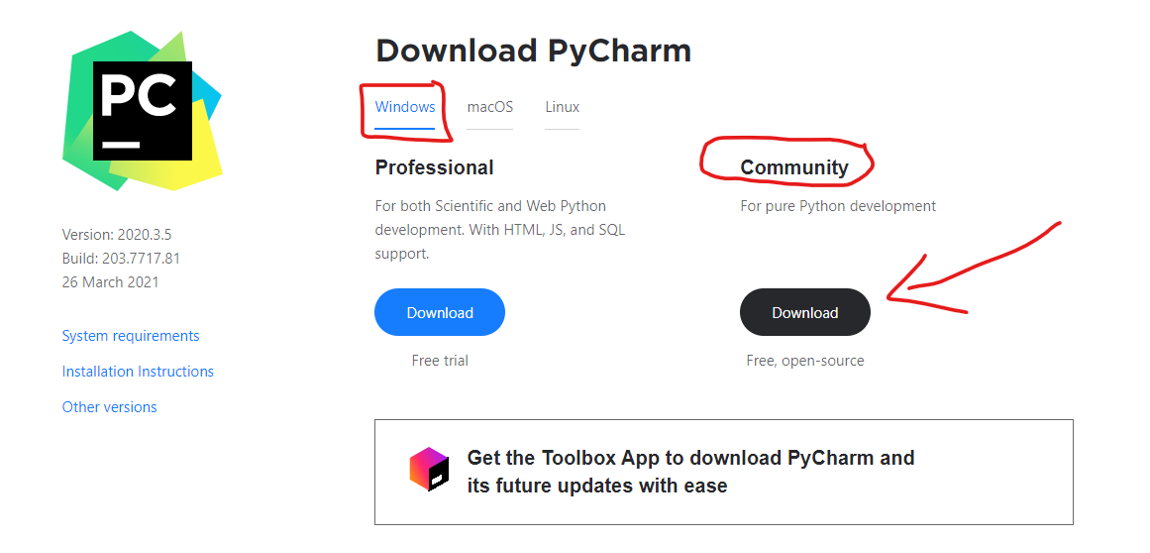
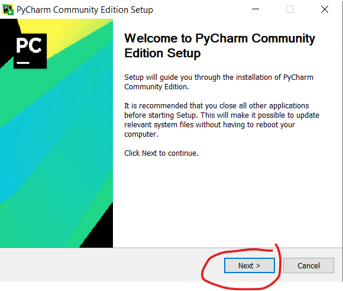
Download and install pycharm
go to the website and download pycharm and download the community version because its free
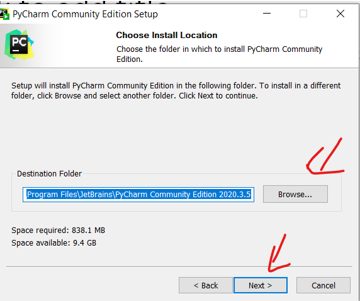
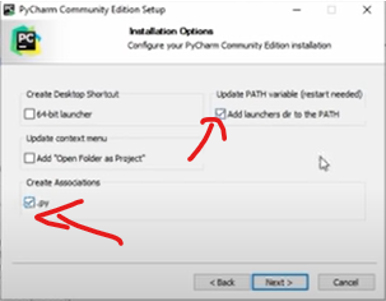
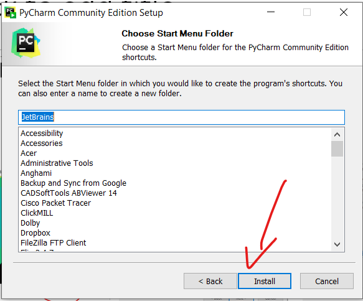
Complete installation process and make sure to add path
Create project
Create a new project , and make sure to make the interrupter as python 3.7

install opencv
Go to file > setting > project pythonProject > python interupeter , then click add
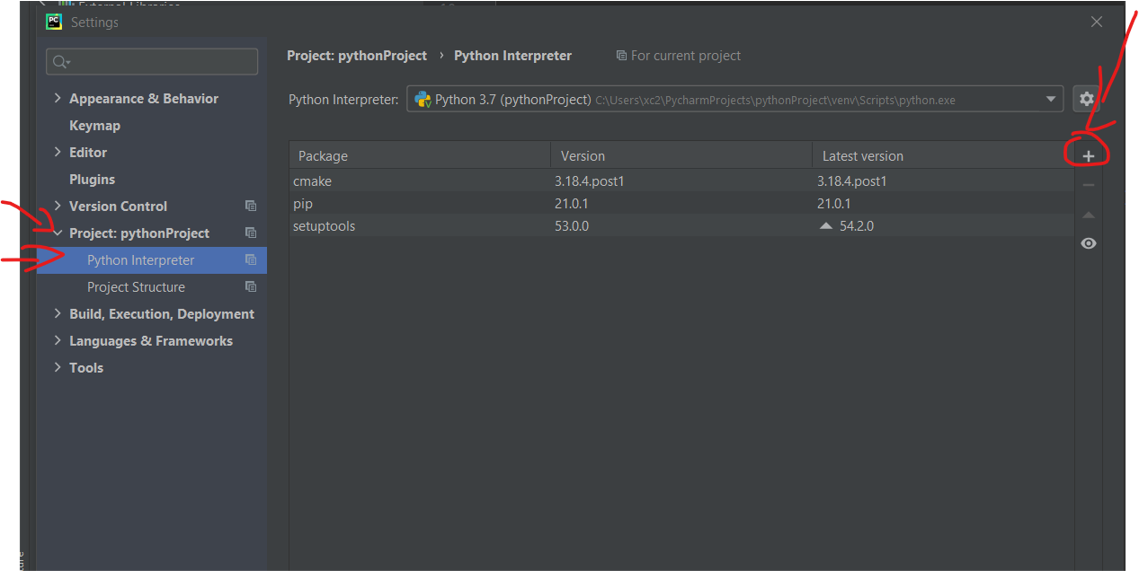
Now search for Open cv > then choose OpenCV-python and click install the package, close the window now and create your first python project by right clicking on the project you have created And go to new and create new python file

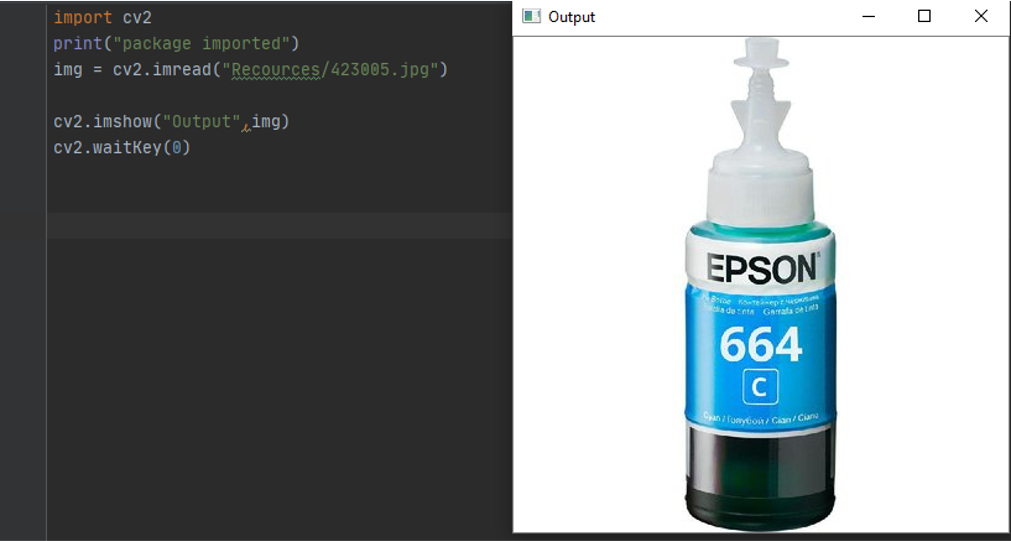
import image to opencv
the first thing to do is to calll opencv librarry using Import cv2 this is stand for computer vision
to test the output and to print massage to make sure its working
Print ( “ package imported “ )
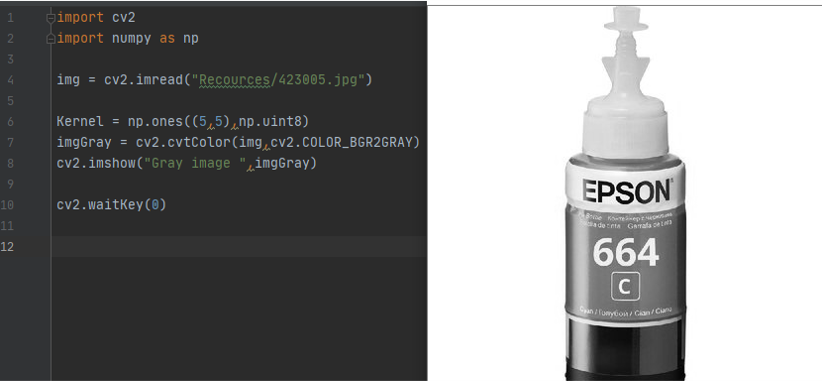
then we use this function to read from image
img = cv2.imread() and you put the path like this (“path to image”/”name of image.file type”)
to display image we use the function imshow
Cv2.imshow() “name of the output”, the image or the variable ( img )
now we add delay to make the image hold before closing using
Cv2.waitKey( Millis ) if 0 its means infinite if number it in milisecound
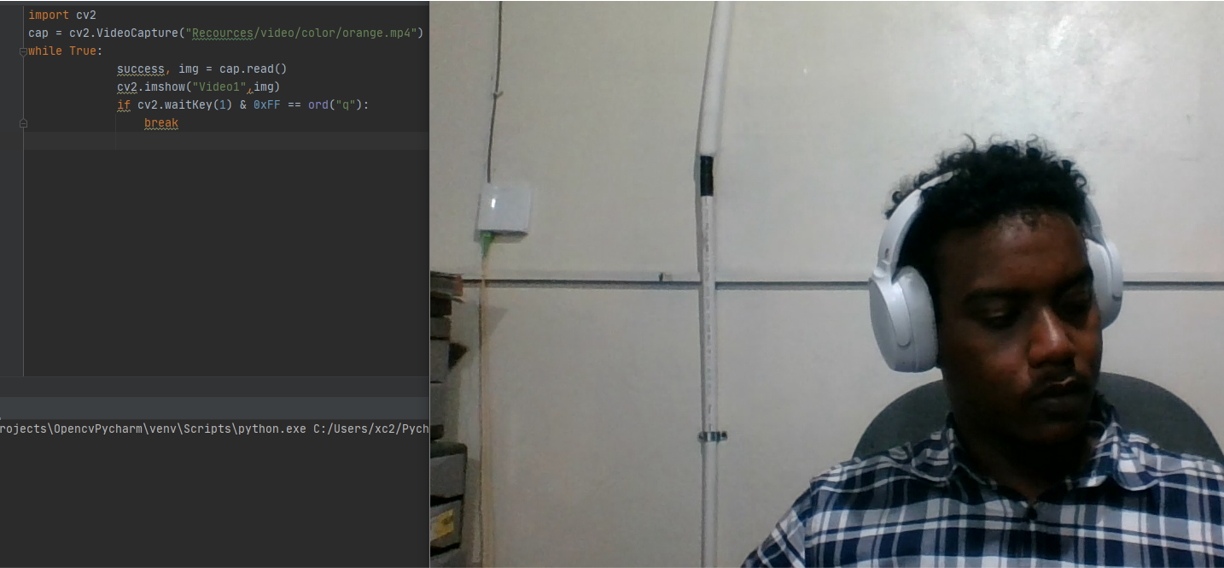
import video to opencv
Video is a sequence of images we need to capture the video then pay it frame by frame i used this code
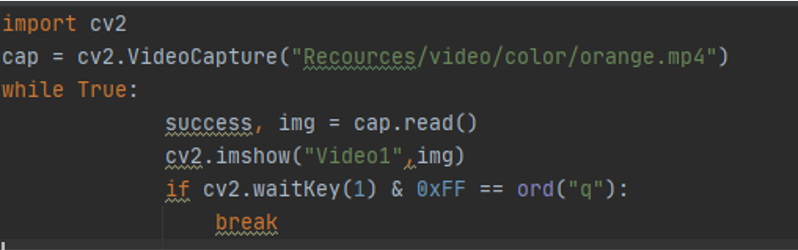
cap = cv2.VideoCapture(“Video Path") // cap is the variable and video path is where the video located The function is to break the video into a frames and save it in the variable cap
Then we need a while While True: loop to read the frames of the video
img = cap.read() this function retrn success if the frames was readed correctly
If function is to break the loop after the video is palayed or to break with the keyboard button pressed Q
Reading from a webcam
Is similar to importing a video just instate of file path just writer the id of the camera , if you have one web cam or using a lapto just type 0 and it will run the default, if you have more than one webcam you can type the id number of that web cam
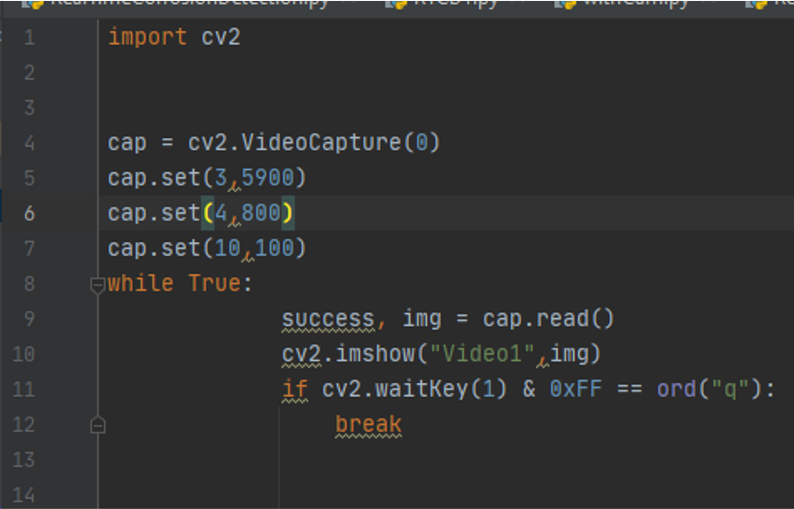
cap = cv2.VideoCapture(camera id ) is the camera id because im using my laptop
Cap.set ( 3,640) we define parameter for our webcam to make it with a specific size so we defined the width with is id number 3
Cap.set (4,480) id number 4 is the high
Cap.set (4,480) 10 is the id number for brightness
The rest of the code remain the same
While True:
success, img = cap.read()
cv2.imshow(“Video1”,img)
if cv2.waitkey(1) & 0xFF == ord(‘q’):
break
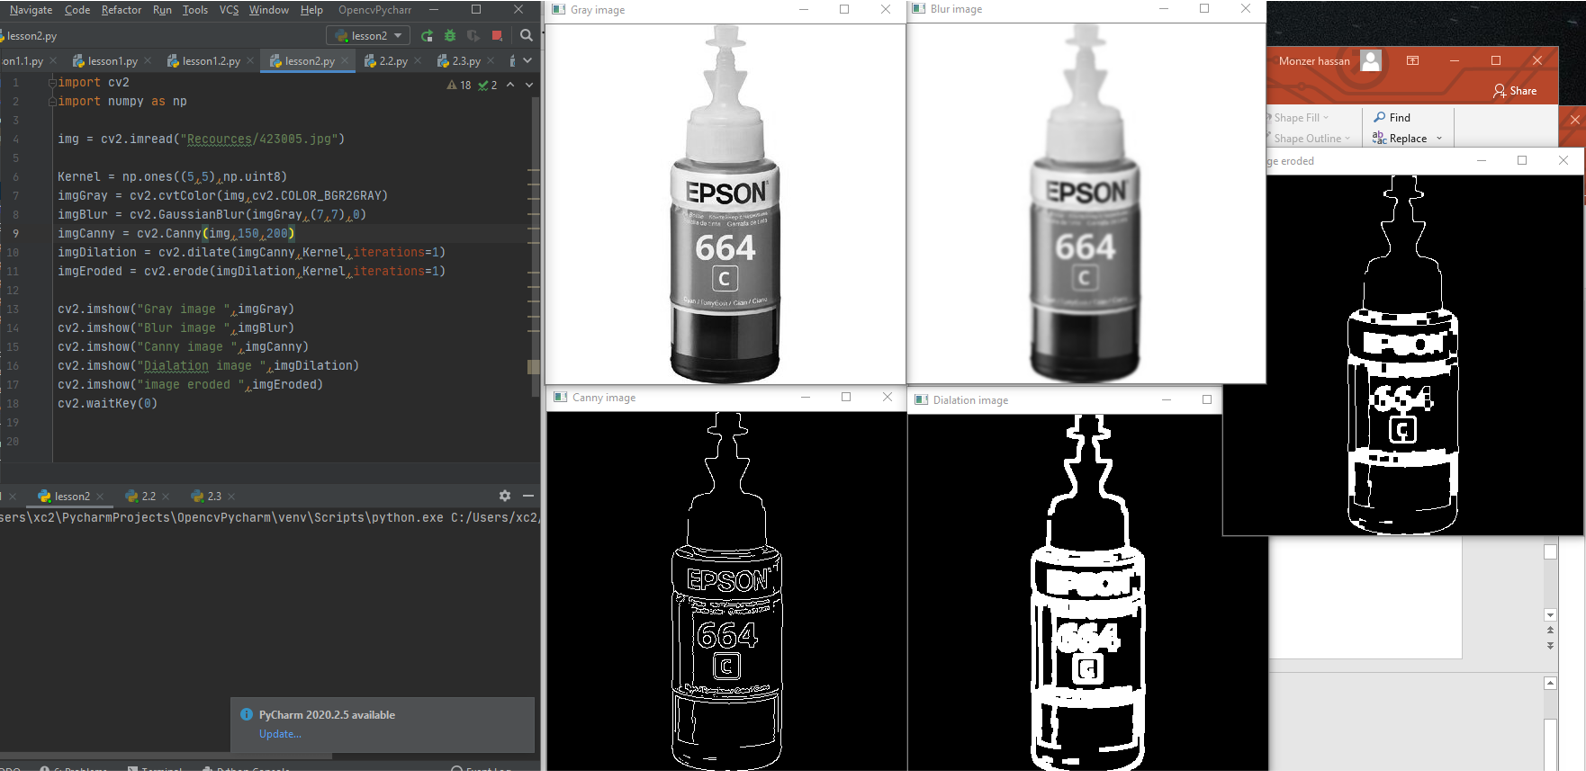
Function ( convert to Grayscale )
the Code
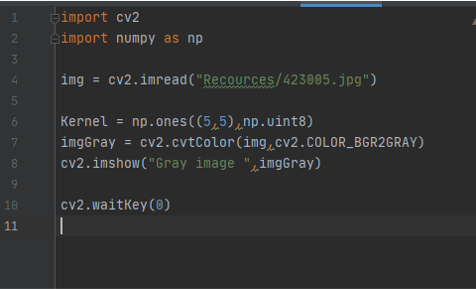
Convert image to color spaces
imgGray = cv2.cvtColor(img,cv2.COLOR_BGR2GRAY) we use this function to convert the image into gray scale we use the function callet cvt convert to color img first this is the path for the image then the function to convert the image
the Output
Download it from here
Function ( blur )
the Code
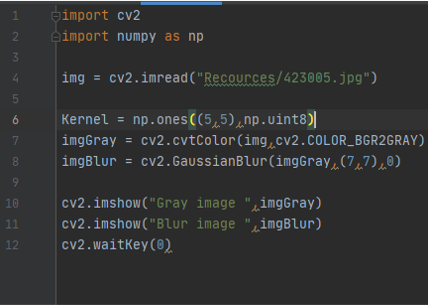
imgBlur = cv2.GaussianBlur(imgGray,(7,7)) first define the image you want to blur then define the kernel value and it must be a odd number and then to define the sigmax value 0
the Output
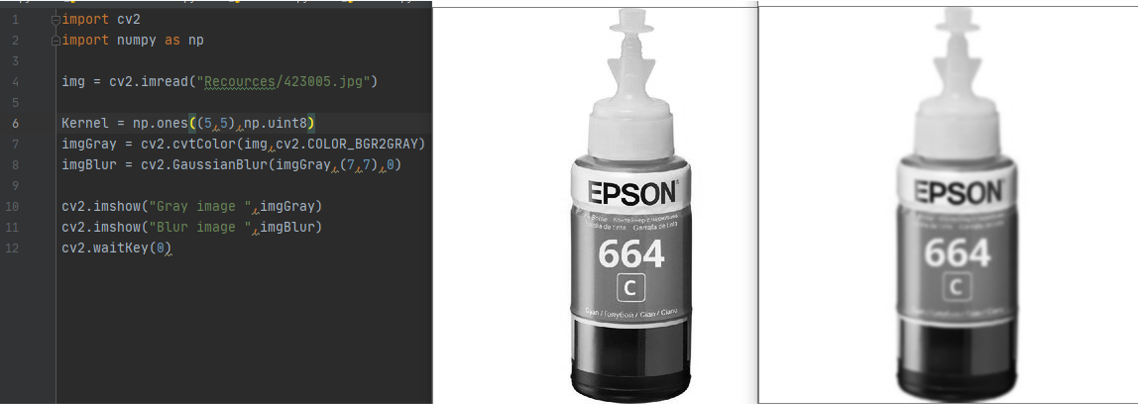
Download it from here
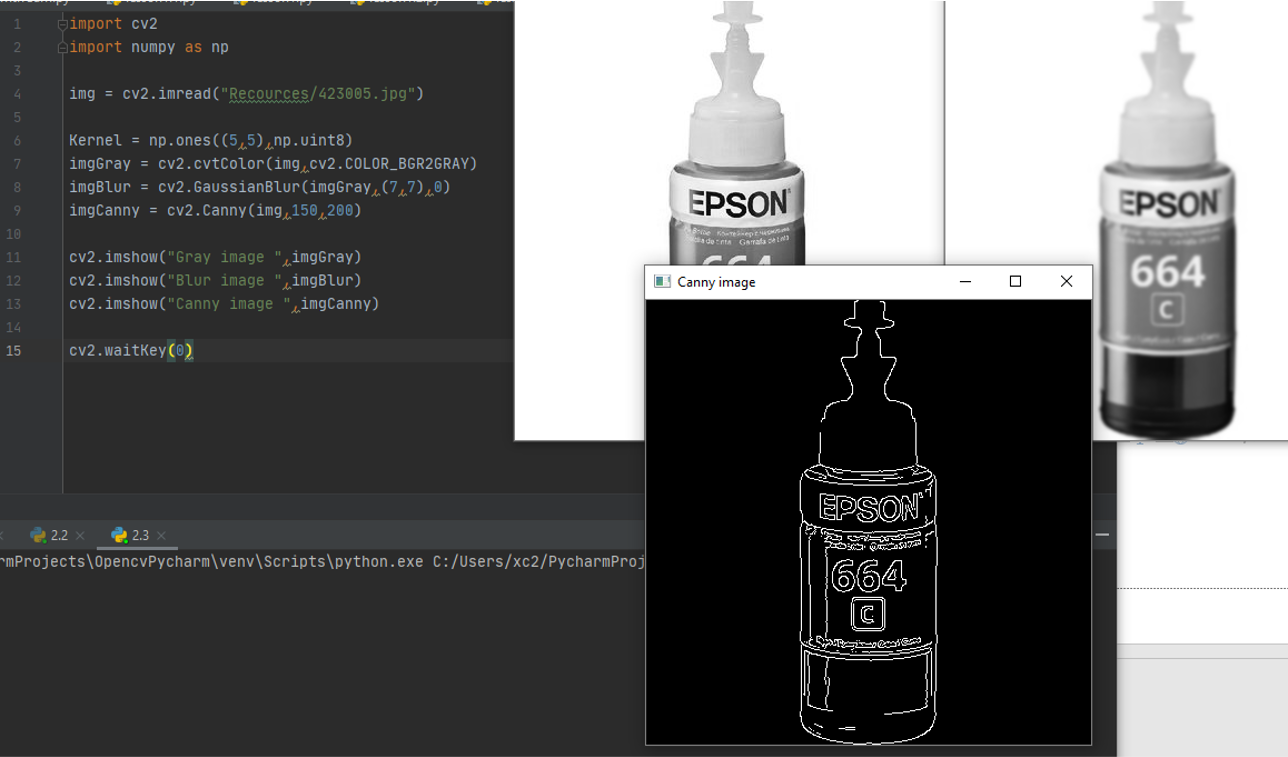
Function ( Detect Edjes of picture )
the Code
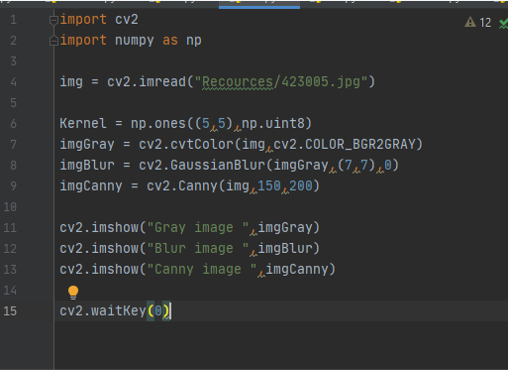
imgCanny = cv2.Canny(img,100,100) fist is the image then the threshold 1, threshold 2
the Output
you can Download it from here
Function (Dilation and Errosion )
the code

imgCanny = cv2.Canny(img,100,100) fist is the image then the threshold 1, threshold 2
In order to do a dilation to play with the thikness of the cany lines we need to add matrix and we need to install numpy We need liberry called numpy in order to play with metrecis import numpy as np
Because kernel is a matrix
Kernal = np.ones((5,5),np.uint8) defines a matrx with all ones and then make it with size of 5*5 and make it with unsigned int that between 0 255
imgDilation = cv2.dilate(imgCanny,Kernel,iterations=1)
imgEroded = cv2.erode(imgDilation,Kernel,iterations=1)
the Output
Download it from here
Function (resize)
the code
 to resize i used this code
imgResized = cv2.resize(img,(1000,1000)) it will ask for three variable first is the name of the variable that contain the picture you want to resize then dimension width and hight
imagecroped = img[0:220,0:200] this to crop the picture you have to specify the starting point and the ending point
the Output

Download it from here
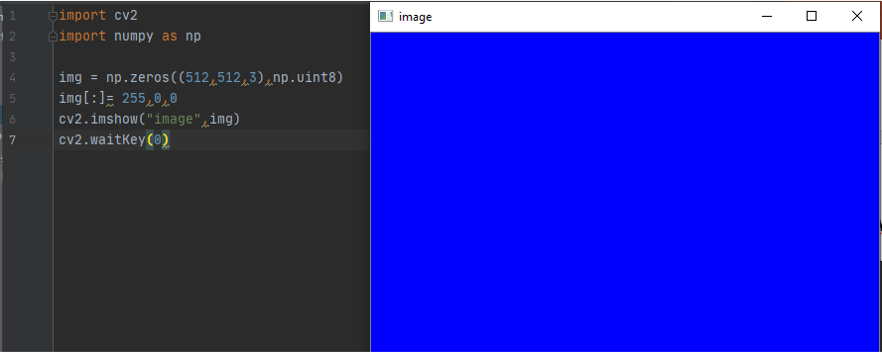
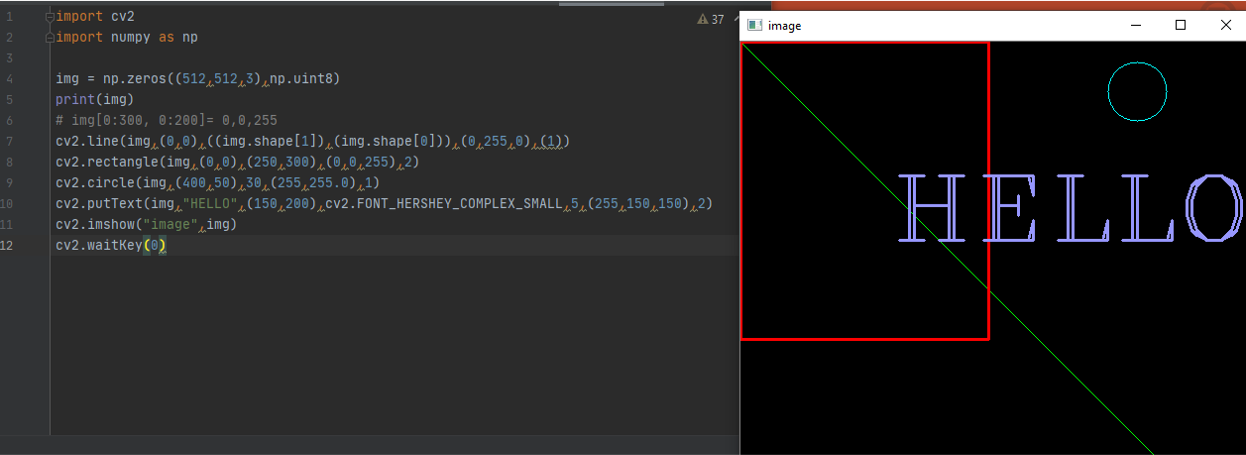
To draw on images
the Code
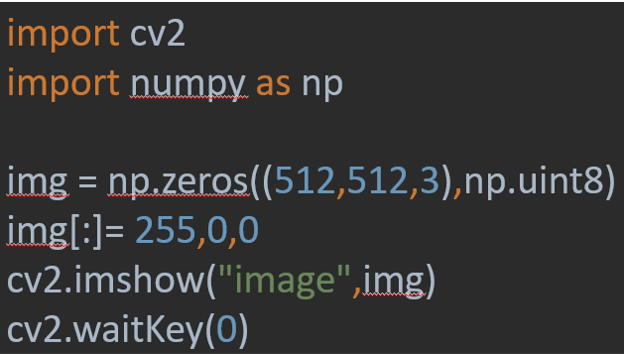
img = np.zeros((512,512,3),np.uint8)
It will make the matrix with zeros and the three numper 512 512 is for the size 3 for the colored picture to have BGR
Img img[:]= 255,0,0 is to color the image with a specific value Hight:Widhth here the color is blue 255,0,0
the Output
Download it from here
To draw a line and rectangle and circle
the Code
 Use
Use cv2.line ( define the image you want ,(starting point),(ending point),(define the color),(thinkness)
Example
cv2.line(img,(0,0),((img.shape[1]),(img.shape[0])),(0,255,0),(1)) 1 is the width 0 for the hight
Regtangle is the same put you use cv2.rectangle
To fill the rectangle replace the thikness with this cv2.FILLED
For the circle ( center point instate of the starting point then you have to define radius)
to write Text i used cv2.putText(img,"HELLO",(250,250),cv2.FONT_HERSHEY_DUPLEX,1,(255,150,150),2) where the first part is to choose the picture you want to write on it, then the test you want ,then a location for the text , then font and color using cv2.FONT_HERSHEY_DUPLEX,1,(255,150,150),2)
the output
Download it from here
Stacking images
i wanted to see the process of image conversion of the function that i did before, making the picure gray then blur then detect its edges and then make it eroded , ifound away that it stack images all togather in one image so i want to take a try for it
the Code
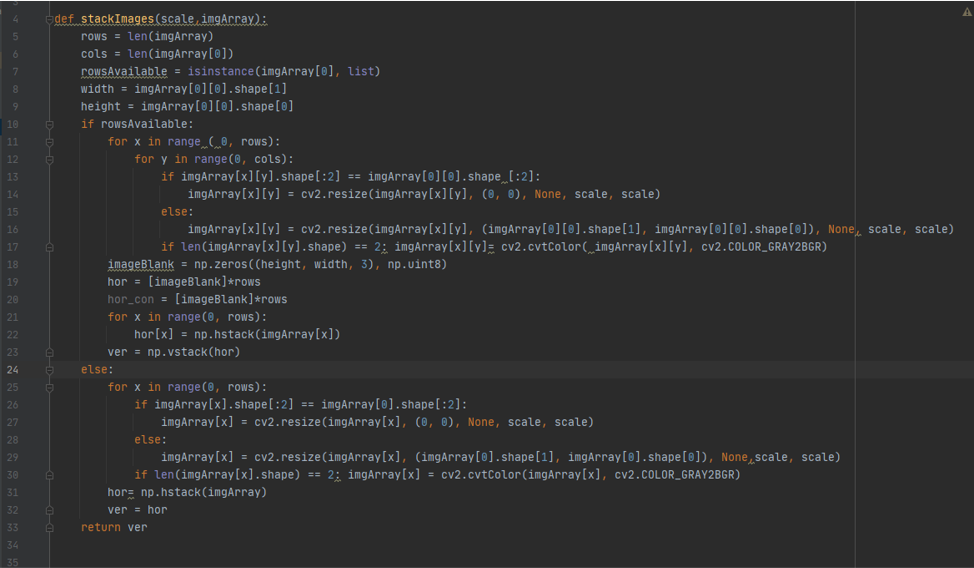
def stackImages(scale,imgArray): here it define new function with the name stack images and receive tow values, scale for the size of the stcked picture , array the picture you want to stacke it and arrange it in array form
and the rest of the code is to arrange it in the form of 6 picture all in one
to call and use this function by typing for example
imgStack = stackImages(0.6, ([imgGray, imgBlur], [imgCanny, imgDilation],[imgEroded,imgEroded]))
the output

Download it from here
project color detection
after learning form previous exercise and examples its time to make something cool, i wanted to detect colors on images and to do that i knew that in order to have the right parameter for a specific color you need to manipulate the picture first, and i wanted this to be continuous process, so i used this code to make a window that have track bars
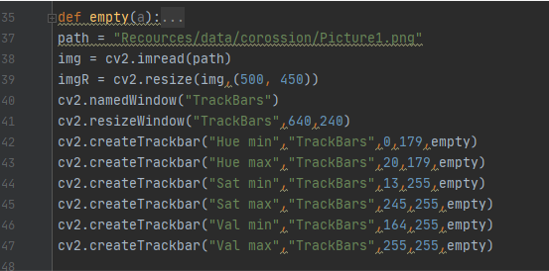
the code cv2.namedWindow("TrackBars") is to create a window with the name " trackbars"
cv2.resizeWindow("TrackBars",640,240) the size of the window
cv2.createTrackbar("Hue min","TrackBars",0,179,empty) is to create track bar with name of " Hue min " in the window trackbars that have value starting from 0 up to 179
making a mask with this values and change it accordingly
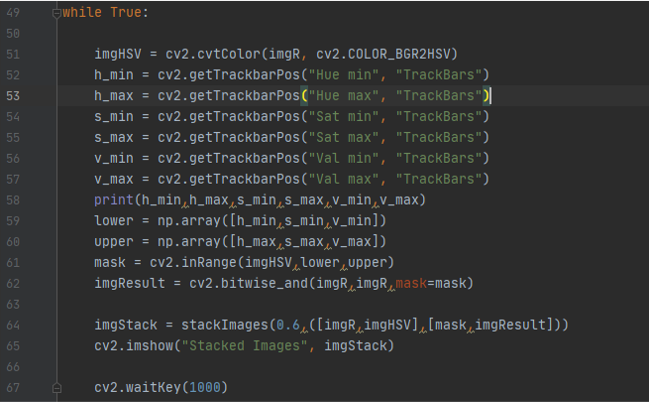
imgHSV = cv2.cvtColor(imgR, cv2.COLOR_BGR2HSV) to change the image to thermal image
h_min = cv2.getTrackbarPos("Hue min", "TrackBars") to have the value from the track bar and save to variables , here its in varibale h_min
lower = np.array([h_min,s_min,v_min]) convert the values into array
mask = cv2.inRange(imgHSV,lower,upper) create mask over the thermal image and with the values in the array in variable “lower , upper” and save it in result
imgStack = stackImages(0.6,([imgR,imgHSV],[mask,imgResult])) stacking the images together in one
the output
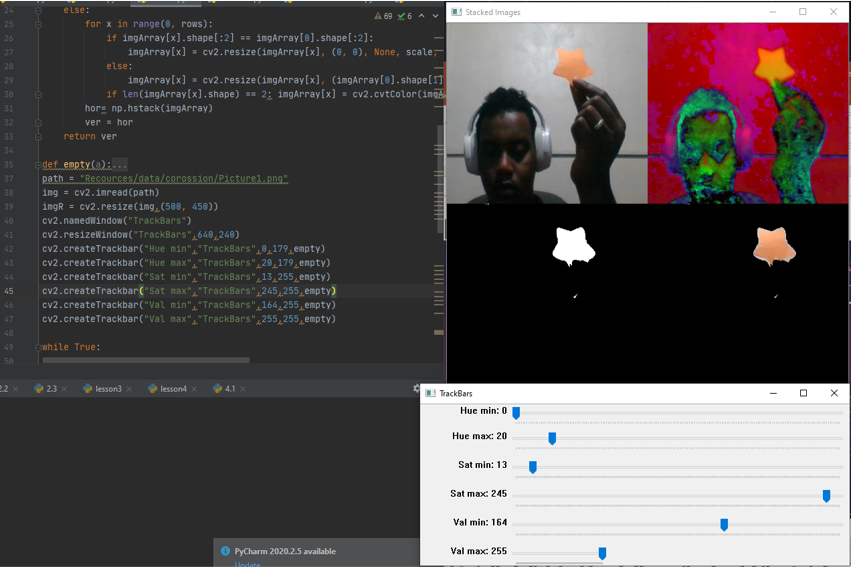
Download it from here
project color detection in video with contoure
using the same process for color detecting in images but this time for videos , as we said earlier that the video is just a set of images, so we will do the same just we need to capture video first as we did before
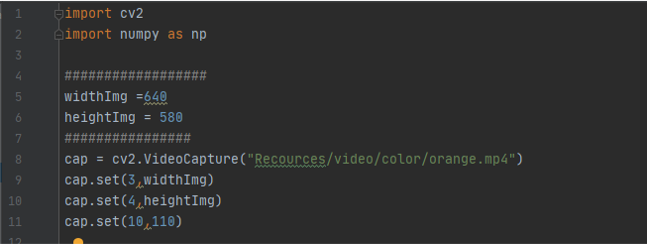
using cap = cv2.VideoCapture("Recources/video/color/orange.mp4") to capture the frames in the variable cap
then put cap variable in while loop to read the frames and to do image processing to it as we did in pervious example with track bars
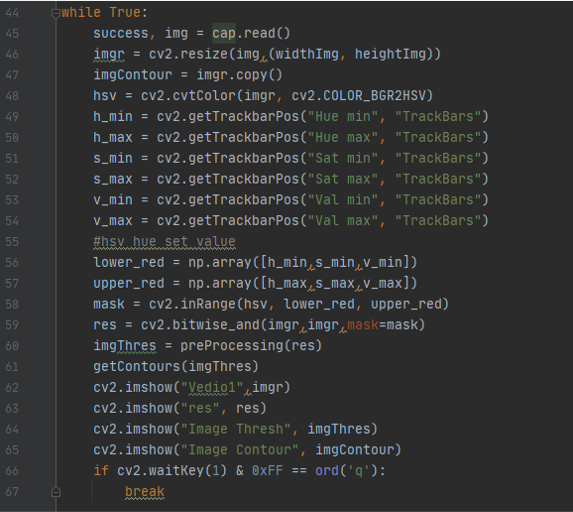 you can notice new things in this code
 imgContour = imgr.copy() here i make new copy of the same image in order to write on it and saved it in " imagecotour "
also `` res = cv2.bitwise_and(imgr,imgr,mask=mask) and imgThres = preProcessing(res) and getContours(imgThres) ``` here i saved the image with mask on top of it in the variable " res " and passed it to a function " preProcessing " that i will explain it next, and then saved the result in “imgThres " ad pased this value to the function “getCountours”
the process you can see it here in this new functions
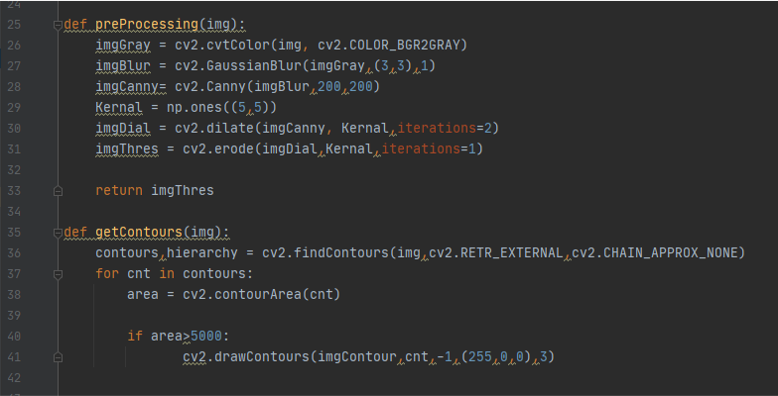
def preProcessing(img): to recive the value we passed from the varible res and then cnovert it into gray scale using imgGray = cv2.cvtColor(img, cv2.COLOR_BGR2GRAY) then make it blur with imgBlur = cv2.GaussianBlur(imgGray,(3,3),1) then detect edges wth imgCanny= cv2.Canny(imgBlur,200,200) then dilate and erode it with imgDial = cv2.dilate(imgCanny, Kernal,iterations=2) and imgThres = cv2.erode(imgDial,Kernal,iterations=1) then pass the value to the next function
def getContours(img): here we want to have drwing around the detected picture using countour function first to find the contour using contours,hierarchy = cv2.findContours(img,cv2.RETR_EXTERNAL,cv2.CHAIN_APPROX_NONE) then defin the era of the contour using area = cv2.contourArea(cnt) if the area was bigger than 5000 draw around it with blue using cv2.drawContours(imgContour,cnt,-1,(255,0,0),3)
the result of the program
adding colored box and text around contour
to draw a box around the contour we will use the same program just with few modification only in get contour function as follow,
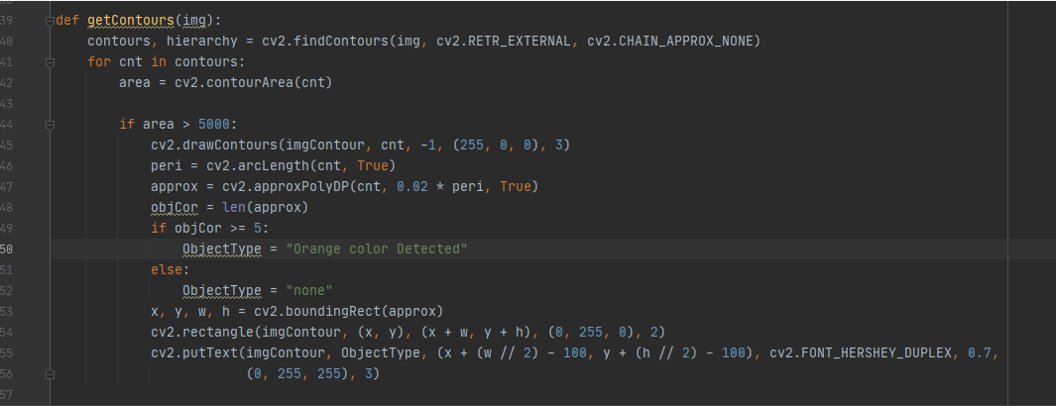
it will check first if the contour was there , if yes then will type ornage color detected using ObjectType = "Orange color Detected" if not it will write “none” ObjectType = "none"
x, y, w, h = cv2.boundingRect(approx) to draw a rectangle around the contour coordinate
cv2.rectangle(imgContour, (x, y), (x + w, y + h), (0, 255, 0), 2) to draw the box on the image we copied before
cv2.putText(imgContour, ObjectType, (x + (w // 2) - 100, y + (h // 2) - 100), cv2.FONT_HERSHEY_DUPLEX, 0.7,(0, 255, 255), 3) to write on the picture and specified the color and font and the location of the text
the result of the program
Download
colored box and text around contour
References
TOP 10 COMPUTER VISION TOOLS FOR 2020