Group assignment:
- Compare as many tool options as possible.
Individual assignment
- Write an application that interfaces a user with an input and/or output device that you made
in this week we got introduced to a lot of software’s that we can use for interfacing with our boards, in order to make it more user friendly.
and for me since i am more familiar with Arduino environment its better to use processing to do the job, but first lets get into the basics of graphic’s and understand pixels
Understand Pixel
A pixel is the smallest unit of a digital image or graphic that can be displayed and represented on a digital display device.
A pixel is the basic logical unit in digital graphics. Pixels are combined to form a complete image, video, text, or any visible thing on a computer display.
A pixel is also known as a picture element (pix = picture, el = element)
to understand it even better lets write the number 3 in a screen of 10 X 10, first lets divide the picture into small boxes then fill the boxes with black and mark it as zeros to shape the number 3,
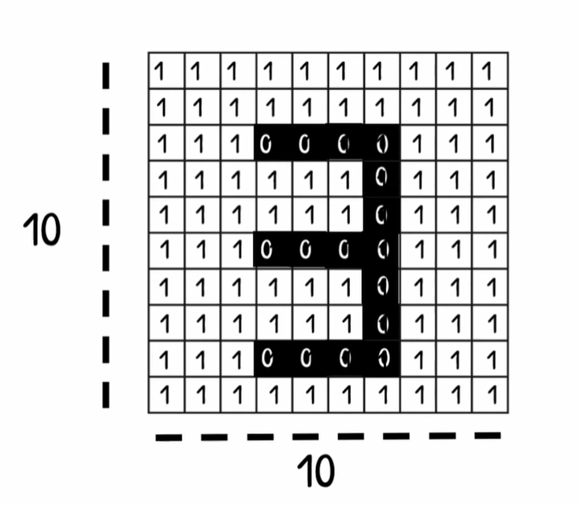
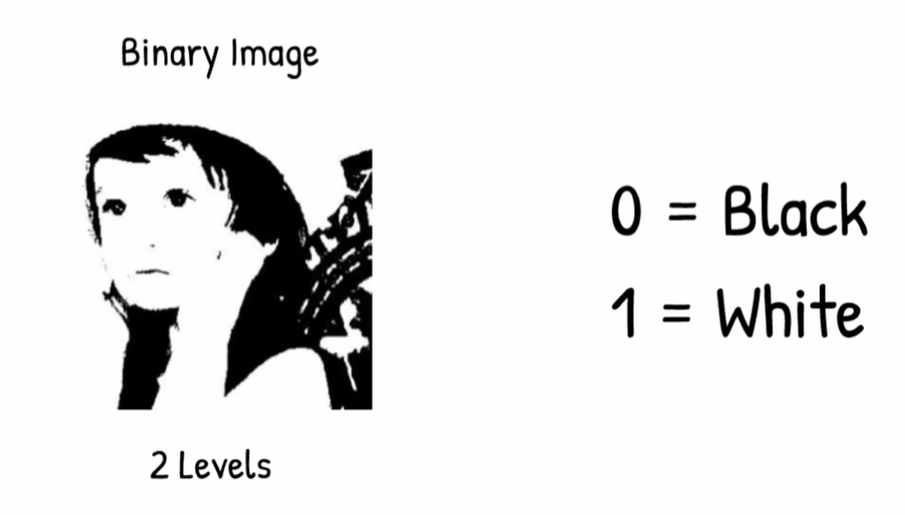
Image of black and white
this is We called a binary, image it has only values of 0 and one and with 2 layer, and like we did with number 3 here we did the same but with more pixels in the picture.
Gray scale image
To make the picture have more details we will add more layer and divide the colors for 255 values and make it 255 shades of grays and we call this image a gray scale image

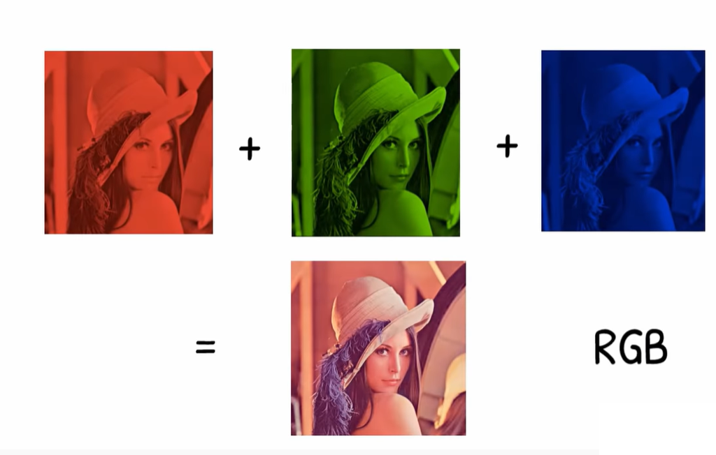
Colored image
By the same way we can have the colored image we divide it into 255 shade for each color Red , Green , Blue
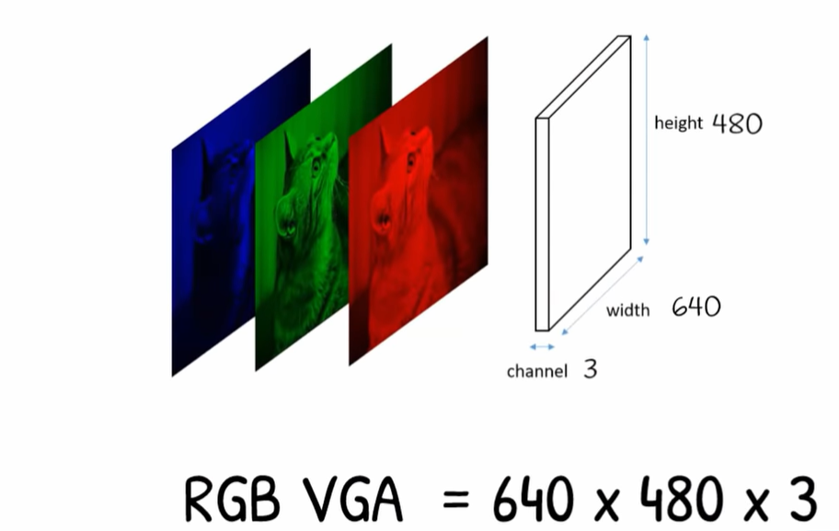
screen resolution
Screen resolution refers to the clarity of the text and images displayed on your screen. At higher resolutions, such as 1600 x 1200 pixels, items appear sharper. They also appear smaller so more items can fit on the screen. The larger the monitor, usually the higher the resolution it supports.
Familiar With this
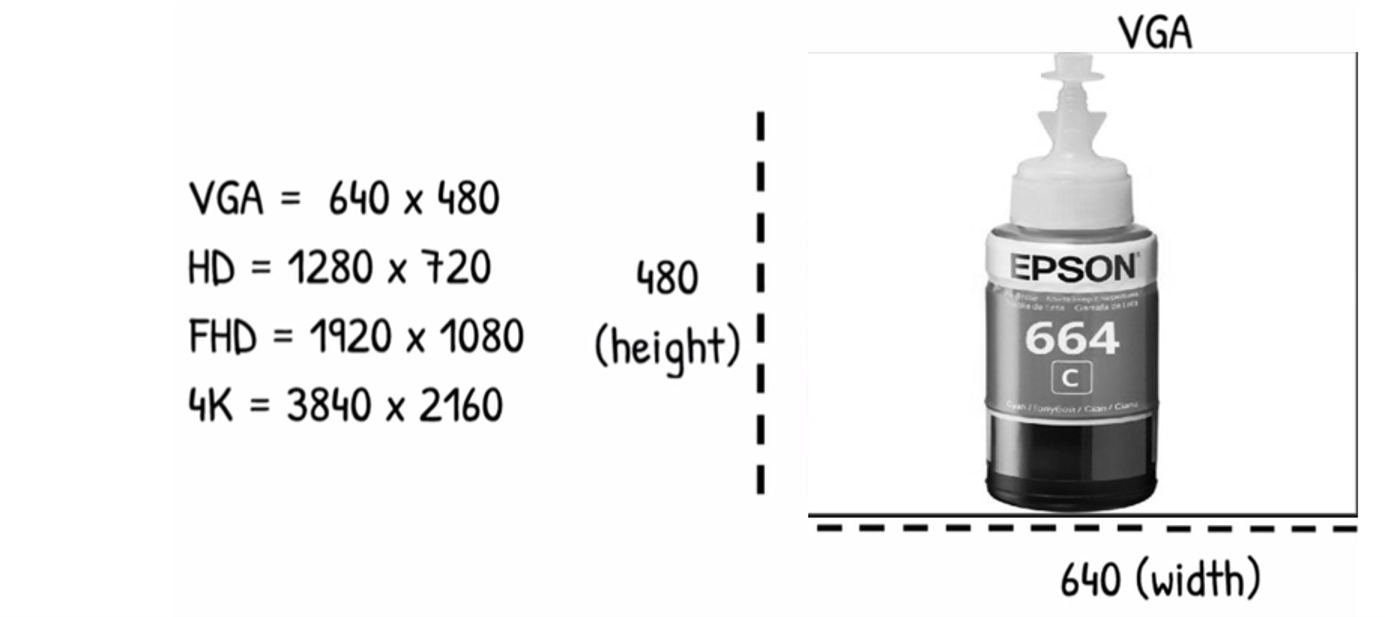
VGA have 640 pixel in width and 480 in Height
Colored VGA Image
Adding these layer in top of each other will represent the full colored images
Processing

Processing is a flexible software sketchbook and a language for learning how to code within the context of the visual arts..
download
Processing work in cross platform, I am using windows 10 64 bit this is what I am going to download
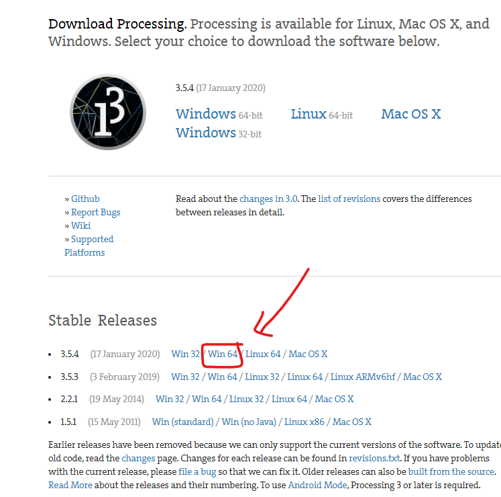
extract and around
once the download complete extract the files and run processing.exe

Getting started tutorial
in processing website they have good documented tutorial for getting started with the program, i do recommend to go through it to understand its environment and how to deal with graphics,
navigate to tutorials and start with hello processing
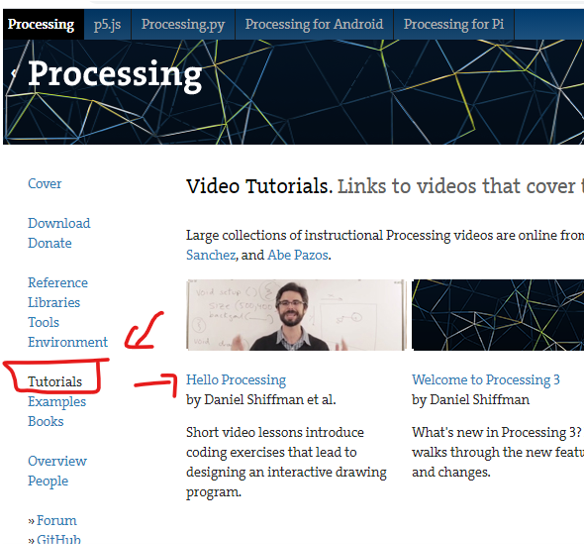
Hello Processing
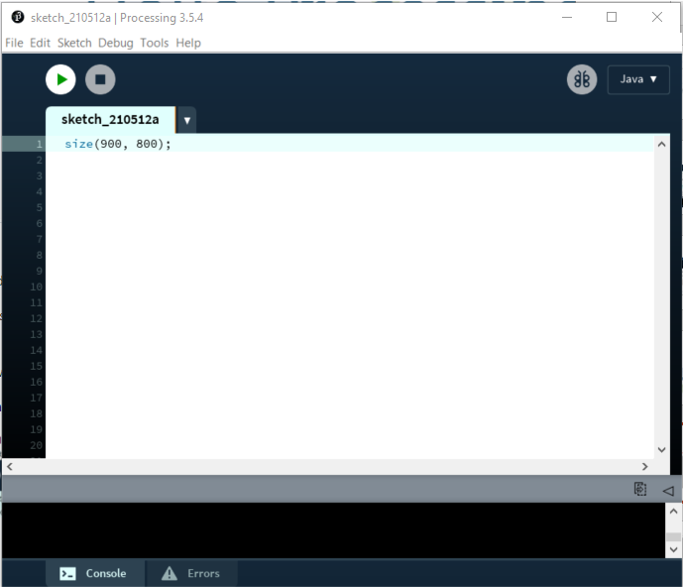
now lets jump to processing to understand more about its function

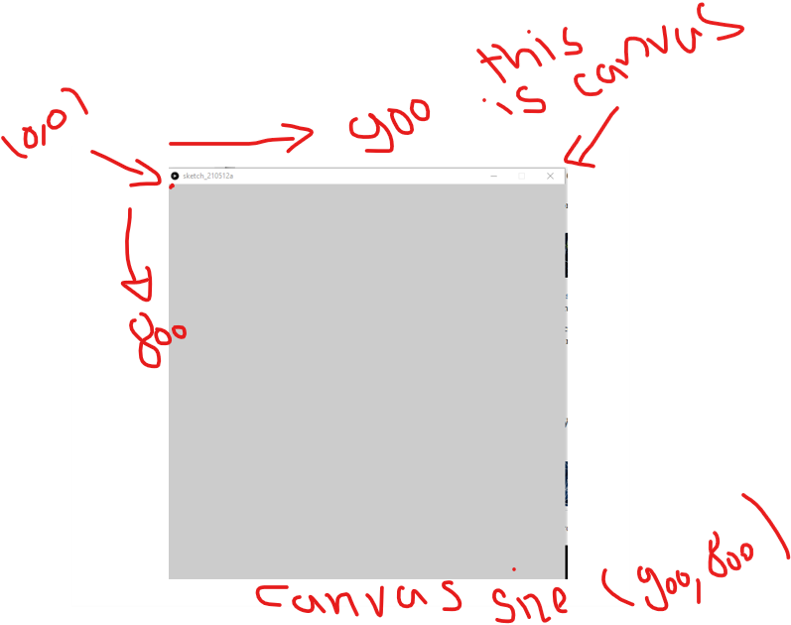
Canvas
first we need to understand what is canvas
The canvas is a two-dimensional grid. The coordinate (0, 0) is at the upper-left corner of the canvas. Along the X-axis, values increase towards the right edge of the canvas. Along the Y-axis, values increase towards the bottom edge of the canvas.
and its the window that will hold our graphics and codes in processing,
start a canvas by writing size function and then decide the size of your canvas
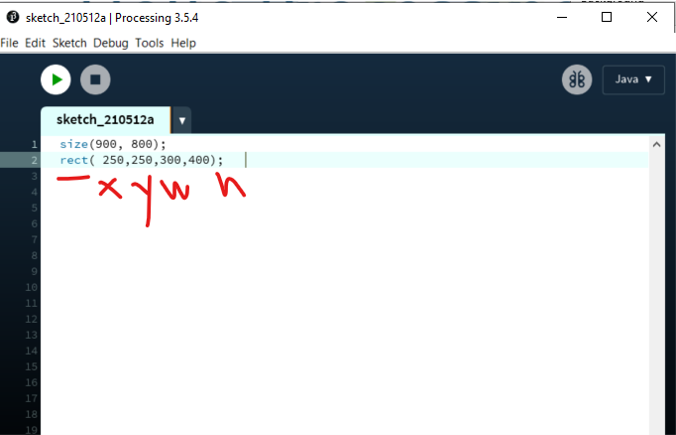
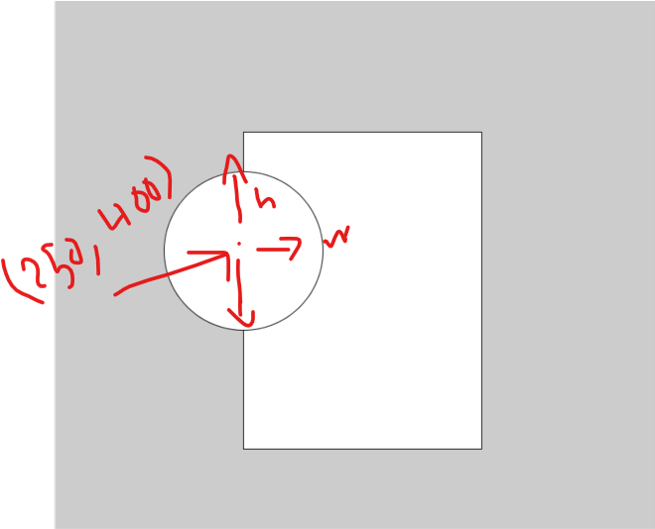
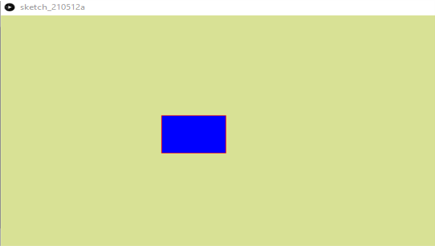
Rectangle
The origin (0,0) is in the top lef corner ,To draw rectangle we will write rect function
" Rect( x,y,w,h); " where x and y is the starting point of the rectangle and it will be top left corner and w is the width and h is the Hight
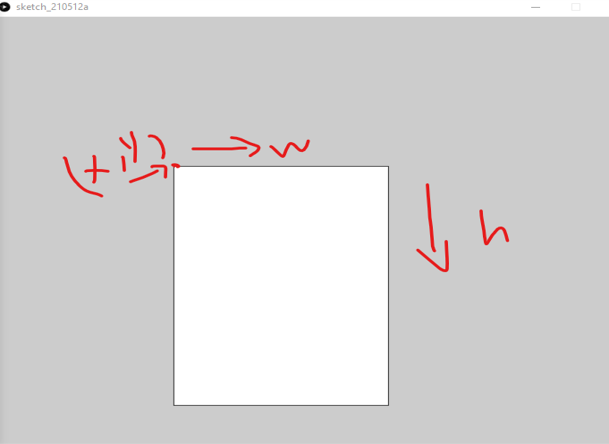
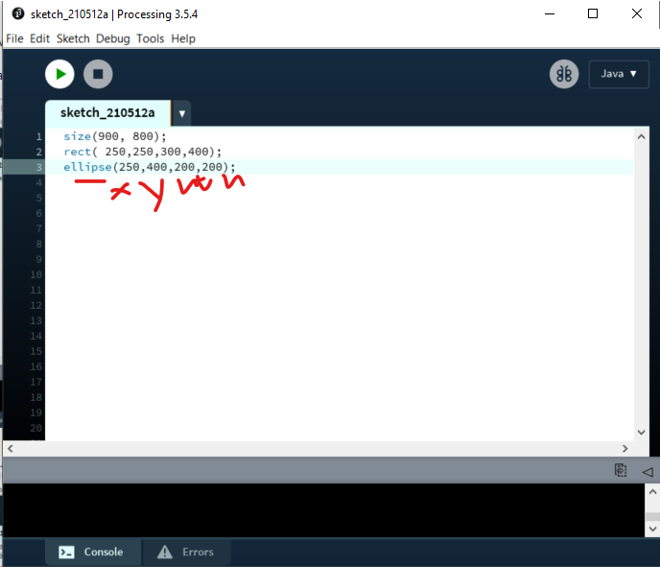
Circle
To draw a circle you need to use ellipse function
Ellipse(x,y,w,h); think about as a circle inside a rectangle to have complete circle w and h should be equal, And for the coordinate x and y this means the center of the circle
- if you notice that the circle has been written over the rectangle, that because the flow of the code in processing start from top to bottom so it will draw the rectangle first then over write it with the circle.
Colors (stroke , fill , shade of gray )
A stroke is a line of color that precisely follows a path, and its the outline of the shape
A fill is a color enclosed by a path. and its the inner fill of the shape
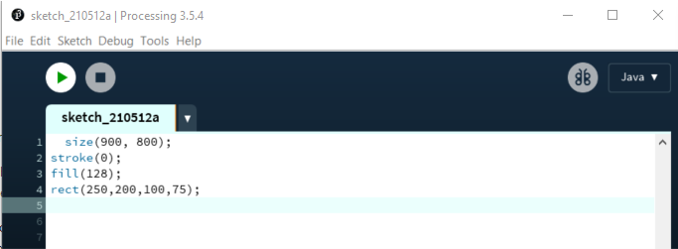
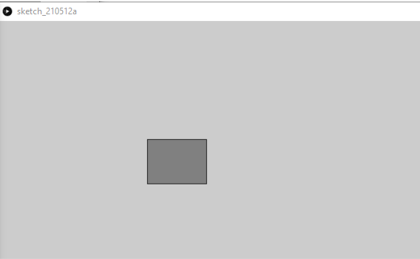
To color the rectangle with shade of gray between 0 – 255 you need to call stroke and fill function first Stroke is , fill is and you can use tow color for booth stroke(0); fill(128); rect(250,200,100,75);
Colors ( RGB )
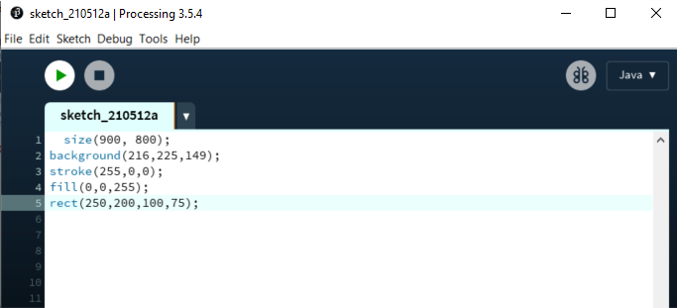
To use rgb collor in the stroke and fill function you need to choose three values for red green and blue , think about as a mixing of light And also you can color tha canvas background with the function below
background(216,225,149);
stroke(255,0,0); fill(0,0,255); rect(250,200,100,75);
Interact
in processing to write more complex programs you need to add functions, there is tow main functions that has to be writing first which is:
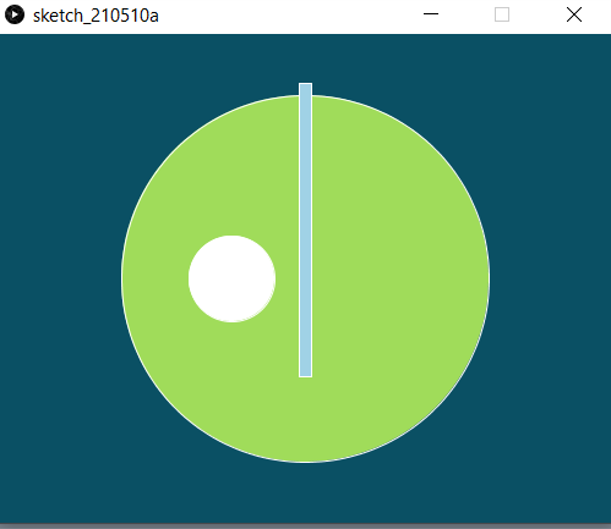
Void setup is the line of code that happen one time once you hit run in the program Void draw its set of code that will loop infinity in loop
void setup() { background(10, 80, 100); size(900, 800); }
Void Draw () { stroke(255, 255, 255);
fill(160, 220, 90);
ellipse(250, 200, 300, 300);
fill(160, 210, 230);
rect(245, 40, 10, 240);
fill(255, 255, 255);
ellipse(190, 200, 70, 70); }

Mouse
now lets test something new , we will use the cordinate of the mouse pointer using mouseX, mousey function.
Mousex and mouseY is the coordinate of our mouse in screen , and it should be x then y to have it in the same direction of the screen so it will follow the pointer, If you reverse it it will go against the coordinate of the mouse
Example
void setup() { size(500,400); }
void draw() { background(0); stroke(255); fill(128); ellipse(mouseX, mouseY, 100, 100); }
IF , else Statment
Now we got introduced to if and else statement to get more complex program you need to answer question, and depends on the answer you will set multiple action depending on it, the question we are answering here is " is the mouse has been pressed ? " using mousePressed function , this function return value of Boolean true if the mouse has been presed other wise it will return false
Example 1
in this example we will draw circle and if the muse pressed will change it to rectangle
void setup() { size(500,400); }
void draw()
{
background(0);
stroke(255);
fill(128);
if (mousePressed)
{
rect(250,200,100,100);
}
else
{ ellipse(250, 200, 100, 100);
}
}
Example 2
in this example we will draw circle and if the muse pressed will change its color
void setup()
{ size(500,400); }
void draw()
{ background(0);
if (mousePressed)
{ fill(0,255,0); }
else
{ fill(255,0,0); }
ellipse(mouseX,mouseY,60,60); }
Example 3
in this example we make the background in void setup which mean it only will be drawn one time , and then will draw circle and let it draw according to the mouse coordinate, and if the muse pressed will change clear the screan by drawing black background
void setup()
{ size(500,400); background(0); }
void draw()
{ if (mousePressed) { background(0); } ellipse(mouseX,mouseY,60,60); }
Example 4
in this example we make the background in void setup which mean it only will be drawn one time , and then if the muse pressed will draw circle and let it draw according to the mouse coordinate, else if not pressed it will clear the screen by drawing black background
void setup()
{ size(500,400); background(0);}
void draw()
{ if (mousePressed) { stroke(255); fill(128); ellipse(mouseX, mouseY, 30, 30); }else{ background(0); stroke(255); fill(128); ellipse(mouseX, mouseY, 30, 30); } }
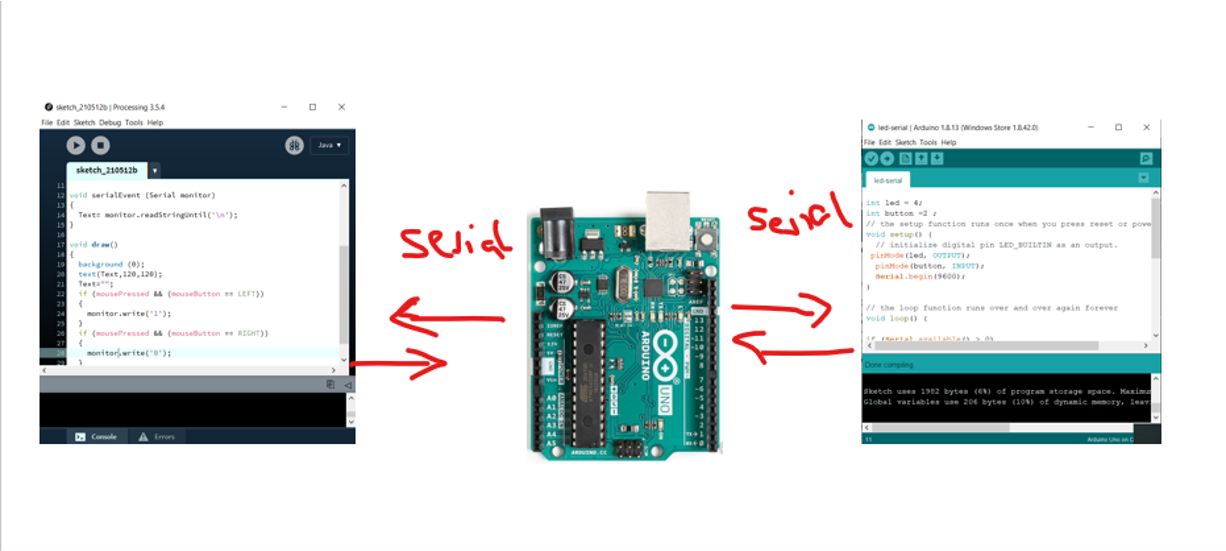
Arduino + processing
the way we can make the tow program talking to each other is by using serial communication

Serial Comunication
serial communication is the process of sending data one bit at a time, sequentially, over a communication channel or computer bus. This is in contrast to parallel communication, where several bits are sent as a whole, on a link with several parallel channels.
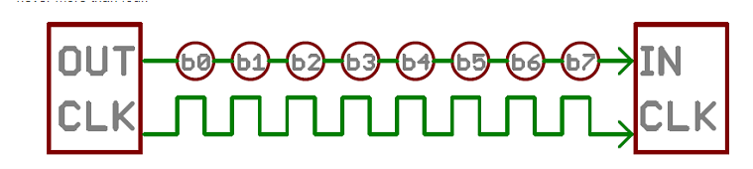
for more information about serial comunication
Arduino + processing serial
the way we can make the tow program talking to each other is by using serial communication
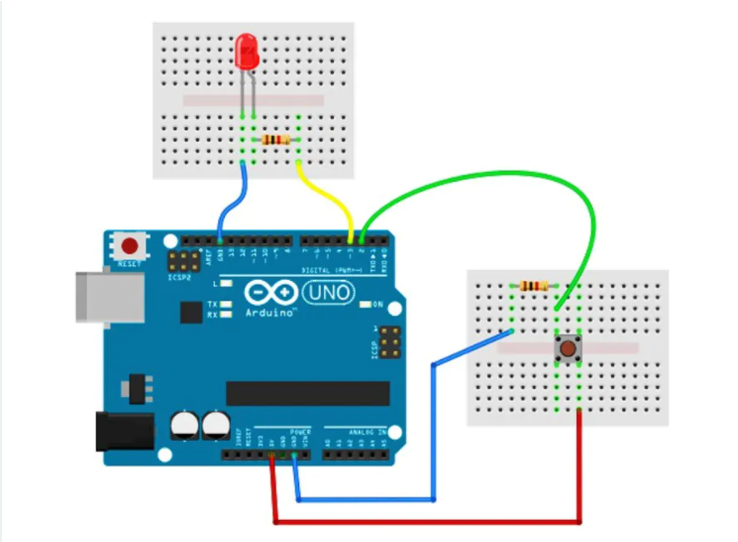
Arduino Wiring
first lets wire our component
push button connected to —– Pin 2
pull down resistor 1K ohm connected to —– Pin 2 and GND
LED anode connected to —– Pin 3
resistor 220 ohm connected to cathode of LED to and TO GND
Arduino Program
lets write simple Arduino program that write to serial when we press a button , and receive from the serial monitor to turn on and of the led
Compile and download the code
int led = 3;
int button =2 ;
void setup() {
pinMode(led, OUTPUT);
pinMode(button, INPUT);
Serial.begin(9600);
}
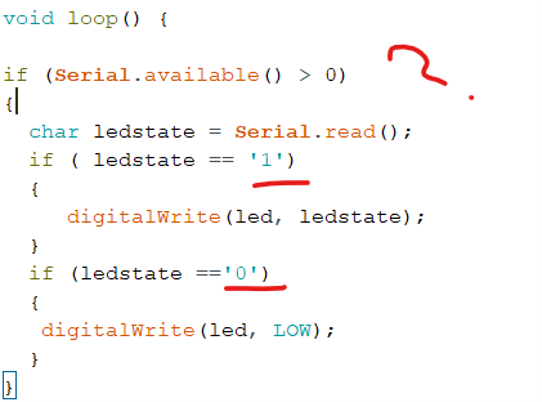
void loop() {
if (Serial.available() > 0)
{
char ledstate = Serial.read();
if ( ledstate == ‘1’)
{
digitalWrite(led, ledstate);
}
if (ledstate ==‘0’)
{
digitalWrite(led, LOW);
} }
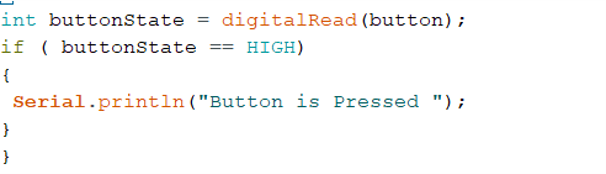
int buttonState = digitalRead(button);
if ( buttonState == HIGH)
{
Serial.println(“Button is Pressed “);
} }

Explain Arduino Program
at the tob we have declared tow variable 1- led for pin number 3 in arduino and button for pin 2.
and we used this variable in void setup , and set pinmode for them, led as output , button as input .
then we opened a serial communication between arduino and our computer using the function serial.begin() , then set the bud rate to 9600 , which is the speed of the communication, you have to set a bud rate so the computer and Arduino can talk with the same speed

void loop 1
the void loop have tow part, first we are checking if there is anything writing in the serial port ? , if there is information in the serial then it will check what is there .
it will save the information that coming from the serial port and save it in variable called ledstate , this variable we declered it as char , char variable can save only one value in it , and since we we are sending just binary value of 1 or 0 this will be the good use for it
then it check if the value is " 1 " it will turn on the led if its " 0 " it will turn off the led
void loop 2
the next part is it read the value of the button in pin 2 , and save the value to buttonState variable , and if the value is HIGH whech mean the button has been pressed it will write " button is pressed " in serial port
Processing - import serial
not like the arduino program that the serial librariy is by defoult its imported , in processing if you want to use the serial comunication the first step you have to do is to import the library
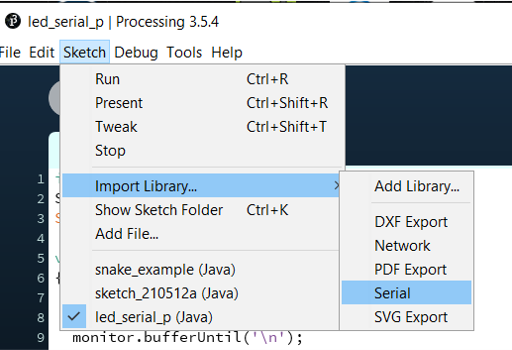
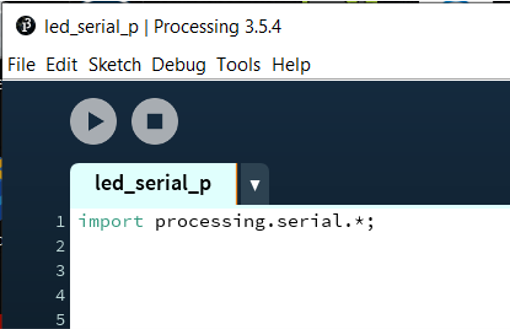
Processing - import serial
now lets write a program in processing that interact with arduino
- it should send chr 0 or 1 to turn on and of the led
- it should print the text that it receive in the serial port
Explaining Processing program
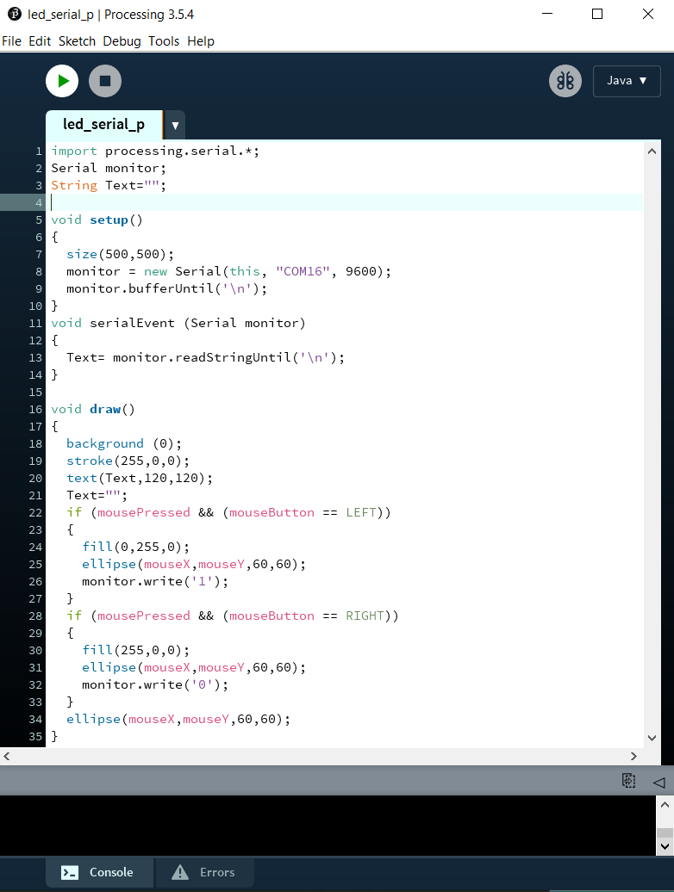
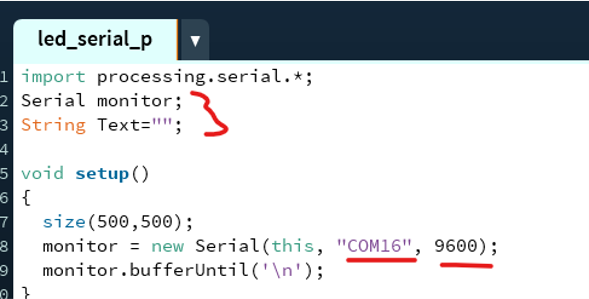
the first line is the calling for the serial library in processing program
the second line is to create a serial object so we can call the serial function in the program to interact with is
the third line is a string variable that we will use it later to store the information that coming form the serial port
then we have the void setup ()
we declered the canvas saize of 500 X 500 , then for the serial object we set the com port that arduino is connected to in my case its COM16 " change it according to your setting " then set the bud rate to 9600 as we set it in the arduino so they can understand each other
Explaining Processing program
part 1
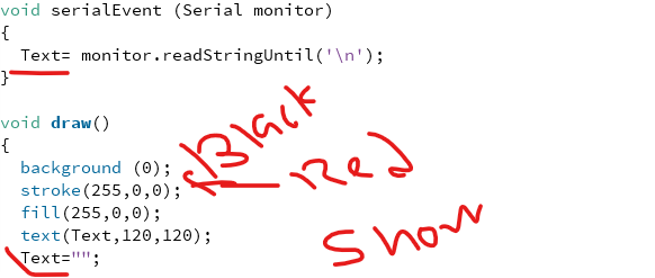
next lets create a function for the serial event that cheack the serial communication, and it save the information that is in the serial port using the function readStringUntil() and then put the until as ‘\n’ which means that it will read until there is a new line and save in the text variable
part 2
in void draw () the loop that run forever , there is the background color and we put the value of 0 its mean the background will be black then i set the Stroke and fill to chose the cooler of the writing i choose red (255,0,0)
then text function to show what is the information in the text variable and decide where to write in the screen.
last thing is Text”"; this is to clear the information in this variable to write new one .
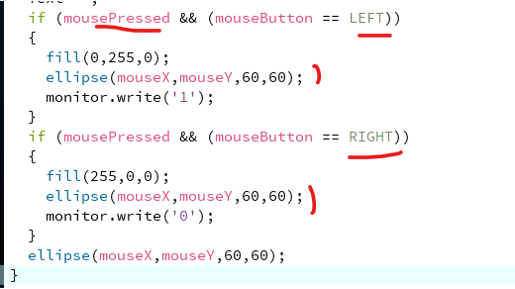
part 3
this part will control turning the led on and off
by using the mousePressed() function to check if the button is pressed or not and if its the left or the right button
if its the left is pressed , it will drow a cricle and make it green and sent to serial the value " 1 "
and if its the Right is pressed , it will drow a cricle and make it Red and sent to serial the value " 0 "
last thing is to draw a white circle and make it follow the coordinate of the mouse
things in Action in Arduino
things in Action in Attiny45
i used an older board that i made during my electronic design