Group assignment:
- Compare the performance and development workflows for different microcontroller families
- Document your work (in a group or individually)
Individual assignment:
- Read the datasheet for the microcontroller you are programming
- Program the board you have made to do something, with as many different programming languages and programming environments as possible.
for this assignment i will use Attiny45 in the board that i have designed in electronic Design.
in that assignment i programmed the board to blink an LED with a button, but i didn’t really read the datasheet of the microcontroller nor understand its structure and how things happening inside it, so its a chance for me to dive deep this week into more details about microcontrollers
What is an embedded programming ?
Embedded programming is a specific type of programming that supports the creation of consumer facing or business facing devices that don’t operate on traditional operating systems the way that full-scale laptop computers and mobile devices do. The idea of embedded programming is part of what drives the evolution of the digital appliances and equipment in today’s IT markets.
Embedded programming is also known as embedded software development or embedded systems programming.
What is Attiny 45
ATTINY45 is high performance, low power controller from ATMEL. It is an 8 bit controller based on Advanced RISC architecture . It is one of members of ATTINYXX series, popular because of its small size and features.
RISC Architecture
RISC, or Reduced Instruction Set Computer. is a type of microprocessor architecture that utilizes a small, highly-optimized set of instructions, rather than a more specialized set of instructions often found in other types of architectures.
History
The first RISC projects came from IBM, Stanford, and UC-Berkeley in the late 70s and early 80s. The IBM 801, Stanford MIPS, and Berkeley RISC 1 and 2 were all designed with a similar philosophy which has become known as RISC. Certain design features have been characteristic of most RISC processors:
- one cycle execution time: RISC processors have a CPI (clock per instruction) of one cycle. This is due to the optimization of each instruction on the CPU and a technique called
- pipelining: a techique that allows for simultaneous execution of parts, or stages, of instructions to more efficiently process instructions;
- large number of registers: the RISC design philosophy generally incorporates a larger number of registers to prevent in large amounts of interactions with memory
Datasheet
The datasheet has a list of features, electrical specifications, some basic hardware-implementation examples, pin definitions, and footprint dimensions.
Here is a Datasheet for Attiny45 .

features
here is the first page in the datasheet , you can notice that there is three chips that share the same feature which is Attiny25 / Attiny45 / Attiny85
the main feature that in the first page is
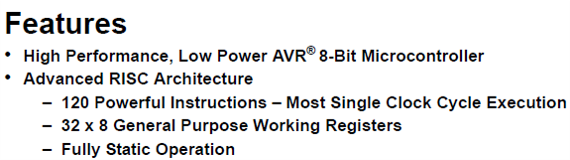
- its Low Power AVR® 8-Bit Microcontroller
- its Designed based on RISC Architecture and i have explained it above
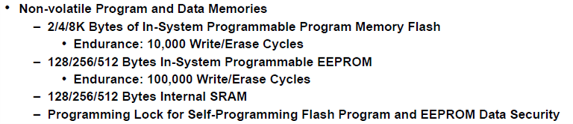
what is Non-volatile Program and Data Memories ?
In computing, memory refers to the devices used to store information for use in a computer. and there is tow type of memories
- Volatile Memory : Volatile memory is computer memory that requires power to maintain the stored information .When the power is turned off, all data is erased.
such as RAM in computers
- Non-volatile memory (NVM) or non-volatile storage is a type of memory that can retain stored information even after power is removed. In contrast, volatile memory needs constant power in order to retain data.
such as Falsh memory , Hard disks , ROM
what is In-system programming (ISP) ?
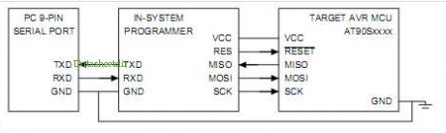
In-system programming (ISP), also called in-circuit serial programming (ICSP), is the ability of some programmable logic devices, microcontrollers, and other embedded devices to be programmed while installed in a complete system, rather than requiring the chip to be programmed prior to installing it into the system.
In-System Programming allows programming and reprogramming of any AVR micro- controller positioned inside the end system. Using a simple Three-wire SPI Interface the In-System Programmer communicates serially with the AVR Microcontroller reprogramming all non-volatile Memories on the chip.
what is EEPROM ?
EEPROM is short for “electrically erasable programmable read-only memory.” It’s a flash drive memory device designed to retain the stored information even when the power is off.
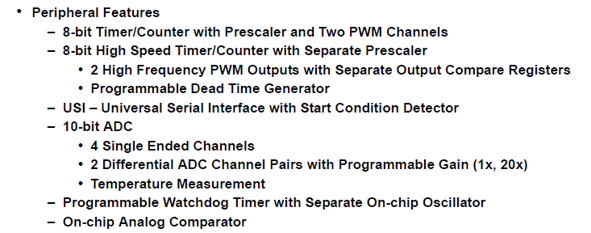
Peripheral Features
what is PWM ?
Pulse-width modulation (PWM), or pulse-duration modulation (PDM), is a method of reducing the average power delivered by an electrical signal, by effectively chopping it up into discrete parts. The average value of voltage (and current) fed to the load is controlled by turning the switch between supply and load on and off at a fast rate. The longer the switch is on compared to the off periods, the higher the total power supplied to the load
what is USI ?
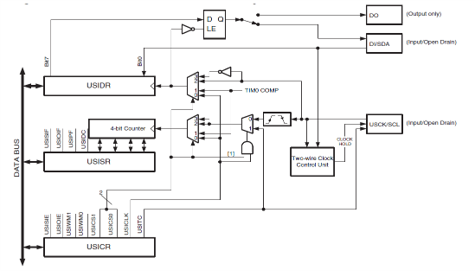
The Universal Serial Interface provides the basic hardware resources needed for synchronous serial communication. The main features of the USI are: Two-wire Synchronous Data Transfer. Three-wire Synchronous Data Transfer. Data Received Interrupt.
what is ADC ?
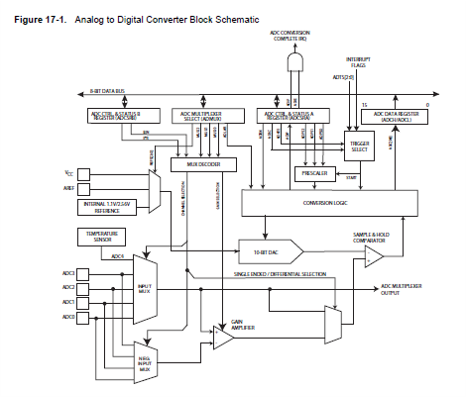
An analog to digital converter (ADC) converts an analog signal into digital form. An embedded system uses the ADC to collect information about the external world (data acquisition system.) The input signal is usually an analog voltage, and the output is a binary number.
what is watchdog ?
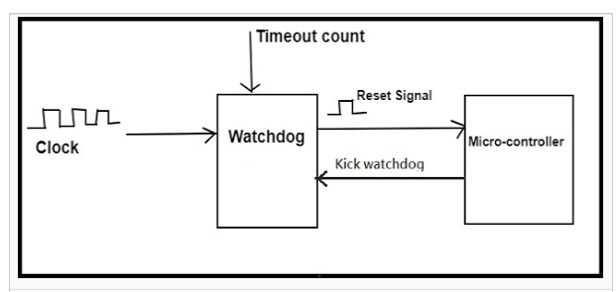
A watchdog timer is a specialized timer module that helps a microprocessor to recover from malfunctions.
what is on ship oscillator ?
The internal oscillator circuit is used to generate the device clock. The device clock is required for the device to execute instructions and for the peripherals to function.
what is Analog comparator ?
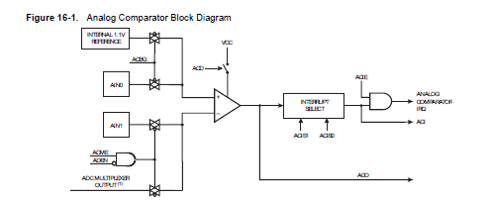
The Analog Comparator is used to compare the voltage of two analog inputs, with a digital output indicating which input voltage is higher. Inputs can either be one of the selectable internal references or from external pins. The comparator output can be sent directly to GPIO or PRS.
Special Microcontroller Features
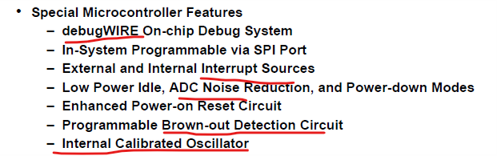
debugWIRE On-chip Debug System
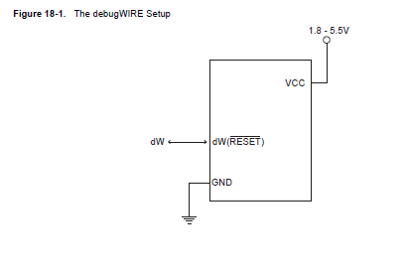
The debugWIRE On-chip debug system uses a One-wire, bi-directional interface to control the program flow, execute AVR instructions in the CPU and to program the different non-volatile memories.
Physical Interface
When the debugWIRE Enable (DWEN) Fuse is programmed and Lock bits are unprogrammed, the debugWIRE system within the target device is activated. The RESET port pin is configured as a wire-AND (open-drain) bi-directional I/O pin with pull-up enabled and becomes the communication gateway between target and emulator. Figure 18-1 shows the schematic of a target MCU, with debugWIRE enabled, and the emulator connector. The system clock is not affected by debugWIRE and will always be the clock source selected by the CKSEL Fuses.
what is Interrupt Sources
Interrupts are the events that temporarily suspend the main program, pass the control to the external sources and execute their task. It then passes the control to the main program where it had left off.
The AVR provides several different interrupt sources. These interrupts and the separate Reset Vector each have a separate Program Vector in the Program memory space. All interrupts are assigned individual enable bits which must be written logic one together with the Global Interrupt Enable bit in the Status Register in order to enable the interrupt. The lowest addresses in the Program memory space are by default defined as the Reset and Interrupt Vectors. The complete list of vectors is shown in “Interrupts” on page 48. The list also determines the priority levels of the different interrupts. The lower the address the higher is the priority level. RESET has the highest priority, and next is INT0 – the External Interrupt Request 0
References Datasheet (page 12,60,61)
what is ADC noise canceler ?
The ADC features a noise canceler that enables conversion during sleep mode to reduce noise induced from the CPU core and other I/O peripherals. The noise canceler can be used with ADC Noise Reduction and Idle mode. To make use of this feature, the following procedure should be used: • Make sure that the ADC is enabled and is not busy converting. Single Conversion mode must be selected and the ADC conversion complete interrupt must be enabled. • Enter ADC Noise Reduction mode (or Idle mode). The ADC will start a conversion once the CPU has been halted. • If no other interrupts occur before the ADC conversion completes, the ADC interrupt will wake up the CPU and execute the ADC Conversion Complete interrupt routine. If another interrupt wakes up the CPU before the ADC Reference Datasheet (page 128)
what is Brown-out Detection ?
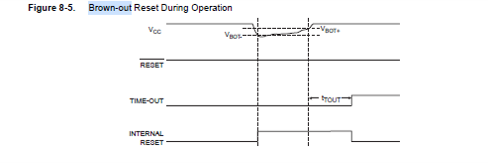 ATtiny25/45/85 has an On-chip Brown-out Detection (BOD) circuit for monitoring the VCC level during operation by
comparing it to a fixed trigger level. The trigger level for the BOD can be selected by the BODLEVEL Fuses. The
trigger level has a hysteresis to ensure spike free Brown-out Detection. The hysteresis on the detection level
should be interpreted as VBOT+ = VBOT + VHYST/2 and VBOT- = VBOT - VHYST/2.
When the BOD is enabled, and VCC decreases to a value below the trigger level (VBOT- in Figure 8-5), the Brownout
Reset is immediately activated. When VCC increases above the trigger level (VBOT+ in Figure 8-5), the delay
counter starts the MCU after the Time-out period tTOUT has expired.
The BOD circuit will only detect a drop in VCC if the voltage stays below the trigger level for longer than tBOD given
in “System and Reset Characteristics” on page 165.
ATtiny25/45/85 has an On-chip Brown-out Detection (BOD) circuit for monitoring the VCC level during operation by
comparing it to a fixed trigger level. The trigger level for the BOD can be selected by the BODLEVEL Fuses. The
trigger level has a hysteresis to ensure spike free Brown-out Detection. The hysteresis on the detection level
should be interpreted as VBOT+ = VBOT + VHYST/2 and VBOT- = VBOT - VHYST/2.
When the BOD is enabled, and VCC decreases to a value below the trigger level (VBOT- in Figure 8-5), the Brownout
Reset is immediately activated. When VCC increases above the trigger level (VBOT+ in Figure 8-5), the delay
counter starts the MCU after the Time-out period tTOUT has expired.
The BOD circuit will only detect a drop in VCC if the voltage stays below the trigger level for longer than tBOD given
in “System and Reset Characteristics” on page 165.
Reference Datasheet (page 41)
what is Internal Calibrated Oscillator ?
Most tinyAVR and megaAVR devices include a factory-calibrated internal RC oscillator. This is usually the default clock source for the CPU and does not require any external components.

- The device is shipped with this option selected.
- This setting will select ATtiny15 Compatibility Mode, where system clock is divided by four, resulting in a 1.6 MHz clock frequency. Reference Datasheet (page 27)
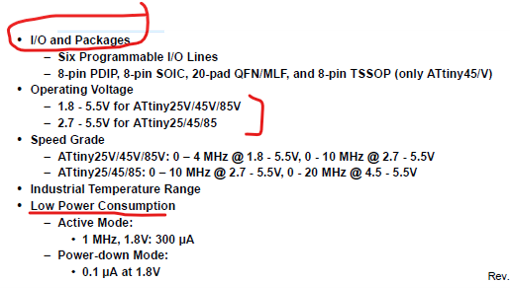
I/O and Packages
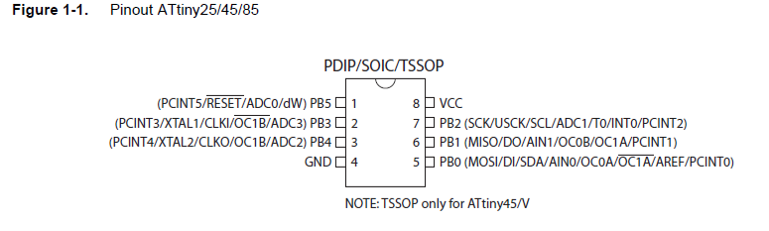
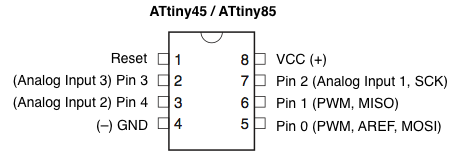
Pin Configurations
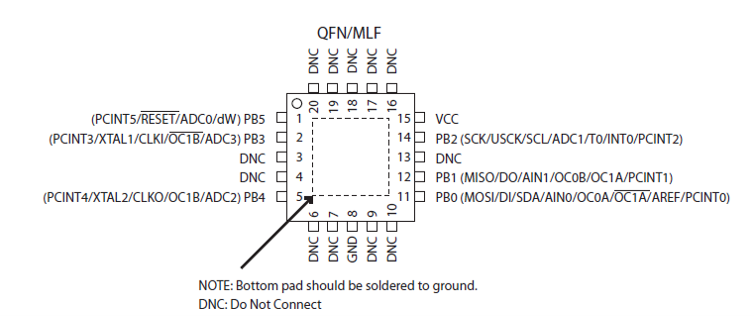
Pin Descriptions
-
VCC: supply voltage.
-
GND: Ground.
-
Port B (PB5:PB0)
Port B is a 6-bit bi-directional I/O port with internal pull-up resistors (selected for each bit). The Port B output buffers have symmetrical drive characteristics with both high sink and source capability. As inputs, Port B pins that are externally pulled low will source current if the pull-up resistors are activated. The Port B pins are tri-stated when a reset condition becomes active, even if the clock is not running.
-
Port B also serves the functions of various special features of the ATtiny25/45/85 as listed in
"Alternate Functionsof Port B” -
On ATtiny25, the programmable I/O ports PB3 and PB4 (pins 2 and 3) are exchanged in ATtiny15 Compatibility Mode for supporting the backward compatibility with ATtiny15.
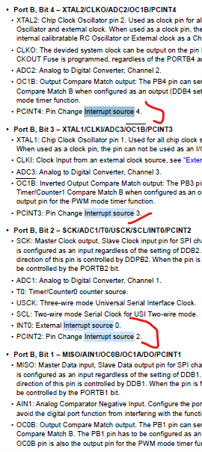
Alternate Functions of Port B
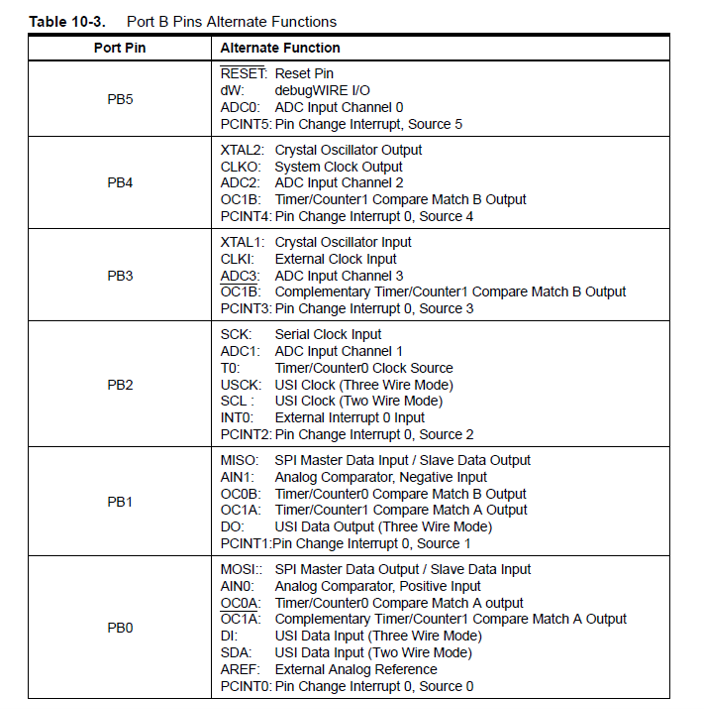
Port B, Bit 5 – RESET/dW/ADC0/PCINT5:
- RESET: External Reset input is active low and enabled by unprogramming (“1”) the RSTDISBL Fuse. Pullup is activated and output driver and digital input are deactivated when the pin is used as the RESET pin.
- dW: When the debugWIRE Enable (DWEN) Fuse is programmed and Lock bits are unprogrammed, the debugWIRE system within the target device is activated. The RESET port pin is configured as a wire-AND (open-drain) bi-directional I/O pin with pull-up enabled and becomes the communication gateway between target and emulator.
- ADC0: Analog to Digital Converter, Channel 0.
- PCINT5: Pin Change Interrupt source 5.
Port B, Bit 4 – XTAL2/CLKO/ADC2/OC1B/PCINT4
- XTAL2: Chip Clock Oscillator pin 2. Used as clock pin for all chip clock sources except internal calibrateble RC Oscillator and external clock. When used as a clock pin, the pin can not be used as an I/O pin. When using internal calibratable RC Oscillator or External clock as a Chip clock sources, PB4 serves as an ordinary I/O pin.
- CLKO: The devided system clock can be output on the pin PB4. The divided system clock will be output if the CKOUT Fuse is programmed, regardless of the PORTB4 and DDB4 settings. It will also be output during reset.
- ADC2: Analog to Digital Converter, Channel 2.
- OC1B: Output Compare Match output: The PB4 pin can serve as an external output for the Timer/Counter1 Compare Match B when configured as an output (DDB4 set). The OC1B pin is also the output pin for the PWM mode timer function.
- PCINT4: Pin Change Interrupt source 4.
Port B, Bit 3 – XTAL1/CLKI/ADC3/OC1B/PCINT3
- XTAL1: Chip Clock Oscillator pin 1. Used for all chip clock sources except internal calibrateble RC oscillator. When used as a clock pin, the pin can not be used as an I/O pin.
- CLKI: Clock Input from an external clock source, see “External Clock” on page 26.
- ADC3: Analog to Digital Converter, Channel 3.
- OC1B: Inverted Output Compare Match output: The PB3 pin can serve as an external output for the Timer/Counter1 Compare Match B when configured as an output (DDB3 set). The OC1B pin is also the inverted output pin for the PWM mode timer function.
- PCINT3: Pin Change Interrupt source 3.
Port B, Bit 2 – SCK/ADC1/T0/USCK/SCL/INT0/PCINT2
- SCK: Master Clock output, Slave Clock input pin for SPI channel. When the SPI is enabled as a Slave, this pin is configured as an input regardless of the setting of DDB2. When the SPI is enabled as a Master, the data direction of this pin is controlled by DDPB2. When the pin is forced by the SPI to be an input, the pull-up can still be controlled by the PORTB2 bit.
- ADC1: Analog to Digital Converter, Channel 1.
- T0: Timer/Counter0 counter source.
- USCK: Three-wire mode Universal Serial Interface Clock.
- SCL: Two-wire mode Serial Clock for USI Two-wire mode.
- INT0: External Interrupt source 0.
- PCINT2: Pin Change Interrupt source 2.
Port B, Bit 1 – MISO/AIN1/OC0B/OC1A/DO/PCINT1
- MISO: Master Data input, Slave Data output pin for SPI channel. When the SPI is enabled as a Master, this pin is configured as an input regardless of the setting of DDB1. When the SPI is enabled as a Slave, the data direction of this pin is controlled by DDB1. When the pin is forced by the SPI to be an input, the pull-up can still be controlled by the PORTB1 bit.
- AIN1: Analog Comparator Negative Input. Configure the port pin as input with the internal pull-up switched off to avoid the digital port function from interfering with the function of the Analog Comparator.
- OC0B: Output Compare Match output. The PB1 pin can serve as an external output for the Timer/Counter0 Compare Match B. The PB1 pin has to be configured as an output (DDB1 set (one)) to serve this function. The OC0B pin is also the output pin for the PWM mode timer function.
- OC1A: Output Compare Match output: The PB1 pin can serve as an external output for the Timer/Counter1 Compare Match B when configured as an output (DDB1 set). The OC1A pin is also the output pin for the PWM mode timer function.
- DO: Three-wire mode Universal Serial Interface Data output. Three-wire mode Data output overrides PORTB1 value and it is driven to the port when data direction bit DDB1 is set (one). PORTB1 still enables the pull-up, if the direction is input and PORTB1 is set (one).
- PCINT1: Pin Change Interrupt source 1.
Port B, Bit 0 – MOSI/AIN0/OC0A/OC1A/DI/SDA/AREF/PCINT0
- MOSI: SPI Master Data output, Slave Data input for SPI channel. When the SPI is enabled as a Slave, this pin is configured as an input regardless of the setting of DDB0. When the SPI is enabled as a Master, the data direction of this pin is controlled by DDB0. When the pin is forced by the SPI to be an input, the pull-up can still be controlled by the PORTB0 bit.
- AIN0: Analog Comparator Positive Input. Configure the port pin as input with the internal pull-up switched off to avoid the digital port function from interfering with the function of the Analog Comparator.
- OC0A: Output Compare Match output. The PB0 pin can serve as an external output for the Timer/Counter0 Compare Match A when configured as an output (DDB0 set (one)). The OC0A pin is also the output pin for the PWM mode timer function.
- OC1A: Inverted Output Compare Match output: The PB0 pin can serve as an external output for the Timer/Counter1 Compare Match B when configured as an output (DDB0 set). The OC1A pin is also the inverted output pin for the PWM mode timer function.
- SDA: Two-wire mode Serial Interface Data.
- AREF: External Analog Reference for ADC. Pullup and output driver are disabled on PB0 when the pin is used as an external reference or Internal Voltage Reference with external capacitor at the AREF pin.
- DI: Data Input in USI Three-wire mode. USI Three-wire mode does not override normal port functions, so pin must be configure as an input for DI function.
- PCINT0: Pin Change Interrupt source 0.
programming ATtiny45 With Arduino as isp
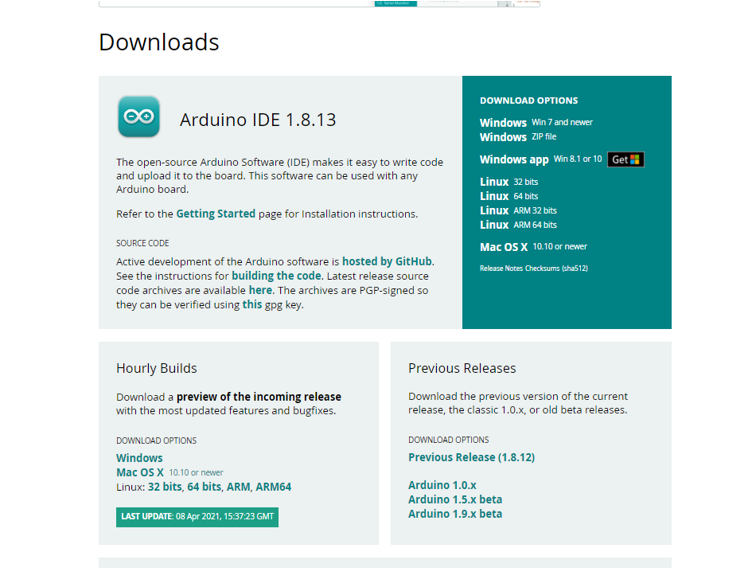
first you need to have Arduino ide you can download it from here depends on your operation system choose the one suitable with you
programming ATtiny45 With Arduino as isp
i foloowed this toturial to upload the sketch using
add attiny board
First you want to open File > Preferences.
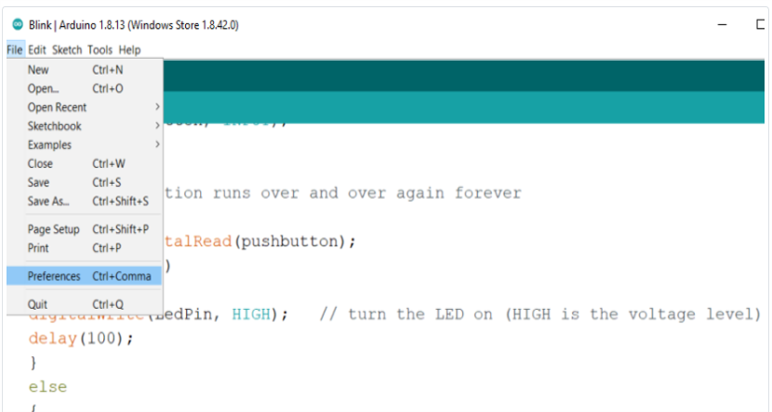
Then, at the bottom of the pop up menu where you see “Additional Boards Manager URLs” you want to copy and paste “https://raw.githubusercontent.com/damellis/attiny/ide-1.6.x-boards-manager/package_damellis_attiny_index.json" (without the quotation marks).
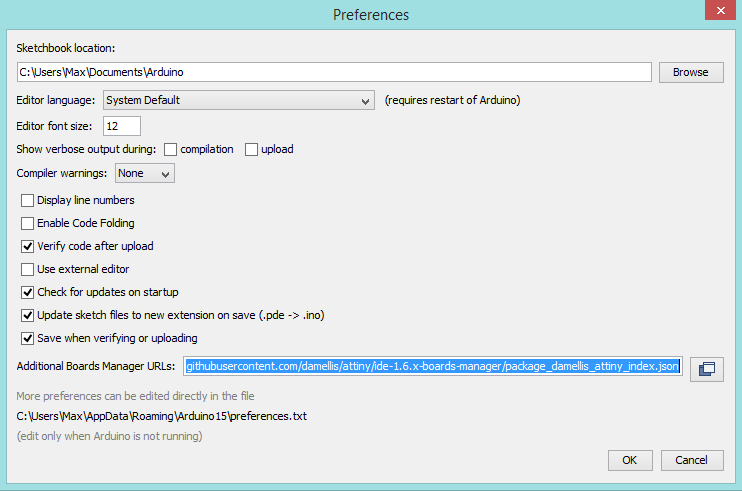
Now click OK.
Navigate to Tools > Board > Board Manager.
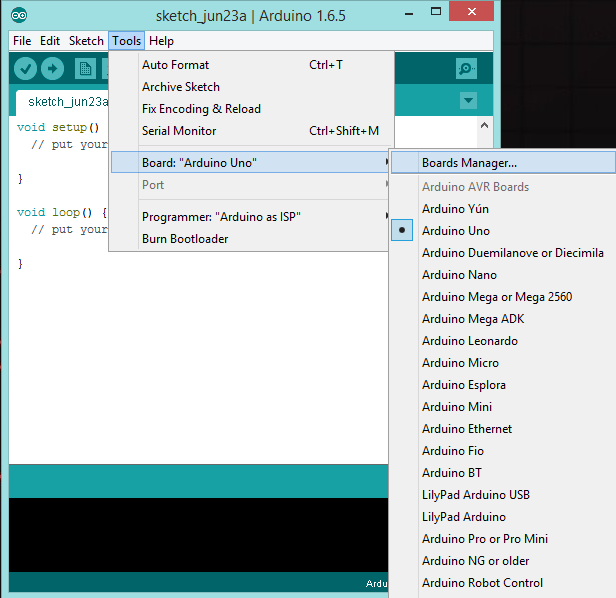
Scroll down to the bottom and you should find “attiny”. Click the install button and the words “Installed” should appear when the task is complete.
To confirm that you have added support for the boards, navigate to Tools > Board and you should see ATtiny at the bottom of the list.
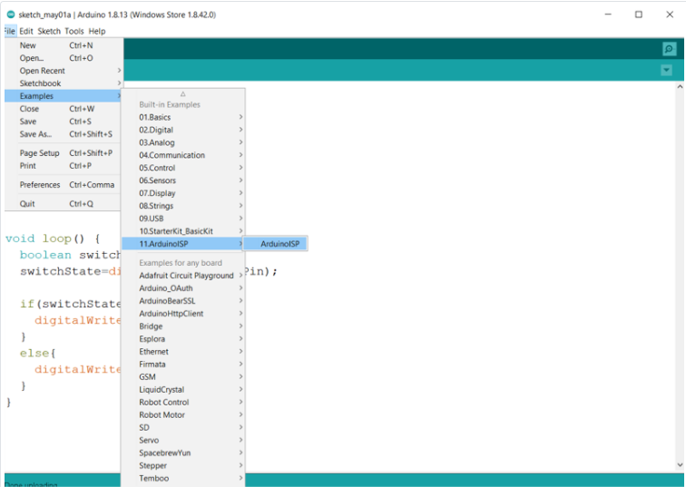
Setup Arduino As ISP
Navigate to File > Examples > ArduinoISP. Open the sketch and upload it to your Arduino.
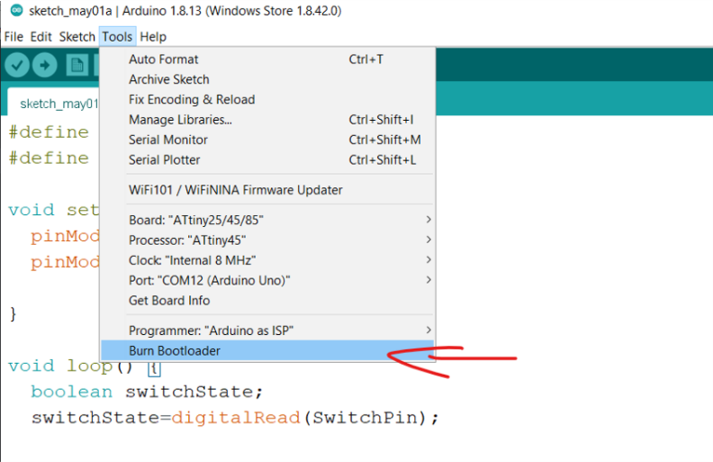
choose the board attiny microcontrollers attiny 25/45/85

choose the processor to attiny 45
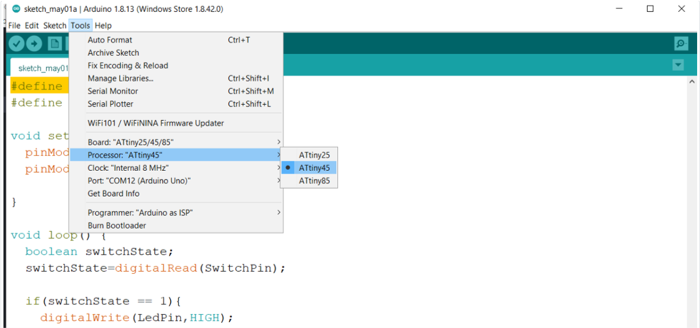
choose the internal clock 8 MHZ

burn bootloader
pinout
testing with blink example
Adding button to the code
Programming Attiny45 with Pure C
what is C programming language
C is a general-purpose programming language that is extremely popular, simple, and flexible to use. It is a structured programming language that is machine-independent and extensively used to write various applications, Operating Systems like Windows, and many other complex programs like Oracle database, Git, Python interpreter, and more.
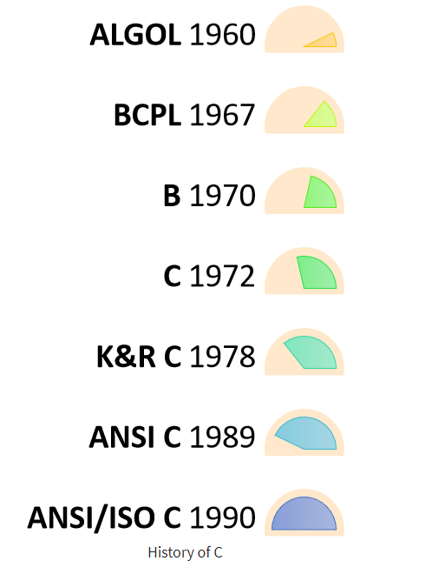
History of C language
The base or father of programming languages is ‘ALGOL.’ It was first introduced in 1960. ‘ALGOL’ was used on a large basis in European countries. ‘ALGOL’ introduced the concept of structured programming to the developer community. In 1967, a new computer programming language was announced called as ‘BCPL’ which stands for Basic Combined Programming Language. BCPL was designed and developed by Martin Richards, especially for writing system software. This was the era of programming languages. Just after three years, in 1970 a new programming language called ‘B’ was introduced by Ken Thompson that contained multiple features of ‘BCPL.’ This programming language was created using UNIX operating system at AT&T and Bell Laboratories. Both the ‘BCPL’ and ‘B’ were system programming languages.

In 1972, a great computer scientist Dennis Ritchie created a new programming language called ‘C’ at the Bell Laboratories. It was created from ‘ALGOL’, ‘BCPL’ and ‘B’ programming languages. ‘C’ programming language contains all the features of these languages and many more additional concepts that make it unique from other languages.
‘C’ is a powerful programming language which is strongly associated with the UNIX operating system. Even most of the UNIX operating system is coded in ‘C’. Initially ‘C’ programming was limited to the UNIX operating system, but as it started spreading around the world, it became commercial, and many compilers were released for cross-platform systems. Today ‘C’ runs under a variety of operating systems and hardware platforms. As it started evolving many different versions of the language were released. At times it became difficult for the developers to keep up with the latest version as the systems were running under the older versions. To assure that ‘C’ language will remain standard, American National Standards Institute (ANSI) defined a commercial standard for ‘C’ language in 1989. Later, it was approved by the International Standards Organization (ISO) in 1990. ‘C’ programming language is also called as ‘ANSI C’.
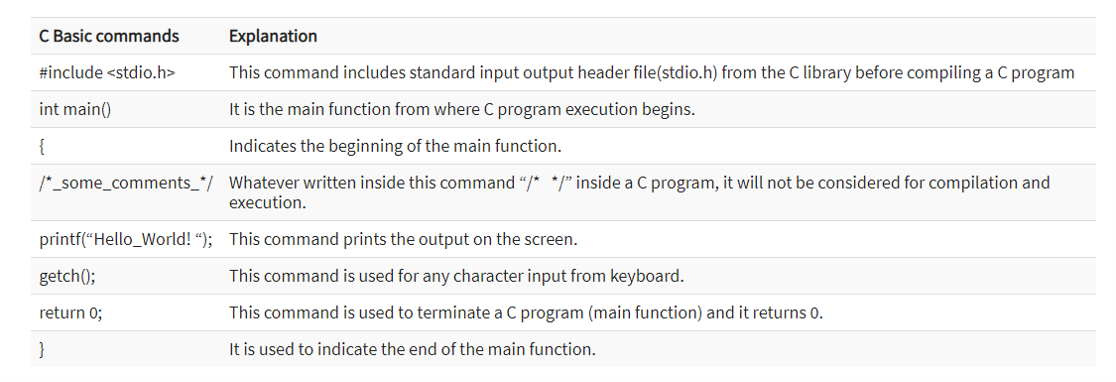
C Basic Commands
Can I use C++ on the AVR?
Basically yes, C++ is supported (assuming your compiler has been configured and compiled to support it, of course). Source files ending in .cc, .cpp or .C will automatically cause the compiler frontend to invoke the C++ compiler. Alternatively, the C++ compiler could be explicitly called by the name avr-c++.see more here
C code Arduino ide
To write code in C in attiny45 i will use Arduino ide and will use it as isp to send the code to the board
blink example
started with the basic code blink to flash an led on my board i used this example and modified it Open MenuProgram Arduino Uno in C Language by Gautam1807 to fit my board
the first line is
<avr/io.h> this will tell the chip where all the ports & pins are located.
<util/delay.h> this use built in delay features. for accurate delay
DDRBData direction register for port B
PORTB4 PORTB4 is connected to the led
BVbit value. }
Button input example
then i made another example for reading input from nutton and then turn on the led
here is the codes for the tow example
ESP32
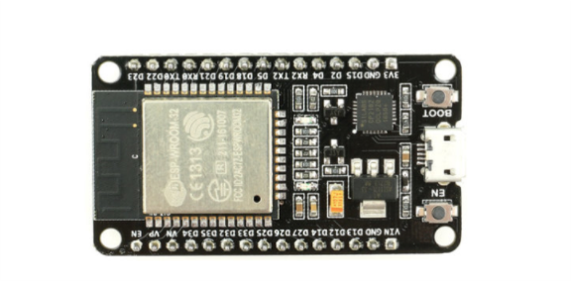
ESP32 is a low-cost, low-power Microcontroller with an integrated Wi-Fi and Bluetooth. It is the successor to the ESP8266 which is also a low-cost Wi-Fi microchip albeit with limited vastly limited functionality
it has a single 2.4 GHz Wi-Fi-and-Bluetooth combo chip designed with the TSMC ultra-low-power 40 nm technology. It is designed to achieve the best power and RF performance, showing robustness, versatility and reliability in a wide variety of applications and power scenarios.
Development Boards
For easy prototyping and interfacing Espressif’s developed many boards! Powered thir own well-known SoCs, and there is deferent series
-
ESP32-S3 Series : 32-bit MCU & 2.4 GHz Wi-Fi
-
ESP32-C3 Series : 32-bit RISC-V MCU & 2.4 GHz Wi-Fi & Bluetooth LE 5 (LE)
-
ESP32 Series : 32-bit MCU & 2.4 GHz Wi-Fi & BT/Bluetooth LE
for more information about esp32 series
Other DevKit
and also there is othe companies who develop boards based on esp32 chip Such as
the one i have in the lap and i put my hands on is the SparkFun ESP32 thing
Sparkfun Esp32 thing
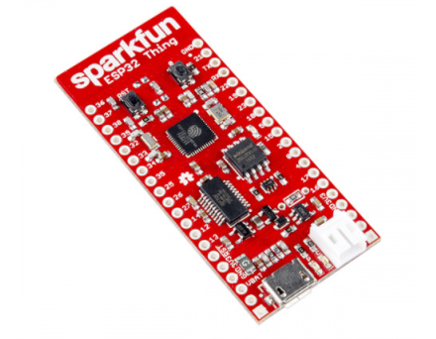 The SparkFun ESP32 Thing is a comprehensive development platform for Espressif’s ESP32, their super-charged version of the popular ESP8266. Like the 8266, the ESP32 is a WiFi-compatible microcontroller but adds nearly 30 I/O pins. The ESP32’s power and versatility will make it the foundation of IoT and connected projects for many years to come.
Hardware Overview
Espressif’s ESP32 is one of the most unique microcontrollers on the market. Its laundry list of features include:
- Dual-core Tensilica LX6 microprocessor
- Up to 240MHz clock frequency
- 520kB internal SRAM
- Integrated 802.11 BGN WiFi transceiver
- 2.2 to 3.6V operating range
- 2.5 µA sleep current under hibernation
- 32 GPIO
- 10-electrode capacitive touch support
- Hardware accelerated encryption (AES, SHA2, ECC, RSA-4096)
The ESP32 Thing is designed to surround the ESP32 with everything necessary to run and program the microcontroller, plus a few extra goodies to take advantage of the chip’s unique features.
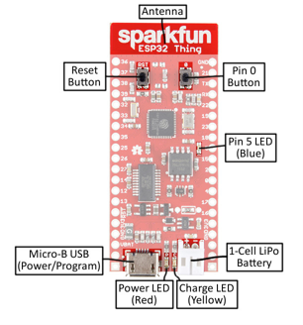
Peripherals and I/O
The ESP32 features your standard fare of hardware peripherals, including:
- 18 analog-to-digital converter (ADC) channels
- 3 SPI interfaces
- 3 UART interfaces
- Two I2C interfaces
- 16 PWM outputs
- 2 digital-to-analog converters (DAC)
- Two I2S interfaces
And, thanks to the chip’s pin multiplexing feature, those peripherals can be connected to just about any of the 28 broken out I/O pins. That means you decide which pins are RX, TX, MISO, MOSI, SCLK, SDA, SCL, etc.
There are, however, a few hardware features – namely the ADC and DAC – which are assigned static pins. The graphical reference below helps demonstrate where you can find those peripherals (click to embiggen!).

Programming
the reason i choose esp32 to use for this week is that i want to test programming it with micropython, i heard alot about it but i didnt test it before, so i found that it is a good chance for me this week to really give it a shot, and i will use esp23 thing to program it
Micropython
MicroPython is a tiny open source Python programming language interpretor that runs on small embedded development boards. With MicroPython you can write clean and simple Python code to control hardware instead of having to use complex low-level languages like C or C++ (what Arduino uses for programming).
The simplicity of the Python programming language makes MicroPython an excellent choice for beginners who are new to programming and hardware. However MicroPython is also quite full-featured and supports most of Python’s syntax so even seasoned Python veterans will find MicroPython familiar and fun to use.
Beyond its ease of use MicroPython has some unique features that set it apart from other embedded systems:
- Interactive REPL, or read-evaluate-print loop. This allows you to connect to a board and have it execute code without any need for compiling or uploading–perfect for quickly learning and experimenting with hardware!
- Extensive software library. Like the normal Python programming langauge MicroPython is ‘batteries included’ and has libraries built in to support many tasks. For example parsing JSON data from a web service, searching text with a regular expression, or even doing network socket programming is easy with built-in libraries for MicroPython.
- Extensibility. For advanced users MicroPython is extensible with low-level C/C++ functions so you can mix expressive high-level MicroPython code with faster low-level code when you need it.
Completely free, open source software
MicroPython is written in C99 and the entire MicroPython core is available for general use under the very liberal MIT license. Most libraries and extension modules (some of which are from a third party) are also available under MIT or similar licenses.
You can freely use and adapt MicroPython for personal use, in education, and in commercial products.
MicroPython is developed in the open on GitHub and the source code is available at the GitHub page, and on the download page. Everyone is welcome to contribute to the project.
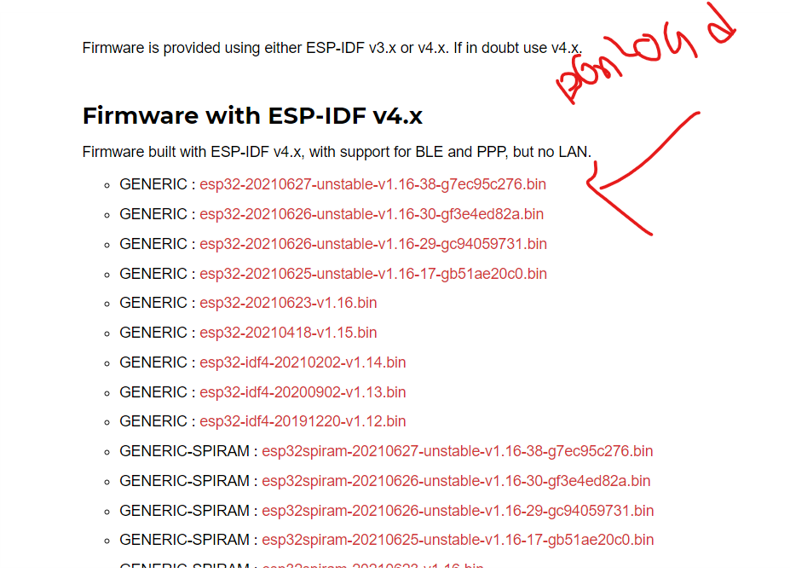
Step 1 : Download firmware
Go to download and choose the board that you want to work with, for me i will choose esp32

- THen you need to download the firmware and save it in yuor computer
then you need to download python ide to interact with the microcontroller,
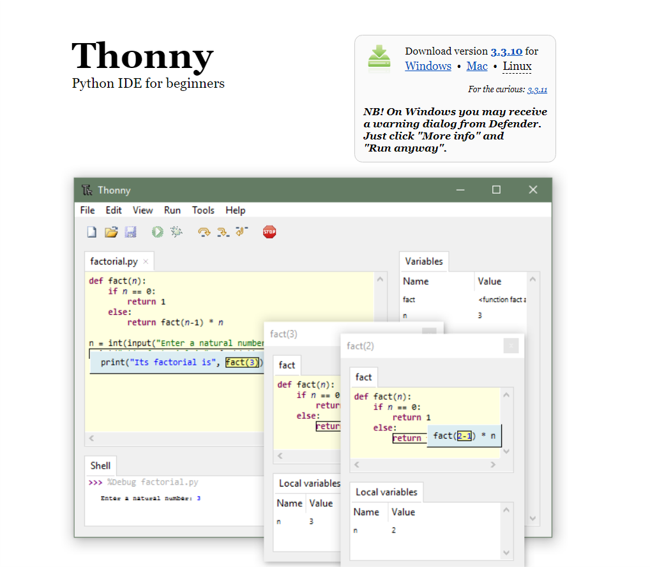
Step 2 : Download Thonny ide
Thonny is a free Python Integrated Development Environment (IDE) that was especially designed with the beginner Pythonista in mind. and you can download it from HERE
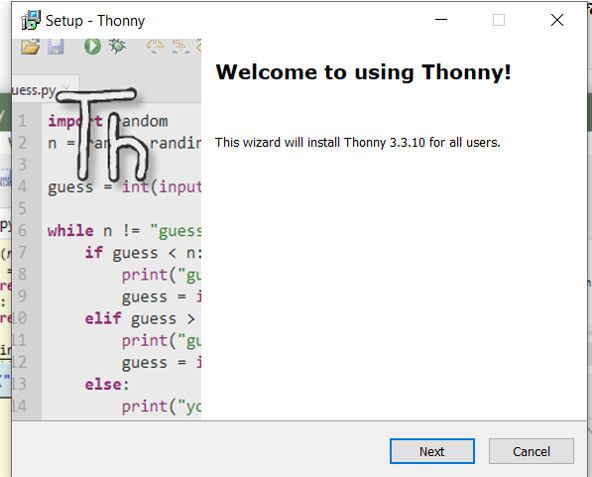
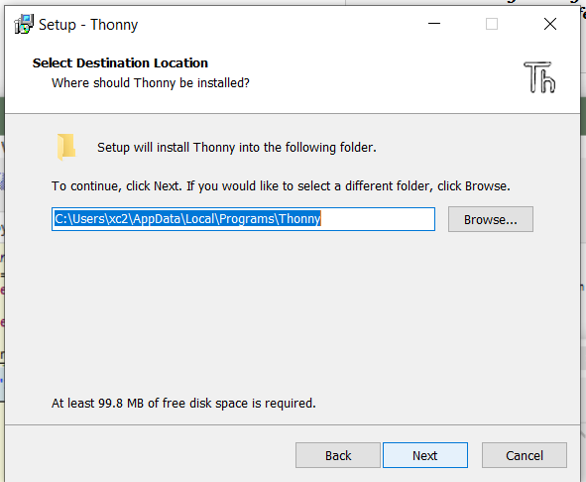
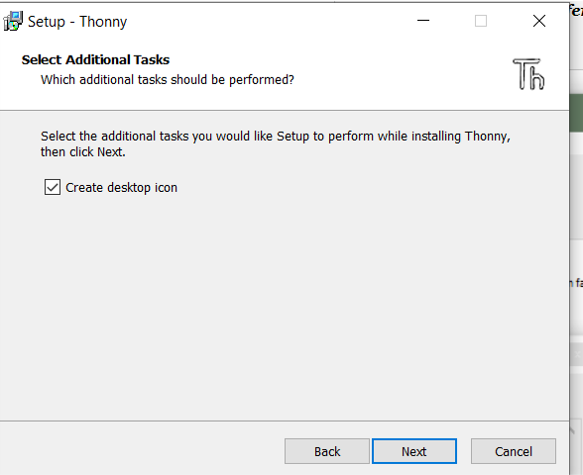
Step 3: install Thonny ide
then go through installation process.

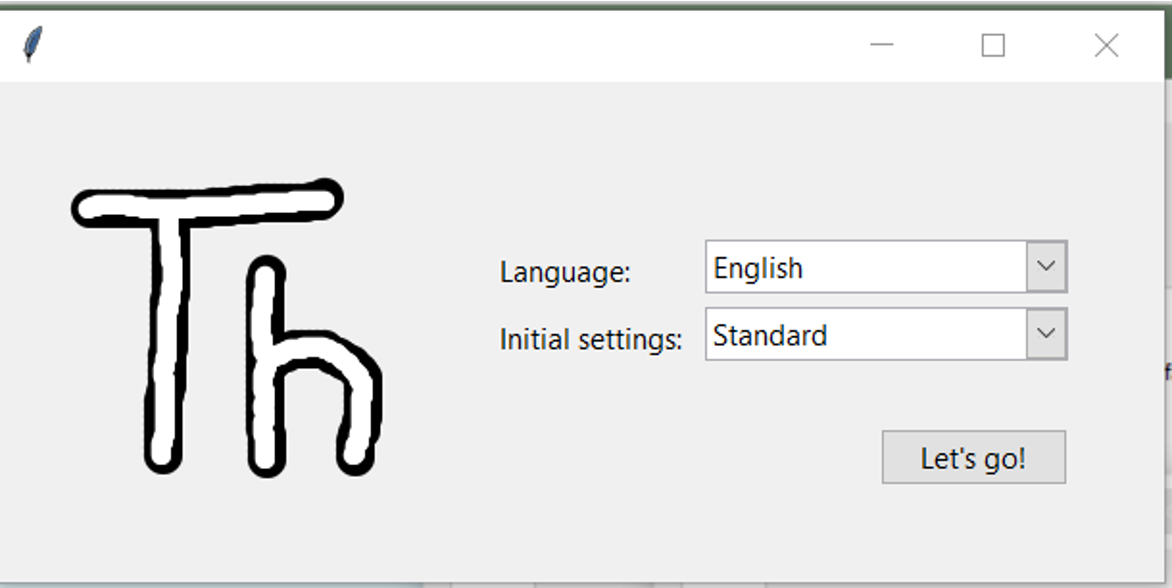
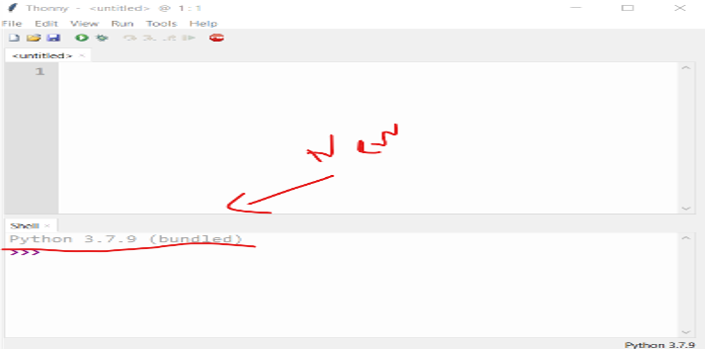
Step 4: Run Thonny ide
now open thoney ide and choose your prefered language, if you see python version in the trerminal below then its mean that you are ready to go , other wise you need to download and install python depends on your operation system
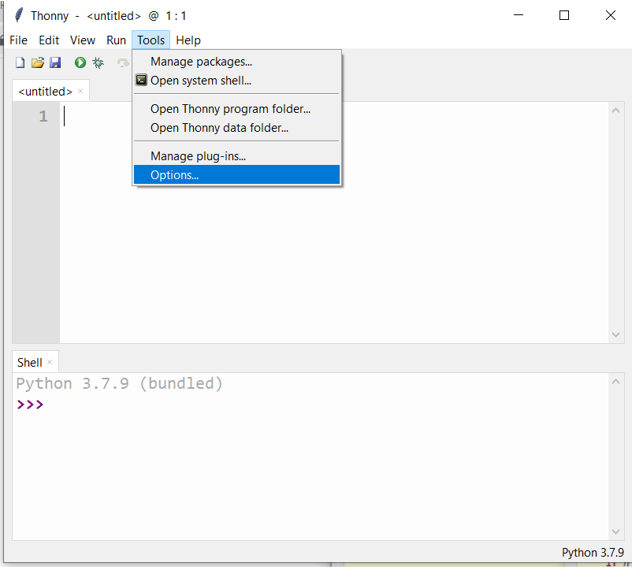
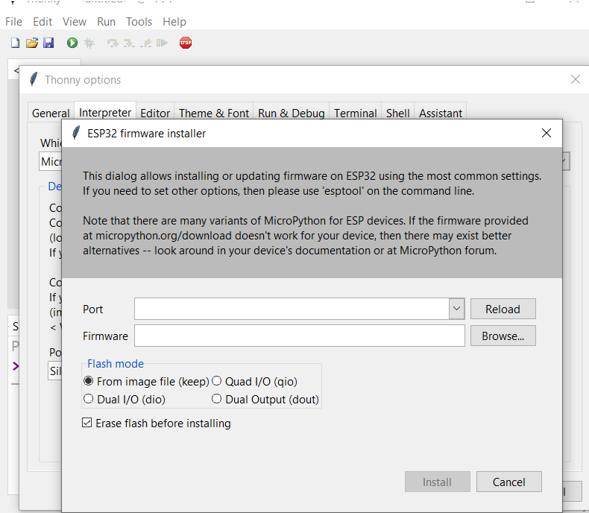
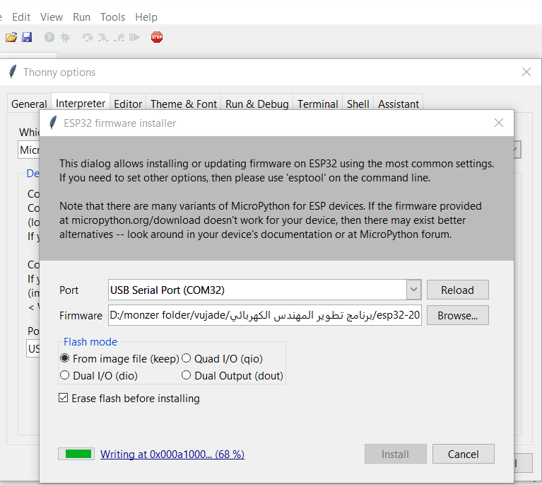
Step 5: install micro python firmware
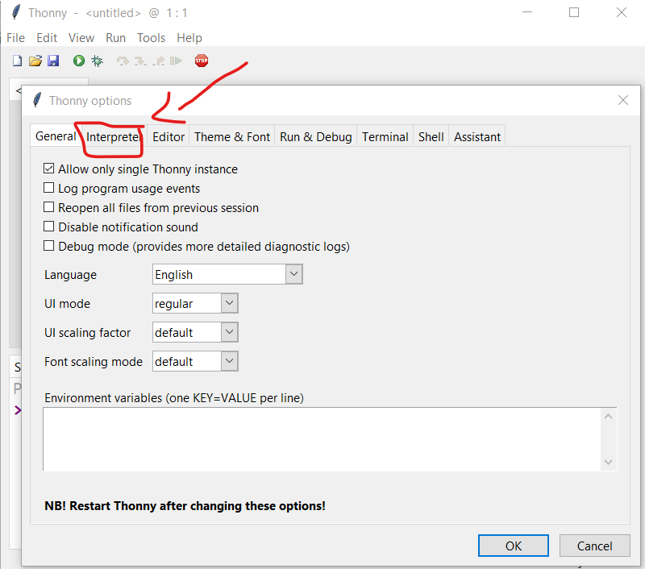
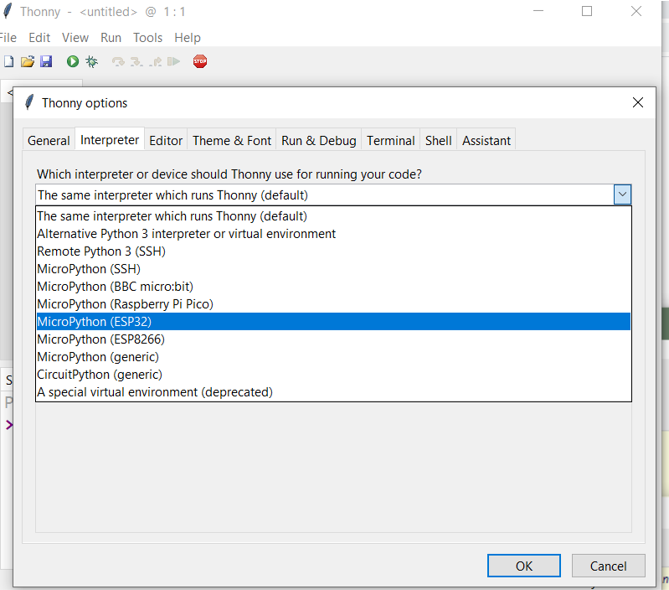
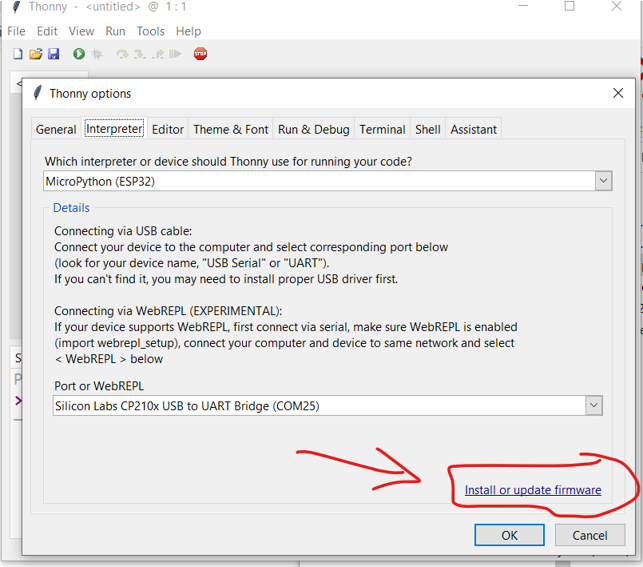
- To install micro python firmware Go to option —»> interpreter
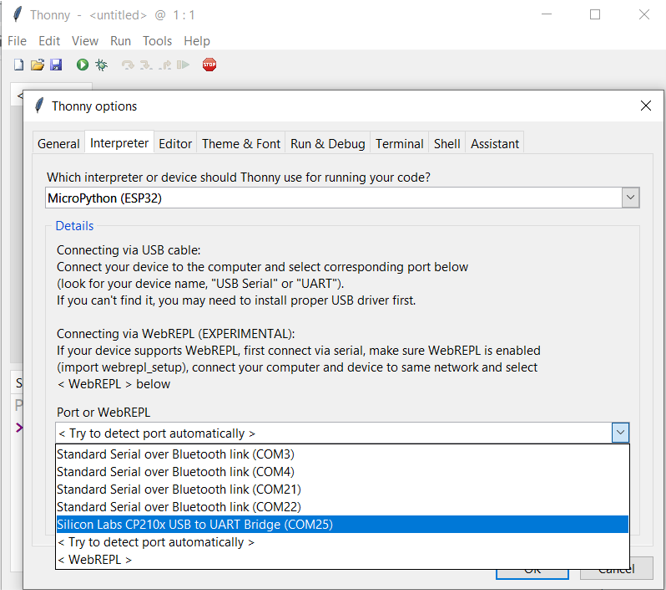
- Select micro python for esp 32 , Then select the com port,
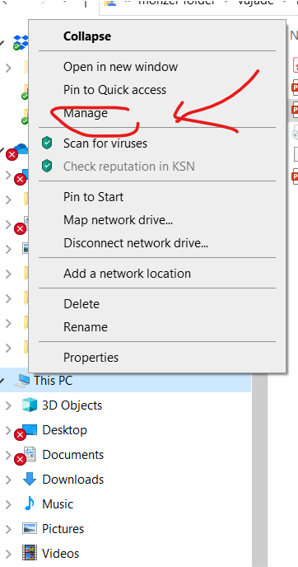
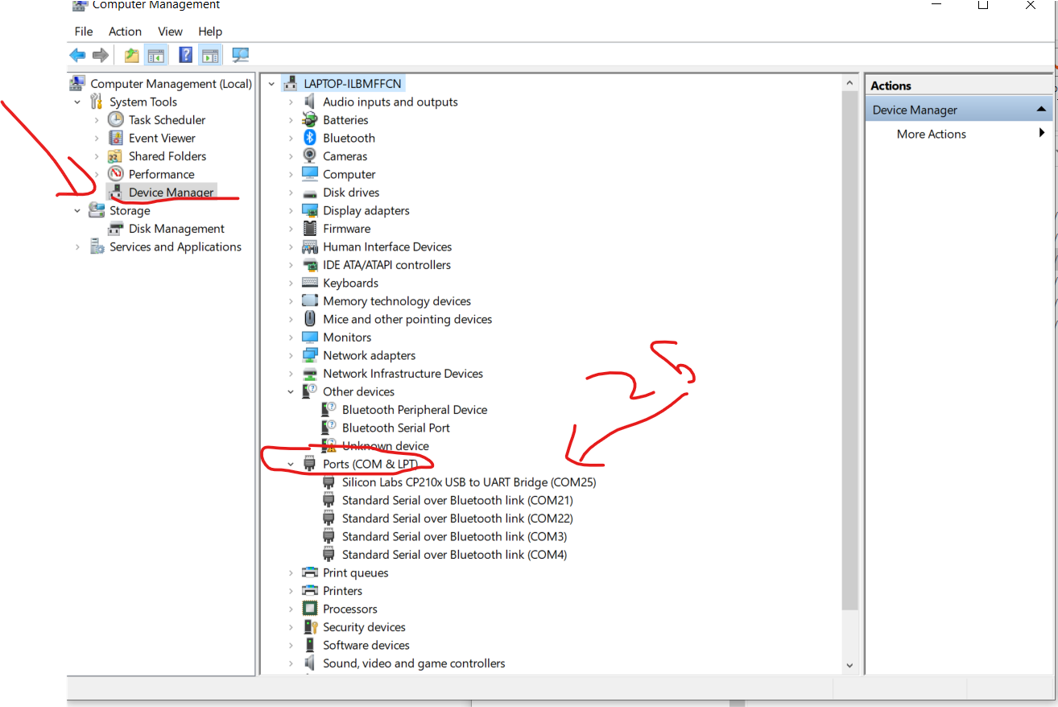
- if you dont know which port your board is connected , Go to your pc –> then Right click —» then manage —» then go to device manager —» under com port you will see the number
- then Click Install firmware
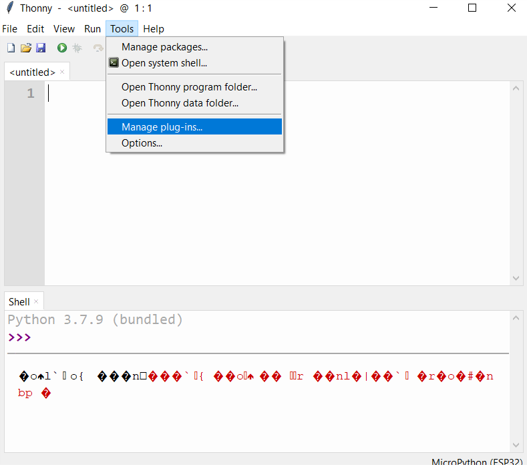
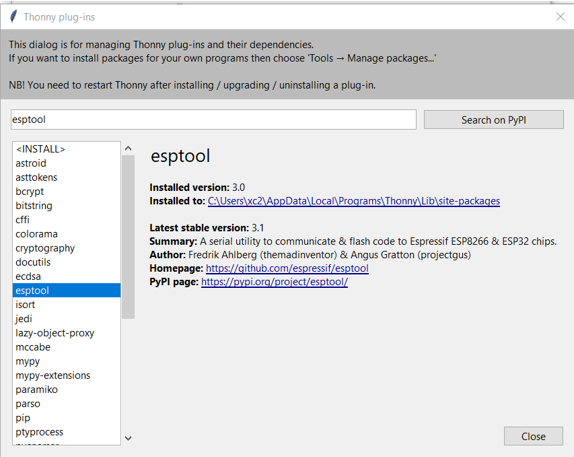
- If install firmware didnt show up its mean you have to download esptools, go to tools – » manage plug-in and search for esptool and install it
- Now click option – interptuer – chose micropython — and com port — click install frameware
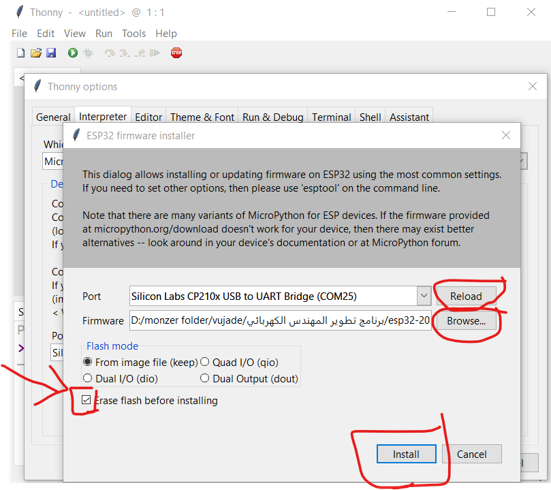
Step 6: press flash button
You have to keep pressing flash button till the installation start , when it stats you can release the button.
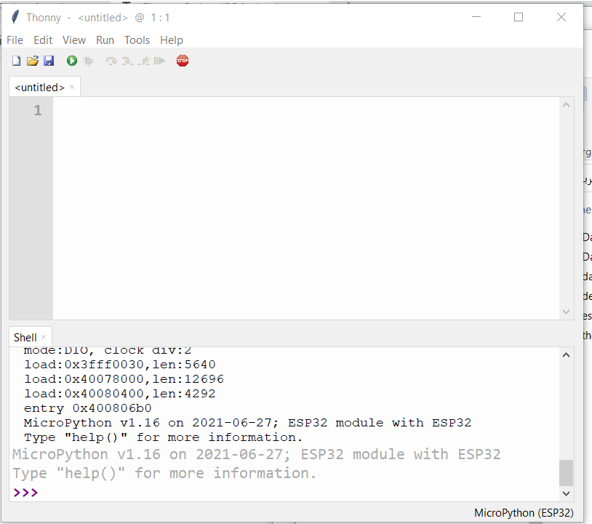
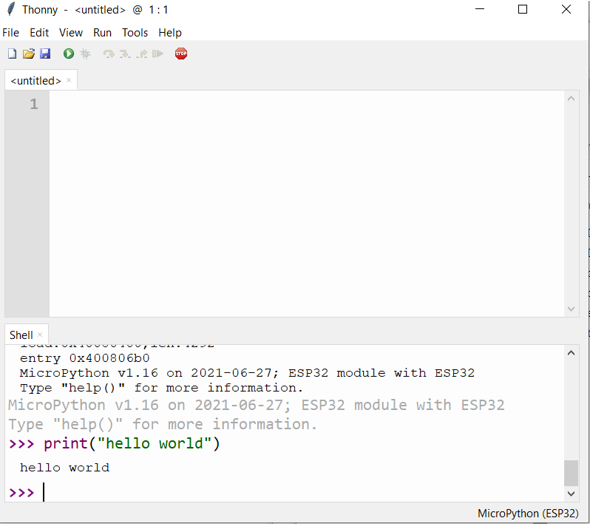
Step 7: print Hello world
Once it done , now you have in the serial monitor the micro python version , And then you can print your first program hello world
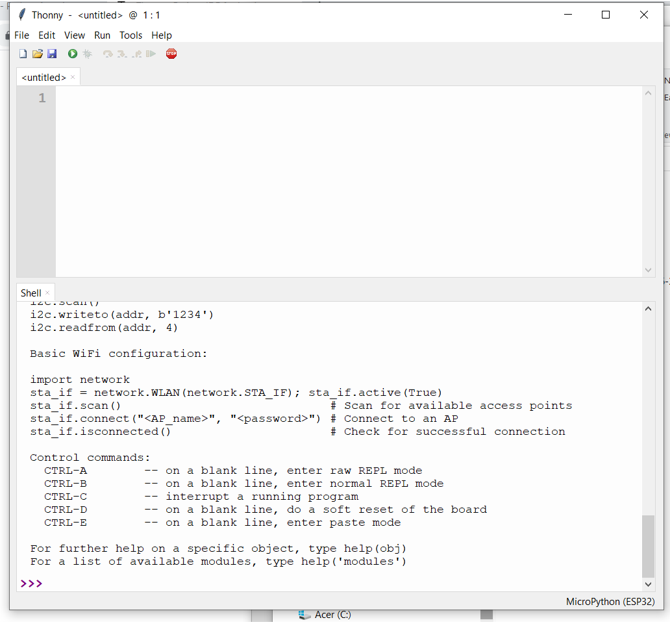
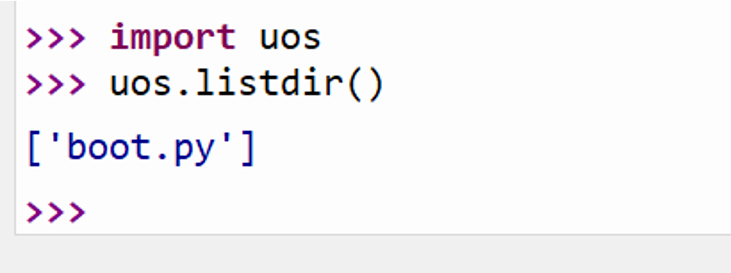
Help command
help () will list for you some sample code
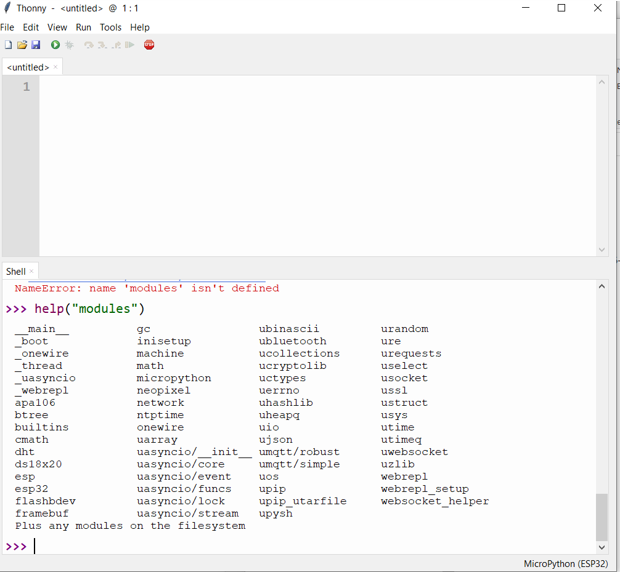
Help (“modules”)
In python, function are called modules , to see all modules you can type the command help(“modules”)
You can use any modules by importing it
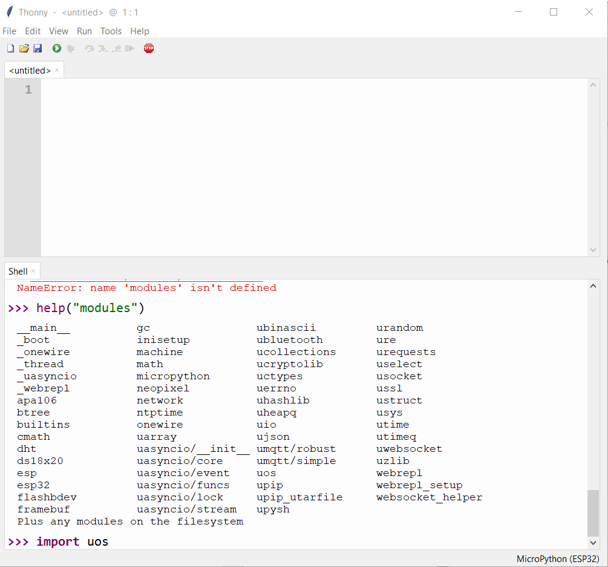
Import uos , which is will help in file systems of an operating system of micro python, and then use uos.listdir() directory to list the files on device By defult boot.py is the only file
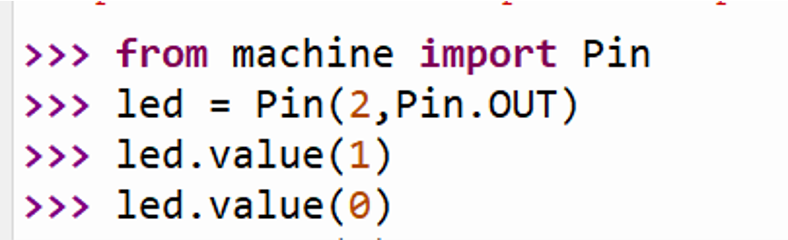
Machine module
You can import the machine module to interact with GPIOs,
to import the GPIO Pins Instate of importing the complete machine module you can only import the pin class of the machine module using
From machine import pin
Then assign it to led variable , pin class take tow argument first is the pin umber the second is ( the in build led on esp32 is pin 2 ) the second argument is the state of the pin eaither input or output Then use led.value(1)
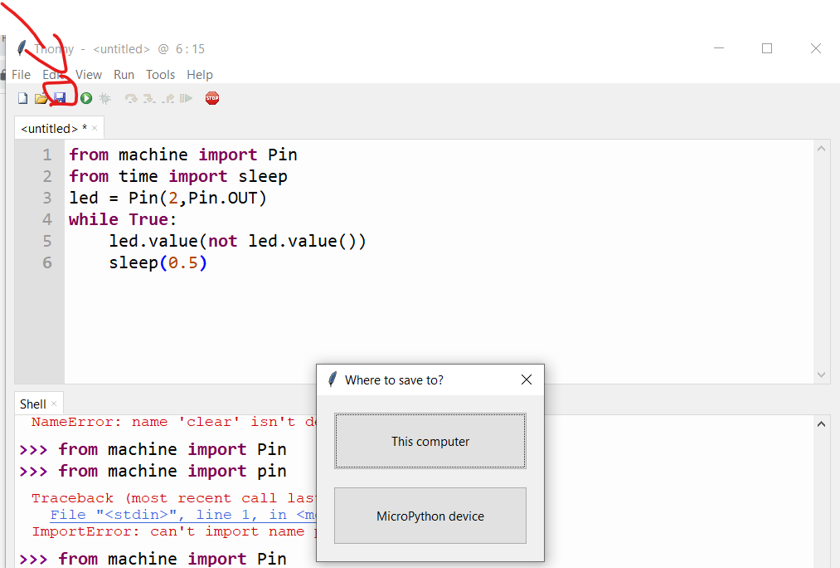
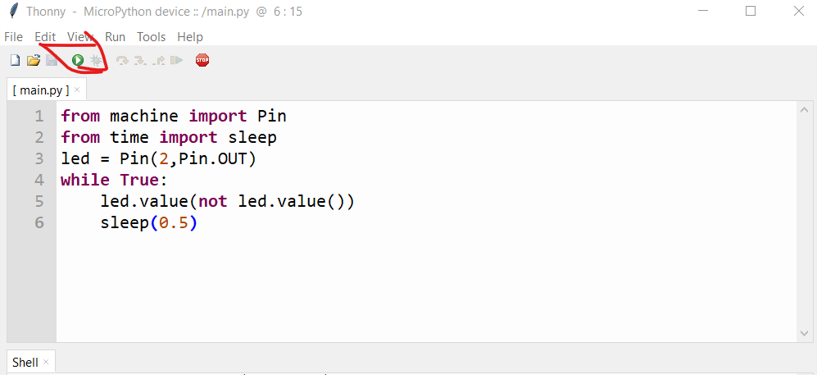
Blink
Now lets write blink example ,
as we did before first i imported pins from machine using
from machine import Pin
then to use the time delay i need to import sleep from time module using
from time import sleep
then i aded a variable " led " and stored to it Pin(2,Pin.OUt) this will define Pin 2 as Output
then used while loop and made it infinite loop using while True :
then inverted the value of led , if it on will be off , if its off will be on using led.value(not led.value())
last thing i have added a time delay of half secound using sleep(0.5)
- Save and Run in Micropython device
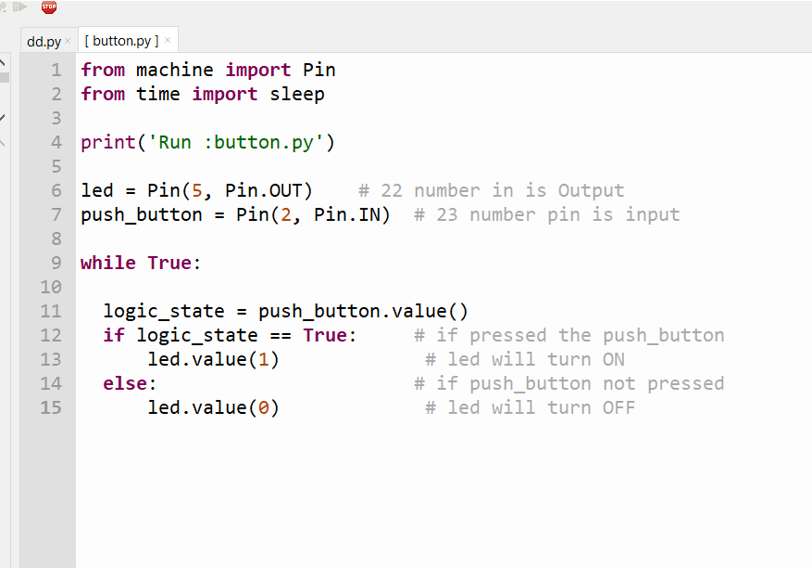
Button
and here another program for reading input value from a button and turn on led, i used the same module machine and here i added push_button = Pin(2,Pin.IN) to read input data from a pin and then compare using if else statement to change the value of the led
Arduino program
- download Ardino program from here
C Language programs
Kicad Files
MicroPython program
- donload micropython Blink example from here