6. Electronics design
General Info
Time zone
| Day | JST | Name | Where | PW |
|---|---|---|---|---|
| Wed | 23:00-2:00 | Class | Zoom class | 1234 |
| Thu | 21:00-22:00 | Local session prep | @kannai or Jitsi | |
| Fri | 10:00-18:00 | Local session | @kannai or Jitsi | |
| Sat | 10:00-18:00 | Local session | @kannai or Jitsi | |
| Sat | 24:00 | Global Open Time | Zoom mcu | 1234 |
| Mon | 23:00-24:00 | Recitation | Zoom class | 1234 |
| Tue | 21:00 | Regional Review(Asia) | Jitsi |
Daylight Saving Time from Mar 14
- Class
- Mar 15: recitation (22:00-23:00)
- Mar 17: embedded programming(22:00-1:00)
- Global Open time
- Mar 20: 23:00??
- Asian review, Local session
- no change
Large format CNC in Hamamatsu
Schedule
-
Mar 13(Sat)
- Kamei
- Ishimura
- Tamiya(stay)
-
Mar 14(Sun)
- Takezawa
- Tamiya

Material
- Mar 13 :カインズホーム(雄踏店)
- 910x1820mm x4 (Group x1, Individual x3)
- thickness
Preparation
- Design(Ready to cut)
- Fusion360
- Should be parametric
- material thickness
- Tool diameter : 6mm
- dog bone in design
- Buy material -> put parameters -> cut
- 2-3 hours to cut, 1-2 hours to Post-processing
- Carry to home
ref. last year local session
ref. homma weekly assignment
Design check
Thu, Fri, Sat
Assignment
Group assignment:
Note
use the test equipment in your lab to observe the operation
of a microcontroller circuit board
Individual assignment:
Note
redraw an echo hello-world board,
add (at least) a button and LED (with current-limiting resistor)
check the design rules, make it, and test it
extra credit: simulate its operation
TODO: Group assignment
use the test equipment in your lab to observe the operation of a microcontroller circuit board
-
Test equipment
- Multimeter(テスター)
- Oscilloscope
-
observe the operation of a microcontroller circuit board
- Use your board from this week or your programmer
- Multimeter
- Connectivity
- Voltage (range: large to small)
- Current
- Oscilloscope
- Signal
- Y axis: Voltage, X axis: Time
- LED Blink on this week board
- ref. last year
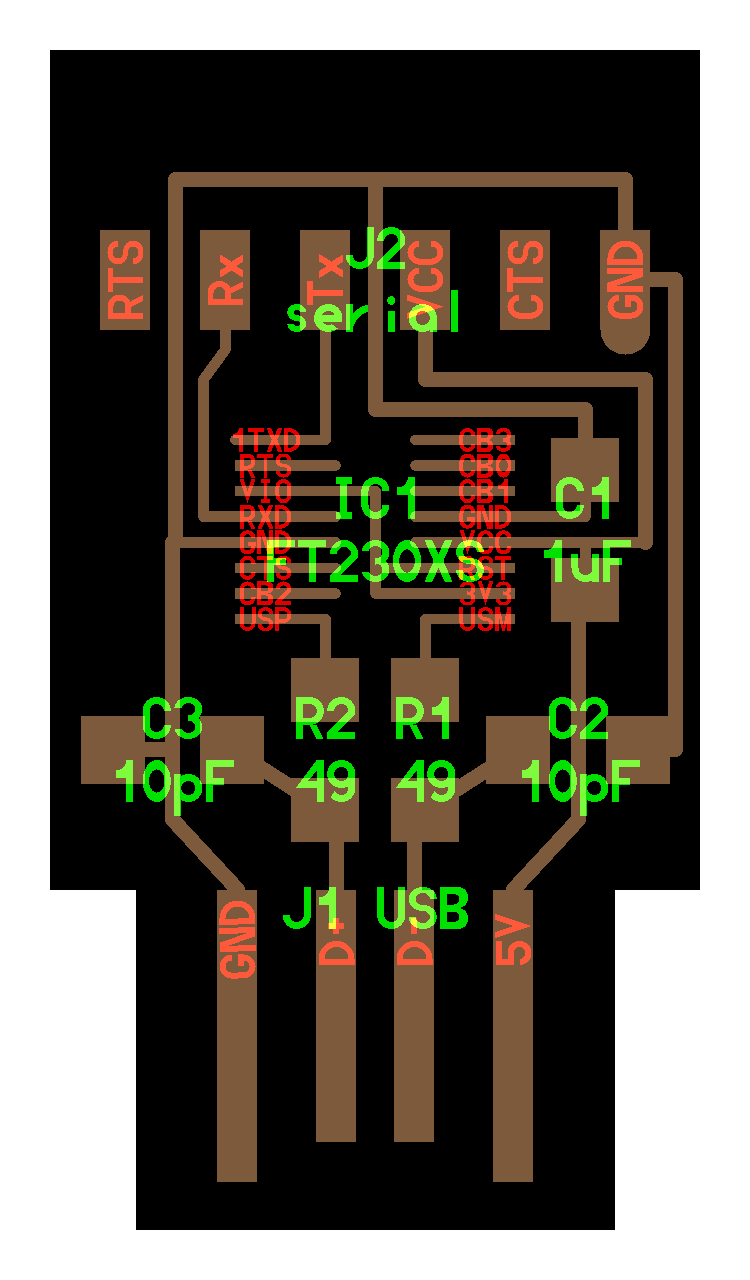
- Serial Communication Echo back
- Use your hello.USB-serial.FT230X
- Connect RX and TX
- TX: Transmitter
- RX: Receiver
- Open Arduino IDE
- Select port
- Open Serial Monitor
- type one of 1-9. A-Z, a-z… -> Send
- (one charactor = 1 byte = 8 bits)
- find Binary from ASCIIコード
- Show signals in Oscilloscope
- ref. tips_Oscilloscope
- Screenshot
- Save/Recall > Action
- Save All > Printボタン > Saves Image to File
- Utility > Options > Printer Setup
- Signal
TODO: Individual assignment
redraw an echo hello-world board,
add (at least) a button and LED (with current-limiting resistor)
check the design rules, make it, and test it
extra credit: simulate its operation
- redraw an echo hello-world board
- redraw > EDA(electronic design automation)
- an echo hello-world board
- UPDI
- ATtiny 412
- ATtiny 1614
- ATtiny 3216
- UPDI
- ATtiny1614 hello buzzer board
- w/button, LED, tact switch, electromagnetic buzzer(+ UPDI 3pin, serial 6pin)
- add (at least)
- button + pull up resistor(or in-chip)
- LED + current-limiting resistor 1k [ohm]
- UPDI 3Pin
- Pinout
- parts
- EDA
-
design rules
- DRC in Eagle board
- Clearance
- 16 mil
- Size Minimum width
- 16 mil
- holes
- ref. Eagle holes making
1
2
SET FILL_LAYER 116 1;
run drill-aid 0
- ref. Eagle holes making
-
make it
- fabmodules
- ensure the path made
- MDX-15
- fabmodules
- test it
- Arduino IDE
- Arduino -> preferences -> Additional Boards Manager URLs -> add
http://drazzy.com/package_drazzy.com_index.json - Tools -> Board -> Board Manager -> search
412->megaTinyCore-> version 2.2.5 or later
- Arduino -> preferences -> Additional Boards Manager URLs -> add
- upload echo.ino program from class page
- Use serial monitor in Arduino IDE
- Example -> Digital -> button in Arduino IDE
- change pin number
- internal pullup
pinMode(5,INPUT_PULLUP) ;
- Arduino IDE