2 - Computer-Aided Design
This week we wil learn about Computer-Aided Design. ‘Computer-aided design (CAD) is a computer technology that designs a product and documents the design’s process. CAD may facilitate the manufacturing process by transferring detailed diagrams of a product’s materials, processes, tolerances and dimensions with specific conventions for the product in question.’
Assignment this week
Model your final project using raster, vector, 2D, 3D, render, animate & audio. Compress your images and videos, and post it on your class page. Create a parametric design.
Files I created
- Gimp
- ImageMagick
- All resized jpg
- Photoshop
- Premiere file
- Fusion 3D file of my final project
- Adobe Dimension
- Illustrator files
- Parametric file
The steps for this assignment
- 1. Make a manual from the Fusion 360 workshop
- 2. Use raster software - Create an impression of the final project
- 3. Using vector software
- 4. Using 3D software - Create an impression of the final project
- 5. Create a parametric design in 3D
- 6. Video software - An impression of my final project
Lets get started!
1. Make a manual from the Fusion 360 workshop
I made 127 screenshots and notes during the workshop. This is far to mutch. So I desided to combine images. Since I never heard of GIMP I challenged myself to do the image altering in Gimp. To be able to work with gimp I followed the basis selecting instruction (see ‘Used sources).
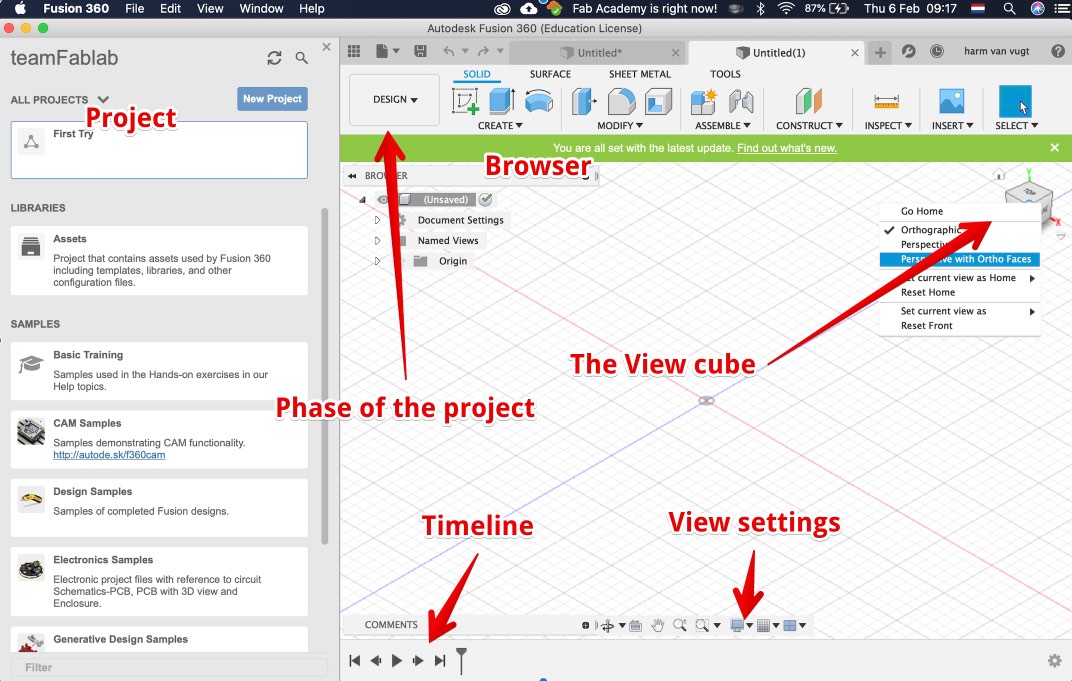
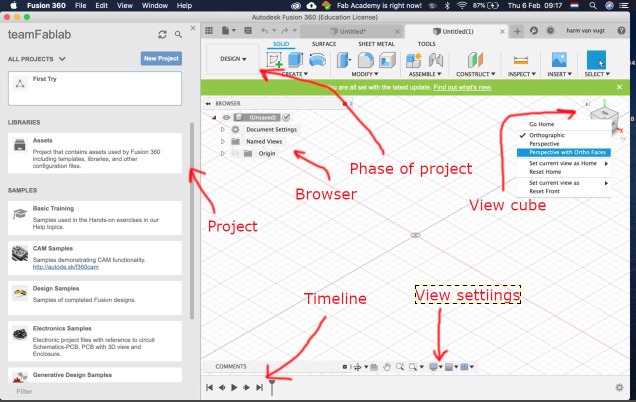
Overview of Fusion 360 workspace
- Project: the project is saved in the cloud, you can work together with multiple people by sharing the project via this menu
- Browser: a bit like Layers. But grouped by type, use to select views of types or alter. Don’t forget to open the objects and sketch folders.
- The view Cube: look around, Home will get you back if you are lost
- Phase of project: differnt ways to alter your project. I work in design for the most time
- View settings
- Timeline: the timeline is usefull to alter someting you did before withou losing all the work you did. Time-travel to the past, without disturbing the entire future.
Create a 2D sketch
- Create new sketch
- Select Plane (the ‘face direction’) x y z. Violet = horizontal, will be most used
- Create a sketch with one of the tools
- Make sure you look from the top (use the view Cube)

Transform 2D in to 3D (by using an Extrude)
- Finish Sketch
- Create > Extrude
- Pull blue arrow or enter dimensions
- Now Body1 (3d object) is created under ‘Bodies’

SAVE YOUR PROJECT
cmd-s
Working with constraints
Constraints will limit the way lines in their position
- Rectangle is a figure with automatic constraints, the angle will always be 90degrees
- If you draw lines, they could get constraints, in this case horizontal
- Add constraints: Via menu ‘Constraints’
- Select the lines you would like to constrain to each other
- Perpendicular: Will keep the angel 90 degrees
- TODO – REMOVING constraints

Midpoints & Alignment & Constrain removal
To align images you will need to work some tricks, there is no standard alignment tool.
- Auto alignment: Drawings will snap automatically if vertex are close
- Ad a Midpoint constraint to a line, and other objects will center
- Convert to a construction line (so it wil not be part of the 3D object)
- Snap the second drawing to the line to center
- Remove a constraint by Selecting
- Press Backspace to remove constraint

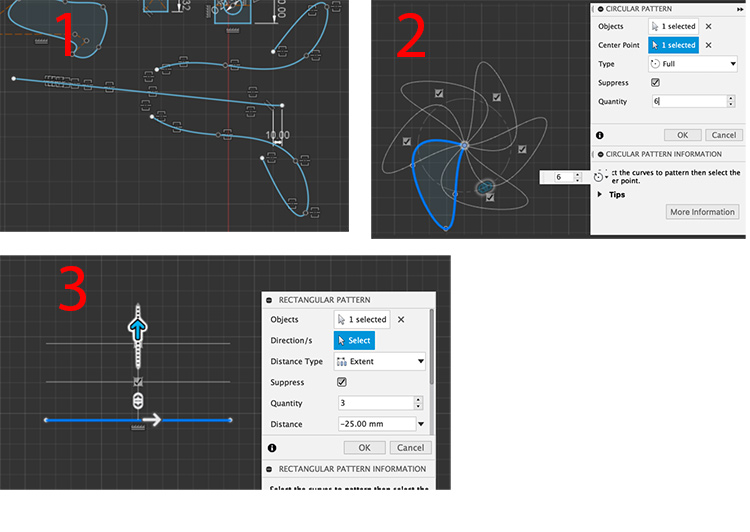
Patterns
Create multiples
- From the ‘Create’, pick Mirror, select two drawings (one is the mirror)
- From ‘Create’, Circular Pattern, select object & center point
- From ‘Create’, Rectangular Pattern, select object & follow dialog
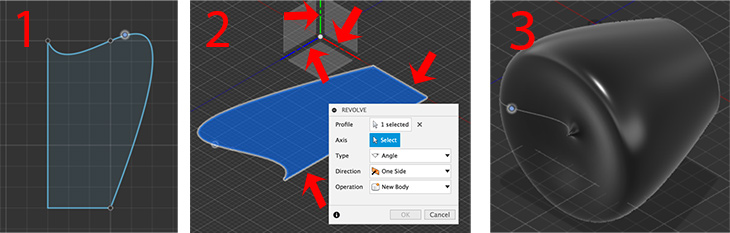
Revolve
Kind of simular to circular pattern, only now in 3D mode
- Draw in Sketch mode (Finisch sketch)
- CREATE > Revolve. Profile: Drawing. Axis: can be any axis (all red arrows)
- The result (press ‘OK’)
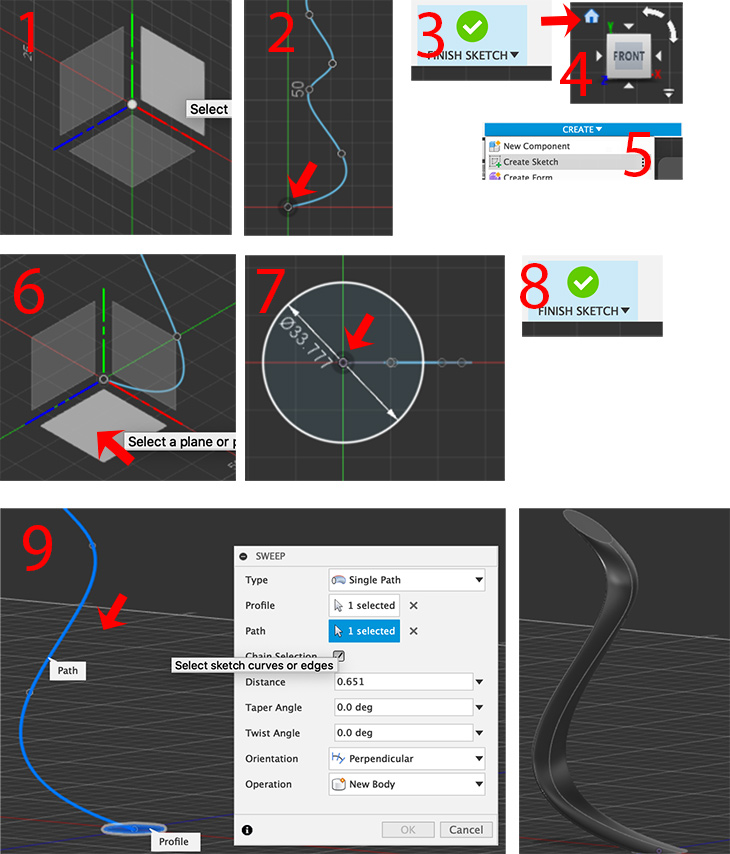
Sweep
Create a body in the direction of a path
- Create a sketch on a VERTIKAL plane
- Draw a line (path) from 0 point
- Finish sketch
- Change view
- Create a new sketch…
- on a HORIZONTAL plane
- Create a circle (or other closed figure) attached to the bottom of the path
- Finish sketch
- CREATE > Sweep. Select the profile (circle) and the path
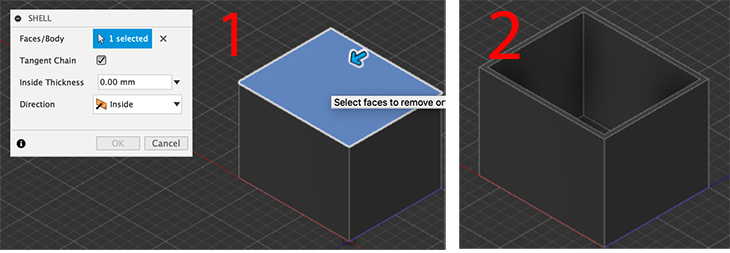
Shell
Create a hollow body
- MODIFY > Shell: pick a flat surface & thickness
- Only the shell remains
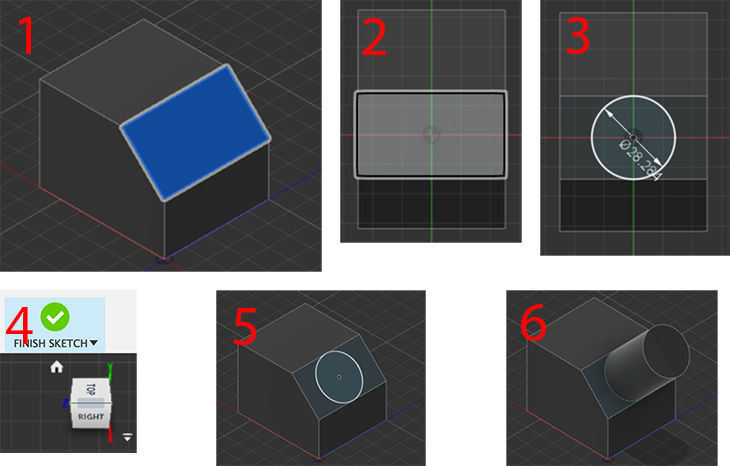
Working on other planes
Create a plane from objects
- Select a flat surface on a body
- CREATE > New Sketch (Right mouse click on surface works too)
- Draw something on the selected surface
- Back to 3D
- The sketch is now on the object
- Create an object from the drawing
Create a planes in mid-air (from menu)
Use a another surface to work on
- CONSTRUCT > Offset Plane
- Select the offset plane (xyz or object surface)
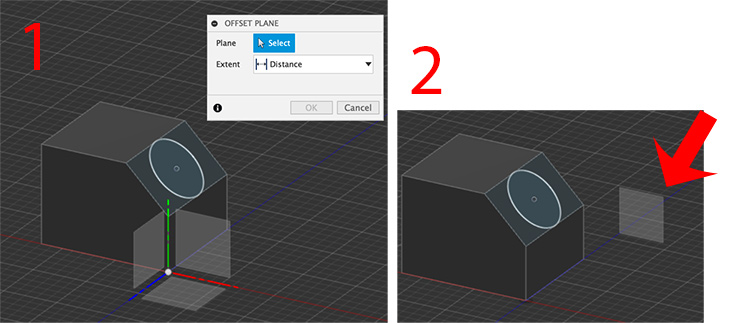
create an moving part
- CONSTRUCT > Offset Plane
- Select the offset plane (xyz or object surface)
In-class assignment
2. Use raster software - Create an impression of the final project
I found images on the Internet. It was a picture showing the painting in plastic and some glare over
Gimp
I tried Gimp to arrange images and add notes (numbers to it). But It was to heavy (to many features) and I couldn’t get use to the way you have to select images and text.
Used sources:
Photoshop
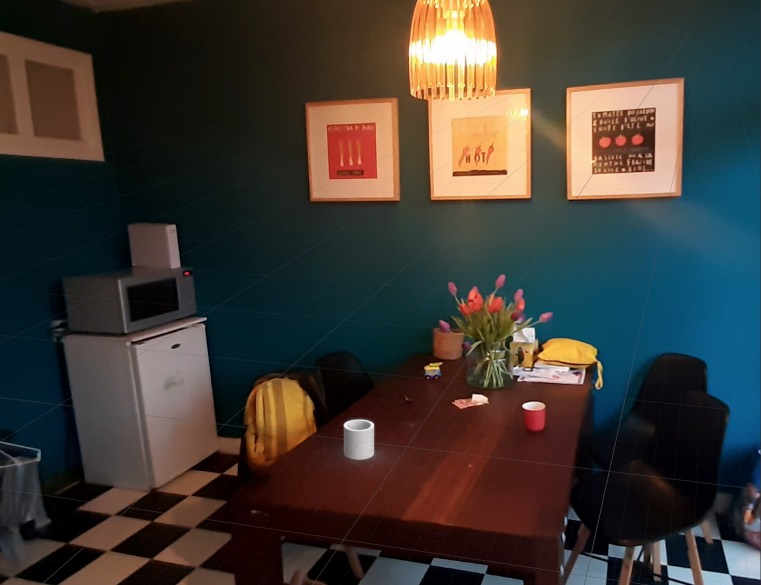
I found an image of the painting we have in the kitchen. But it had a glare. 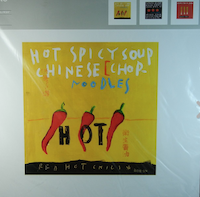 . I removed the glare with the stamp tool.
Selecting the peppers
I used the magic wand tool (I found this using the to create an selection to color. The only problem was I could’n remove a part of the selection. solution: don’t forget to deselect the gradient (see below)
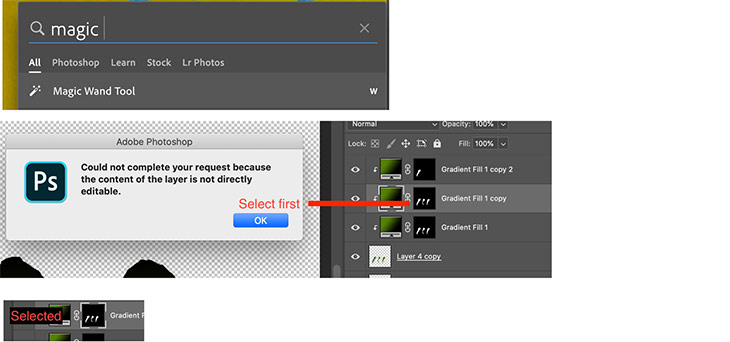
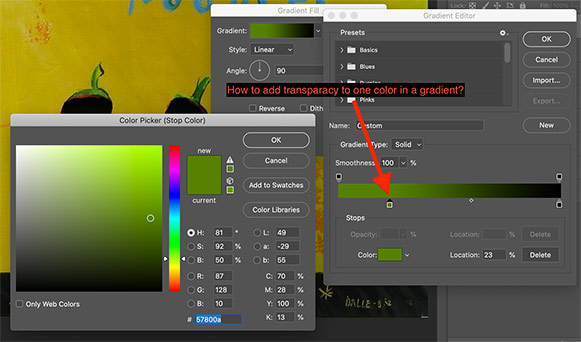
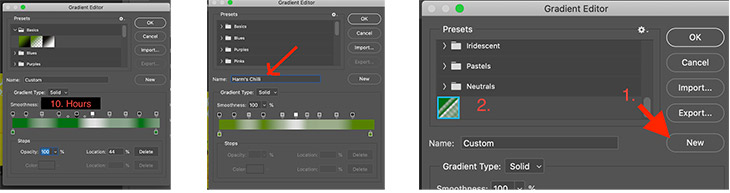
Working with gradient
Problems I encountered working with gradients
After adding it there was no way to alter it again. The solution is to doubleclick the gradient. It opens the gradient (yes It looks obvious now..)
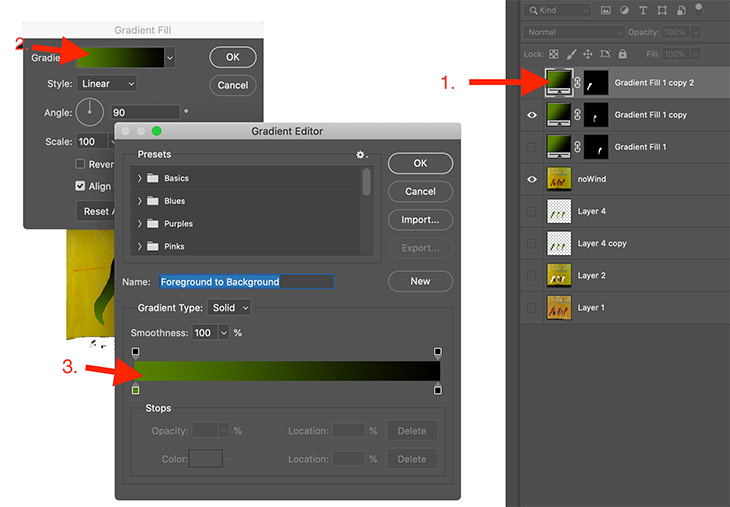
Adding multiple gradients
The square patches on top (nr 1) are the gradients, below the colors (2).
- To add: just click next to one of the patches
- To remove: select and backspace
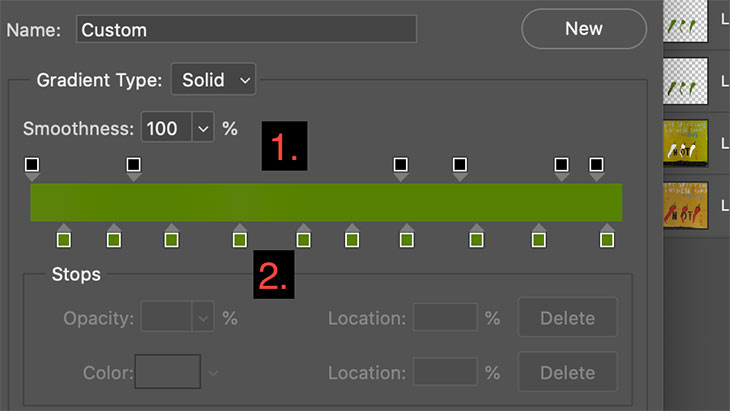
- Appliening the gradient patch to all peppers Best way to proceed is to create a layer group and copy this group
Preview (Mac)
So most visuals describing my steps where made in Preview. My setup:
- Take a full screen schreenshot
CMD - CTRL- Shift -3 - Open preview (CMD - spacebar, type “preview”)
- Enter select all (CMD-a)
- Show markup bar
- Draw a white box the size of the canvas
- Add an Arrow
- Line thickness
- Add text
- Use
CMD - CTRL- Shift - 4to copy a part of the screen - Use
CMD -to paste this image in preview - Select a part of the screen and press
CMD - kto crop image - tools -> image size ‘width 730’
- Save ‘TitleNr’
3. Using vector software
I have a good part of my week to learn Fusion 360 vector software. Next to that I used the photeshop gradient filler (using Vector technology) and Use Illustrator.
Since I decided to use the Voyager theme I have to produce a sideimage every week. This week I will use illustrator and Fusion to create one.
Illustrator:
- Open an new file
- change dimensions (artwork):
Now resize by hand: 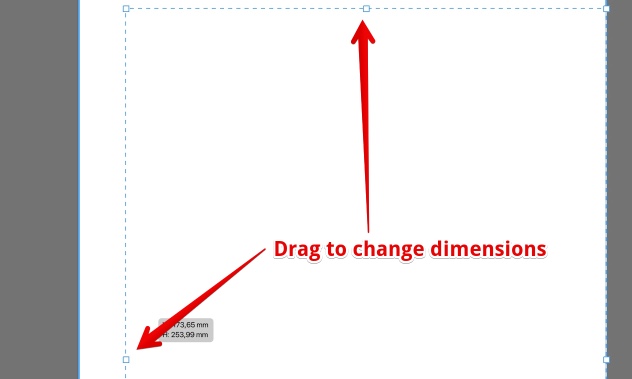
Pick tool to make text 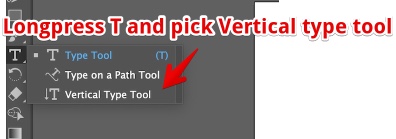
Rotate the text 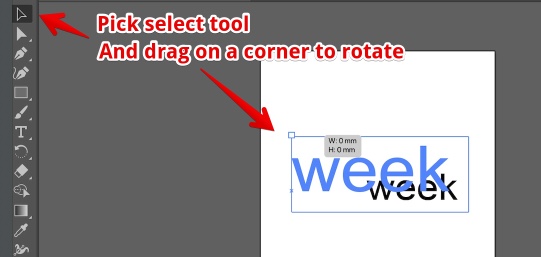
Export the file as SVG file 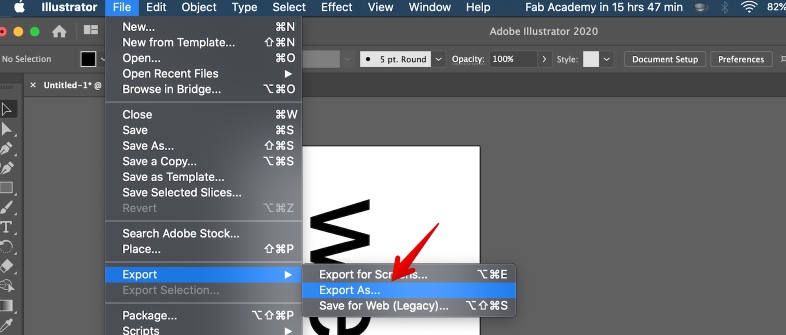
Fusion 360
- In Fusion: insert > SVG
- Select the letters & EXTRUDE
- Move the windows aground if you can’t find the extrude arrow

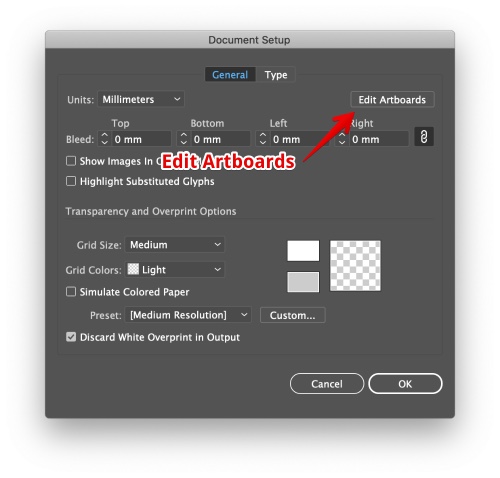
To prevent losing the center, crop the illustrator document to the size of the artwork: File > document Setup > Edit Artboards
Used Sources:
4. Using 3D software - Create an impression of the final project
First I created the entire object, a massive frame with the outer dimensions. Than the cutout, so a small edge will remain to keep the glass in place It was really hard to cutout
Adobe Dimensions
My testdrive with 3D software next to Fusion 360. I tried to create my frame in the kitchen. 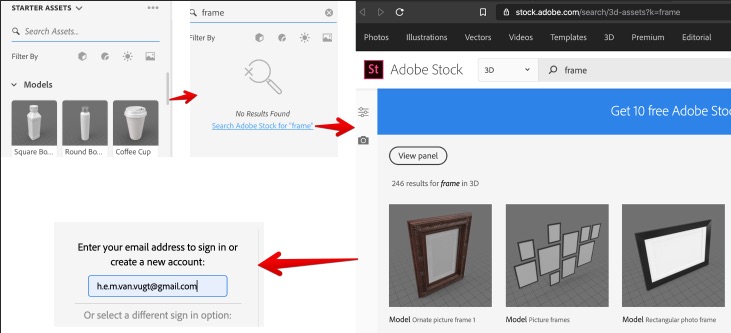 The model of a frame was for sale. But I needed to pay a monthly fee. Bit disappointing you have to pay for a simple frame.
Moving (1) & Rotating(2) is really intuitive: 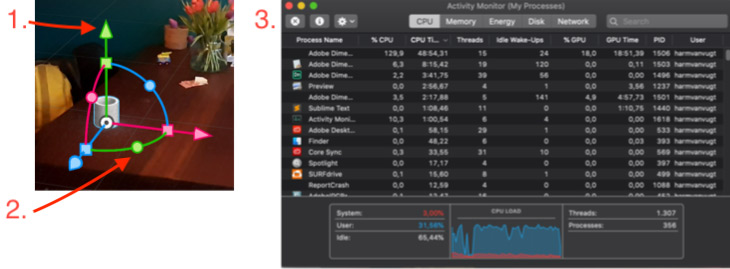
But it was really easy to place an extra cup on the table. If only my laptop could handle it, it could be fun.
The Result
Conclusion Adobe Dimensions is really easy to place 3D objects in an 3D environment. On my laptop I was not able to fully test it, my cpu simply cannot handle it.
Sources:
Fusion 360
I wanted to practice creating an object and use this as an artist impression of the end result.
How to snap to a component? Go to Profile Name (Harm van Vugt) in the top right corner of the Fusion 360 user interface.
- Select Preferences.
- Select Design.
- Enable the following options:
- Auto project edges on reference
- Auto look at sketch -Auto project geometry on active sketch plane
How to stack bodies
- Create object (extrude)
- Add Physical meterial (optional, but helps to keep layers separate)
- Select surface, create sketch & draw the sketch (on this object)
- Create body
- Result
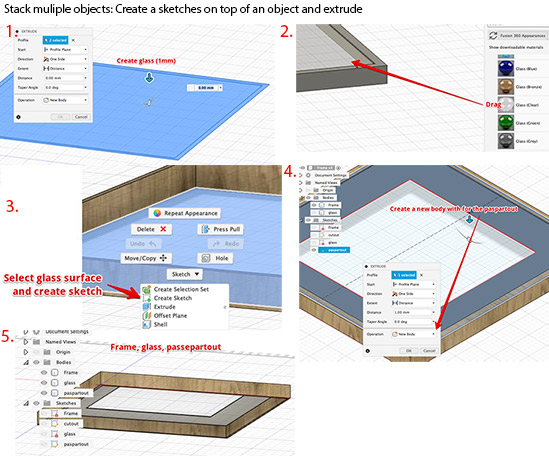
The result of my Fusion 360 object
The photo frame and how i build it
5. Create a parametric design in 3D
The goals is creating the photoframe parametric.
These dimensions should stay the same:
- thickness of glass,
- thickness of paper
- thickness of passepartout
Dimensions I want to change by entering metrics
- framesize
- Frame thickness
- passepartout inner diameter (picture size)
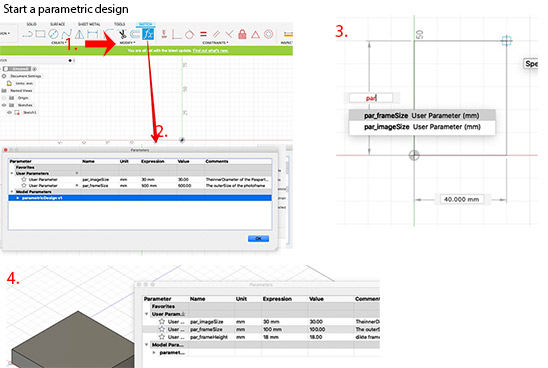
start the parametric design
- Add ‘change parameters’ Modify > Change parameters…
- Open Change parameters & add user parameters. Start with
par_for find-ability - Enter the parameters (auto complete), you can add values
par_height + 10 - alter the ‘expression field: Your body changes
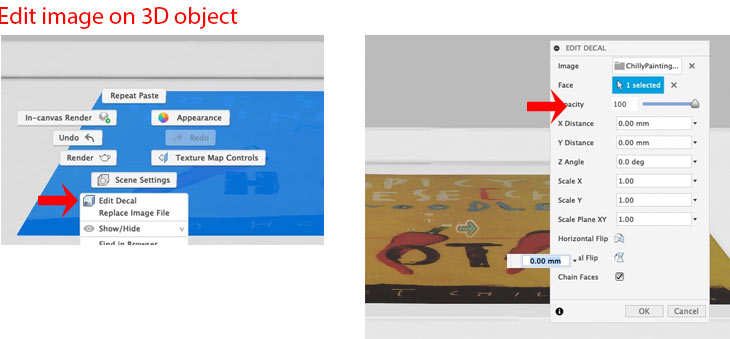
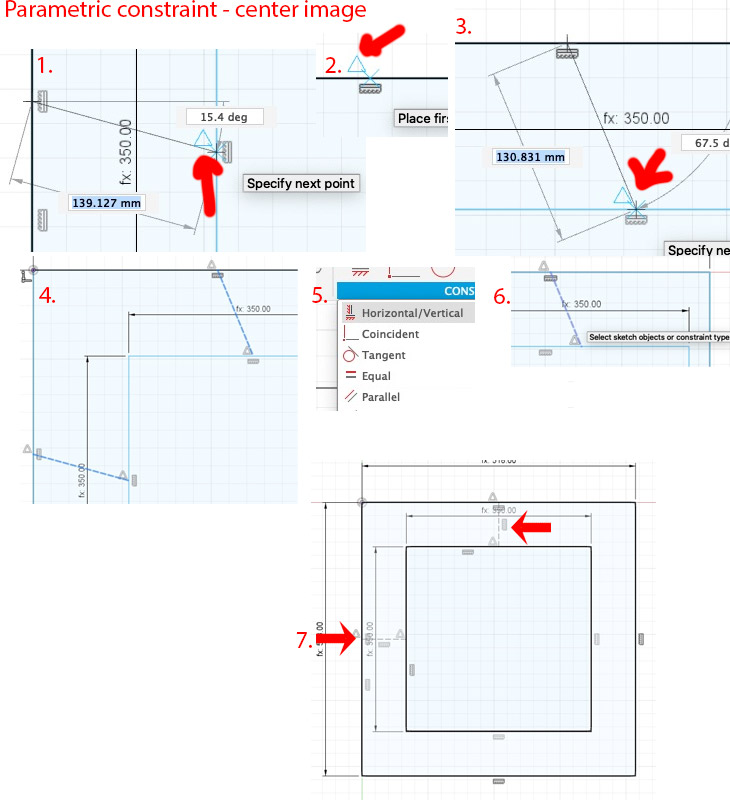
Center images in a Parametric design
- create a horizontal line,
- Connect to center of both images.
- One vertical line connect again to both centers (Don’t enter the size of the line (this will be a constraint))
- select both lines
- Add a horizontal/vertical constraint to both
- the result
The result - Parametric 3D design####
Parametric Design in Fusion 360
Sources used:
6. Video software - An impression of my final project
To animate the frame i made in Photoshop I tried to import this in Premiere. It is not very strait forward how you should build up the Photoshop file. I had the layers grouped. But Premiere didn’t like this…
Importing Photoshop PSD files in premiere
Grouped layers
Import as sequence > result, you only get some images in the timeline 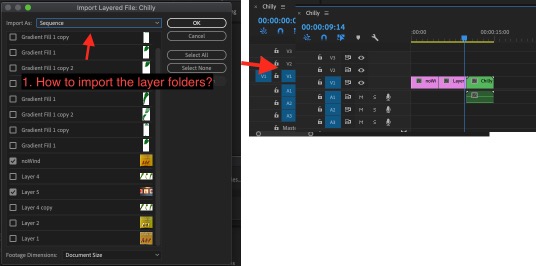
Grouped layers
Import as merged layer > result: all layers are merged to one image 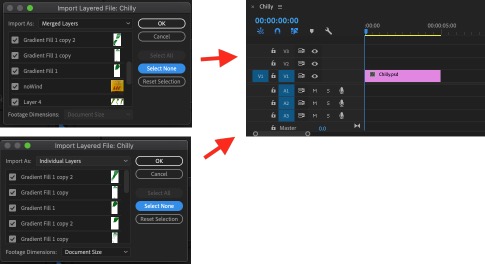
Back to Photoshop
Merge all grouped layers** Create a layer for each sequence 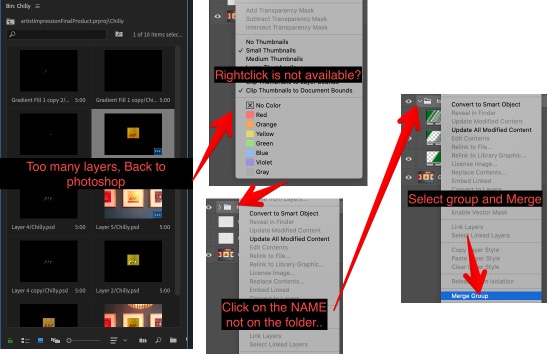
Now it works 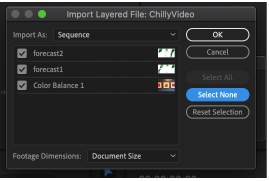
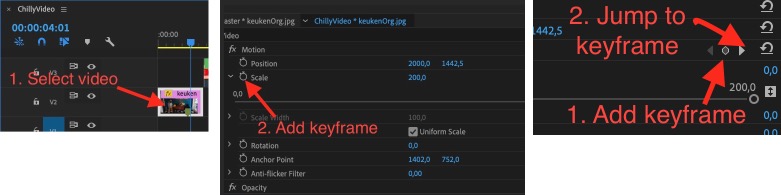
Animate photo’s in Premiere
Add keyframes for animations
Why my Mac does not like me anymore:
While working in Premiere my laptop started to Kernel Panic. I think the reason is the video size in premiere, it is 4000x2885 pix! When I imported the PSD file, Premiere created a workspace with the same dimensions. To solve this: first resize the PSD files before importing it to premiere. Or else! 
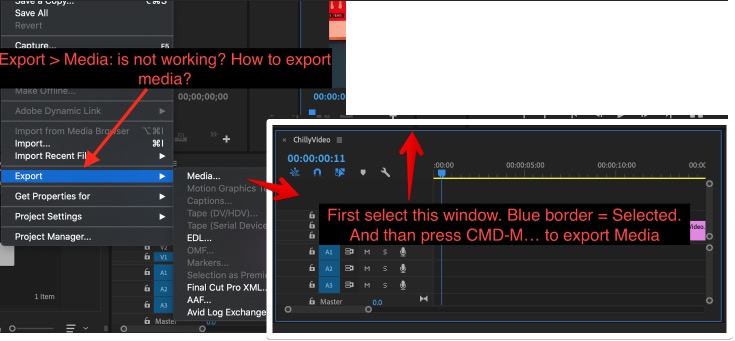
Export the sequence to MP4
Problem: the export is not working, nothing happens when pressing CMD-M. Solution: First select the sequence
The result - Photoshop & Premiere
In this artist impression you will see the color of the peppers turn from red to green. Red = good wind predictions, Green = no wind to go kitesurfing.
Wind Chilly’s
To ‘read’ the wind preditions from the painting you need to know this: 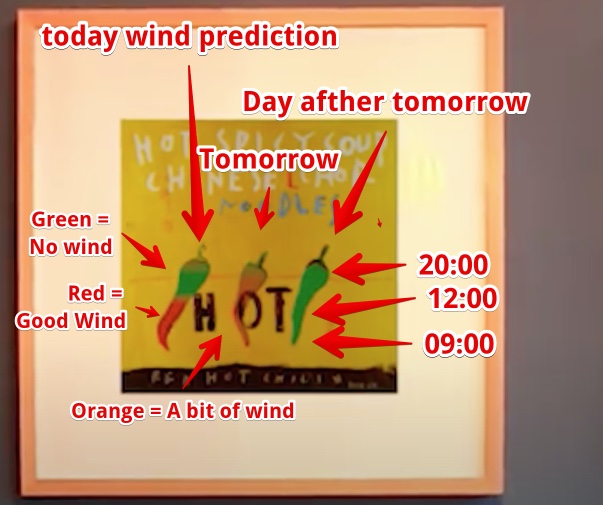
Used Sources
Mistakes and lessons last week
- Last week: My workflow documenting is still far form perfect.
- This week: I stressed less about the documentations, my documentation is more a reference than a logbook.
Wat went really good
- I enjoyed creating the video
- I liked creating the 3D parametric design
- I now have a clear vision about my final project result
My concerns
- Is this really final project I would like to create? (it is logical from my own requirements, but what if I add the requirement ‘fun to create?’)