Exercise, Week 07 - Computer-controlled Machining
Group Assignment - To test runout, alignment, speeds, feeds, and toolpaths for our CNC machine
This
is a group assignment done with Ting Kok Eng and Noel Kristian.
Our collective work is documented on the SP Fablab Website Assignment 5 and
hence only my learning and reflections are documented here
What I have learned:
1. Insert tabs properly to secure my materials before cutting it with CNC machine cutting.
2. Using the proper RPM, feed rate and end mill for cutting my 12mm plywood.
3. Secure the plywood with screws before cutting it with CNC machine.
Flow chart for preparing CNC cutting (1)

Process for preparing my CNC cutting
1. Create 2D design using Fusion 360 (save as dxf file).
2. Prepare and secure plywood onto CNC machine.
3. CAM programming using VCarve Pro to prepare gcode.
a)Load designs into Carve , and joint vectors.
b)Settings;
· Tool diameter 6 mm, No. of flute 2
· Pass Depth 6mm
· Stepover 6mm, 50%
· Spindle Speed 14000 rpm
· Feed Rate 60mm/sec
· Plunge Rate 15mm/sec
· Add Tabs to toolpath
· Check and preview all toolpath path
· Save toolpath and generate gcode file.
4. Load gcode into NC-EAS(Y) to cut the Plywood,
a)Settings;
1. Set XYZ origin
2. Starting CNC cutting
3. Completed cutting, remove tabs from cut materials and perform cleaning.
b)Check and assemble materials together.
Design a shoe rack with Fusion 360, generate gcode and using a CNC machine to cut a plywood for the material use for my shoe rack
I had created a shoe rack with Fusion 360, my shoe rack design created had follow
“Create a Flat-Pack Shoe Rack with Fusion 360 — Fusion 360 for Woodworkers”(1).
Some changes I had make to my parameters; thickness of plywood is 0.4724 inch (12 mm),
end mill bit size is 6 mm.

Setting Parameters for my shoe rack.
Use Parameter to set slot sizes for side panel, slots created will be inserted with crossbeams.

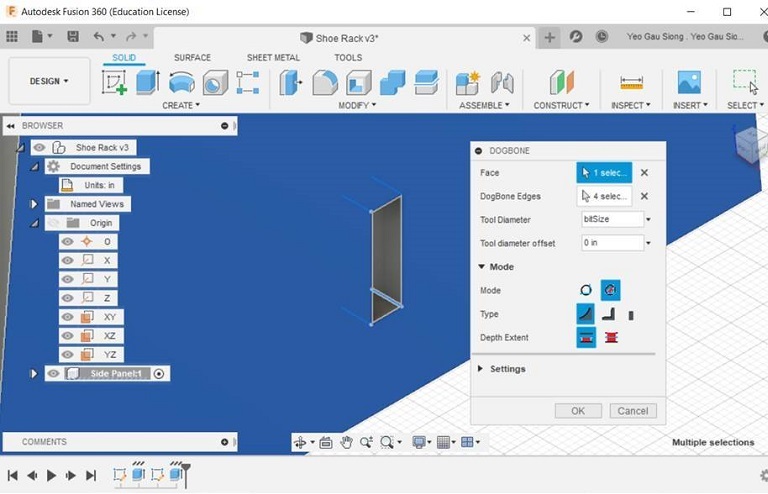
Use Dogbone addin for fusion 360 (2). Select DogBone> click on the face of side panel for a slot.
Created 2 side panels for shoe rack.
Created 10 cross beams for shoe rack.

Using JOINT function to joint side panels and cross beams together.
Select ASSEMBLE>JOINT to join cross beam and side panel together.
Change the appearance of shoe rack to wood


Adding appearance 3D Oak-Unfinished, plywood option not available.
Select Appearance>enter wood>3D Oak-Unfinished.
Completed the design for shoe rack.

Create 4 by 8 feet plywood for all the parts in this design to be lay out flat.
Get the NESTER Add-In for a design and to lay them out flat quickly.
“NESTER is a simple script to lay parts out flat in Fusion 360, is useful for use with a CNC Router.

Using Nester. Select ADD-INS>NESTER.
Arranged components within the plywood, provide 3 inch clearance between parts.
Creating DXF files

Create sketches for side panel, save as a dxf format file. This will be used in VCarve Pro.

Select create sketches for crossbeam, save as dxf format file. This will be used in Vcarve Pro.
This is my Fusion 360 design file for the shoe rack, right mouse click and save link: wk07shoerack.dxf
Using Vcrave prepare to generate gcode

Preparation work, securing 12mm plywood with screws.

Load dxf files into VCarve, and join vectors.

Setting RPM = 1400, feed rate = 60mm/sec, step over 3mm, plunge rate 15mm/sec.

Add tabs to all parts before cutting.

Preview all toolpath.

Save toolpath and generate gcode file.
Using NC-EAS(Y) to Cut the Plywood

Load gcode in NC-EAS(Y).

Set XYZ origin.

Start CNC cutting.

CNC is cutting.

Completed
CNC cutting.

After removing tabs from cut materials, perform vacuum cleaning.

Completed assemble all materials together for shoe rack.
Citation
1. Reference from URL on 14/03/2020: https://www.researchgate.net/figure/Signal-flow-for-CNC-position-control-process_fig6_291336407
2. Reference from URL on 14/03/2020: https://www.youtube.com/watch?v=VJWz-exP4iY
3. Reference from URL on 14/03/2020: https://github.com/DVE2000/Dogbone
4. Reference from URL on 14/03/2020: https://github.com/tapnair/NESTER


