15. Mechanical design
This week we only have a group assignment, which is to design a machine that includes mechanism, actuation and automation. For this week we have to build the mechanical parts and operate it manually. For this weeks process we document the group project and I document my individual contribution.
Files, planning and tools
Files
- Test joint frame - illustrator file
- Fushion 360 frame design file
- Bottom frame - illustrator file
- Side frame - illustrator file
- Back frame - illustrator file
- Top frame - illustrator file
- Connection to parts Anne and Joey - illustrator file
Planning
- Brainstorm for ideas which machine to build
- Research possibilities
- Design and prototype each part
- Testing prototypes
- Assembling of machine
- Redesign parts when needed
Tools
- Fushion 360
- Lasercutter
- Illustrator
- Shopbot
What we did – Group assignment step-by-step
For this week we have a group assignment, the goal for this week is to build the mechanical parts of the machine we design. We will work on the automation and actuation in two weeks. First we brainstormed a couple of times for ideas for possible machines:
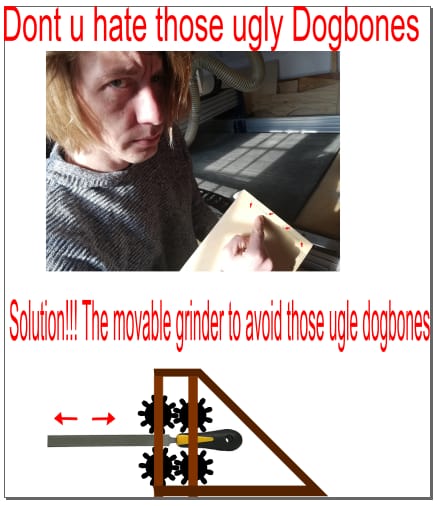 The movable grinder
- dogbone eliminating machine - the movable grinder
- solar panel robot that always wants stand in the shade
- table robot vacuum cleaner
- light painting machine
- carrot cutting machine
- something with marbles
Step 1: Choosing an idea and brainstorming the design
After some brainstorm sessions we agreed with Joey’s idea which is an Marble Calender Machine.
 Our Marble machine is a physical representation of the Waag fablab booking system
In our Fablab we work with an onlinebooking system to reserve a machine, see image above. You can reserve a machine and you can see if someone else reserved it. However you need to go online to see if a machine is reserved. We want to solve this problem with our Marble Calender Machine. We’re going to design and build a visual and physical representation with marbles of our booking system in our Fablab.
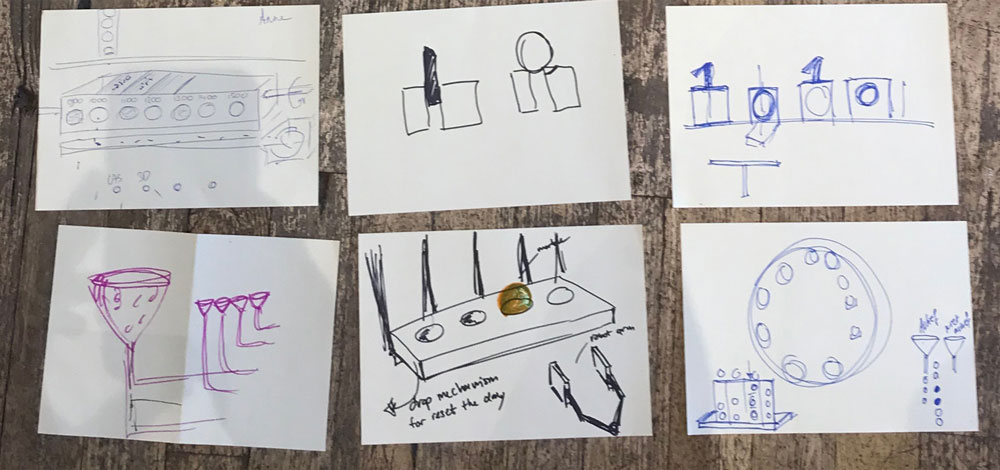 First ideas for our Marble machine
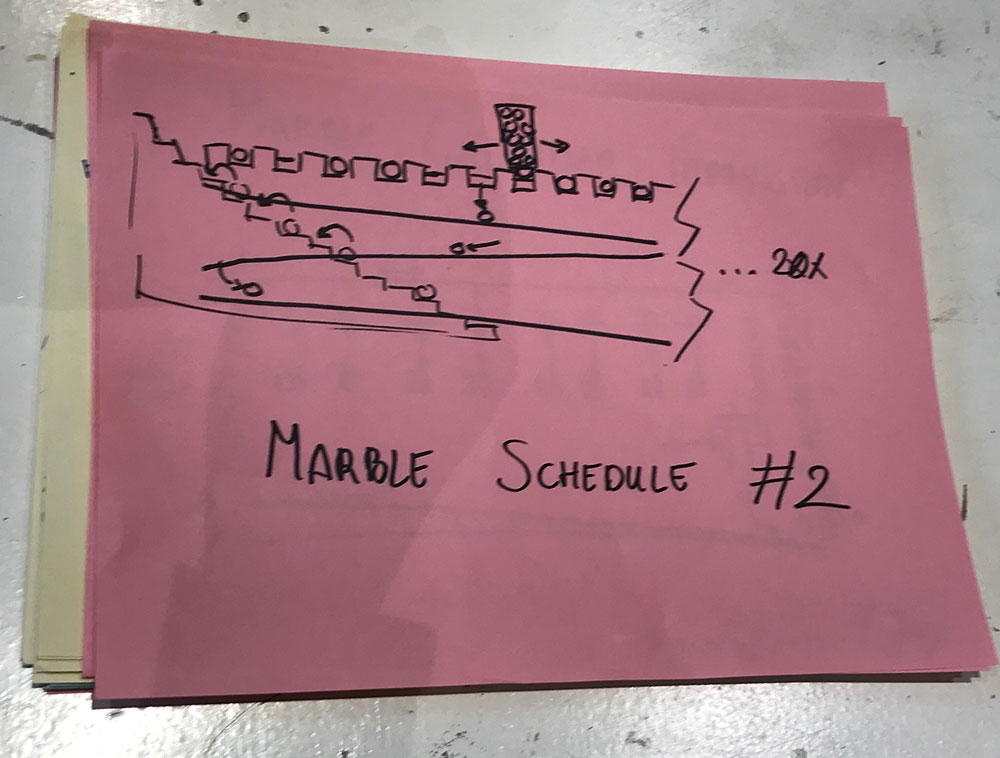
After we decided on this idea we brainstormed and discussed a lot of possible mechanics for our marble machine. And we defined our first basic requirements.
- The machines can be reserved from 8.00 till 18.00 and you can book the machine for each half an hour. This means we need 20 marbles to represent the calender.
- We first decided that we would work out the calender for four machines: the laser, one 3D-printer, the Shopbot, and the Modela.
- Joey researched for an API to use, which available for our booking system.
 First design ideas for our Marble machine
Step 2: Prototyping our initial idea
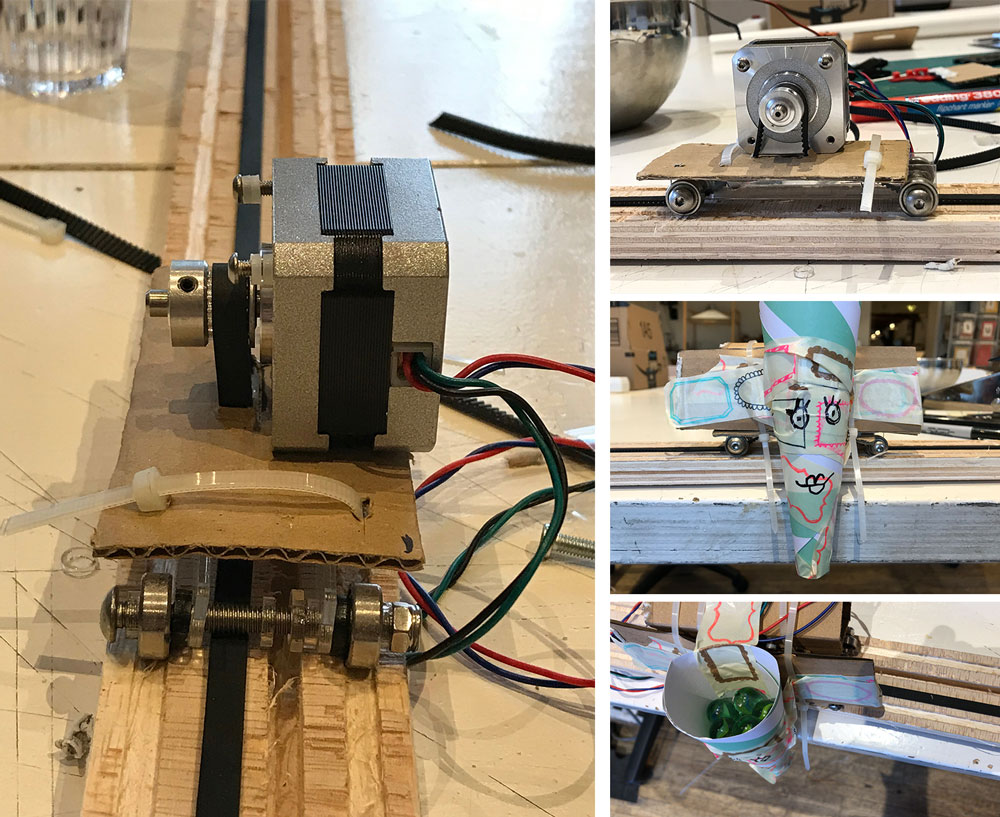
We build a quick cardboard prototype to see if our initial idea for the basic mechanics of dropping a marble in a time slot would work.
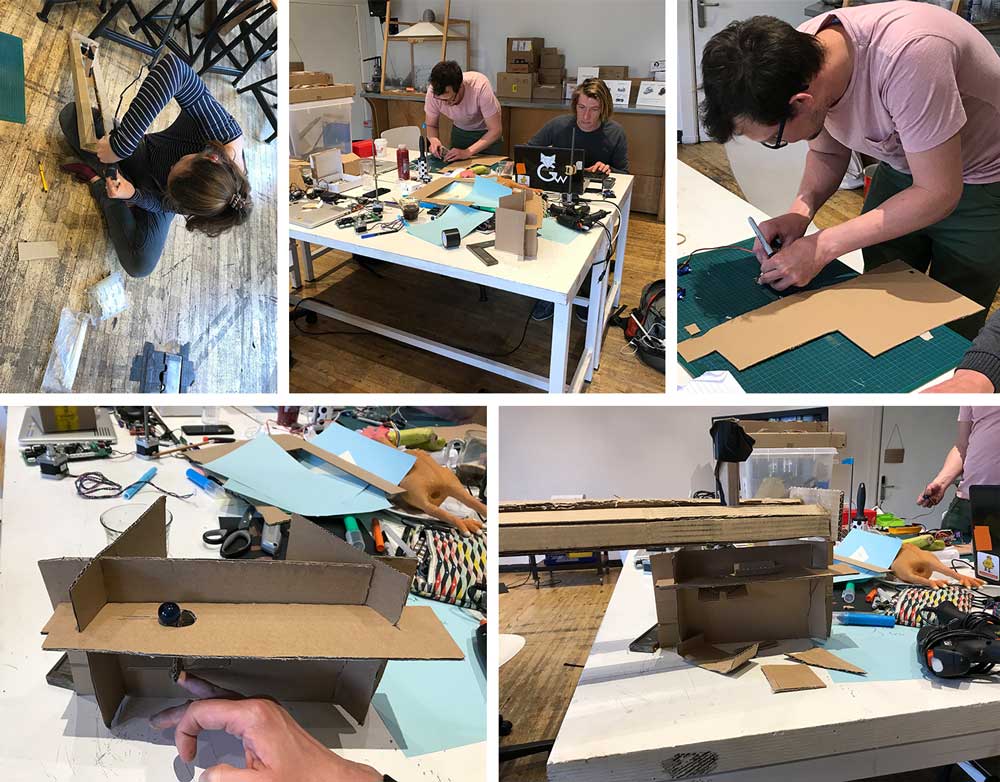 Prototyping with cardboard
We each worked on different parts, Anne and Micky worked on the marble dispenser which goes on top of the machine, and Rutger and Joey worked on the marble placement and the mechanics of dropping the marble in the right slot.
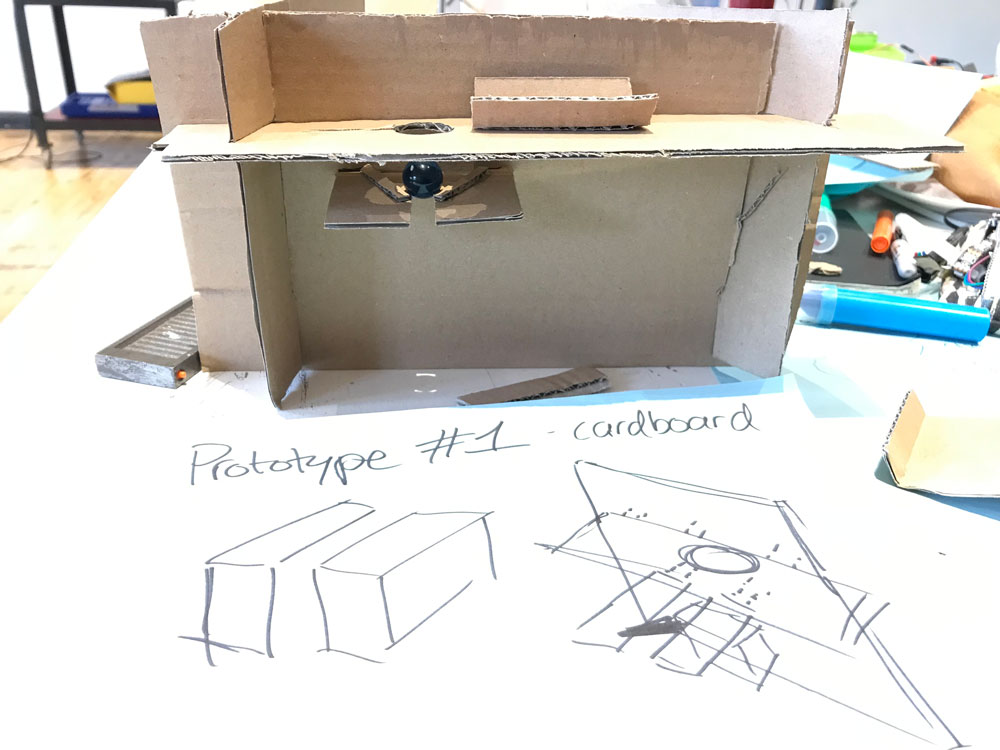 Prototype 1 made with cardboard to test the mechanics
Joey added a servo to see how this would work. This process and the cardboard prototypes was a nice quick way to visualize our initial idea and to get a better understanding for the mechanics of our Marble Calender Machine.
Testing our initial idea about the mechanics
Step 4: Making a planning and dividing tasks
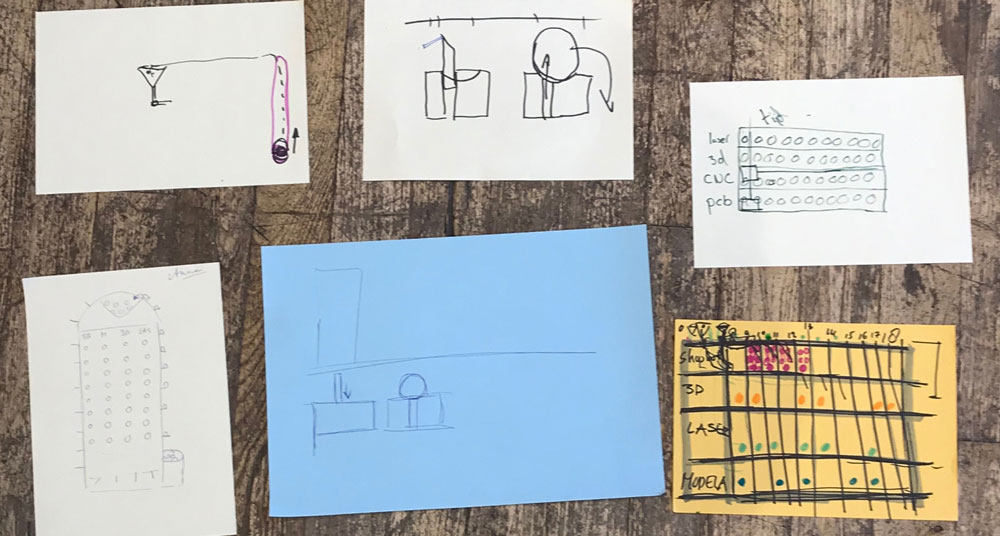
After we prototyped our initial idea we got a better confidence and idea about what we would make. We also decided to change some parts. We all sketched the machine as we thought we would look like, based on these sketches we discussed what would be the best solution. In the end we decided to combine a design from Anne with one from Joey. We will use a dispenser for the marbles and we will ‘kick-out’ the marbles from the slots that aren’t reserved.
 New version of marble machine based on our prototyping tests
This gave us some new requirements:
- We will start with making the agenda for one machine (in stead of 4).
- Ideally we want to add interactivity, so you can select the machine you want to see and the marble machine will represent the agenda for the machine selected. This way we only need the one calender line.
- We decided that we will trow out the marbles of the slots that aren’t reserved with a servo, this means we also need 20 servos.
- We need need something to bring the marble back on top.
Based on this design we looked at our planning and who has time when. In addition, we divided the machine in parts and we made each person responsible for one parts. This way we work and help out each and we each have an individual task.
- The Marble Calender - Joey: this part represents the booking system with marbles.It shows each half a hour with one marbles. This means it needs enough space for 20 marbles. It kicks out the marbles for the slots that aren’t reserved, so it needs 20 servos one for each marble. It needs a connection to the dispenser and it needs a connection to the stairs.
- The Marble Dispenser - Anne this parts first collects the marbles that come up from the Marble Stairs, so it needs a buckets or sorts for collecting 20 marbles. After that it will roll above the Marble Calender to direct the marbles to each half hour slot. Therefor it needs a connection to the Marble Calender and it needs a ‘rolling system’ to go back an forth.
- The Marble Stairs - Rutger this part brings the marbles that went down back up on top. So it connects the Marble Calender with the Marble Dispenser. It needs a mechanics to move the marbles back on top, it needs a connection to the dispenser, and it needs a connection from the calender.
- The Marble Machine Frame - Micky: this parts connects all the different parts together. It should be stable enough to hold each parts. It should possible to tweak the height of the Marble Calender and the Marble Dispenser to make sure the different connections fit and we keep a certain flexibility in the design. It should have a back frame for the Marble Stairs so the marbles won’t fall off.
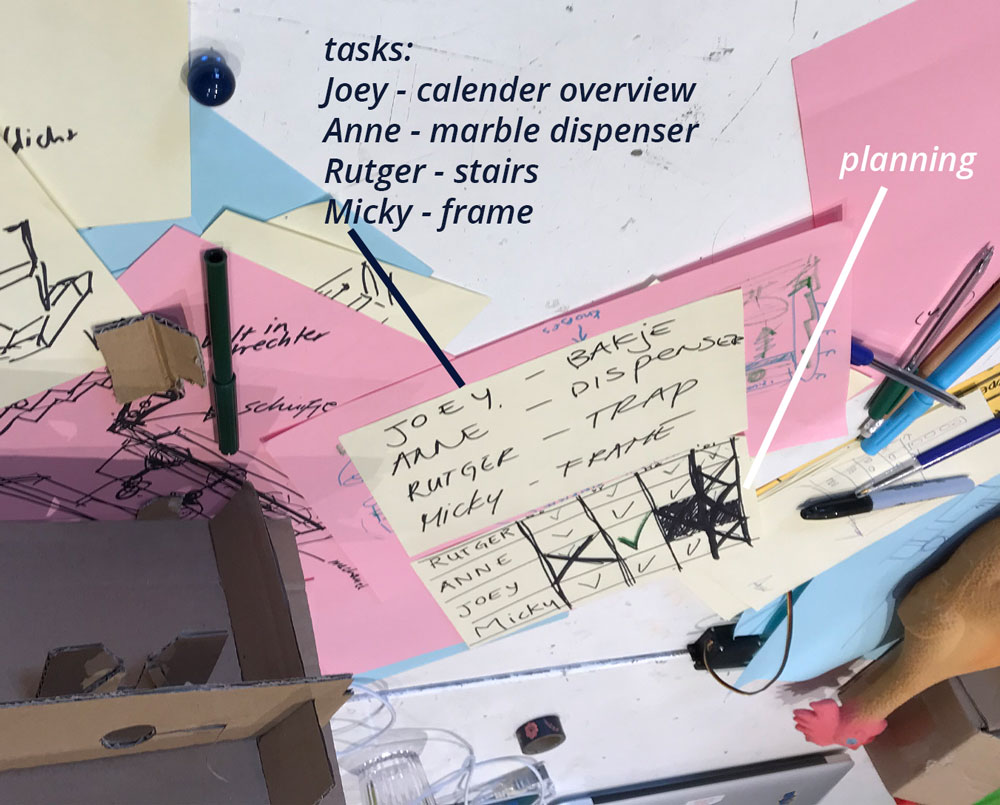 Planning and dividing tasks
Step 5: Prototyping parts of our machine
The next days we each worked on our parts making prototypes and designing each separate part and helped each other whenever someone needed help.
Prototyping the Marble Calender
Joey worked on his prototype for the Marble Calender, first goal was to check the routing and the slots for each marble. He designed the Marble Calender with slots for a marble every half an hour and with 20 servo motors. More details on his ideation, design and build process can be found in his documentation.
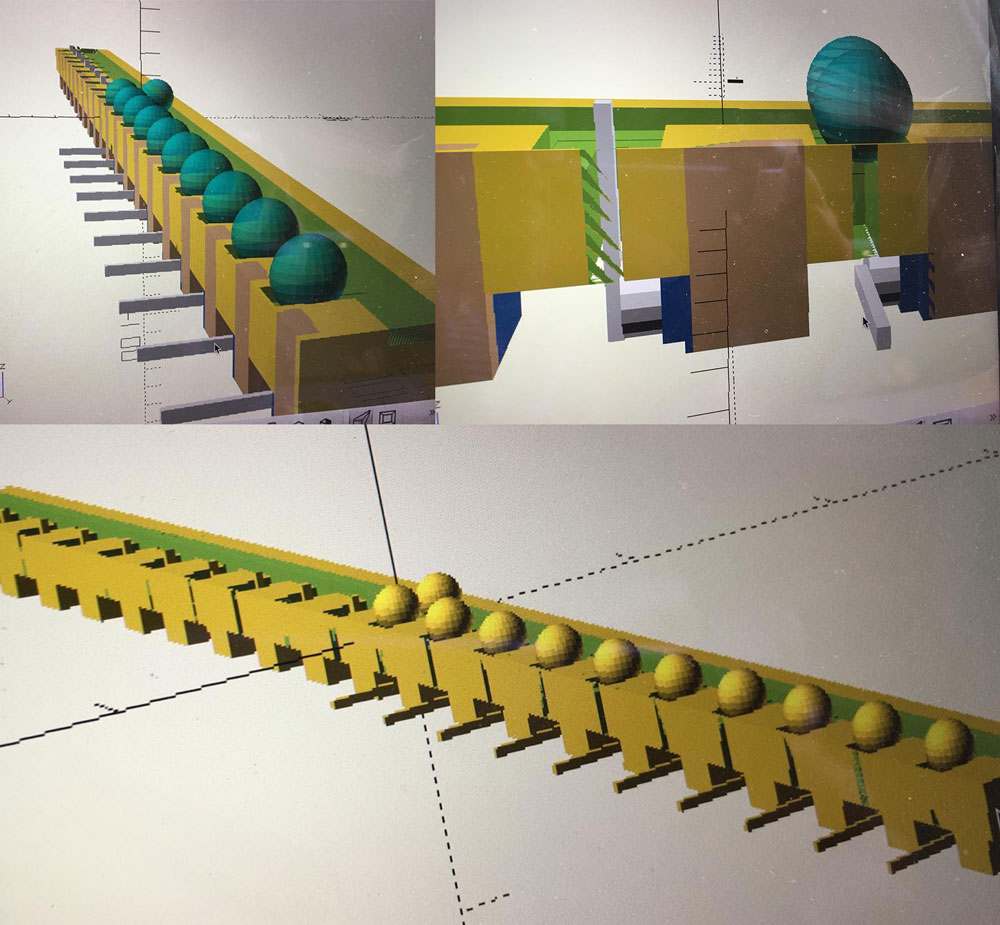 Prototype Marble Calender
Prototyping the Marble dispenser
Anne worked on the prototype of the Marble dispenser. She first made a design in Fushion 360 and used the Shopbot to make the rails. With some help from Micky she build the car for the dispenser. Together they figured out if the design by Anne would work. Anne further developed and fine-tuned the design of the dispenser. Anne elaborates more on her design process in her documentation
 Prototype Marble Dispenser
Prototyping the Marble stairs
Rutger worked on the prototype of the Marble stairs. The first prototype was a little bit bigger than he thought. So for the second prototype he changed his design a couple of times. The biggest challenge for Rutger was to get the right angle for the marbles to roll over to the next stairs.
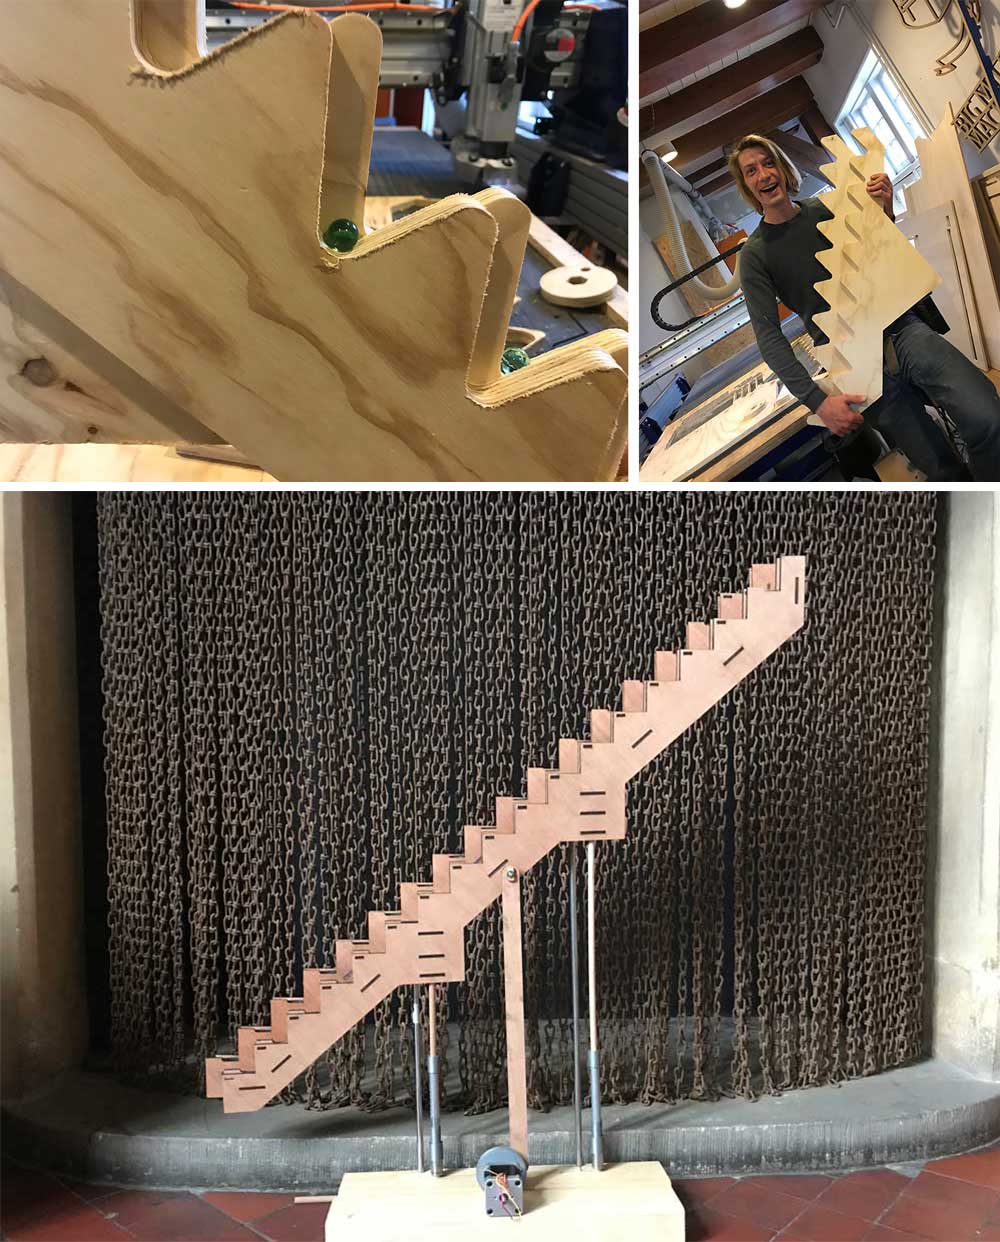 Prototype Marble stairs
Rutger changed the dimensions and design of his stairs. More details on his design and building process can be found in his documentation.
Prototyping the Marble Machine Frame
Micky worked on the prototype of the frame of the machine. First she had to figure out what each of the other members of the team needed so it would fit. Because there was still some uncertainties the frames should be as modular as possible. A more in depth description about the development of the frame can be found in her documentation.
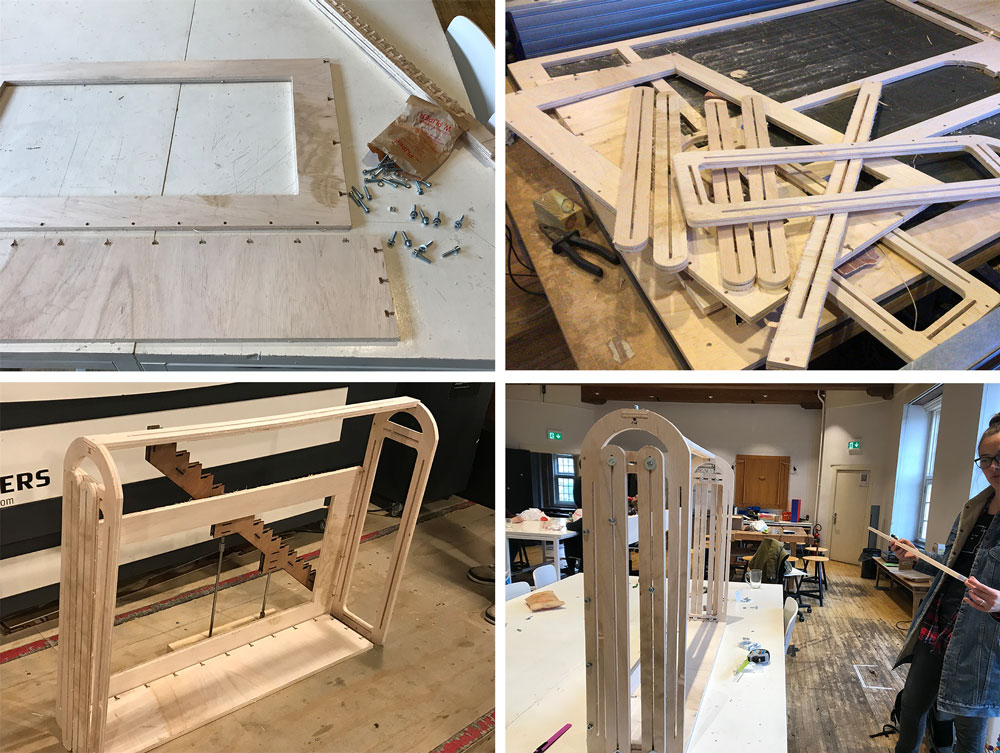 Prototype Marble Machine Frame
Step 6: Connecting parts together
On Wednesday we connected all of the parts together for the first time. This was an important moment because we still didn’t have time to see what the best connection between the pieces would be.
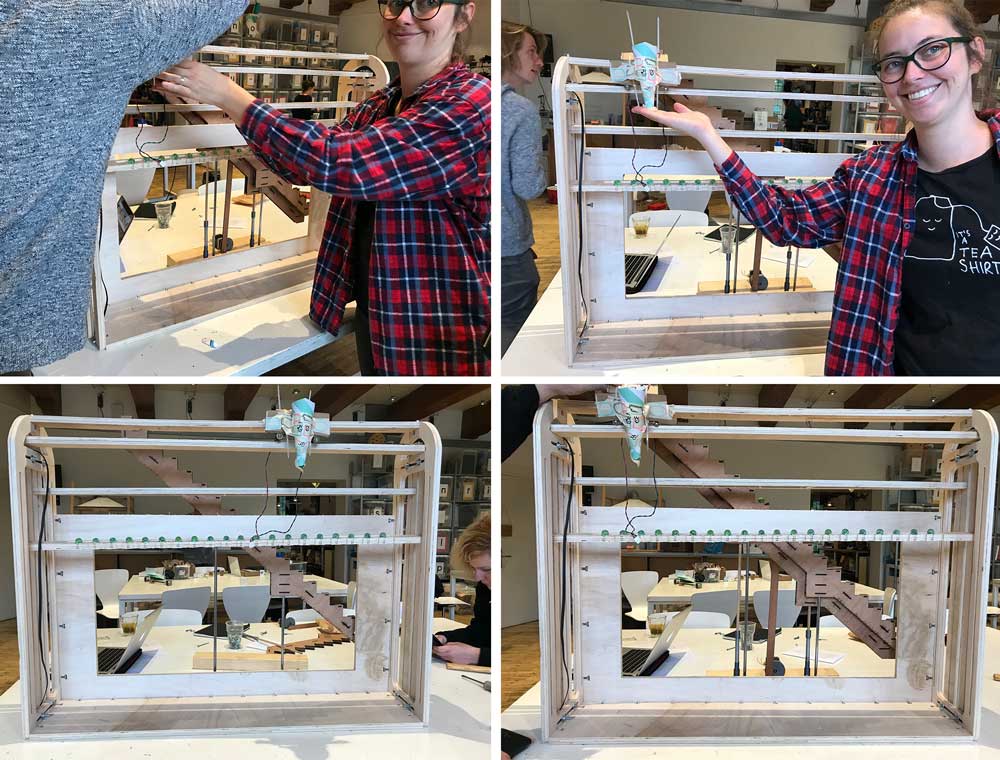
When we had the frame together we could make some new decisions and we realized we had to change some parts.
- Joey has to make the lines and slots a little bit bigger for the marbles to run nicely. There’s a difference in thickness of each marble. However for the smaller marbles his design worked.
- We decided to swap the rails of Anne and Joey, so the marble dispenser will be a marble collector. It collects the marbles from the and brings them to the stairs of Rutger.
- Rutgers stairs drop off the marbles at joey’s calender.
- We still have to make a decision if the stairs will be placed outside or inside the frame.
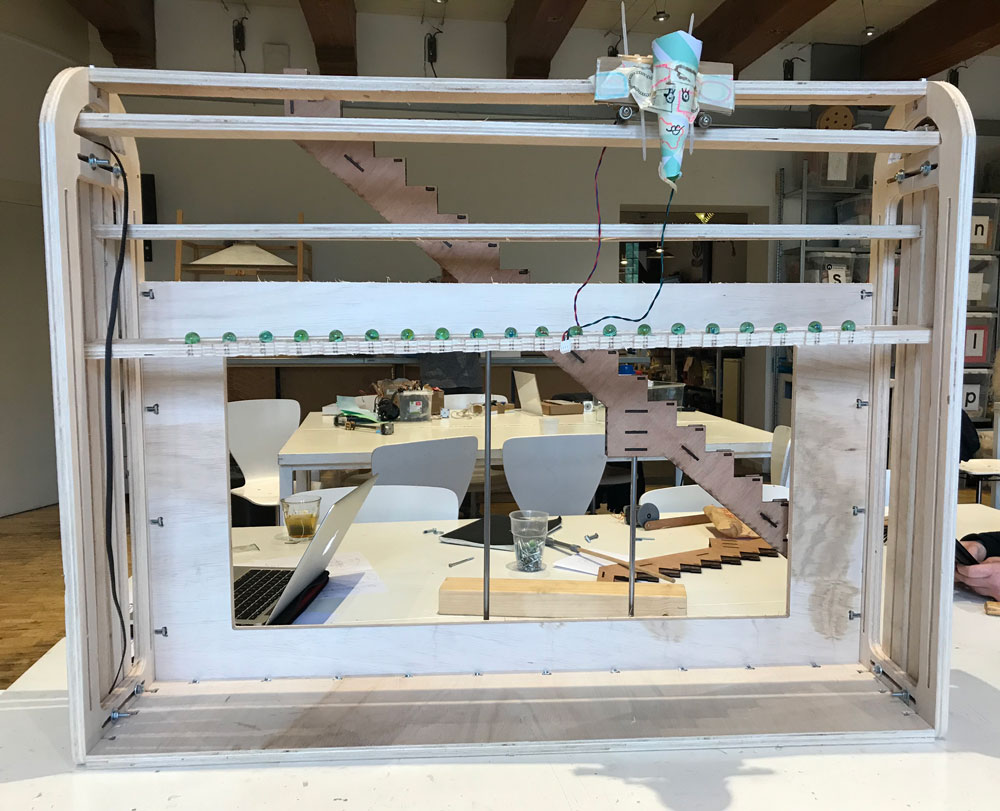 End result Marble Machine Frame
For the next coming weeks we will fine tune the mechanics and design of our machine before we will start with the actuation and automation of it.
What I did – step-by-step
It was my task to design and build the frame of our Marble Calender Machine for the group assignment of this week.
Research and inspiration
Before we started on the design of our marble machine we researched some marble runs and for the frame I looked for inspiration at wooden weaving machinery.
 Inspiration Marble Machine
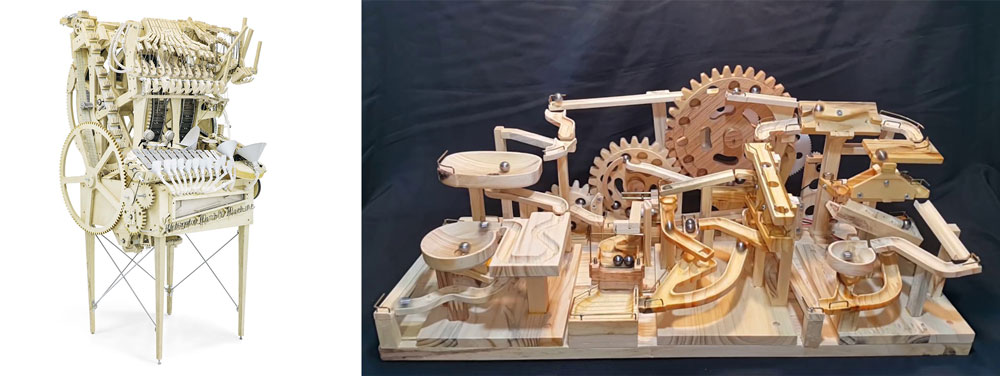
Inspiration: Marble Machine and Runs
Joey mentioned Wintergatan’s Marble Machine, he has a very inspiring Youtube channel where he shows the development of his marble machine. In addition, I found the channel of Wood Marble Machine, which shows very beautiful marble runs.
Inspiration Marble Machine Plant by Wood marble machine
Links for inspiration Marble runs
Inspiration:
As I mentioned before for the frame design I looked for inspiration at the design of a wooden hand loom. Because I think the style of these wooden machineries fit with the style of the marble runs and marble machines. It has a similar wooded look. But most important it’s system is easy to adjust in seize and distance. This can be useful for the design of our machine. This can help with the placement of the runs and the connection to each run.
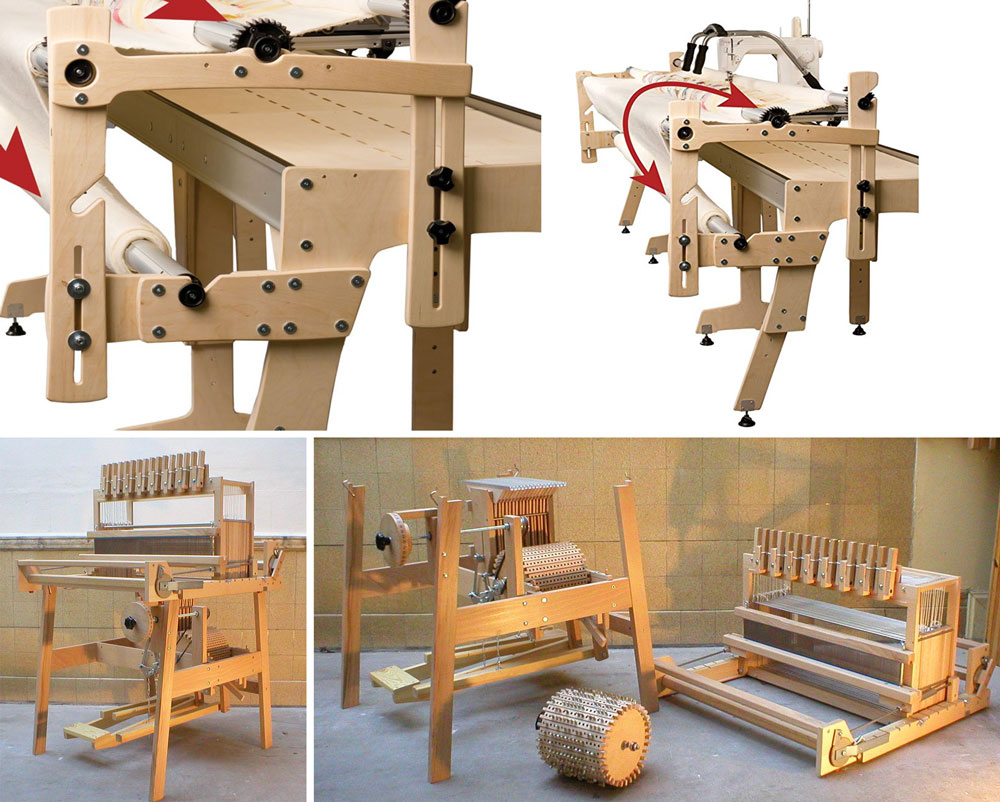 Inspiration wooden loom
links for inspiration loom
- Wikipedia page on loom
- Floor stand with Dobby for table loom 70 cm 16 harnesses
- Hinterberg Design on Stretch Machine Quilting Frame
Step 1: cardboard prototype
I first made a cardboard prototype with laser printer. This was a very basic version of the idea that was in my mind. It helped me to communicate with the rest of the team members and to find out what they need for their part and how it would fit the frame.
 Prototyping frame and marble dispenser
I also helped Anne with the prototyping of her marble dispenser. This helped me to get a better understanding of what is needed for the frame. I realized we needed a top bar to be able to hang the wires on top.
Step 2: designing the frame
For the design of the frame I looked at looms for inspiration. The advantage of these machines is that we can still adjust the depth, distance and height of each part. I first made some sketches to get a better understanding and the dimensions of possible frame design.
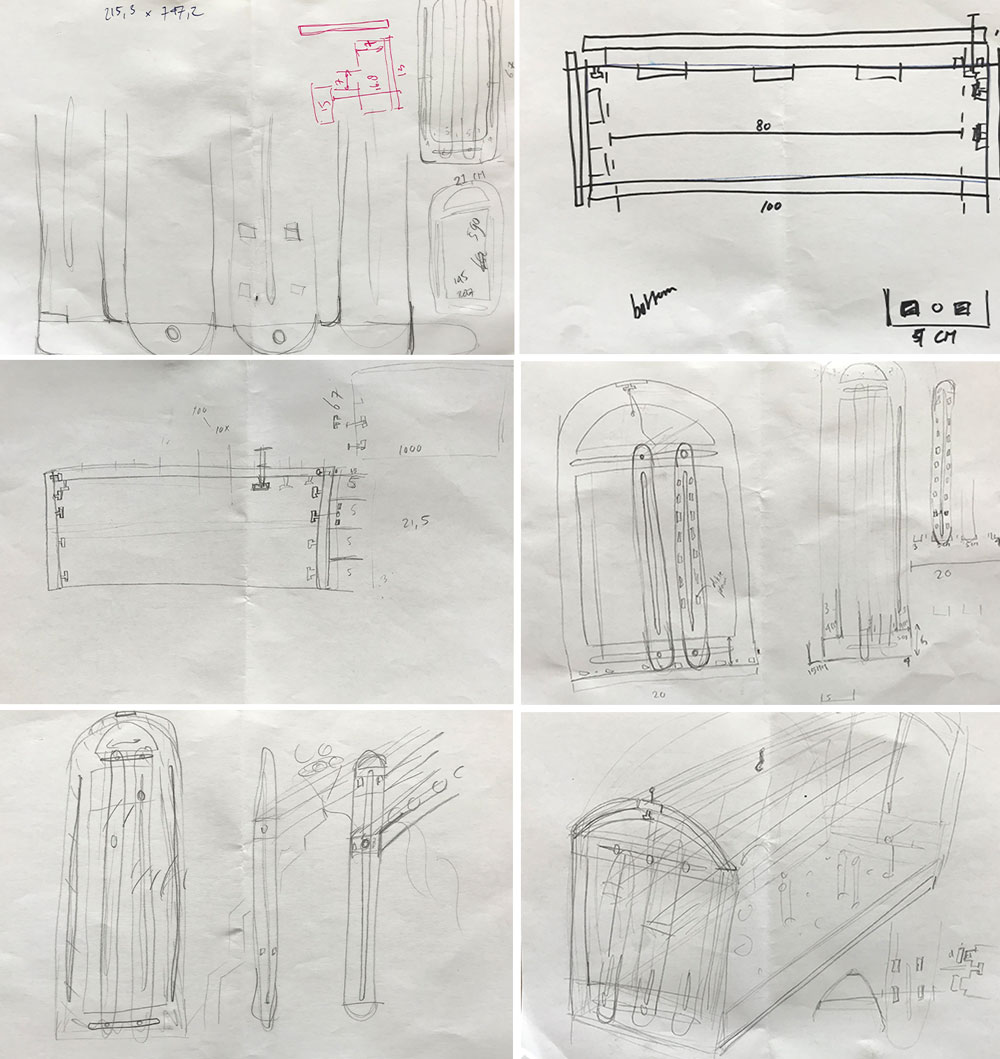 sketches frame design
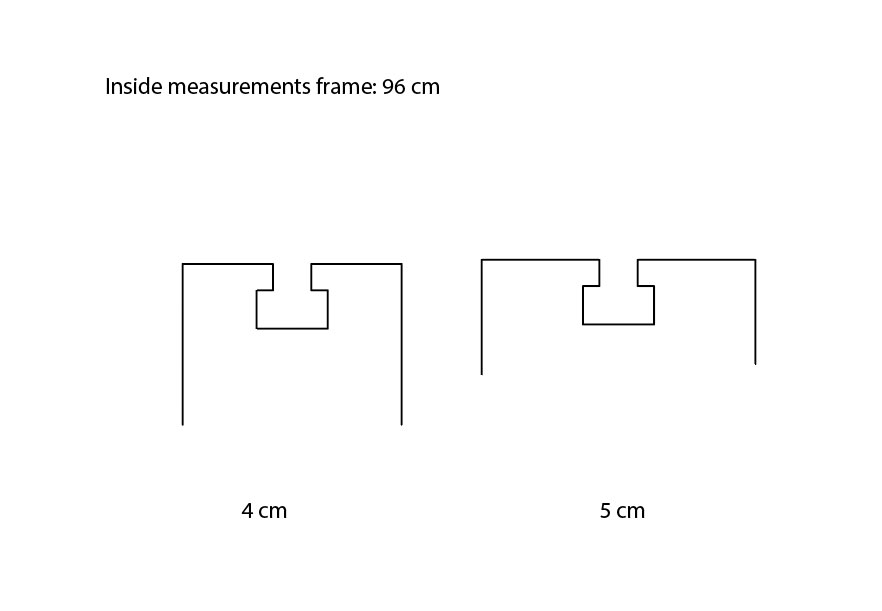
Dimensions of the frame
Together with Anne I looked at the dimensions we would need. The original dimensions we communicated for the frame and what was needed for each part to fit in.
- Width: 100 cm, we need 80 cm for the marbles (4 cm for 20 marbles) plus a margin of 10 cm on each side
- Depth: 15 cm, this is based on a width of 5 cm for each part
- Height: 67 cm, this is based on a nice 3x2 ratio with the width of the frame.
Requirements for the frame
- The bottom: we need a stable base so it won’t move to much. In the inspiration from various marble runs
- The back: this should be solid for stability, but mainly for the stairs of Rutger. This way the marbles won’t fall of.
- The top: a connection for stability and the possibility to hang wires.
- The sides: connections for the machine parts of Anne, Joey and Ruger.
My own 3D design goals
I used Fushion 360 to design the frame. I set myself a couple of goals to practice my 3D designing skills.
Work with the time line: Up till now I find it really difficult to work consistent with the time line of Fushion 360. So for this weeks assignment I want to focus on keeping the time line structured and ‘clean’.
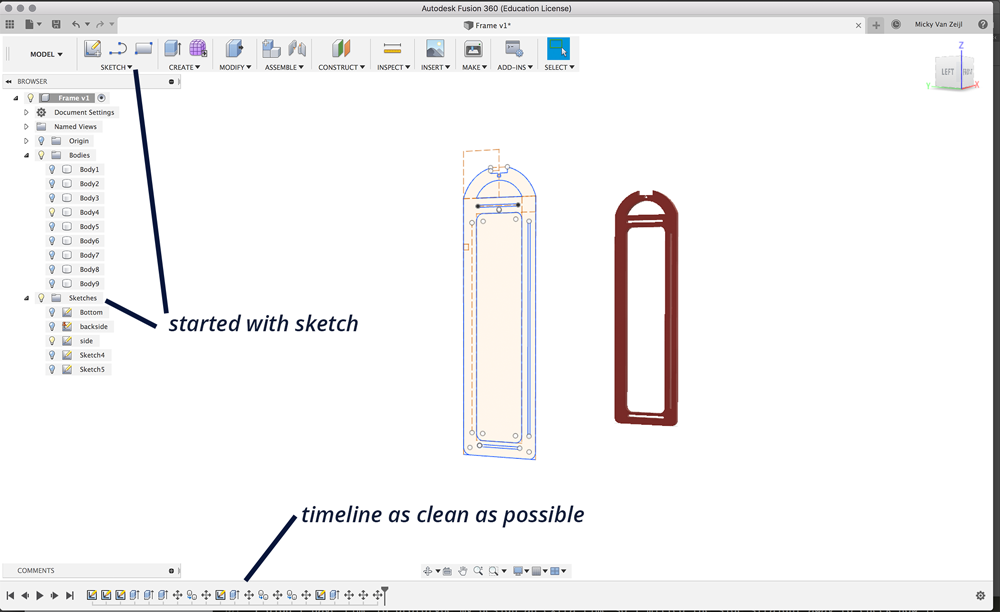 Working with the time line in Fushion
Parametric design: My second goal for this week was to try to design the frame as parametric as possible as this would be useful when I need to change parts later on.
 Working with parameters in Fushion
First design
With all these requirements I made the first design of the frame in Fushion 360. I milled this design to
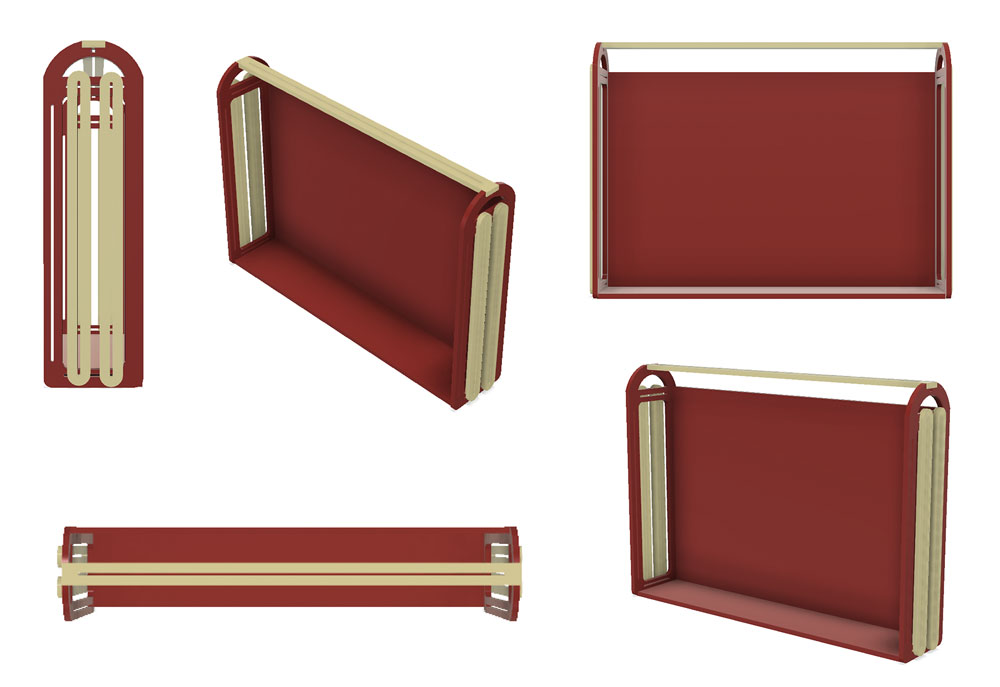 First design of the frame
Step 3: milling the frame
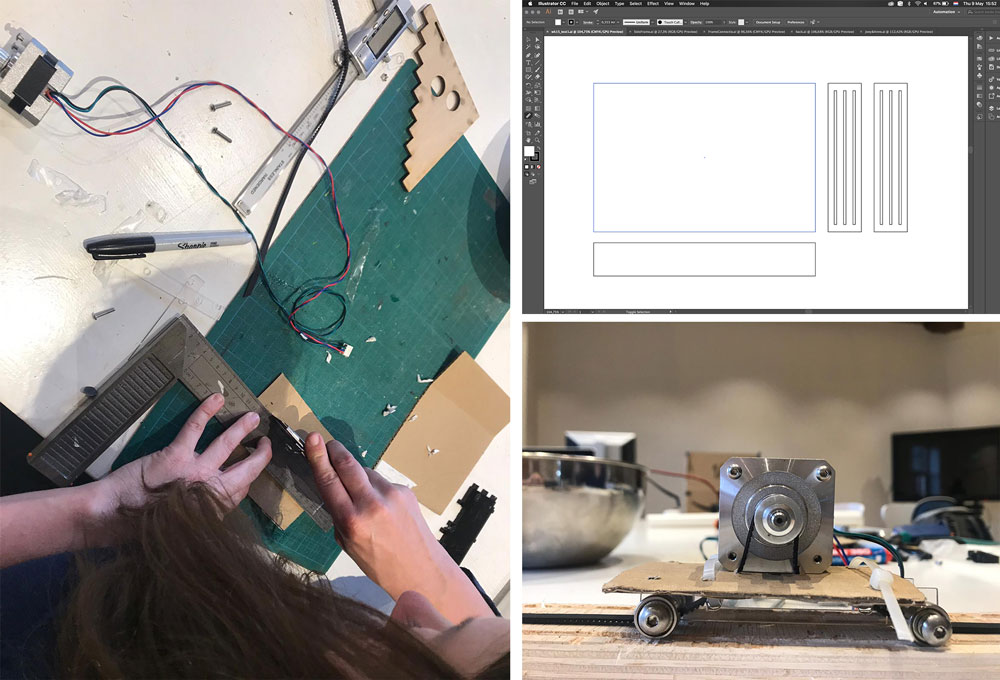
I didn’t have time to prototype my design an extra time. So I first milled one of the side panels to check how it turn out. I saved the sketch from Fushion 360 to a DXF file. I had some problems with my DXF-file as it had a lot of open connections. So it took me a while to clean it up in Illustrator. I removed all the construction and double lines. And I joined the open connection. After this I was able to set the paths for the Shopbot.
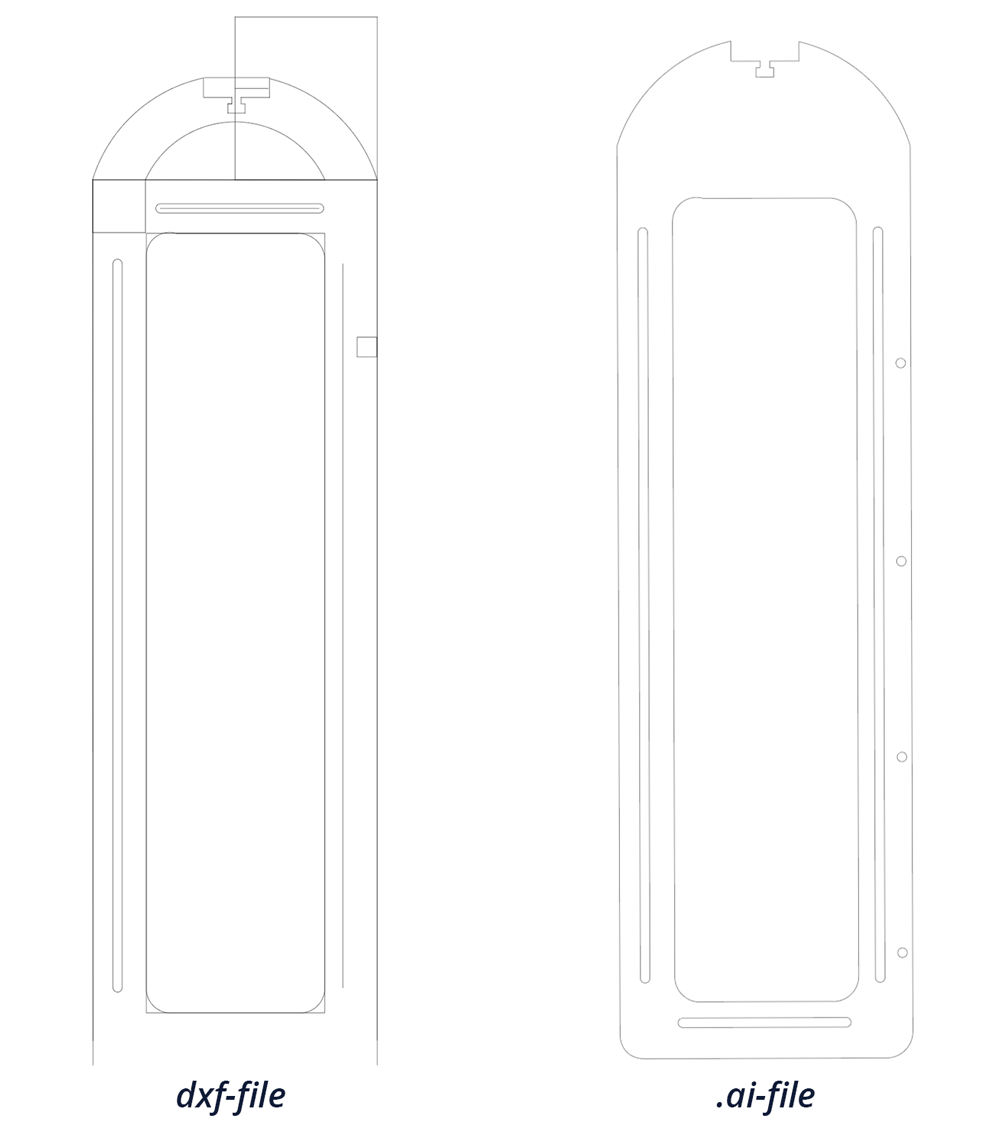 Dxf-file clean up in Illustrator
The milling looked good dimension wise and it gave me confidence I could go on and mill the other parts of the frame. However after I finished second side panel of the frame. I realized that we didn’t have enough wood to finish the frame the way I designed it. So I had to make some design changes to be able to finish on time.
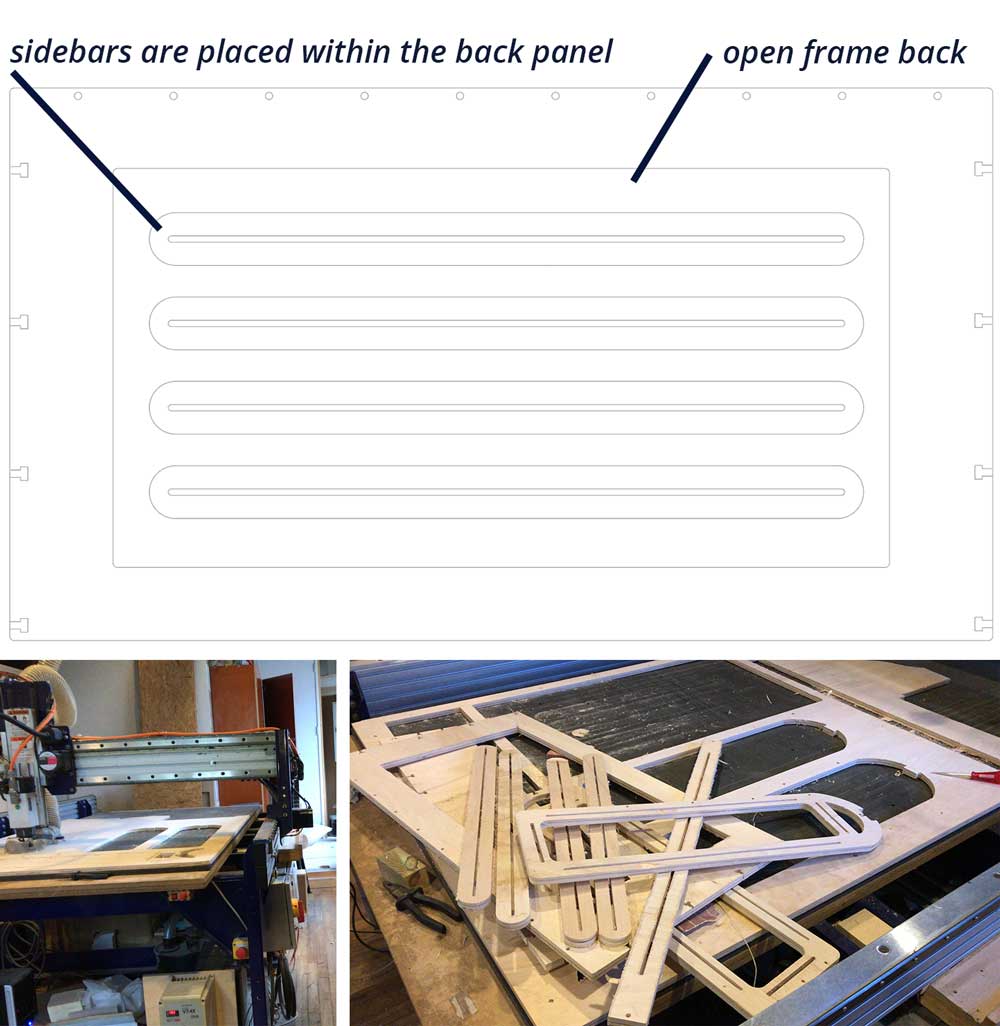 Design change of back panel
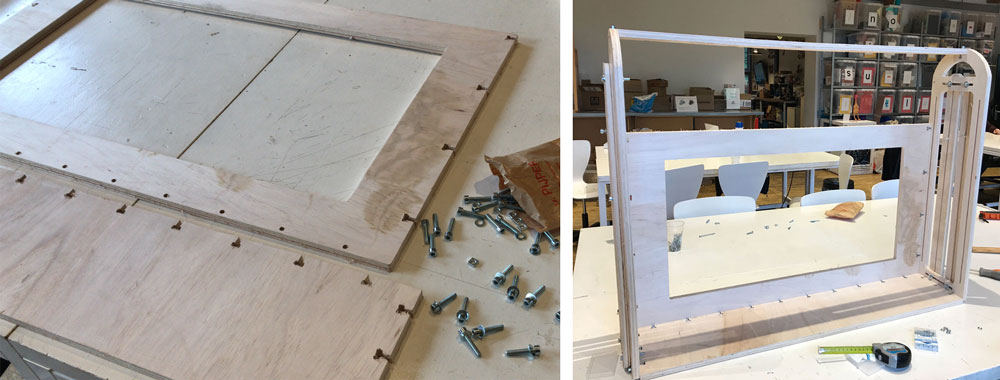
Step 4: putting the frame together.
When I milled all the pieces with the Shopbot it was time to put the frame together. For the connections part of the frame I really wanted squared nuts. I found them at my local hardware store which made me really happy.
 Placing parts together of the Marble Machine Frame
I still want to design and fine tune some parts for the design of the frame:
- The squared nuts are really thin so I will design and 3D print a extra parts so these will fit or I will buy some more squared nuts because this fits nicely in the design.
- I want to design and 3D print a star handle bolt knob for connections on the side bars.
- I did basic sanding if there’s time it would be nice to sand each part in more detail.
Step 5: putting all the parts of the machine together.
When the frame was finished we were able to connect all the other part to the frame. I send the design of the connection parts with the squared nuts to Anne and Joey, so we would be able to hang their rails inside the frame.
 Connection points for the connection to the Marble Calender Machine frame
After we connected Anne’s and Joey parts, we decided that it was better to turn the order of these to elements around. So Joey’s Calender will get its marbles from the stairs by Rutger. And Anne’s dispenser will be a collector in stead. These rails and the little car will collect the marble that are kicked out by Joey’s Calender.
First version Marble Calender Machine
To do
After we fitted everything together, we decided that we still have a lot of to do’s for our machine design to finish the mechanics before we can go into the automation of our machine.
- Fix the stairs. Make sure these work with the marbles.
- When the stairs are finished we can find out what’s the best way to fit it in the frame.
- Redesigning the rails of the Marble Calender so it’s wide enough for all the marbles.
- Finishing the marble collector.
- Making connection rails to each separate part.
What I did wrong – and how I solved it
Not enough wood
When I was milling my frame I figured out while I was milling that there wasn’t enough wood to mill the frame the way I designed it. To make sure I could all mill it in one day I changed the design of the back panel:
- The height is 52 cm instead of 67 cm. this way the height of the back panel fits with the material I have.
- The back panel is now an open frame instead of a solid wooden plate. I used the material inside the back panel for the side bars. This way I had enough space on my material for each part of the frame.
Bad quality wood
While I was using the Shopbot to mill my design I noticed that the wood is really flaky and when it was finished it had very rough sides. Which means that I had to sand a lot to make it look good. The sanding gave a lot of dust more than usual. Next time I will double check the quality of the wood. And I still think that part of the flakiness comes from the mill. It’s probably not sharp enough.
What I learned
How to keep the Fushion time line ‘clean’
My goal for this week was to work with the Fushion time line and to try to keep this as ‘clean’ as possible. What really helped for me was to have a plan before hand. I thought of a short and easy workflow for myself to see if this would work, it did. So I will try to use this next time as well.
- Make physical sketches and plan what you want to make.
- Decide how the 3D design is build up. So which part would be a new sketch in Fushion 360.
- First make the sketches of each part in Fushion 360.
- After I finished the sketches I did the extrude for the 3D design.
- Go back to edit sketch when you want to make changes to the sketches.
How to make a frame for a machine
I learned that making machine, even a small machine, with a group is quite complex a lot for one week. Because I was making the frame I learned that first of all you need to know what each person is doing and needs. But on the other side the others needed restrictions and measurements from me, so they would know what their design requirements would be. Only when it all comes together you can really figure out how each part fits.
What made me proud!
We had a lot of fun this week working together on our group project. I proud of the results we have so far and I look forward to the final result in the Machine week.
 Group work
Credits and references
This week really was a team effort to get everything done. As a group we did a great job communicating and helping each other out. Rutger helped out with milling parts of the group assignment with the Shopbot when we weren’t able to come to the Waag due to other responsibilities.