16. Interface and application programming
Highlights

APP Inventor
App Inventor lets us develop applications for Android phones using a web browser and either a connected phone or emulator. The App Inventor servers store our work and help you keep track of your projects.
We can build apps by working with:
- The App Inventor Designer, where we can select the components for our app.
- The App Inventor Blocks Editor, where we can assemble program blocks that specify how the components should behave. We assemble programs visually, fitting pieces together like pieces of a puzzle.

LED Control App
APP Inventor Designer
1. Sign In: Opened the wesite of APP Inventor the link ai2.appinventor.mit.edu. Signed in with my existing gmail account.

2. New Project:The Projects menu on the top left of the screen and selected “Start new project” and then give the name “led_control”


3. Layout: Chose horizonatal arrangement and added button or label or list pricker wherever required.

4. Label: It gives provision to label the component. On right we can edit the text.

5. List Picker: Under User interface, chose the feature of list picker and added a Bluetoothe image to it.


6. Button:Added two buttons, to make LED on and off. Changed the charactteristics of height, width, text and colour under the porperties section.


7. Clock:Per second, the client checks to see if the data is available. If it is than it reads and display the data. So, for this add Clock sensor component which is also a hidden component.

8. Bluetooth:Also add bluetooth client component to establish bluetooth connection.

App Inventor Blocks Editor
The Blocks Editor is where we program the behavior of we app. There are Built-in blocks that handle things like math, logic, and text with each components we have added.
1. Shift to Block Editor: To assemble programme shifted from design to block editor.

2. List Picker:Clicked on the list picker and selected ListPicker Before Picking and set the elements of list as available bluetooth devices.

2. Control:added blocks for led on and led off buttons. Here, we are sending a to turn on led and b to turn off led according to code.

4. Bluetooth Client:We can apply condition that, function will occur only when the bluetooth is connected and to make led on and off using single button.


Sharing and Packaging App
Package the app (.apk file) by going to the “Build” menu on the App Inventor toolbar. Selected “Application (Save to my Computer).” A pop-up box alert showed that the download has begun.

Uploading Programme
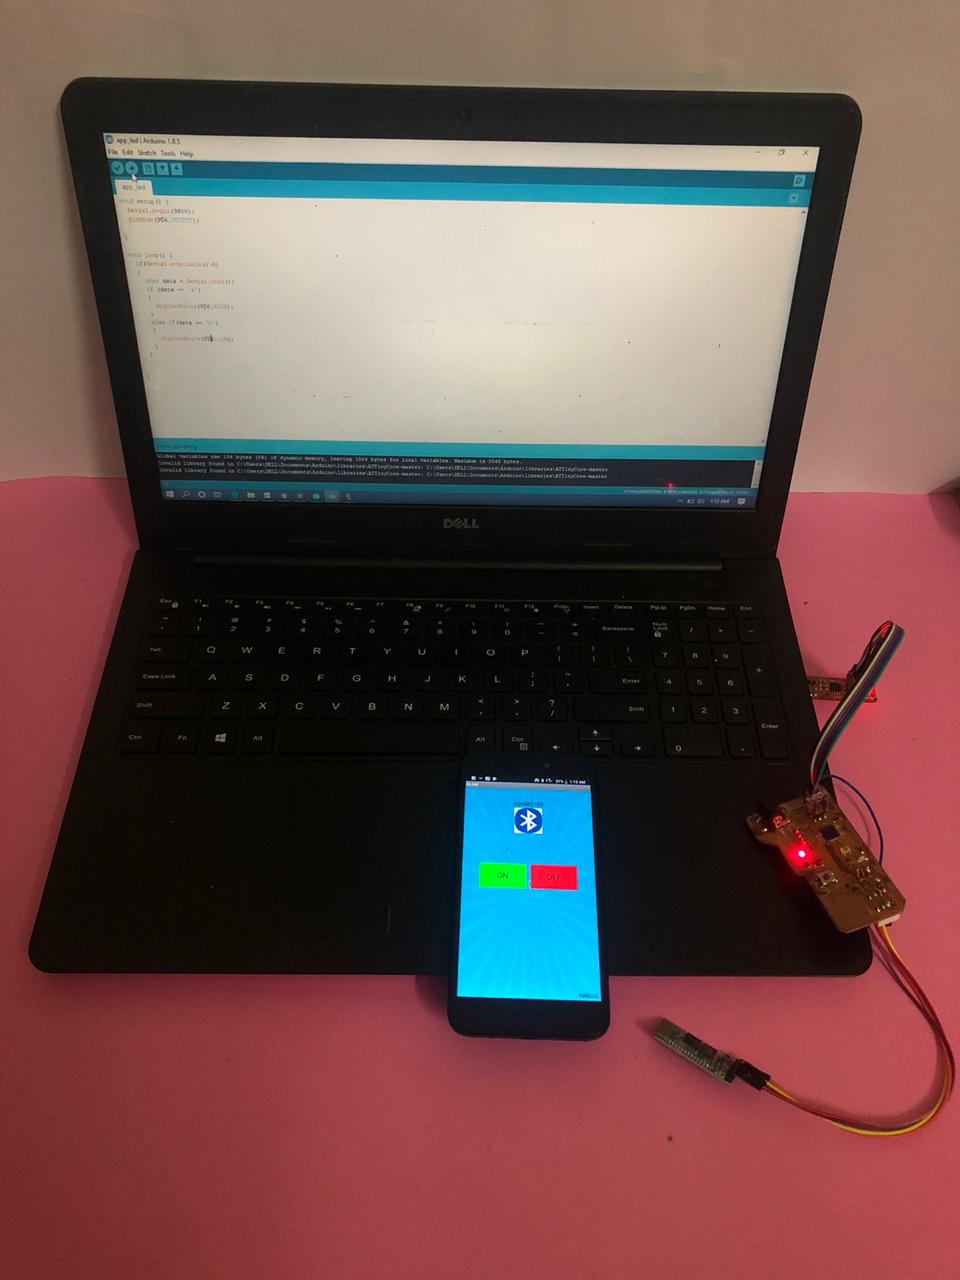
I have used my week 11- Input Devices board which has ATmega 328p microcontroller. The LED is connected to PD6 pin of microcntroller. Using Fab ISP made in Week 5- Electrnoics Production programmed the board.

Running the App
1. Installation Downloaded the app in Android phone. At times the settings of the phone need to be changed to allow installation of non-market applications.

2.Bluetooth Pairing: The bluetooth was visible with name “HC-05” to be paired with other bluetooth devices.

3. Pairing Password: The universal password to connect HC-05 bluetooth is 1234.

4. Not Connected: Opened the app which has beautiful screen showing buttons for On/Off Led, bluetooth icon and showing the status of bluetooth i.e, disconnected.

5. Connected: The bluetooth is connected and now the Led control is in our hands.

6. Set up: The picture and video below shows the Led being turned ON and OFF from the app.
Arduino code file available here.
App file in .apk format available here.
Problems Faced
- App inventor doesn’t work on IOS. Being a Apple user, I couldn’t install the app in my mobile and had to borrow my friend’s mobile.
- The RX and TX pins of Bluetooth are to be connected to TX and RX of the board. I made mistake connecting RX with RX.First, I had tried the experiment on Arduino and there RX was connected to RX and TX to TX. Later, I realised it has been done on Arduino for the ease of user.